lamber M115 User manual

DISHWASHERS
WITH PULL-THROUGH RACK
INSTRUCTIONS
MANUAL
M115
R06/2012


DECLARATION OF CONFORMITY
The following :
LAMBER snc di Affaba F. e C. – Via Italia 6 – 26855 Lodi Vecchio (LO) ITALY
Declare under our responsibility that:
Apparatus:
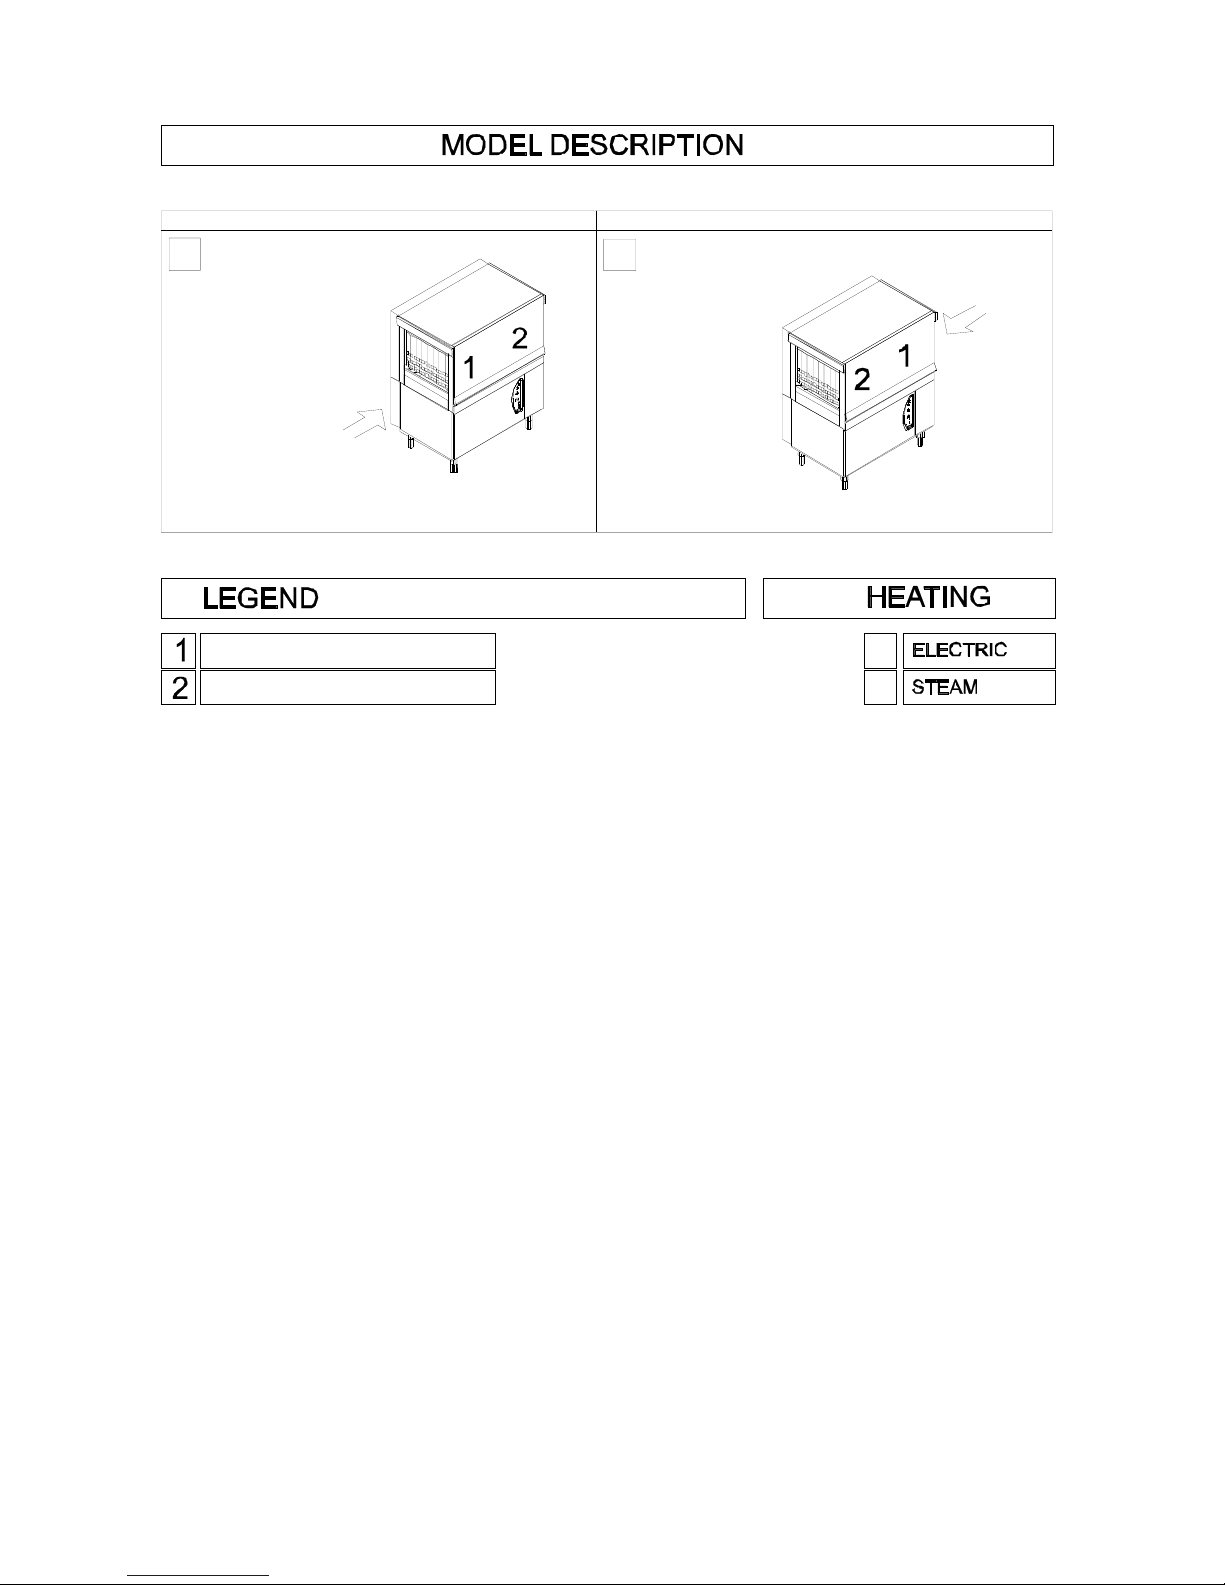
DISHWASHER WITH PULL THROUGH RACK
Trademark:LAMBER
Manufacturer :LAMBER mod. M115 / M115-AS
matr……………..
for which this declaration refers to the conformity of the following standards:
Safety of household and electrical appliances - General requirements EN60335-1(2002) + A1/A11(2004), A12 (2006) + A2 (2006)
+ + A13 (2008) + A14 (2010) + A15 (2011)
Safety of household and electrical appliances - Part 2^ Particular requirements for commercial electric dishwashing machines
EN60335-2-58 (2005) + A1 (2008) + A11 (2010).
Household and similar electrical appliances – Electromagnetic fields – Measurement methods for electromagnetic fields of
household appliances and similar apparatus with regard to human exposure EN 62233:(2008)
Limits and methods of measurement of radio disturbance characteristics of electrical motor-operated and thermal appliances for
households and similar purposes, electric tools and similar electric apparatus - EN 55014-1–1(2006) + A1 (2009)
Limits for harmonic current emissions (equipment input current
16 A per phase) - EN 61000-3-2(2006) or >16A and
75A + A2
(2005) EN 61000-3-12(2005)
Limitation of voltage fluctuations and flicker in low-voltage supply systems for equipment with rated current
16 A. EN 61000-3-
3(2008) o >16A e 75A EN 61000-3-11(2000)
Immunity requirements for household appliances, tools and similar apparatus. Product family standard EN 55014-2(1997) +
A1(2001) + A2 (2008)
Safety of machinery Basic concepts, general principles for design - Basic terminology, methodology-ISO 12100-1 (2009).
Safety of machinery - Basic concepts, general principles for design - Technical principles-ISO 12100-2 (2009).
on the basis of what is foreseen by the Directives:
2004/108/CE, 2006/42/CE.
2004/108/EC, 2006/42/EC.
We decline any responsability for injuries or damage derived from machine misuse, abuse by others or improper machine maintenance or repairs.
(date) li 01/01/2013
The administrator
technical file case manager : Ing Roberto Affaba
address : via italia 6 – 26855 – Lodi Vecchio (LO) Italy

4
WASTE OF ELECTRICAL AND ELECTRONIC EQUIPMENT DIRECTIVE (WEEE,RAEE in Italy) 2002/96/EC AND
SUBSEQUENT 2003/108/EC
The marking shown below indicates that the product cannot be disposed of as part of normal household waste.
Electrical and Electronic Equipment (EEE) can contain materials harmful to health and the environment, and therefore
is subject to separate waste collection: it must be disposed of at appropriate waste collection points or returned to the
distributor against purchase of new equipment of similar type or having the same functions.
The directive mentioned above, to which make reference for further details, provides for punitive actions in case of
illegal disposal of such waste.
LAMBER, manufacturer of this equipment, is enrolled in the Italian WEEE Register – the Register of Producers of
Electrical and Electronic Equipment- from the 18th /02/2008 with the number IT08020000000617.

5
WASHING
RINSING
MODEL MODEL
M115
left-right M115
right-left

6
TECHNICAL DATA AND DESCRIPTION
The table reported at page 5 shows the basic models of conveyor dishwashers and
identifies the single washing areas to which additional modules can be added to improve
their performance. ACCESSORIES
COLD PRE-WASHING
STEAM CONDENSER - CVM fan kW
DRYING – AS fan kW Heat element kW
ADDITIONAL RINSING - RIS
HEAT RECOVERER – RC-CVM fan kW
AUTOTIMER
SPLASH SHIELD (PMC-PMA-PMA/R)
BOOSTER PUMP Motor kW
TECHNICAL SPECIFICATIONS
Model:
version Left-Right Right-Left
1st speed baskets/hour 2
nd speed baskets/hour
ELECTRIC POWER kW
ELECTRICAL INPUT A
ELECTRIC CABLE mm2
CIRCUIT BREAKER A
lcc ELECTRIC INPUT 6 kA
VOLTAGE
PRE-WASHING TANK ELEMENTS kW ELECTRIC PUMP kW
FIRST WASHING TANK ELEMENTS kW ELECTRIC PUMP kW
SECOND WASHING TANK ELEMENTS kW ELECTRIC PUMP kW
THIRD WASHING TANK ELEMENTS kW ELECTRIC PUMP kW
PRE-RINSING TANK ELEMENTS kW ELECTRIC PUMP kW
RINSING BOILER ELEMENT kW
BOILER ELEMENT kW
GEARED MOTOR kW

7
DESCRIPTION
CHARACTERISTICS
* Body and tank in stainless steel construction 18/10 AISI 304,
* Tunnel composition:
- 1 Wash - wash arms : 3 upper + 2 lower
- 1 Rinse - rinse arms : 1 upper + 1 lower
* Completely automatic,
* Upper and lower fixed washing ( 55÷60 °C )
* Upper and lower fixed rinsing ( 85-90 °C )
* Washing and rinsing arms in stainless steel constructions, easy disassembly
and interchangeable,
* Double skin with thermic and acoustic insulation ;
* Slanted tank with rounded edges,
* Stainless steel autodraining washing pump,
* Counterbalanced door
* Front panel composition ::
- Main ON/OFF switch;
- Start pushbutton
- Stop pushbutton
- Emergency pushbutton
- Machine ON indicator
- Machine ready indicator
- Overload cutout indicator
* Frontal maintenance
* Automatic tank loading
* Rinse economizer
* Tank and pump filters
* Insulated Boiler
SAFETY
* Feet adjustable and strong
* Pressure-switch protection for Heating elements
* Thermic protection for washing pump
* Automatic stopping of pull-through in case of foreign bodies
* Low voltage control circuit (24V) for greater safety
during work operation
* Dishes (Stop with End Micro-switch on the exit table)
* Door opening safety device

8
Contents
General norms page 09
Introduction and safety norms page 10
Unpacking and delivery checks page 12
1 – INSTRUCTIONS FOR THE USER page 13
First section - For the user – Operation before washing page 14
Switch-on and use of the dishwashing machine mod. M115 page 16
Washing of dishes – During washing operations page 18
After washing operations page 20
Helpful suggestions - Achievements page 21
Safety devices page 21
Washing flow control system page 23
Useful hints of stainless steel maintenance page 24
2 – INSTRUCTIONS FOR THE INSTALLER page 25
Installation page 26
Second section - For the installer - Disposal page 27
Positioning – Electrical connection page 29
Water connections page 30
Water draining - Steam feeding – page 31
Steam exhaust – Vapours suction – Testing - Working temperatures page 32
Torque limiter page 33
Steam condenser - Autotimer page 34
Possible drawbacks – causes - remedies page 35
Table connection scheme page 41
Wiring diagram page 42

9
INSTRUCTIONS MANUAL DISHWASHING MACHINE
M115
The automatic-rack conveyor dishwashing machines of the M115 series are designed to
wash any kinds of dishes .
The modular system and the various optionals available allow the make-up of
dishwashing machines with the most appropriate features in order to meet your
production,space saving and energy-saving requirements.
GENERAL NORMS ENGLISH
Tank You for purchasing our Dishwashing Machine.
Perfect washing-up results as far as hygiene concerns and a correct operation of the
dishwashing machine can be assured only in case the instructions reported in the present
manual are carefully followed.
We hope the information reported in the present manual will be helpful to You.
They are based on data and our best updated knowledge.
Carefully read the Instructions reported in the manual, recommendations and suggestions
included. Carefully read the terms of sale too, the ones limiting warranty included.

10
INTRODUCTION
AND SAFETY NORMS
INTRODUCTION
This equipment is destined only to the use it has been conceived for: tableware washing
such as dishes, glasses, cups, cutlery, trays, etc. Using it to wash machine components or
objects whose dimensions are superior to the machine working passage is improper and
therefore dangerous.
- The noise of the machine running empty, measured at the working positions (fig. 1) and at 1.6m
from the floor, is the following:
position 1 position 2 position 3
Leq A Level equivalent
of sound pressure dB(A) 70 68 70
The level of peak sound pressure Lpc is not declared as it is much inferior to 130dB(C):
PRELIMINARY OBSERVATION
Carefully read the instructions reported in the present user manual, as it gives important
indications about safety of installation, operation and maintenance:
- carefully keep the present manual for further consultations;
- the illustrations and drawings showing the machine are intended for general reference only
and are not necessarily accurate in every particular;
-the dimensions and characteristics of the machine, given in this Manual, are not to be considered
binding and may be changed without prior notice;
- having removed the packing material, check that all the equipment is present. If there is any
doubt, do not use it and contact qualified personnel. The packing elements (plastic bags,
nails, etc.) should be kept away from children, because they are dangerous.

11
GENERAL SAFETY REGULATIONS
THIS SAFETY CODE HAS BEEN COMPILED IN YOUR INTEREST. Strict adherence to
these rules will reduce the risks of injury both to yourself and to others;
Personnel working with this machine must adhere strictly to all statutory safety regulations as well
as the specific rules listed below. Failure to do so may result in personal inyury and damage to
the machine;
- DO NOT attempt to move, install, set-up or operate this machine until you have read and
fully understood this Manual. If doubt persists, ask your supervisor;
- never leave tools, parts or other loose material on or in the machine;
- Before switching the equipment the equipment on, make sure that the model plate data
conforms to that of the electrical and water distribution network;
- remember that even with the mains isolator in the “OFF” position, the incoming cables are
still live;
- BEFORE starting machine o cycle, after any maintenance or repair work, make sure all
protective are correctly installed;
- be vigilant at all times, remember that your safety and that of your fellow workers depend
on you;
- when moving or lifting the machine, care must be taken to comply with all the relevant
regulations governing such operations;
- installation should be carried out by qualified personnel according to the manufacturer's
instructions.
- this equipment should be destined to the use which it has been conceived for. Any other
application should be considered improper and consequently dangerous;
- the equipment should only be used by personnel trained for its use;
SPECIAL SAFETY REGULATIONS
- adjustement and repairs must be carried out only by personnel qualified. Repair carried out
by unskilled personnel may be dangerous;
- perfect washing-up results as far as hygiene concerns and a correct operation of the
washing machine can be assured only in case the instructions reported in the present
handbook are carefully followed;
- the machine must be only used by authorized personnel which must comply with sanitary
measures;
- do not leave the machine in environment with temperatures inferior to 0°C;
- the machine protection degree is IP55 for Control board and IP32 for machine, therefore it
should not be washed with direct high pressure jets of water;
- If the power cable is defective, it must be replaced by your manufacturer or by a
technical assistance service or by a qualified technician in order to avoid risks.

12
UNPACKING AND DELIVERY CHECKS
When the case with the machine has been received, unpack it as follows:
- Remove the upper cover and the wooden case side walls, take care not to damage
the machine,
- Remove possible accessories boxes,
- Remove the protecting cellophane,
- Make sure that the machine has not been damaged during transport,
- Make sure that all covers and panels have been correctly fixed and that no loosen
part is present,
- Visually inspect that all electrical components are integral.
TRANSPORT AND INSTALLATION
- To lift and transport the machine, insert the truck forks under the frame connected to
the points indicated by the yellow adhesives applied on the machine front side (see
draw below).
disforchem115
draw “A”*
- Before plugging the machine, make sure that the supply voltage of the domestic
wiring system and the water supply from water connection corresponds to the ones
reported on the rating plate
- Installation should be carried out by qualified personnel according to the
manufacturer's indications
During instalation, it is recommended to level the machine in order to ensure a correct
operation.

INSTRUCTIONS FOR THE USER

14
M115
First Section - FOR THE USER
OPERATION BEFORE WORKING
BEFORE STARTING THE WORKING OPERATION BE SURE THAT:
- the wall-mounted on/off switch is switched on;
- the water and steam* cocks are open;
- water and steam (*) are present in the system;
- the filters are in their housings
- curtains are correctly positioned;
- the inspection doors are closed;
- the dimensions of the dishes to be washed do not exceed the washing working
dimensions;
- Check that the detergent and rinse aid containers are not empty.
- Switch the machine on . Go to the page dealing with the model selected .
(*) for steam machines only
DETERGENTS
In case the machine is not provided with an automatic dispenser, pour the detergent
directly into the washing tank and uniformly distribute it on the filters in the doses indicated
by the supplier.
N.B.: If you make use of chlorinated sanitizers, it is always advisable to employ an
automatic dispenser with feeler for the measurement of the detergent concentration,
because brownish spots can form on the surfaces due to chlorine reactions when pouring
the detergent directly into the tank.
In any case the product shall be introduced near the pump suction pipe in the tank and at
least 15 cm far from the bottom in order to avoid corrosion.
Choice of the suitable cleansing agent is an essential condition if you want to obtain
extremely good washing results as concerns hygienic results. It is then important to
consider some points. First of all only highly alkaline and chlorine-active antifoam
products, especially made for industrial dish-washing machines, must be used and they
must be produced by well known reliable Firms.
Mean concentration of the cleansing agents in powder must be 1,5÷2,5 g/lt. Mean
concentration of liquid cleansing agents nust be 2÷4 g/lt.
In order to avoid scales and corrosions, put cleansing agent above water level on the
nearest area of the sucking pump filter, in this way it will immediately dilute and will not
deposit on the tank bottom.

15
DESCALING
When hard water is used you can find, inside the machine and also on objects,
calcareous sediments which must be removed both for hygienic and operating reasons
by a descaling operation.
Operating process and frequency of this intervention are suggested by your cleansing
agent supplier who has suitable products, generally containing phosphoric acid.
In order to avoid damage to the machine do not increase the quantities and once
operations end rinse abundantly.
HYGIENE
At last each 30 days it would be useful to do this operation which guarantees the
complete hygienic conditions of the machine. We suggest to contact your cleansing agent
supplier who will give you quantity and name of the most suitable product you can use
and that, generally, is an active chloride powder (100÷200 ppm).
In order to avoid damage to the machine do not increase the quantities and once
operations end, rinse abundantly.

16
SWITCH-ON AND USE OF THE DISHWASHING MACHINE
MOD. M115
H
G
D
I
P
M
LEGEND
M – Overload cut-out indicator
G - Machine ready indicator
D – Machine on indicator
I - Stop pushbutton
H – Start pushbutton
P – Switch ON/off
BEFORE STARTING THE WORKING OPERATIONS
MAKE SURE THAT:
- the cock is open and the water doesn’t
lack,
- the filters are in
their housings;
- rinse aid and washing detergent pumps’
containers are filled.
- the machine’s door is CLOSED.
THEN PROCEED:
1) Put the wall switch in position ‘’ON’’.
The displays of the washing and rinsing
temperatures will light on.
Then press the on/off switch "P" to start up
the machine.
The lamp "G" will start flashing and the
tanks’ filling will automatically start. Lamp
"G" lighted on indicates that the
appropriate level has been reached in the
tank and the heating element starts
working.
2) Wait until the washing temperature is
between 55° and 60° C and the rinsing one
is between 80° to 85° C. Check the
temperature looking at the thermometers
on the front panel .
3) Then press the start button “H”.
The washing will start and the racks will
move. Rinsing is operated automatically in
correspondence with the passing through
of the dishes.
4) At this point the machine is ready to
wash the dishes (see page 18) .
5) If it’s required to stop the washing
operations, press the button ”I” to stop the
washing pump and the rack moving.

17
To switch off completely the machine,
press the switch "P" into position "Off"
and turn the wall switch in position OFF.
If lamp M lights on, that indicates possible
anomalies at the motors.
The red mushroom-shaped emergency
pushbutton "P" has to be used in case of
anomaly. Once the trouble has been
removed, it is possible to restart the
machine only after the pushbutton has
been rotated and released.
The machine is equipped with a valve for
the automatic drain.
At the end of the washing operations:
-press button “I” (STOP),
-check that the switch ‘P’ is in position ON,
-open the machine’s door,
-keep pressed button ‘H’ for 3 seconds until
the lighting up of lamp ‘G’, that will fast and
intermittently flash. At this moment the
automatic drain will start,
-the drain will automatically stop after 2
minutes,
-switch off the machine and close the door.
N.B. The door can be closed also after the
starting of the tank drain.

18
WASHING OF DISHES
1) Fisrt of all, remove any food residues
and any oily masses .
2) Knives , forks and spoons should be
previously softened; the same applies to
dishes, should they be washed a long time
after their use .
3) Arrange the dishes as shown in the
figures (page 22) .
4) Push the rack toward the inlet of the
machine. The feeding system will make it
step up automatically . (N.B. Insert the
shelves so that dishes are faced to the inlet
and trays are parallel to the machine).
5) There is a limit switch on the output-
table which can stop the machine.
If the operator can not remove the baskets
from the output-table in time and the
baskets accumulate there, the machine will
stop its conveyor and the rinsing system.
In order to restart the normal working it is
sufficient to remove the baskets from the
output-table.
DURING WASHING OPERATIONS
1) Check that the water temperatures are
in accordance with the specified values .
2) Monitor the levels of the detergent and
the rinse agent liquid in the respective
containers .
3) Remove the filters periodically and
remove any residues therefrom; it is
suggested to buy another spare filter in
order not to have to stop the machine for
an extented period of time .
4) Avoid dipping your naked hands into the
soapy hot water present in the tanks. This
can cause burns and skin irritations.
In this case, immediately rinse them with
plenty of water.
5) When the machine is working, do not
open the inspection doors too quickly.
6) In case the conveyor belt is stopped by
the safety device (limit switch), stop the
machine by means of the red emergency
mushroom pushbutton located near the
operator before removing the obstacle
causing the trouble.
7) Deactivate the equipment in case of
fault or malfunction. For repairs, only
address to a technical assistance center
authorised by the manufacturer and
impose the use of original spare parts.
The non-observance of the above could
compromise the safety of the appliance
and of the operators.
For possible troubles occurring during the
working cycles, see the relevant chapter.

19
BASKETS
cestelli-m115-GB/cdr
PP12/18
G8 CVA (option)
TAKE CARE !
BASKETS WITH DISHES
OR TRAYS MUST BE PUT
INTO THE WASHING
TUNNEL AS SHOWN
IN THE PICTURE.
M115
CB

20
AFTER WASHING OPERATIONS
PRECAUTION AND CLEANING
INSTRUCTIONS
1– high temperatures can be reached
inside the machine (90°C). Affter
power supply has been removed, wait
until the machine has reached the
room temperature, before working on
it;
-never leave tools, parts or other loose
material on or in the machine;
-BEFORE starting machine or cycle,
after any maintenance or repair work,
make sure all protective are correctly
installed;
2- Take off the machine by means the
disconnecting switch located on the
control panel.
3- IMPORTANT: Before carrying-out the
cleaning and maintenance operations,
disconnect the equipment from the
mains voltage through the wall-
mounted on/off switch and close the
water and steam* supply cocks;
4-Lift the inspection doors making sure
that they are firmly linked to the
apposite support.
.
5 -Wash the inside of the machine with
a water jet. When everything is
clean and water is completely
drained, take out and clean carefully
the flat filters and that of the pre-
wash (if any) and wash them
carefully every day (don't beat them
against the floor or others) .
6– When the tanks are empty remove
and wash the slide filters and the
suction pump filters .
7– Remove and wash the splash-guard
curtains.
8- For machines with steam
condensation only, remove the
steam aspiration filter (fig.5) end
clean it.
9- Check that the washing nozzles are
not clogged. If necessary,
disassemble the nozzles and pay
attention to assemble them again in
the right position (twice a week).
10 - Remove the rinsing arms by rotating
them counter-clockwise and check
that the nozzles are not clogged: if
otherwise, clean them using a
needle (every week).
11 - Replace the filters taking care that:
Curtains shall have their shortest
side turned towards the basket inlet
(see the blue signalling marks
located on the doors)
12 - Clean the outside part of the
machine using a wet sponge .Don't
use water jets that, beside being
dangerous, could also damage the
electrical parts.
Don't use detersive, abrasives, steel-wools
or steel-brushes.
14 – In order to avoid the formation of
nasty smells, let the doors open
making sure that they are firmly
linked to the apposite supports.
* for steam machines only
Table of contents
Other lamber Dishwasher manuals

lamber
lamber F85 User manual

lamber
lamber 01FEKS User manual

lamber
lamber L21-RGB User manual

lamber
lamber S280 User manual

lamber
lamber 015/24L-dy User manual

lamber
lamber F92-ek User manual

lamber
lamber DSP26-add User manual

lamber
lamber 01F User manual

lamber
lamber 050F-ek User manual

lamber
lamber P550-EK User manual

lamber
lamber L21-ek Instruction Manual

lamber
lamber LINEAR 30 User manual

lamber
lamber L21-ek User manual

lamber
lamber F85 User manual

lamber
lamber Minibar Instruction Manual

lamber
lamber 050F User manual

lamber
lamber P550-EK User manual

lamber
lamber F92-ek Instruction Manual

lamber
lamber L20 User manual

lamber
lamber DSP4 User manual