Lamona LAM3802 Guide

www.howdens.com/appliance-registration
Built-In Single Steam Assisted Oven LAM3802
Instructions and Installation
ISSUE v3. 030522

2www.howdens.com
Built-In Single Steam Assisted Oven LAM3802

3
Instructions and Installation
Welcome
Dear Customer,
Congratulations on your choice of oven.
The user manual will help you use your product quickly
and safely.
• Please read this user manual before installing
and using the oven.
• Always follow the safety instructions.
• Keep this user manual within easy reach for future reference.
• Register your appliance to access a digital copy of your user
manual for future reference.
• Please read any other documents supplied with the product.
Explanation of symbols
Throughout this manual the following symbols are used.
Important information or useful usage tips.
Warning for possible hazards to health and
property.
Warning possibility of an electric shock.

4www.howdens.com
Built-In Single Steam Assisted Oven LAM3802
Contents
1. Before using the oven 5
General Safety 5
Safety for children 7
Safety when working
with electricity 8
General warnings about
cooking in the oven 8
2. Environmental instructions 9
3. General information 10
Oven layout 10
Control panel layout 10
Accessories 10
4. Operating modes 11
5. Preparation 12
First cleaning of appliance 12
Initial heating 12
Tips for energy saving 12
6. How to operate the
main oven and grill 13
Setting the correct time 13
Select temperature &
Operating mode 13
How to use the Oven & Grill 13
Shelf positions 13
7. Clock programmer 14
Minute Minder 14
Timer Cooking 14
Delayed Start Cooking 15
Using the Steam Function 16
8. Key Lock 17
9. Cooking tables 18
Oven cooking table 18
10. Cooking and baking advice 20
11. Care and maintenance 22
General information 22
Cleaning the control panel 22
Cleaning oven door glass 22
Removal of the oven
door glass 23
Replacing the oven lamp 23
Removing and cleaning
wire racks 24
12. General notes on cleaning 24
13. Aqua clean function 25
14. Installation 26
Before installation 26
Electrical connections 27
Cooling fan 29
15. Technical specification 30
16. Troubleshooting 31
17. Your guarantee 32

5
Instructions and Installation
1. Before using the oven
• Make sure that you have removed all packaging, wrappings,
stickers and film from the oven’s surface and inside the oven cavity
(see page 11).
• It is recommended that you clean and wash the oven’s surface
before using for the first time (page 11).
• This appliance is for domestic cooking purposes only. It must not
be used for other purposes, e.g. room heating, or drying towels and
dish cloths over the handle. Commercial use will void the guarantee
(see guarantee page).
• The manufacturer shall not be liable for any damage caused by
improper use or handling errors.
General Safety
• The appliance can be used by those aged 8 or over and by
those with limited physical, sensorial or mental capacities, without
experience or knowledge of the product, only if supervised or
provided with instruction as to the operation of the appliance, in a
safe way with awareness of the possible risks.
• Connect the product to an earthed outlet protected by a fuse of
suitable capacity as stated in the “Technical specifications” table.
Our company shall not be liable for any problems arising due to the
product not being earthed in accordance with the local regulations.
• Do not operate the product if the power cable is damaged.
Call qualified service agent.
• Do not operate the product if it is defective or has any visible damage.
• Do not carry out any repairs or modifications on the product.
However, you may remedy issues that do not require any repairs or
modifications. See Troubleshooting, later in this booklet.
• Never wash down the product with excessive water, as there is the risk
of an electric shock!
• Never use the product when your judgment or coordination is
impaired by the use of alcohol and/or drugs.
• Product must be disconnected from the mains during installation,
maintenance, cleaning and repair procedures.
• Do not place aluminium foil on the base of the baking tray.

6www.howdens.com
Built-In Single Steam Assisted Oven LAM3802
• Repair procedures must always be performed by qualified service
agents. The manufacturer shall not be held responsible for damages
arising from procedures carried out by unauthorised persons, which
may also void the guarantee.
• Be careful when using alcoholic drinks in your dishes. Alcohol
evaporates at high temperatures and may cause fire since it can ignite
when it comes into contact with hot surfaces.
• Do not heat closed tins and glass jars in the oven. The pressure that
would build-up in the tin/jar may cause it to burst.
• Do not place any flammable materials close to the product as the sides
may become hot during use.
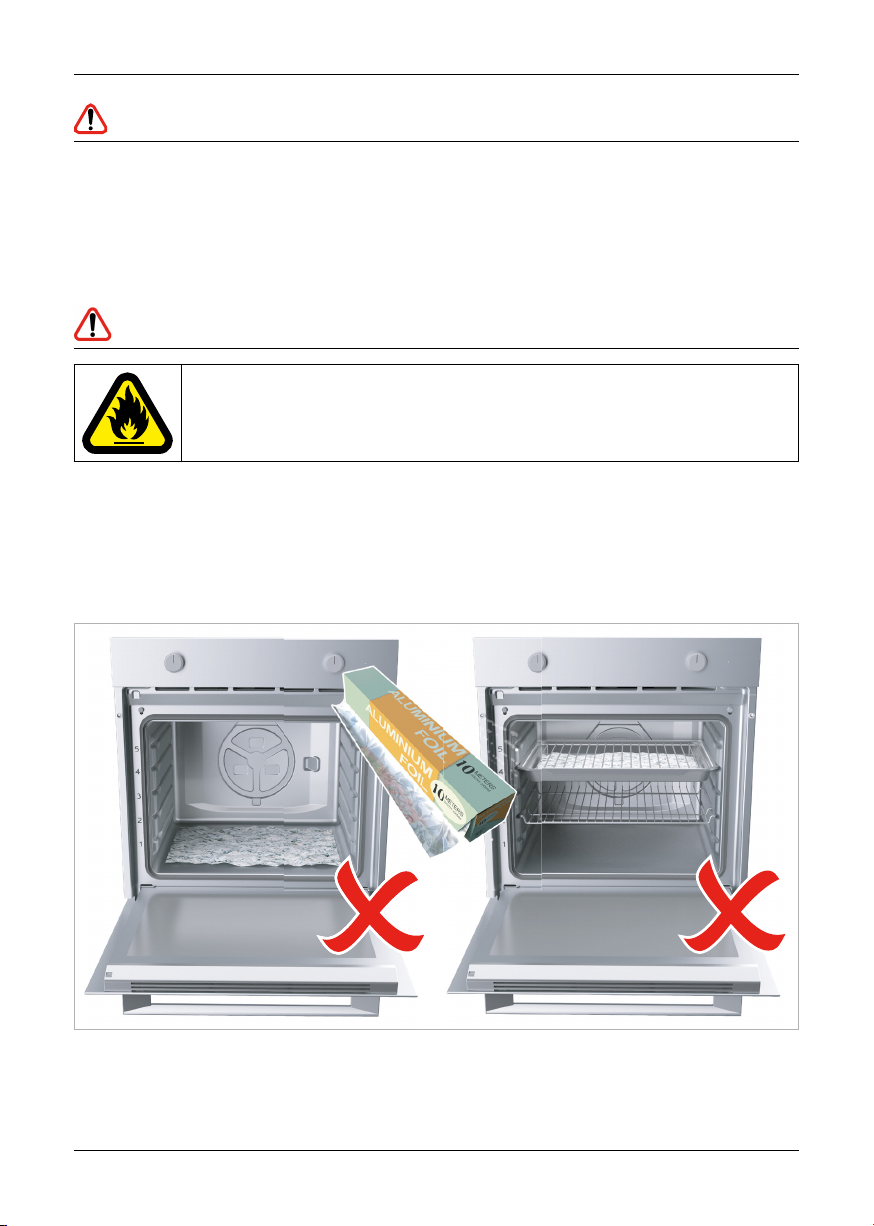
• WARNING FIRE RISK: Do not place
aluminium foil, baking trays or cook on
the base of this oven, doing so will cause
permanent damage to your appliance and
cabinetry with the potential risk of fire.
• Keep all ventilation slots clear of obstructions,
as this may cause premature failure of the
oven element.
• Parts of the appliance may become hot
during or immediately after use. Care should
be taken to avoid touching the heating
elements, and components inside the oven
which maybe hot. Always allow sufficient time
for the oven to cool.
• Do not allow the oven to cool with the door open. Even if the appliance
door is only open a little, front panels of adjacent units could become
damaged over time.
• If the door seal is very dirty this can prevent the door from closing
properly during use, resulting in possible damage to adjacent furniture
and poor efficiency. Always ensure the door seal is clean.
• Always use heat resistant oven gloves when putting dishes in or
removing dishes from the hot oven.
• Do not use the product if any door glass is removed or damaged.
• Rear surface of the oven may get hot when it is in use. Make sure that
the electrical connections do not contact the rear surface; otherwise,
connections may be damaged.
• Do not trap the mains cable and do not route it over hot surfaces. The
cable insulation may melt and cause a fire as a result of a short circuit.
• Make sure that the product function knobs are switched off after
every use.

7
Instructions and Installation
• When hot and cold air meet, condensation can form. The outer door
is air cooled and the inner glass will become hot during cooking,
therefore some condensation might form. This is perfectly normal. All
condensation will disappear as the oven reaches cooking temperature.
• Product must be installed by a qualified person in accordance with the
regulations in force. Otherwise, the guarantee may become void.
• Do not use harsh abrasive cleaners or sharp metal scrapers to clean the
oven door glass since they can scratch the surface, which may result in
shattering of the glass.
• Do not use a steam cleaner for cleaning operations.
• WARNING: Avoid possibility of an electric shock - ensure the
appliance is switched off before replacing the lamp.
• The means for disconnection must be incorporated in the fixed wiring
in accordance with the wiring rules.
• The instructions state the type of cord to be used, taking into account
the temperature of the rear surface of the appliance.
• Do not switch the oven off at the mains isolation switch immediately
after cooking. Cooling fan continues to run for up to 20-30 minutes
approx. even after the oven control is turned off.
• When filling in the water tank the level of the water must not exceed
the maximum level indicated on the tank.
• WARNING: Risk of burn and damage to the appliance: using the
steam function released steam can cause burns: Open the door
carefully to avoid injury after using a cooking function with steam.
Safety for children
• Electrical products can be dangerous to children under 8 years of age.
• Keep children away from the product when it is operating and do not
allow them to play with or near the product.
• CAUTION: accessible parts of the oven may become hot when the
oven or grill is in use. Children should be kept away until the product has
cooled down.
• Do not store any items above the appliance that children may reach for.
• When the door is open, do not load any heavy object on it and do not
allow children to sit on it. The door or door hinges may be damaged.
• The packaging materials will be dangerous for children. Keep the
packaging materials away from children. Please dispose of all parts of
the packaging according to environmental standards.

8www.howdens.com
Built-In Single Steam Assisted Oven LAM3802
Safety when working with electricity
• Any work on electrical equipment and systems should only be
carried out by authorised or qualified persons.
• In case of any damage, switch off the product and disconnect
it from the mains. To do this, turn off at the fuse box.
• Make sure that fuse rating is compatible with the product.
General warnings about cooking in the oven
• Do not place aluminium foil or baking trays on the base of the oven
when in use. Heat is reflected downwards and can damage the oven
and the cabinets beneath.
• Do not line the grill tray or any baking trays with aluminium foil.
The reflected heat can damage the heater.
WARNING! Risk of fire!

9
Instructions and Installation
Waste regulation
Disposing of the old product. Compliance with the WEEE Directive
and disposing of the waste product:
This product complies with EU WEEE Directive (2012/19/EU).
This product bears a classification symbol for waste
electrical and electronic equipment (WEEE).
This product has been manufactured with high quality
parts and materials which can be reused and are suitable
for recycling. Do not dispose of the waste product with
normal domestic and other wastes at the end of its
service life. Take it to the collection centre for the recycling
of electrical and electronic equipment. Please consult your local
authorities to learn about these collection centres. Appropriate disposal
of used appliance helps prevent potential negative consequences for
the environment and human health.
Compliance with RoHS Directive:
The product you have purchased complies with EU RoHS Directive
(2011/65/EU). It does not contain harmful and prohibited materials
specified in the Directive.
Package information
• Packaging materials of the product are manufactured from
recyclable materials in accordance with our National Environment
Regulations. Do not dispose of the packaging materials together with
the domestic or other wastes. Take them to the packaging material
collection points designated by the local authority.
Future transportation
• Keep the product’s original carton and transport the product in it.
Follow the instructions on the carton. If you do not have the original
carton, pack the product in bubble wrap or thick cardboard and
tape it securely.
Check the general appearance of your product for any
damages that might have occurred during transportation.
2. Environmental instructions

10 www.howdens.com
Built-In Single Steam Assisted Oven LAM3802
3. General information
Oven layout
Control panel layout
Accessories
Oven tray / grill pan
Control panel
Steam button
Light
Heating element
Oven shelf positions / Lateral wire grid
Grill pan wire rack / trivet
Oven tray / grill pan
Oven shelf
Telescopic shelf
Oven door
Handle
Grill pan wire rack / trivet
Oven shelf / (x2 included)
Lateral wire grids
(Left / Right)
Telescopic runners
(Left / Right)
AOven / grill function knob
BMain oven temperature control knob
COven /grill temperature indicator
DOven steam button
B C DA

11
Instructions and Installation
4. Operating modes
All functions for the ovens and grill are listed in this section. Please note*
depending on the model of your oven, the number and order of
operating modes available may deviate from the illustrations shown below.
Function
symbol
Function
description
Description and use
Lamp Turns on the oven light. This will automatically activate
the cooling fan.
Defrost When the dial is set to this position. The fan circulates air at room
temperature around the frozen food so that it defrosts in a quickly
without the protein content of the food being changed or altered.
Multi-Level +
Steam
The hot air is distributed to different shelves, making this function ideal
for cooking different types of food at the same time, without ever
mixing flavours and smells. By pressing the STEAM button, the steam
option works with traditional heat, thus ensuring the best taste and
texture for your dishes and perfect leavening. This mode is suitable
for cooking puff pastries, yeast based deserts, bread and pizza,
roasted meat, and fish. Please note that amount of steam generated
is limited since it is not a pure steam oven.
Fan assisted
grill + Steam
Use the upper ventilation and heater at the same time to perfectly
cook large portions of food. This mode is especially suitable for
roasting crispy dishes such as meat, poultry or fish. Please note that
amount of steam generated is limited since it is not a pure steam
oven.
Fan and
Lower
element
The bottom heating element is used with the fan circulating the air
inside the oven. This method is ideal for juicy fruit flans, tarts, quiches
and pâté. It prevents food from drying and encourages rising in
cakes, bread dough and other bottom-cooked food. Place the shelf
in the position 1.
Top and
bottom heat
Top and bottom heat is used. The foodstuffs are heated
simultaneously from above and below. Suitable for cakes, cookies
and casseroles. For best results cook with one tray only.
Grill + Steam
Use the turbo-grill with the door closed. The top heating element is
used with the fan circulating the air inside the oven. Preheating is
necessary for red meats but not for white meats. Ideal for cooking
thick food items, whole pieces such as roast pork, poultry, etc. Place
the food to be grilled directly on the shelf centrally, at shelf position
3. Slide the drip tray under the shelf to collect the juices. Make sure
that the food is not too close to the grill. Turn the food over halfway
through cooking. Please note that amount of steam generated is
limited since it is not a pure steam oven.
Pizza With this function hot air circulated in the oven to ensure perfect
result for dishes such as pizza or cake.
*Tested in accordance with the CENELEC EN 60350-1 used for definition of energy class.

12 www.howdens.com
Built-In Single Steam Assisted Oven LAM3802
5. Preparation
First cleaning of the
appliance
1. Remove all packaging materials.
2. Wipe the surfaces of the
appliance with a damp cloth
or sponge and dry with a clean
cloth and mild detergent.
The surface may get damaged
by some detergents or cleaning
materials.
Do not use aggressive detergents,
cleaning powder / cream or any
sharp objects or abrasives.
Initial heating
It is recommended to heat up
the product for about 30 minutes
and then switch it off. Thus, any
production residues or layers will
be burnt off and removed.
1. Take the tray and the wire grid
out of the oven.
2. Close the oven doors.
3. Select the highest oven & grill
power levels (See How to use
the oven and grill section).
4. Operate oven & grill for about
30 minutes.
5. Turn off your oven & grill and
allow to cool.
Small amounts of fumes may
emit during the initial heating
process; this is normal,
however monitor the oven
at all times and ensure that
the room is well ventilated.
Tips for saving energy
The following information will
help you to use your appliance in
an ecological way, and to save
energy:
• Use dark coloured or enamel
coated cookware in the oven
as the heat transmission will
be better.
• Perform a preheating operation
if it is advised in the user manual
or cooking instructions. Do not
open the door of the oven
frequently during cooking.
• Try to cook more than one dish
in the oven at the same time
whenever possible. You can
place two cooking vessels onto
the wire shelf.
• Cook one dish after another.
The oven will already be hot.
• You can save energy by
switching off your oven a few
minutes before the end of the
cooking time. Do not open the
oven door.
• Defrost frozen dishes before
cooking them if possible if
applicable.

13
Instructions and Installation
6. How to operate the main oven and grill
Setting the correct time
WARNING: The oven will not
operate until clock is set.
When first switched on the clock
display will flash ‘12.00’.
Touch the + or – buttons whilst the
display is flashing to adjust the
time. (The display stops flashing
after 5 sec and time is displayed).
To adjust clock time:
Press mode button x 4 times
until clock symbol is displayed.
Touch the + or – buttons whilst
display is flashing to set the time
of day. (The display stops flashing
after 5 sec and time is displayed).
Select temperature
& Operating mode
The operating modes of
the electric oven are selected
with the function knob.
The temperature is adjusted
with the thermostat knob.
How to use the Oven & Grill
1. Close the oven door
2. Set thermostat knob to the
desired temperature
3. Set function knob to the
required operating mode
The oven heats up to the adjusted
temperature and maintains it.
During heating, the temperature
indicator light will remain on
until the desired temperature is
reached.
Shelf positions
The oven has 5 shelf positions as
illustrated below, it is important
to position the wire shelf into the
runners correctly.
Please ensure shelves are fully
inserted before closing the oven
door, failure to do so could lead
to damage to the door.
A B
AOven / grill function knob
BOven / grill thermostat knob

14 www.howdens.com
Built-In Single Steam Assisted Oven LAM3802
Warning - Do not place aluminium
foil or baking trays on the bottom
of oven cavity. This can lead to
permanent damage to your
appliance.
Warning - Do not place plates,
dishes or trays on the bottom of
oven cavity when oven is in use.
Warning - Do not use the oven or
grill cavity for storage when not in
use.
Switch off the electric oven
Turn function knob and thermostat
knob to off position (top).
7. Clock Programmer
Minute Minder (0.01 min - 23.59hr)
Press mode button x 1 time
until alarm symbol is displayed.
Touch the + or - buttons to set the
desired time duration. The alarm
will sound when the selected time
has elapsed. Touch any button to
stop alarm.
To cancel:
Press mode button x 1 time
until alarm symbol is flashing.
Touch the + or - buttons to set the
duration to 00.00.
Timer Cooking
Timed Operation Period
Oven cooks for a selected time period
then stops: (0.01min to 23.59hr)
Press mode button x 2 time until
Cook symbol is displayed and
flashing.
Touch the + or - buttons to set the
desired cooking time duration.
(Display reverts to time of day
after desired time period is set
and + symbol remains lit).
Select desired oven cooking
mode and temperature using the
oven control knobs.
The alarm will sound and the
Cook symbol will flash when
the selected cooking time has
elapsed.
Turn oven control knobs to ‘Off’
and touch any button to stop
alarm and return over to ‘Manual’
use mode.
To check time left:
Press mode button x 2
To Cancel:
Press mode button x 1 time until
Cook symbol is displayed.
Touch the + or - buttons until alarm
sounds and display shows 00.00.
Clock time returns.
Note: Whilst cook symbol is
flashing, the oven cannot be used
in ‘Manual’ mode.

15
Instructions and Installation
Time Stop Point
Oven cooks until a designated time
then stops: (up to 23.59hr)
Press mode button x 3 times
until symbol is displayed and
flashing.
Touch the + or - buttons to set
the desired stop time. (Displayed
reverts to time of day after desired
stop time is set and + symbol
remains lit).
Select desired oven cooking
mode and temperature using the
oven control knobs.
The alarm will sound and the
symbol will flash when the
selected time has been reached.
Turn oven control knobs to ‘Off’
and touch any button to stop
alarm and return to ‘Manual’ use
mode. (Timer will sound for 2 mins
then stop if no button is pressed).
To cancel:
Press mode button x 3 times
until symbol is flashing.
Touch the + or - buttons until alarm
sounds and time of day returns.
Delayed Start Cooking
The two timed cooking modes
can be combined to create a
delayed start cooking period.
Programme a Timed Operation
Period (as described on p12).
Then
Programme a Time Stop Point
(as described on p12).
Both symbols and will be
displayed and the cooking
process will start at a future point
in time e.g.
If Time Stop Point is set to 16.00
and Timed Operation Period is set
to 1.30 hrs - the oven will switch on
at 14.30 and cook until 16.00.
To Check Settings:
Push mode button x 2 to see
cooking period.
Push mode button x 3 to see
cooking end time.
To cancel:
Press mode button x 2 time until
Cook symbol is displayed.
Touch the + or – buttons until
alarm sounds and display shows
00.00 Clock time returns.

16 www.howdens.com
Built-In Single Steam Assisted Oven LAM3802
Using the Steam Function
Steam function lets you have
better humidity during cooking
cycle. We recommend alternating
steam cooking with traditional
cooking.
WARNING: Risk of burn and
damage to the appliance.
Released steam can cause burns:
Open the oven door carefully to
avoid injury after using a cooking
function with steam.
1. Open the oven door.
2. Only fill the cavity bottom with
water when the oven is cold. Fill
the cavity bottom using max.
150ml water.
3. Put food in the appliance and
close the oven door.
4. Set the function you prefer to
cook with steam;
--
5. Turn the knob for the
temperature to select a
temperature.
6. Wait five minutes for preheating.
Then press the steam oven
button.
The steam oven button works with
the function;
--
CAUTION: Do not refill the cavity
bottom with water during cooking
or when the oven is hot.
7. To turn the appliance off switch
the function and temperature
knob to zero positions.
8. To avoid injury, wait for the oven
to cool down. Remove water
from the cavity bottom. Clean
the drip tray after every cooking
cycle. Please see chapter
general notes on clearing for
cleaning instructions.
Please not that amount of steam
generated is limited since it is not
a pure steam oven.

17
Instructions and Installation
8. Key Lock
How To Use
Child Lock function is activated by touching Set + for a
minimum of 5 seconds. From this moment on all other functions
are locked and the display will flash STOP and preset time
intermittently.
STOP
To set Child Lock function:
Press set + for a minimum of
5 seconds.
Display will then flash STOP
How To Deactivate
Child Lock function is deactivated by touching touchpad.
Set + again for a minimum of 5 seconds. From this moment
on all functions are selectable again.

18 www.howdens.com
Built-In Single Steam Assisted Oven LAM3802
9. Cooking tables
The values indicated in the tables below are indicative. They may
vary according to the type food, the quantity and your preferences
of cooking.
Baking and roasting
Level 1 is the lowest shelf level.
Oven cooking table
Dish
Cooking
level
number
Oven
Function
Rack
position Accessories Temperature
(ºC)
Cooking
time (min)
(approx.)
Cakes in tray
One level 3 Oven Tray 175 30 - 40
2 levels 2 - 3 Oven Tray 175 45 - 60
Cakes in mould One level 2 Oven Tray 175 50 - 60
Small cakes
One level 3 Oven Tray 180 22 - 35
2 levels 1 - 3 Oven Tray 180 30 - 40
3 levels 1 - 3 - 5 Oven Tray 180 30 - 40
Sponge cake One level 3 Oven Tray 200 15 - 20
Shortbread 3 levels 3 Oven Tray 140 25 - 32
Cookies
One level 3 Oven Tray 175 25 - 30
2 levels 2 - 3 Oven Tray 170 - 190 35 - 45
3 levels 1 - 2 - 3 Oven Tray 175 30 - 40
Dough pastry
One level 3 Oven Tray 200 35 - 45
2 levels 2 - 3 Oven Tray 200 50 - 60
3 levels 1 - 2 - 3 Oven Tray 200 55 - 65
Filled savoury
pastry
One level 3 Oven Tray 200 25 - 35
2 levels 2 - 3 Oven Tray 200 35 - 45
3 levels 1 - 2 - 3 Oven Tray 190 45 - 55

19
Instructions and Installation
Dish
Cooking
level
number
Oven
Function
Rack
position Accessories Temperature
(ºC)
Cooking
time (min)
(approx.)
Leaven One level 3 Oven Tray 200 35 - 45
Lasagna One level 3 Oven Tray 200 30 - 40
Beefsteak
(whole)/Roast One level 3 Oven Tray
Start 250, after 25
mins change to
180 - 190
100 - 120
Lamb haunch
casserole One level 3 Oven Tray
Start 220, after 25
mins change to
180 - 190
70 - 90
Roast chicken One level 2 Oven Tray
Start 250, after
15 mins change
to 190
55 - 65
Turkey (5.5kg) One level 1 Oven Tray
Start 250, after
25 mins change
to 190
150 - 210
Fish One level 3 Oven Tray 200 20 - 30
Hamburgers One level 4 Oven Shelf MAX 20 - 25*
Toast One level 4 Oven Shelf MAX 2 - 3
* Turn food two thirds of the way through cooking
While cooking with 2 trays at the same time, place the deep tray to the upper shelf and shallow tray to the
lower shelf.
It is suggested to perform preheating for all foods.
It is suggested to preheat for 5 minutes for all grilled foods

20 www.howdens.com
Built-In Single Steam Assisted Oven LAM3802
10. Cooking and baking advice
Risk of scalding by hot steam!
Take care when opening the oven
door as steam may escape.
Tips for baking
• Use nonstick coated
appropriate metal trays and
containers or heat-resistant
silicone moulds.
• Make best use of the space on
the shelf.
• It is recommended to place the
vessels in the middle of the shelf.
• Select the correct shelf position
before turning the oven or grill
on – don’t move oven shelves
when hot.
• Keep the oven door closed.
Tips for roasting
• Seasoning with lemon juice and
black pepper will improve the
cooking performance when
cooking a whole chicken, turkey
or a large piece of meat.
• Meat with bones takes about
15 to 30 minutes longer to cook
than a roast of the same size
without bones.
• Let meat rest in the oven for
about 10 minutes after the
cooking time. The juices will be
better distributed thought the
meat and will not run out when
the meat is cut.
• Fish in a heat proof dish should
be placed at the medium or
lower level.
Tips for grilling
• Grilling is ideal for cooking
meat, fish and poultry and will
achieve nice browning without
drying out the food. Flat pieces,
meat skewers and sausages
are particularly suited for
grilling, as are vegetables with
a high water content, such as
tomatoes and onions. Distribute
the pieces to be grilled on the
wire rack.
• Distribute the pieces to be
grilled on the wire rack.
• Use tray or grill pan under the
wire rack in order to collect
dripping fat or juices.
• Adding some water to the grill
pan will assist with cleaning.
Tips for baking cake
• If the cake is too dry, increase
the temperature by 10 °C and
decrease the cooking time.
• If the cake is wet, use less
liquid or lower the temperature
by 10°C.
• If the cake is too dark on top,
place it on a lower shelf, lower
the temperature and increase
the cooking time.
• If cooked well on the inside but
sticky on the outside use less
liquid, lower the temperature
and increase the cooking time.
Table of contents
Other Lamona Oven manuals

Lamona
Lamona LAM3209 Guide

Lamona
Lamona LAM3204 Troubleshooting guide

Lamona
Lamona LAM3702 User manual

Lamona
Lamona LAM3700 User manual

Lamona
Lamona LAM3301 Troubleshooting guide

Lamona
Lamona LAM4402 User manual

Lamona
Lamona LAM3600 Troubleshooting guide

Lamona
Lamona LAM3100 Troubleshooting guide

Lamona
Lamona LAM3412 Guide

Lamona
Lamona LAM3204 Troubleshooting guide

Lamona
Lamona LAM3803 Guide

Lamona
Lamona LAM3451 Guide

Lamona
Lamona LAM4675 Guide

Lamona
Lamona HJA7030 User manual

Lamona
Lamona LAM3801 Guide

Lamona
Lamona LAM3601 Guide

Lamona
Lamona LAM 3200 Assembly Instructions

Lamona
Lamona LAM3404 Troubleshooting guide

Lamona
Lamona HJA 3240 Assembly Instructions

Lamona
Lamona LAM4408 Guide