6Manual No. 313-473M 3/18/10
Land Pride
Assembly Instructions
Sprocket and Chain Arrangement
Thereisno“range”associatedwiththeSmallSeedsdrive.
If set correctly, the Small Seeds box should turn the same
speed regardless of whether the main seed box is set for
high or low range. Study the seeds charts in your All
Purpose Seeder Operator’s Manual 313-354M and
install sprockets and roller chains based on whether you
are using high range or low range seeding charts.
High Range Set-Up
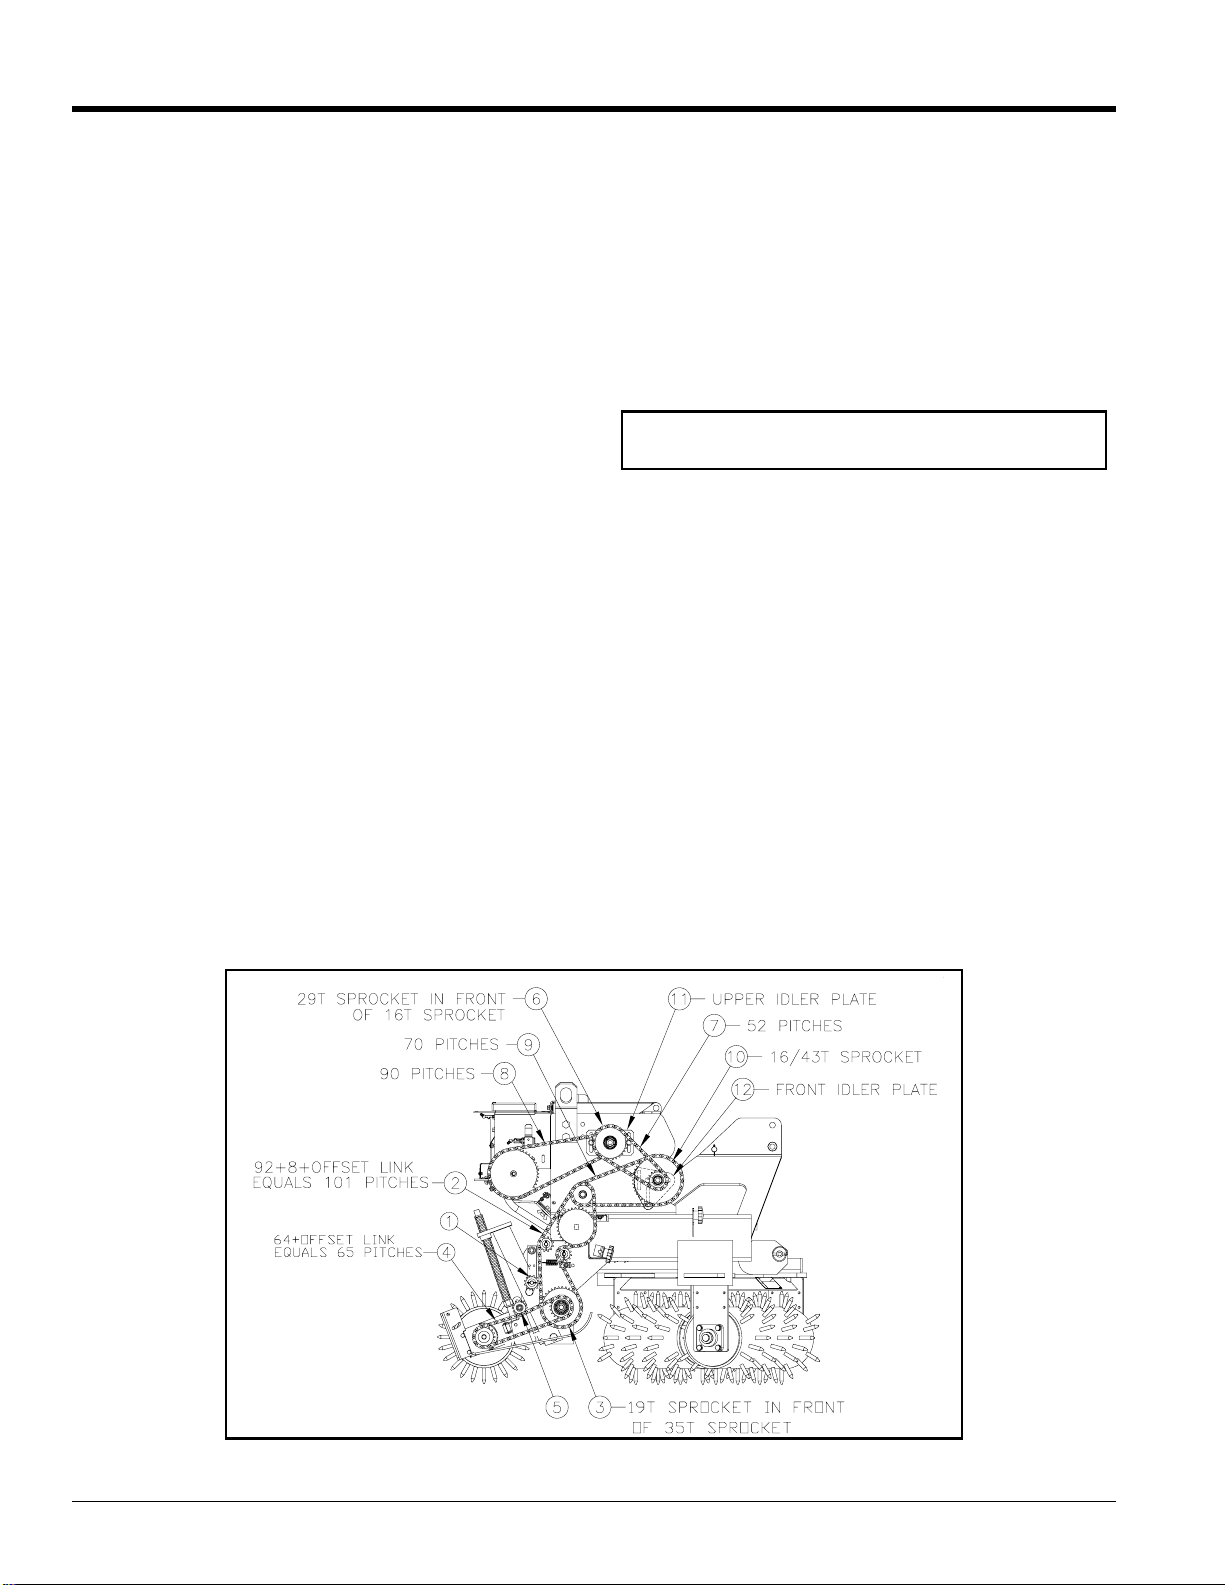
Refer to Figure 10:
The 19/35T Sprocket (#3) is arranged with the
19T sprocket in front of the 35T sprocket and the 16/29T
sprocket(#6) isarrangedwith the29Tsprocket infrontof
the 16T sprocket. All other sprockets remain unchanged.
Main Seeds Box Drive Arrangement
1. Loosen3/8" nutsecuringdrivetension sprocket(#5).
Remove drive chain (#4) from sprocket (#3).
2. Pull idler sprocket (#1) away from roller chain (#2)
and remove chain from sprocket (#3).
3. Remove 5/8" nut and flat washer from center of
sprocket (#3).
4. Rearrange sprocket (#3) so that the 19T sprocket is
in front of the 35T sprocket and then replace 5/8" flat
washer and lock nut. Torque nut tight.
5. Drivechain(#4)shouldbe65pitcheslonganddriven
chain(#2) 101 pitcheslong.If drivechain (#4)has73
pitches, then remove 8 pitches from it and add those
pitches to driven chain (#2).
6. Install drive chain (#2) onto 35T sprocket (#3) and
then driven chain (#4) onto 19T sprocket (#3).
Small Seeds Box Drive Arrangement
1. Loosen the 5/8" nuts located at the center of idler
sprockets (#6 & #10).
High Range Sprocket & Chain Arrangement
Figure 10
26926
2. Loosen 3/8” cap screws securing idler slide
plates (#11 & #12).
3. Remove roller chains (#7 & #8) from sprocket (#6).
4. Remove 5/8" nut, lock washer and 1/4" long spacer
tube from center of idler sprocket (#6).
5. Rearrangesprocket(#11)sothatthe29Tsprocket is
in front of the 16T sprocket and then replace
1/4" long spacer tube, lock washer and 5/8" hex nut.
Draw nut up snug. Do not tighten.
6. Install roller chain (#8) onto 16T sprocket (#6) and
then roller chain (#7) onto 29T sprocket (#6).
7. At the same time, reposition sprockets (#6 & #10) to
remove excess slack in roller chains (#7 & #8).
8. Secure lower idler slide plate (#12) by drawing the
3/8" cap screws up snug. Maker sure cap screws are
loose enough to make final adjustments to the
sprocketsbytappingontheidlerplatewithahammer
and punch.
9. Adjust upper idler plate (#11) to remove any
remainingslackoutofbothchains(#7)andthen
secure the plate by drawing the 3/8" cap screws up
snug. Make sure cap screws are loose enough to
make final adjustments to the sprockets by tapping
on the idler plate with a hammer and punch.
10. Tap on idler plates (#11 & #12) until chains (#7 & #8)
have a small amount of slack. If necessary, slightly
loosen 5/8" center sprocket nuts to reposition
sprockets (#6 & #10) on their idler plates.
11. Once the chains are properly tensioned, tighten the
3/8" cap screws on the idler plates and 5/8" nuts in
the center of the sprockets to the correct torque.
NOTE: The remaining steps are easier if completed
by 2 people.