Larson Electronics EPL-48-2L User manual

EPL-48-2L
Larson Electronics, LLC Phone: (800) 369-6671 Fax: (903) 498-3364 www.larsonelectronics.com
1of 5
Explosion Proof Light
Waterproof Fluorescent Light Fixture - Paint Spray Booth, Rigs - 4 foot, 2 l
Instruction Manual
Thank you for your purchase of the Larson Electronics EPL-48-2L.
WARNING:
READ CAREFULLY BEFORE INSTALLING FIXTURE. RETAIN THESE INSTRUCTIONS FOR FUTURE REFERENCE.
CRITICAL SAFETY INSTRUCTIONS:
•INSTALLATION SHOULD ONLY BECONDUCTED BY A QUALIFIED ELECTRICIAN IN ACCORDANCE WITH NEC AND ANY
RELEVANT LOCAL BUILDING CODES.
•RISK OFFIRE OR ELECTRIC SHOCK. FIXTURE INSTALLATION REQUIRES KNOWLEDGE OF FIXTURE'S ELECTRICAL
SYSTEMS. IFNOTQUALIFIED, CONTACT A QUALIFIED ELECTRICIAN.
•BE CERTAIN ELECTRICAL POWER IS OFF BEFORE AND DURING INSTALLATION AND MAINTENANCE.
•MAKE SURE THE SUPPLY VOLTAGE IS THE SAME AS THE FIXTURE'S RATED VOLTAGE.
•TO PREVENT WIRING DAMAGE OR ABRASION, DO NOT EXPOSE WIRING TO EDGES OF SHEET METAL OR SHARP
OBJECTS. SUITABLE FOR DAMP LOCATIONS.
IMPORTANT
READ CAREFULLY BEFORE INSTALLING THIS FIXTURE. SAVE THESE INSTRUCTIONS FOR FUTURE
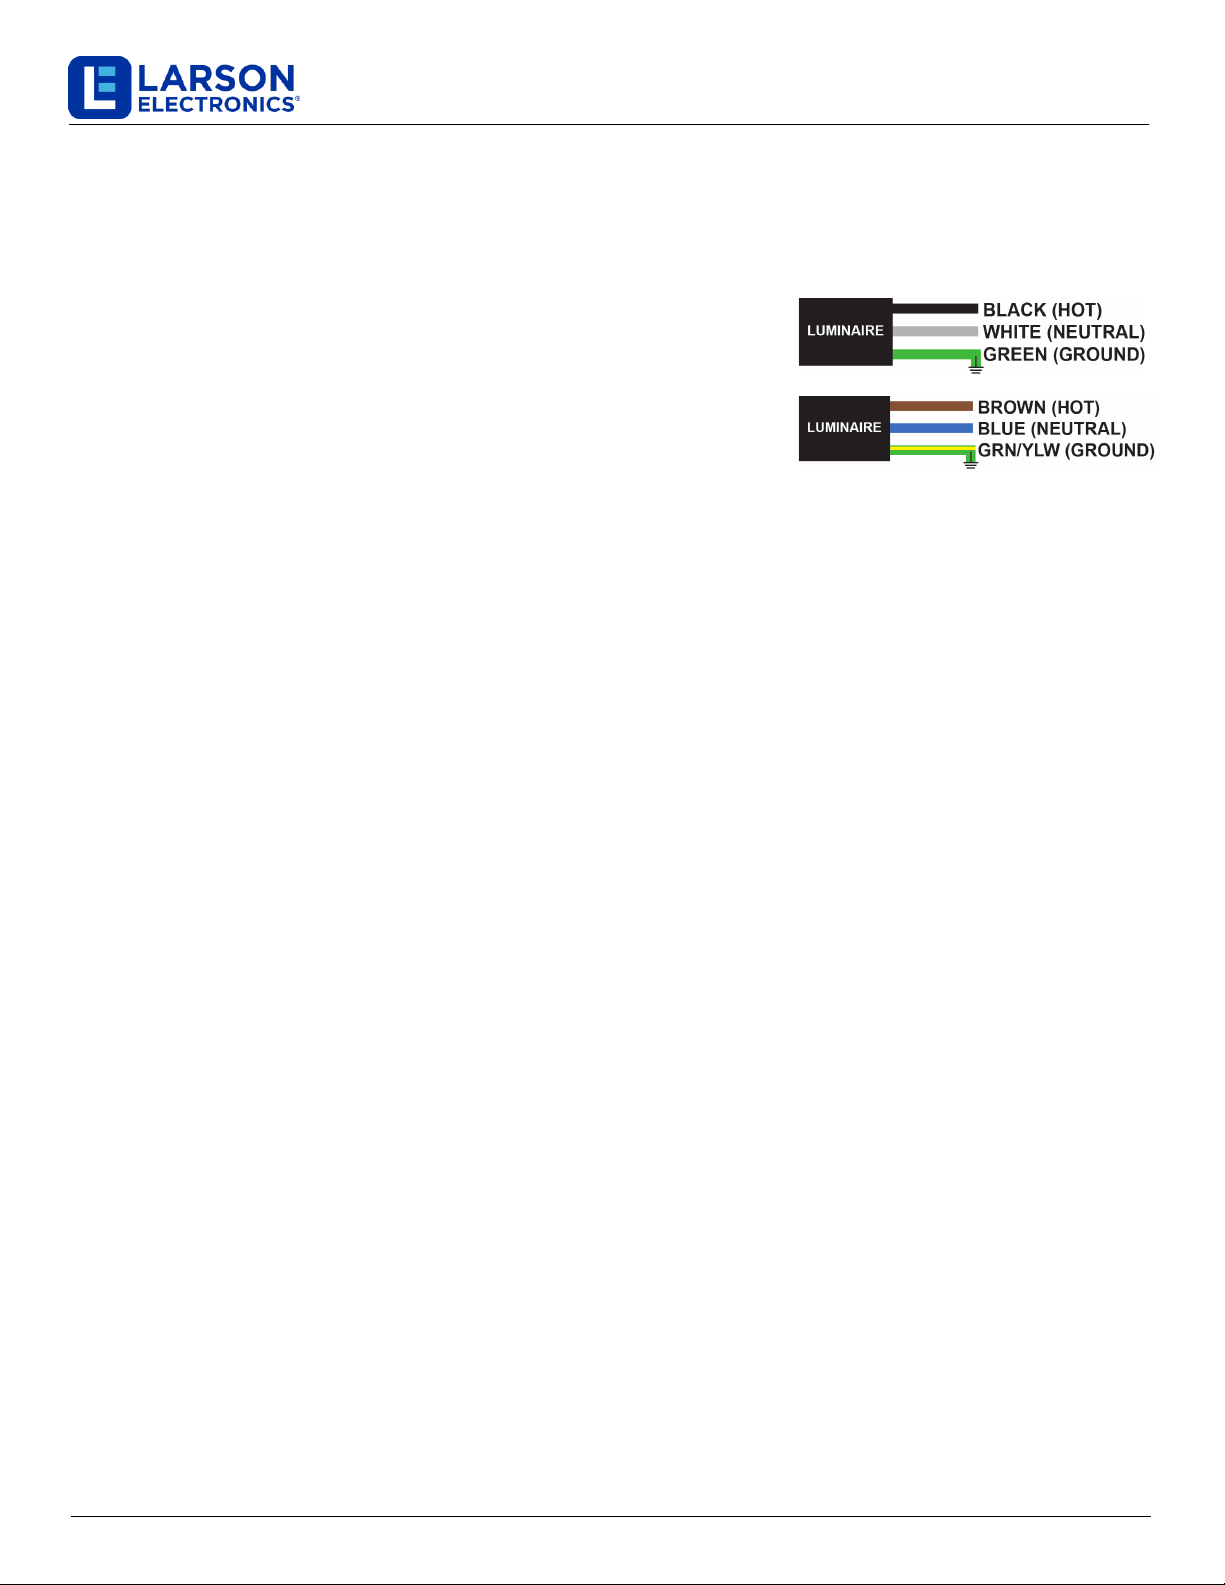
REFERENCE. THE EPL-48-2L MUST BE WIRED IN ACCORDANCE WITH NATIONAL ELECTRICAL CODE AND ALL
APPLICABLE LOCAL CODES. PROPER GROUNDING IS REQUIRED FOR SAFETY.
WE STRONGLY ENCOURAGE ONLY A LICENSED ELECTRICIAN INSTALL, OPERATE AND MAINTAIN THIS
PRODUCT. IF YOU ARE NOT QUALIFIED OR UNFAMILIAR WITH ANY ASPECT OF THIS INSTRUCTION SHEET,
CONSULT AN ELECTRICIAN. THERE ARE NO SERVICEABLE PARTS INSIDE.
WARNING: MAKE SURE POWER IS TURNED OFF BEFORE STARTING THE
INSTALLATION OR PERFORMING ANY MAINTENANCE.
RISK OF FIRE/ELECTRIC SHOCK –DISCONNECT POWER AT BREAKER BEFORE INSTALLING OR SERVICING.
RISK OF PERSONAL INJURY –FIXTURE MAY BECOME UNSTABLE OR DAMAGED IF NOT INSTALLED PROPERLY.
RISK OF BURN –ALLOW FIXTURE TO COOL BEFORE SERVICING.
WARNING
TO AVOIDTHE RISKOF FIRE,EXPLOSION OR ELECTRIC SHOCK, THIS PRODUCT SHOULD BE INSTALLED,
INSPECTEDAND MAINTAINEDBY A QUALIFIED ELECTRICIANONLY, IN ACCORDANCEWITHALL
APPLICABLEELECTRICAL CODES.
TO AVOIDELECTRIC SHOCK:
•BE CERTAIN ELECTRICAL POWER IS OFF BEFORE AND DURING INSTALLATION AND MAINTENANCE.
•PRODUCT MUST BE CONNECTED TO A WIRING SYSTEM WITH AN EQUIPMENT-GROUNDING
CONDUCTOR.
TO AVOID EXPLOSION:
•MAKE SURE THE SUPPLY VOLTAGE IS WITHIN THE VOLTAGE RATING.
•ENSURE THE MARKED T RATING IS LESS THAN THE IGNITION TEMPERATURE OF THE HAZARDOUS
ATMOSPHERE.
•DO NOT OPERATE IN AMBIENT TEMPERATURES ABOVE THOSE INDICATED ON THE PRODUCT
NAMEPLATE.
•DO NOT OPERATE IF THE LENS, CORD, SEALS, HOUSING, RECEPTACLES, ETC. IS CRACKED OR
DAMAGED. IF SO, DISCONTINUE USE AND CONTACT MANUFACTURER FOR REPLACEMENT PARTS.
•ALL FASTENERS SHOULD BE PROPERLY SEATED.
The Larson Electronics EPL-48-2L Explosion Proof Fluorescent Light Fixture is NRTL Listed for United States and
Canada Class 1 Division 1 and Class 1 Division 2 for hazardous locations where flammable chemical/petrochemical
vapors exist or have the potential to exist. The unit carries a T6 temperature rating, it is also approved for Paint Spray
Booths.

EPL-48-2L
Larson Electronics, LLC Phone: (800) 369-6671 Fax: (903) 498-3364 www.larsonelectronics.com
2of 5
WIRING
Standard pigtail(flying leads) wiring
We strongly encourage a licensed electrician install this product,in all locations especially in outdoor areas
where weatherproofing may be required. Universal voltage driver permits operation at 120V - 277V AC, 50 or 60Hz.
Warning: Check product label for correct input voltage!
Attach supply line wires to the appropriate light fixture wires as shown
in thediagram
Secure each pair of wires according to the diagram. Utilize a junction box or
similar device and take precautionary steps for weatherproofing all
connections if installed in a location where water may come in contact with the
unit. Ensure the unit is properly grounded and that wiring is done according to
all local and national electrical/building codes.
ADJUSTABLE SURFACE MOUNTING BRACKETS
Each bracket is cinched to the bracket mounting peg on each side of the light. The angle of the bracket is set by tightening
two cap screws on either side of the bracket. The cap screws act as a set screw. The bracket itself is mounted via a single
bolt hole at the top the bracket. There are two brackets, one on each end of the light. Once the brackets are mounted to a
surface (ceiling, floor or wall), the light fixture can be removed from the brackets by loosening the cap screws that hold the
bracket to the mounting peg.
SUSPENSION MOUNTING
Pendant mount fixtures hang from the ceiling and are suspended by rigid pipe. Each fixture features a 1/2” NPT junction box
on one end, and a 1/2” NPT adjustable L-bracket on the other end of the fixture. Operators bring rigid pipe down to the
threaded mounting hubs. Wiring is fed down through the rigid pipe to the junction box and tied in to the fixture’s lead wires,
completing the electrical connection. The adjustable L-shape mounting bracket provides support for the opposite end of the
fixture.
INSTALLATIONPRECAUTIONS
Do not install fixture in any classified location where the marked operating temperature exceeds the ignition
temperature of the hazardous atmospheres.
Consult fixture nameplate for the suitability ambient temperature shown on the nameplate.
Refer to fixture nameplate for minimum supply wire temperature rating.
Verify that the supply voltage agrees with fixture rating as indicated on nameplate.
All local and national electrical/building codes must be followed when installing this lighting fixture. For
code interpretation, consult your local authority.
Product must be used only with glass tubes intact and all cap threads fully engaged. Do not use if glass tubes
are cracked or damaged.

EPL-48-2L
Larson Electronics, LLC Phone: (800) 369-6671 Fax: (903) 498-3364 www.larsonelectronics.com
3of 5
Caution: Only use lamp size, type and /or wattage as shown on fixture nameplate.
INSTRUCTIONS FOR INSTALLING
We strongly recommend that only a licensed electrician install this product.
WARNING: Make sure that the power is disconnected before installing. This fixture is extremely heavy and must be
mounted to a surface that can structurally support the load.
NOTE: This fixture requires a minimum of 50 inches of clearance from re-lamp end for lamp replacement. An optional
drop mounting kit that will allow for end to end row mounting is available, please consult factory.
WARNING: Do not let fixture hang on one bracket at any time. Failing to comply can result in breakage of
end casting or mounting bracket, allowing the fixture to fall, which can cause serious injury or death.
The mounting brackets are shipped installed on the
fixture.
Install the brackets to wall or ceiling with two 3/8" bolts
(not supplied) at center measurements.
Fixture is now ready for mounting.
For pendant mounts, see reference image.
It is strongly suggested to use two licensed electricians to proceed with the final mounting of the fixture to avoid any
possible personnel injury or damage to the fixture as the unit weights up to 46lbs (21.0 kg) and will be slightly awkward
to hold in position and attach to brackets mounted on wall or ceiling. Depending on mounting height and scaffolding, a
hydraulic man–lift or two good quality ladders should be used.
INSTRUCTIONS FOR WIRING LAMP
This lamp includes 50ft SOOW cable whip pre-attached from factory.
Once mounted, run cable to compatible receptacle outputting the correct voltage.
Check product label to ensure voltage is correct. This lamp is shipped with
selected voltage from factory which includes either 347-480V AC 50/60Hz.
Wire diagram included for maintenance reference.
WARNING: Fixture must be grounded as required per paragraph 410-21 and article 250 of the National Electric Code
and/or rule 30-500. Failure to properly ground this fixture will create an electrical shock, which can cause serious injury
or death.
PENDANT (-PND)
SURFACE (-SFC)
WARNING
4To avoid risk of fire, explosion or electric shock, this product should be maintained by a qualified electrician only, in
accordance with all applicable codes and regulations.
4To avoid electric shock: Be certain electrical power is OFF before and during maintenance.
INSTRUCTIONS FOR RELAMP

EPL-48-2L
Larson Electronics, LLC Phone: (800) 369-6671 Fax: (903) 498-3364 www.larsonelectronics.com
4of 5
Caution: Only use lamp size, type and/or wattage as shown on fixture nameplate.
1. Disconnect power to the fixture prior to servicing. FIGURE 1
2. With a wrench, remove end-cap (lamp access cover) for the lamp you wish to replace.
Rotate counter-clockwise. FIGURE 2
3. Loosen the two lamp holder bracket screws holding the old lamp. FIGURE 3 Twist and
remove the lamp holder bracket. FIGURE 4
4. Remove the old lamp and install the new lamp, seating lamp in opposite lamp holder.
FIGURE 5
5. Replace lamp holder into position on the lamp. Twist slightly to place the lamp holder
bracket under screw heads and tighten the screws. FIGURE 3
6. Reattach end-cap. Rotate clockwise. FIGURE 6
FIGURE 1
FIGURE 2
FIGURE 3 FIGURE 4
FIGURE 5
FIGURE 6

EPL-48-2L
Larson Electronics, LLC Phone: (800) 369-6671 Fax: (903) 498-3364 www.larsonelectronics.com
5of 5
MAINTENANCE
Caution: To avoid personal injury, disconnect power to the light and allow the unit to cool down before
performing maintenance.
Warning: No user serviceable parts inside of fixture. Risk of electric shock. Removal of the lens will void
the warranty.
1. Perform visual, mechanical and electrical inspections on a regular basis. We recommend routine
checks to be made on a yearly basis. Frequency of use and environment should determine this. It is
recommended to follow an Electrical Preventive Maintenance Program as described in NFPA 70B:
Recommended practice for Electrical Equipment.
2. The lens should be cleaned periodically as needed to ensure continued photometric performance.
Clean the lens with a damp, non-abrasive, lint-free cloth. If not sufficient, use mild soap or a liquid
cleaner.
3. Inspect the cooling fins on the luminaire to ensure that they are free of any obstructions or
contamination (i.e. excessive dust build-up). Clean with a non-abrasive cloth if needed.
4. Do not operate if the lens is cracked or damaged. All fasteners should be properly seated.
USE AND CARE
Unauthorized modification may impair the function and/or safety of this device and could affect the life of the equipment.
Always check for damaged or worn out parts before using the device. Store it in a secure place out of the reach of
children when not in use.Inspect for good working condition prior to storage and before re-use.
REPLACEMENT PARTS
The EPL-48-2L is designed to provide years of reliable performance. Should the need for replacement parts arise, please
contact Larson Electronics.
THESE INSTRUCTIONS MAY NOT COVER ALL DETAILS OR VARIATIONS OF THIS PRODUCT FOR YOUR EQUIPMENT OR INSTALLATION REQUIREMENTS.
SHOULD FURTHER INFORMATION NOT COVERED BY THESE INSTRUCTIONS BE REQUIRED, PLEASE CONTACT LARSON ELECTRONICS BY EMAIL AT
SALES@LARSONELECTRONICS.COM OR BY PHONE AT 1-800-369-6671 FOR FURTHER ASSISTANCE.
PLEASE VISIT LARSONELECTRONICS.COM FOR WARRANTY AND RETURN INFORMATION.
Table of contents
Other Larson Electronics Safety Equipment manuals
Popular Safety Equipment manuals by other brands

Hilmerson Safety
Hilmerson Safety Safety Rail System installation instructions

Guardian Fall Protection
Guardian Fall Protection Diablo 2.0 Tie-Back SRL instruction manual

Bornack
Bornack ONE ROPE user manual

KStrong
KStrong AFA930101 User instruction manual

Guardian Fall Protection
Guardian Fall Protection Rapid Deployment Rescue Ladder instruction manual

BGS technic
BGS technic 3620 instruction manual