LaunchPad Pivot User manual

SLOVENČINA
1
NÁVOD NA POUŽITIE
Kĺby Pivot umožňujú voľný pohyb v kĺbe členkových ortéz.
Pivot joints are intended to provide free motion articulation for Ankle Foot Orthosis.
1) Začnite prípravou vášho modelu členkovej ortézy na podtlakové tvarovanie .
Begin by preparing your AFO model for vacuum forming.
2) Označte os členkového kĺbu. Dávajte pozor, aby bola paralelná s osou rotácie nohy.
Mark the ankle joint axis, taking care to keep it parallel to the axis of rotation of the foot.
3) Označte polohu mediálneho a laterálneho kĺbu.
Mark the medial and lateral joint locations.
4) Označte dlahy s pántom pomocou permanentnej fixky, aby boli jasne
identifikované mediálne a laterálne členkové kĺby a orientácia. Je to dôležité,
keďže bude každý členkový kĺby formovaný podľa modelu.
Mark Hinge Plates with a permanent marker to identifythe medial and lateral ankle joints
and to indicate orientation. This is important, as you will be forming each ankle joint to the
model.
5) Sledovaním obrysu členkového kĺbu na pozitívnom modeli na stanovenej osi členkového kĺbu
umožníte pri tvorbe dláh s kĺbom podľa modelu presné umiestnenie.
Trace an outline of the ankle joint on the positive model at the established ankle joint axis to allow accurate
placement when forming the Hinge Plates to the model.
6) Pomocou prstov (alebo nástroja) vytvarujte dlahy s kĺbom podľa pozitívneho
modelu .
Use your fingers (or a tool) to form the Hinge Plates to the positive model.
Dlahy s pántom Hinge Plate
Indexovaný otvor Indexed hole
Indexovaná matica Indexed nut
Kĺbový nit Articulating rivet
Výrobná podložka Fabrication pad
Dokončovacia podložka Finishing pad
Skrutka s ultranízkou hlavičkou Torx 15 Ultra-low head torx 15 screw

SLOVENČINA
2
7) Zakryte plastový model nylonovým návlekom. Ak používate vložku pre vnútornú topánku, tento
krok preskočte.
Cover the plaster model with a nylon hose. Skip this step if using a spacer for an inner boot.
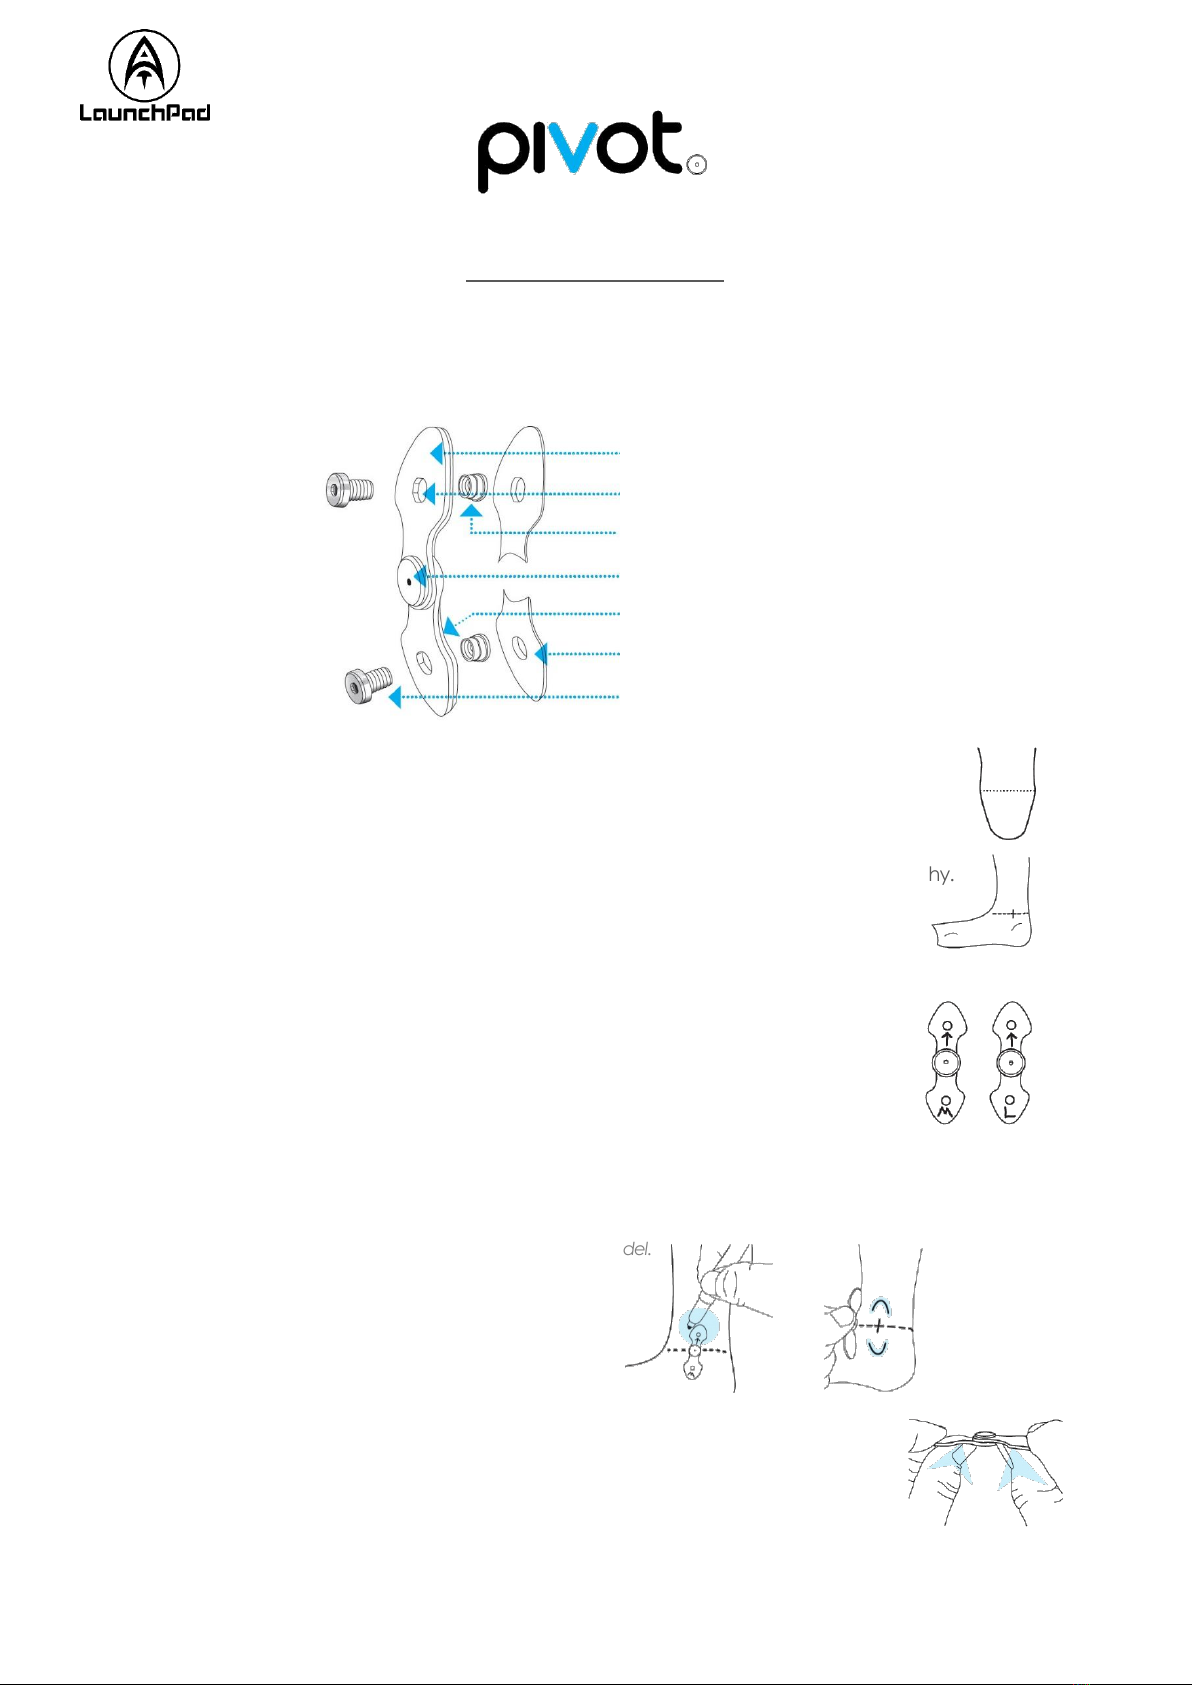
8) Odlepte zadnú stranu z lepiacej časti na bielych výrobných podložkách pripojených k dlahám
s pántom a prilepte k modelu členkové kĺby. Dávajte pozor na správne zarovnanie.
Peel the backing from the adhesive on the white Fabrication Pads attached to the Hinge Plates and stick
the ankle joints to the model, paying careful attention to their alignment.
Lepidlo sa odhalí
adhesive revealed
9) Zaveďte klinec bez hlavičky (pribalený) do stredového otvoru kĺbového nitu do
hĺbky tak, aby bol zarovno s povrchom a aby sa členkový kĺb nehýbal. Poznámka:
použitie klinca takisto napomôže pri vyťahovaní kĺbu z dutiny po vytvarovaní.
Insert a brad nail (included) into the center hole of the Articulating Rivet and drive it flush to
ensure the ankle joint does not move. Note: use of the nail will also help with removing the
joint from the cavity after forming.
10) Zakryte kĺb a model veľmi tenkým nylonovým návlekom (napr. Feather Stretch). Dávajte pozor,
aby bola zaistená správna poloha kĺbov.
Cover the joint and the model with a very thin nylon hose (e.g., Feather Stretch), taking care to ensure the
proper positioning of the joints.
11) Vytvarujte podtlakom obvyklým spôsobom, zaistite dobré utesnenie a dostatočný podtlak.
Veľmi tesný kontakt medzi kĺbom a dutinou je zásadný pre funkčnosť kĺbu.
Vacuum form as usual, ensuring a good seal and tight vacuum. A very close fit between the joint and the
cavity is critical to the performance of the joint.
12) Keď plast vychladne, vytiahnite členkovú ortézu z pozitívneho modelu. Klinec bez hlavičky by sa
mal dať z modelu jednoducho vytiahnuť.
Once the plastic has cooled, remove the AFO from the positive model. The brad nail should pull easily out of
the model.
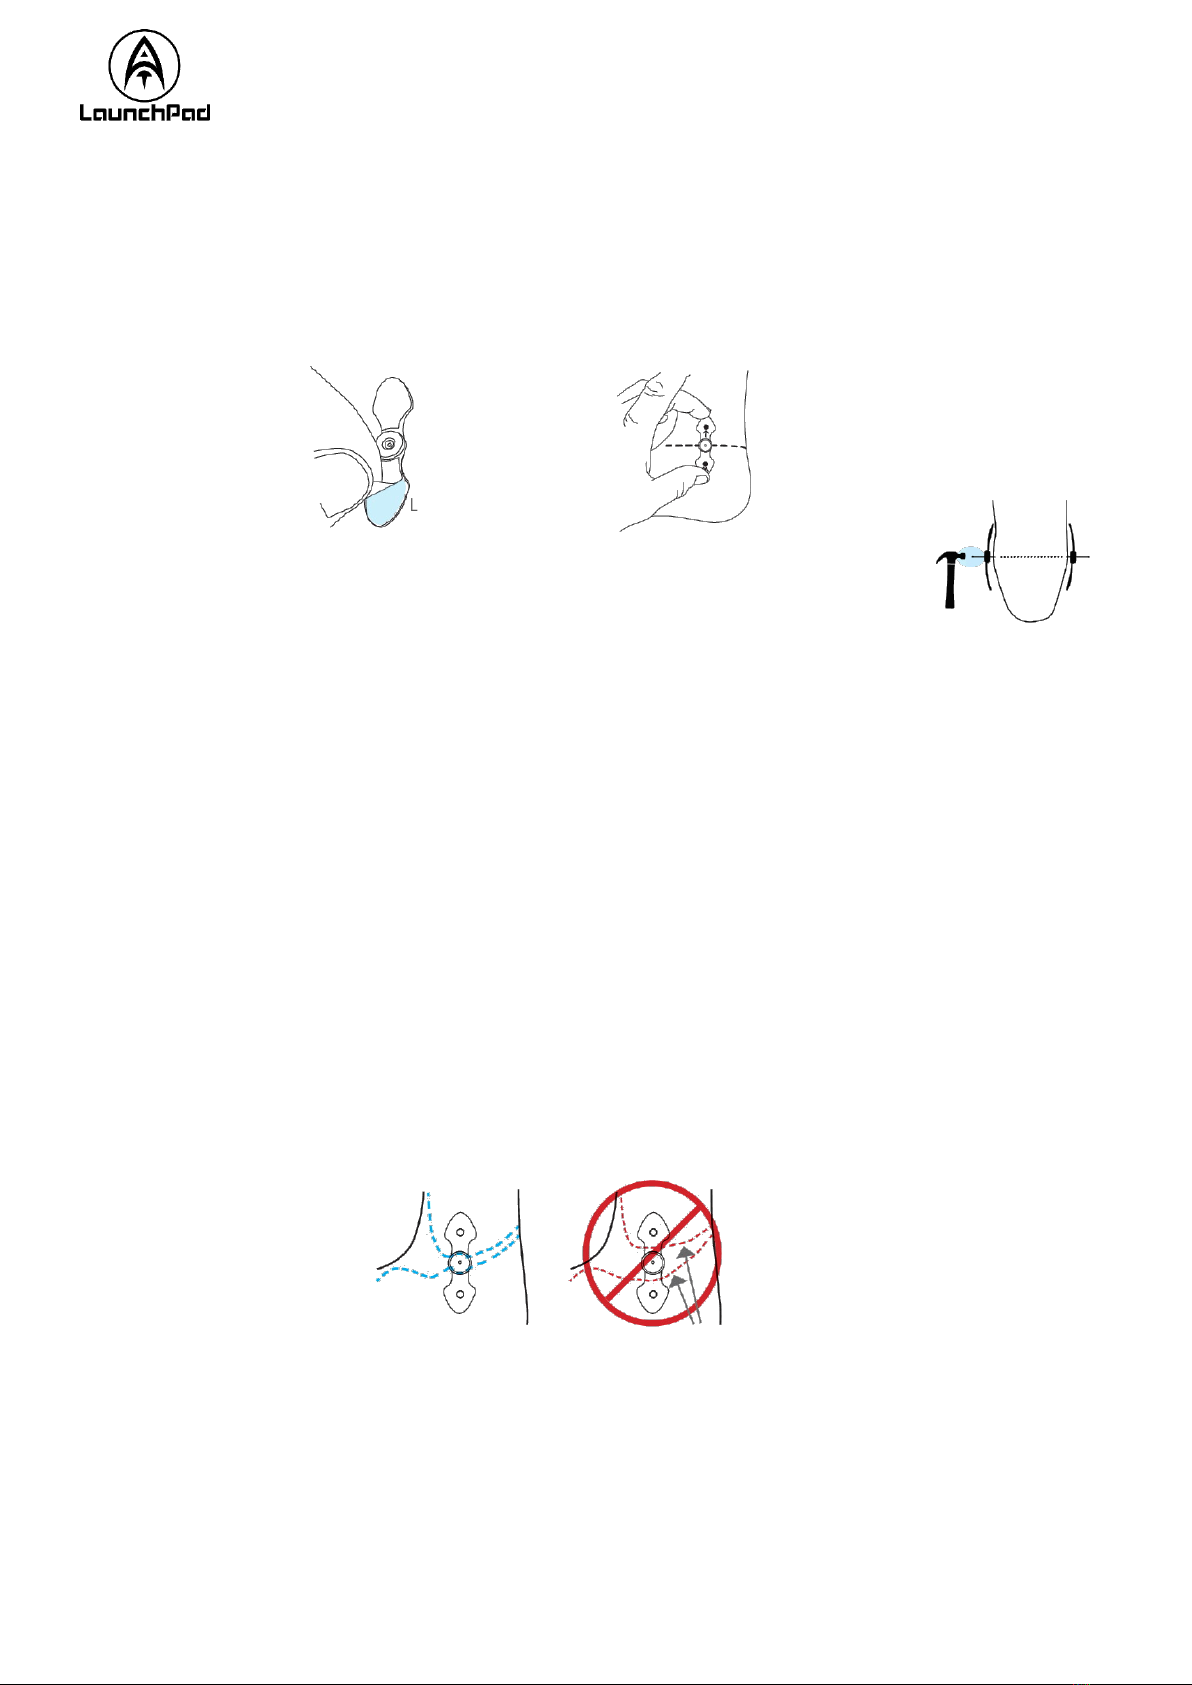
13) Pomocou značkovacej ceruzky určite línie rezu okolo členkových kĺbov. Je dôležité, aby línie
opracovania presahovali až ku kĺbovému nitu. Bude tak zaistená správna podpora pre kĺb.
With a marking pencil, establish your trim lines around the ankle joints. It’s important that the trim lines extend
all the way to the Articulating Rivet to ensure proper support for the joint!
Správne Línie opracovania príliš vysoké
correct trim lines too high
14) Vytiahnite kĺby z dutín členkovej ortézy ťahom za exponovaný koniec klinca bez hlavičky
pomocou klieští. (Prístup ku kĺbom si môžete uľahčiť rezom okolo predných línií opracovania.)
Remove the Pivot joints from the AFO cavities by pulling on the exposed end of the brad nail with a pliers.
(You may want to cut along the front trim lines to improve access to the joints.)

SLOVENČINA
3
15) Dokončite opracovanie členkovej ortézy a uistite sa, že plast siaha až ku kĺbovému nitu a je
teda zaistená správna podpora pre kĺb.
Finish trimming out the AFO ensuring that the plastic extends all the way to the
Articulating Rivet to ensure proper support for the joint.
16) Pomocou vrtáka s priemerom 13/64“ alebo 5 mm vytvorte pilotný otvor v
členkovej ortéze uprostred dutiny kĺbového nitu. Pomocou vrtáka s
priemerom 7/16” alebo 11 mm vyvŕtajte v dutine väčší otvor. Týmto
vytvoríte líniu opracovania okolo kĺbového nitu.
Using a 13/64” or a 5mm bit, create a pilot hole in the AFO at the center of the
Articulating Rivet cavity. Using a 7/16” or 11mm bit, drill a larger hole in the cavity.
This will establish the trim line around the Articulating Rivet.
17) Pomocou nástroja Pivot-Punch (k dispozícii na zakúpenie) rýchlo a presne
vytvorte fixačné otvory v členkovej ortéze. Ak nemáte nástroj Pivot-Punch,
pomocou vrtáka s priemerom 13/64“ alebo 5 mm vyvŕtajte fixačný otvor do
priehlbín vytvorených indexovaným otvorom v hornej a spodnej časti dutín
dlahy s pántom.
Use the Pivot Punch tool (available for purchase) to quickly and accurately create
your mounting holes in the AFO. If you don’t have a Pivot Punch tool, use a 13/64” or
a 5mm bit to drill mounting holes into the dimples, created by the Indexed Hole, at the
top and bottom of the hinge plate cavities
18) Zlúpnite z kĺbu biele výrobné podložky. Nie je potrebné vyčistiť zvyšné lepidlo, keďže oblasti
zakryjú dokončovacie podložky.
Peel off the white Fabrication Pads from the joint. There
is no need to clean off the residual adhesive as the
Finishing Pads will cover this.
19) Nainštalujte členkové kĺby Pivot do príslušných dutín a zaistite ich indexovanou
maticou a skrutkami s ultranízkou hlavičkou Torx 15. POZNÁMKA: POTREBNÉ
PRIDAŤ lepidlo LOCTITE 263 (tvrdnutie 24-hodín)
Install Pivot ankle joints in their respective cavities and secure with Indexed Nut and Ultra-
Low Head Torx 15 Screws. NOTE: MUST ADD LOCTITE 263 (24 hour cure)
20) Odlepte zadnú stranu z dokončovacích podložiek a prilepte ich k vnútornej strane
dlahy s pántom.
Peel the backing off the Finishing Pads and adhere the pads to the inside of the Hinge Plate.
Tento produkt je potrebné používať výhradne na určený účel. Výroba musí
prebiehať pod dohľadom certifikovaného protetika podľa uvádzaných pokynov.
This product should only be used for its intended purpose and should be fabricated under the guidance of a certified
Orthotist per the provided instructions

SLOVENČINA
4
Manufactured by LaunchPad O&P
2545 Chicago Ave, Suite 507, Minneapolis, MN 55404 USA
Authorized Representative EU:
Dirame Ortho, ASSESTEENWEG 27-29, B-1740 TERNAT, Belgium
T: +32 (0)2 582 82 50 / F: +32 (0)2 582 61 12
Table of contents
Other LaunchPad Medical Equipment manuals
Popular Medical Equipment manuals by other brands

Spencer
Spencer DAVIS SR01010A user manual

Braun
Braun Aesculap Reusable trocar system 5 mm Instructions for use/Technical description

Suros
Suros ATEC Easy guide

Etac
Etac Molift Operator's manual

Revitive
Revitive ProHealth user manual

Basic American
Basic American Zenith 7000 Instructions for use and service manual