LEHMANN QLEEN Q Station Operation manual

User information
Q-Station
72669
Version 02/2023

2 |
Introduction to the user information QLEEN Q-Station
Thank you for choosing a QLEEN Q-Station cleaning system from Lehmann.
Before you start with the cleaning work, here is some important user information.
Please read these carefully and be sure to observe them.
As the owner of a QLEEN Q-Station cleaning system, please also make absolutely sure that your employees have
also read the „Q-Station User Information“and follow the safety and warning instructions.
Please also observe and comply with the „General User and Safety Instructions“(separate publication of
Lehmann KG).
This document is the original user information. It is written in German. Copies in other languages are translations
of this original user information.
Manufacturer / Publisher
Address Karlhans Lehmann KG
Kranichstrasse 2a
D-17235 Neustrelitz
Phone (+49) 3981 48 850
Fax (+49) 3981 44 06 20
E-Mail info@qleen.de
Internet www.qleen.de
Youtube www.youtube.com/@qleen
Facebook www.facebook.com/lehmannkg/
Copyright
This document is protected by copyright.
Copying, reproduction, translation or conversion into an electronic medium or into a machine-readable form, as
a whole document or in parts, is not permitted without the permission of Lehmann KG. Subject to change without
notice.
© Lehmann KG, Neustrelitz, 2023
Trademark
The names QLEEN, PURAQLEEN, ROTAQLEEN, CARBONPOLE, TITANPOLE are registered trademarks of Lehmann
KG, Neustrelitz.
Country of origin
Federal Republic of Germany
Introduction

| 3
We are pleased that you have chosen our QLEEN Q-Station product.
Item number 72669
Type designation QLEEN Q-Station
Serial number _________________
Year of manufacture _________________
Introduction

4 | Table of contents
1 Table of contents
Topics Page
2. General notes and safety instructions 2.1 Instruction structure 5
2.2 Safety instructions 6
3. Description of the QLEEN Q-Station
3.1 The PUREWATER principle - cleaning with pure water
7
3.2 Sustainability 7
3.3 Water hardness and productivity of the mixed bed resin
7
3.4 Functionality of the QLEEN Q-Station 8
3.5 Areas of application 8
3.6 Scope of delivery 8
3.7 Connectors and controls 9
3.8 Remote control 10
3.9 Hose reel 10
4. Starting up
4.1 Installation 11
4.2
Unroll the hose
11
4.3 Connection of the water supply 11
4.4 Water supply through the house water connection 12
4.5 Water supply through a water tank 12
4.6 Switching on the machine and remote control 13
4.7 Bleeding 14
4.8 Bleeding the pump 14
4.9 Bleeding the dosing pump 15
4.10 Mounting the poles and brush 16
4.11 Connecting a ROTAQLEEN 18
5. Cleaning
5 Cleaning 19
5.1 Cleaning with PUREWATER or tap water 20
5.2
Cleaning with tap water and cleaning solution
20
5.3 Cleaning with ROTAQLEEN 24
6. Water quality meter 6 Water quality meter 25
6.1 Operation 25
7. Alarms 7.1 Alarm at saturation of the mixed bed resin 25
7.2 Discharged battery alarm 26

| 5
Topics Page
8. Aer cleaning 8.1 Dismantling 26
9. Additional information
9.1 Maintaining and cleaning the device and accessories
29
9.2 Charging the batteries 29
9.3 Replacing the mixed bed resin 30
9.4 Cleaning/replacing the strainer at the water inlet 31
9.5 Battery change remote control 31
9.6 Troubleshooting 32
9.7 Storage 33
9.8 Repair and maintenance 33
9.9 Recycling and disposal 33
9.10 Warranty and guarantee 33
9.11 Manufacturer information 33
10. Technical information
10.1 Supply connections 34
10.2 Climatic operating conditions 34
10.3 Technical data 34
10.4 CE Declaration of Conformity 34
Table of contents
2 General notes and safety instructions
This manual will give you an overview of the functions, operation and proper use of our QLEEN Q-Station
machine.
Certain symbols in these instructions indicate various information:
The information sign indicates useful tips and information.
The exclamation mark warns of potential dangers and risks
2.1 Instruction structure

6 | General notes and safety instructions
2.2 Safety instructions
Warning: Fire and explosion hazard:
• Never use flammable liquids or operate the machine near flammable liquids/vapors or
combustible dust.
This machine is not equipped with an explosion-proof motor. The electric motor emits sparks
during startup and operation that can cause ignition of flammable materials.
• Do not aspirate flammable materials with the machine.
Warning: Risk of electric shock:
• Before each start-up, check the power cable and the power plug for damage.
If any damage is detected, the machine must be shut down immediately and repaired by a
specialist!
• When plugging in the machine, make sure that the power plug and your hands are not wet!
Caution: Danger of accident:
• The operating personnel must be adequately trained in the use of the machine.
• The machine must be in perfect condition.
• Only set up the machine on solid, even surfaces.
• Wear sturdy, non-slip footwear with protective caps to protect yourself from being crushed by
the machine.
• Work on roofs only with appropriate safety equipment.
• Take care not to get mixed bed resin in your eyes. For further safety instructions and handling
of the mixed bed resin, read the "Mixed bed resin systems user information".
• When using cleaning solution, observe the respective manufacturer's specifications.
Warning: Risk of accidents and damage to the machine and equipment
• Use the machine only from +5 °C and higher, frost damage to the machine and equipment may
occur.
• Do not work with the pole system in wind forces above 2 (>3.3 m/s), the rod system may
buckle and fall o

| 7
Description of the QLEEN Q-Station
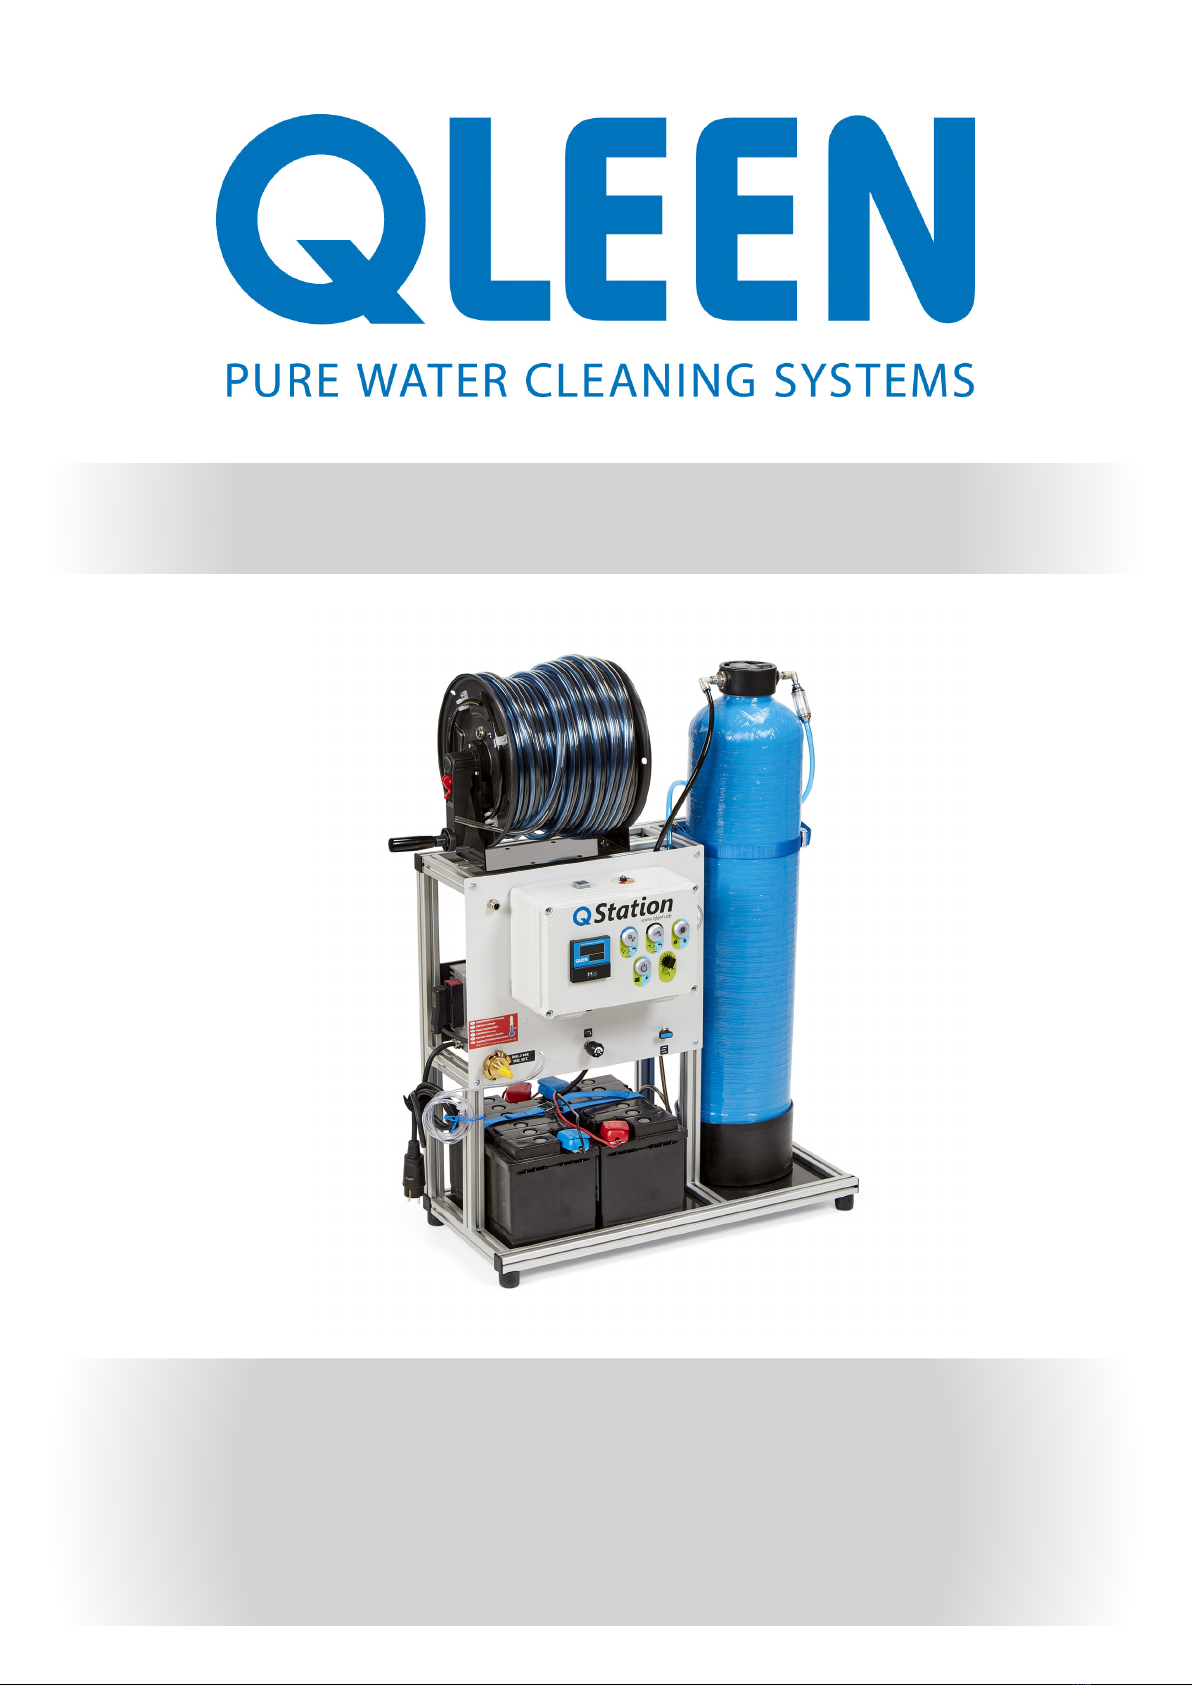
3 Description of the QLEEN Q-Station
3.1 The PUREWATER principle - cleaning with pure water
The high chemical-free cleaning power of PUREWATER is the basis on which the
PURAQLEEN principle for cleaning glass, solar and facade surfaces.
In this process, tap water is passed through a granulate bottle. The minerals contained in the tap water
accumulate in the mixed bed resin and all salts are removed from the water.
The tap water is demineralized by pre-pressurization in the granulate bottle and reaches the cleaning head as
PUREWATER.
PUREWATER not only has a very good wetting capacity, but also dries without stains or streaks, even in strong
sunlight.
This means that in many cases the use of cleaning solutions can be dispensed with.
(exception: greasy, oily or very heavy soiling).
3.2 Sustainability
Our system contributes to the careful and sustainable use of resources for cleaning in times of dwindling resources.
In contrast to the reverse osmosis process, our devices operate in the energy-saving low-pressure range; the
pressure of the domestic water supply is suicient to operate our devices.
In addition, our systems convert 100% of the supplied water into PUREWATER, which can be used for cleaning.
3.3 Water hardness and productivity of the mixed bed resin
The water hardness at the place of use can be obtained from the local water supplier.
This allows you to estimate the yield of the granulate bottle.
Depending on the measured value, the following values result for the maximum PUREWATER quantity and
cleaning time with a granulate bottle (at a maximum initial value of 50 µS, approximate data):
* Based on a flow rate of 200 l/h with the brush bow Vario
German hardness level Corresponds
approximately to
conductance Estimated total quantity Estimated total cleaning
time*
2,8 °dH 100 µS 10200 l 51,0 h
5,6 °dH 200 µS 5100 l 25,5 h
8,4 °dH 300 µS 3400 l 17,0 h
11,2 °dH 400 µS 2500 l 12,5 h
14,0 °dH 500 µS 2000 l 10,0 h
16,8 °dH 600 µS 1700 l 8,5 h
19,7 °dH 700 µS 1650 l 8,25 h
22,5 °dH 800 µS 1200 l 6,0 h
25,3 °dH 900 µS 1100 l 5,5 h
28,0 °dH 1000 µS 1000 l 5,0 h

8 |
3.4 Functionality of the QLEEN Q-Station
Aer switching on, the power button lights up green and the system is ready for operation.
The operating modes are selected via the control buttons or the remote control.
PUREWATER/tap water blue hose, cleaning solution/tap water black hose, change of direction ROTAQLEEN
Tap water is required for cleaning with PUREWATER.
For this purpose, tap water is passed through the mixed bed resin system in the granulate bottle and
demineralized in the process.
See also "Mixed bed resin system user information" (Lehmann KG publication).
Tap water is required for cleaning with cleaning solution (for particularly heavy soiling). The cleaning solution
is sucked out of a cleaning solution container by the dosing pump and added to the tap water in the dosage to
be set.
Aer working with cleaning solutions, the system should always be rinsed with tap water.
A pump conveys the clean water/cleaning solution/tap water via a DUO hose attached to the pole set* to the
cleaning head* at the top end of the pole set*.
There it is distributed evenly and sparingly over the surfaces to be cleaned via fine nozzles*.
The pole set* consists of individual, mountable poles.
This results in variable working lengths between approx. 2 m (min.) and up to 21 m (max.).
With the DUO hose, the blue hose conveys the PUREWATER or tap water, and the black hose conveys the tap
water or cleaning solution.
The integrated water quality measuring device provides information on the quality of the outgoing PUREWATER.
3.5 Areas of application
Typical applications for the QLEEN Q-Station are:
• To restore and increase the energy yield of solar and photovoltaic systems.
• Glass-clear and streak-free view for windows, window frames, conservatories, glass and greenhouses
• Oen diicult to access outdoor advertising spaces and lighting boxes
• Against the intensive pollution by insects on vehicles (train, ship, plane, truck, car).
* Accessories not included
3.6 Scope of delivery
QLEEN Q-Station (72669)
• QLEEN Q-Station base station with 25 l granulate bottle filled with mixed bed resin, pump, dosing pump
and integrated measuring device for water quality
• 50 m DUO hose on hose reel
• Remote control
• Suction hose
• Fastening lugs
• Gardena to quick coupling adapter
• Quick Start Guide, Instruction
Description of the QLEEN Q-Station

| 9
3.7 Connections and controls
Description of the QLEEN Q-Station
Control valve for the
black hose
Connection for a power
supply for permanent
operation on the mains
supply
Water inlet via claw
coupling or Gardena
2 lead gel
batteries
Charger for the batteries
Hose reel with 50 m DUO
hose
Suction hose for
cleaning solution
Bleeding tap
25 l mixed bed resin
bottle with fine filter
Control panel with integrated
water quality meter
Connection for the black
hose
Pushbutton for the blue hose
(PUREWATER/tap water)
Button for changing
the direction of the
ROTAQLEEN
Measuring device for
the PUREWATER quality
Button for the black hose (cleaning
solution/tap water)
Controller for dosing
pump quantity
Battery indicator
Water meter
Power buttonROTAQLEEN socket
Charge indicator

10 |
3.8 Remote control
3.9 Hose reel
Description of the QLEEN Q-Station
Button for changing
the direction of the
ROTAQLEEN
Button for the black hose
(cleaning solution/tap water)
Button for the blue hose
(PUREWATER/tap water)
Status LED
Button for switching the
alarm on/o
Belt clip
Power switch
Connection hose for
the black hose (cleaning
solution/tap water)
Connection for the black
hose (cleaning solution/
tap water)
Locking lever for the
drum
Crank handle with
folding function

| 11
4 Starting up
4.1 Installation
Caution Risk of injury and accident
• The installation of the Q station should only be carried out by qualified personnel
• Do not place on inclined, sloping and uneven surfaces, the QLEEN Q station may fall over
• If there are obvious defects on the QLEEN Q station or the pole system, do not put them into
operation!
Starting up
4.2 Unroll the hose
The QLEEN Q-Station is designed for installation in a car or trailer.
Eyelets are supplied for mounting.
4.3 Connection of the water supply
Water can be supplied directly to the house water connection via a Gardena hose or from a tank using the
suction hose.
Caution the device may be damaged:
Only use clean tap water with a maximum inlet pressure of 5 bar for the water supply!
Otherwise, the unit or the mixed bed resin may be damaged.
Before assembly, check the strainer and the seals in the quick coupling for contamination.
These can reduce the flow rate and lead to a pressure drop at the nozzles.
1. Unfold the hand crank
2. Fold the red safety lever upwards
3. Extend the DUO hose to the required length
4. Disconnect the black connection hose from the drum
5. Connect the connection hose to the drum inlet and the water
outlet on the machine
⇒The DUO hose is ready for use

12 |
4.4 Water supply through the house water connection
2. Connect the house water connection by means of Gardena
hose to the inlet of the QLEEN Q-Station
3. Open the tap of the house water connection
⇒The water supply via the house water connection is
established
Starting up
4.5 Water supply through a water tank
2. Attach the suction hose to the machine with the quick
coupling and screw it tight
1. Attach the Gardena adapter to the water inlet and lock it in
place by turning it clockwise.
1. Remove the Gardena adapter from the water inlet by turning
it counterclockwise.

| 13
3. Sink the side with the filter in the tank to the bottom
⇒The water supply via the water tank is established
Starting up
Warning: Risk of electric shock:
• Check the power cable and the power plug for damage before each starting up.
If any damage is found, the machine must be shut down immediately and repaired by a
specialist!
• When plugging in the machine, make sure that the power plug and your hands are not wet!
1. Insert the mains plug of the power supply* into the socket.
4.6 Switching on the machine and the remote control
The control keys on the machine are mirrored on the remote control. It can be switched on with the control
keys and switched o again with the remote control and vice versa.
7. To turn on the remote control, set the Power switch to »I«
Normal operation runs on the integrated rechargeable batteries.
The QLEEN Q-Station detects whether an optional power supply* is connected and plugged in and
automatically switches to mains operation when switched on.
* Accessories are not included
2. Switch on the machine with the »Power« key,
in battery mode the key lights up greengreen,
In mains operation, the key lights up turquoiseturquoise
⇒The machine is switched on

14 | Starting up
4.7 Bleeding
In order to ensure a constant water flow and pressure, the pump must be bled before each use.
If a cleaning solution is to be used, the dosing pump must also be bled.
4.8 Bleeding the pump
5. Switch o the machine with the »PUREWATER/tap water«
key
⇒The pump is bled
2. Switch on the machine with the »PUREWATER/tap water«
key,
the key lights up greengreen
3. Run for 1 - 2 minutes until the water flows evenly from the
bleeding tap
1. Open the bleeding tap
4. Close the bleeding tap

| 15
2. Turn the dosing pump regulator to 100%
4.9 Bleeding the dosing pump
Starting up
1. Place the cleaning solution suction hose in the cleaning
solution tank and let it sink to the bottom
3. Start bleeding with the »Cleaning solution/tap water«
key, the key flashes greengreen/turquoiseturquoise for 20 seconds during
bleeding
4. When bleeding is complete, the »Cleaning solution/tap
water« key lights up greengreen continuously
5. Switch o the machine with the
»Cleaning solution/tap water«
⇒The dosing pump is bled
⌛20 Seconds

16 |
4.10 Mounting the poles and brush*
Starting up
The pole system supplied is for a height up to 15 m and can be extended to a height of 21 m.
The carbon poles should always be at the top and the titanium poles below them because of weight and
stability.
To protect against damage to edges and protrusions, the half titanium poles must always be mounted in the
uppermost position.
1. Place the brush adapter on the half titanium pole and fasten it with a clockwise rotation
2. Secure with the wing screw
Caution: Danger of falling:
• Always secure the poles and brush adapter with the wing screws
• Always use half the titanium rod as the top pole to protect the carbon poles from damage
• Do not use pole set above wind force 2 (>3.3 m/s)
3. Insert the brush bow into the brush adapter until the snap button engages
4. Loosen the knurled screw on the joint and set the desired working angle of the brush
5. To set the brush vertically, press the snap button and rotate the brush holder 90 degrees
180°
* Accessories are not included

| 17
6. Connect the blue hose with the 2 nozzles through or over the brush
7. Connect the black hose to the single chemistry nozzle or the 2 free nozzles
8. Fix the DUO hose with the Velcro tape
9. Place the brush against the wall and push it upwards
10. Click in the next bars from below and fix them with a half
clockwise rotation of the bar
11. Secure with the wing screw
12. Secure the hose to the pole with the Velcro strap
13. Add more poles up to the required height by repeating steps
9 - 12
14. At the end of the poles fasten the handle piece and secure it
with the wing screw, thus the pole system can be put down
⇒The device is now ready for operation
Starting up

18 |
4.11 Connecting a ROTAQLEEN*
The ROTAQLEEN are electric rotating brushes for use with heavy soiling and/or large areas.
The QLEEN Q-Station is equipped with a connection and control for supply and return for all current
ROTAQLEEN
For further information read the „User information ROTAQLEEN“.
Starting up
* Accessories are not included
Beware of damage to the ROTAQLEEN:
• Always connect the blue input to the ROTAQLEEN and run water through it during operation,
this serves to cool the motor
• Do not use a cleaning solution with the ROTAQLEEN
1. Assemble the pole set and brush adapter,
see Page 16 (4.11 Mounting the poles and brush)
2. Insert the ROTAQLEEN into the brush adapter until the
snap button clicks into place
3. Roll out the cable to the required length
4. Connect the socket of the cable drum with the plug of the ROTAQLEEN
5. Connect the plug of the cable drum to the ROTAQLEEN socket on the machine
6. Connect the hose to the nozzles on the ROTAQLEEN
7. Attach the hose and cable to the poles with the Velcro straps
⇒The ROTAQLEEN is ready for operation

| 19
Cleaning
5 Cleaning
For most soiling, the PUREWATER is completely suicient.
Only heavily soiled and oily or greasy surfaces must be pre-treated with a cleaning solution.
Dirt that can only be removed by intensive mechanical cleaning (e.g. glass plane) should also be pre-treated
accordingly.
The higher the level at which work is carried out, the greater the dirt load at the lower levels, because the
"foreign dirt" from the higher level is added to the "inherent dirt".
This should be taken into account when calculating the work and the order.
1. Mount the pole system to the maximum height of the cleaning area
see Page 16 (4.11 Mounting the poles and brush)
2. Place the brush in the upper area and activate the desired cleaning mode with the remote control
3. Move from one side to the other with even up and down movements over the surface to be cleaned
4. To increase the mechanical cleaning performance, press the pole system lightly against the surface to
be cleaned with the help of the guide hand
5. Proceed in the same way for the underlying surfaces until the entire surface is cleaned.
6. Adjust the pole system according to the working height to ensure fatigue-free work
Caution Risk of injury
• Tripping hazard: Pay attention to the hose when working!
• Crash hazard: Place the poles on the floor during work interruptions! Do not lean against
vertical walls, this may cause them to fall over and result in injury or damage to the
equipment!
• Crash hazard: Do not work with the pole system above wind force 2 (>3,3 m/s)
• Risk of electric shock: Do not work with the pole system under high-voltage lines!

20 |
5.1 Cleaning with PUREWATER or tap water
Cleaning with PUREWATER is the most chemical-free and sustainable way of cleaning.
Surfaces dry streak-free and without wiping due to the good salt absorption capacity of PUREWATER.
The cleaning mode tap water is the cost eective way to pre-clean heavily soiled surfaces.
The cleaning mode is changed with the control button and/or the remote control.
The PUREWATER or tap water is pumped through the blue hose.
Cleaning
Switching on the PUREWATER
• Briefly press the »PUREWATER/tap water« button on the
machine or remote control, the button lights up greengreen
⇒Aer a short time, the PUREWATER comes out of the
nozzles via the blue hose and the ROTAQLEEN starts up
Turning on the tap water
3. Press the »PUREWATER/tap water« button on the machine or
remote control for 2 seconds until it lights up turquoiseturquoise
⇒Aer a short time, the tap water comes out of the nozzles
via the blue hose and the ROTAQLEEN starts up
2 Seconds
Aer switching on the machine, it is in the standard PUREWATER mode.
Switching the cleaning mode
• If the »PUREWATER/tap water« key lights up greengreen, the
machine is in the cleaning solution mode
• Press the »PUREWATER/tap water« button on the machine or
remote control for 2 seconds, the button lights up turquoiseturquoise
• If the »PUREWATER/tap water« key is lit up in turquoiseturquoise, the
machine is in the tap water mode
• Press the »PUREWATER/tap water« button on the machine or
remote control for 2 seconds, the button lights up greengreen
•
⇒The machine switches to the respective other mode
2 Seconds
2 Seconds
This manual suits for next models
1
Table of contents
Other LEHMANN Cleaning Equipment manuals