Leica BIOSYSTEMS Aperio GT 450 User manual

MAN-0392, Revision A | 22 May 2019
Aperio GT 450
Quick Reference Guide
For research use only. Not for use in diagnostic procedures.

Aperio GT 450 Quick Reference Guide
Copyright Notice
ÌÌCopyright © 2019 Leica Biosystems Imaging, Inc. All Rights Reserved. LEICA and the Leica logo are registered trademarks of Leica Microsystems IR GmbH.
Aperio is a trademark of the Leica Biosystems group of companies in the USA and optionally in other countries. Other logos, product and/or company names
might be trademarks of their respective owners.
Contact Information – Leica Biosystems Imaging, Inc.
Headquarters Customer Support General Information
Leica Biosystems Imaging, Inc.
1360 Park Center Drive
Vista, CA 92081
USA
Tel: +1 (866) 478-4111 (toll free)
Direct International Tel: +1 (760) 539-1100
US/Canada Tel: +1 (844) 534-2262 (toll free)
Direct International Tel: +1 (760) 539-1150
US/Canada/Worldwide Email:
US/Canada Tel: +1 (866) 478-4111 (toll free)
Direct International Tel: +1 (760) 539-1100
Email: [email protected]

Aperio GT 450 Quick Reference Guide, Revision A
Contents | 3
1. INTRODUCTION ................................................ 5
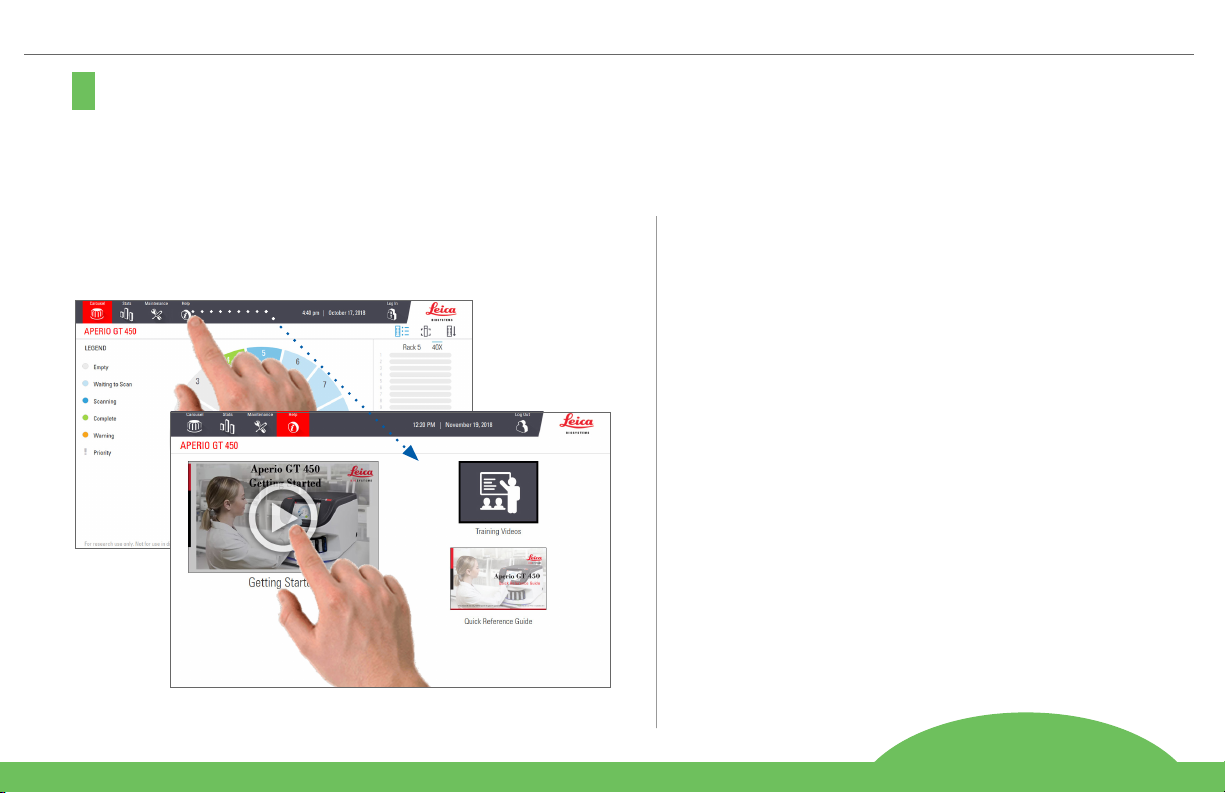
Help Videos.......................................................... 5
User Guides.......................................................... 5
Scanner Overview................................................ 6
Touchscreen Interface Overview ......................... 7
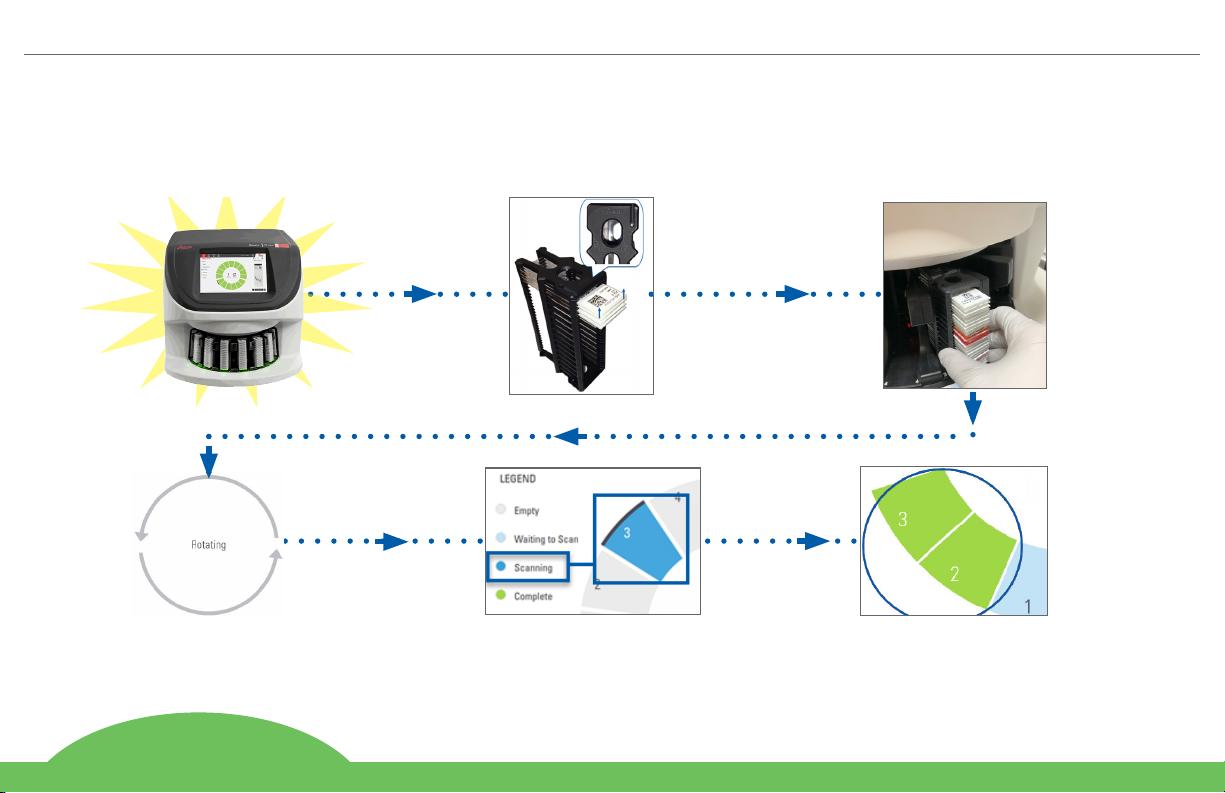
Scanning Workflow.............................................. 8
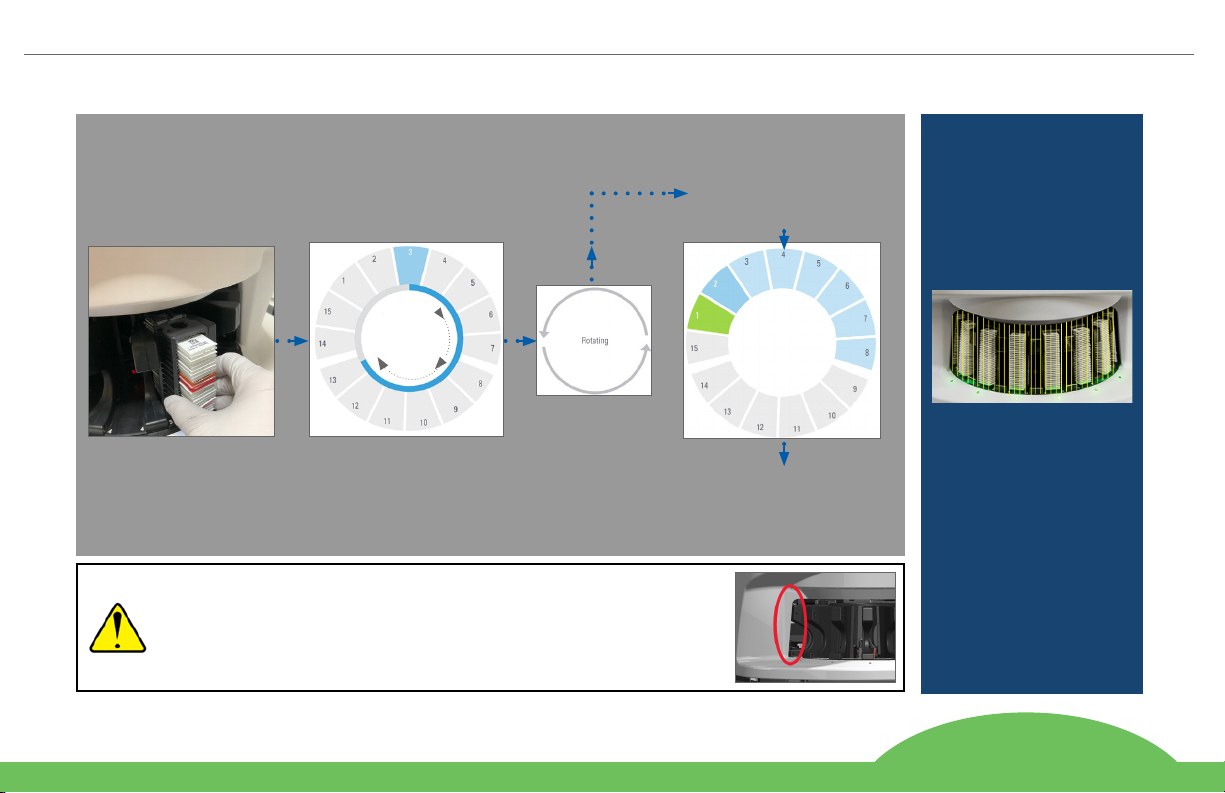
Carousel Rotation ................................................ 9
Key Concepts ..................................................... 10
Icon Glossary...................................................... 11
2. SLIDE PREPARATION CHECKLISTS ............. 12
Slides ................................................................. 12
Coverslips........................................................... 12
Slide Labels........................................................ 12
Barcodes ............................................................ 12
3. SCAN SLIDES .................................................. 13
Load Slides in the Rack...................................... 13
Load Racks in the Carousel................................ 14
Unload Racks from the Carousel .............................15
Priority Scanning................................................ 16
Scan Status........................................................ 17
Scan Statistics................................................... 18
Rack View .......................................................... 19
Slide View.......................................................... 20
Rack Order.......................................................... 20
Rack Warnings................................................... 21
4. MAINTENANCE............................................... 22
Maintenance Checklists .................................... 22
Daily (recommended)......................................... 22
Six Month........................................................... 22
Yearly ................................................................. 22
Restart the Scanner........................................... 23
Shut Down the Scanner..................................... 23
Contents

Aperio GT 450 Quick Reference Guide, Revision A
4 | Contents
5. TROUBLESHOOTING...................................... 24
Additional Resources......................................... 24
Serial Number and Firmware Version ............... 24
Open and Close the Scanner Cover................... 25
Return Pusher to Safe Position.......................... 26
Safe Restart After an Error................................ 27
Errors and Solutions........................................... 28
Broken Slides Inside the Scanner...................... 41
6. INDEX................................................................ 42

Aperio GT 450 Quick Reference Guide, Revision A
Introduction | 5
Introduction
This guide provides basic steps for using the Aperio GT 450 digital slide scanner. See below for additional resources.
Please watch the videos (accessible from the touchscreen interface) before working with the scanner.
Help Videos
Access training videos and this guide from the touchscreen:
User Guides
In addition to this guide, the following guides are available:
Ì`Aperio GT 450 User’s Guide
Ì`Aperio GT 450 IT Manager and Lab Administrator
Guide
Ì`Aperio GT 450 Specifications

Aperio GT 450 Quick Reference Guide, Revision A
6 | Introduction
Scanner Overview
Rack loading area (front 6)
Status lights (6)
Touchscreen
interface
Fan filter
Power / network connections
Carousel
Aperio GT 450 Front Aperio GT 450 Back
On/off switch

Aperio GT 450 Quick Reference Guide, Revision A
Introduction | 7
Touchscreen Interface Overview
The example below shows the Home screen.
Home screen
(carousel view)
Scanner statistics
Help videos and guides
Rack status legend
Carousel and rack status
Rack view
Rack order
Slide view
Rack actions
Slide view, rack order,
rack view appear here
Home screen (carousel view), scanner statistics, help videos and guides appear here
Log in to the scanner
Maintenance area
Selected rack

Aperio GT 450 Quick Reference Guide, Revision A
8 | Introduction
Scanning Workflow
This workflow shows the scanning process for one rack of slides. For step-by-step instructions, go to “Scan Slides” on page 13.
Rack rotated
automatically
Scanning starts Scan and Image QC complete
Scanner on Slides loaded Rack loaded

Aperio GT 450 Quick Reference Guide, Revision A
Introduction | 9
Carousel Rotation
10-second timer before
carousel rotates:
1. Racks rotated to scan
area in order loaded
2. Maximum empty rack slots
rotated to front
WARNING: Keep hands away from the carousel and pinch point areas when
the carousel is rotating.
AVERTISSEMENT: Garder les mains éloignées du carrousel et des zones de
points de prise quand le carrousel est en rotation.
If an object breaks the
light curtain:
the carousel does not
rotate
the 10-second timer
starts again
An infrared safety light
curtain detects objects in
the loading area:
Racks loaded
The carousel automatically rotates after you load racks: Safety light curtain

Aperio GT 450 Quick Reference Guide, Revision A
10 | Introduction
Key Concepts
Scanner settings Your lab administrator defines the scan settings and sets the PIN codes.
Scan
magnification
The Aperio GT 450 always scans at 40x.
Rack scanning All actions, such as setting priority, are applied to an entire slide rack (not individual slides).
Image quality The Auto-Image QC feature automatically checks image quality as each slide is scanned. If the rack status is
green, the scan and Image QC were successful for all slides in the rack.
Slide calibration Each slide is calibrated when it’s scanned.
Continuous
loading
The Aperio GT 450 is a continuous loading scanner. You can continue to load new racks and unload
completed racks without interruption.
Automatic
carousel rotation
The carousel rotates the racks automatically. For details, see “Carousel Rotation” on page 9.
Visual status
indicators
The carousel view on the touchscreen and the status lights in front of the rack slots provide real-time status.
PIN code /
scanner login
If the scanner asks for a PIN code, enter the 5-digit code provided by your Lab Administrator.

Aperio GT 450 Quick Reference Guide, Revision A
Introduction | 11
Icon Glossary
The following icons appear on the touchscreen interface.
Carousel – Carousel view (Home screen).
Stats – Scanner statistics. (See page 18.)
Help – Instructional videos and user guides.
Login – Scanner login, where you enter your 5-digit
PIN code.
Logout – Lock the touchscreen interface.
Slide View – Macro image for the scanned slide.
(See page 20.)
Rack Order – Scan order for racks. (See page 20.)
Rack View – Scan status for each slide in the
selected rack. (See page 19.)
Scan completed – In Rack View, indicates the slide
scanned successfully, passed image QC, and that the
image was saved to the specified image location. (See
page 19.)
Slide warning – In Rack View, alerts you of a slide
issue. (See page 21.)
Priority scan – On the rack position in the carousel
view and in Rack View, indicates the rack’s priority
scan order, from 1 to 3. (See page 16.)
Rotate – Appears on the touchscreen interface when
the carousel is rotating.

Aperio GT 450 Quick Reference Guide, Revision A
12 | Slide Preparation
Slide Preparation Checklists
Slides
Ì Slides stained according to manufacturer’s instructions.
Ì Slides are clean. Wipe with clean lint-free cloth (no chemical
cleaners).
Ì No dirt, fingerprints, markings, writing, extra mounting media,
broken slides, chips, or scratches.
Ì Slides are fully cured (not “wet”).
Ì No mounting media around slide edges.
Ì No tissue on coverslip edges or overlapping the label.
Ì No stain residue around slide edge.
Coverslips
Ì Fully cured coverslip is in place. You must use coverslips with
Aperio GT 450.
Ì Minimal mounting media used.
Ì No air pockets under coverslip.
Ì Coverslip is not hanging over the side of the slide.
Ì Only one coverslip per slide.
Slide Labels
Ì Only one label per slide.
Ì Labels do not extend past edges of the slide.
Ì Labels do not cover any tissue.
Ì Labels are not under the coverslip.
Ì Labels are firmly attached.
Ì Labels are not applied to the bottom surface of the slide.
Barcodes
Ì Barcode labels meet the same application requirements as slide
labels.
Ì Barcode labels applied to the slide label region.
Ì Only one barcode label per slide.
Ì Use only supported barcode labels.
Ì Use only high-quality printed barcode labels.

Aperio GT 450 Quick Reference Guide, Revision A
Scan Slides | 13
Scan Slides
This section contains instructions for scanning slides.
Load Slides in the Rack
1. Make sure the Leica logo and
“SIDE UP” text on the rack is
facing up.
2. Make sure the slide labels are
facing out and up.
3. Push the slides into the rack until they touch the back of
the rack.

Aperio GT 450 Quick Reference Guide, Revision A
14 | Scan Slides
Load Racks in the Carousel
Slides are scanned in the order loaded.
1. Place the loaded rack into an open slot in the carousel in the
orientation shown on page 13.
2. Push the rack forward until it stops.
When the rack is fully inserted, there is a “click” sound, and
the rack position on the Home screen turns light blue.
3. Continue loading racks as needed or until you fill the front-six
rack slots.
4. Wait for the carousel to rotate more empty rack slots to the
loading area.
5. Continue loading racks as needed.
6. When a rack is scanned successfully, the rack status turns
green.
7. You can now remove the completed rack and load another
rack.

Aperio GT 450 Quick Reference Guide, Revision A
Scan Slides | 15
Unload Racks from the Carousel
1. Remove the rack from the rack slot.
To unload a rack that is not in the loading area:
1. Tap the rack position.
2. Tap Rotate to rotate the rack to the loading area.
3. After the rack is rotated to the front, carefully remove the
rack.

Aperio GT 450 Quick Reference Guide, Revision A
16 | Scan Slides
Priority Scanning
Use Priority to move one or more racks to the front of the scan
queue. You can apply the Priority option on up to three racks at a
time.
1. Tap the rack position.
2. Tap Priority.
The Priority icon and scan queue number appear:
3. To view the rack scan order, see page 19.
iTo cancel a priority, you have to remove the rack.

Aperio GT 450 Quick Reference Guide, Revision A
Scan Slides | 17
Scan Status
CAUTION: If you must remove a rack before all slides
in the rack are scanned, note the rack and slide status.
After removal, the rack’s scan status is no longer
available.
To check the scan status of a rack:
1. Check the rack position status color against the Legend:
2. The rack statuses are:
Empty Rack is empty and available for use.
Complete All slides in the rack scanned successfully
and passed image QC. Scanned images are
saved to the specific location.
Scanning The rack is currently being scanned.
Waiting to
Scan
The rack is loaded successfully and waiting
to scan.
Warning There is an issue with one or more slides in
the rack. See page 21.
Priority The rack is set for priority scanning (see page
16).
Rack Error on Current Scan
If there is an error on at least one slide in the rack that is
currently scanning, the rack position pulses blue and orange. See
page 21.

Aperio GT 450 Quick Reference Guide, Revision A
18 | Scan Slides
Scan Statistics
To view scan statistics, tap Stats. To change the time frame of the statistics, tap the buttons above the graph.

Aperio GT 450 Quick Reference Guide, Revision A
Scan Slides | 19
Rack View
1. Tap the Rack View icon to show the scan status for each slide in the rack.
Slide status colors correspond to the Legend:
The slide is scanning
The slide is waiting to scan
The slide slot is empty.
The scanned image was successfully
transferred to the specific image location.
No scanned image was created. (See page
21.)
The slide scanned successfully, passed image
QC, and was transferred to the specified image
location.
The slide has a warning. (See page 21.)

Aperio GT 450 Quick Reference Guide, Revision A
20 | Scan Slides
Slide View
1. Select the rack by tapping it on the touchscreen.
2. Tap the Slide View icon to individual images for the
selected rack.
Ìy Tap and to view other
slides in the rack.
Ìy If any tissue is outside the
scan area (the green box), you
can tap Scan Entire Slide to
rescan the whole slide.
Ìy If there is an error scanning the
slide, a message appears in the
box. (See page 21.)
.
Rack Order
1. Tap the Rack Order icon to show the scan order of the
racks.
Ìy Racks in the list appear in the
scan order.
Ìy The scan status is indicated for
each rack.
Ìy In the example, rack 3 is set as
priority.
Other manuals for Aperio GT 450
1
Table of contents
Other Leica BIOSYSTEMS Laboratory Equipment manuals

Leica BIOSYSTEMS
Leica BIOSYSTEMS HistoCore SPECTRA CV User manual

Leica BIOSYSTEMS
Leica BIOSYSTEMS ASP300S User manual

Leica BIOSYSTEMS
Leica BIOSYSTEMS SM2010 R User manual

Leica BIOSYSTEMS
Leica BIOSYSTEMS Aperio AT2 DX User manual

Leica BIOSYSTEMS
Leica BIOSYSTEMS Aperio GT 450 Service manual

Leica BIOSYSTEMS
Leica BIOSYSTEMS SM2010R User manual

Leica BIOSYSTEMS
Leica BIOSYSTEMS VT1000 S User manual

Leica BIOSYSTEMS
Leica BIOSYSTEMS HistoCore PEARL User manual

Leica BIOSYSTEMS
Leica BIOSYSTEMS HistoCore BIOCUT User manual