Leica VOH IV User manual

VOH IV
User Guide
V1.1, 16.09.2022

VOH SA
GU-04-06-01
VOHIV 4.0 User Guide
Version 1.1
09.2022
Page 1 / 20
VOH SA
© Copyright
BAP
Table of content
1General.........................................................................................................................................................2
1.1 Warranty....................................................................................................................................................2
1.2 Security informations.................................................................................................................................2
1.3 Transport...................................................................................................................................................3
1.4 Storage......................................................................................................................................................3
2Specifications..............................................................................................................................................3
3First use.......................................................................................................................................................4
3.1 Get started.................................................................................................................................................4
3.2 Standard Display.......................................................................................................................................5
Navigation (upper left corner)..............................................................................................................5
Notification block (upper right corner)..................................................................................................5
« Correction »block (upper center)......................................................................................................5
« Temperature » block (lower center)..................................................................................................5
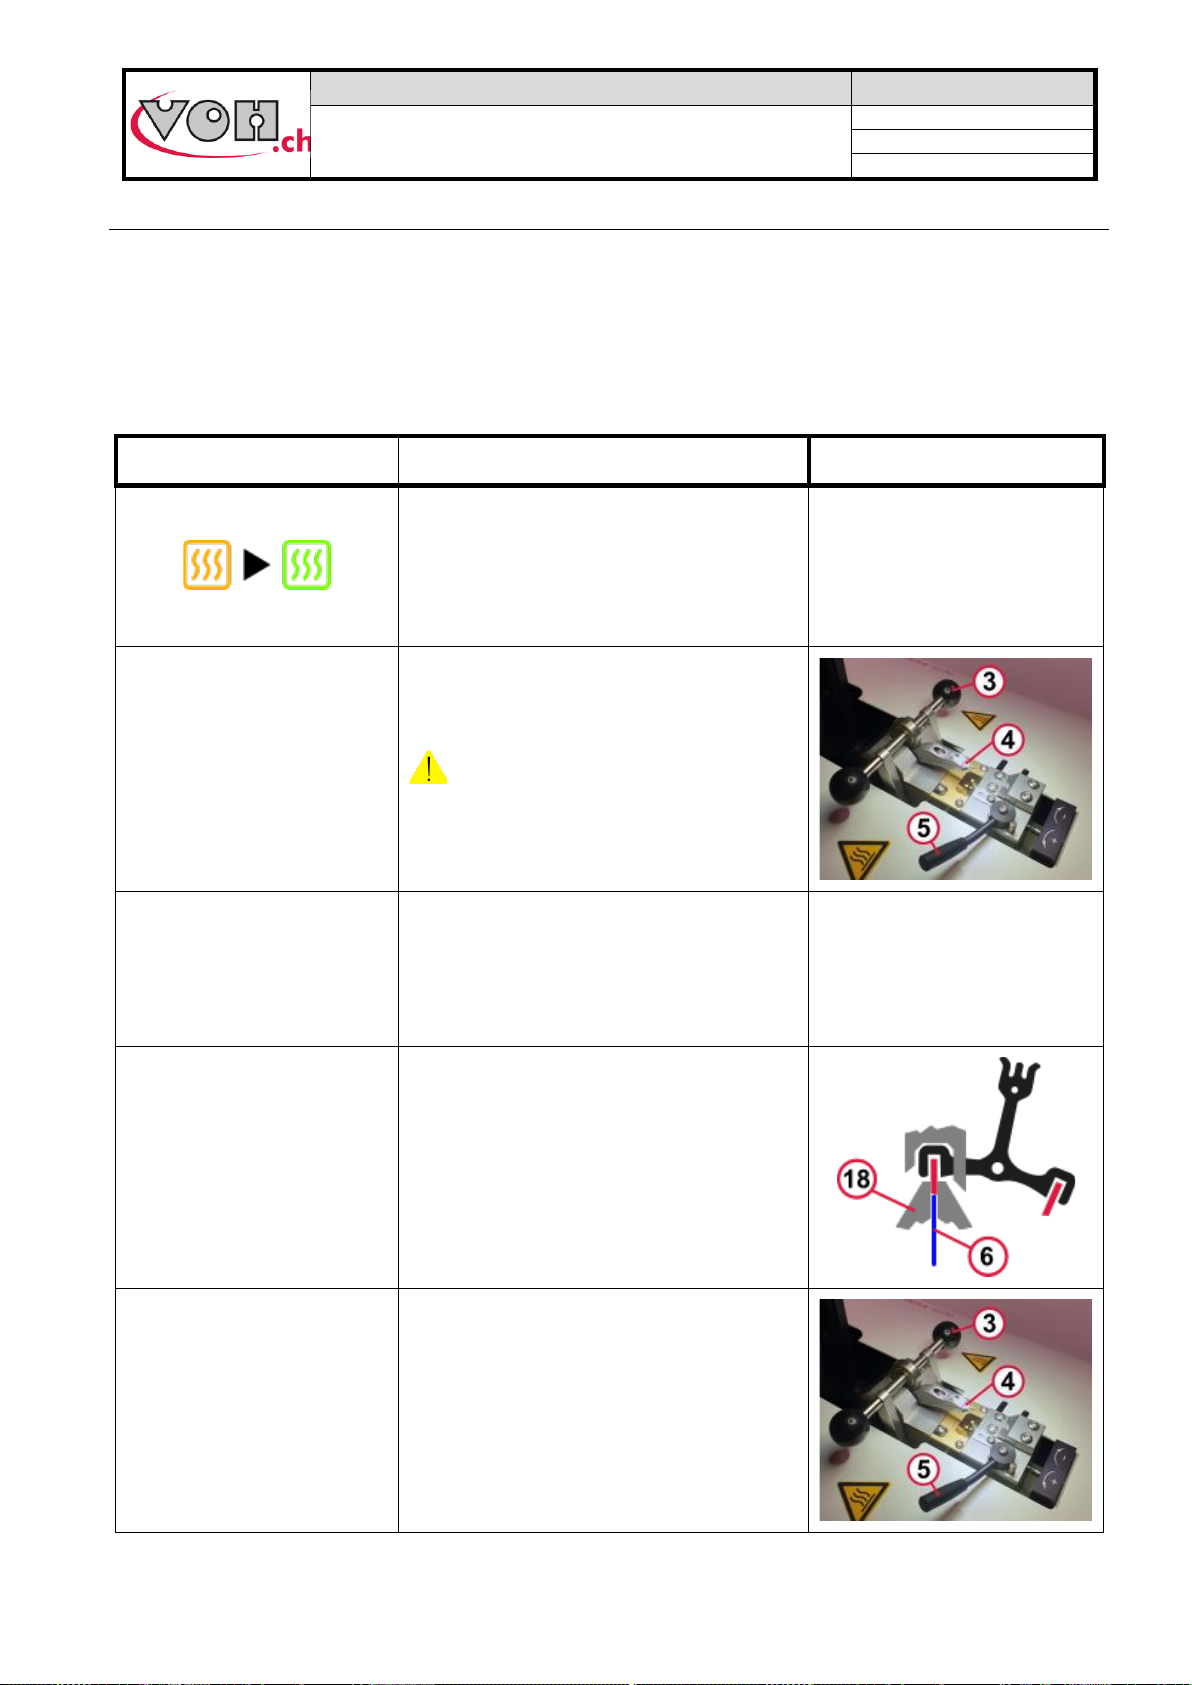
3.3 Working progress......................................................................................................................................6
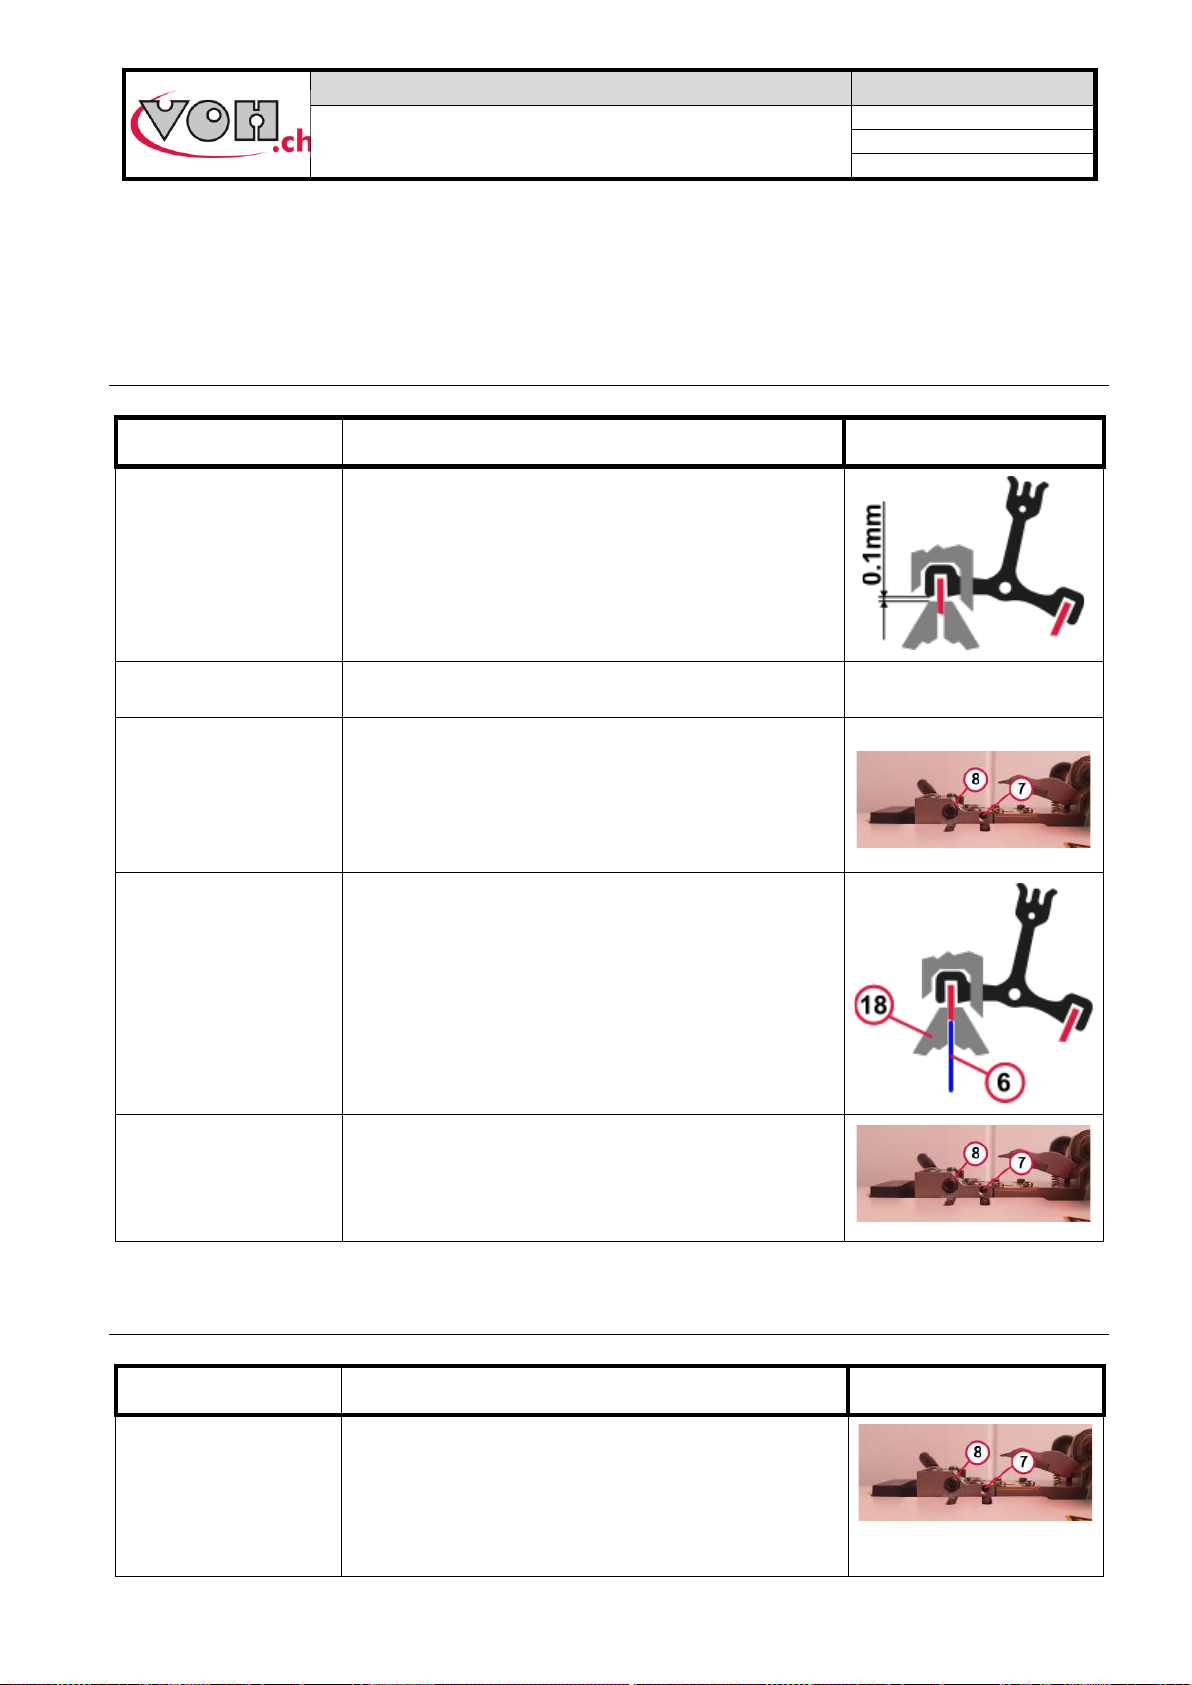
4Settings when changing pallet fork type..................................................................................................9
4.1 Adjusting the stop......................................................................................................................................9
4.2 Adjusting the clamping force of the pallet clamp.......................................................................................9
4.3 Adjustment of the pallet fork locking force ..............................................................................................10
5Details of the user interface.....................................................................................................................11
5.1 Selection of the user type........................................................................................................................11
5.2 Display settings.......................................................................................................................................11
5.3 Device settings........................................................................................................................................12
5.4 The Preset function.................................................................................................................................13
Operator home screen with Preset function ......................................................................................13
Administrator home screen with Preset function...............................................................................14
5.5 Link references to different types of pallet forks (Preset mod activated)................................................16
Bluetooth scanner activation..............................................................................................................16
Link a reference.................................................................................................................................17
6Safety measures .......................................................................................................................................18
7Disclaimer of liability/warranty................................................................................................................19
8Maintenance and service .........................................................................................................................19
9Representation / Distribution ..................................................................................................................19
Suivis des modifications :
Ver.
Date
Rédigé
Modifications
IHM
Validé
V1.0
19.09.2022
LPF
EN creation based on FR version
LPF
User Guide updated on website : https://voh.ch/service-clients/

VOH SA
GU-04-06-01
VOHIV 4.0 User Guide
Version 1.1
09.2022
Page 2 / 20
VOH SA
© Copyright
BAP
1 General
1.1 Warranty
VOH SA guarantees this product against any manufacturing or material defect under normal conditions of use
and service, for a period of two years from the date of commissioning by the customer. If at any time during the
warranty period, the product is found to be defective or fails, VOH SA will repair or replace it (at VOH SA's option).
If the product is defective, call VOH Customer Service at +41(32) 945 17 45.
The warranty does not apply if VOH SA proves that the defect or failure is due to improper use of the equipment.
The product is equipped with warranty seals. Any breakage or rupture of these seals will result in the cancellation
of the warranty.
.
Figure 1: Warranty Seals
VOH SA's liability is limited to the repair or replacement of the product under the conditions set forth above.
IN NO EVENT SHALL VOH SA BE LIABLE FOR ANY LOSS OR DAMAGE WHATSOEVER, INCLUDING
CONSEQUENTIAL OR INCIDENTAL DAMAGES ARISING DIRECTLY OR INDIRECTLY FROM ANY BREACH
OF WARRANTY, EXPRESS OR IMPLIED, OR ANY OTHER FAILURE OF THIS PRODUCT. THIS WARRANTY
IS THE ONLY EXPLICIT WARRANTY THAT VOH SA MAKES ON THIS PRODUCT.
This warranty covers the original purchaser only and is not transferable.
If you have any questions regarding this warranty, write to VOH SA :
VOH SA
La Praye 5a
CH-2608 Courtelary
Phone : +41(32) 945 17 45
Fax : +41(32) 945 17 55
Internet : http://www.voh.ch
1.2 Security informations
Warning
▪Do not use the VOH IV if it is damaged. Before using the VOH IV, inspect its housing and electrical
connections.
▪The VOH IV should be used according to the manufacturer's instructions.
▪Do not use the VOH IV in a dirty environment.
▪The VOH IV should only be used by trained personnel.
▪Caution!!!
▪Please read the information in this manual before using the equipment. Incorrect use may damage the
system or cause incorrect results.
▪Do not disassemble the equipment. Only the manufacturer reserves the right to replace or repair a
defective component.
▪Use this device at a temperature between 10°C and 40°C (140°F) Don’t use the VOH IV if it is damaged.
Before usage VOH IV, inspect the box and electrical connections.

VOH SA
GU-04-06-01
VOHIV 4.0 User Guide
Version 1.1
09.2022
Page 3 / 20
VOH SA
© Copyright
BAP
1.3 Transport
This device is not intended for frequent transport. If it is necessary to move it, please take care not to cause any
shocks that could damage the mechanics of the device. Also, in case of transport over a long distance, use a
packaging that protects against shocks.
1.4 Storage
VOH IV should be stored in a dry and dust-free place. The storage temperature should be between 10°C and
40°C. It is highly recommended to cover the device to protect it from dust and moisture.
2 Specifications
•Shifting of the pallets on the same axis
•Bi-directional correction
•Precision of the correction ± 1µm
•Adjustable clamping force
•Adjustable heater from 50 –160°C increases of 5°C
•Vision by binocular LEICA
•Lightening LED
•Usable for every current typ of pallets
•temperature selector and offset positions, pre-programable
•Colorfull touchscreen Display
•Master switch ON / OFF
•Power supply via transformer 230 VAC / 24 VDC
•Improved design and ergonimics
•Can be connected to a 2D barcode reader
•Compatible to LINKiX

VOH SA
GU-04-06-01
VOHIV 4.0 User Guide
Version 1.1
09.2022
Page 4 / 20
VOH SA
© Copyright
BAP
3 First use
3.1 Get started
Display VOH IV
Comments
Device
After pluging in the power supply
on the Plug-in location (0), Power on the
device by switching the power switch (1)
Adjust the sharpness of the binocular
LEICA by using the knob 12.
The zoom can be adjusted by using the
knob 13. (adjustment of the LED lightning,
see chapter 6.3)
Adjust and choose the tempareture as you
wish, with the 2 touchscreen buttons.
We suggest two different temperatures:
•75°C (167°F) for pallets with traditional shellac.
•120°C (248°F) for current pallets.

VOH SA
GU-04-06-01
VOHIV 4.0 User Guide
Version 1.1
09.2022
Page 5 / 20
VOH SA
© Copyright
BAP
3.2 Standard Display
Figure 2: VOH IV, Home screen (WM1301)
Navigation (upper left corner)
To navigate through the different pages of the device, use the icons in the upper left section.
The red icon indicates the current page, while the white icons allow access to other pages.
Notification block (upper right corner)
•- Page number: each page is identified with a unique code of type WM13XX. This makes
troubleshooting easier.
•- The currently selected language is indicated (FR, DE, EN)
•- The currently selected user is indicated. If it is an operator (OPE) or an administrator (ADM). The
administrator has broader rights than an operator
« Correction »block (upper center)
This block indicates the current correction in um using numbers as well as a bar graph.
« Temperature » block (lower center)
This block is linked to the management of the device's temperature.
•“Temp”:Measured temperature
•“Set”: Setpoint temperature
•Icon in the center:
oOrange: heating in progress
oGreen: setpoint temperature reached, pallets correction possible
oFlashing red: temperature too hot, above the setpoint. Do not place any pallets.
Wait until the light turns green.
•Up/Down button: selection of the temperature in 5°C (41F) increments.

VOH SA
GU-04-06-01
VOHIV 4.0 User Guide
Version 1.1
09.2022
Page 6 / 20
VOH SA
© Copyright
BAP
3.3 Working progress
DISCLAIMER
The operating temperature of the device is over 100°C (212°F), the risk of burning yourself is real, we
recommend you to be very careful and never touch the device with bare hands when it is switched on!
Before any intervention, you must switch off the device by its main switch (1), remove the power supply
plug (15) and wait 30 minutes so the unit cools down.
Display VOH IV
Comments
Device
The warm-up time is approx. ~25 min. It
must be observed, the status indicator turns
GREEN when the temperature is reached.
Push the rolling clamp (3) against the rear so
that the support (4) is raised.
CAUTION: Never operate the
eccentric lever (5) of the lifting clamp
when the clamping support (4) is in the
down position..
Open the lifting clamp with the eccentric
lever (5)
Insert the pallet fork (fork side up) by
engaging one pallet to be adjusted in the
clamp (18) and press it lightly against the
stop (6), located between the two jaws.
Note: when using for the first time or when
changing the type of pallet, the stop must be
adjusted, see: Chapter 4.1.
Close the clamp with the eccentric lever (5).
Note: When using for the first time or when
changing the type of apallet fork, the
clamping force of the clamp must be
adjusted, see: Chapter 4.2.

VOH SA
GU-04-06-01
VOHIV 4.0 User Guide
Version 1.1
09.2022
Page 7 / 20
VOH SA
© Copyright
BAP
Set the digital number on the display to 0, by
using the adjustment wheel (10)
Lock the pallet fork by gently moving the
rolling clamp (3) against the front until it
stops. It's best to do so with both hands.
Note: When using for the first time or when
changing the type of pallet fork, the locking
force of the rolling clamp (3) can be
adjusted, see: Chapter 4.3
By turning the carriage displacement wheel
(10) you can move the pallet by the desired
amount. The displacement value can be
read on the digital display. It is
recommended to go 2-3µm beyond the
desired value and then go back, in order to
avoid the spring effect of the glue.
Release the pallet fork by gently pushing the
rolling clamp (3) backwards with both hands.
Open the lifting clamp by using the eccentric
lever (5)

VOH SA
GU-04-06-01
VOHIV 4.0 User Guide
Version 1.1
09.2022
Page 8 / 20
VOH SA
© Copyright
BAP
Gently pull the pallet fork away from the
touching elements.
Note: If, during handling, you drop your
pallet fork inside the VOH IV, you can
retrieve it by removing the recovery tray (16).

VOH SA
GU-04-06-01
VOHIV 4.0 User Guide
Version 1.1
09.2022
Page 9 / 20
VOH SA
© Copyright
BAP
4 Settings when changing pallet fork type
Below are the settings to be made the first time or when changing the type of the pallet fork.
4.1 Adjusting the stop
Display VOH IV
Comments
Device
This stop must be adjusted to a gap of ~ 0.1 mm
between the body of the pallet fork and the end of the
clamp. To perform this adjustment, the device (VOH
IV) must be cold.
Place the pallet fork and observe it’s position.
Unlock the screw (7) with an allen key 1.5 mm
Adjust the stop (6) in the required position.
Lock the screw (7)
4.2 Adjusting the clamping force of the pallet clamp
Display VOH IV
Comments
Device
The force of the pallet clamp can be adjusted by turning
the regulation screw (8) with an allen key 2.5mm
= increase in force
= decrease in force

VOH SA
GU-04-06-01
VOHIV 4.0 User Guide
Version 1.1
09.2022
Page 10 / 20
VOH SA
© Copyright
BAP
4.3 Adjustment of the pallet fork locking force
Display VOH IV
Comments
Device
The locking force of the pallet fork, can be adjusted by
screwing () or unscrewing () the adjustment screw
(11) located at the back of the mechanical block.

VOH SA
GU-04-06-01
VOHIV 4.0 User Guide
Version 1.1
09.2022
Page 11 / 20
VOH SA
© Copyright
BAP
5 Details of the user interface
5.1 Selection of the user type
Display VOH IV
Comments
Device
From the home screen (WM1301), click on
the bottom navigation icon.
If the current user is « Operator », the
administrator password will be requested.
If the current user is « Administrator », the
user will change to « Operator ».
Enter the administrator password with the
keyboard on the screen.
The standard password for the
administrator is: « 1234 ».
Once you enter the correct password,
the page for settings as « Administrator »
appears.
On « Administrator » mode, the button
« Device settings » is available. On
« Operator » mode, this is not the case.
5.2 Display settings
Display VOH IV
Comments
Device
From the « Settings » page (WM1302), click
on the button « Display settings »

VOH SA
GU-04-06-01
VOHIV 4.0 User Guide
Version 1.1
09.2022
Page 12 / 20
VOH SA
© Copyright
BAP
The page WM1310 opens.
It’s possible to :
- Set the language
- Set the clock
- Set the date
ADM or OPE, It’s the same page.
By clicking on the down pointing arrow, the
second half of the page appears.
- Display brightness
- As ADM : changing password for the
« Administrator »
5.3 Device settings
The device settings are only avaliable on « Administrator » mode.
Display VOH IV
Comments
Device
From the page « Settings » (WM1302),
click on the button « Device settings »
Heater : it’s possible to disable the heater
until the next restart of the machine.
Distance Min/Max : adjustment of the bar-
graph for minimum or maximum value,
shown on the Home Screen.
Preset : enable or disable the « Preset »
function. see chapter 5.4
By clicking on the down pointing arrow,
the second half of the page appears :
Light : enable or disable the light ring.
LED intensity : If the light is « ON », you
can adjust the brightness of the LED by 0
to 100 %.

VOH SA
GU-04-06-01
VOHIV 4.0 User Guide
Version 1.1
09.2022
Page 13 / 20
VOH SA
© Copyright
BAP
5.4 The Preset function
The Preset function allows savings from multiple types of pallet forks. Each type of pallet fork, can be saved with
a specific temperature as well as a preset position for the 0.
To enable this fonction, see chapter 5.3
Operator home screen with Preset function
With Preset function enabled, an operator can select different types of pallet forks but is not allowed to change
temperature or the position for the 0.
Figure 3: VOH IV, OPE home screen with preset function enabled (WM1301)
5.4.1.1 Select a pallet fork
Display VOH IV
Comments
Device
On « home screen » (WM1302), click on
the bottom center button.
A list of different types of available pallet
forks appears.
Simply click on any type of pallet fork and
the presets will load. Ready for work.

VOH SA
GU-04-06-01
VOHIV 4.0 User Guide
Version 1.1
09.2022
Page 14 / 20
VOH SA
© Copyright
BAP
Administrator home screen with Preset function
Figure 4: VOH IV, ADM home screen with preset function enabled (WM1301)
5.4.2.1 Add a pallet fork
Display VOH IV
Comments
Device
On « home screen » (WM1302), click on
the « plus » button in the lower left corner.
Choose a name for the type of pallet fork
you want to add. A Keyboard will appear.
(you can type max. 20 characters)
Confirm with the « Check » button.
The page with the type of pallet fork
appears.

VOH SA
GU-04-06-01
VOHIV 4.0 User Guide
Version 1.1
09.2022
Page 15 / 20
VOH SA
© Copyright
BAP
The button « SET 0 » allows to take the
actual position as the new 0 position to
work with.
As in standard mode, these 2 buttons
allow to select the working temperature by
steps of 5°C.(41°F)
Once the pallet fork is edited, just save it
with the « Check » button.
5.4.2.2 Edit or delete a pallet fork
Display VOH IV
Comments
Device
On « home screen » (WM1302) on ADM
mode, click on the bottom center button to
show the list of pallet forks.
Select the pallet fork to edit or delete.
To delete, click on the « Trash » button.
To Select a pallet fork, click on the the
« Check » button.

VOH SA
GU-04-06-01
VOHIV 4.0 User Guide
Version 1.1
09.2022
Page 16 / 20
VOH SA
© Copyright
BAP
Once the pallet fork selected, click on the
« Edit » button.
The editing page from the selected pallet
fork appears.
It’s possible to chage the name by clicking
it.
To save, click on the « Check » button.
5.5 Link references to different types of pallet forks (Preset mod activated)
The VOH IV Device allows references to be linked to pallet fork types.
These references are scanned via the Blutetooth scanner, and the corresponding pallet fork is automatically
loaded.
Bluetooth scanner activation
With the preset function enabled, see chapter 5.3 :
Display VOH IV
Comments
Device
From the « settings » screen (WM1302),
click on the « Scanner » button.
Follow the procedure shown on screen,
choose the scanner to pair with the
VOH IV Device.
The MAC address on the right-hand side
of the list is engraved on the VOH
scanner, delivered by us.
Once the scanner is connected, a
« Bluetooth » icon appears in the
notification block. (upper right corner)

VOH SA
GU-04-06-01
VOHIV 4.0 User Guide
Version 1.1
09.2022
Page 17 / 20
VOH SA
© Copyright
BAP
Link a reference
Display VOH IV
Comments
Device
To Link a reference to one type of pallet
fork, begin to edit the selected pallet fork.
On the « Home screen » (WM1302) on
ADM mode and in edition mode, click on
the bottom center button to show the list
with references linked to the current pallet
fork.
Simply scann a reference to add to this
list.
It’s also possible to delet a reference by
clicking the « Trash » icon.
Caution: Only one reference can be
linked to one type of pallet fork. In
opposite case, a error message will
appear.

VOH SA
GU-04-06-01
VOHIV 4.0 User Guide
Version 1.1
09.2022
Page 18 / 20
VOH SA
© Copyright
BAP
6 Safety measures
Display VOH IV
Comments
Device
Adjust the carriage to approx. +500 µm by using the
micrometric screw (10).
Close the clamp for the pallet (18) by using the
eccentric lever (5).
Place anti-rust paper on the plate and lower the
support (4).

VOH SA
GU-04-06-01
VOHIV 4.0 User Guide
Version 1.1
09.2022
Page 19 / 20
VOH SA
© Copyright
BAP
7 Disclaimer of liability/warranty
The manufacturer does not accept responsibility for damage caused by improper use, transport or storage as
described in this manual. Modifications to the device and opening of the housing are prohibited and lead to the
exclusion of liability. The warranty claim expires when it is proven that the defects cannot be attributed to the
original cause.
8 Maintenance and service
To be completed or redirected to corresponding maintenance protocol documents.
9 Representation / Distribution
Table of contents
Other Leica Microscope manuals