manuals.online logo
Brands
  1. Home
  2. •
  3. Brands
  4. •
  5. Leica
  6. •
  7. Microscope
  8. •
  9. Leica SP2 User manual

Leica SP2 User manual

Other manuals for SP2

1

Other Leica Microscope manuals

Leica DM750 M User manual

Leica

Leica DM750 M User manual

Leica MC120 HD User manual

Leica

Leica MC120 HD User manual

Leica Z6 APO User manual

Leica

Leica Z6 APO User manual

Leica M320 User manual

Leica

Leica M320 User manual

Leica EZ4 E User manual

Leica

Leica EZ4 E User manual

Leica DMi8A User manual

Leica

Leica DMi8A User manual

Leica SP5C User manual

Leica

Leica SP5C User manual

Leica M420 User manual

Leica

Leica M420 User manual

Leica DM300 User manual

Leica

Leica DM300 User manual

Leica SP8 User manual

Leica

Leica SP8 User manual

Leica SP5 II User manual

Leica

Leica SP5 II User manual

Leica M125 B User manual

Leica

Leica M125 B User manual

Leica DM750 M User manual

Leica

Leica DM750 M User manual

Leica Stellaris 5 User manual

Leica

Leica Stellaris 5 User manual

Leica StereoZoom User manual

Leica

Leica StereoZoom User manual

Leica DMS300 User manual

Leica

Leica DMS300 User manual

Leica SP8 Setup guide

Leica

Leica SP8 Setup guide

Leica TCS SP5 X User manual

Leica

Leica TCS SP5 X User manual

Leica MATEO TL User manual

Leica

Leica MATEO TL User manual

Leica DM1000 LED User manual

Leica

Leica DM1000 LED User manual

Leica M60 B User manual

Leica

Leica M60 B User manual

Leica M125 C User manual

Leica

Leica M125 C User manual

Leica DM6B User manual

Leica

Leica DM6B User manual

Leica S7 E User manual

Leica

Leica S7 E User manual

Popular Microscope manuals by other brands

Brütsch Rüegger FUTURO instruction manual

Brütsch Rüegger

Brütsch Rüegger FUTURO instruction manual

Elenco Electronics EDU-41003 instructions

Elenco Electronics

Elenco Electronics EDU-41003 instructions

Nikon SMZ25 instruction manual

Nikon

Nikon SMZ25 instruction manual

National DC3-163 instructions

National

National DC3-163 instructions

KERN Optics OPE-1 User instructions

KERN Optics

KERN Optics OPE-1 User instructions

OPTIKA MICROSCOPES B-150D Operation manual

OPTIKA MICROSCOPES

OPTIKA MICROSCOPES B-150D Operation manual

Prior Lux POL operating instructions

Prior

Prior Lux POL operating instructions

Olympus SZ61 instructions

Olympus

Olympus SZ61 instructions

Opitec Smartscoop 115615 instructions

Opitec

Opitec Smartscoop 115615 instructions

KERN OPO-1 operating instructions

KERN

KERN OPO-1 operating instructions

Topcon SP-1P user manual

Topcon

Topcon SP-1P user manual

AO Cycloptic Reference manual

AO

AO Cycloptic Reference manual

MshOt MZ62 user manual

MshOt

MshOt MZ62 user manual

Celestron 44345 instruction manual

Celestron

Celestron 44345 instruction manual

KERN Optics OZR-5 User instructions

KERN Optics

KERN Optics OZR-5 User instructions

VWR VisiScope 384 Series instruction manual

VWR

VWR VisiScope 384 Series instruction manual

Atlantis SL 2000 user manual

Atlantis

Atlantis SL 2000 user manual

ThermoFisher Scientific Continuµm manual

ThermoFisher Scientific

ThermoFisher Scientific Continuµm manual

manuals.online logo
manuals.online logoBrands
  • About & Mission
  • Contact us
  • Privacy Policy
  • Terms and Conditions

Copyright 2025 Manuals.Online. All Rights Reserved.

LMW Microscopy Lab : Leica SP2 Page 1 `6/26/2012
ManualforLeicaSP2ConfocalMicroscope

Enteryouname,thedate,thetime,andtheaccountnumberintheuserlogbook.

Thingstocheckbeforestart‐up.

Makesurethatyoursampleslidesarecleanandsealed.UseWindexandcottonballsorKimwipestoclean
coverslips.Fixedsamplesneedtobesealedwithnailpolish.
Checktheobjectives.The10xand20xobjectivesareDRYobjectives,andshouldNEVERhaveoilonthem!
Thereare40xand63xOILimmersionobjectives,anda63xWATERimmersionobjectivealsoonthis
microscope.Ifoilimmersionobjectiveshaveoilonthem,wipethelensgentlyonlywithlenspaper.

SystemStart‐up.
1. Turnonthemicroscopecontrollerbandthe
ScannerLaserHeNecandPC/Standd
switches.
2. Turnonthecomputereandlogontothe
desktop.
3. TurnontheMercuryArcLamppowersupplier,
ifyoulookatfluorescentlylabeledsamples.
4. StarttheLCSprogramby
double‐clickingtheLCSiconon
thedesktop.
Onthepop‐upstartingwindowpanel,select
thePersonalthatcontainsyoursettingfor
acquisitionparametersyouhavecreatedor
Companyforadefaultsetting.











b
f
e
d
c
LMW Microscopy Lab : Leica SP2 Page 2 `6/26/2012
OveviewofLeicaConfocalSoftware(LCS)
UponLCSprogramstart,thebasicimageacquisitionmenuwillappear.TheAcquirebutton
shouldappearpressed.

ClicktheBeambutton todisplaytheBeamPathSettingas
appeared.
ClicktheZ‐Scanbutton andselectz‐Wide(thisisrequiredtofocusto
sampleontheregularslideholderbytheRemoteControlKnobs;seebelow).
WiththeObjbutton,youcanselecttheobjectiveyouwanttouse.(Amessagewindowmaypop
up,andclickOK)
WithMicCtrlbutton,youcanswitchbetweenScanmode(forlaserscanning)andVisualmode
(forviewingthroughtheeyepiece).


LMW Microscopy Lab : Leica SP2 Page 3 `6/26/2012
BasicOperationofLeicaDMIRE2Microsocpe.
Bright‐fieldviewing:
1. Placeyoursampleslidewithcoverslip
(preferably#1.5thickness)facingdowntothe
objectiveonthestage.

2. Forbright‐fieldviewing,turnonthemicroscope
halogenlamplightbyturningthewheel b
towardyouandturntheVIS‐SCANswitchcto
VISposition(Note:switchbacktoScanpositionforconfocalscanning,see
below)

3. Startwithlowmagnificationobjectives(10Xor20X)firsttofocusontoyour
specimen.Youcanplacethedesiredobjectiveinpositionbyturningthe
lensturret dbyhandorbyclickingObjbutton andselectingan
objectiveyouwanttouse(recommended;seebelow).Theinformationof
theselectedobjectiveandtheirz‐positioncanbereadonthereadout
panel eatthefrontofthescope.

4. FocusontothesamplebymovingtheobjectiveturretwiththeCoarse
FocusButtonsf(upperandlower)andtheFineFocusKnob g.Pushthe
upperCoarseButtontobringtheobjectivetotheupperlimit(“0µm”)
position–wherethemicroscopehasbeencalibratedforyoursampleto
benearinfocus.

5. UsetheFinefocusknobtofinetunefocusing.Theextentofthefine
movementcanbesetfromS0(veryfine)toS3(coarse)bypressingthe
STEPbutton h(S2isrecommendedformostcases).
PleaseDONOTpresstheLEARN,CHANGE,orbuttons.

6. Withmostcellsortissuesamplesstainedwithfluorescentdye,you
couldeasilyfocustoyoursamplewithafluorescencemode(see
below)orPhaseContrastmode.ForPhaseContrastmodewith10xor
20xobjectives,turntheCondenserRingi toselectPH1(for10x)or
PH2(for20x).

7. Forusingoilorwaterimmersionlens,lowertheobjectiveturret
slightly,exposethelensbyturningtheturrethalfwaybyhand,and
placeadropofoilorwaterontheobjective(becarefulnottotouchthelensdirectlywithapplication
tools!).Placetheslideovertheobjectiveandraisetheobjectiveuntiltheoiljustspreadsoutasitcontacts
theslide.Usefindfocusknobtograduallybringyoursampleintofocus.Checkyourslideoccasionallyto
makesurethatyouarenotpushinguptheslidewiththeobjective.Thiscandamagetheobjectivelensand
yoursample!

e
c
b
d
e
g
f
h
i
LMW Microscopy Lab : Leica SP2 Page 4 `6/26/2012
Fluorescentviewing:
Youcancheckyoursampletoseeifyourfluorescencelabelingworksby
usingthemercurylampilluminationandtheappropriatefiltersets.The
microscopehasfiltersetsforviewingDAPI(A),greenfluorescence(I3)
andredfluorescence(N2.1).
1. Presseithertheleftorrighthorizontalarrowbutton jonthefront
ofthescopetochoosethefilter(FLUO)set.“Scan”positionhasno
filtersetinplaceandisusedforlaserconfocalscanning.The
fluorescentlightcanbeblocked(closed)oremittedbypressingthe
Shutter 1) button(The“closed”lightshouldbeoffforfluorescent
viewing.).
2. TurntheVIS‐SCANswitch 1! toScanpositiontoblockthe
transmittedbright‐fieldlight,ifnecessary.
3. Examinethesamplethroughtheeyepieces.(MakesurethatPORTSisinVISand
MAGisat1x.Ifnot,changeitselectingVisualfromMicCtrlbuttoninLCS
programwindow.)
4. Whenyouarereadytoscanyoursamplewithlaser,closetheSHUTTER1) to
preventanyunnecessarybleachingofthesamplewithmercuryarclamplight.

SettingupforConfocalLaserScanning.

Toturnonthelaser(s);
(1) Turnononlythelasersyouwilluse.Theydo
notneedmorethanaminuteorsotowarmup
andstabilize,soitisnotnecessarytoturnthem
onuntilyouknowyouneedthem.
(2) Argonlaser(for458,476,488,and514nm
excitationline):Turn ontheredLaserAr/ArKr
switch bandturntheLevelAr/ArKrlevelknob
ctoMIN.Then,turntheleftAr/ArKrkeydto
“ON”,andthenturnfurtherto“START”positionand
releasethekey.AdjustthelaserpowerwithLEVEL
knob c(usually9o’clockpositionissufficient).
(3) MellesGriotyellowDPSS(561nm)laser:push the
greenbutton eforafewsecondsandrelease.
(4) He/Ne(633nm)laser:turntheHe/Ne633keyfto
ON.
(5) DiodeUVlaser405nm:Turnontheredpower
button g andturnthekey h toIposition.
1$ 1%
b
g
j
1)
1
!
c
d
e
f
h
LMW Microscopy Lab : Leica SP2 Page 5 `6/26/2012
LCSImagingprogramsetting
1. First,selecttheappropriatelaserlinesandsetupdetectorsforthe
fluorescentlabelsyouusedonyoursamplefromthedrop‐downLlisti
(LeicaFactorysetting). Thiswillautomaticallysetuptheemissiondetector
band‐widthj,activatetheproperdetector(PMTs)1),dichroic
beamsplitter1!,andexcitationlaserwavelengthandpower1@.Youcan
adjusttherangeandpositionofdetectorbandwidthandthelaserpower
levelasnecessary.

2. Youcanalsochangethecolorschemeofindividualimagesintoanycoloror
greyscalebyclickingthepseudo‐colorselector 1# associatedwitheach
PMTonthewindowscreen(Note:thecolorinformationwillbesavedwithimagefileswhensaved).
3. PressModebuttontoselectScanMode(defaultisXYZ).

i
1@
j
1)
1!
1#
LMW Microscopy Lab : Leica SP2 Page 6 `6/26/2012
4. PressFormat ,andSpeedbuttonstoselecttheseparameters(defaultsare512x512formatand
400Hzscanspeed).
5. PressZ‐scanbuttonandselectz‐WideinordertouseZPOSknob 1$ tomovetheobjectivefor
focusing(Defaultisz‐Galvo,whichisusedwithGalvostageadaptor).

6. ClickMicCtrlbutton toselectScanmodeforlaserscanning(itwillautomaticallyshutoffvisual
outputthroughtheeyepieces).
7. PressContinuousbuttontostartscanning(itwillbecomeStopbutton).Animageorimages,
dependingonthenumberofactivedetectors,willappearontherightmonitor.
RemoteControlKnobs
8. Optimizetheimagesbyadjustingparametersincluding;
1. Thez‐position(focusing)withinthespecimen(Z‐POSknob1$).
2. Zoomfactor(ZOOMknob 1%): Defaultis1;increasingzoomwillmagnifytheimageandimprovethe
resolution,butalsowillbleachthesamplefaster!
3. PMT1,2,3,TransandSmartOffsetknobs 1^: TurnPMTknobstoincreasethedetectorsensitivitysoto
increasethesignalintensityofeachfluorescentandtransmissionimagechannel(Note:KeepthePMTlevel
under600V).Todecreasebackgroundsignal,clickthemouseoverachanneltoselectitandturnOffset
knobcounterclockwise.WithQLUTbuttonintheExperimentliveviewwindow,afulldynamicrange
ofthePMTforoptimalimagequalitycanbeobtained.Everyclickingthisbuttonchangestheviewwindow
inthreedifferentLUTmodes;pseudocolor,Hi‐Lo,andmonochrome.IntheHi‐Lomode,pixelssaturating
thePMTwillappearblueandpixelswhichareblack(0value)appeargreen.AdjustthePMTgainandPMT
offsetsuchthatthebrightestpixelsarejustunderthesaturation(afewbluepixels)andthedarkestpixels
arejustabovethezerovalue(asomegreenpixels).(AdjustLaserpowerbydraggingthelaserpowerbaron
themenuwindowifnecessary).

Pseudocolor    Hi‐Lomonochrome
1$ 1%
1^
LMW Microscopy Lab : Leica SP2 Page 7 `6/26/2012
ClicktheStopbutton againtostopscanning.(Youcansavethecurrentparametersettingwith
Savebuttonandputaspecificnameforlateruse). 
ViewingImages.
Singlebutton–
putsupfull
screenof
selected
fluorescent
channel.
Ch1,2,3,4
buttons–activate
thechannelon
thescreen.
Tiledbutton–
viewsupto3
channels
simultaneously.
Ovlbutton–
overlays(merge)
multiplechannels
intoone.
Displaybutton‐
changethe
magnificationof
thescreenimage.
Lutbutton‐open
colorlook‐up
table.
AcquiringSingleOpticalSectionImage.
MakesuretoswitchMicCtrltoScanmode.
PressSingleScanbuttontoacquireanimagebyasinglelaserscanningatascanningspeed(normally
400Hz).Theresultingimagemaydisplaybackgroundnoise.Imageaveragingisaprocesstodecreasethis
noiseandimprovethesignal‐to‐noiseratio.
Touseaveraging,clickeitherLi.A(lineaveraging,recommended)orAver (frameaveraging)
buttonandselectthenumberoflines(orframes)tobeaveraged(4lineorframeaveragingisagood
startingpoint).Then,clicktheSingleScanbutton.
LMW Microscopy Lab : Leica SP2 Page 8 `6/26/2012
Afterscanning,theimagewillbesavedinthedirectory(temporarilyintheRAM).Savethedatatothe
harddrivewiththeSavebuttononthetopmenuiconpanel ,
andtypethefilename.(Note:Alltheimages(as*.tiff)willbesavedunderthesavedLeicafile(as*.lei)).
Computercrashorpoweroutagewillresultinlossofunsaveddata!SAVEFREQUENTLY!!
Ifyouwanttocreateanewfolderforanewsetofimages,clickNewicononthemenupanel.
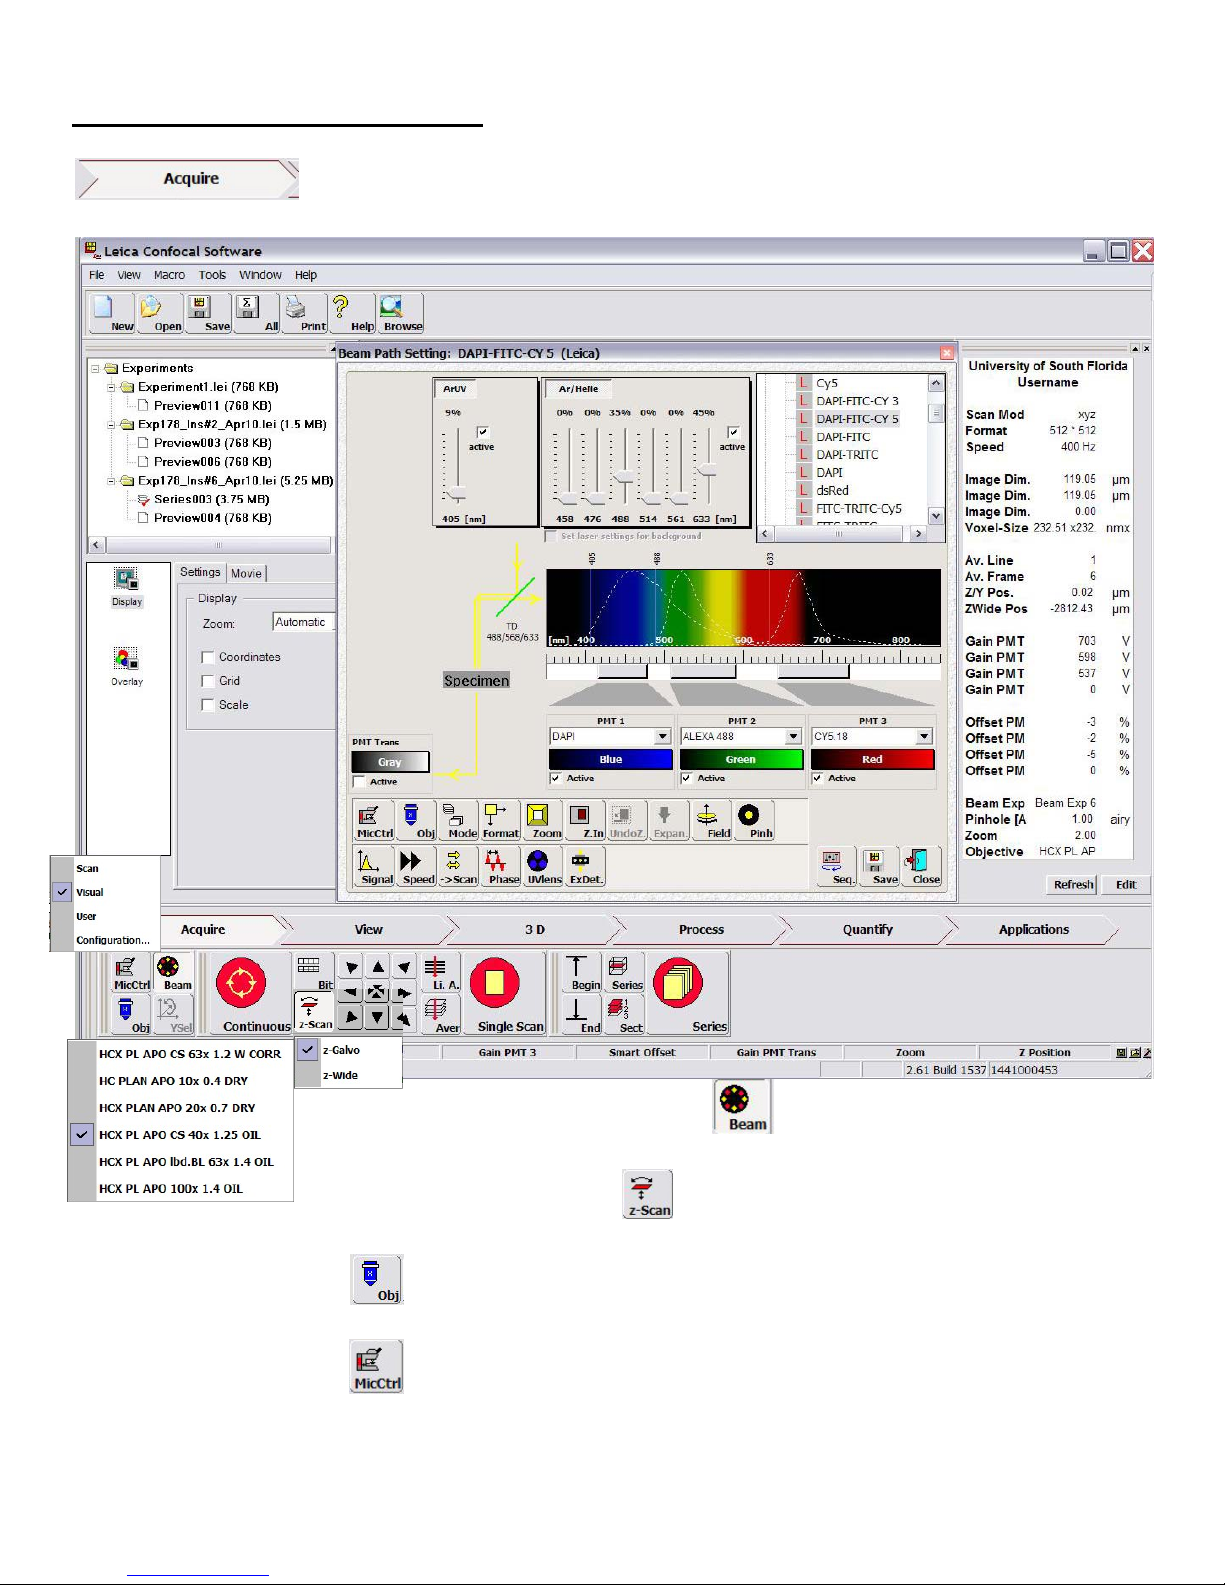
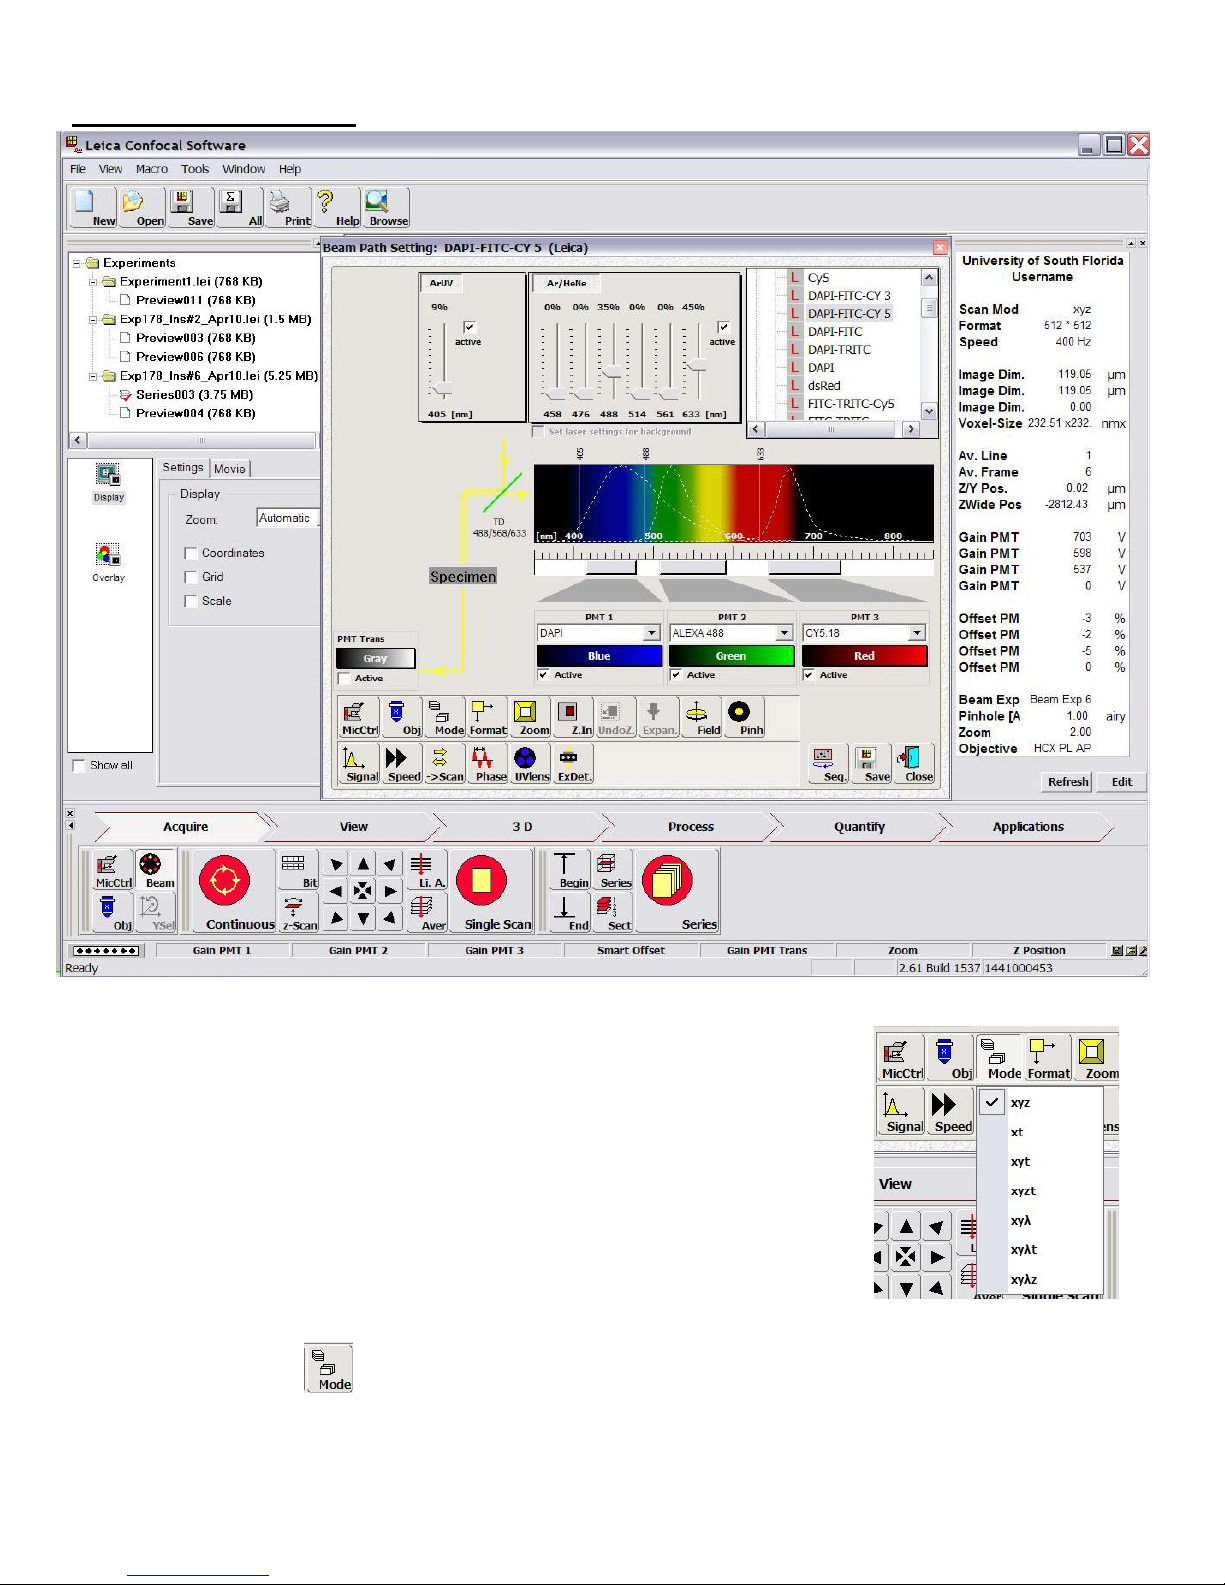
LMW Microscopy Lab : Leica SP2 Page 9 `6/26/2012
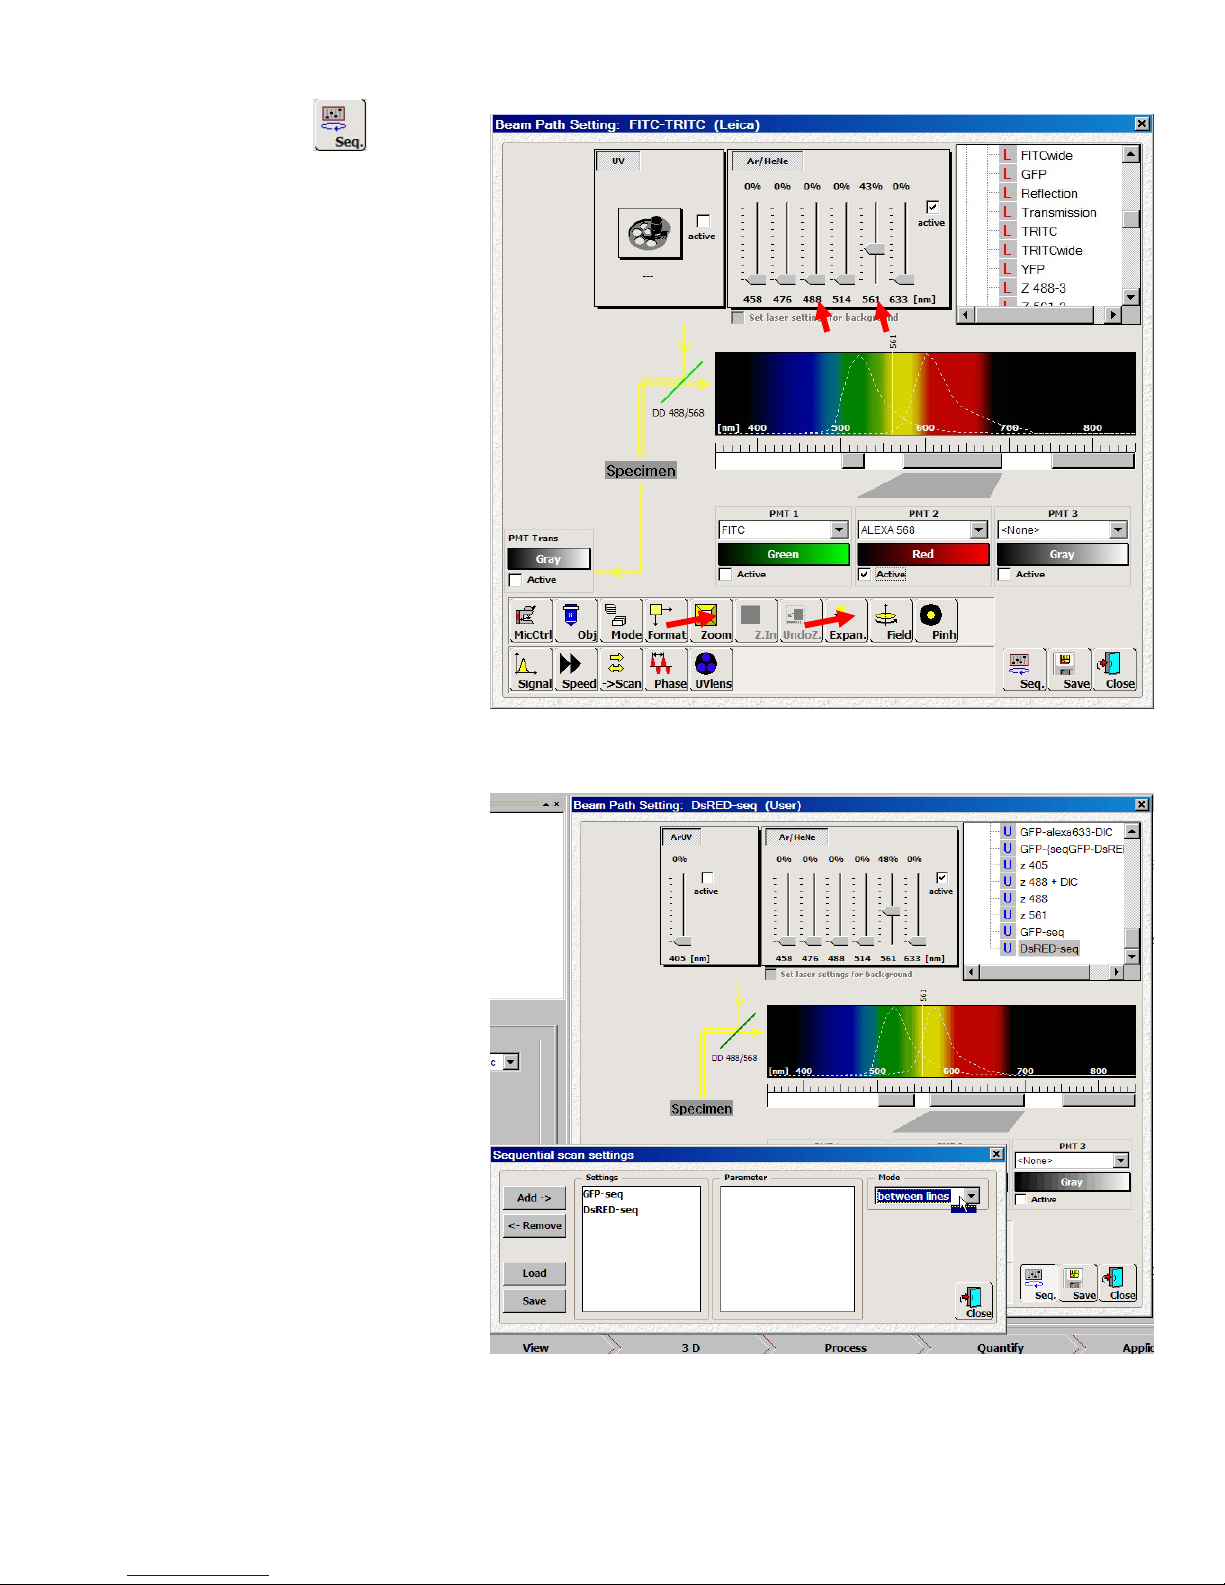
SequentialScanningMode
Thisconfocalmicroscopycandetectupto
fourchannels(3fluorescenceand1
transmission)simultaneouslyaslongasall
theexcitationandemissionspectraof
fluorophoresarewellseparated.Imagingof
samplesstainedwithdifferentdyesthus
simplyrequiresmanipulationoflaserpower
andadjustmentofthedetectorbandwidth.
However,oftenexcitationofone
fluorophoremaycausetheemissionto
appearintotherangeofanother(bleed‐
through)orcanbeinducedbyneighboring
laserlines(cross‐talk),bothofwhich
producefalsesignals.Toavoidthese,the
sampleshouldbescannedsequentiallyby
collectingonefluorophoresignalatany
giventime.Therearetwowaystosetup
sequentialscanmodedependingon
fluorescenceofyoursample.
Toscansequentiallythesamplewithoutneedtouse405nmUVlaser(noDAPIstaining):
1. Choosethebeamsettingparameter
foryourfluorophores(forexample,
GFPandDsRED)byselectingtheLeica
FITC‐TRITCfromthepresetlist).Itwill
setlaserlines,dichroicmirror,and
PMTsforsimultaneousimagingofthe
twocolors.

2. Setupaconditionforone
fluorophore(i.e.FITC)byonly
activatingandadjustingthelaserlevel
andthePMT(i.e.decreasethe561
nmlaserpowerto0%anduncheck
thePMT2Activebox).

3. ClickSavebuttonbontheBeamPath
Settingpanelandtypeanameforthis
setupasyourownsetting(i.e.“GFP‐
seq”).ClickOKandthesettingwillbe
intheUsersetlist(Uinfrontofthe
settingname).

4. Repeatthesameprocessfortheotherfluorophore(i.e.TRITC)andsavetheconditionasanothersetting
(i.e.“DsRED‐seq”).MakesuretouncheckthePMT1Activecheckboxandlower488laserlevelto0%.

b
LMW Microscopy Lab : Leica SP2 Page 10 `6/26/2012
5. ClicktheSeqbuttonin the
BeamPathSettingwindow.The
Sequentialscansettingswindowc
willappear.Addthefluorophore
acquisitionsettingoneatatimeby
selectingitfromthepresetlistmenu
andthenclickAddbuttoninthe
Sequentialscansettingswindow.

6. Keepthescanmodedat“between
lines”.DonotclosetheSequential
scansettingswindow.
Youcansavethissequential
acquisitionsettingsbySavebutton
e intheSequentialscansettings
window.

7. Starttheacquisitionbyclicking
SingleScanorSeriesbutton
dependingonyourimaging
condition.

























c
d
e