LEMI ELBA PEDI SPA User manual

CAPRI-ELBA PEDI SPA
INSTRUCTION FOR USE ............................................................
ISTRUZIONI PER L’USO .............................................................
NOTICE D’UTILISATION .............................................................
BEDIENUNGSANLEITUNG .........................................................
pag. 3
pag. 17
pag. 31
seite. 45
ORIGINAL INSTRUCTIONS
CAPRI PEDI SPA
ELBA PEDI SPA

2
This equipment has been designed and built using state of the art technologies and processes to gua-
rantee the best reliability in the me and ensure maximum safety.
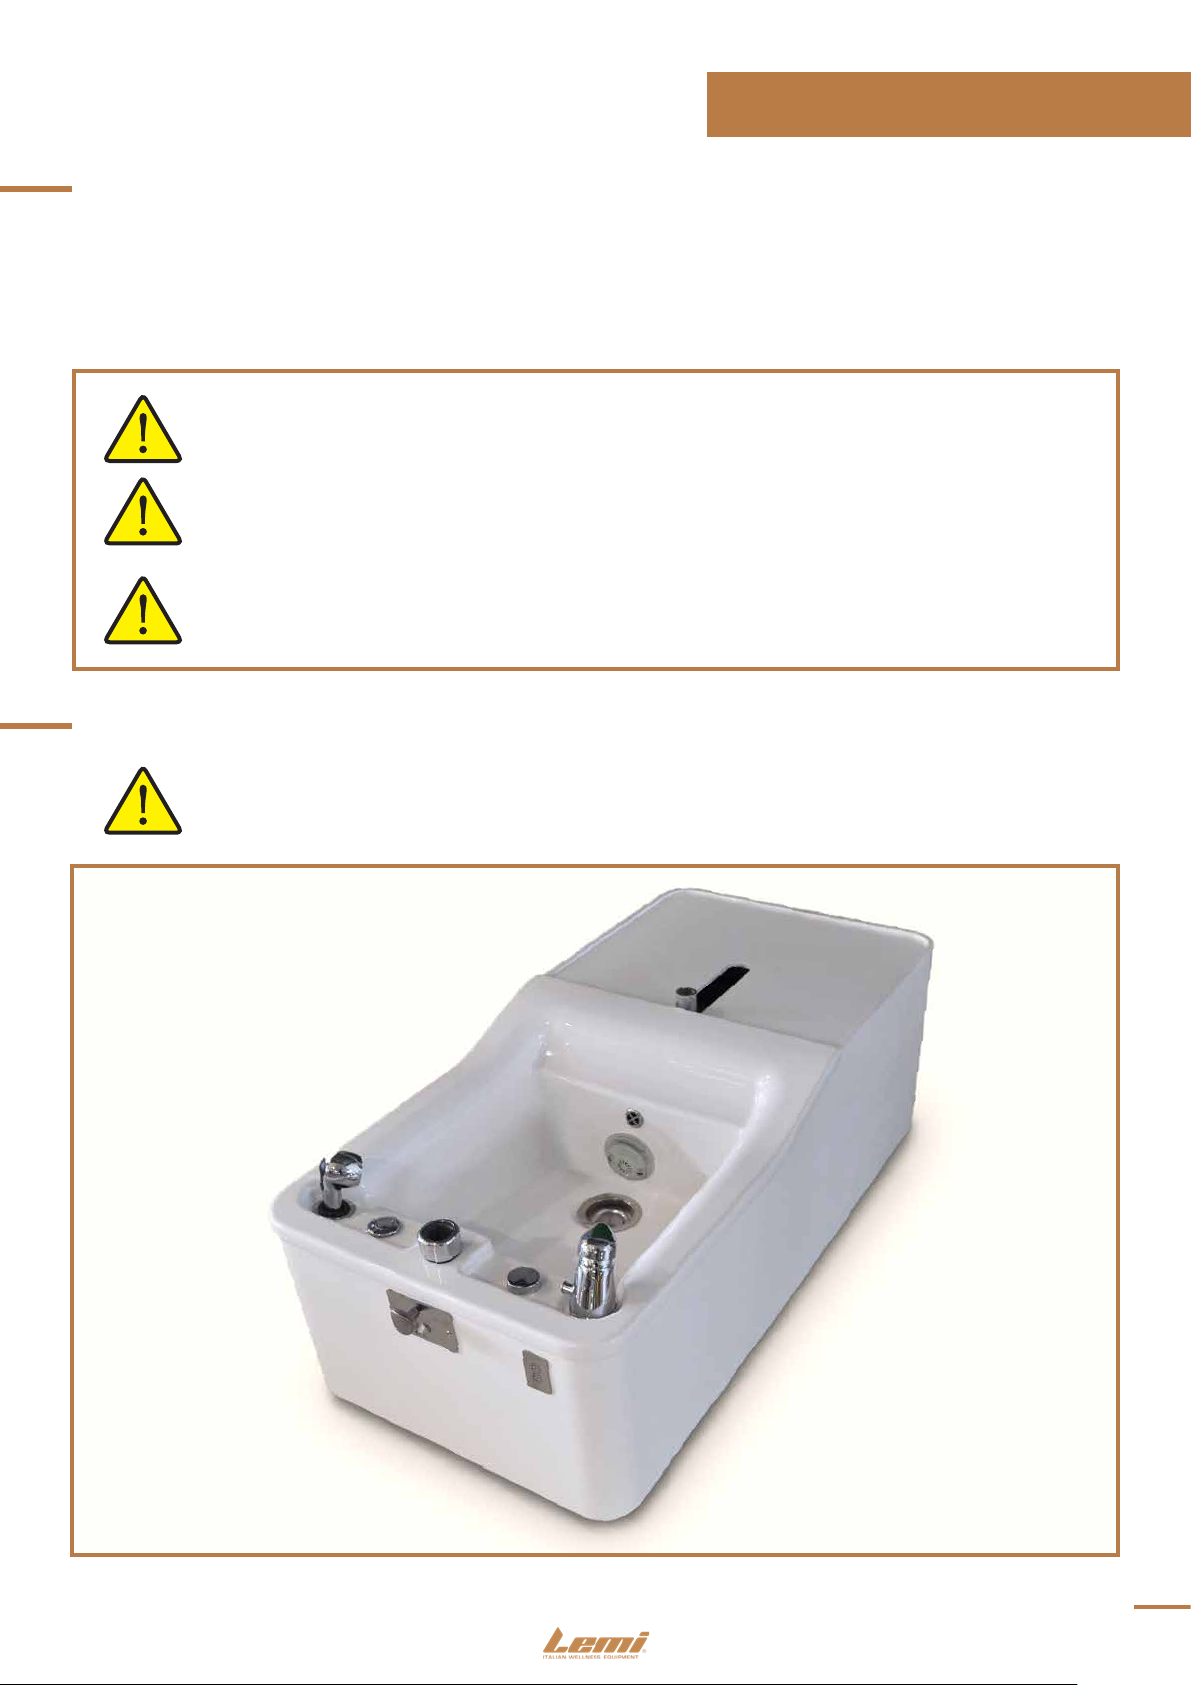
This equipment is suitable for professional pedicure.
For a correct and safe operaon of the equipment is essenal to carefully read and observe what is in-
dicated in this manual. All documentaon accompanying the equipment – and in parcular this manual
– must be carefully preserved for future reference.
Questa apparecchiatura è stata progeata e costruita ulizzando tecnologie e procedimen allo stato
dell’arte per garanrne la migliore adabilità nel tempo ed assicurarne la massima sicurezza.
Questa apparecchiatura è adaa per traamen professionali di pedicure.
Per un correo e sicuro funzionamento dell’apparecchiatura è indispensabile leggere aentamente ed
osservare quanto indicato nel presente manuale. Tua la documentazione di corredo dell’apparecchia-
tura - ed in parcolar modo il presente manuale - deve essere accuratamente conservata per riferimen-
futuri.
Cet équipement a été conçu et construit en ulisant des technologies et des procédés de qualité élevée
an de garanr la plus grande abilité à long terme et d’assurer la plus grande sécurité.
Cet équipement a été conçu pour les traitements professionnels de pédicure.
Pour un bon fonconnement de l’équipement il est indispensable de lire aenvement et de respecter
les indicaons fournies par la présente noce. Toute la documentaon fournie avec l’équipement doit
être soigneusement conservée pour ulisaon ultérieure.
Diese Liege wurde verwendend die modernster Technologien und Prozesse entwickelt und gebaut, um
die beste Zuverlässigkeit in der Zeit und die maximale Sicherheit zu versichern.
Dieses Gerät ist für die professionelle Pediküre geeignet. Für einen korrekten und sicheren Betrieb der
Liege ist es wichg, was in diesem Handbuch angegeben sorgfälg zu lesen und beachten,. Die ganze
Unterlagen geliefert mit der Liege – und insbesondere dieses Handbuch – es muss sorgfälg für die
Zukun erhalten bleiben.
EN
IT
FR
DE

3
EN- INSTRUCTION FOR USE
GENERAL REGULATION
INSTALLATION
OPERATING PROCEDURES
CLEANING
pag. 4
pag. 5
pag. 9
pag. 13
pag. 14
pag. 16
pag. 17
1.
5.
6.
3.
2.
4.

4
1. GENERAL REGULATION
Rev. 01-02/'14
62 cm
24,4"
86 cm
33,9"
128 cm
50,2" 5 cm
2,0"
45 cm
17,9"
15 cm
5,8"
53 cm
21,0"
39 cm
15,3"
131 cm
51,7"
10 cm
3,9"
50°
DESCRIPTION OF PRODUCTS
1. Water temperature mixer (tap)
2. Diverter for manual hand shower
3. Drain handgrip
4. Start buon
5. Hand shower
6. Adjustment buon of seat posion
7. Handgrip for vercal adjustment of the footrest
8. Drain
9. Hydromassage Magna jet
10. Full drain
11. Frame of the handrest tray
12. Handrest tray
1
2
3
4
5
7
8
9
10
11
12
6

5
7. Handgrip for vercal adjustment of the footrest
8. Drain
9. Hydromassage Magna jet
10. Full drain
11. Frame of the handrest tray
12. Handrest tray
2. INSTALLATION
Important: CAPRI / ELBA PediSpa were designed to be installed as a xed unit and they have to
be posioned in an appropriate structure and on a stable oor.
All equipment containing water at a working level, weighs about 141 Kg.
It is recommended to consult a technician before posioning the equipment in a suitable cabin.
NEVER LIFT CAPRI / ELBA PEDISPA BY TAKING THE WOODEN COVER.
ATTENTION! The pedicure staon is equipped with 4 perimeter adjustable feet. It is
important that the 4 feet are regulated to level each imperfecon of the oor.
ATTENTION! To posion in the cabin or move of your pedicure staon, place your
hands under the wooden basin cover taking only the metallic frame base.
ATTENTION! Capri / Elba Pedispa will be delivered with the chair disassembled from the ba-
sin shown in the gure below.

6
- HOT WATER (RED) 3/8 female
- COLD WATER 3/8 female
ATTENTION! All hydraulic connecons must be realized by a licensed plumber according to
the local and naonal plumbing requirements.
ATTENTION! Before connecng hot and cold water pipes to the water supply system, let the
water ow from the water supply to make sure that all wastes come out from the inner piping.
Drain connecons are
Ø40 mm PVC exible pipe.
HOT WATER
COLD WATER
STEP 1: Remove the upper covering plate.
Remove the rear wooden cover
STEP 2: Unscrew the 4 screws using the suitable
key to remove the rear wooden cover
Remove the le lateral wooden cover.
- Hot and cold water pipes connecons must be realized with
1/2” or similar.

7
For a regular ow of water we suggest the Ø40 mm
oor drain as low as possible (oor level).
Connecons must be realized according to the
requirements of the exisng local and Naonal rules.
We recommend to use resistant les on the surrounding
oor. In addion to the Capri PediSpa drain, we
recommend to slope the oor towards a second drain in
case of water oulow.
if there is incompability between the socket and the plug of the equipment, replace
the socket with a suitable type by professionally qualied personnel. Pull the plug from the power
outlet grasping the plug, not the cable.
Insert the plug into a suitable electrical socket to operate the appliance.
Make sure that the brass ring on the pin remains xed when you place the seat.
To x the armchair on the basin, take the metal
part that connects the arm to the back and place the pin
inside the hole on the metal frame of the basin.
Unscrew the screw on the pin of the seat.
Screw to x the seat.

8
Reassemble the le and right wooden
cover sliding as shown in the picture.
Fix the rear wooden cover screwing the 4
screws (2 upper and 2 lower) using the appropriate key.
Install the foot rest in the appropriate hole
as shown in the picture. For its adjustment, see
“3. Operang procedures”.
Reassemble the rear wooden cover in the
appropriate guides and pressing on the sides to x it.
Close the upper covering plate.

9
3. OPERATING PROCEDURES
(ONLY FOR CAPRI PEDI SPA)
Press the AUTO FILL buon to automacally ll the basin
(sensor up to the set level).
When water reaches the level, the water outlet stops and the jet of
air (hydro massage) acvate automacally.
(ONLY FOR CAPRI PEDI SPA)
(FOR ELBA PEDI SPA)
To acvate the hydromassage press the buon with the icon,
once the water has reached the magna jet level.
To acvate the hydromassage on , press the whole
buon.
Press the TAP buon for manual lling. To stop the water outlet,
press again the tap buon.
ALWAYS COVER
Before lling your Capri Pedi Spa/Elba Pedi Spa with water, make sure the basin is clean and sterilized and
that any debris is inside the basin to avoid the risk of scratching the acrylic surface.
Open the water tap and adjust the water temperature by turning it on the right for hot water, and le for
cold water.

10
ATTENTION!
B.
ABSENCE OF WATER
A.
C.
PARTIAL FILLING
(A).
BC
In case your Capri Pedi Spa has operang problems, in parcular with the system iFill-Auto auto ll, we
suggest you proceed with the following reset procedure:
1) Switch o the power to the machine for a few seconds, wait a few
seconds and then connect the Capri Pedi Spa to the power supply again.
unl it emits a prolonged
sound and as soon as the pressure is released the leds will start to ash.
2) Aer hearing the sound,

11
To use the hand shower, pull the diverter placed on the
tap and rotate it to lock. In this way, water will ow out
from the hand shower. Place the hand shower in the ap-
propriate hole on the le of the basin when you do not
use it.
3.7. Drain
Rotate le/right to close or open the drain
To adjust the footrest height, unscrew
anclockwise the front knob and move the
upholstered part up or down with the other
hand. Rotate clockwise to x the posion.
1. Remove it from the basin
2. Rotate the 2 plasc covers to open
3. Separate the 2 plasc parts
4. Remove the internal impeller
5. Clean it:
- 5.1. Place the plasc covers and the impeller in a bath with
20 cl Saniguest detergent
- 5.2. Cover with clean water
- 5.3. Soak for about 2 hours
- 5.4. Dry with a so clean cloth, do not use abrasive sponge
6. Reassemble the parts
7. Place the jet on the basin
The magna jet must be posioned with the holes
horizontally.
Thanks to the magnet, the component will x to the
basin.

12
To adjust the recliner of the seat, pull the lever
on the right side of the chair and move the back
of the seat.
Release the lever to x.
The chair can rotate 180° from side to side to facilitate access to the customer. Move the chair le or right.
Place the metal frame on each armrest.
Place the tray on the frame.
To slide the upholstered cushion forwards or
backwards, unscrew the black knob and screw
to x the posion
The seat is electrically adjustable forwards or
backwards.
To adjust the seat, press the buons in the front
side of the basin.
ATTENTION! The client should never be allowed to enter or exit the chair except in “rotated” posion.

13
Perimetro esterno
poltrona
VOLTAGGIO 220V 2 FASI+TERRA
PRESA 10A MIN
Portata impianto elettrico:
Alimentazione elettrica
spina schuko
86 cm
33,7"
Perimetro esterno
vasca
Tubo
O
40
uscita scarico
a terra
Attacco 3/8" F sulla macchina
entrata acqua calda
Attacco 3/8" F sulla macchina
entrata acqua fredda
20 cm
7,8"
10 cm
4,0"
10 cm
3,8"
20 cm
7,8"
8 LITRI / MINUTO
Portata impianto idrico:
ATTENZIONE: PER SCARICO
A PARETE, VA AGGIUNTA
LA POMPA DI SCARICO
(OPTIONAL)
Voltaggio 220v 2 fasi + terra
Presa 10A min
8 litri / minuto
ATTENZIONE! P

14
Degreasing solvent-based agents: e.g. ACETONE, DENATURED ETHYL ALCOHOL, TRICHLOROETHYLENE, FUEL,
TURPENTINE…
Watered-down acids (HYDROCLORIDRIC ACID, NITRIC ACID) or products containing watered-down acids
Watered-down bases (CAUSTIC SODA, SODIUM HYPOCHLORITE, AMMONIA, BLEACH) or products containing
weak bases
Fluorinated hydrocarbons (e.g. LEAKS FROM REFRIGERANT GAS)
Food-grade oils (e.g. OLIVE OIL, SEEDS OIL)
Lubricang mineral-based oils
Soap water (neutral soap)
So sponge
It is forbidden to use the following products which could seriously damage the plasc covering, pro-
voking cracks and the subsequent breaking:
To CLEAN the basin we recommend:
Always rinse with clean water and dry with a so, not abrasive cloth.
We suggest to cover the chair with a towel or disposal sheet before the client sits.
FIBERGLASS BASIN CLEANING
CHAIR CLEANING
Pay parcular aenon to the jeans that can stain the covering without any possibility of being removed.
Clean the chair before each use, paying parcular aenon to remove all traces of physiological uids of
the previous paent.
To clean the chair use a cloth and lukewarm water (if necessary diluted neutral detergent). If necessary, use
a non-aggressive disinfectant, then wipe o with a clean dry cloth.
Do not use products such as alcohol, acetone, bleach, paint thinner, gasoline.
5. CLEANING

15
1) AFTER
Empty the basin, SPRAY the basin with contact disinfectant SANIGUEST and clean it with a so sponge or cloth. Rinse
the basin with the hand shower.
2) REGULARLY
SPRAY the basin with GO KAL an-scale, carefully avoiding contact with eyes and skin. Clean it with so sponge or
cloth. Let water ow from jets copiously for some seconds in order to remove any strong deposit. Rinse with hand
shower.
Do not use any cream or powder cleanser, pure disinfectant or any scratching sponge or cloth!
DO NOT USE BLEACHING SOLUTION OR ANY OTHER CORROSIVE PRODUCTS TO CLEAN THE CHAIR
N.B. If you need to order our SANIGUEST and GO KAL disinfectant, please contact us by phone +39/0374/36.30.69 or
email order[email protected]
The strict observance of these easy cleaning and maintenance instrucons will keep your basin clean, white and
bright for long me.

16
133 cm
52,4"
86 cm
33,7"
CAPRI PEDI SPA
ELBA PEDI SPA

17
IT- ISTRUZIONI PER L’USO
REGOLAZIONE GENERALE
INSTALLAZIONE
PROCEDURE OPERATIVE DI UTILIZZO
PULIZIA
pag. 18
pag. 19
pag. 23
pag. 27
pag. 28
pag. 29
1.
5.
6.
3.
2.
4.

18
Rev. 01-02/'14
62 cm
24,4"
86 cm
33,9"
128 cm
50,2" 5 cm
2,0"
45 cm
17,9"
15 cm
5,8"
53 cm
21,0"
39 cm
15,3"
131 cm
51,7"
10 cm
3,9"
50°
DESCRIZIONE ARTICOLI
1. Miscelatore temperatura acqua (rubineo)
2. Deviatore per doccino manuale
3. Manopola scarico
4. Pulsante di avviamento
5. Doccino manuale
6. Pulsante regolazione seduta
7. Manopola regolazione vercale poggiapiedi
8. Scarico
9. Motore (girante)
10. Scarico Troppo pieno
11. Telaio vaschea poggia mani
12. Vaschea poggia mani
1. REGOLAZIONE GENERALE
1
2
3
4
5
7
8
9
10
11
12
6

19
7. Manopola regolazione vercale poggiapiedi
8. Scarico
9. Motore (girante)
10. Scarico Troppo pieno
11. Telaio vaschea poggia mani
12. Vaschea poggia mani
2. INSTALLAZIONE
CAPRI / ELBA PediSpa sono state progeate per essere installate come unità sse e devono
essere posizionate in una struura appropriata e su pavimento stabile.
L’intera arezzatura contenente acqua a livello di lavoro, pesa circa 141 Kg.
Si raccomanda di consultare un tecnico prima di posizionarla per accertarsi che il supporto sia idoneo.
ATTENZIONE! Capri / Elba PediSpa è dotata di 4 piedini regolabili perimetrali. E’ importante che
tu e 4 i piedini siano regola per livellare ogni imperfezione del pavimento.
ATTENZIONE! Per il posizionamento in cabina o per spostare la vostra Capri / Elba PediSpa
posizionare le mani al di soo del carter di legno impugnando il telaio metallico soo-
stante.
ATTENZIONE! Capri / Elba PediSpa vi sarà consegnata con la vasca separata dalla poltrona
come da gura soostante.

20
- ACQUA CALDA (BORDO ROSSO) 3/8 femmina.
- ACQUA FREDDA 3/8 femmina.
ATTENZIONE! Tu i collegamen idraulici devono essere realizza da un idraulico secondo le norma-
ve nazionali vigen.
ATTENZIONE! Prima di collegare l’acqua calda e fredda al sistema di fornitura dell’acqua, far
scorrere l’acqua per accertarvi che tu i residui escano dalle tubazioni interne.
I collegamen idraulici
(scarico) sono in PVC essibile Ø40 mm.
Rimuovere l’ asse di copertura
Slare il carter di legno posteriore
Svitare le 4 vi con l’apposita chiave per
togliere il carter di legno posteriore
Slare l’asse laterale sinistro
- I collegamen dell’acqua calda e fredda devono essere fa
con tubazioni da 1/2” o equivalen. ACQUA CALDA
ACQUA FREDDA
This manual suits for next models
1
Table of contents
Languages:
Other LEMI Spa Accessories manuals
Popular Spa Accessories manuals by other brands

Takara Belmont
Takara Belmont YUME ESPOIR installation instructions

AREBOS
AREBOS Copenhagen Original user manual

Gecko
Gecko in.ye-V3 Tech book

Leisure Concepts
Leisure Concepts Covermate III installation instructions

Leisure Concepts
Leisure Concepts Covermate III installation guide

COVANA
COVANA OASIS COVER owner's manual