LEMI PEDI SPA User manual

PEDI SPA- PEDI SPA ECO
INSTRUCTION FOR USE ............................................................
ISTRUZIONI PER L’USO .............................................................
pag. 3
pag. 17
ORIGINAL INSTRUCTIONS
PEDI SPA PEDI SPA ECO

2
This equipment has been designed and built using state of the art technologies and processes to gua-
rantee the best reliability in the me and ensure maximum safety.
This equipment is suitable for professional pedicure.
For a correct and safe operaon of the equipment is essenal to carefully read and observe what is in-
dicated in this manual. All documentaon accompanying the equipment – and in parcular this manual
– must be carefully preserved for future reference.
Questa apparecchiatura è stata progeata e costruita ulizzando tecnologie e procedimen allo stato
dell’arte per garanrne la migliore adabilità nel tempo ed assicurarne la massima sicurezza.
Questa apparecchiatura è adaa per traamen professionali di pedicure.
Per un correo e sicuro funzionamento dell’apparecchiatura è indispensabile leggere aentamente ed
osservare quanto indicato nel presente manuale. Tua la documentazione di corredo dell’apparecchia-
tura - ed in parcolar modo il presente manuale - deve essere accuratamente conservata per riferimen-
futuri.
EN
IT

3
EN- INSTRUCTION FOR USE
GENERAL REGULATION
INSTALLATION
OPERATING PROCEDURES
CLEANING
pag. 4
pag. 5
pag. 9
pag. 13
pag. 14
pag. 16
pag. 17
1.
5.
6.
3.
2.
4.

4
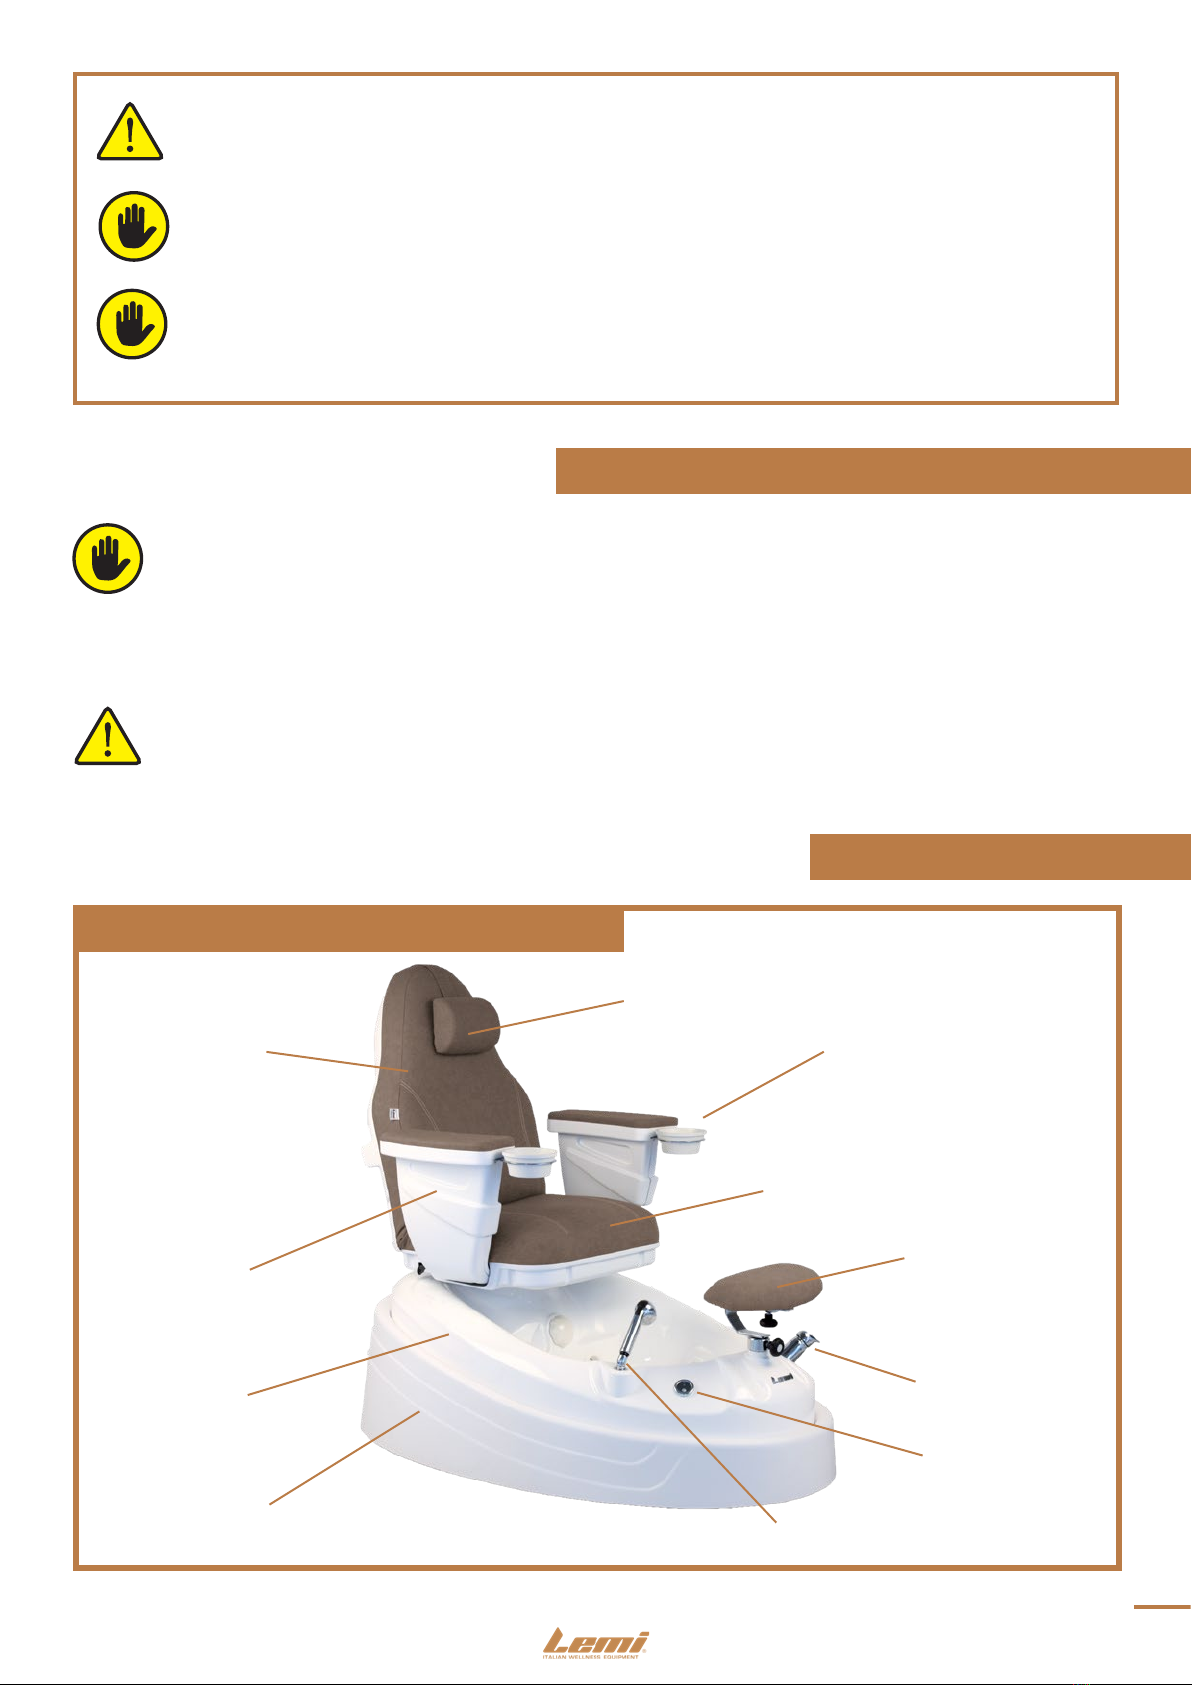
The equipment has been designed and built for the execuon of spa manicure and spa pedicure treatments, facial
treatments.
1. INTRODUCTION
The successful and safe operaon of the equipment is guaranteed only if it is used in accordance
with the specicaons in this manual and, in general, in the accompanying documentaon; therefore
it is essenal to carefully read and keep all the relave documentaon. Although the equipment is
equipped with acve and passive safety features, not all risks can be avoided due to its incorrect use.
You must always make sure that all users have fully understood the rules of use; the manufacturer
declines any responsibility for damage to persons or property resulng from improper use of the device. Do not re-
move or damage the labels, noces and warnings placed on side of the equipment. In case you need to restore them,
please contact the manufacturer. The manufacturer Brusaferri & C., declines any and every responsibility for failure to
observe the rules of safety and prevenon described in the various secons of this manual and for any damage caused
by improper use. All intervenons on the equipment (maintenance, adjustments, repairs, cleaning) must be carried out
by suitably trained personnel and in accordance with what is indicated in this manual.
This operang manual should be kept for future reference. We recommend:
In the case of sale or transfer of the equipment to another person, this manual and its annexes should be delivered
intact to the new users.
Keep the manual in a place accessible and known to all operators, protected from moisture and heat and
protected from the direct sun beams. Use the manual in order not to damage any part of the content: do
not remove, tear or modify any part of the manual.
The equipment is provided with labels with the following data, in conformity with actual rules

5
The equipment can be raised and moved manually by two or four people ,taking it exclusively by the mechanical frame.
The equipment is shipped packed in a carton box. Open the box so you can freely li the equipment.
The weight of the equipment (without water in the tub) is 74 kg.
The equipment contains 20/25 liters of water at working level.
2. TRANSPORT AND INSTALLATION
ATTENTION!
ATTENTION! To posion in the cabin or to move your PediSpa / PediSpa Eco, remove the perimeter ring
and place your hands below, holding the metal frame.
ATTENTION! PediSpa / PediSpa Eco will be delivered with the seat disassembled from the basin.
The use of non-slip les on the surrounding oor is recommended. It is advisable to lt
the oor towards a second drain in case of water spillage.
The user must ensure that the lighng of the work areas is sucient to allow a good view of the operaons and all
elements of the equipment; the level of lighng should be in accordance with the UNI EN 12464-1; in parcular should
be avoided shadows and annoying glare.
It is recommended to consult a technician before placing the equipment, to ensure that the support is suitable. The
ooring on which the equipment will be placed must be solid, smooth, horizontal and adequate to support its weight
and ensure the stability. Adjust if necessary by screwing or unscrewing the feet.
ATTENTION! Pedi Spa/Pedi Spa Eco is supplied with 8 adjustable
feet, 7 on the perimeter and 1 - very important - located under
the central part of the basin. All 8 feet (especially the one under
the basin) must be adjusted in order to level o all ground
defects.

6
Protected against overcurrent by an automac circuit breaker (circuit breaker) or fuses, properly sized; the ope-
rang current of the protecons must be as low as possible taking into consideraon the maximum absorpon
of the device;
Equipped with a device sensive to insulaon failure (dierenal) with operang current low enough; this device
must be posioned downstream of the overcurrent protecve device (or be integrated with it);
Having cables with secon suitable for the power absorbed by the appliance.
To avoid the risk of electric shock, this appliance
The equipment has been designed and built to operate in a closed and dry room. The ambient operang condion are:
• temperature: 5° ÷ 40° C
• humidity: 30% ÷ 75% without condensaon.
If the environmental condions are parcularly crical it is advisable to provide the room with an adequate air condi-
oning system to bring the humidity and temperature values within acceptable limits.
%
The system of power supply must have voltage and frequency equal to the rated voltage and frequency of the power
supply of the device and be appropriate to the installed capacity, as indicated on the idencaon plate of the equip-
ment.
Voltage
Frequency
Power / Absorpon
Power supply
Duty cycle
IP Protecon
230 V
50/60 Hz
2,4 A max
Alternate Current (AC) One Phase L+N
2 min work / 18 min at 10% maximum
IP54
Control box class II
The equipment is provided with 8 adjustable feet that enable to level it perfectly and to compensate any failing of the
ooring. The regulaon can be done by screwing or unscrewing the feet.
The posion of the equipment compared to xed obstacles must be such as to allow the easy passage for the use
and maintenance; in parcular, the minimum space to allow the passage of persons shall be equal to 650 mm (in
accordance with UNI EN 349:2008). The minimum distance between the completely lowered back and xed obstacle
has to be 500 mm, in order to avoid the body to be crashed by the equipment.

7
PEDI SPA / PEDI SPA ECO
ON/OFF
Tap
Before using the equipment, please check that:
- the equipment does not present any damage arising from transport or handling; if needed, please
contact the seller or the manufacturer
- all packing (carton box, foam, plasc) have been removed;
- the voltage of your cabin is the same as the voltage showed in secon 2.6 Power Supply;
- all control devices (electrical or manual) work correctly
- For the installaon, please contact qualied personnel only.
- Before the seng at work of the equipment itself, run a few idling cycles test, in condions of safety, by
qualied personnel.
5. DESCRIPTION

8
1 - Rear Hydrojets
2 - Boom Hydrojets ONLY
3 - Hydro-pump Sucon Inlet
4 - Side Hydrojets
5 - Drain & Overow Control
6 - Hand Shower
7 - ON/OFF buon
8 - Footrest Support
9 - Thermostac Water Control
Aqua/Aero Control Adjustment ONLY
11 - Removable Lower Skirt Assembly
12 - Seat Orizontal Adjustment
13 - Seat Reclining Back Adjustment
14 - Removable Manicure Bowls
ARTICLES DESCRIPTION PEDI SPA / PEDI SPA ECO
1
2
6
4
5
3
8
9
10
11
12 13
14
7

9
(RED BORDER) 1/2” male
1/2” male
- DRAIN: Ø40 mm PVC exible pipe
ATTENTION! All hydraulic connecons must be realized by a licensed plumber according to the local and
naonal plumbing requirements.
ATTENTION! Before connecng hot and cold water pipes to the water supply system, let the water ow
from the water supply to make sure that all wastes come out from the inner piping.
If the tap is connected directly to a salt water supply, it is essenal that a fresh water ushing system is
also provided. This will ensure that the internal components of the tap are ushed with fresh water aer
being exposed to salt water.
HOT WATER
COLD WATER
6. CONNECTIONS
Risk of electric shock. This system must be connected to a suitable electrical supply source
by a licensed electrician, in accordance with local and naonal electrical codes.
ATTENTION! For a regular ow of water we suggest
the Ø40 mm oor drain as low as possible (oor level).
Connecons must be realized according to the
requirements of the exisng local and Naonal rules.
EARTH
N
L
Internaonal: LEMI PEDI SPA
Brown = live
Blue = neutral
Yellow / Green = earth
YELLOW / GREEN

10
Use the nuts and washers provided to secure
from the boom (under the bowl) and ghten using a
13mm wrench.
Posion the seat by aligning the seat base
aachment bolts with the holes in the acrylic base.
Do not obstruct the air gap between the boom of the system and the oor in any way.
It may cause component overheang and damage to your equipment.
ATTENTION CAREFULLY AND THOROUGHLY READ AND FOLLOW ALL INSTRUCTIONS.
VENTILATION
This system is designed to be operated and normally cooled by the standard venlaon means, allowing normal air
ow beneath and around electrical and hydro-pump assemblies. Feet are designed to elevate the system and provide
an adequate venlaon area by providing an air gap between the boom of the covering or skirt and the oor.
7. OPERATING PROCEDURES FOR USE
DANGER: this system is not designed for use by or for children.
Use this unit only for its intended use as described in this manual. Do not use aachments or products not
recommended by the manufacturer.
Never drop or insert any object into any opening.
Do not operate this unit without the guard over the sucon ng.
A green with yellow wire marked by the grounded (earthing) symbol is provided within the Electrical Box
To reduce the risk of electric shock, connect this terminal or connector to the grounding terminal of your
electric service.
ATTENTION
Remove all packaging material and inspect system thoroughly to ensure that no damage has
occurred during handling/transportaon. If this occurs, immediately make a complaint to the carrier /
retailer.
Select installaon locaon in accordance with the instrucons stated in the “Posioning” secon
of this manual (2.4.). When selecng locaon, consideraon must be given to the proximity of the
electrical and hydraulic connecons.

11
Electrical and plumbing connecons can now be made in accordance with locaon plumbing and electrical
codes. Refer to “Electrical and Plumbing Connecon” secons of this manual for technical support informaon.
Once the electrical and plumbing connecons are made, the system should be lled with water and tested so
that all plumbing and ng can be inspected prior to ng the enclosure skirt.
DO NOT OPERATE THE IN THE
AS SHOWN.
Test the system by lling the tub at the level indicated
below. This will prevent water splashing from the tub
when the system is running.
Note: the drain of the tub must be closed before lling
it with water.
ATTENTION!
The equipment features a level probe that guarantees the acvaon of the hydromassage.Below this
level, the whirlpool does not operate.
WARNING! during the lling phase to avoid overow.
WATER LEVEL
WARNING! When water tesng the system and before lling the system with water, all electrical
enclosure boxes must be closed and covers secured to prevent water inltraon, should leaks occur.
Check that the seat and footrest have been adjusted and locked
Fill the tub unl the water level reaches the above limit (drain knob)
For opmum hygiene, clean the feet and lower legs of each customer before using the equipment, using an
appropriate ansepc detergent soluon.
Always assist the client while sing or geng up from the equipment once the treatment is nished (posion the
seat sideways to facilitate the entry/exit)
Never leave the customer alone.
make sure that:
the basin is immaculately clean and sterile
the drain is closed (it opens and closes by turning the special knob)
the 6 jets around the perimeter are open (rotate counterclockwise)
and directed downwards to prevent water splashing from the tub
Make sure that the jets are open and directed downwards. The jets
can be opened, closed or adjusted by turning the white ring of each jet
clockwise or counterclockwise. Make it a general procedure to always
keep the jets in the open posion unl you are familiar with your system.
Open the water tap and adjust the water temperature by turning the knob to the right for hot, le for cold.
in the version, the water will only come out of the hand shower.
WATER TAP
DIVERTER

12
Once the water tub is lled, to acvate the whirlpool, press the ON/OFF buon
to allow the system to operate for 20 minutes.
If spills occur, turn o the system, drain the water
(see § 7.7.) and turn o the power.
In case of leakage make sure that all components are ghtened. If
necessary contact the manufacturer or supplier for repair or replacement
of components. Aer compleng the water check, mount the perimeter
ring of PediSpa/PediSpa Eco.
Not all products can be used in the equipment.
Recommended products: water-soluble salts, micronized
seaweed with sea salts, water-soluble oil.
ATTENTION! If you use any products containing clay, oils or abrasive products, the equipment may be
damaged in just a short me resulng in potenally expensive repair costs that may not be covered
under warranty.
The euipment features a Corona Discharge Ozone Generator. Ozone is a natural bacteriocidal and germicidal gas.
It preserves water and air from microorganisms and harmful bacteria. The ozone generator acvates automacally
when the pump is turned on.
Besides its ansepc, anbacterical and anviral properes, ozone notably improves the oxygen ow into ssues.
Ozonized hydromassage is extremely relaxing and represents a very good remedy for stress, by providing a pleasant
well-being sensaon.
REGULATIONS FOR USE
Duty Cycle: max 20 minutes, 3 mes a week.
Each of the 6 side and jets can be individually adjusted both
direconally and in the open/closed posion.
OPEN CLOSE

13
If you want to add micro air/ozone bubbles to the water, open the
aeraon control aer adding your products. Air will enrich the water
with oxygen, help smulate the skin and acvate the product ingredients
for beer absorbancy into the skin for more eecve treatment and
desirable results.
To adjust aero control, turn the knob counterclockwise to decrease,
clockwise to increase.
If a drain pump is installed on the equipment, follow the instrucons below to empty the tub.
Open the drain knob.
Press the DRAIN buon on the tub: the drain pump is acvated and the tub begins to empty.
GREEN LED
the machine is powered
FLASHING: the “DRAIN” funcon is running
RED LED
remains on during “DRAIN” funcon (ashing green light)
Aer about 2/3 minutes the pump will turn o automacally and the tub will be empty. The green LED will remain
steady and the red one will turn o.
Rinse the tub.
ATTENTION! If you want to turn o the drain funcon the automac shutdown, simply press
the DRAIN buon again.
Shut o the pump and open the drain by turning drain/overow knob
counterclockwise.
When basin is empty, rinse with the hand shower, clean and sanize the
basin area, remove and sanize the jet assemblies, and re-assemble so
that the client will be ready for the next guest.
ATTENZIONE! Proper cleaning and sanitaon is
extremely important and cannot be over emphasized.
ATTENTION! In the version with drain pump, the equipment features a second buon in addion to the
ON/ OFF, relave to the DRAIN.

14
The seat can be adjusted forward or backward by pressing the
side buon, while a praccal lever allows you to adjust the
inclinaon of the backrest (preferably with the guest sing
on the equipment). Once you have selected the ideal posion,
release the buon or lever to lock it.
The equipment can rotate 180° on both sides to facilitate
access to the guest, simply by moving it unl it reaches the
end of the ride, both on one side and on the other.
ATTENTION! The customer must access the seat when the equipment is in the “rotated” posion, sit-
ng on the equipment and then resng his feet in the tub.
ATTENTION! The customer should NOT STAND in the tub.
To use the hand shower, pull the diverter (located to the le of
the water tap) and turn it to lock it. In this way the water will
come out of the hand shower. Adjust the ow of the jets accor-
ding to your preferences using the buon above the head of
the showerhead. Once nished, reposion the hand shower in
its seat (facing the inside of the tub).
HAND SHOWER DIVERTER
the diverter is present only on PEDI SPA. In the ECO
version, the water comes out directly from the hand shower.

15
The footrest is adjustable in height and depth.
To adjust the height, unscrew the knob on the front and adjust
the posion of the footrest. Tighten the knob to secure the
posion.
To adjust the depth, turn the knob under the footrest with one
hand and adjust the posion with the other. Tighten the knob
to secure the posion.
Place the metal frame on each armrest.
Place the tray on the frame.
8. CLEANING
FILTER CLEANING
The lter of hydro-pump sucon inlet should be cleaned every 15/20 days in order to always keep your basin in good
condion
ATTENZIONE! When the lter of hydro-pump is clogged, the poor water sucon can make your Pedi
SPA noisier.
Remove the cover from hydro pump sucon by turning ANTICLOCKWISE
Remove the lter and rinse copiously with water in order to remove impuries.
Put the cleaned lter back in its original posion and close by turning the cover clockwise. Pay aenon to the correct
lter posion.
1 32

16
We suggest to cover the equipment with a towel or disposal sheet before the client sits.
Pay parcular aenon to the jeans that can stain the covering without any possibility of being removed.
Clean the equipment before each use, paying parcular aenon to remove all traces of physiological uids
of the previous paent.
To clean the equipment use a cloth and lukewarm water (if necessary diluted neutral detergent). If neces-
sary, use a non-aggressive disinfectant, then wipe o with a clean dry cloth.
Do not use products such as alcohol, acetone, bleach, paint thinner, gasoline.
Degreasing solvent-based agents: e.g. ACETONE, DENATURED ETHYL ALCOHOL, TRICHLOROETHYLENE, FUEL,
TURPENTINE
Watered-down acids (HYDROCLORIDRIC ACID, NITRIC ACID) or products containing watered-down acids
Watered-down bases (CAUSTIC SODA, SODIUM HYPOCHLORITE, AMMONIA, BLEACH) or products containing
weak bases
Fluorinated hydrocarbons (e.g. LEAKS FROM REFRIGERANT GAS)
Food-grade oils (e.g. OLIVE OIL, SEEDS OIL)
Lubricang mineral-based oils
Soap water (neutral soap)
So sponge
It is forbidden to use the following products which could seriously damage the plasc covering, provoking
cracks and the subsequent breaking:
To CLEAN the basin we recommend:
Always rinse with clean water and dry with a so, not abrasive cloth.
WARNING!

17
At the end of each treatment, drain the water and spray the special detergent SANIGUEST inside the tank.
Clean using a so sponge and rinse with the appropriate manual shower.
Fill the tank no at the level with clean water. Use the measuring cup to introduce 30 cc of detergent “Pedi Blu”.
Acvate the whirlpool for 2-3 minutes.
Switch o the pump WITHOUT EMPTYING: THE TANK MUST REMAIN FULL THROUGHOUT THE NIGHT OR FOR
THE DAYS OF INACTIVITY.
At the beginning of the working day, start the whirlpool again for 1-2 minutes, drain the water and rinse with the
appropriate manual shower. Now the tank is ready to receive the rst customer.
Spray the special GO KAL descaling liquid in the bath, paying close aenon to the contact with hands and eyes.
Leave for a few minutes and rub the tub with a so sponge. Before rinsing abundantly with the appropriate manual
shower, let water ow for a few seconds from the lling plant to eliminate any trace of limestone even from the jets.
If you need to order our SANIGUEST and GO KAL disinfectant, please contact us by phone +39/0374/36.30.69 or
email order[email protected]
The strict observance of these easy cleaning and maintenance instrucons will keep your basin clean, white and
bright for long me.
The equipment has been designed and constructed so as to reduce as much as possible the necessary maintenance
and ensure proper funconing over the years without any problems. During any intervenon on the equipment, it is
recommended to follow the instrucons given in this secon.
Constantly check the general condion of the equipment: the integrity of the protecons, the electrical equipment and
the condion of the pads.

18
All the spare parts must be requested to Brusaferri & C. that will supply them directly or will give you indicaons on the
place where they can be found. Please note that any extraordinary maintenance must be performed by personnel of
Brusaferri & C. or authorized by it.
11. SPARE PARTS
Any serious accident occurring in relaon to this device must be immediately reported to the manufacturer and the
competent authority of the member state in which the user and / or paent is established.
ATTENTION!
Any extraordinary maintenance must be performed by qualied personnel of the technical service Brusaferri & C. or
Service Centre authorized by the manufacturer.
Informaon about the Authorized Service Centre to which you can turn, can be obtained directly from the manufacturer
Brusaferri & C srl – phone 0374/363068-69 – mail: ser[email protected]
For a correct and quickly resoluon of the problem, it is necessary to communicate the model and the serial number of
the equipment and the descripon of the defect, or what are the visible problems, and under what condion it occurs.
The broken equipment, if under warranty, must be sent to the Service Centre together with the cercate of guarantee,
transport charges must be paid by the purchaser.
Repairs and maintenance of the equipment can be carried out exclusively by competent personnel, that is of Brusaferri
& C. or authorized by it. Informaon on the sta to contact for possible intervenons can be obtained directly from
Brusaferri & C.

19
If the equipment becomes inoperave or is not to be used for an extended period of me, it is recommen-
ded to remove it from service and remove the plug from the socket. All materials used to manufacture the
equipment are not toxic or hazardous to the health of operators, so they can be handled without special
precauons. In case of disable of the equipment you should perform a separaon of dierent materials for
subsequent reuse or dierenated eliminaon. All electrical and electronic products should be separately
disposed, using specic collecon facilies appointed by the Government or the Local Authories.
The correct disposal of the obsolete equipment will help to prevent potenal negave eects on human
health and the environment. For informaon, contact your Local Council or the Waste Disposal Service.

20
36 cm /14,2”
145 cm /57”
96 cm /37,8”
87,5 cm /34,4”
71,5 cm /28,1”
63,5 cm /25”
54,5 cm /21,5”
Power supply
Tube ø 40
Water drain
Tube 1/2”
Hot water inlet
Tube 1/2”
Cold water inlet
FEET
HEAD
Voltage 220V 2 phase + heart
Socket 10A min
8 liters / minute
POWER SUPPLY CONNECTION
Electric plant capacity:
VOLTAGE 220V 2 FASES+EARTH
SOCKET 10A MIN
This manual suits for next models
1
Table of contents
Languages:
Other LEMI Spa Accessories manuals
Popular Spa Accessories manuals by other brands

ataraina
ataraina aromacaron CT-AMC01 instruction manual

Stingray
Stingray ALVA AIR ACS301 manual

Spin Spa
Spin Spa Spinning Spa Brush quick start guide

Exerpeutic
Exerpeutic Heavenly manual

SPAccessories
SPAccessories Cover Classic Lifter Installation & use manual

Clearwater Spas
Clearwater Spas CLEAR A-400 user guide

Leisure Concepts
Leisure Concepts Covermate III instructions

Hot Tub Company
Hot Tub Company SpaEase 100 instruction manual

Heat Wave
Heat Wave NP5877 manual

Leisure Concepts
Leisure Concepts SMARTOP SwimSpaVanish XL installation instructions

Moisturnt
Moisturnt HY-X500-01 instruction manual

Pyle
Pyle SereneLife PHSPAMT24HT user manual