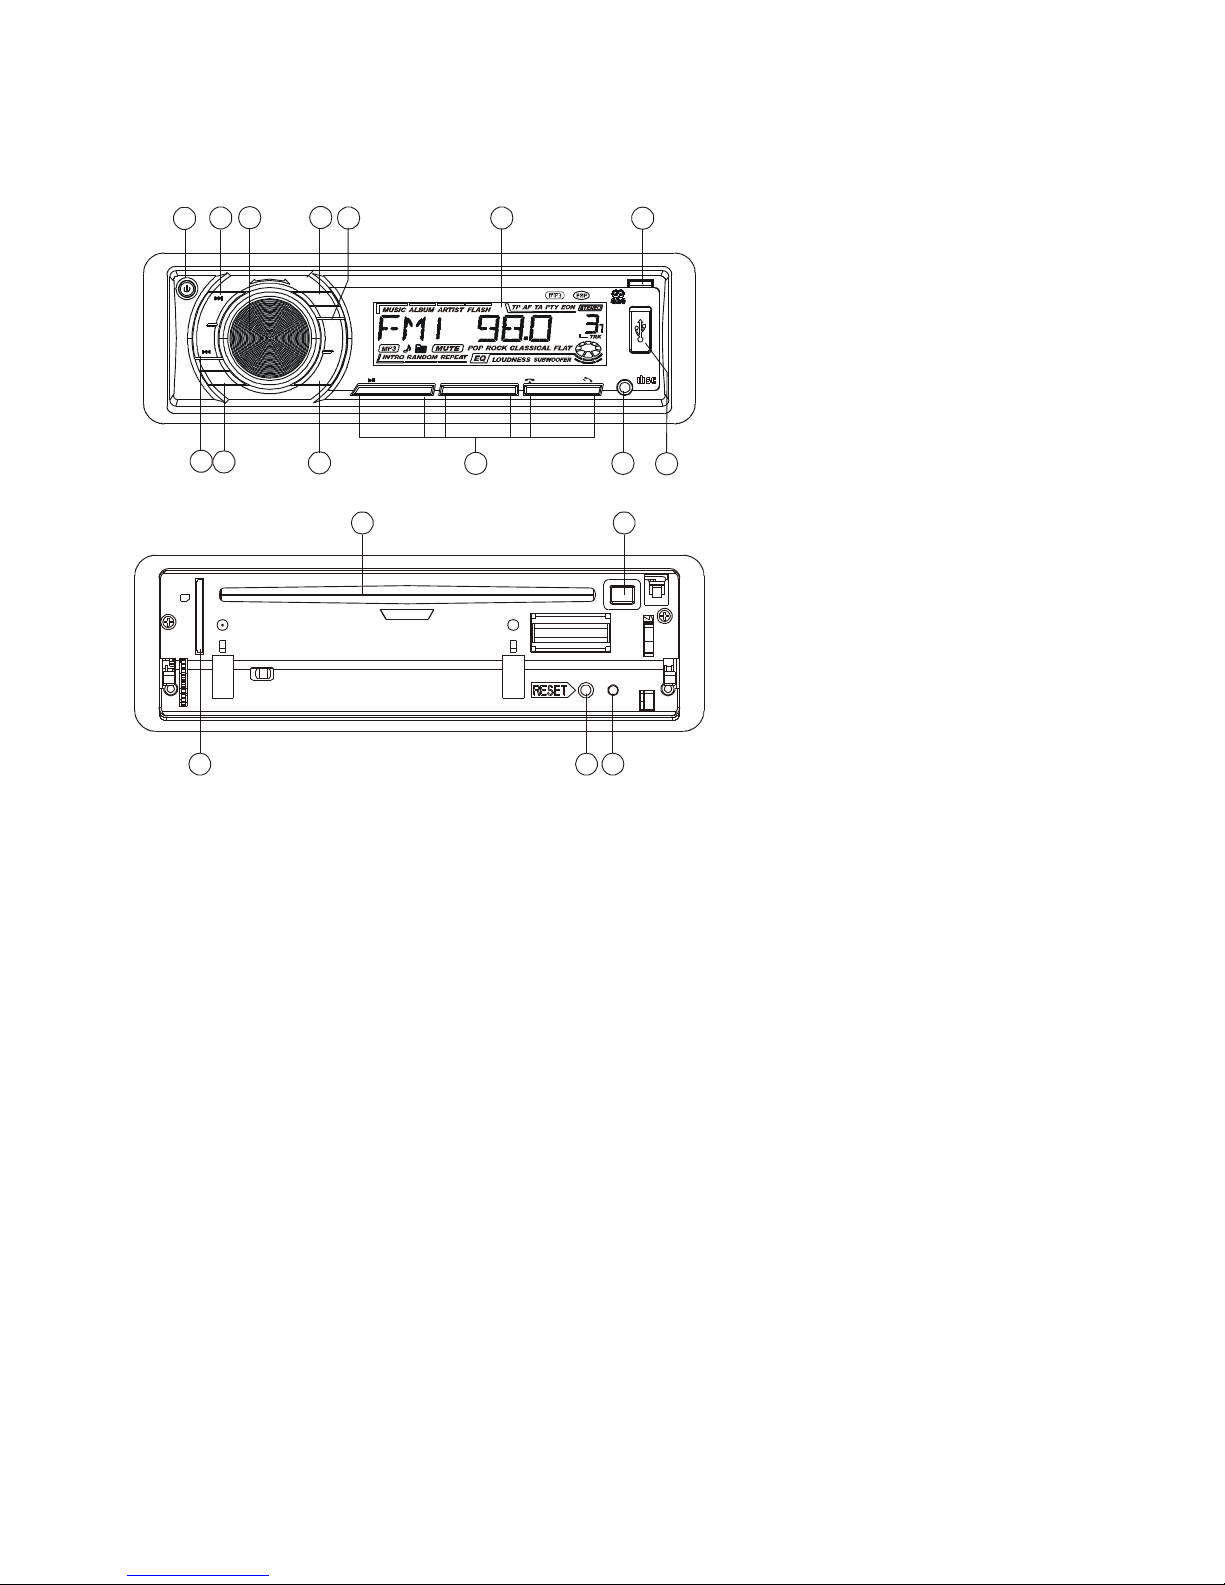
LENCO CS-455 BT User manual

CS-455 BT
INSTRUCTION MANUAL
DSP
VOL SEL
_
+
MOD
RPTINT RDMTOP AUX
CD/USB/SD/MMC/MP3 PLAYER
REL
/PTY
MUTE
BND
APS
32 5
46
1-10 +10 CO M PA CT
DI G ITAL AU D IO
5 IN 1 CAR AUDIO SYSTEM WITH
AM/FM-RDS DIGITAL PLL TUNING RADIO
SD/USB/CD(ESP)/MP3 PLAYER
BLUE TOOTH HANDFREE SYSTEM
www.lenco.eu

1
PRECAUTIONS AND MAINTENANCE
1. If the car interior is extremely hot, as after being parked in the sun, do not use the player until the car has
been driven for a while to cool off the interior.
2. The protective case is to safely keep the front panel.
3. The unit is designed for negative terminal of the battery which is connected to the vehicle
metal. Please confirm it before installation.
4. Do not allow the speaker wires to be shorted together when the unit is switched on. Otherwise
it may overload or burn out the power amplifier.
5. Do not install the detachable panel before connecting the wire.

2
LOCATION AND FUNCTION OF CONTROLS
SD
13
14
171816
1
2 3
5
7810
15
4 6911 12
DSP
VOL SEL
_
+
MOD
RPTINT RDMTOP AUX
CD/USB/SD/MMC/MP3 PLAYER
REL
/PTY
MUTE
BND
APS
32 54 6
1-10 +10 COM PACT
DIG ITAL AUD IO
1.REL button
2.SEL button and VOL dial
3. LCD
4&5. I<< and >>I button
6. BAND button
7. POWER/MUTE button
8. APS button
9. TOP/PLAY/PAUSE,INT,RPT
RDM and 1-6 Number buttons
10. MODE/PTY button
11. DSP button
12. AUX button
13. EJECT button
14. CD slot
15. USB port
16. SD slot
17. Anti-theft LED indicator
18. RESET button

3
Basic Operation
1. REL BUTTON
Press the REL button to fold down the front control panel.
Then a disc can be inserted into the disc slot or ejected by pressing the EJ button.
After flipping down the front panel, push it leftwards, then pull the right side of the panel outwards to
remove it from the unit chassis.
2. SEL BUTTON (Select)AND VOL KNOB
A) Press the SEL button briefly, it is activated as selecting each mode of E. VOL.
-> VOLUME ->BASS ->TREBLE -> BALANCE -> FADER ->
When selecting a desired audio mode, rotate the VOL knob to adjust the audio effect.
In each mode, the waiting time is about 5 seconds, and the time waiting time is over, it returns to the
last display mode of tuner or CD mode.
The control mode of E.VOL is operated with following numeric display.
- VOL: (MIN)00, 01,......46, 47(MAX).
- BASS/TRE: -07, -06,...,00,...+06,+07
- BAL: 0LR9, 1LR9, ..., 9LR9,..., 9LR1, 9LR0
- FAD: 0FR9,1FR9, ..., 9FR9,..., 9FR1, 9FR0
B) When pressed longer 2 seconds, it is activated as cyclical mode of following functions for
user’s selection.
->TA (ON/OFF) ->AF (ON/OFF) ->TA (ALARM/SEEK) ->PI (SOUND/MUTE) ->
RETURN (LONG/SHORT) ->MASK(DPI/ALL) ->BEEP (ON/OFF) -> USER SET
(FLAT/CLASSIC/ROCK/POP)->VOL(LAST/DEFA) ->MONO/STEREO(only for
FM mode) ->LOUD(ON/OFF)->LOCAL/DX(only for FM mode)->CLK(ON/OFF)
->CLK(12/24)mode.
After selecting the desired mode, rotate the VOLknob to select one setup item of the desired mode.
1)TA ON/OFF
When TA mode is on(TA is displayed on LCD), it will begin to seek TA station and TA SEEK will be
displayed on LCD for a while.
When traffic announcement is transmitted:
a) If the unit is in SD, USB or disc mode, it will switch to radio mode temporarily.
b) Temporarily switch over to an EON linked station when EON detects a traffic announcement on that
other program, and TP will be displayed on LCD.
c) If volume level is below 20, volume level is raised to 20, and returns to its previous mode and volume
level when the traffic announcement is over.
If volume is adjusted during traffic announcement, only the traffic announcement volume is valid.
* TA interruption function:
The current traffic announcement is cancelled by pressing this key. But the TA mode will not be off.
* When TAis on, SEEK, (SCAN),AUTO MEMORY function can be received or saved only when traffic
program identification code has been received. When TA is ON, traffic program identification code is
not received during specified time.

4
2)AF (ON/OFF)
WhenAF switching mode is selected and the state ofAF switching mode is displayed byAF segment
in display.
Segment off:AF switching mode off.
Segment on:AF switching mode on, and has RDS information.
Segment flashing:AF switching mode on, but RDS information is not received yet.
WhenAF switching mode is selected, the radio checks the signal strength ofAF all the time.
The interval of checking time of each AFs depends on the signal strength of current station,
from a few minute for strong station to a few seconds for weak station. Every time that
new AF is stronger than current station, it switches over to that frequency for very short time,
and NEW FREQUENCY is displayed for 1-2 second. Because the mute time ofAF
switching or checking time is very short, it is almost inaudible in case of normal program.
During FM mode, whenAF is on, SEEK, (SCAN),AUTO-MEMORY function can only receive
and save RDS program.
3) TA SEEK/TAALARM:
TASEEK mode: when newly tuned station does not receive TP information for 5 seconds,
the radio retunes to next station which has a different PI to the last station, but has the TP information.
When TP information gets lost at the current station for retune time which is set by RETUNE SHORT(90
seconds) or RETUNE LONG(150 seconds), the radio starts to retune to next same PI station. When
same PI station does not receive in 1 cyclic search, the radio retunes to next station with TP information.
TA ALARM mode: when this mode is selected, any automatic retune mode is not activated.
Only double beep sound(ALARM) will be heard.
When newly tuned station does not have TP information for 5 seconds, beeps are sounded.
When TP information gets lost at the current station for retune time, the beep sound will be heard.
When newly tuned station has no RDS signal, PI SEEK is suppressed .
4) PI SOUND/ PI MUTE:
PI SOUND mode: if a car cruises between buildings that could cause reflecting signals, a phenomenon
may occur, due to different PI codes being received from the sameAF source. when different PI sounds
(DIP) are heard occassionally, this will happen for less than 1 second.
PI MUTE mode: under above same situation, a mute sound will be heard for less than1second.
5) RETURN L / RETURN S:
The initial time of automatic TA search or PI SEARCH mode is selected.
When PI information is not received for retune interval , the radio starts to retune to next same PI
station.
When same PI station does not receive 1 cyclic search, the radio goes to last station and waits for 4-5
minutes until PI code is received.
RETURN Lmode: selected as 150 seconds.
RETURN S mode: selected as 90 seconds.
6) MASK DPI/MASK ALL:
MASK DPI mode: masks only the AF which has different PI.
MASK ALL mode: masks the AF which has different PI and NO RDS signal with high field strength.

5
7)BEEP ON/BEEP OFF
BEEP ON mode: The beep is generated when any key is pressed.
BEEP OFF mode: The beep sound is disabled..
8)VOL LAST/VOL DEFA
VOL LAST: The radio switches on at the actual volume it had when it was last switched off.
VOL DEFA:After pressing SEL button,AVOL will be displayed. Then you can pre-select a
constant switch-on volume by using the VOL knob.
9)CLK ON/OFF
CLK ON: Clock will always show on the display when power off.
CLK OFF: Clock will disappear on the display when power off.
3. LCD Display
4&5. TUNE, SEEK, TRACK, SKIP UP / DOWN BUTTONS
Press the >>| or |<< button shortly to manual tune up/down for the desired radio station frequency
step by step.
Press and hold the >>| or |<< button for longer 0.5 seconds, to automatically tune up/down for the
radio station frequency of strong signal.
6. BAND BUTTON
Press the BND button briefly to select the radio broadcasting band you would like to hear.
The AM/FM band is toggled cyclically through the tuning bands:
->FM 1-> FM 2 -> FM 3 -> MW 1->MW 2 ->.
7. POWER ON/OFF,MUTE BUTTON
When the unit is power off, the unit comes to ON by pressing any button on the front panel (except the
OPEN key ). It also can turn on the unit to insert a disc, SD card or USB stick into their slots or socket.
When the unit is power on, press and hold the power button, the unit goes into power off mode.
This button serves to switch the MUTED state on/off.
Press this button to suppress the loudspeaker temporarily, and press again to resume listening.
The muted state will be also released when the MODE, SEL button is pressed and VOL knob
on the front panel is used.
8. APS BUTTON (Auto-storage /Preset scan)
1) when long pressing for more than 1 seconds, the radio searches from the current frequency and
checks the signal strength level until 6 station are found.And then the 6 stations frequency are
preset to the corresponding preset memory numbered bank. The auto-storage operation is
implemented in the each selected band.
When the auto-storage operation is finished, the radio execute the Preset Scan.
2) when short pressing, the radio searches for each preset station in the current band and holds
at that preset number for 5 seconds with releasing mute, and then search again.

6
9. PRESET STATION MEMORYAND TOP/>||, INT, RPT, RDM BUTTONS
Go to any preset station by pressing one of the 6 preset station buttons (1-6).
If one of these buttons is pressed for more than 2 seconds, the station currently being listened to will be
memorized into the selected preset button.
10. MODE AND PTY (PROGRAM TYPE) BUTTON
Press the MODE/PTYbutton to change among tuner (radio), disc (when a disc is loaded), SD card (when
an SD card is inserted) , USB (when an USB stick is inserted) and AUX mode.
In Radio mode, Press MODE/PTY button longer to select one of the following mode:
POP M- - NEWS
While selecting PTY TYPE, its selection is implemented by preset buttons as described in preset key.
(press one of the 6 preset buttons shortly and repeatedly to select the PTY TYPE in the preset button)
When POP M or NEWS is on, theprevious PTY program and PTY word is displayed on LCD.
If there are no keys entered for 2 seconds, previously selected PTYis searched. During 1 loop, if desired
PTY is not found, NO PTY is flashed, then return to previous normal radioand PTY icon goes off.
11. DISP BUTTON
Press the DISP button briefly to display time for 5 seconds on the display, and then returns to its previous
display unless the button is pressed again.
Press the DISP button l more than 1 second until the clock time flashes, then rotate the VOL knob
to adjust time.
12. AUX INPUT JACK
For connection of other audio device.
13. EJECT KEY
n the power on state, the loaded disc can be ejected by pressing the EJ key.
14. CD SLOT
15. USB SOCKET
When needing to play the file in the USB stick, open the plastic cover cap and insert the USB stick into
the socket. It will switch to the USB mode automatically, and then play the first file in the USB.
When no need to use USB socket, please cover the plastic cover cap.
16. SD CARD SLOT
When you need to play the file in the SD card, insert the SD card into the card slot. It will change into the
SD mode automatically, and then play the first file in the SD.
Note:
When SD card and USB stick are both inserted into their slot or socket, the system will change into
the USB mode automatically.
17. FLASHING LED
18. RESET BUTTON
Before operating the unit for the first time, or after replacing the car battery or changing the connections.
You must reset the unit.
Press this button with a cuspidal object. This operation will erase the clock setting and some stored
contents.

7
CD/MP3/USB/SD Operation
1. Skip up/down buttons
Press the >>| button briefly to play next track.
Press the |<< button briefly to play the current track from the beginning of it if the playing time is more
than 2 seconds.
Press the |<< button briefly to play the previous track if the playing time is less than 2 seconds.
Press the >>| or |<< button and hold to skip forwards or backwards, release to resume normal playback.
2. APS button
Press APS button repeatedly to select TRACK SEARCH, DIRECTORY SEARCH o r
FIRST CHARACTER SEARCH mode.
In TRACK SEARCH mode, the LCD will display TRK T 000 and flash the biggest digit0 that the MMC/SD
card, USB or MP3 disc contain. Rotate the knob to select the number of the flashing digit from 0 ~ 9. Then
press SEL button to confirm the number and flash next smaller digit 0.With the same means, select
the number of the flashing digit. After finishing selecting the number of all flashing digit, press SEL button
to play the track of the selected serial number.
In DIRECTORYSEARCH mode, the LCD will display the root folder(if there is not the root folder, it will find
a root folder named ROOT). Then rotate the knob to select your desired folder, Finally press SEL button to
play the first track of the folder.
In FIRST CHARACTER SEARCH mode, the LCD will display A- rotate the knob to select file's first
character by the order of A~Z and 0~9. Then press >>| or |<< button to select one file its first characters is
the selected one. Finally press SEL button to play the selected file.
3. PLAY/PAUSE, INT, RPT, RDM buttons
1) Press the TOP/ >|| button briefly to interrupt the playback of the disc, SD or USB.
Press again to resume normal playback of the disc, SD or USB.
Press the TOP/>|| button and hold for approximately 0.5 seconds to play the first track of the disc,
SD or USB.
2) Press the INT button to sample the first 10 seconds part of each track, and the INT ON will be visible on
the LCD display.
In the process of INT, press INT button again to stop sampling and to continue playing the current track,
and the LCD will display INT OFF.
3) Press the RPT button once to play the current track repeatedly, and the RPT ONE will be visible on the
LCD display.
During MP3 disc, SD or USB mode, press the RPT button twice continuously to playthe current folder
repeatedly, and the RPT DIR will be visible on the LCD display.In the process of RPT, press RPT
button again to stop playing repeatedly mode and the LCD will display RPT OFF.
4) Press the RDM button to play all tracks on disc in random order, and the RDM ON will be visible on the
LCD display.
In the process of RDM, press RDM button again to stop playing in random order and the LCD will
display RDM OFF.
5) During the normal playback of MP3 disc, SD, USB:
Press the radio preset button 6 and 5 to move up and down10 tracks at a time.

8
Blue Tooth Handfree System
1. Pair
To pair your mobile phone with a Bluetooth device, simply activate the Bluetooth function on your mobile
phone and search for devices. When the stereo has been found it should show as Car Kit, when you try to
connect, it will ask for a password.
The default password is 0000.When you have successfully paired your phone the message BTREADYwill
be displayed followed by the mobile number. When the phone has successfully connected you will see a
blue led on the display flashing.
This LED will turn to solid when you are on a call or disappear when you disconnect from the stereo.
2. Connection or disconnection
A) Use the mobile phone to do connection or disconnection
1) In the connection status, find the paired and connected Bluetooth Device, then press the
disconnection button to do disconnection.
2) In the disconnection status, find the paired and disconnected Bluetooth Device, then
press the connection button to do connection.
B) When turn on the power again(after Acc off ), the front panel can search the phone have pair
automatically and be connection.And it will take you about 20 seconds.
3. Accept/Reject/Hold/End Call
Accept - Press the 5(-10,HAND UP) button
Reject - Press the 6(+10,HOLD)button
4. Talking volume level setting
At talking status, use the VOL knob to adjust the sound output, but this volume level can not be reserved.
Note: the default volume level is 25.
5. To transfer the audio of a file played by Mobile Phone to the CarAudio Player
If the mobile phone supports A2DP and could play audio, when the Mobile Phone plays an audio file(For
some Mobile Phones, you must select Play by BT firstly), the playing will be transferred to the Car Audio
Player.
In A2DP mode, if the Bluetooth device of the Mobile Phone support AVRCP, the functions of the >>|, |<<
and PLAY/PAUSE buttons are the same as one in disc mode(no fast forward /backward functions for
the >>|/|<< buttons). The other buttons available in disc mode are not available.
In A2DP mode, if the Bluetooth device of the Mobile Phone supportAVRCP, pressing the MODE button can
switch on between the radio, disc, USB, CARD and A2DP. But after entered the A2DP mode again, to
resume the playback and transfer to the Car Audio Player by the Mobile Phone, you must press the
PLAY/PAUSE button.
In A2DP mode ,if the phone music play mode turn to the radio mode, you need to wait about 10 seconds.

9
WIRES CONNECTION
CONNECTOR A
1.
2.
3.
4. Memory +12V
5. Auto Antenna Output
6.
7. ACC
8. GROUND
Notice: Some cars have special wires connection(the Memory and the ACC connection have changed), so
here support the both sides ISO socket.
CONNECTOR B
1. Rear Right Speaker (+)
2. Rear Right Speaker (-)
3. Front Right Speaker (+)
4. Front Right Speaker (-)
5. Front Left Speaker (+)
6. Front Left Speaker (-)
7. Rear Left Speaker (+)
8. Rear Left Speaker (-)

10
CARE FOR USING CD'S:
About CD-R/CD-R/W discs:
In addition to commercially-recorded audio CD's, this unit can play CD-R and CD-R/W discs.
In come cases, particularly when recorded on older CD burners, some CD-R and CD-R/W
discs may not play.Also, whenever you are recording a CD for playback in this receiver,
it is recommended that you record at 24x or slower speed for CD-R and 4x or slower
for CD-R/W to achieve higher signal quality and better playback performance.
1. To keep the disc clean:
Do not attach any sticker or adhesive tape on the disc.
Handle the disc by its edge to keep the disc clean and do not touch the surface.
Before playing a disc, wipe it off with a clean, dust-free cleaning cloth.
Wipe the disc outwards from the disc center.
2. When one has already been inserted. Doing so may damage the unit. Insert a disc with labeled surface up,
or it will damage the unit.
3. Do not expose the disc to direct sunlight or nearby heat sources such as heating vents, caliduct which can
cause the disc to warp.
Do not leave disc in a car if it is parked in direct sunlight as that will lead to a considerable rise in
the temperature inside the car.
4. Do not use any secondhand or rented disc, usually, there is glue on the surface of those discs, it will stop
the unit working and damage it.
5. Always store the disc in its case for protection. Scratched up discs will produce poor sound performance and
cause CD player to skip.
6. In raining day or wet area, the moisture may form on the disc or the optical parts, the playback may
not be possible. If moisture forms on the disc, wipe it off with a soft cloth.
If moisture forms on the optical parts of the unit, allow the unit to sit for about one hour with
power on..
7. Do not use solvents such as benzine or thinners. Commercially available cleaners or anti-static
spray will damage the unit.

11
TROUBLE SHOOTING
Before using the check list please make all the connections first.
If you still have questions after going through the checklist, please consult your local
customer service representative.

12
INSTALLATION

13
SPECIFICATION
GENERAL
Power requirement........................................................................................DC 12V.
Current consumption..................................................................................10A MAX.
POWER OUTPUT...................................................................................... 25W X 4.
.
Number of channels...................................................................................2 STEREO.
Chassis dimensions.............................................................178[W] X 50[H] X 165[D].
FM SECTION
Frequency range.............................................................................87.5MHz -108MHz
Usable sensitivity...................................................................................................3uV.
I.F Frequency................................................................................................10.7MHz.
AM SECTION
Frequency range............................................................................522KHz - 1620KHz
I.F Frequency...................................................................................................450KHz
Usable Sensitivity.................................................................................................40dB
LINE - OUT
Output.................................................................................................... MAX 1200mv
CD/SD or USB PLAYBACK
System...........................................................................................MP3 audio system.
Usable disc....................................................................CD/CD-R/CD-RW/MP3/WMA
Frequency characteristics..................................................................20-100Hz ≤ 5dB
10-20KHz ≤ 5dB.
Signal to noise ........................................................................................50dB [1KHz]
If at any time in the future you should need to dispose of this product please note that: Waste electrical
products should not be disposed of with household waste. Please recycle where facilities exist. Check
with your local authority or retailer for recycling advice. (Waste Electrical and Electronic Equipment
Directive)

14
CS-455BT
BEDIENUNGSANLEITUNG
DSP
VOL SEL
_
+
MOD
RPTINT RDMTOP AUX
CD/USB/SD/MMC/MP3 PLAYER
REL
/PTY
MUTE
BND
APS
32 5
46
1-10 +10 CO M PA CT
DI G ITAL AU D IO
5-IN-1 KFZ-RADIO MIT MW/UKW-RDS-DIGITAL-PLL-RADIO
& SD/USB/CD (ESP)/MP3-PLAYER
BLUETOOTH-FREIHANDSYSTEM
www.lenco.eu

15
SICHERHEITSHINWEISE UND WARTUNG
1. Wenn es im Auto besonders heiß ist, z. B. nach längerer Parkzeit in der Sonne, benutzen Sie den Player
bitte erst nach dem sich dasAuto verhältnismäßig abgekühlt hat.
2. Eine Schutztasche dient dem Schutz des Bedientafel.
SCHUTZHÜLLE
BEDIENTAFEL
3. Das Gerät wurde so konzipiert, dass der negative Anschluss der Batterie an die Karosserie angeschlossen
wird. Überprüfen Sie dies bitte vor dem Einbau.
4. Schließen Sie niemals die Lautsprecherdrähte im eingeschalteten Zustand des Geräts kurz. Dies könnte zu
Überlastung und Verbrennungen führen.
5. Installieren Sie die abnehmbaren Bedientafel vor demAnschluss der Kabel.

16
ANORDUNG UND FUNKTIONEN DER BEDIENELEMENTE
SD
13
14
171816
1
2 3
5
7810
15
4 6911 12
DSP
VOL SEL
_
+
MOD
RPTINT RDMTOP AUX
CD/USB/SD/MMC/MP3 PLAYER
REL
/PTY
MUTE
BND
APS
32 54 6
1-10 +10 C OM PACT
DIG ITAL AUD IO
1. REL-Taste
2. SEL-Taste und VOL-Regler
3. LCD-Anzeige
4 & 5. und
6. BAND-Taste
7. POWER/MUTE-Taste
8. APS-Taste
9. TOP/WIEDERGABE/PAUSE, INT,
RPT RDM und Zifferntasten 1 - 6
10. MODE/PTY-Taste
11. DSP-Taste
12. AUX-Taste
13. EJECT-Taste
14. CD-Ladefach
15. USB-Anschluss
16. SD-Kartensteckplatz
17. Anti-Diebstahl-LED
18. RESET-Taste

17
Grundlegende Bedienung
1. REL-TASTE
2. SEL-TASTE (Auswahl) UND VOL-DREHKNOPF (Lautstärke)
Betätigen Sie die REL-Taste, um die Bedientafel aufzuklappen.
Sie können dann eine Disc in das Disc-Ladefach einlegen bzw. durch Betätigung der EJ-Taste auswerfen.
Nach dem Umklappen der Bedientafel nach unten, drücken Sie sie nach links und ziehen sie dann die rechte
Seite nach außen, um sie aus dem Gerätegehäuse zu entfernen.
A) Betätigen Sie die SEL-Taste zurAuswahl des E.VOL.-Modus.
→ VOLUME (Lautstärke) → BASS (Bässe) → TREBLE (Höhen) → BALANCE → FADER →
Nachdem Sie den gewünschten Audiomodus gewählt haben, benutzen Sie den VOL-Drehknopf, um den
jeweiligen Audioeffekt einzustellen.
In jedem Modus beträgt die maximale Wartezeit etwa 5 Sekunden. Wenn diese Zeit abgelaufen ist, kehrt die
Anzeige zum Radiobetrieb oder CD-Modus zurück.
Der E.VOL-Modus wird über die folgenden numerischenAnzeigen bedient.
- VOL: (MIN) 00, 01, ......46, 47 (MAX).
- BASS/TRE: -07, -06, ..., 00, ...+06, +07
- BAL: 0LR9, 1LR9, ..., 9LR9, ..., 9LR1, 9LR0
- FAD: 0FR9, 1FR9, ..., 9FR9, ..., 9FR1, 9FR0
b) Wenn Sie die Taste länger als 2 Sekunden gedrückt halten, können Sie auf eine der folgenden Funktionen
zugreifen.
→ TA (ON / OFF) → AF (ON / OFF) → TA (ALARM / SEEK) → PI (SOUND / MUTE) → RETURN (LONG /
SHORT) → MASK (DPI / ALL) → BEEP (ON / OFF) → USER SET (FLAT / CLASSIC / ROCK / POP) → VOL
(LAST / DEFA) → MONO / STEREO (nur für UKW-Modus) → LOUD (ON / OFF) → LOCAL / DX (nur für
UKW-Modus) → CLK (ON / OFF) → CLK (12 / 24).
Nach der Auswahl des gewünschten Modus, drehen Sie bitte den VOL-Drehknopf zur Auswahl der
gewünschten Einstellungsoption.
1) TA ON / OFF
Wenn der TA-Modus eingeschaltet ist (TA wird in LCD-Anzeige) beginnt eine TA-Sendersuche und in der
LCD-Anzeige erscheint TASEEK.
Wenn Verkehrsnachrichten übertragen werden:
a) Wenn das Gerät sich im SD-, USB- oder Disc-Modus befindet, geht es vorübergehend in den Radiomodus.
b) Das Gerät schaltet vorübergehend zu einem anderen Sender im EON-Netz, wenn EON auf anderen
Verkehrsnachrichten erkennt. TP wird entsprechend auf dem LCD-Bildschirm angezeigt.
c) Wenn die Lautstärke unter 20 liegt, wird das Lautstärkeniveau auf 20 angehoben und geht wieder zum
ursprünglichen Niveau zurück, wenn die Verkehrsnachrichten zu Ende sind.
Wenn die Lautstärke automatisch angehoben wird, dann ist diese Einstellung nur für die Dauer der
Verkehrsnachrichten gültig.
* TA-Unterbrechungsfunktion:
Die aktuelle Verkehrsansage wird durch Betätigung dieser Taste abgebrochen. Der TA-Modus wird dadurch
nicht deaktiviert.
* Bei eingeschaltetem TA-Modus, können die SEEK, (SCAN), AUTO MEMORY-Funktionen nur wenn der
Verkehrsprogrammerkennungscode empfangen, benutzt und gespeichert wurde.
Wenn der TA-Modus eingeschaltet ist, wird der Verkehrsprogrammerkennungscode im angegebenen Zeitraum
nicht empfangen.
2) AF (ON / OFF)
Durch Betätigung dieser Taste wird der AF-Umschaltmodus aktiviert und der Status des AF-Modus im

18
AF-Segment der Anzeige angezeigt.
Segment aus: AF-Umschaltmodus aus
Segment an:AF-Umschaltmodus ein + verfügbare RDS-Informationen
Segment blinkt: AF-Umschaltmodus ein, RDS-Informationen werden aber noch nicht empfangen.
Nachdem der AF-Modus aktiviert ist, überprüft das Radio ständig die AF-Signalstärke. Der Intervall zwischen
den AFs, hängt von der Signalstärke des momentanen Sender. Das Gerät braucht dafür wenige Sekunden
oder mehrere Minuten. Jedes Mal wenn der neue AF-Sender starker ist als der momentane Sender, kann er
innerhalb von kürzester Zeit zur neuen Frequenz gehen und NEWFREQUENCY wird für 1-2 Sekunden
angezeigt. Weil die Stummschaltung der Tonausgabe während der AF-Umschaltung äußerst kurz ist, kann die
Umschaltung bei normalen Radioprogrammen in der Regel nicht wahrgenommen werden.
Bei eingeschalteter AF-Funktion können die Such- und Autospeicher-Funktionen im UKW-Modus nur für
RDS-Programme benutzt werden.
3) TA SEEK / TAALARM:
TA SEEK-Modus: Wenn der neu eingestellte Sender für 5 Sekunden keine TP-Information empfangen kann,
geht das Radio zum nächsten Sender, der identisch mit dem letzten Sender (PI) ist, aber über TP-Information
verfügt.
Wenn TP-Informationen für den aktuellen Sender verlorengehen und damit eine Neuabstimmung
entsprechend der Einstellungszeit RETUNE SHORT (90 Sekunden) oder RETUNE LONG (150 Sekunden)
nicht möglich ist, startet das Radio mit dem nächsten gleichen PI-Sender. Wenn der gleiche PI-Sender nicht
nach der ersten Suche gefunden wird, sucht das Radio nach dem nächsten Sender mit TP-Informationen.
TAALARM-Modus: Wenn dieser Modus gewählt wird, bleibt die automatische Neuabstimmung deaktiviert. Nur
ein Alarmsignal (doppelter Piepton) wird ausgegeben.
Wenn ein neu eingestellter Sender für 5 Sekunden keine TP-Information zur Verfügung stellt, ertönt ein
Signalton.
Wenn die TP-Informationen beim aktuellen Sender verloren gingen, wird einAlarmsignal ausgegeben.
Wenn ein neu eingestellter Sender über kein RDS-Signal verfügt, wird die PI SEEK-Funktion unterdrückt.
4) PI SOUND / PI MUTE:
PI SOUND-Modus: Bei der Autofahrt zwischen Gebäuden, kann es dazu kommen, das Signale reflektiert und
unterschiedliche PI-Codes vom gleichen AF empfangen werden.Wenn verschiedene PI-Töne (DIP) zu hören
sind, geschieht dies für weniger als 1 Sekunde.
PI MUTE-Modus: In der gleichen Situation, kann es zu einer Stummschaltung für weniger als 1 Sekunde
kommen.
5) RETURN L / RETURN S:
Die Ersteinstellung der automatischen TA- oder PI-Suche ist eingestellt.
Wenn PI-Informationen nicht bei der Sendersuche gefunden wurden, startet das Radio eine erneute Suche,
um einen Sender mit dem gleichen PI zu finden.
Wenn der gleiche PI-Sender nicht beim ersten Suchvorgang gefunden wurde, geht das Radio zum letzten
Sender und wartet 4 - 5 Minuten, bis ein PI-Code empfangen wird.
RETURN L-Modus: Eingestellt auf 150 Sekunden.
RETURN S-Modus: Eingestellt auf 90 Sekunden.
6) MASK DPI / MASKALL:
MASK DPI-Modus: Maskiert wird nur der AF mit abweichender PI.
MASK ALL-Modus: Maskiert den AF, der unterschiedliche PI- und NO RDS-Signale mit hoher Sendekraft
besitzt.

19
7) BEEP ON / BEEP OFF
BEEP ON-Modus: Ein Signalton wird erzeugt, wenn eine Taste betätigt wird.
BEEP OFF-Modus: Die Signalton-Funktion wird deaktiviert.
8) VOL LAST / VOL DEFA
VOL LAST: Das Radio wird mit der gleichen Lautstärke eingeschaltet, mit der es ausgeschaltet wurde.
VOL DEFA: Nach Betätigung der SEL-Taste, wird AVOL angezeigt. Sie können dann eine konstante
Einschaltlautstärke einstellen, indem Sie den VOL-Drehknopf benutzen.
9) CLK ON / OFF
CLK ON: Die Uhrzeit wird immer in der Anzeige angezeigt, selbst wenn das Gerät ausgeschaltet ist.
CLK OFF: Die Uhrzeitanzeige verschwindet von der Anzeige, wenn das Gerät ausgeschaltet wird.
3. LCD-Anzeige
4 & 5. TUNE, SEEK, TRACK, SKIP UP / DOWN
Betätigen Sie >>| oder |<<, um in Einzelschritten nach den gewünschten Radiosendern zu suchen.
Halten Sie die Tasten >>| oder |<< für länger als 0,5 Sekunden gedrückt, um automatisch nach Radiosendern
mit einem starken Signal zu suchen.
6. BAND
Betätigen Sie die BND-Taste zur Auswahl des gewünschten Frequenzbands.
Die MW/UKW-Frequenzbandeinstellung wird in der folgenden Reihenfolge umgeschaltet:
→ UKW1 → UKW2 → UKW3 → MW1 → MW2 →.
7. POWER ON / OFF, MUTE
Wenn das Gerät ausgeschaltet wird, können Sie es durch Betätigung einer beliebigen Taste der Bedientafel
(mitAusnahme der OPEN-Taste) einschalten. Das Gerät wird ebenfalls eingeschaltet, wenn Sie eine Disc oder
SD-Karte einlegen bzw. ein USB-Speichermedium anschließen. Wenn das Gerät eingeschaltet, halten Sie die
EIN/AUS-Taste gedrückt und das Gerät wird ausgeschaltet.
Diese Taste dient dazu, die Stummschaltung ein- bzw. auszuschalten.
Betätigen Sie diese Taste, um vorübergehend die Lautsprecherausgabe zu unterdrücken. Betätigen Sie die
Taste erneut, um die Audioausgabe wieder einzuschalten. Die Audioausgabe wird auch dann wieder
freigegeben, wenn Sie die MODE- oder SEL-Taste betätigen oder den VOL-Knopf auf der Vorderseite
verwenden.
8. APS-TASTE (Auto-Speicherung / Sender speichern)
1) Bei Gedrückthalten der APS-Taste für mehr als eine Sekunde, sucht das Radio von der aktuellen Frequenz
aus und überprüft die Signalstärke, bis 6 Sender gefunden werden. Diese 6 Sender werden dann unter der
entsprechenden Speichernummer gespeichert. Dies wird für das jeweilige Frequenzband ausgeführt.
Wenn die automatische Speicherung abgeschlossen ist, führt das Radio eine Sendersuche durch.
2) Bei der Betätigung der Taste, sucht das Radio nach jedem voreingestellten Sender im aktuellen
Frequenzband und stoppt bei gespeicherten Sendern für 5 Sekunden während die Tonausgabe eingeschaltet
wird. Danach fährt das Gerät die Suche fort.
9. SENDERSPEICHER UND TOP / >||, INT, RPT, RDM
Gehen Sie zu dem jeweiligen gespeicherten Sender, indem Sie eine der Sendertasten (1-6) betätigen.
Wenn Sie eine dieser Tasten länger als 2 Sekunden gedrückt gehalten wird, wird der derzeit gehörte Sender
Table of contents
Languages:
Other LENCO Car Receiver manuals

LENCO
LENCO CS-180 DVD - User manual

LENCO
LENCO CS-176 User manual

LENCO
LENCO CS-430BT User manual

LENCO
LENCO CS-340 User manual

LENCO
LENCO CS-1004 User manual

LENCO
LENCO CS-341 User manual

LENCO
LENCO CS-470 DVD User manual

LENCO
LENCO CS-176 User manual

LENCO
LENCO CS-420 User manual

LENCO
LENCO CS-321 User manual
Popular Car Receiver manuals by other brands

Pioneer
Pioneer MVH-G210BT user manual

NextBase
NextBase X-Premium X1 instruction manual

Sony
Sony Xplod CDX-F7700 operating instructions

JVC
JVC KD-AVX2 - DVD Player With LCD Monitor Errata

Xomax
Xomax XM-2DTSBN6214 installation manual

Antique Automobile Radio
Antique Automobile Radio 283302BT operating instructions