LENCO CS-460 User manual

CS-460
Instruction Manual
4 IN 1 CAR AUDIO SYSTEM
WITH DVD.JPEG.MP4.MP3.WMA.CD
USB AND SD PLAYER
AM/FM-RDS DIGITAL PLL TUNING RADIO
Remark: Any information subject to change without further notice
www.lenco.eu

1
Contents
1. Before Operation..................................................................................................................2
1.1 Glossary................................................................................................................. 2
1.2 Precautions.............................................................................................................2
1.3 Maintenance and Cleaning of Discs.......................................................................3
1.4 Battery Information of Remote Control...................................................................3
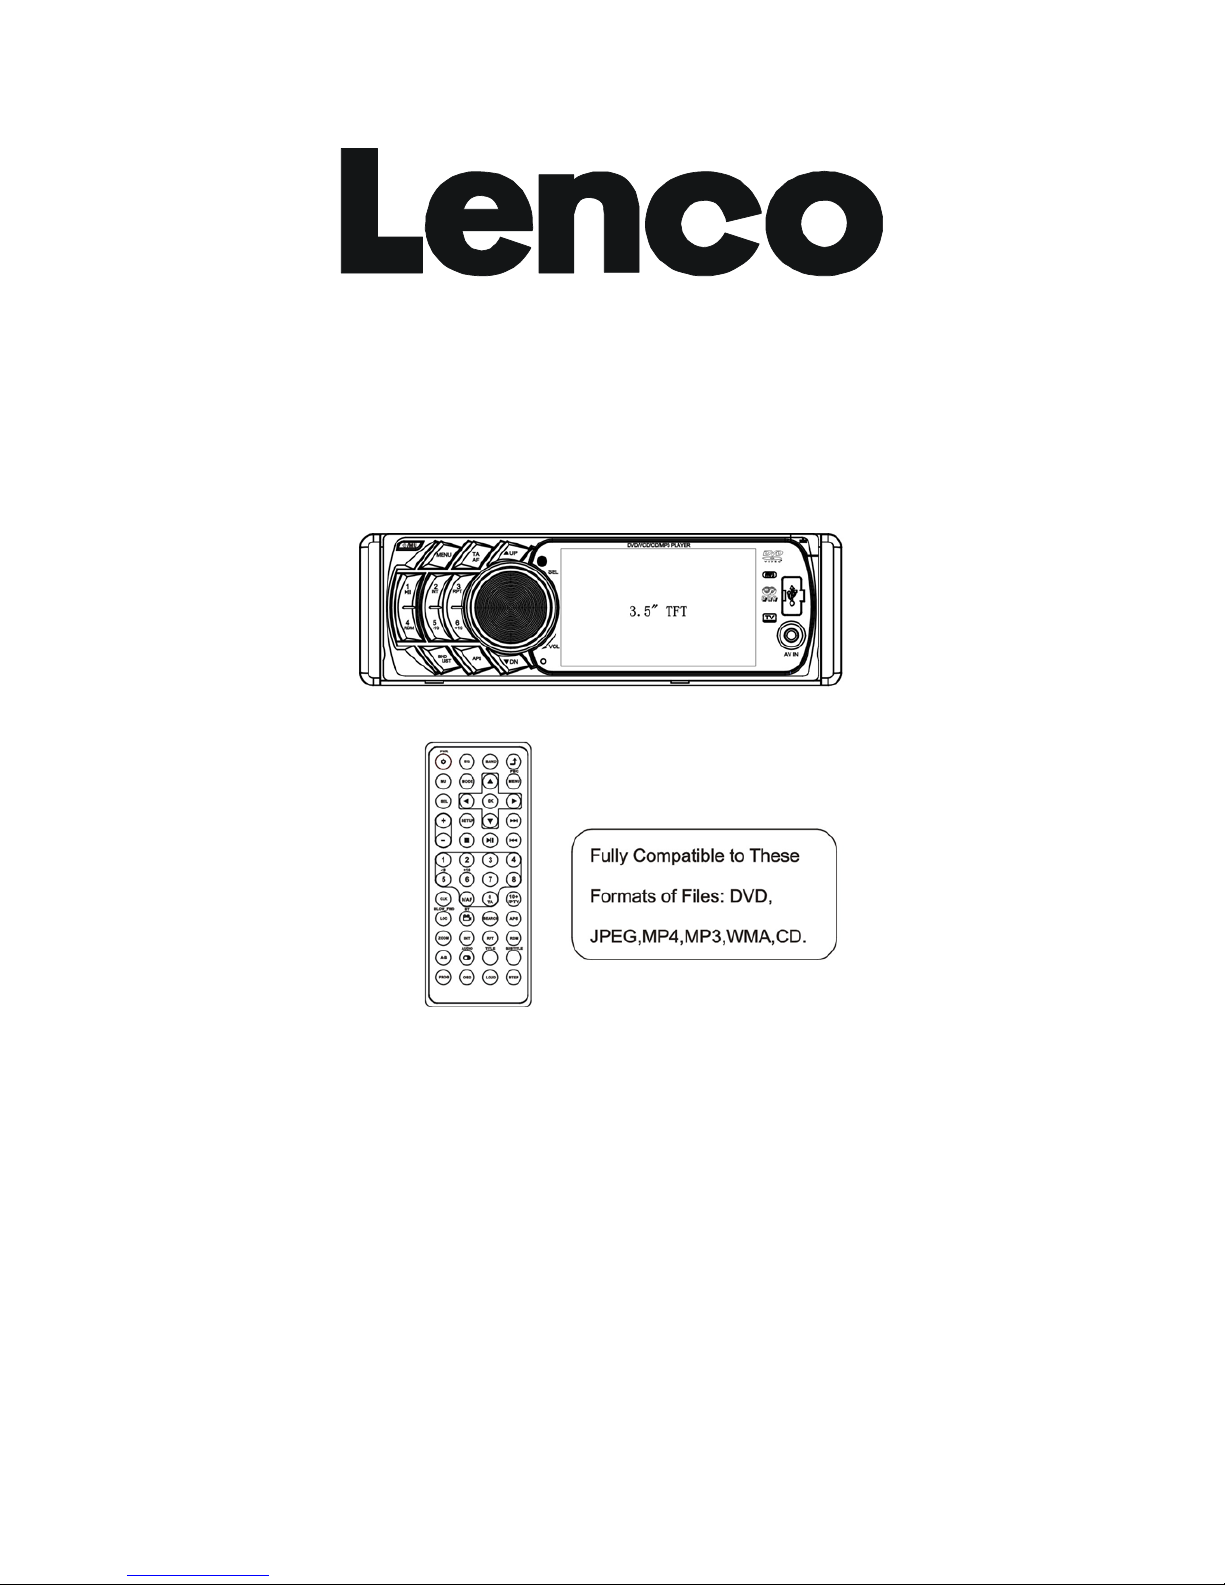
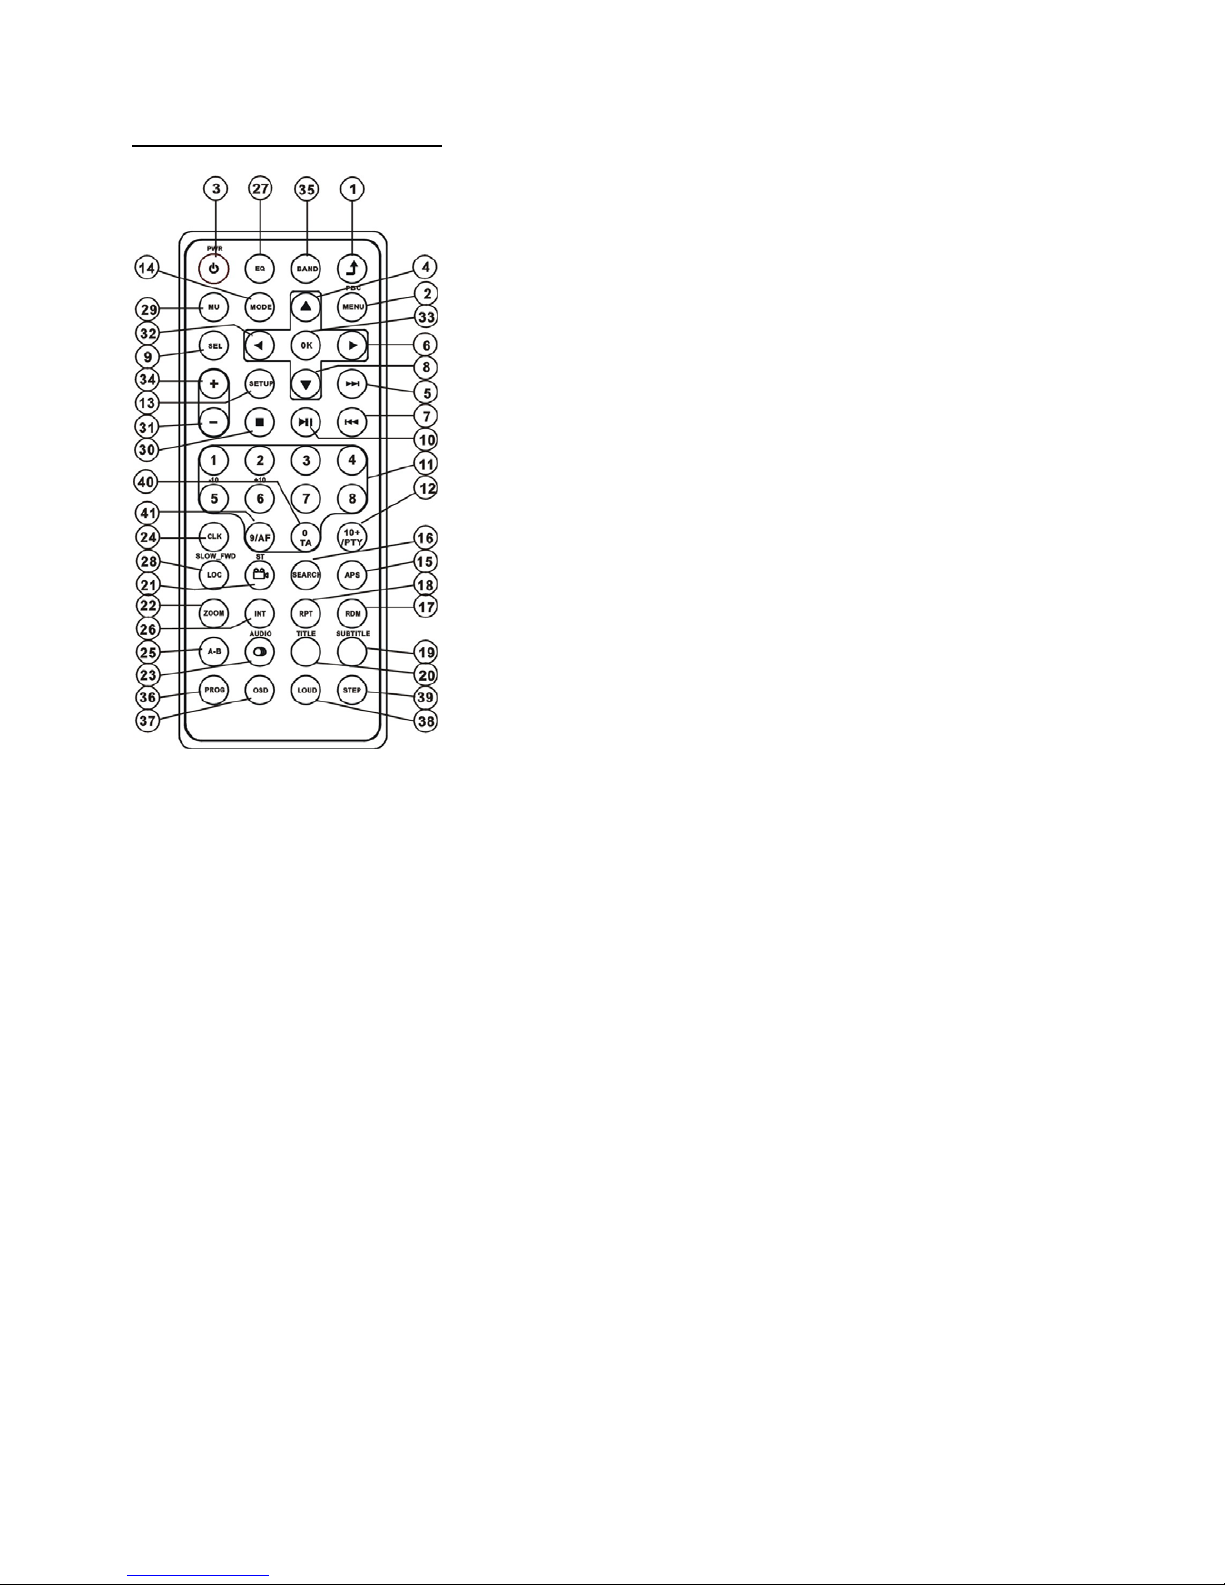
1.5 Remote Control Description...................................................................................4
1.6 Locations and Names of Controls..........................................................................5
1.7 Description of Rear Cabinet............................ ......................................................6
1.8 Unit Installation......................................................................................................7
2. Common Operation............................................................................................................8
3. Radio Operation................................................................................................................10
4. Basic Disc, USB or SD Operation.....................................................................................12
4.1 Begin Playback.....................................................................................................12
4.2 Pause Playback....................................................................................................13
4.3 Stop Playback ......................................................................................................13
4.4 Select Chapter/Track with UP/DN or >>|/|<< Buttons...........................................13
4.5 Select Chapter/Track with Number Buttons..........................................................13
4.6 Select Chapter/Track with Root/PBC Menu..........................................................13
4.7 Terminate the Playback.........................................................................................14
4.8 Playback with Speed.............................................................................................14
4.9 Playback with Slow Speed....................................................................................14
4.10 Playback with Still Frame.......................................................................................14
4.11 Playback Repeatedly...........................................................................................14
4.11.1 One/All Repeat.................................................................................................15
4.11.2 A-B Repeat..........................................................................................................15
4.12 Playback in Scan Mode.......................................................................................15
4.13 Playback from a specified Chapter/Track or a Specified Time..............................15
4.14 Playback in Random..............................................................................................16
4.15 Playback in Different Angle..................................................................................16
4.16 Playback in Zoom Mode......................................................................................16
4.17 Change Caption Language....................................................................................16
4.18 Change Audio Language.......................................................................................16
4.19 Program Playback...............................................................................................16
4.20 Playback Picture CD in JPEG Format.................................................................17
4.21 Operation about file style of video.......................................................................17
4.22 ESP and Id3 Function..........................................................................................18
4.23 USB and SD Reader Operation..........................................................................18
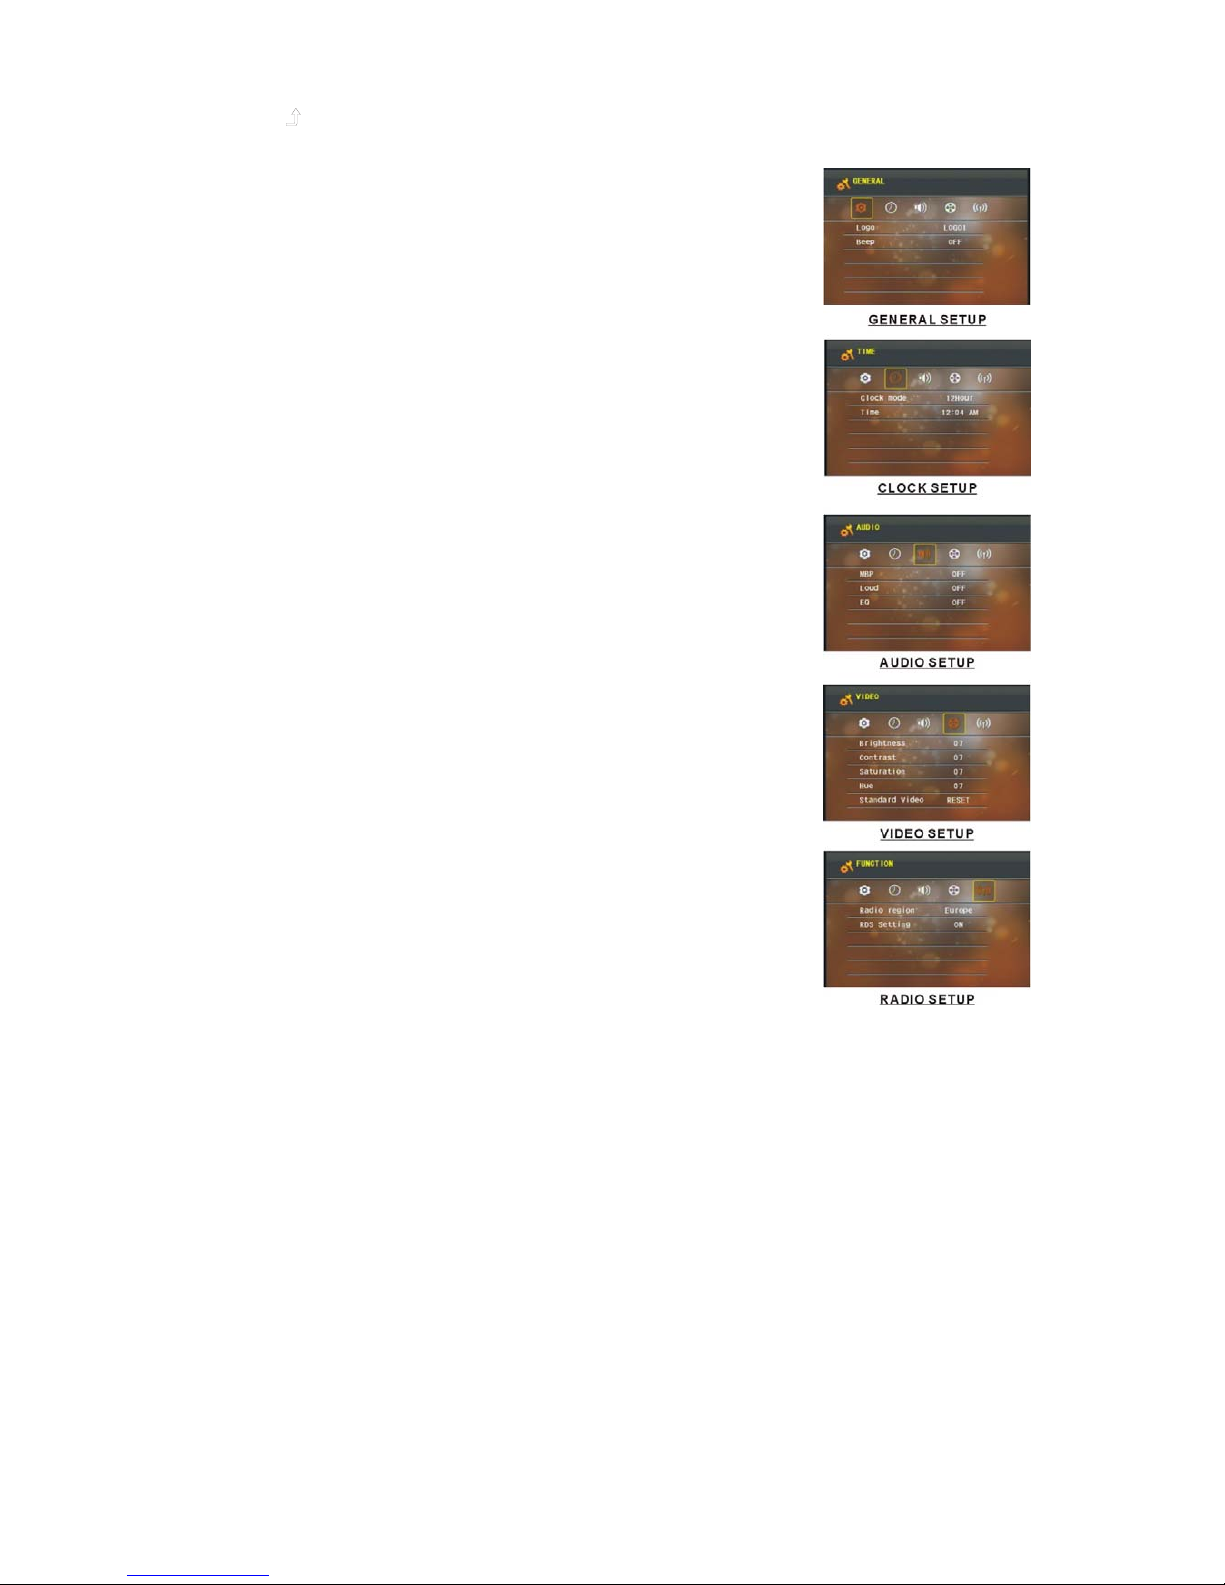
4.24 DVD System Menu Setup Operation...................................................................18
4.25 Parental Control...................................................................................................22
4.26 Region Code.......................................................................................................23
5. Trouble Shooting..............................................................................................................24
6. Specification.....................................................................................................................25

2
1. Before Operation
1.1 Glossary
PBC (playback control)
It is a kind of signal(menu) recorded in the disc with SVCD or VCD2.0 format used for the playback control. For
the discs containing PBC, it can playback interactive software with the menu displayed on TV. And if the
disc contain still images, it can playback high definition of still image.
Title
Generally, the title is the important part of DVD disc. for example, the theme part of movie is title 1, the part
described how to make movie is title 2, the cast is title 3, etc. Every title contain a serial number that is easy to
lookup.
Chapter
A title can be divided into several blocks, so that every block can be operated as a unit, the unit is called
chapter. The chapter contain a unit at least.
Track
It is the biggest component of VCD. Generally, every song of karaoke disc is a track.
1.2 Precautions
Safety
1. Power Source: The unit should be connected to power supply only of the type described in the operating
instructions or as marked on the unit.
2. The unit is designed for negative terminal of the battery which is connected to the vehicle metal.
Please confirm it before installation.
3. Do not allow the speaker wires to be shorted together when the unit is switched on. Otherwise it may
overload or burn out the power amplifier.
4. Do not install the detachable panel before connecting the wire.
5. The protective case is to safely keep the front panel(see the photo).
Environment
1. Do not use this unit when water and moisture is near it.
2. If moisture forms inside the Lens, it may not operate properly. To correct this problem, wait about one
hour for the moisture to evaporate.
3. If the car interior is extremely hot, do not use the player until the car has been driven for a while to cool
off the interior.

3
1.3 Maintenance and Cleaning of Discs
Disc Maintenance
1. To keep the disc clean, handle the disc by its edge, do not touch the disc surface of the play side.
2. Do not stick paper or tape on the disc. If there is glue (or analog) on the disc surface, must wipe it up before
using.
3. Do not expose the disc to direct sunlight, or nearby heat sources such as caliduct, or leave it in a car parked
in direct sunlight where there can be a considerable rise in temperature.
4. Put the disc inside disc case to keep temperature after finishing playback.
Disc Cleaning
1. Before playing, wipe the disc with a clean lint. wipe the disc outwards from the disc center.
2. Do not use petrel, thinner. commercially cleaner or anti-static spray can damage the unit.
Fig.1 Fig.2 Fig.3
A
B
+ side up
1.4 Battery Information of the Remote Control
Replace Battery in the Remote Control:
1.Before using the remote control for the first time, pull the insulating sheet out of the remote control as the
direction indicated by the arrow.(see fig.1)
2.Press the movable block hold as the direction indicated by the A arrow (See fig.2), then pull the battery
holder out of the remote control as the direction indicated by the B arrow(see fig.2).
3.Replace the old battery by a new battery with (+) polarity side upward. (See fig.3).
4.Insert the battery holder to the original position in remote control. (See fig.3).
Note about the Battery of the Remote Control:
1.Improper use of battery may cause overheating or explosion. so that Result in injury or fire .
2.Battery leakage may cause damage to the remote control(Battery Life: 6 months with normal use in normal
room temperature).
3.Do not short the battery.
4.Do not throw the battery into the fire.
5.To avoid the risk of accident, keep the battery out of reach of children.

4
1.5The Remote Control Description
16. SEARCH BUTTON
17. RDM BUTTON
18. RPT BUTTON
19. SUBTITLE BUTTON
20. TITLE BUTTON
21. VIEW-ANGLE/ST BUTTON
22. ZOOM BUTTON
23. AUDIO BUTTON
24. CLK BUTTON
25. A-B BUTTON
26. INT BUTTON
27. EQ/OPEN BUTTON
28. LOC/SLOW-FWD BUTTON
1. BACK BUTTON
2. MENU/PBC BUTTON
3. POWER BUTTON
4. ^ BUTTON
5. >>| BUTTON
6. > BUTTON
7. |<< BUTTON
8. v BUTTON
9. SEL BUTTON
10. PLAY/PAUSE BUTTON
11. NUMBER(0~9,+10
-10)BUTTONS
12. 10+/PTY BUTTON
13. SETUP BUTTON
14. MODE BUTTON
15. APS BUTTON
29. MUTE BUTTON
30. STOP BUTTON
31. VOLUME- BUTTON
32. < BUTTON
33. OK BUTTON
34. VOLUME+ BUTTON
35. BAND BUTTON
36. PROG BUTTON
37. OSD BUTTON
38. LOUD BUTTON
39. STEP BUTTON
40. TA BUTTON
41. AF BUTTON

5
1.6 The Locations and Names of Controls on or in the unit
The Front Panel
The Front Facet after removing the front panel
1. POWER/MUTE BUTTON
2. MENU BUTTON
3. UP / DN BUTTONS
4. SEL/VOL BUTTON
5. LCD
6. REL BUTTON
7. BAND/LIST BUTTON
8. APS BUTTON
9. 1/PLAY/PAUSE BUTTON
10. 2/INT BUTTON
11. 3/RPT BUTTON
12. 4/RDM BUTTON
13. 5/-10 BUTTON
14. 6/+10 BUTTON
15. AV IN JACK
16. USB JACK
17. Card slot
18. RESET BUTTON
19. LED indicator
20. TA/AF BUTTON
21. IR Remote Sensor
22. EJECT BUTTON
23. DISC SLOT

6
1.7 Description of Rear Cabinet
Note: 1. After connecting the Parking Line ,the video on the monitor of the front panel will be displayed only
when the hand brake is on.
2.Use the clip end of a Ground Line provided by manufacturer to connect the Fixing Screw Bolt, use
another end of the Ground Line to connect the negative pole of the power source. Otherwise, the
video on screen maybe flashing.
Description of Connecting the Parking Brake Line to the Parking Brake System Built in the Car
The Description of the Fixed ISO Female Connector
CONNECTOR A
1.
2.
3.
4. Memory +12V
5. Auto Antenna
6.
7. 12V (To Ignition Key)
8. GROUND
CONNECTOR B
1. Rear Right Speaker (+)
2. Rear Right Speaker (-)
3. Front Right Speaker (+)
4. Front Right Speaker (-)
5. Front Left Speaker (+)
6. Front Left Speaker (-)
7. Rear Left Speaker (+)
8. Rear Left Speaker (-)

7
1.8 UNIT INSTALLATION

8
2. Common Operation
1. To turn on/off the unit
Under power off mode, press the POWER button to turn on the unit.
Under power on mode, press and hold the POWER button on the front panel or briefly
press the POWER button on the remote controller to turn off the unit.
2. To select function mode
Press the MENU button to turn to mode select, then rotate VOL knob to select TUNER,
DISC(After inserting a disc), USB(After inserting a USB storage), Card(After inserting a SD
card), or AUX mode.
After selecting ,press SEL to confirm and turn to your selection.
3. To adjust sound level
Rotate the VOL knob on the front panel or press the + or - button on the remote controller to
directly adjust the volume level.
4. To mute sound
Press the MUTE button on the remote controller to turn on/off MUTE mode.
Briefly pressing the POWER button on the front panel also can turn on/off MUTE mode.
In MUTE mode, the MUTE mode can be released by pressing the following buttons: MUTE,
VOL or +/-, SEL, MODE.
5. To display and adjust the clock time
Press the CLK button to display clock time on the monitor of the front panel.
To adjust the time, please turn to setup mode time setting.
6. To select a preset EQ mode
Press the EQ button to select the preset music equalizer curves: POP, ROCK, CLAS, EQ
OFF .
The sound effect will be changed.
7. To remove the front panel
Press the REL button on the front panel to detach the front panel from the unit, then you can
remove the front panel.
8. To turn on/off LOUDNESS mode
Press the LOUD button to turn on/off LOUDNESS mode.
When turning on LOUDNESS mode, it will enhance bass level immediately when the bass
is not enough.
9. To reset the unit
when the display is incorrect, or the function buttons are not effective or sound is distorted,
press the REL button to detach the front panel from the unit and remove it, then use the
sharp end of a thing to press the RESET button, which will reset to factory default, and
re-instate the correct functions.
10. To adjust sound modes
To adjust the sound modes, briefly and repeatedly press the SEL button on the front panel to
select one of the sound modes such as : VOL, BAS (without preset EQ), TRE (without
preset EQ), BAL, FAD and EQ.
Note: this function except in play mode select.

9
11. Return control
Pressthe button or MENU button to up to the previous menu.
12. To do setup
In setup mode, select the GENERAL, CLOCK,
AUDIO, VIDEO, RADIO as follow:
GENERALSETUP
Logo: this function allows to choose the starting screen.
Beep: Choose the buttons' sound on/off.
CLOCK SETUP
Clock mode: Select 24 HOUR or 12 HOUR.
Clock time: Adjust the clock.
AUDIO SETUP
MBP: Choose between MBP LEFT/RIGHT/OFF.
Loud: Choose between Loudness ON/OFF.
EQ: Choose between the different types of EQ.
VIDEOSETUP
Brightness
Contrast
Saturation
Hue
Standard Video
RADIO SETUP
Radio region: choose the radio zone.
RDS setting: ON/OFF

10
3. Radio Operation
1. BAND BUTTON
Press the BAND button on the front panel to select your desired
radio band of FM1, FM2, FM3, AM1 and AM2, and the selected
band will be displayed on the monitor of the front panel, press
1-6 buttons to select your favour.
Press and hold this button again to select RDS function such as :
PTY, AF, TA, ST, LOC, LOUD by rotate VOL knob.
2. TUNE/SEEK UP/DOWN BUTTONS
1) Press and hold the UP/ DN button to automatically search up/
down for a available station from the current frequency.
2) Briefly press the UP / DN button to manually search up or down with step by step for
your desired station from the current frequency.
3. APS BUTTON
1) When press and hold the APS button, the radio searches from the lowest frequency and
checks the signal strength level until 1 cycle search is finished. And then the 6 strongest
stations are preset to the corresponding preset number memory bank. The AS operation
is implemented in each bank of the selected band. When the AS operation is finished,
the radio executes the preset scan, and after preset scanning for one cycle, it will stop
scanning and broadcasting the No.1 station for Fm1.
(It can store 3x6 stations for FM and 2x6 stations for AM in all)
2) When press the APS button briefly on the front panel or the remote control, the radio
searches for each preset station from the M1. When the field strength level is more than the
threshold level of the stop level, the radio holds at that preset number for few seconds with
releasing mute, and then searches again. After finishing a circle of searching, it will stop
searching on the M1.
NOTE: In FM band, FM1,FM2,FM3 is checked one at a time.
In AM band, Am1, Am2 is checked one at a time.
4. PRESET STATION [ 1-6 ] BUTTONS
1) To memorize the current frequency on the current band, press and hold any one of the six
Number buttons (1-6) .
2) To recall the memory station on the current band, press one of the Number buttons [1-6] .
5. STEREO/MONO BUTTON
Press the ST button on the remote control to select the STEREO or MONO sound mode for
FM band.
6. LOC BUTTON
1) When the signal of the distance radio station are very weak and the receiving effect is bad
during tuning, check whether there is the word LOC on LCD. If there is the word LOC
on LCD, press this button to turn off the LOC function, then tune again for the distance radio
station;
2) When the signals from the local radio stations are too strong, this could lead to interference.
Radio interface-1
Radio interface-2

11
press this button to turn on the LOC function, and the LOC icon will be lit up on the LCD.
Re-tune for the local station required.
7. PTY (PROGRAM TYPE) BUTTON
Press the PTY button shortly to select one of the following mode:
PTY MUSIC group- - PTY SPEECH group- - PTY OFF
When PTY group is on, press the VOL+ or VOL- button on the remote
controller or rotate the VOL knob on the front panel to select one of PTY programs:
<-->NEWS<-->AFFAIRS<-->INFO<-->SPORT<-->EDUCATE
<-->DRAMA<-->CULTURE<-->SCIENCE<--> VARIED<-->WEATHER<-->
FINANCE<-->CHILDREN<-->SOCIAL<-->RELIGION<-->PHONE IN<-->
TRAVEL<-->LEISURE<-->DOCUMENT< -->PTY NONE<-->POP M< -->
ROCK M<-->EASY M<-->LIGHT M<--> CLASSICS<-->OTHER M<-->
JAZZ<-->COUNTRY<-->NATION M<-->OLDIES<-->FOLK M<-->
When PTY group is on, pressing the 6 number buttons also can select one of PTY programs
as above.
After selecting one of the PTY programs, it will display SEEK PTY and automatically search
for the station of the PTY program. If the station of the PTY program does not exist, it will
display PTY NONE and then return back to the normal station.
8. AF [ALTERNATIVE FREQUENCIES] BUTTON
Press and hold the TA/AF button, the AF switching mode is selected and the state of the AF
switching mode is displayed by AF segment in display.
Segment off: AF switching mode off.
Segment on: AF switching mode on, and has RDS information.
Segment flashing: AF switching mode on, but RDS information is not
receivedyet.
When the AF switching mode is selected, the radio checks the signal strength of the AF all
the time. The interval of checking time of each AFs depends on the signal strength of the
current station, from a few minute for the strong station to a few seconds for the weak station.
Every time that a new AF is stronger than the current station, it switches over to that
frequency for very short time, and the NEW FREQUENCY is displayed for 1-2 seconds.
Because the mute time of the AF switching or the checking time is very short, it is
almost inaudible in case of normal program. (When AF flash on LCD, it will search for the
stronger RDS station. If AF and TP flash on LCD, it can only search for the traffic
announcement station).
In FM mode, when AF is on, SEEK, (SCAN), AUTO-MEMORY function can only receive and
save the RDS program.
9. TA [TRAFFIC ANNOUNCEMENT] BUTTON
Press the TA/AF button shortly to turn on TA search mode.
When traffic announcement is transmitted:
1).If the unit is in Disc Play mode, it will switch to radio mode temporarily.
2).Temporarily switch over to an EON linked station when EON detects a traffic
announcement on that other program, and TA, TP will be displayed on LCD
* TA interruption function:
The current traffic announcement is cancelled by pressing TA button shortly.
* When TA is on, SEEK, (SCAN), AUTO MEMORY function can be received
or saved only when traffic program identification code has been received.

12
4. Basic Disc, USB or SD Operation
4.1 Begin playback
1. Press the POWER button briefly to turn on the DVD player.
After turning on the DVD player, please turn on the monitor, and ensure that the video
output of the monitor is the video input from the DVD player connected with the monitor.
? Common Question
Q: There is not anything is displayed on TV screen when the DVD player is turned on.
How to solve the problem?
A: Ensure that the TV was set to right video input(not TV channel); for example,
if you make VIDEO1 INPUT of TV and DVD player connected with each other,
then you need set TV to VIDEO1.
2. Press the RELEASE button to detach the front panel from the unit.
3. Insert a disc into the DISC SLOT(Label surface up), then flip up the front panel till
hearing a clip.
NOTE
1. For some discs that are seriously scratched or poor manufacturing or recording quality,
it may not play.
2. If the player can not read disc under normal condition, please try to eject and reload
the disc again.
3. Remark:
1) In addition to normal CD and DVD, this unit supports to play CD-R, CD-R/W, DVD-R and
DVD-R/W as well; however, depending on the conditions of the recording equipment,
recording program or the disc itself, some CD-R, CD-R/W, DVD-R or DVD-R/W may not
play.
2) When dealing with CD-R, CD-R/W, DVD-R or DVD-R/W recording, too high recording
speed may result in poor signal quality and therefore, it is recommendable to select as
lower as possible recording speed.
4. Play USB & Card
Insert an USB or SD Card into their slots respectively, then the root menu will be displayed
on the monitor and it will play audio file automatically if the USB or SD Card include audio
files.
Press OSD on the remote to turn on function select.

13
:select to pause playback.
: select to stop playback .
: select one of them can select next or previous chapter/track.
: Same as the REPEAT button on the remote control.
:ToselectRDMon/off.
: To select audio language.
:ToselectLOUDon/off.
4.2 Pause Playback
When playing DVD/VCD/CD/MP3/WMA discs, press the
PAUSE button on IR remote control to pause the playback,
press the PLAY button to resume normal playback.
4.3 Stop Playback
When playing DVD/VCD/MP3/WMA/CD discs, press the STOP button once to pause
the playback, then press the PLAY button to resume the normal playback; press the STOP
button twice to stop the playback, then press the PLAY button to start playback from the
beginning of the first chapter/track.
4.4 Select Chapter/Track with UP/DN or >>| / |<< Button
Press the UP/DN button on the front panel or the >>| / |<< button on the remote control
during playback to select the next or last chapter/track to playback.
Note: Press the UP/DN or the >>|/|<< button multiple times to advance
multiple chapters/tracks forward or backward.
4.5 Select Chapter/Track with Number Buttons
When playing DVD/VCD(PBC OFF)/MP3/WMA/CD discs, press one of the 1~9 to directly
select and play the 1st to 9th track / chapter.
If you want to play the track/chapter with serial number bigger than 9, For example 1,
to play the 35th track/chapter,just press 3 and then press 5 on the remote.
For example 2, to play the 107 track/chapter, just press 1 and press 0 and then press 7 on
the remote.
Note: pressing and holding the +10 or -10 buttons will allow you to play the next 10 or last
10 chapter/track(only for MP3/WMA).
4.6 Select Chapter/Track with Root/PBC Menu (If the used disc includes root/PBC menu)
When playing DVD discs:
1. Press the TITLE button on the remote control to display the title list.
2. Press the direction buttons to select your desired title, and then press the OK or
PLAY button to open the root menu of the selected title.
3. Press the direction buttons to select your desired chapter, finally press the OK or
PLAY button to play the selected chapter.

14
During playback, pressing the MENU button can directly display the root menu of the
title that is playing.
In VCD mode
1. When starting to turn on the PBC function, it will play from the beginning of the disc till it
display the PBC menu on TV screen if the disc include the PBC menu.
2. Press the number buttons to select your desired track to play.
InMP3/WMAmode
1. The root menu is displayed on the monitor screen all the time(and the TITLE or
MENU button is not available).
2. Press the direction buttons to select your desired FOLDER, then press the OK or
PLAY button to open the FOLDER, and then press the direction buttons to select
your desired file, finally press the OK button to play the selected file.
In CD mode, the TITLE, PBC, MENU buttons are disabled.
4.7 Terminate Playback
1. Press the RELEASE button to detach the front panel from the unit, then press the
EJECT button to eject disc, and then remove the disc and flip up the front panel
till hearing a clip.
2. Press and hold the POWER button on the front panel or briefly press the POWER
button on the remote controller to turn off the DVD player.
4.8 Playback with Speed
During normal playback, press and hold the UP/DN button on the front panel or the
>>|/|<< button on the remote controller continuously to fast forwards or backwards
at the following speeds: x2, x4, x8, x20, normal.
During speed playback, press the PLAY button to resume normal playback.
4.9 Playback with Slow Speed
During playback , press the SLOW_FWD button to execute the Slow Forward function.
With each consecutive pressing of the SLOW_FWD button, the playback speed decreases.
The speed levels in Slow Forward as follows: x1/2,x1/3,x1/4,x1/5,x1/6,x1/7,normal.
During slow forward, press the PLAY button to resume normal playback.
The function is only for video.
4.10 Playback with still frame
If the unit is currently running DVD/VCD disc, press the STEP button consecutively to
display the still frame forward with step by step.
Press the PLAY button to resume normal playback.
4.11 Playback Repeatedly

15
4.11.1 ONE/ALL Repeat
1. In the mode of DVD disc playback:
Press the RPT button to select REP CHAPTER, REP TITLE, REP ALL or REP OFF.
2. In the mode of VCD(PBC OFF)/CD disc playback:
press the RPT button to select REP ONE, REP ALL or OFF.
When it is in the state of PBC ON, during VCD disc playing, the RPT
button are not available.
3. In the mode of MP3/WMA disc playback:
Press the RPT button to select REP ONE, REP DIR, REP ALL or OFF.
4.11.2 A-B Repeat
Press the A-B button if you want to repeat a specific segment on a disc that you define:
1. Press the A-B button at a point (A) where you want it to be the start point of the repeat
segment.Press the A-B button again at a point (B) where you want it to be the terminal
point of the repeat segment. Then it will play the segment repeatedly.
2. To cancel the A-B repeat mode and resume normal playback, press the A-B
buttonforthethirdtime.
Note:
During VCD/MP3/WMA/CD playback, points A and B must be within the
sametrack.
During DVD playback, points A and B can be selected from different chapters.
4.12 Playback in Scan Mode
1. When playing VCD(PBC OFF)/CD discs, press the INT button to play the previous 10
seconds part of each track on the disc. Press the INT button again to resume normal
playback.
2. When playing DVD/MP3/WMA discs, the INT button is not available.
4.13 Playback from a specified chapter/track or a specified time
1. When playing DVD discs, press the SEARCH button to display a interface and highlight
the title item, then use the number buttons to input the serial number of the title; use the
direction buttons to highlight the chapter item, then use the number buttons to input the
serial number of the chapter; you can still use the direction buttons to highlight the time
item, then use the number buttons to input the desired time to start playback; finally press
the OK or PLAY button to play the selected chapter or play from the selected time.
2. When playing VCD/MP3/WMA/CD discs, press the SEARCH button to display a interface
and highlight the track item, then use the number buttons to input the serial number of the
track; you can still use the direction buttons to highlight the time item, then use the
number buttons to input the desired time to start playback; finally press the OK or PLAY
button to play the selected track or play from the selected time.
4.14 Playback in Random

16
When playing DVD/VCD(PBC OFF)/MP3/WMA/CD discs, press the RDM button to switch
between RANDOM (ON)/RANDOM OFF. When in RANDOM (ON) mode, it will play in
random.
4.15 Playback in Different Angle
1. When playing VCD/MP3/WMA/CD discs, the ANGLE button on the IR remote
control is not available.
2. When playing DVD discs, press the ANGLE button repeatedly on the IR remote control to
view in different angle.(This function is only for the DVD discs with ANGLE function)
4.16 Playback in Zoom Mode
In DVD/VCD mode, during playback, press the ZOOM button continuously to enlarge a
certain area of the images on the screen with these multiples:
ZOOMx2,ZOOMx3,ZOOMx4,ZOOMx1/2,ZOOMx1/3,ZOOMx1/4,ZOOM OFF.
Press one of the ^/v/>/< buttons to select the area you want to enlarge.
4.17 Change Caption Language
When playing DVD discs, press the SUBTITLE button repeatedly to select
the language of the caption or turn off the caption.(depend on the disc used.)
When playing VCD/MP3/WMA/CD discs, the button is not available.
4.18 Change Audio Language
1. When playing DVD discs, press the AUDIO button repeatedly on the IR
remote control to select the desired language type(depend on the disc used)
2. When playing VCD discs, press the AUDIO button repeatedly to select the
sound mode of the MONO L, MONO R, and Stereo, no language function.
3. When playing CD/WMA/MP3 discs, the AUDIO button is invalid.
4.19 Program Playback
It allows you to enter the order in which you want some chapters/tracks in
DVD/VCD/MP3/WMA/CD disc to play.
1 During playback, press the PROG button to enter a program interface as follows:
2 Use the direction buttons to move cursor onto the desired place for inputting

17
the sequence number.
3 Use the number button to input desired sequence number of title/chapter/
track with desired sequence.
4 Use the direction button to move cursor onto Play item, then press the OK
button to play the programmed titles/chapters/tracks in programmed order;
only pressing the PLAY button also can play the programmed titles/chapters
/tracks in programmed order.
* To exit program playback, firstly press the STOP button, then press the PLAY
button to enter sequence playback; or press the PROG button twice again.
* To remove the all programmed sequence numbers, move the cursor onto
Clear item, then press the OK button.
* To change the programmed sequence, move the cursor onto the item you
want to change, input the desired sequence number.
* During VCD playback, if it is in PBC ON mode, at the same time of entering
the state of program playback, it turns off PBC mode.
4.20 Playback Picture CD in JPEG Format
1. The root menu is displayed on the monitor when
beginning to switch on DISC mode. At the time,
it plays MP3/WMA file.(the TITLE or MENU
button is not available).
In the root menu, the left file sort icon is for
MP3/WMA file; the middle file sort icon is for
VIDEO file; the right file sort icon is for JPG file.
If one of these 3 file sort does not exist, you
can not move cursor onto the file sort icon.
2. When displaying the root menu, press the direction buttons to select your desired FOLDER,
file or file sort icon, then press the OK or PLAY button to open the FOLDER, or play the
selected file, or play only this sort of file.
When displaying the root menu, you can also use the number buttons to select the serial
number of the file and play the file. When you select a JPEG file sort icon, press the ^ or >
button to select the first JPEG file, then press the v button to select the desired JPEG file,
finally press the OK or PLAY/PAUSE button to display the JPEG picture in full
screen from the selected JPEG picture.
3. During JPEG playback, press one of the >/</^/v buttons to change the angle
of viewing picture that is displaying as follows:
>: 90 deg cw; <: 90deg ccw; ^:UP<-->DOWN; v: LEFT<-->RIGHT
During JPEG playback, press the PROG button to change the mode of refresh picture.
During JPEG playback, press the STOP button to stop playing and return to the root menu.
* During JPEG playback, the following buttons are not available: SLOW-FWD,
SUBTITLE, TITLE, ANGLE, STEP, AUDIO, RDM, INT and A-B.
* In JPEG mode, the other operations are same as ones in MP3/WMA mode.
4.21 Operation about file style of video
1. The root menu is displayed on TV when beginning to switch on DISC mode, then
it will automatically play the first file.
During playback, press the STOP button to stop playing and return to the root menu.
2. When displaying the root menu, press the direction buttons to select your desired
FOLDER or file, then press the OK or PLAY button to open the FOLDER, or play the
selected file.
When displaying the root menu, you can also use the number buttons to select the
USB interface

18
serial number of the file and play the file.
* The ANGLE, PROG, RDM, INT and TITLE/PBC button are not valid.
* The other functions are same as ones in DVD disc; but the RPT function is same as
one in MP3/WMA.
4.22 ESP and Id3 Function
There is ESP function for all formats of discs.
In MP3/WMA mode, during playback, the information of the file name, folder name,
song s title, artist and album will be scrolling on the LCD display.
As long as the current playing MP3 music contains relevant Id3 tag information in version
1.0/2.0 format, the 3 items underlined above will be scrolling on the LCD display; otherwise,
they will not.
4.23 USB and SD Reader Operation
Power on the DVD player, then insert the USB storage or SD Card (firstly flip down the front
panel), and then the monitor will display the root menu of the USB storage or SD Card.
All the operations are same as ones of the corresponding format.
When you want to pull out the Card, firstly push it,
and then pull it out.
4.24 DVD System Menu Setup Operation
1. Press the SETUP button on the remote controller to access the DVD System
Menu on the monitor.
2. There are 6 setup pages in all for the System Menu. Press the > or < button
to select an desired setup page.
3. Press the ^ or v button to select an setup item in the selected setup page.
4. Press the > button to enter the setup item. Then press the v or ^ button to select
a desired mode of the setup item, finally press the OK button to confirm it.
* Press the < button to return to the upper level.
* Press the SETUP button again or use the direction buttons to highlight the
item of the EXIT SETUP and then press the OK button to exit the System Menu.
For the DVD System Menu, there are 6 setup pages in all. They display as follows:
4.24.1 SYSTEM SETUP
TV TYPE
The setup item is for matching TV screen size.
4:3 PS: Choose the item when connecting a TV set with 4:3 screen. When playing
the pictures with 16:9 size, the left and right parts of the video will be cut out,
and display in full screen.
4:3 LB: Choose the item when connecting a TV set with 4:3 screen. When playing
the pictures with 16:9 size, the top and bottom parts of the TV screen will be

19
turned into a black square respectively.
16:9: Choose the item when connecting a TV set with 16:9 wide screen.
PASSWORD
This setup item is for locking or unlocking the rating level of the Parental Control.
The defaulted state is locked. The defaulted password is 0000.
You can set a new password that you like: Select the PASSWORD item and then
press the > button to enter it, then input the original password 0000, and then
press the OK button to unlock it. Press the > button to enter it again, then input a
new password that you like and then press the OK button to make it effective.
Before the other persons see the Manual, you should get the password in mind
and cut out the part of PASSWORD in the Manual.
RATING
The item is for setting a new rating level of the Parental Control.
1. Select the PASSWORD item and then press the > button to enter it, then input
the password mentioned above, and then press the OK button to unlock the
setting of the rating level of the Parental Control.
2. Select the RATING item and then press the > button to enter it, then use the direction
buttons to select your desired rating level, then press the OK button to confirm.
3. Select the PASSWORD item again and then press the > button to enter it, then input the
password, and then press the OK button to lock the new setting of the rating level of the
Parental Control.
DEFAULT
This item is for making all setup items change back to original status.
4.24.2 LANGUAGE SETUP
OSD LANGUAGE
This item is for selecting the language of the SYSTEM MENU and all operating prompt
interface displayed during playback.
AUDIO LANG
This item is for selecting a audio language.
SUBTITLE LANG
This item is for selecting a subtitle language.
MENU LANG
This item is for selecting a disc menu language.
4.24.3 AUDIO SETUP
Table of contents
Languages:
Other LENCO Car Receiver manuals

LENCO
LENCO CS-180 DVD - User manual

LENCO
LENCO CS-340 User manual

LENCO
LENCO CS-176 User manual

LENCO
LENCO CS-455 BT User manual

LENCO
LENCO CS-430BT User manual

LENCO
LENCO CS-440 BT User manual

LENCO
LENCO CS-174 User manual

LENCO
LENCO CS-450 CD User manual

LENCO
LENCO CS-340 User manual

LENCO
LENCO CS-340 User manual

LENCO
LENCO CS-115 User manual

LENCO
LENCO CS-410 User manual

LENCO
LENCO CS-322 User manual

LENCO
LENCO CS-351 User manual

LENCO
LENCO CS-420 User manual

LENCO
LENCO CS-470 DVD User manual

LENCO
LENCO CS-340 User manual

LENCO
LENCO CS-175 User manual

LENCO
LENCO CS-180 DVD - User manual

LENCO
LENCO CS-176 User manual