NOTE:Toaccesscontrolsettings,removethecontrolpanelcover.If
necessary,removethewarninglabelthatcoverstheadjustmentdials
(refer to Control Panel Diagram).
Factory Settings: Thesensorisshippedfromthefactorytowork
inalmostallsituations,withoutanyaddedadjustments.Thefactory
settingsare:Blindersopen,10minutesxedTime-Out,Lightsalways
turnONregardlessofexistinglightlevels,Mediumpassiveinfrared
(PIR)range,andHighUltrasonicrange.ThePIRandultrasonic
technologiesarebothactive.
Blinders:Theblindersaretwoindependentshuttersthatcannarrow
theeld-of-viewfromamaximumof180°downto32°.Theblinders
areoperatedbymovingtheblinderleverstowardsorawayfrom
thecenteroftheSensor.Theblinderleverscanbefoundabovethe
controldialsinthecontrolpanel(refer to Control Panel Diagram).
Time-Outs:TheSensorhasthreetypesofTime-Outs:Fixed,
Adapting,andWalkthrough.
• Fixed Time-Out:ThevalueofthisTime-Outisuserselected
throughtheuseoftheTimeControlSettings(refer to Control
Panel Diagram and Time-Out Settings).
• Adapting Time-Out:Whenactivated,thevalueofthisTime-Out
(30minutes)ischangedbytheSensorbasedonroomoccupancy
andlightingconditions.
• Walk-through Time-Out:ThevalueofthisTime-Outispresetto
2.5minutesandonlyexistsintheAdaptingTime-Outmode.
Fixed Time Delay:ThexedTime-Outvalueisselectedbyrotating
theTimeControldial.Therearefour(4)valuesfromwhichtochoose.
Eachmarkaroundthedialcorrespondstoadifferentvalueas
indicatedbelow(refer to Control Panel Diagram).
NOTE: Alltimedurationsareapproximatewithin±10seconds.
Adapting Time Delay:TheSensorhasbuiltinadaptingintelligence
thatmodiestheAdaptingTime-Outdurationinresponsetothe
occupancyconditionsoftheroomitisinstalledin.IftheSensor
detects“large,”infrequentmotionitwillINCREASEtheAdapting
Time-Outduration.IftheSensordetects“large,”frequentmotion(as
inseveralpersonsinaroomduringameeting),itwillDECREASEthe
time-outdurationonlyifitwasNEVERincreased(thisisbecausethe
built-inintelligencewillalwaysproceedinthedirectionof“increasing”
adaptingTime-Outonceithasincreaseditforanyoftheoccupancy
conditionssensed).TheAdaptingTime-Outdurationwillrangefrom10to
30minutesintimeplustheWalk-ThroughTimeDelay.
Walk-Through Time Delay:Thewalk-throughfeature,whichis
onlyactiveintheAdaptingTime-Outmode,isusefulwhenaroomis
momentarilyoccupied.Withthisfeature,theSensorwillturnthelights
OFFshortlyafterthepersonleavestheroom.Thewalk-throughfeature
worksinthefollowingmanner:Whenapersonenterstheroom,thelights
willturnON.Ifthepersonleavestheroombeforethewalk-throughtime-
outof2.5minutes,theSensorwillturnthelightsOFFafter2.5minutes.If
thepersonstaysintheroomforlongerthan2.5minutes,theSensorwill
insteadusethestoredAdaptingTimeDelay.
Iftheroomisoccupiedforlongerthan2.5minutes,theSensorwillenter
theOccupiedModewiththetime-outdurationspeciedbytheAdapting
Time-Outsetting.
IftheSensordetectsmotionwithin30secondsafterthelightsturnOFF,
itwillturnthelightsONandincreasethetime-outvalueby1.5timesthe
existingvalue.
TheAdaptingTime-Outmayberesettothebasevalueof30minutesby
rotatingtheTimeControltoanewtimeselectionvalueandthenbackto
theAdaptingTime-Outvalue(refer to Control Panel Diagram).
Ambient Light Override:TheAmbientLightOverrideisusedtokeep
thelightsOFFifthereisalreadyenoughnaturallightintheroom.
Forproperoperation,theAmbientLightOverrideadjustmentmustbe
performedwhenthereisenoughnaturallight(refer to the SETTINGS
section).Iftheadjustmentismadewhenthereislessnaturallight,the
lightsmaynotturnONeventhoughtheyareneededandwillrequire
manualactivationofthepush-buttonstoturnthelightsON.
NOTE: Theambientlightlevelinthecenterofaroomwillbedifferent
thanthelevelatthewallwheretheswitchislocated.
Ambient Light Dial:Theambientlightsettingisadjustedwiththe
AmbientLightDial(refer to Control Panel Diagram).TurningtheLight
Dialfullycounter-clockwise(CCW),setstheSensortomanualONmode
(see following section).IfthelightcontrolisinthefullyCWposition,
thelightswillturnONwhenevermotionisdetected,eveninfulldaylight.
IntermediatesettingswillcausethelightstoturnONonlywhenthe
ambientlightisbelowthelevelselectedbythelightcontrol.
NOTE:WhenthesettingisattheminimumCCWlevel,thelightswillstay
OFFwhentheroomisdim.Whenthesettingisatthemaximumlevel
clockwise(CW),thelightswillturnONwhentheroomisbright.
Manual ON Mode:WhenthelightcontrolisinthefullyCCWposition
thelightswillneverautomaticallyturnON.Inthismodethelightsneed
tobemanuallyturnedONbythepush-button,andwillturnOFFwiththe
absenceofmotion.
PIR RANGE: TodecreasePIRdetectionrangeandsensitivity,rotatethe
knobCCW(refer to Control Panel Diagram).Thedetectionrangecan
beadjustedfrom100%downto30%.
ULTRASOUND (US) SENSITIVITY AND PIR DISABLE:USsensitivity
canbeadjustedtoHIGH-MEDUIM-LOWbyholdingtheONbuttonfor
15seconds.TheLEDwillashtorepresenttheUltrasonicsensitivity
andPIRstatus.TappingthePrimaryorSecondaryONbuttonduringthe
desiredLEDashindicationwillsetthesensitivityandPIRstatus.Use
thefollowingchart:
NOTE:Theprogramtimesoutin30secondsfromthelastbuttonpress.
ThefactorysettingfortheUSsensitivityisHIGHwithPIRandUltrasonic
technologiesenabled.
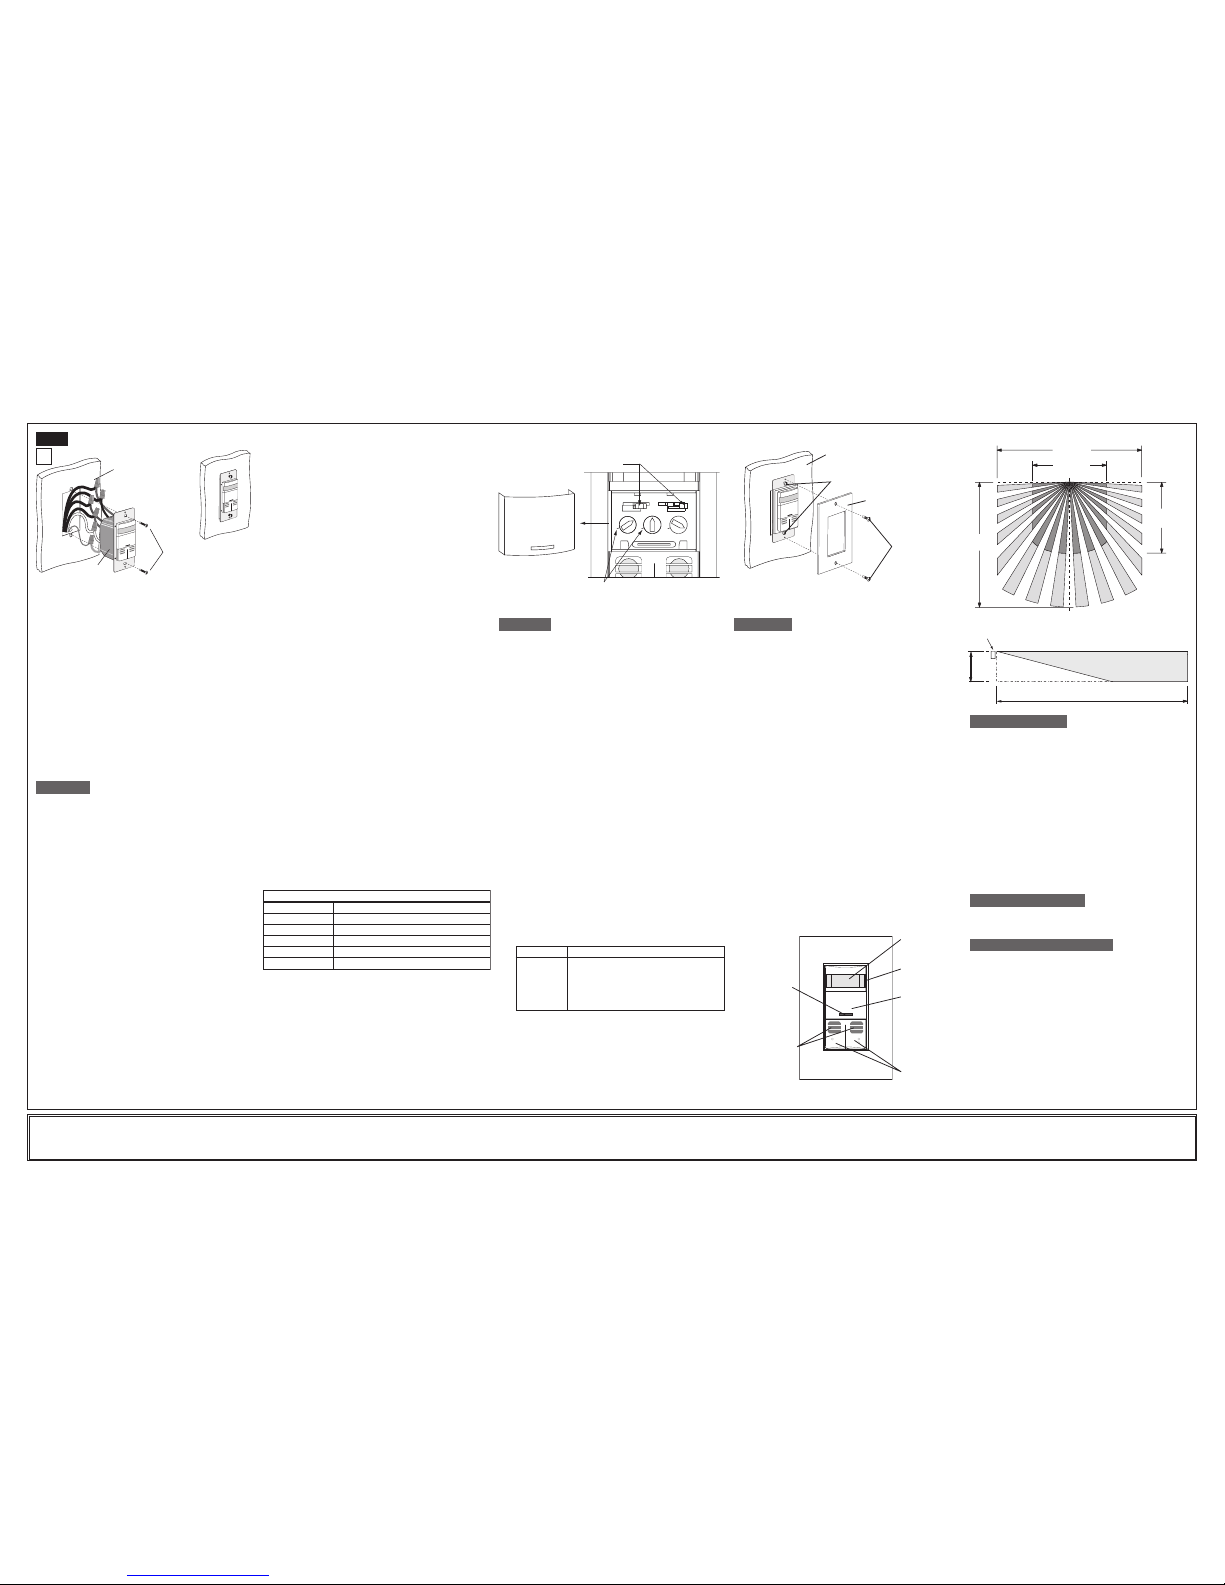
Wall surface
Sensor
Mounting
screws
(2 places)
Testing your Sensor prior to completely
mounting in wall box:
Step 6
NOTE:Dresswireswithabendasshownindiagramtorelievestress
whenmountingdevice.
• Positionallwirestoprovideroominoutletwallboxfordevice.
• Partiallysecuredeviceusinglongmountingscrewsprovided.
• Restorepoweratcircuitbreakerorfuse.
NOTE:Allow1minuteforwarm-upafterenergizing.
NOTE:AllmodelsoftheOSSMDarefactorypresettoworkwithout
anyadjustments.Ifnecessary,adjusttheBlindersandPIRRange
Controltostopanyunwantedactivationofthelights(refer to
FEATURES section).
• ForadditionalTimeControlSettings(refer to the SETTINGS
section).
NOTE:ToavoidPERMANENTDAMAGEtotheunit,becareful
NOTTOOVERTURNthecontrolknobsorleverswhensettingthe
Sensor.Thecontrolscanbeaccessedbyremovingthewallplate
(ifapplicable)andcontrolpanelcover(refer to Control Panel
Diagram).Useasmallstraightbladescrewdrivertoadjustknobs
andblinderlevers.
NOTE:DONOTpressinonblinderleversoruseexcessiveforce
(refer to Control Panel Diagram).
• AttachtheControlPanelcoverwhenthedesiredsettingsare
complete.
If lights do not turn ON, refer to the TROUBLESHOOTING section.
TIME
1
2
A
3
RANGE
BLINDERS
LIGHT
4 7
10
4 7
10
h Mark
Blinder adjustment levers
Control Panel Cover
PUSH BUTTON(S)
Cat.No.OSSMD-FThasasinglepush-buttonswitchthattoggles
relaysandtheircorrespondingloads,ONandOFF.Iftherelaysare
OFF,therelayswillturnONwhenthepush-buttonispressed,and
remainONinthepresenceofmotion.Intheabsenceofmotion,the
SensorUnitwillTime-OutandturnrelayoneOFF.Relaytwowill
remainONforthexed10minuteadditionaldelay.Whenthatperiod
timesout,relaytwowillturnOFF.
IftherelaysandtheircorrespondingloadsareON,relayonewill
turnOFFwhenthebuttonispressed.Relaytwowillremainonfor
10minutesaftertheTime-Outexpires.Afterthesetwoevents,the
relayswillturnONwiththenextdetectedmotion.
Cat.No.OSSMD-MDandOSSMD-GDhavetwopush-button
switchesthattoggletherelaysandtheircorrespondingloads,ONand
OFF.Buttononecontrolsrelayoneandbuttontwocontrolsrelaytwo.
IftherelaysareOFF,therelayswillturnONwhentheirpush-buttonis
pressed,andremainONinthepresenceofmotion.Intheabsenceof
motion,theSensorUnitwillTime-OutandturnbothoftherelaysOFF.
IftherelaysandtheircorrespondingloadsareON,therelayswillturn
OFFwhentheircorrespondingbuttonsarepressed.Therelayswillstay
OFFregardlessofmotiondetected,untiltheTime-Outexpires.Afterthe
Time-Outexpires,therelayswillturnONwiththenextdetectedmotion.
NOTES:
• TheMotionIndicatorLEDwillblinkevery1secondwhilemotionis
detected.
• WhentheTime-OutexpiresandtherelaysturnOFFa30second
vacancyconrmationexiststoturntherelay(s)backON.Afterthis
timethedevicewillbeplacedintoalowerdetectionthresholdmode.
• InManual-ONmode,thebuttonmustbepressedtoturnthelights
ON.Intheabsenceofmotion,theunitwillTime-Outandturnthe
lightsOFF.
• IfManual-Onmodeisdesired,keeptheLightknobinthefully
counter-clockwise(CCW)position.
NOTE:ToavoidPERMANENTDAMAGEtotheunit,becarefulNOT
TOOVERTURNoruseexcessiveforcewhensettingthecontrolknobs
orleversofCatNo.OSSMD.Useasmallstraightbladescrewdriverto
adjusttheknobsandyourngertoadjusttheblinderlevers.
1. RemoveDecora®wallplateandControlPanelCoverfromSensor.
2. RotatetheTimedialtoselectthedesiredxedTime-Outvalue.
3. IftheSensorisinstalledwithin6feetofanairduct,rotatetheRange
Control1/4turncounter-clock-wise(CCW).
4.Set the Ambient Light Level - AMBIENT LIGHT:Cat.No.OSSMD
hasanadjustmenttodetermineatwhatminimumambientlight
leveltheunitwilloperate.Theadjustmentshouldbemadewhenthe
ambientlightisatthelevelwherenoarticiallightisneeded.Follow
thesestepstomakeamoreaccurateadjustmentofthelightcontrol.
ThisfeaturewillnotworkinManual-Onmode.
A. WiththelightsON,rotatetheTimeControlfullyCCWtothesetthe
Time-Outtothethirty(30)secondtestmode(refertoControlPanel
Diagram).
B. RotatetheLightControlfullyCCW.
C. ManuallyturnOFFthelights.
D. RotatetheLightControlclockwise(CW)SLOWLY,untilthelights
turnON.Thisisthesettingforthecurrentleveloflightintheroom.
NOTE:WhenthelightcontrolisinthefullyCCWpositionthelights
willneverautomaticallyturnON.ThisistheManual-Onmode,
wherethelightsneedtobemanuallyturnedONbythepush-
button,andwillturnOFFwiththeabsenceofmotion.
IfthelightcontrolisinthefullyCWposition,thelightswillturnON
whenevermotionisdetected,eveninfulldaylight.
IntermediatesettingswillcausethelightstoturnONonlywhenthe
ambientlightisbelowthelevelselectedbythelightcontrol.
NOTE:Theambientlightinaroomwillchangewiththetimeofday
andtheseasonoftheyear.
5. Time-Out Settings:
A. AdjusttheTimedial.TheSensorAmberLEDwillashtwiceeach
timetheTimedialispointedatanewTime-Outvalue.TheTime-
Outvaluesfornon-adaptingmodeare:
NOTE:Toreturntoadaptingmode,rotatetheTimedialtofullCW
position(Asetting).BesuretheTimedialisrotateduntilanAmber
LEDashisissuedtobesureanewsettingwasselected.
6. Ifdesired,adjusttheblinderstoblockanyunwantedmotion.
(/)SlashMark
1
2
3
A
30secondxedtime-outforperformingawalktest
10minutesxedtime-out
20minutesxedtime-out
30minutesxedtime-out
AutoAdapting
Value of TimeFace Marking
FEATURES
SETTINGS OPERATION
LIMITED 5 YEAR WARRANTY AND EXCLUSIONS
LevitonwarrantstotheoriginalconsumerpurchaserandnotforthebenetofanyoneelsethatthisproductatthetimeofitssalebyLevitonisfreeofdefectsinmaterialsandworkmanshipundernormalandproperuseforveyearsfromthepurchasedate.Leviton’sonlyobligationistocorrectsuchdefectsbyrepairorreplacement,atitsoption,ifwithinsuchveyearperiodtheproductisreturnedprepaid,
withproofofpurchasedate,andadescriptionoftheproblemtoLeviton Manufacturing Co., Inc., Att: Quality Assurance Department, 59-25 Little Neck Parkway, Little Neck, New York 11362-2591.Thiswarrantyexcludesandthereisdisclaimedliabilityforlaborforremovalofthisproductorreinstallation.Thiswarrantyisvoidifthisproductisinstalledimproperlyorinanimproperenvironment,
overloaded,misused,opened,abused,oralteredinanymanner,orisnotusedundernormaloperatingconditionsornotinaccordancewithanylabelsorinstructions.There are no other or implied warranties of any kind, including merchantability and fitness for a particular purpose,butifanyimpliedwarrantyisrequiredbytheapplicablejurisdiction,thedurationofanysuchimpliedwarranty,
includingmerchantabilityandtnessforaparticularpurpose,islimitedtoveyears.Leviton is not liable for incidental, indirect, special, or consequential damages, including without limitation, damage to, or loss of use of, any equipment, lost sales or profits or delay or failure to perform this warranty obligation.Theremediesprovidedhereinaretheexclusiveremediesunderthiswarranty,
whetherbasedoncontract,tortorotherwise.
1. IfthereisnoresponsefromtheunitandtheLEDneverblinksor
thepushbuttondoesnotactivatethelights1-1/2minutesafter
powerisapplied,thenuninstalldeviceandverifywiring(Step 4).
2. IfthelightsconstantlystayON,evenwhentheroomisunoccupied:
A.ChecktheTimesetting.Seehowthistimecomparestohow
longthelightsstayON.
B.TryloweringthePIRRangeControl.Rotatetheknob
counterclockwiseabout30°.
C.Iftheproblempersists,tryreducingagain.
NOTE:DonotreducesomuchthattheSensorUnitcannotsee
normaloccupancy.
D.TryloweringtheUltrasonicSensitivity.
E.BesuretousetheBlinderstoblockanyunwantedhallway
trafc.
F. Checkforreectedheat/motionastheSensorUnitmaybe
seeingmotionthroughawindow.
G.CheckforadjacentHVACand/orheaterducts.
TROUBLESHOOTING
Lens
Blinders
Control panel
cover
Push buttons
LED window
US sensor ports
Thisequipmenthasbeentestedandfoundtocomplywiththelimits
foraClassAdigitaldevice,pursuanttopart15oftheFCCRules.
Theselimitsaredesignedtoprovidereasonableprotectionagainst
harmfulinterferencewhentheequipmentisoperatedinacommercial
environment.Thisequipmentgenerates,usesandcanradiateradio
frequencyenergyand,ifnotinstalledandusedinaccordancewith
theinstructionmanual,maycauseharmfulinterferencetoradio
communications.Operationofthisequipmentinaresidentialarea
islikelytocauseharmfulinterferenceinwhichcasetheuserwillbe
requiredtocorrecttheinterferenceattheirownexpense.
FCC COMPLIANCE STATEMENT
• Fortechnicalassistancecontactusat1-800-824-3005
• Visitourwebsiteatwww.leviton.com
PRODUCT INFORMATION
• Securedevicebyrmlytighteningmountingscrews.
• InstallDecora®stylewallplate(soldseparately).
Wall surface
Device mounting screw
(2 places)
Wallplate
Wallplate
mounting
screw
(2 places)
20 ft (6.1 m)
small motion
30 ft (9.1 m)
20 ft (6.1 m)
small motion
40 ft
(12.2 m)
Field - of - View (Horizontal)
40 ft.
(12.2 m)
4 ft.
(1.2 m)
Sensor
Side (Vertical) Field - of - View
DI-000-OSSMD-00A2008©LevitonMfg.Co.,Inc.
Control Panel Diagram
US Sensitivity and PIR Disable
3 amber flashes High ultrasonic sensitivity, PIR enabled
2 amber flashes Medium ultrasonic sensitivity, PIR enabled
1 amber flash Low ultrasonic sensitivity, PIR enabled
3 green flashes High ultrasonic sensitivity, PIR disabled
2 green flashes Medium ultrasonic sensitivity, PIR disabled
1 green flash Low ultrasonic sensitivity, PIR disabled
7. ReplacetheControlPanelCoverandDecora®wallplate.


