manuals.online logo
Brands
  1. Home
  2. •
  3. Brands
  4. •
  5. Leviton
  6. •
  7. Accessories
  8. •
  9. Leviton Acenti AC315 User manual

Leviton Acenti AC315 User manual

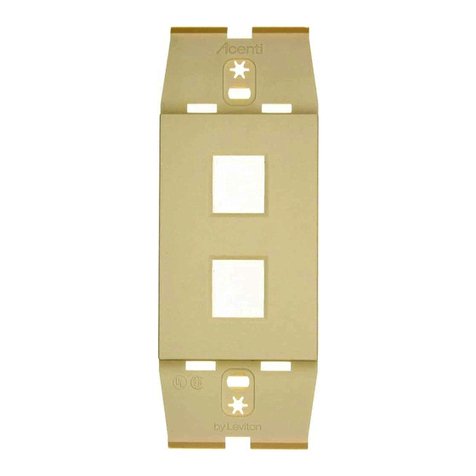
Triplex Receptacle
Cat. No. AC315
15A-125V
Cat. No. AC320
20A-125V
INSTALLATION INSTRUCTIONS
PK-93602-10-00-0A-X0
Tools needed to install your Receptacle:
Slotted/Phillips Screwdriver
Pliers
Cutters
INSTALLING YOUR RECEPTACLE
NOTE: Use check boxes when Steps are completed.
WARNING: TO AVOID FIRE, SHOCK, OR DEATH; TURN OFF
POWER at circuit breaker or fuse and test that power is off before wiring!
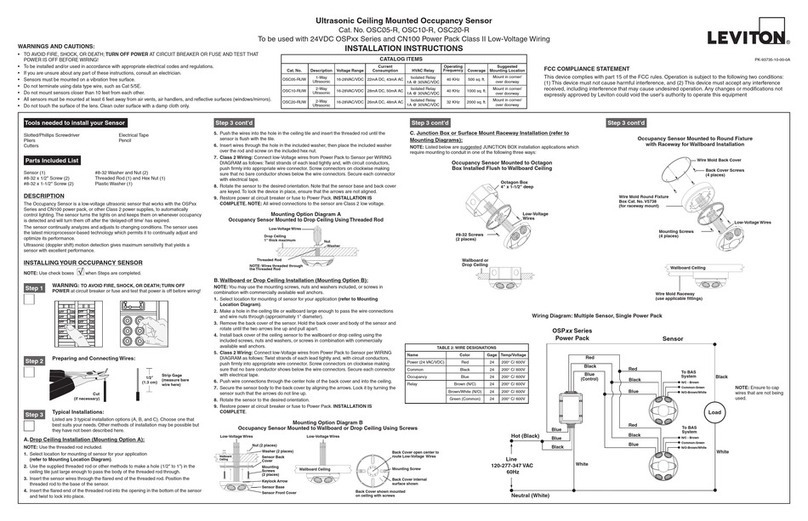
Preparing wires:
This receptacle can be wired using side wire terminal screws or
back wire clamps. Choose appropriate wire stripping specifications
accordingly.
Installing your Alignment Plate:
Important Notice for Installer
To achieve proper aesthetic installation of the Acenti products, the wall
surface surrounding the wall box opening must be fairly flat and free of
irregularities.The wall box must be level and recessed or flush to the wall
surface.The Acenti installation system allows for adjustments that will
correct minor flaws that may be present in the installation area.
This device must be installed with the Acenti™ Alignment Plate.The
Alignment Plate is packaged with the Acenti™ Wallplate, which is sold
separately from this device.
The Alignment Plate will function properly only if it is mounted to a flat
wall surface as described above.
•Leviton recommends to temporarily position the Alignment Plate prior
to wiring the device. If the wall box wires extend at least 6 inches out
of the wall box, it is also possible to install the Alignment Plate after
the device has been wired (refer to Wallplate instruction sheet).
•The Alignment Plate must be installed with the tab towards the
bottom.
•Leviton recommends the following 3 methods to temporarilyhold the
Alignment Plate – use of device mounting screw, use of wall box wires,
or use of electrical tape (refer to the following figures):
Step 2
Step 1
ONOFF
ONOFF
ONOFF
ONOFF
ONOFF
ONOFF
ONOFFONOFF
ONOFF
ONOFF
ONOFF
ONOFF
WARNINGS AND CAUTIONS:
•To be installed and/or used in accordance with appropriate electrical codes
and regulations.
•If you are unsure about any part of these instructions, consult a qualified
electrician.
•Disconnect power at circuit breaker or fuse when servicing, installing or
removing device.
WARNINGS AND CAUTIONS:
• The Acenti™ Triplex Receptacle uses a multi-function self-grounding clip
that provides an automatic ground connection in a properly grounded metal
wall box.
•Use this device only with copper or copper clad wire. With aluminum wire
use only devices marked CO/ALR or CU/AL.
√
Step 3
Cut
(if necessary)
•Make sure that the ends of the wires from the wall box are
straight (cut if necessary)
.
•Remove insulation from each wire in the wall box as shown.
3/4"
(1.9 cm) 5/8"
(1.6 cm)
For Side Wire Stripping
(measure bare wire here) For Back Wire Stripping
(measure bare wire here)
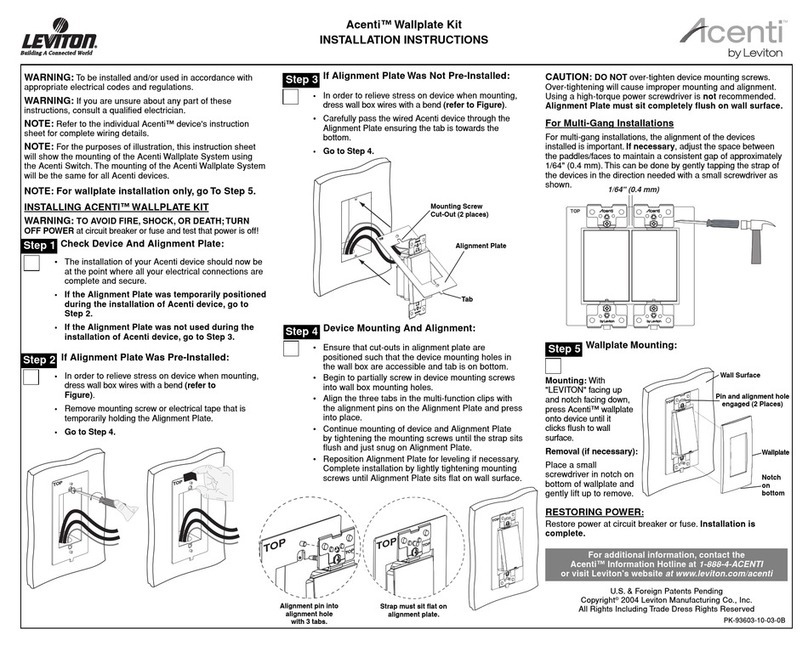
Alignment Plate
Held By Tape
Alignment Plate
Held By Wires
Alignment Plate Held
By Mounting Screw
TOP
TOP
Mounting
Screw
Alignment
Plate
TOP
Electrical
Tape
Installing your Receptacle – Single Feed Wiring Only:
LIMITED 5 YEAR WARRANTY AND EXCLUSIONS
Leviton warrants to the original consumer purchaser and not for the benefit of anyone else that this product at the time of its sale by Leviton is free of defects in materials and workmanship under normal and proper use for five years
from the purchase date. Leviton’s only obligation is to correct such defects by repair or replacement, at its option, if within such five year period the product is returned prepaid, with proof of purchase date, and a description of the
problem to Leviton Manufacturing Co., Inc., Att: Quality Assurance Department, 59-25 Little Neck Parkway, Little Neck, NewYork 11362-2591.This warranty excludes and there is disclaimed liability for labor for removal of
this product or reinstallation. This warranty is void if this product is installed improperly or in an improper environment, overloaded, misused, opened, abused, or altered in any manner, or is not used under normal operating
conditions or not in accordance with any labels or instructions. There are no other or implied warranties of any kind, including merchantability and fitness for a particular purpose, but if any implied warranty is required by the
applicable jurisdiction, the duration of any such implied warranty, including merchantability and fitness for a particular purpose, is limited to five years. Leviton is not liable for incidental, indirect, special, or consequential
damages, including without limitation, damage to, or loss of use of, any equipment, lost sales or profits or delay or failure to perform this warranty obligation. The remedies provided herein are the exclusive remedies
under this warranty, whether based on contract, tort or otherwise. PK-93602-10-00-0A-X0
Step 5
Connect wires per WIRING DIAGRAM as follows:
TO SIDE WIRE:
NOTE: Side wire terminals accept up to #10 AWG wire.
•Loop wires clockwise 3/4 turn around terminal screws.
•Green or bare copper wall box wire (Ground) to Green screw.
•Black (Hot) wall box wire to Brass screw.
•White (Neutral) wall box wire to Silver screw.
•Tighten terminal screws to 14-16 in.-lbs. of torque.
Hot
Neutral
Ground
Step 4 Step 4 cont'd
TO BACK WIRE:
NOTE: Back wire terminals accept up to #10 AWG wire.
•Insert straight wires under clamps with appropriate terminal screws.
•Loop Green or bare copper wall box wire (Ground) clockwise 3/4 turn around
Green terminal screw.
•Black (Hot) wall box wire under clamp with Brass screw.
•White (Neutral) wall box wire under clamp with Silver screw.
•Tighten terminal screws to 14-16 in.-lbs. of torque.
NOTE: The Acenti™ Triplex Receptacle uses a multi-function self-grounding clip
that provides an automatic ground connection in a properly grounded metal wall
box.
Receptacle Mounting:
To complete the Acenti™ Receptacle and Wallplate
installation, please refer to the instructions included
with the Acenti™ Wallplate and Alignment Plate.
U.S. & Foreign Patents Pending
Copyright©2004 Leviton Manufacturing Co., Inc.
All Rights Including Trade Dress Rights Reserved
For additional information, contact the Acenti™
Information Hotline at
1-888-4-ACENTI
or visit
Leviton's website at
www.leviton.com/acenti
Side Wire Connection
Side wire terminals accept up to
#10 AWG wire.
Back Wire Connection
Back wire clamps accept up to
#10 AWG wiire.
Clamp
Clamp
•Tighten screws clockwise.
This manual suits for next models

1

Other Leviton Accessories manuals

Leviton HCP15 User manual

Leviton

Leviton HCP15 User manual

Leviton 279-S00 User manual

Leviton

Leviton 279-S00 User manual

Leviton 37820 User manual

Leviton

Leviton 37820 User manual

Leviton Decora IPP15-1LI User manual

Leviton

Leviton Decora IPP15-1LI User manual

Leviton Renu RUAA1 Series User manual

Leviton

Leviton Renu RUAA1 Series User manual

Leviton 1x6 Passive Audio Module User manual

Leviton

Leviton 1x6 Passive Audio Module User manual

Leviton Decora ODS15-ID Operation manual

Leviton

Leviton Decora ODS15-ID Operation manual

Leviton ODS0D-ID-TD Operation manual

Leviton

Leviton ODS0D-ID-TD Operation manual

Leviton IPP0R User manual

Leviton

Leviton IPP0R User manual

Leviton OSFHS-IxW User manual

Leviton

Leviton OSFHS-IxW User manual

Leviton OSC04-R Series User manual

Leviton

Leviton OSC04-R Series User manual

Leviton OSC10-M0W User manual

Leviton

Leviton OSC10-M0W User manual

Leviton OSC04-I User manual

Leviton

Leviton OSC04-I User manual

Leviton Provolt ODC05-UDW User manual

Leviton

Leviton Provolt ODC05-UDW User manual

Leviton ACENTI User manual

Leviton

Leviton ACENTI User manual

Leviton OSFHU Operation manual

Leviton

Leviton OSFHU Operation manual

Leviton ODS15-ID User manual

Leviton

Leviton ODS15-ID User manual

Leviton OSC04-I User manual

Leviton

Leviton OSC04-I User manual

Leviton DECORA ODS10-IDI User manual

Leviton

Leviton DECORA ODS10-IDI User manual

Leviton OSFHS-lxW User manual

Leviton

Leviton OSFHS-lxW User manual

Leviton T6525-I User manual

Leviton

Leviton T6525-I User manual

Leviton 8200 User manual

Leviton

Leviton 8200 User manual

Leviton ODD10-ID User manual

Leviton

Leviton ODD10-ID User manual

Leviton ODP10-I1I User manual

Leviton

Leviton ODP10-I1I User manual

Popular Accessories manuals by other brands

Badger Meter 228 Series Installation & operation manual

Badger Meter

Badger Meter 228 Series Installation & operation manual

KingShield DH020A-C instructions

KingShield

KingShield DH020A-C instructions

SCANDIA ELEVATOR I Series Assembly instructions

SCANDIA ELEVATOR

SCANDIA ELEVATOR I Series Assembly instructions

ROSE DISPLAYS ANOGOTCHA PLUS WITH MULTICLIPS AND REGULAR... manual

ROSE DISPLAYS

ROSE DISPLAYS ANOGOTCHA PLUS WITH MULTICLIPS AND REGULAR... manual

ROSE DISPLAYS ANOFRAME VERSAMOUNT CEILING ANCHORS manual

ROSE DISPLAYS

ROSE DISPLAYS ANOFRAME VERSAMOUNT CEILING ANCHORS manual

iDeaPLAY WPB-100 user manual

iDeaPLAY

iDeaPLAY WPB-100 user manual

Omron Photomicrosensor (Transmissive) EE-SX1107 specification

Omron

Omron Photomicrosensor (Transmissive) EE-SX1107 specification

Quasar ARM user guide

Quasar

Quasar ARM user guide

ENFORCER ECO-LARM RM-R100-TLQ manual

ENFORCER

ENFORCER ECO-LARM RM-R100-TLQ manual

Telcoma Automations ILB sincro installation instructions

Telcoma Automations

Telcoma Automations ILB sincro installation instructions

Techly I-CHARGE-2000020W manual

Techly

Techly I-CHARGE-2000020W manual

ALZA WW09-E3b-2U user manual

ALZA

ALZA WW09-E3b-2U user manual

FIBARO FGWPG-111 user manual

FIBARO

FIBARO FGWPG-111 user manual

Skywalker SAK100.1 user manual

Skywalker

Skywalker SAK100.1 user manual

turck LRS510 Series Instructions for use

turck

turck LRS510 Series Instructions for use

netvox R718F2 user manual

netvox

netvox R718F2 user manual

DynaSample XPression owner's manual

DynaSample

DynaSample XPression owner's manual

ViewSonic VS500-L manual

ViewSonic

ViewSonic VS500-L manual

manuals.online logo
manuals.online logoBrands
  • About & Mission
  • Contact us
  • Privacy Policy
  • Terms and Conditions

Copyright 2025 Manuals.Online. All Rights Reserved.