manuals.online logo
Brands
  1. Home
  2. •
  3. Brands
  4. •
  5. LG
  6. •
  7. Air Conditioner
  8. •
  9. LG LTUD4881EA User manual

LG LTUD4881EA User manual

Other LG Air Conditioner manuals

LG A2UW18GFA0 User manual

LG

LG A2UW18GFA0 User manual

LG PM12SP NSJ User manual

LG

LG PM12SP NSJ User manual

LG ARNU18GTQD4 User manual

LG

LG ARNU18GTQD4 User manual

LG A4UQ28GFA0 User manual

LG

LG A4UQ28GFA0 User manual

LG GSNH126E0M0 User manual

LG

LG GSNH126E0M0 User manual

LG LS243HLV3 User manual

LG

LG LS243HLV3 User manual

LG EN 61000-2 User manual

LG

LG EN 61000-2 User manual

LG R18AWN-NC11 User manual

LG

LG R18AWN-NC11 User manual

LG PZCWRCG3 User manual

LG

LG PZCWRCG3 User manual

LG LW6511R User manual

LG

LG LW6511R User manual

LG T1861H User manual

LG

LG T1861H User manual

LG V-net PDRYCB000 User manual

LG

LG V-net PDRYCB000 User manual

LG AMNH12GAF11 User manual

LG

LG AMNH12GAF11 User manual

LG L8UC100BFA2 User manual

LG

LG L8UC100BFA2 User manual

LG LS-B0760CM/B0760HM User manual

LG

LG LS-B0760CM/B0760HM User manual

LG ATNQ18GPLE3 User manual

LG

LG ATNQ18GPLE3 User manual

LG 828A20468Q User manual

LG

LG 828A20468Q User manual

LG T06EV4 User manual

LG

LG T06EV4 User manual

LG LT-D3680CL User manual

LG

LG LT-D3680CL User manual

LG UV12 User manual

LG

LG UV12 User manual

LG C07AHB User manual

LG

LG C07AHB User manual

LG ARNU093TJC2 User manual

LG

LG ARNU093TJC2 User manual

LG ARNU073TEC2 Instruction Manual

LG

LG ARNU073TEC2 Instruction Manual

LG ARNU24GB4G2 User manual

LG

LG ARNU24GB4G2 User manual

Popular Air Conditioner manuals by other brands

Fujitsu ASYG 09 LLCA installation manual

Fujitsu

Fujitsu ASYG 09 LLCA installation manual

York HVHC 07-12DS Installation & owner's manual

York

York HVHC 07-12DS Installation & owner's manual

Carrier Fan Coil 42B Installation, operation and maintenance manual

Carrier

Carrier Fan Coil 42B Installation, operation and maintenance manual

intensity IDUFCI60KC-3 installation manual

intensity

intensity IDUFCI60KC-3 installation manual

Frigidaire FAC064K7A2 Factory parts catalog

Frigidaire

Frigidaire FAC064K7A2 Factory parts catalog

Sanyo KS2432 instruction manual

Sanyo

Sanyo KS2432 instruction manual

CLIMAVENETA a-CHD U-2T 606+2209 OPERATING AND INSTALLATION Manual

CLIMAVENETA

CLIMAVENETA a-CHD U-2T 606+2209 OPERATING AND INSTALLATION Manual

Midea EWK06CW5 user manual

Midea

Midea EWK06CW5 user manual

Pioneer FAB Series installation manual

Pioneer

Pioneer FAB Series installation manual

SPT WA-1511S user manual

SPT

SPT WA-1511S user manual

Mitsubishi Electric Mr.Slim MSZ-A24NA operating instructions

Mitsubishi Electric

Mitsubishi Electric Mr.Slim MSZ-A24NA operating instructions

Mitsubishi Electric PUHZ-RP50VHA4 Service manual

Mitsubishi Electric

Mitsubishi Electric PUHZ-RP50VHA4 Service manual

Panasonic CS-S18HKQ Service manual

Panasonic

Panasonic CS-S18HKQ Service manual

Panasonic CS-E15NKE3 operating instructions

Panasonic

Panasonic CS-E15NKE3 operating instructions

Gree GWH18TC-K3DNA1B/I Service manual

Gree

Gree GWH18TC-K3DNA1B/I Service manual

Friedrich ZoneAire Compact P08SA owner's manual

Friedrich

Friedrich ZoneAire Compact P08SA owner's manual

Daikin R32 Split Series installation manual

Daikin

Daikin R32 Split Series installation manual

Daikin FFQ09Q2VJU Operation manual

Daikin

Daikin FFQ09Q2VJU Operation manual

manuals.online logo
manuals.online logoBrands
  • About & Mission
  • Contact us
  • Privacy Policy
  • Terms and Conditions

Copyright 2025 Manuals.Online. All Rights Reserved.

ENGLISH
IMPORTANT
Please read through this manual. It contains valuable
information about your air conditioner. This manual may
help save time and money by explaining proper product
maintenance and preventing improper use.
PRECAUTIONS
Pay close attention to precautions in order to prevent
potential hazards and damage from misuse or improper
installation. LG is not responsible for any damages caused
by misuse of the product.
LG
Cassette-Type Air Conditioner
OWNER'S MANUAL
LG
Prior to installation, this air-conditioning
unit must be submitted for approval by the
utility service which provides electricity
(EN 61000-3 Norm.)
F or Your Records
R ead This Manual
CAUTION
2
Cassette-Type Air Conditioner Owner’s Manual
TABLE OF CONTENTS
Write the model and serial numbers here:
Model #
Serial #
You can find them on a label on the side of each unit.
Dealer's Name
Date Purchased
Inside you will find many helpful hints on how to use
and maintain your air conditioner properly. Just a little
preventive care on your part can save you a great
deal of time and money over the life of your air
conditioner.
You'll find many answers to common problems in the
chart of troubleshooting tips. If you review our chart of
Troubleshooting Tips first, you may not need to call
for service at all.
• Contact the authorized service technician for repair
or maintenance of this unit.
• Contact the installer for installation of this unit.
• The air conditioner is not intended for use by young
children or invalids without supervision.
• Young children should be supervised to ensure that
they do not play with the air conditioner.
• When the power cord is to be replaced, replacement
work shall be performed by authorized personnel
only.
• Installation work must be performed in accordance
with the national wiring standards by authorized
personnel only.
1. Safety Precautions
2. Operating Instructions
3. Care and Maintenance
4.
Before you call for service
WARNING
WARNING
WARNING
CAUTION
Never Do This
Always Do This
WARNING
WARNING
Precautions
Safety
Precautions
3
ENGLISH
To prevent injury and property damage, follow these instructions.
Incorrect operation due to ignoring instructions will cause harm or damage, the seriousness of which is
indicated by the following symbols.
■
Do not install, remove and reinstall the unit by yourself.
• Improper installation will cause water leakage, electrical shock, or fire. Please consult
authorized dealer or specialist for the installation work. Please note fault caused by improper
installation is not covered by warranty.
• Unit must be installed in an easily accessible area. Any additional cost required to hire a
special equipment to service the unit will be the responsibility of the customer.
Do not damage or use an
unspecified power cable.
•
It will cause electrical shock or fire.
• If the supply cord is damaged, it
must be replaced by a service
agent or a similarly qualified
person in order to avoid a hazard.
Do not operate switches with
wet hands.
• It may cause electrical shock.
Plug in the power plug
properly.
• It will cause electrical shock
or fire due to heat
generation.
Do not operate or stop the unit by
inserting or pulling out the power plug.
• It will cause electrical shock or fire due to heat
generation.
Do not expose the skin to cool air directly for
a long time.
• This could damage your health.
If an abnormality (smell of burning, etc)
occurs, stop the air conditioner, and
turn off the breaker.
• If the unit continues to be operated in an abnormal
condition, it may cause a fire, trouble, etc. In this
case, consult your dealer.
Repair or relocation should not be done by
the customer.
• If this is done incorrectly, it may cause a fire,
electric shock, injury by dropping of the unit, water
leakage, etc. Consult your dealer.
This symbol shows the possibility of death or serious injury.
This symbol indicates the possibility of injury or damage to property.
Installation precautions
CAUTION
CAUTION
CAUTION
CAUTION
4
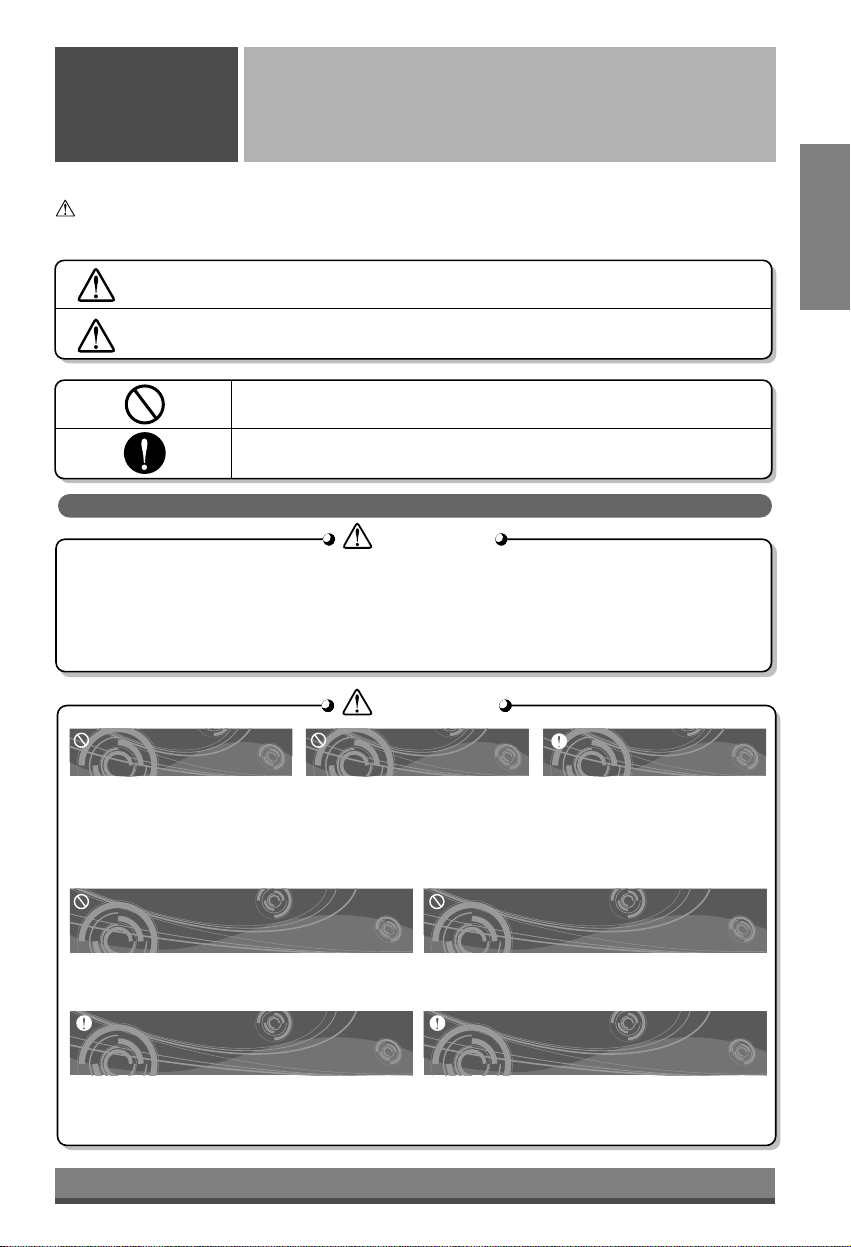
Do not clean the air
conditioner with water.
• Water may enter the unit and
degrade the insulation. It may
cause an electric shock.
Ventilate well when used
together with a stove, etc.
• An oxygen shortage may occur.
When the unit is to be
cleaned, switch off, and turn
off the breaker.
• Since the fan rotates at high
speed during operation, it may
cause an injury.
Do not put a pet or house
plant where will be exposed
to direct air flow.
• This could injure the pet or plant.
Do not apply an insecticide
or flammable spray.
• It may cause a fire or
deformation of the cabinet.
Do not leave on installation
stand which is damaged.
• The unit may drop or fall down
and cause an injury.
Do not put a stove, etc.
where is exposed to direct
air flow.
• It may cause imperfect
combustion.
When the unit is not going to
be used for a long time, turn
off the breaker.
• It may cause an injury.
Do not step on the outdoor
unit and do not put anything
on it.
• It may cause an injury through
dropping or falling down.
Do not operate for a long
time in high humidity, e.g.
leaving a door or window
open.
• In the cooling mode, if it is
operated in a room with high
humidity (80%r.h. or more) for a
long time, water condensed in
the air conditioner may drop and
may wet and spoil furniture, etc.
Do not step onto an unstable
bench when
attaching/detaching the
panel.
• It may case an injury, etc. by
falling down.
Do not use for special
purposes.
• Do not use this air conditioner to
preserve precision devices, food,
animal, plants and art objects.
It may cause deterioration of
quality, etc.
If the supply cord is damaged, it
must be replaced by a special cord
or assembly availible from the
manufacturer of its service agent.
• If will cause electrical shock or
fire.
When the air filter is to be
removed, do not touch the
metal parts of the indoor unit.
• It may cause an injury.
Do not insert hands through
vanes when the air
conditioner is operating.
• It will cause an injury by the
rotating blower.
• Contact the authorized Service technician for repair or maintenance of this unit.
• Contact the installer for installation of this unit.
• The air conditioner is not intended for use by young children or infirm persons without
supervision.
• Young children should be supervised to ensure that they do not play with the air conditioner.
Anti-bacteriaAnti-bacteriaAnti-bacteria
Signal Receptor
Heat Pump Model
Cooling Model
Outdoor Unit
Remote
Controller
Air Intake
(side, rear)
Air Outlet
Connecting Wire
Drain Hose
Connection Pipe
Power Wire
Air Outlet
Air
Intake
Air Outlet
Air Intake
(side, rear)
Connection Piping
Drain hose
Connecting wire
Control cover
Signal Receptor
Indoor Unit
Operating Instructions
Safety
Precautions
5
ENGLISH
Indoor Unit, Outdoor Unit
Signal Receptor
Receives the signals from the remote control.
(Signal receiving sound: two short beeps or one long beep.)
Operation Indication Lamps
On/Off : Lights up during the system operation.
Filter Sign : Lights up after 2400 hours from the time of first operating
unit. (Refer to page 19.)
Timer : Lights up during Timer operation.
Defrost Mode : Lights up during Defrost Mode or Hot Start operation.
(Heat pump model only)
Outdoor Unit : Lights up during outdoor unit operation.
Operation (Cooling model only)
Forced : Operation procedures when the remote control
Operation can't be used.
Heat pump model: Cassette Type Air Conditioner for cooling and heating
Cooling model: Cassette Type Air Conditioner for cooling
6
Name and Function of Remote Controller
Timer Cancel
Program Week
Hour Min
Holiday
Set/Clr
RESET
Plasma
ZONE
1234
Operation unit
Humidify
JET
AUTO
AUTO SWING OPERATION
FAN SPEED
Program set
SUB FUNCTION
SET TEMP
Room Temp
HI
MED
LO
Heater
Defrost
Filter
Preheat
Out door
Time
Timer
On
Set no. Time
Off 01 03 05 07 09 11 13 15 17 19 21 23
Remote Controller
3
10
12
14
15
11
13
18
16
2
1Heat Pump Model
Cooling Model
5
4
6
8
9
7
17
Operation display
Displays the operation conditions.
On/Off Button
Operation starts when this button is pressed, and
stops when the button is pressed again.
Set Temperature Button
Used to set the temperature when the desired
temperature is obtained.
FAN Operation Button
Used to circulate room air without cooling or heating.
Fan Speed Button
Used to set the desired fan speed.
Operation Mode Selection Button
Used to select the operation mode.
•Auto Operation Mode
•Cooling Operation Mode
•Soft Dry Operation Mode
•Heating Operation Mode(except cooling model)
Auto Swing Button
Used to swing up and down.
Room Temperature Checking Button
Used to check the room temperature.
Plasma Air Clean Button (optional)
Timer Cancel Button
Used to cancel the timer.
Timer Set Button
Used to set the timer when the desired time is
obtained.
Week Button
Used to set a day of the week.
Program Button
Used to set the weekly timer.
Holiday Button
Used to set a holiday of the week.
Time Set Button
Used to set the time of the day and change the time in
the weekly timer Function.
Set and Clear Button
Used to set and clear the weekly timer.
Jet Cool Button
Used to select jet cool mode.
Reset Button
Used to set the current time and clear the setting time.
18
17
16
15
14
13
12
11
10
9
8
7
6
5
4
3
2
1
❈
Display temperature can be different from actual room temperature if the remote controller is
installed at the place where sun-rays are falling directly or the place nearby heat source.
ENGLISH
7
ON OFF
SET
CANCEL
PLASMA
Signal transmitter
(Transmits the signals to the signal receptor)
1
2
7
8
9
10
15
11
4
5
6
14
3
12
13
Heat Pump
Model
Cooling Model
Flip-up door
(opened)
Wireless Remote Controller (optional)
This air-conditioner is equipped with wired remote controller basically. But if you want to be available with
wireless remote controller, you pay for it.
OPERATION DISPLAY
Displays the operation conditions.
ON/OFF BUTTON
Operation starts when this button is pressed and stops
when the button is pressed again.
JET COOL BUTTON
Used to select jet cool mode.
ON/OFF TIMER BUTTONS
Used to set the time of starting and stopping operation.
TIME SETTING BUTTONS
Used to adjust the time.
TIMER SET/CANCEL BUTTONS
Used to set the timer when the desired time is obtained
and to cancel the Timer operation.
AIR SWING BUTTON
Used to swing up and down.
SLEEP MODE BUTTON
Used to set Sleep Mode Auto operation.
AIR CIRCULATION BUTTON
Used to circulate the room air without cooling or heating
(turns indoor fan on/off).
ROOM TEMPERATURE CHECKING BUTTON
Used to check the room temperature.
RESET BUTTON
Used prior to resetting time or after replacing batteries.
INDOOR FAN SPEED SELECTOR
Used to select fan speed in four steps-low, medium,
high, or CHAOS.
ROOM TEMPERATURE SETTING BUTTONS
Used to select the room temperature.
ORERATION MODE SELECTION BUTTON
Used to select the operation mode.
PLASMA AIR CLEAN BUTTON(OPTIONAL)
15
14
13
12
11
10
9
8
7
6
5
4
3
2
1
CAUTION
of handling the Remote Controller
•Aim at the signal receptor on the wired remote controller so as to operate.
•The remote control signal can be received at a distance of up to about 7m.
•Be sure that there are no obstructions between the remote controller and the signal receptor.
•Do not drop or throw the remote controller.
•Do not place the remote controller in a location exposed to direct sunlight, or near the heating unit, or any
other heat source.
•Block a strong light over the signal receptor with a curtain or etc. so as to prevent the abnormal operation.
(ex:electronic quick start, ELBA, inverter type fluorescent lamp)
8
AUTO SWING
HI
ZONE
Operation unit Program set
Room Temp
MED
LO
AUTO
JET
Heater
Defrost
Filter
Preheat
Humidify
Out door
Timer
On
Set no. Time
Off 01 03 05 07 09 11 13 15 17 19 21 23
1234
OPERATION
FAN SPEED
SUB FUNCTION
SET TEMP
Time
AUTO SWING
HI
ZONE
Operation unit Program set
Room Temp
MED
LO
AUTO
JET
Heater
Defrost
Filter
Preheat
Humidify
Out door
Timer
On
Set no. Time
Off 01 03 05 07 09 11 13 15 17 19 21 23
1234
OPERATION
FAN SPEED
SUB FUNCTION
SET TEMP
Time
AUTO SWING
HI
ZONE
Operation unit Program set
Room Temp
MED
LO
AUTO
JET
Heater
Defrost
Filter
Preheat
Humidify
Out door
Timer
On
Set no. Time
Off 01 03 05 07 09 11 13 15 17 19 21 23
1234
OPERATION
FAN SPEED
SUB FUNCTION
SET TEMP
Time
AUTO SWING
HI
ZONE
Operation unit Program set
Room Temp
MED
LO
AUTO
JET
Heater
Defrost
Filter
Preheat
Humidify
Out door
Time
Timer
On
Set no. Time
Off 01 03 05 07 09 11 13 15 17 19 21 23
1234
OPERATION
FAN SPEED
SUB FUNCTION
SET TEMP
Hour
Min
Week
RESET
Set the Current Time and day of the Week
1
Press the ' ' button.
Each time the button is pressed, the number is changed from 00to 23.
This number indicates current hour.
For example, if it is 14:25, press button 14 times.
2
Press the ' ' button.
Each time the button is pressed, the number increases from 00to 59.
This number indicates current minute.
For example, if it is 14:25, press button 25 times.
3
Press ' ' button.
Each time the button is pressed, a day of the week is shifted from sunday to saturday.
For example, if today is Wed, press button 3 times.
4
Press the ' ' button.
If you want to confirm the current time and a day of the week, click the Reset button.
Hour
Hour
Min
Min
Week
Week
RESET
Unless you press any button about 5 (sometimes 10) seconds while setting function, the setting mode returns to
initial mode.
ENGLISH
9
Week
Program
SET/CLR
MinHour
AUTO SWING
Time
HI
ZONE
Operation unit
Room Temp
MED
LO
AUTO
JET
Heater
Defrost
Filter
Preheat
Humidify
Out door
Timer
On
Set no.
Off
1234
OPERATION
FAN SPEED
SUB FUNCTION
SET TEMP
Program set
01 03 05 07 09 11 13 15 17 19 21 23
Time
AUTO SWING
Program set
Time
HI
ZONE
Operation unit
Room Temp
MED
LO
AUTO
JET
Heater
Defrost
Filter
Preheat
Humidify
Out door
Timer
On
Set no.
Off
1234
OPERATION
FAN SPEED
SUB FUNCTION
SET TEMP
01 03 05 07 09 11 13 15 17 19 21 23
Time
Weekly Programming
1
Press the Program button.
The remote controller is displayed like a picture. Then ' ', ' ' and '01' is blinked.
2
Press the ' ' button.
Press button repeatedly until desired mode appears.
For example, if you want Thu, press button 4 times.
3
Select the time you want.
Press or button, then blinking letter is shown.
If you press button, then ' ' shape appears.
' ' shape means that five o'clock is reserved.
Using below buttons, you can reserve time.
* For example, the air-conditioner is on 6,7,8 and 13~22 o'clock.
Program set
Week
Week
Week
MinHour
SET/CLR
unit
05
Holiday Setting
Timer Setting
Self-diagnosis Function
Time
HI
ZONE
Operation unit
Room Temp
MED
LO
AUTO
JET
Heater
Defrost
Filter
Preheat
Humidify
Out door
Timer
On
Set no.
Off
1234
OPERATION
FAN SPEED
SUB FUNCTION
SET TEMP
Program set
01 03 05 07 09 11 13 15 17 19 21 23
Time
AUTO SWING
Time
HI
ZONE
Operation unit
Room Temp
MED
LO
AUTO
JET
Heater
Defrost
Filter
Preheat
Humidify
Out door
Timer
On
Set no.
Off
1234
OPERATION
FAN SPEED
SUB FUNCTION
SET TEMP
01 03 05 07 09 11 13 15 17 19 21 23
Time
AUTO SWING
Program set
Program set
Time
HI
ZONE
Operation unit
Room Temp
MED
LO
AUTO
JET
Heater
Defrost
Filter
Preheat
Humidify
Out door
Timer
On
Set no.
Off
1234
OPERATION
FAN SPEED
SUB FUNCTION
SET TEMP
01 03 05 07 09 11 13 15 17 19 21 23
Time
AUTO SWING
10
If Tuesday is a holiday in this week, you may set a holiday.
Press the Program button.
1
Press the Week button.
Select the Tuesday.
2
Press the Holiday button.
Then the remote controller will be displayed ' '.
The outside rectangular means holiday.
3
Program
Press the Timer button.
1
Timer
MinHour
Press or button, then you can control the desired time.
If you press button, the display panel shows ( ex : ).
It means 3 hours later, it will stop while 'ON' mode, it will operate while 'OFF' mode.
2
MinHour
If you want to cancel the timer setting function, press the Cancel button.
3
Cancel
Week
Holiday
' CH' will flash in the remote controller display when a problem occurs.
Then please contact your dealer.
If you want to turn it 'ON' during 'OFF' mode or turn it 'OFF' during 'ON' mode, you can use timer
setting function.
Min
O eration un
01 03