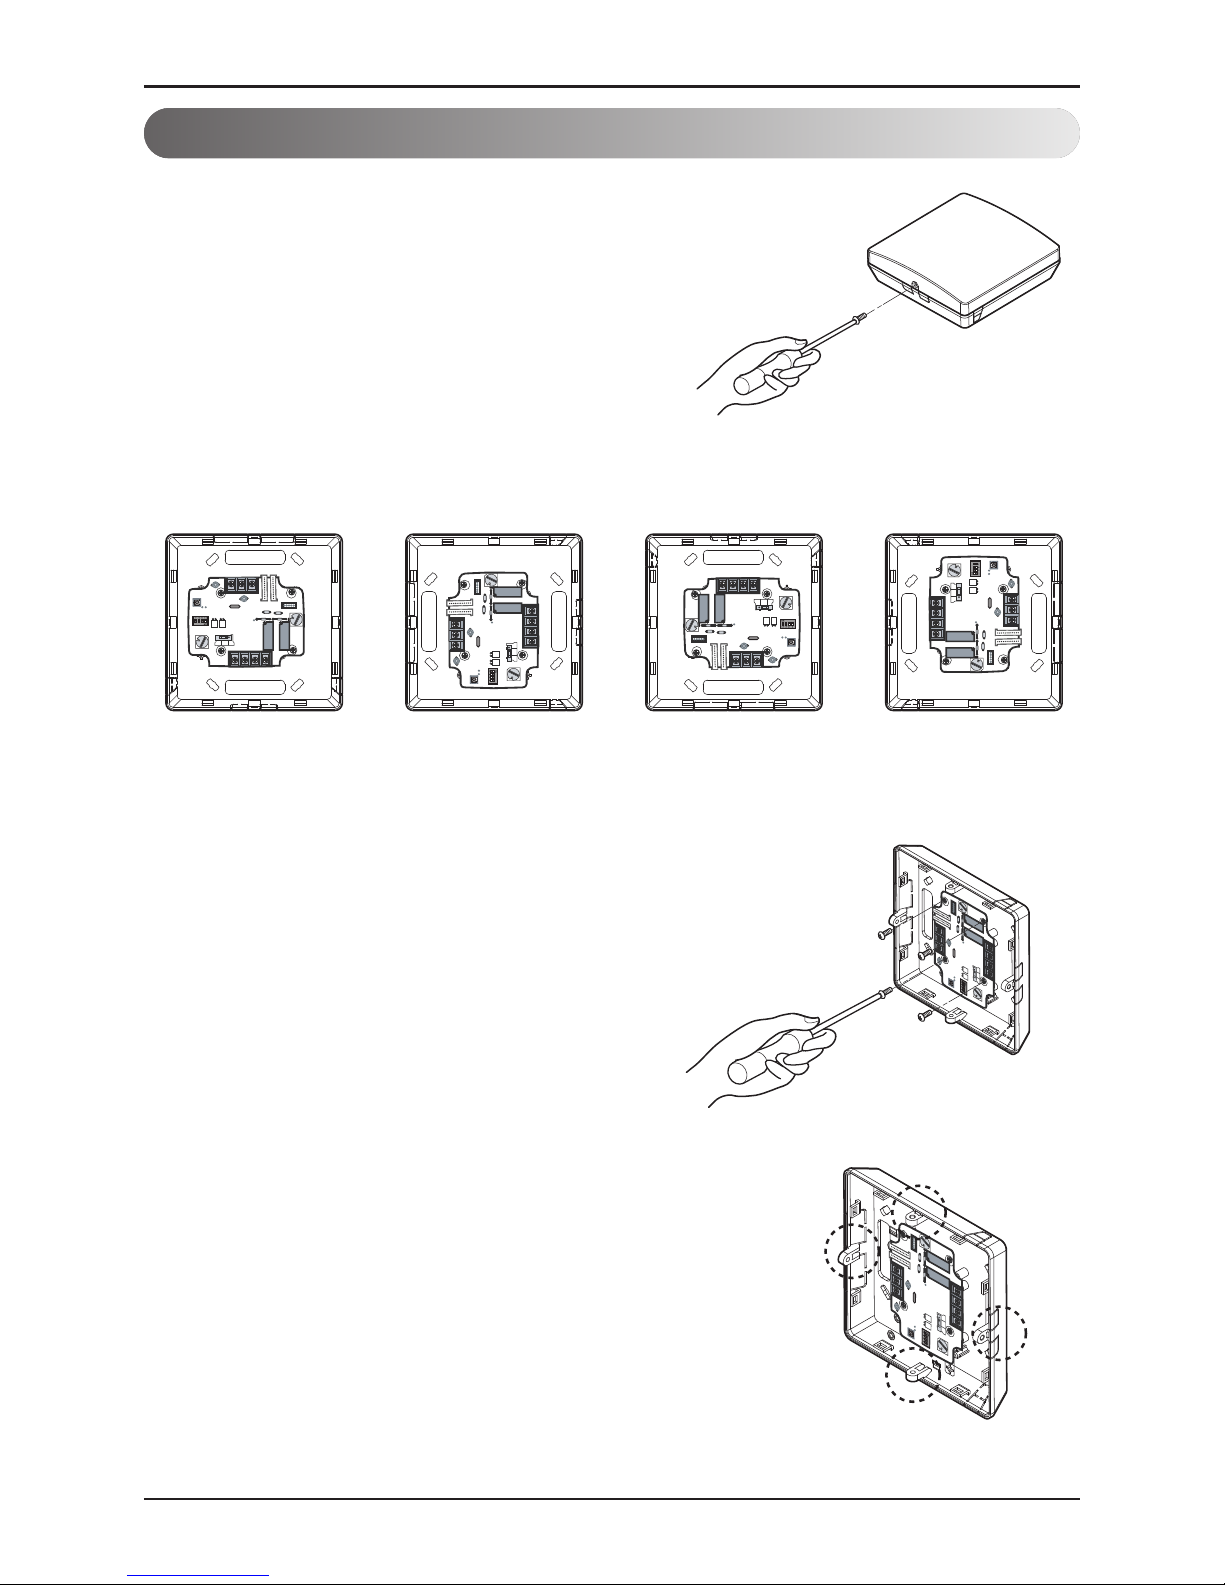
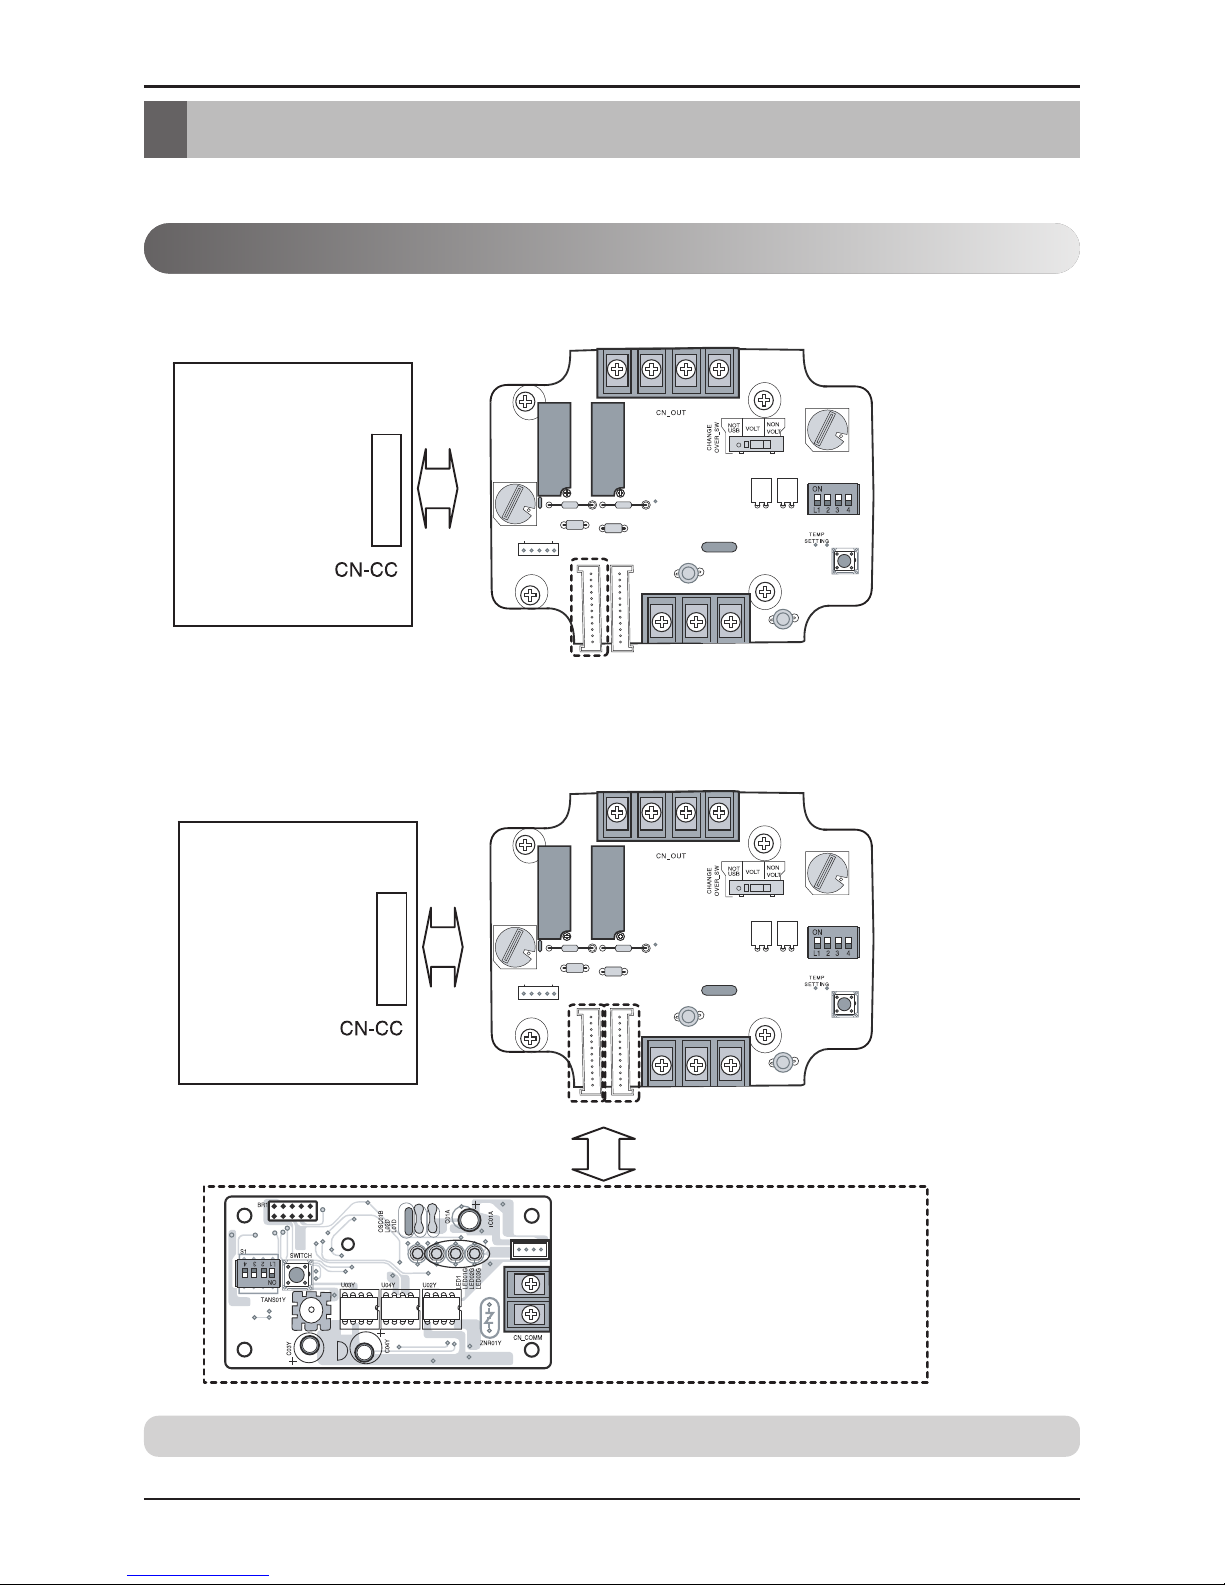
LG PQDSBC1 User manual

P/NO : MFL67708312
www.lg.com
TYPE : Dry contact For Economizer
MODEL : PQDSBC1
INSTALLATION MANUAL
• Please read this installation manual completely before installing the product.
• Installation work must be performed in accordance with the national wiring
standards by authorized personnel only.
• Please retain this installation manual for future reference after reading it
thoroughly.
ENGLISH ESPAÑOL FRANÇAIS

2Dry contact For Economizer
Dry Contact for setback Unit Installation Manual
TABLE OF CONTENTS
nSafety Precautions .............................................................3~5
nPart Description ......................................................................6
nInstallation Method .............................................................7~9
Installation inside of the indoor unit..........................................................7
Installation outside of the indoor unit .......................................................8
nSetting and using method ..............................................10~17
1. Power supply and indoor unit connection .........................................10
2. Setting of Contact Signal Input ..........................................................11
3. Setting the desired temperature ........................................................12
4. Control mode setting..........................................................................13
5. Indoor unit monitoring ........................................................................18

Safety Precautions
Installation Manual 3
ENGLISH
nInstallation
Service
Center
Service
Center
To prevent injury to the user or other people and property damage, the following instructions
must be followed.
nIncorrect operation due to ignoring instruction will cause harm or damage. The seriousness is
classified by the following indications.
nMeanings of symbols used in this manual are as shown below.
WARNING
CAUTION
This symbol indicates the possibility of death or serious injury.
This symbol indicates the possibility of injury or damage.
Be sure not to do.
Be sure to follow the instruction.
WARNING
Don’t touch with the hands
while the power is on.
• Cause fire, electric shock,
explosion or injury.
Product installation must
be referred to a service
center or installation shop.
• Cause fire, electric shock,
explosion or injury.
Request installation from
installation shop or service
center when reinstalling
the product.
• Cause fire, electric shock,
explosion or injury.
Safety Precautions

Standardized
product
Safety Precautions
4Dry contact For Economizer
Do not install the product
in the place where rain can
get to the product.
• Cause product failure
Do not install the unit in
humid locations.
• Cause product failure
Do not put the product
closer to fire.
• Cause fire
Do not install in a place
that cannot withstand the
weight of the product.
• The product may get
damaged or may break.
Do not install the product
to a place that generates
oil, steam, salt, sulfuric
gas, etc.
• Cause the product’s
deformation or failure.
Use standardized Product.
• Cause product failure
Do not change or extend
power lines arbitrarily.
• Cause fire or electric shock.
Do not give a shock to the
product.
• If you give a shock to the
product, it may cause the
product’s failure.
Do not use a heater near
the power line.
• Cause fire or electric shock.
nOperation

Service
Center
STOP
Safety Precautions
Installation Manual 5
ENGLISH
Do notspill water inside of
the product.
• Cause electric shock or
breakdown.
If the product has been
inundated, you must refer to
a service center or
installation shop.
• It can cause a fire.
Children and elderly use the
product under the
guardian’s supervision.
• Cause accidents and product
failures.
Do not use for special
purpose / place such as
conserving flora and fauna,
precision instruments, art.
• Otherwise, it can cause property
damage.
Remove the power plug
when cleaning.
• Cause fire or electric shock.
Do not place heavy objects
on the power line.
• Cause fire or electric shock.
Do not disassemble, repair,
or modify the product.
• Cause fire or electric shock.
Do not touch with wet
hands.
• Cause fire or electric shock.

6Dry contact For Economizer
Part Description
PCB
Front Case Rear Case
ISO View
Side Side
NOT
USB
e
CN_OUT
CHANGE
OVER_SW
VOLT NON
VOLT
TEMP
SETTING
1
2
5
89
7
3
6
11
10
4
Part Description
1. CN_INDOOR : Connect communication wire between indoor unit and Dry contact For Economizer
and supply power to Dry contact For Economizer
2. CN_PI485 : PI485 connector
3. CHANGE_OVER_SW : Switch to select voltage (5V-12V) of contact point
4. CN_CONTROL : Contact point signal input
5. CONTROL_MODE_SW : Switch to select the control mode
6. SETTING_SW : Switch to select whether to use set function of Dry contact For Economizer
7. TEMP_SETTING : Switch to set the desired temperature of the indoor unit
8. CN_OUT (O1, O2) : Connector to show whether the indoor unit is operating
9. CN_OUT (E3, E4) : Connector to show whether there is an error with the indoor unit
10. DISPLAY_LED : LED to display the status of the Dry contact For Economizer
11. RESET_SW : Reset switch
DRY CONTACT FOR ECONOMIZER

Installation Manual 7
Installation Method
Installation inside of the indoor unit
1) Loosen and remove one screw that secures the product.
2) Loosen two screws that secure the PCB to separate rear of the case from the PCB.
3) Connect the connection wires properly according to the connection method. (Refer to the instruction
and set-up description)
4) Set the switch according to the setting method. (Refer to the instruction and set-up description)
5) Secure PCB on adequate space inside of the indoor unit.
1. Install the product on flat surface and install anchoring screws at more than 2 places. Otherwise
the central controller may not be anchored properly.
2. Do not tighten anchoring screws too tightly. It may cause deformation of the case.
3. Do not deform the case at random. It may cause malfunction of the central controller.
Installation Method
NOT
USB
e
CN_OUT
CHANGE
OVER_SW
VOLTNON
VOLT
TEMP
SETTING
NOT
USB
e
CN_OUT
CHANGE
OVER_SW
VOLTNON
VOLT
TEMP
SETTING
ENGLISH

8Dry contact For Economizer
Installation Method
Installation outside of the indoor unit
NOT
USB
e
CN_OUT
CHANGE
OVER_SW
VOLT NON
VOLT
TEMP
SETTING
NOT
USB
e
CN_OUT
CHANGE
OVER_SW
VOLT NON
VOLT
TEMP
SETTING
NOT
USB
e
CN_OUT
CHANGE
OVER_SW
VOLT NON
VOLT
TEMP
SETTING
NOT
USB
e
CN_OUT
CHANGE
OVER_SW
VOLT NON
VOLT
TEMP
SETTING
1) Loosen and remove one screw that secures the
product.
2) Position the rear case to the direction towards to the
connector for convenient cable arrangement.
3) Secure the rear case on the installation place using the
supplied fixing screws.
4) Remove knock out shapes on the rear case (4-sided)
according to the connector’s size and direction.
NOT
USB
e
CN_OUT
CHANGE
OVER_SW
VOLTNON
VOLT
TEMP
SETTING
NOT
USB
e
CN_OUT
CHANGE
OVER_SW
VOLTNON
VOLT
TEMP
SETTING

Installation Manual 9
ENGLISH
Installation Method
5) Connect the connection wires properly according to the connection method. (Refer to the instruction
and set-up description)
6) Set the switch according to the setting method. (Refer to the instruction and set-up description)
7) Hang the front of the case to the rear case hook and tighten the fixing screws on the bottom part.
1. Install the product on flat surface and install anchoring screws at more than 2 places. Otherwise
the central controller may not be anchored properly.
2. Do not tighten anchoring screws too tightly. It may cause deformation of the case.
3. Do not deform the case at random. It may cause malfunction of the controller.
NOT
USB
e
CN_OUT
CHANGE
OVER_SW
VOLTNON
VOLT
TEMP
SETTING
NOT
USB
e
CN_OUT
CHANGE
OVER_SW
VOLTNON
VOLT
TEMP
SETTING

Setting and using method
10 Dry contact For Economizer
Setting and using method
1. Power supply and indoor unit connection
You must press the RESET switch when you are completed with all the settings to reflect the
settings.
n
When using the Dry contact For Economizer independently
nWhen using with the central controller (Only when the indoor
unit PCB is a non-communication model)
Indoor unit
PCB
PI485: Connect to central controller
CN_PI485
CN_INDOORCN_INDOORCN_INDOOR
CN_INDOOR
Indoor unit
PCB
CN_INDOOR
CN_INDOORCN_INDOORCN_INDOOR
ÚCN-CC ↔CN_INDOOR, CN-OUT(PI485) ↔CN_PI485

Setting and using method
Installation Manual 11
ENGLISH
2. Setting of Contact Signal Input
nFor input contact closure only (No power input)
nFor input contact voltage : 5 VDC ~ 12 VDC
LG does not
supply this section
(Local supply)
LG does not
supply this section
(Local supply)
5 VDC ~ 12 VDC

Setting and using method
12 Dry contact For Economizer
3. Setting the desired temperature
nWhen setting the desired temperature of the Dry contact For
Economizer
: When operating the indoor unit, set the desired temperature according to the TEMP_SW setting.
When the indoor unit is unlocked, the desired temperature can be reset by other controller.
1) Turn on the TEMP_SETTING switch of SETTING_SW.
2) Use the TEMP_SW to set the temperature as shown below.
nWhen not using the desired temperature setting of Dry
contact For Economizer
1) Turn off the TEMP_SETTING switch of SETTING_SW.
ÚWhen operating the indoor unit initially with Dry contact For Economizer, set the desired temperature
to 18℃(64℉).
SETTING_SW
SETTING_SW
01234567
1
8(64) 19(66) 20(68) 21(70) 22(72) 23(74) 24(76) 25(77)
Desired temperature setting table
TEMP SW
setting
89ABCDEF
26(78) 27(80) 28(82) 29(84) 30(86) 30(86) 30(86) 30(86)
TEMP SW
setting
Temperature
setting °C(°F)
Temperature
setting °C(°F)

Setting and using method
Installation Manual 13
ENGLISH
4. Control mode setting
nUse the CONTROL_MODE_SW to set the control mode you
want from 0~F.
nDescription of each control mode
1) Disable using Dry contact For Economizer
ÚSet this when the Dry contact For Economizer is connected but not used.
ÚIndoor control priority
Central control > Dry contact For Economizer > Wired/Wireless remote controller, indoor unit button
ÚDry contact For Economizer controls the indoor unit according to the applicable mode when there is
a change in input of A and B.
CONTROL_MODE_SW
Input A Input B Operating mode
OFF OFF
ON OFF
OFF ON
ON ON
The indoor unit cannot be controlled through the
Dry contact For Economizer
No change in indoor unit condition
CONTROL
MODE SWITCH
0

Setting and using method
14 Dry contact For Economizer
2) General mode
Input A Input B Operating mode
OFF OFF
ON OFF
OFF ON
ON ON
OFF OFF
ON OFF
OFF ON
ON ON
OFF OFF
ON OFF
OFF ON
ON ON
OFF OFF
ON OFF
OFF ON
ON ON
OFF OFF
ON OFF
OFF ON
ON ON
OFF OFF
ON OFF
OFF ON
ON ON
Indoor unit stopped, locked
Indoor unit prior operating condition maintained, unlocked
Indoor unit stopped, locked
Indoor unit operating, unlocked
Indoor unit stopped, locked
Indoor unit prior operating condition maintained, unlocked
Indoor unit operating, unlocked
Indoor unit stopped, locked
Indoor unit prior operating condition maintained, unlocked
Indoor unit prior operating condition maintained, locked
Indoor unit prior operating condition maintained, unlocked
Indoor unit prior operating condition maintained, locked
Indoor unit operating, unlocked
CONTROL
MODE SWITCH
1
2
3
4
5
6

Setting and using method
Installation Manual 15
ENGLISH
3) Fan level setting mode
4) Power save mode
ÚWhen the indoor unit is operating with a Dry contact For Economizer, the fan level can be changed by
other controller when the fan level is set to low level and the indoor is in unlocked condition.
ÚWhen setting 9, A mode, the TEMP_SETTING must always be set to ON.
ÚPower save mode: Adjust the set temperature to +3℃(6℉) for cooling and -3℃(6℉) for heating.
Input A Input B Operating mode
OFF OFF
ON OFF
OFF ON
ON ON
OFF OFF
ON OFF
OFF ON
ON ON
Indoor unit operating at low level, locked
Indoor unit operating at low level, unlocked
Indoor unit stopped, locked
Indoor unit operating at low level, locked
Indoor unit operating at low level, unlocked
Indoor unit stopped, locked
Indoor unit prior operating condition maintained, unlocked
CONTROL
MODE SWITCH
7
8
Input A Input B Operating mode
OFF OFF
ON OFF
OFF ON
ON ON
OFF OFF
ON OFF
OFF ON
ON ON
Indoor unit operating in power save mode, locked
Indoor unit operating in power save mode, unlocked
Indoor unit stopped, locked
Indoor unit operating not in power save mode, unlocked
Indoor unit operating in power save mode, locked
Indoor unit operating in power save mode, unlocked
Indoor unit stopped, locked
CONTROL
MODE SWITCH
9
A

Setting and using method
16 Dry contact For Economizer
5) Compressor stop mode
ÚCompressor stop mode: The compressor is stopped during cool/heat operation.
ÚPower save mode: Adjust the set temperature to +3℃(6℉) for cooling and -3℃(6℉) for heating.
6) Operating mode selection mode
Input A Input B Operating mode
OFF OFF
ON OFF
OFF ON
ON ON
Indoor unit operating (Compressor in stop mode), locked
Indoor unit prior operating condition maintained
(Compressor not in stop mode), unlocked
Indoor unit stopped, locked
CONTROL
MODE SWITCH
B
7) Thermal off in cooling mode when interlocking with Economizer
ÚWhen setting E mode, turn on 2nd switch of SETTING.
Input A Input B Operating mode
OFF OFF
ON OFF
OFF ON
ON ON
OFF OFF
ON OFF
OFF ON
ON ON
Indoor unit stopped, unlocked
Indoor unit in cool/high operation, unlocked
Indoor unit in heat/high operation, unlocked
Indoor unit in fan/high operation, unlocked
Indoor unit stopped, locked
Indoor unit in cool/high operation, locked
Indoor unit in heat/high operation, locked
Indoor unit in fan/high operation, locked
CONTROL
MODE SWITCH
C
D
Input A Input B Operating mode
OFF OFF
Indoor unit prior operating condition maintained, occupied, unlocked
ON OFF
Indoor unit operating with thermal off in cooling mode, occupied, unlocked
OFF ON
Indoor unit prior operating condition maintained, unoccupied, unlocked
ON ON
Indoor unit prior operating with thermal off in cooling mode, unoccupied, unlocked
CONTROL
MODE SWITCH
E

Setting and using method
Installation Manual 17
ENGLISH
ÚWhen interlocking with occupancy sensor, set CONTROL_MODE_SW to F.
When setting F mode, turn on 3rd switch of setting.
8) Occupancy mode
Input A Input B Operating mode
OFF OFF Occupied, unlocked
ON OFF Unoccupied, unlocked
OFF ON Occupied, locked
ON ON Unoccupied, locked
CONTROL
MODE SWITCH
F

Setting and using method
18 Dry contact For Economizer
ÚWhen indoor unit is operating with Cooling Thermal On Mode the relay output is closed
5. Indoor unit monitoring
nMonitoring operation and error status : Refer to below and
connect to the control device that you want to control.
1) Turn Off the 2nd switch of SETTING_SW.
nCooling, Thermal On Mode and Occupancy output : This relay
output Is for interlocking with economizer.
1) Turn ON the 2nd switch of SETTING_SW.
Operation Display Error Display
Local Supply
(Depends on Operation
display power type)
Power
AC or DC
Local Supply
(Depends on Error
display power type)
Power
AC or DC
SETTING_SW
Economizer
Cooling Thermal On Mode
Occupancy
SETTING_SW
When using local supply, do not use high voltage over than AC 24 V.
2) Set CONTROL_MODE_SW to E.

Setting and using method
Installation Manual 19
ENGLISH
nMonitoring fan and error status : Refer to below and
Connect to the control device that you want to control.
1) Turn on the 3rd switch of SETTING_SW.
FAN Display Error Display
Local Supply
(Depends on Operation
display power type)
Power
AC or DC
Local Supply
(Depends on Error
display power type)
Power
AC or DC
SETTING_SW
When using local supply, do not use high voltage over than AC 24 V.
2) Set CONTROL_MODE_SW to F.

20 Dry contact For Economizer
Other manuals for PQDSBC1
1
Table of contents
Languages:
Other LG Air Conditioner manuals
Popular Air Conditioner manuals by other brands

mundoclima
mundoclima CL23390 Installaton manual

American Standard
American Standard 4A6V8024A1000B Service facts

Friedrich
Friedrich ZoneAire Compact P08SA owner's manual

Argo
Argo SWAN EVO operating instructions

Mitsubishi Electric
Mitsubishi Electric MSZ-GE25VA operating instructions

Mitsubishi Electric
Mitsubishi Electric Mr.SLIM MS24WN Service manual