LG 505C User manual

LG505C User Guide
- English
Some of the contents in this manual may differ from your phone
depending on the software of the phone or your service provider.

Phone Overview
2
Phone Overview
1.Earpiece Lets you hear the caller.
2.
Touch Screen
Displays incoming calls, messages and
indicator icons as well as a wide variety of content you
select to view.
3.
Shortcuts Key
Allows quick access to a customizable
Shortcut Menu.
4.
Quick Keys
The Quick Keys provide easy access to
Messages, the phone Dialpad, the Main Menu, and
Prepaid which easily activate with the touch of your
fingertip.
5.
Send Key
Use to answer incoming calls and to place
calls from the Dialpad. From Standby mode, pressing
this key will open the All Calls list of your Recent Calls
menu.
6.
Clear Key / Voice Commands Key
Deletes single
spaces or characters. Also backs out of menus, one level
at a time. While in Standbymode, use for quick access
to Voice Commands or press and hold to access Voice
Recorder.
7.
PWR/End Key
Use toturn the power on/off and to end
acall. Also returns to Standby mode.
8.
Earphone Jack
Allowsthe use of a headsetto hear
caller's voice.

3
Phone Overview
1.
Accessory Charger Port
Connects the phone to
the battery charger, or other compatible accessories.
2.
Volume Keys
Use to adjust the Master Volume in
Standby mode* and the Earpiece Volume during a
call.
3.
Lock/ Unlock Key
Press to lock or unlock the
touch screen and keys.
4.
microSD™ Slot
Accommodatesoptional
microSD cards up to 16GB.
5.
CameraKey
Press for 3 seconds to access the
Camera function. When pressed short, Multimedia
menu will be available.
6.
Camera Lens
Used for taking pictures. Keep it
clean for optimal photo quality.

Phone Overview
4
Phone Overview
Internal Qwerty Keypad
Your phone features a QWERTY keyboard, specifically designed for
easy and comfortable text entry. The QWERTY keyboard uses a
standard layout.
1. Function Key allows you enter the alternate
character (such as ~for the W key) on the
QWERTY keyboard. To lock the function key
(as when entering a series of numbers or
alternate characters), press twice.
2. SHIFT Key lets you change letter capitalization
when entering text, using the QWERTY
keyboard.
3. CLEAR Key Use todeletealetter, words or
sentences. Also use it to exit the menu and go
back to standby mode.
4. Enter key Use togo to next line editing your
message.

Menus Overview
5
Menus Overview
Prepaid
1. Add Airtime
2. Buy Airtime
3. My Phone Number
4. Airtime Info
5. Airtime Display
6. Serial Number
7. Code Entry Mode
Contacts
1. New Contact
2. Contact List
3. Groups
4. My vCard
5. Speed Dials
Messages
1. New Text Message
2. New Picture
Message
3. Inbox
4. Drafts
5. Outbox
6. Voicemail
7. Templates
8. Delete All
9. Settings
Recent Calls
1. Missed Calls
2. Received Calls
3. Dialed Calls
4. All Calls
5. Call Timer
6. DataCounter
Games
1. BuyGames
2. Let’s Go Bowling
3. UNO
Menu Access
Touch Menu to access the twelve phone menus. There are two
methods of accessing menus and submenus:

Menus Overview
6
Menus Overview
Browser
Multimedia
1. Take Photo
2. Record Voice
3. My Stuff
4. Music
New Text Message
Take Photo
My Schedule
1. Alarm Clock
2. Calendar
3. Notepad
Tools
1. Voice Command
1. Call<Name or
Number>
2. Send Msg to
<Name or
Number or
Group>
3. Check <Item>
4. Contacts
<Name>
5. Play
6. Help
2. Calculator
3. Ez Tip Calculator
4. World Clock
5. Unit Converter
1. Currency
2. Area
3. Lenght
4. Mass
5. Temperature
6. Volume
7. Velocity
6. Drawing Panel
7. Stopwatch
Settings
1. Sound Settings
1. Master Volume
2. Call Sounds
3. Message Alerts
4. Button Sounds
5. Service Alerts
6. Power On/Off
2. Display Settings
1. Display

7
Menus Overview
Backlight
2. Keypad
Backlight
3. Wallpaper
4. Clocks &
Calender
5. Theme
6. Font Settings
7. Dial Font Size
8. Clock Format
9. Name Match for
Dialing
3. Call Settings
1. Answer Options
2. Auto Retry
3. TTY Mode
4. One Touch Dial
5. Voice Privacy
4. Touch Settings
1. Auto Touch Lock
2. Vibrate Type
3. Vibrate Level
4. Tone Type
5. Calibration
5. Phone Settings
1. Airplane Mode
2. Languages
3. Loccation
4. Security
5. System Select
6. Bluetooth
7. USB Connection
8. Memory
1. Phone Memory
2. Card Memory
3. Save Options
8. Phone Info
1. My Number
2. MEID
3. Icon Glossary
4. SW/HW Version

Getting Started with Your Phone
8
Getting Started with Your Phone
The Battery
The phone comes with a
rechargeable battery. The battery
charge level is shown at the top
of the LCD screen.
Installing the Battery
Remove the battery cover. Align
the battery contacts with the
phone terminals at the top of
the battery compartment. Gently
push down on the battery until it
clicks intoplace. Replace the
battery cover.
Removing the Battery
Turn the phone off. Remove the
battery cover. Use the fingertip
cutout near the bottom of the
battery compartment to lift the
battery out.
Charging the Battery
To use the charger provided with
your phone:
Warning! Use only the charger
provided with the phone. Using
any charger other than the one
included with the L
L
G
G
5
5
0
0
5
5
C
C
may
damage your phone or battery.
Note
It is important to fully charge the
battery before initial use of the
phone.
Slot

9
Getting Started with Your Phone
1. Connect the USB data cable
into the wall adapter, as shown
below.
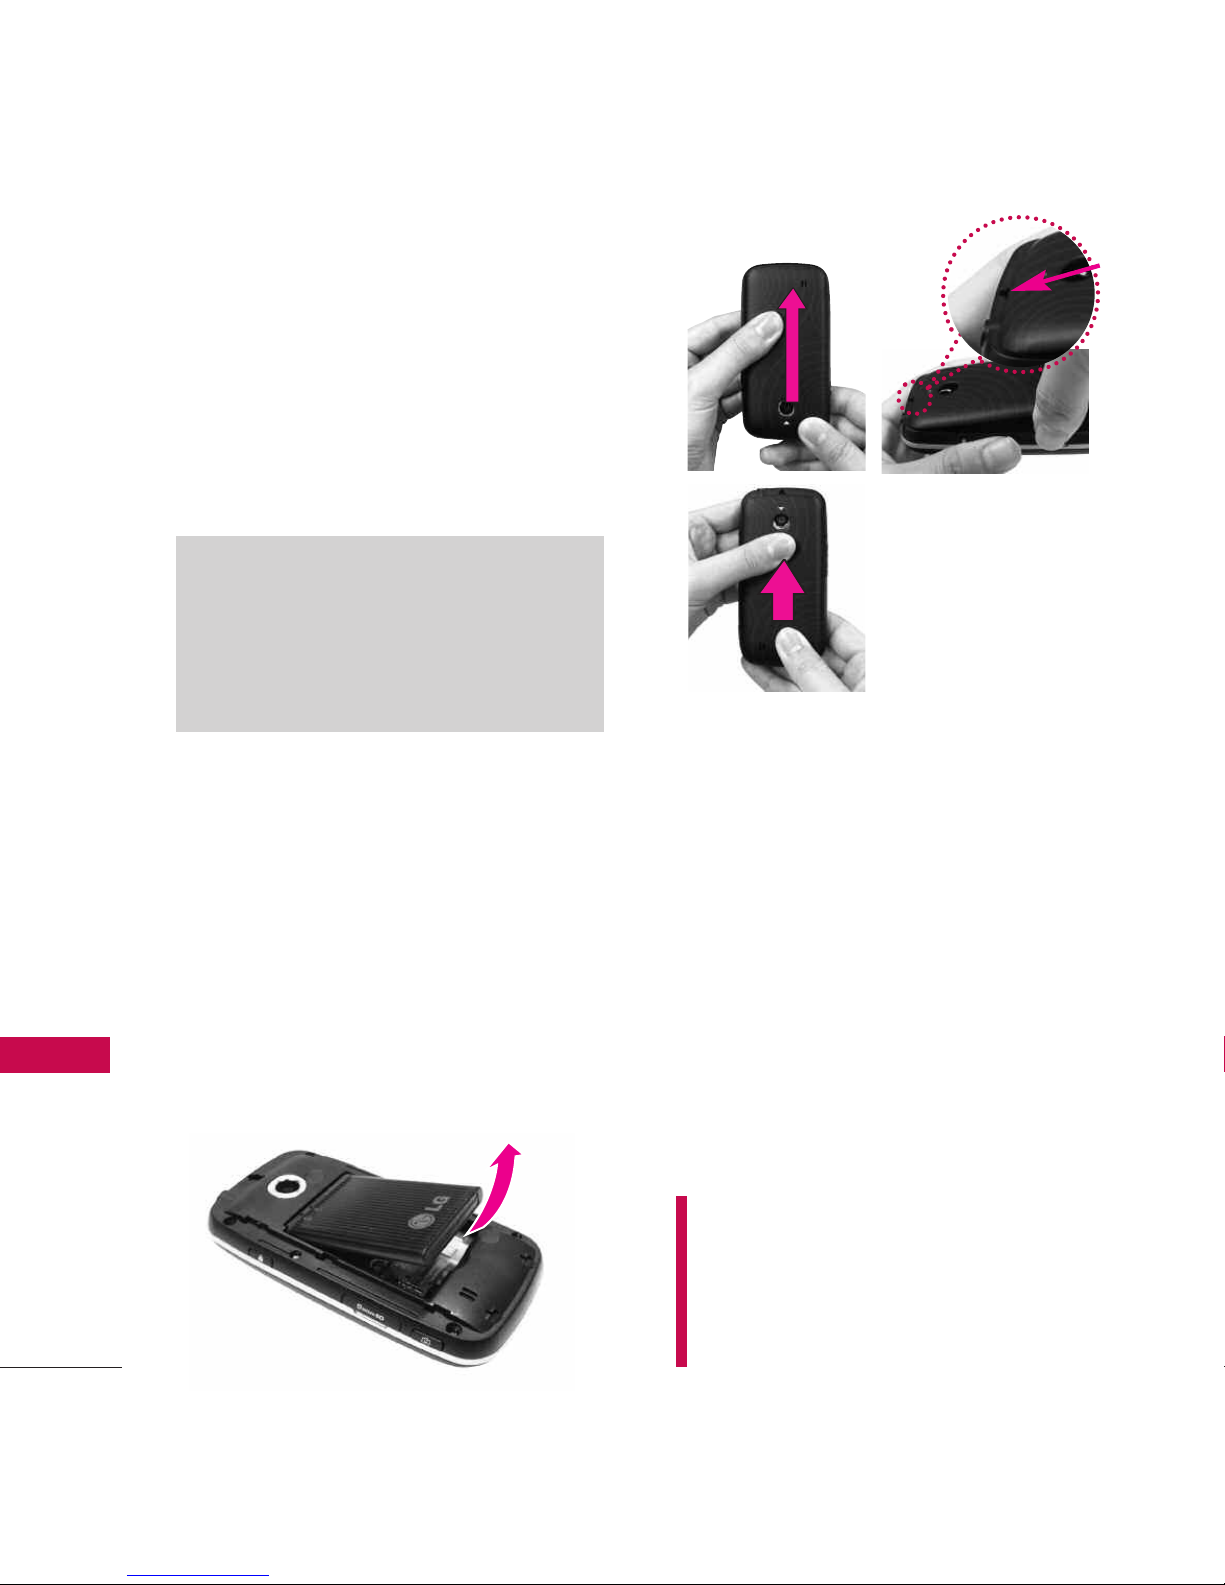
2. Gently uncover the phone's
accessory/ charger port. Then
plug the USB data cable (as
shown in the next image) into
the accessory/ charger port
and the other end into an
electrical outlet. The charge
time varies depending upon
the battery level.
Battery Charge Level
The battery charge level is shown
at the top right of the LCD
screen. When the battery charge
level becomes low, the low
battery sensor alerts you in three
ways: sounding an audible tone,
blinking the battery icon, and
displaying a warning message. If
the battery charge level becomes
exceedingly low, the phone
automatically switches off and
any function in progress is not
saved.
Turning the Phone On and Off
Turning the Phone On
1. Install a charged battery or
connect the phone to an
external power source.
2. Press for about 3
seconds until the LCD screen
lights up.
Notice
Please make sure that the'B' side is facing up
before inserting a charger or data cable into
the charger port of your phone.

Getting Started with Your Phone
10
Getting Started with Your Phone
Turning the Phone Off
1. Press and hold until the
display turns off.
Signal Strength
Call quality depends on the
signal strength in your area. You
can tell how much signal strength
you have by the number of bars
next to the signal strength icon:
the more bars, the stronger the
signal. If you’re having problems
with signal quality, move to an
open area or, when inside a
building, try moving near a
window.
Screen Icons
To see the icon glossary, go to
Menu
->
Settings
->
Phone Info
->
Icon Glossary
on
your phone.
Making Calls
1. Make sure the phone is
turned on. If not, press
for about 3 seconds to turn it
on.
2. Enter the phone number
(include the area code if
needed).
3. Press .
4. Press to end the call.
Correcting Dialing Mistakes
If you make a mistake while
dialing a number, touch the Clear
Key once to erase the last
digit entered, or hold the Clear
Key down to delete all digits.

11
Getting Started with Your Phone
Redialing Calls
With the touch screen unlocked,
press the
Send Key
once to
view a list of all of your recent
calls. The last 270 calls (90
Received, 90 Missed and 90
Dialed) are stored in the call
history list. Touch the
Dial Key
next to any of the entries to
place a call to that number.
You can also press the
Send Key
twice to redial the last
number you dialed, received or
missed in the call history.
Receiving Calls
1. When the phone rings and/or
vibrates, press to answer.
2. Press to end the call.
Tip
To choose answer options:
Menu
->
Settings
->
Call Settings
->
Answer Options
.
Choose from the following options:
Any Key/Auto with Handsfree/
Slide Open(Speakerphone)
Note
If you press or (the side
keys), while the phone is ringing,
the ringing or vibration is muted for
that call.

Lock Mode
Sets your phone to require a 4-
digit password in order to use
the phone.
To set Lock Mode on, touch
Menu
->
Settings
->
Phone Settings -> Security ->
Enter the Phone Lock Code ->
Lock Phone.
Mute Function
The Mute function is available
during a phone call. To quickly
activate Mute during a call.
Quick Volume Adjustment
Quickly adjust the Master Volume
and Earpiece Volume by pressing
the upper Volume Key to increase
and lower Volume Key to decrease.
Call Waiting
Your cellular service may offer
call waiting. While a call is in
progress, a beep indicates another
incoming call. When call waiting
is enabled, you may put the active
call on hold while you answer the
other incoming call. Check with
your cellular service provider for
information about this function.
1. Press the
Send Key
, to
automatically put the first call
Note
Until you change it, the default
lock code/password is the last 4
digits of your phone number.
Quick Access to Convenient Features
12
Quick Access to Convenient Features
Note
The Earpiece Volume can only be
adjusted by the Volume Keys during
a call. To turn sounds off, unlock the
phone, press and hold the lower
Volume Key for 3 seconds, then
press and hold the upper Volume
Key to return to Normal Mode.

13
Quick Access to Convenient Features
on hold and answer the new call.
2. Press the
Send Key
again, to put the second call
on hold and return to the first
caller.
Caller ID
Caller ID displays the phone
number or name of the incoming
call. If the caller’s identity is stored
in Contacts, the name will appear
along with the phone number.
Check with your service provider
for availability.
Speed Dialing
Speed dialing is a convenient
feature that allows you to make
phone calls quickly. A number
key can be assigned to a specific
phone number. By touching and
holding down a number key, your
phone will recall the phone
number associated from the
Contact List and dial that phone
number for you. Speed Dial
Number 1 is set to Voicemail by
default and is unchangeable.
Dialing Single Digit Speed Dials
(from 2 to 9)
Enter and hold the Speed Dial
number.
OR
Enter the Speed Dial number and
press .
Dialing Double Digit Speed
Dials (from 10 to 99)
Enter the first digit and then
touch and hold the key of the
second digit.
OR
Enter the first and second digits
and press .

Text Input
Each time you touch a data entry field, the touchscreen automatically
displays a keypad allowing you to enter text, numbers, and symbols. For
example, in a text field, an alphabet keypad appears, but you can also
switch to number mode to enter digits.
Entering and Editing Information
14
Entering and Editing Information
Options:
Insert Template/Save As Draft/Add/ Priority
Level/ Callback #/Save Template/Cancel
Message
Handwriting input mode Key.
Touch to delete text.

Contacts in Your Phone’s Memory
15
Contacts in Your Phone’s Memory
The Basics of Storing
Contacts Entries
1. Enter the phone number you
want to save (up to 48 digits).
2. Touch
SAVE
and select either
Add New Contact
or
Update
Existing
on the pop-up screen.
3. Touch a Phone Label.
Mobile 1/ Home 1/ Office
1/ Mobile 2/ Fax/ Home 2/
Office 2
4. Touch the Name field and
enter a name for the contact
(up to 32 characters). Then
touch and . A
confirmation message is
displayed briefly.
Phone Numbers With
Pauses
When you call automated
systems, such as voice mail or
credit billing numbers, you often
have to enter a series of numbers
to navigate through the system.
Instead of entering these
numbers by hand, you can store
the numbers in your Contacts
separated by special pause
characters (W, P). There are two
different types of pauses you can
use when storing a number:
Add Wait
The phone stops dialing until
you touch
Release
to advance to
the next number.
Add 2-Sec pause
The phone waits 2 seconds
before sending the next string of
digits.
SAVEDONE
Note
Use
Update Existing
to add
another phone number to a
contact already stored in memory.

Storing a Number with Pause
or Wait
1. Touch
Menu
.
2. Touch .
3. Touch
New Contact
.
4.
Enter a name (up to 32
characters) and enter a number.
5. Touch and select
Add
Wait
or
Add 2-Sec Pause
.
6. Add Wait / Add 2-Sec pause
7. Enter the additional
number(s), touch and
.
Adding a Pause or Wait to an
Existing Number
1. Touch
Menu
.
2. Touch .
3. Touch
Contact List
.
4. Scroll through the list and
touch the Contact entry you
wish to edit.
5. Touch
EDIT
.
6. Touch the number.
7. Touch .
8. Touch
Add Wait
or
Add 2-
Sec Pause
.
9. Enter the additional
number(s), touch and
then .
Searching Your Phone’s
Memory
The LG505C phone is able to
perform a dynamic search of the
contents in your phone’s
Contact List. A dynamic search
compares entered letters or
numbers on the Dialpad against
the entries in your Contacts. A
matching list is displayed in
descending order. You can then
select a number from the list to
call or view it.
SAVE
DONE
CONTACTS
SAVE
DONE
CONTACTS
Contacts in Your Phone’s Memory
16
Contacts in Your Phone’s Memory

17
Contacts in Your Phone’s Memory
Searching by Letter
1. Touch , to
display your contacts
alphabetically.
2. Touch
Go To
followed by the
key(s) on the alphanumeric
keypad that corresponds with
the letters in the Contact's
name. The matching contacts
will be displayed.
Scrolling Through Your
Contacts
1. Touch , to
display your contacts
alphabetically.
2. Use your finger to scroll up
and down through the list.
Contacts Options
1. Touch
Menu
.
2. Touch .
3. Touch Right Option Key
Options
.
4. Select an option.
Send via Bluetooth
: Send a
contact(vCard) via Bluetooth
®
.
Delete
: Delete the selected entry
in your Contacts.
Message
: Send a text message or
picture message to the selected
contact.
Lock/Unlock
: Edit the selected
contact information.
Making a Call From Your
Phone’s Memory
Once you have stored phone
numbers in your Contacts, you
can place calls to those numbers
quickly and easily.
●
By touching a phone number in
Contacts or Call History and
pressing or touch .
CONTACTS
CONTACTS
CONTACTS

●
By using Speed Dialing.
From Contacts
1. Touch .
2. Touch .
3. Touch the phone number.
From Call History
1. Touch
Menu
.
2. Touch
Recent Calls
.
3. Touch the type of recent call.
Missed Calls/Received
Calls/Dialed Calls/All Calls
4. Touch phone number.
5. Touch or press .
Speed Dialing
For a single-digit Speed Dial,
press and hold the digit or press
the digit, then press . For a
double-digit Speed Dial, press
the first digit and hold the
second digit or press the first
and second digits, then press
to call.
CONTACTS
Contacts in Your Phone’s Memory
18
Contacts in Your Phone’s Memory

Using Phone Menus
19
Prepaid
Prepaid
The Prepaid Menu provides
shortcuts to access useful
account information.
1. Add Airtime
Add Airtime allows you to start
an over-the-air request for
additional airtime.
1. Touch , .
2. Touch
Add Airtime
.
2. Buy Airtime
Buy Airtime allows you to start
an over-the-air request for
additional airtime.
1. Touch , .
2. Touch
Buy Airtime.
.
60 mins./ 120 mins./ 200
mins./ 450 mins.
3. My Phone Number
My Phone Number displays the
phone's phone number.
1. Touch , .
2. Touch
My Phone Number
.
4. Airtime Info
Airtime Info displays the balance
and due date.
1. Touch , .
2. Touch
Airtime Info
.
5. Airtime Display
Airtime Display allows you to
enable/disable the display of
Balance and Due Date
information on the Home screen.
1. Touch , .
2. Touch
Airtime Display
.
Balance/ Due Date

6. Serial Number
Serial Number simply displays
the phone's serial number.
1. Touch , .
2. Touch
Serial Number
.
7. Code Entry Mode
Code Entry Mode will allow the
phone to accept Tracfone related
codes in order to add units,
modify specific data, and
troubleshoot the phone. In using
the Code Entry Mode, you can't
receive incoming calls or use
events alerts.
1. Touch , .
2. Touch
Code Entry Mode.
Contacts
The Contacts Menu allows you
to store names, phone numbers
and other information in your
phone’s memory.
1. New Contact
Allows you to add a new contact
to your Contact List.
1. Touch .
2. Touch
Contacts
.
3. Touch
New Contact
.
4. Enter the name.
Note
Using this submenu, the number is
saved as a new Contact. To save
the number into an existing
Contact, edit the Contact entry.
Prepaid/Contacts
20
Prepaid/ Contacts
Other manuals for 505C
1
This manual suits for next models
1
Table of contents
Other LG Cell Phone manuals