Lifetime 80339 User manual

CONTACT OUR GREAT CUSTOMER SERVICE:
Icon Legend..................................................................4
Warnings & Notices.....................................................5
Parts Identifier.............................................................6
Lower Frame Assembly...............................................7
Upper Frame Assembly............................................11
Base Assembly...........................................................16
Cleaning & Care.........................................................23
Registration...........................................................24
Warranty.................................................................25
Dial 1-800-225-3865
7:00 am–5:00 pm (M–F) MST
and 9:00 am–1:00 pm (Sat) MST
Live Chat: www.lifetime.com/customerservice
(Click on the “LIVE CHAT” tab)
QUESTIONS?
MODEL# AND PRODUCT ID (both are needed when contacting us)
Model Number: Product ID:
TOOLS REQUIRED TABLE OF CONTENTS
80339
1/2" (≈13 mm)
9/16" (≈14 mm)
DNU 3/16" (≈5 mm) (x1)
(Included)
Pour le français, voir la page 2. Para el español, ver la página 3.
ASSEMBLY INSTRUCTIONS
BEFORE ASSEMBLY:
• Assemble on a level platform
• At least 2 people recommended for setup
MODEL #60091
TABLE CART
MODEL 80339
ADDITIONAL ASSEMBLY HELP
For assembly help, scan: or search
1216460
in the BILT app.
COPY

2
CONTACTER NOS SERVICES À LA CLIENTÈLE SUPÉRIEURE:
Légende des icônes......................................................4
Avertissements et avis..................................................5
Identificateur des pièces...............................................6
Assemblage du cadre inférieur......................................7
Assemblage du cadre supérieur..................................11
Assemblage de la base...............................................16
Nettoyage et entretien................................................23
Enregistrement.............................................................24
Garantie...............................................................26
Composer le 1-800-225-3865
Du lundi au vendredi 7 h – 17 h (HNR)
et samedi 9 h – 13 h (HNR)
Entretien en direct: www.lifetime.com/customerservice
(Cliquer sur la languette « LIVE CHAT »)
QUESTIONS ?
MODÉLE ET RÉFÉRENCE DU PRODUIT
(il faut avoir les deux en entrant en contact avec nous)
Número de modèle : Référence du produit :
OUTILS REQUIS SOMMAIRE
80339
1/2 po (≈13 mm)
9/16 po (≈14 mm)
DNU 3/16 po (≈5 mm) (x1)
(Incluse)
For English, see page 1. Para el español, ver la página 3.
INSTRUCTIONS D’ASSEMBLAGE
AVANT L’ASSEMBLAGE :
• Assembler sur une plate-forme nivelée
• Nous recommandons, au moins, 2 adultes pour
l’assemblage
MODEL #60091
CHARRETTE À
TABLES
MODÈLE n° 80339
POUR DE L’AIDE SUPPLÉMENTAIRE AVEC L’ASSEMBLAGE
For assembly help, scan: ou chercher
1216460
dans l’appli BILT.
L’ASSEMBLER AVEC BILT
TÉLÉCHARGER L’APPLI GRATUIT AUJOUR’HUI
Pour de l’aide avec l’assemblage, scanner :
COPY

3
CONTACTAR NUESTRO SERVICIO A CLIENTES VALORADO:
Leyenda de íconos.......................................................4
Advertencias y avisos..................................................5
Identificador de piezas.................................................6
Ensamblaje del armazón inferior..................................7
Ensamblaje del armazón superior..............................11
Ensamblaje de la base...............................................16
Limpieza y cuidado....................................................23
Registro....................................................................24
Garantía................................................................27
Marcar al 1.800.225.3865
De lunes hasta viernes 7:00 h–17:00 h (HNR)
y sábado 9:00 h–13:00 h (HNR)
Live Chat: www.lifetime.com/customerservice
(Cliquear en la lengüeta «LIVE CHAT»)
¿PREGUNTAS?
MODELO E ID DEL PRODUCTO (se necesitan los dos al contactarnos)
Número de modelo: ID del producto:
INSTRUMENTAL REQUERIDO ÍNDICE
80339
1/2 in (13 mm)
9/16 in (14 mm)
DNU 3/16 in (≈5 mm) (x1)
(Incluida)
For English, see page 1. Pour le français, voir la page 2.
INSTRUCCIONES DE ENSAMBLAJE
ANTES DE ENSAMBLAR:
• Ensamblar sobre una plataforma nivelada
• Recomendamos, por lo menos, 2 adultos para el
ensamblaje
MODEL #60091
CARRETILLA PARA
MESAS
MODELO n° 80339
AYUDA ADICIONAL CON EL ENSAMBLAJE
For assembly help, scan: o buscar
1216460
en la app BILT.
ENSAMBLARLO CON BILT
DESCARGAR LA APP GRATIS HOY
Para ayuda con el ensamble, escanear:
COPY

4
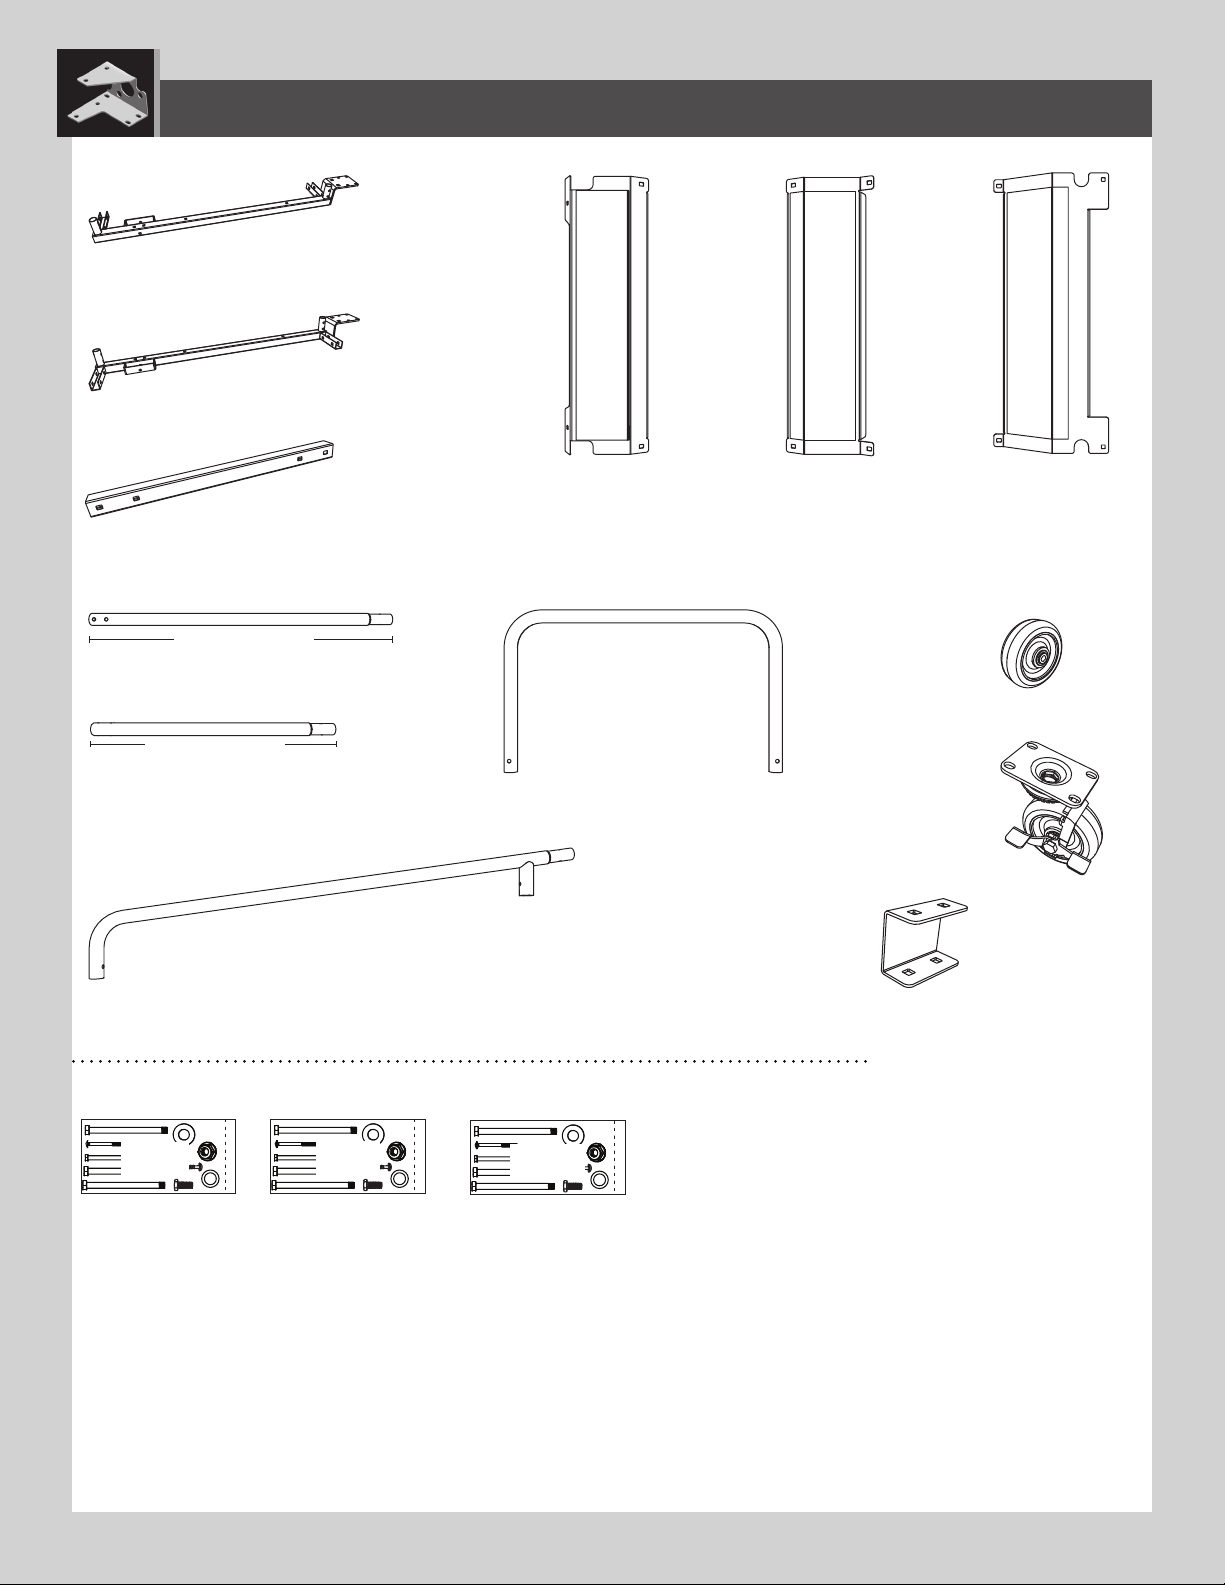
• Indicates the parts/no parts required for a section.
• Indique les pièces à utiliser/qu’aucone pièce n’est requise pour une section.
• Indica las piezas que se usarán/que no necesitan en una sección.
• Indicates special heed should be taken when reading.
• Indique qu’une attention spéciale doit être portée à la lecture.
• Indica que uno debe prestar atención al leer.
• Indicates the hardware to be used for a section.
• Indique la quincaillerie à utiliser pour une section.
• Indica los artículos de ferretería que se usarán para una sección.
• Indicates the tools to be used for a section.
• Indique les outils à utiliser pour une section.
• Indica las herramientas que se utilizarán para una sección.
• Indicates the number of adults required to perform a specific step, e.g., 2, 3, 4, etc.
• Indique le nombre d’adultes requis pour eectuer une étape spécifique, p. ex., 2, 3, 4, etc.
• Indica el número de adultos requeridos para realizar un paso específico, p.ej., 2, 3, 4, etc.
• Indicates no hardware required for a specific page or section.
• Indique qu’aucun matériel n’est requis pour une page précise.
• Indica que no se necesitan los artículos de ferretería para una página específica.
• Indicates to use/not use an electric drill for a specific step.
• Indique quand utiliser une/que ne pas utiliser de perceuse électrique pour une étape précise.
• Indica la utilización de/que no utilizar un taladro eléctrico para un paso específico.
ICON LEGEND / LÉGENDE DES ICÔNES / SIGNIFICADO DE LOS ÍCONOS
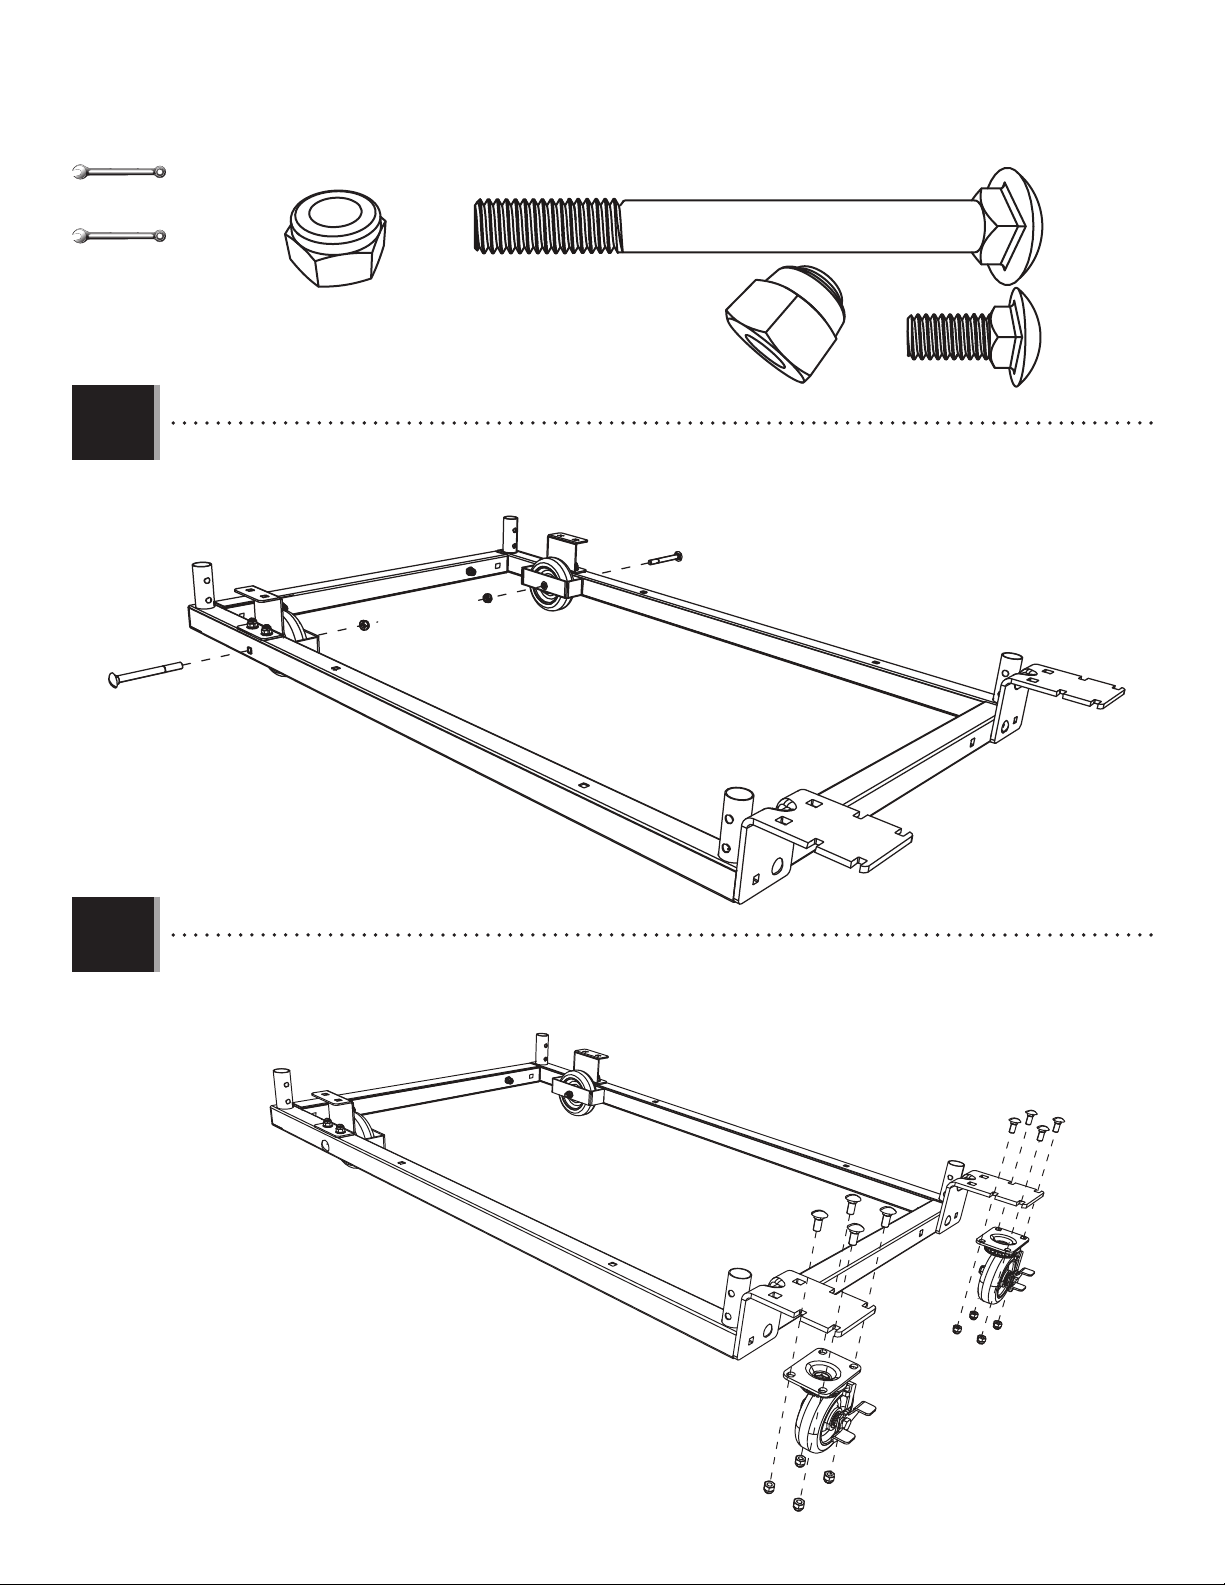
• These nuts are centerlock nuts. They are designed to be tight; therefore, they will be harder to tighten. Tighten until flush with the metal or plastic.
• Ces écrous sont des écrous de blocage central. Ils sont conçus pour être serrés; de ce fait, ils seront plus diciles à resserrer.Serrer jusqu’à ce qu’ils
soient au ras du métal ou du plastique.
• Estas tuercas son tuercas de bloqueo central. Están diseñadas para estar apretadas; por lo tanto, serán más difíciles de apretar.Apriételas hasta que
estén al ras del metal o plástico.
1216460 2/24/2021

5
English:
•Failure to follow these warnings may result in serious injury or property damage and will void warranty.
• To ensure safety, do not attempt to assemble this product without following the instructions carefully.
• Assemble the product on level ground.
• Two capable adults are required for assembly.
• All who participate in the assembly process should wear safety glasses throughout the assembly.
• Proper and complete assembly are essential to reduce the risk of accident or injury.
• Check all hardware for tightness before and during the usage season.
• Most injuries are caused by misuse and/or not following instructions. Use caution when using this product.
Français :
• Le non-respect de ces avertissements peut entraîner en conséquence des blessures sérieuses ou dommages à la propriété et annulera la
garantie.
• Pour assurer la sécurité, ne pas tenter d’assembler ce produit sans suivre attentivement les instructions.
• Assembler ce produit sur une surface nivelée.
• Deux adultes capables sont requis pour assembler ce produit.
• Toutes les personnes qui participent à l’assemblage doivent porter des lunettes de sécurité tout le long de l’assemblage.
• L’assemblage, correct et complet, est essentiel pour réduire le risque des dangers ou des blessures.
• Serrer bien toute la quincaillerie avant et au cours de la période d’usage.
• La plupart des blessures sont causées par l’abus et/ou par le non-respect des instructions. Être prudent en utilisant ce produit.
Español:
• El incumplimiento de seguir estas advertencias puede resultar en lesiones graves o daño a la propiedad y anulará la garantía.
• Para asegurar la seguridad, no intentar armar este producto sin seguir detenidamente las instrucciones.
• Ensamblar el producto sobre una superficie nivelada.
• Dos adultos competentes son requeridos para ensamblar el producto.
• Todos los que participan en el ensamble del producto deben llevar gafas de seguridad a lo largo del ensamble.
• El armado, propio y completo, es esencial para reducir el riesgo de accidentes y lesiones.
• Apretar todo el herraje antes de y durante la temporada de uso.
• La mayoría de las lesiones son causadas por el uso erróneo y/o el incumplimiento de seguir las instrucciones. Tener cuidado al usar este
producto.
WARNINGS & NOTICES / AVERTISSEMENTS ET AVIS / ADVERTENCIAS Y AVISOS

6
EAS (x2)
EBJ (x2)
AMU (x2)
EAZ (x2)
EBB (x1)
EBF (x1)
vCM
EBG (x2)
EBA (x1)
EBE (x2)
EAY (x2)
23.4” (59.4 cm)
vCM
23.4" (59,4 cm)
31.3" (79,5 cm)
EAX (x1) EBC (x1) EBD (x1)
EBK EBL EBM
PARTS IDENTIFIER / IDENTIFICATEUR DES PIÈCES / IDENTIFICADOR DE PIEZAS
BLISTER PACKS / PLAQUETTES / BLÍSTERES
LARGE PARTS / GRANDES PIÈCES / PIEZAS GRANDES

7
EAS (x2)
EBJ (x2)
AMU (x2)
EAZ (x2)
EBB (x1)
EBF (x1)
1/2" (x1)
13mm (x1)
9/16" (x1)
14 mm (x1)
1
vCM
EBI (x2) DBA (x8)
EAV (x6)
EAQ (x2) EES (x2)
EAW (x8)
EET (x16)
EBK
Blister Pack / Plaquette / Blíster
HARDWARE REQUIRED / QUINCAILLERIE REQUISE / HERRAJE REQUERIDO
Large Parts / Grandes Pièces / Piezas grandes
PARTS REQUIRED / PIÈCES REQUISES / PIEZAS REQUERIDAS
TOOLS REQUIRED / OUTILS REQUIS / INSTRUMENTAL REQUERIDO
1LOWER FRAME ASSEMBLY / ASSEMBLAGE DU CADRE INFÉRIEUR / ENSAMBLE DEL ARMAZÓN
INFERIOR
1

8
TOOLS AND HARDWARE REQUIRED / OUTILS ET QUINCAILLERIE REQUIS / INSTRUMENTAL Y HERRAJE REQUERIDOS
EBF
EBB EAZ
EAZ
EBI
EBI
EAV
EAV
DBA
DBA
EET
EET
EET
EET
DBA
DBA
DBA (x4)
EBI (x2)
EET (x4)
EAV (x2)
1/2" (x1)
13 mm (x1)
XSECTION 1 (CONTINUED) / SECTION 1 (SUITE) / SECCIÓN 1 (CONTINUACIÓN)
1.1
1.2
• Insert the ends of the two Side Frames (EBB &EBF) into the front and rear Braces (EAZ). Align the holes.
• Insérer les extrémités des deux charpentes latéraux (EBB &EBF) dedans les supports (EAZ) avant et arrière. Aligner les
trous.
• Insertar los extremos de los dos armazones laterales (EBB &EBF) dentro de los soportes (EAZ) delantero y trasero. Alinear los
agujeros.

9
TOOLS AND HARDWARE REQUIRED / OUTILS ET QUINCAILLERIE REQUIS / INSTRUMENTAL Y HERRAJE REQUERIDOS
1/2" (x1)
13 mm (x1)
EBJ
EBJ
EAV
AMU
AMU
EAV
EET
EET
DBA
DBA
DBA (x4) EET (x4)EAV (x4)
XSECTION 1 (CONTINUED) / SECTION 1 (SUITE) / SECCIÓN 1 (CONTINUACIÓN)
1.3
1.4
• Secure the Wheel Brackets (EBJ) to the Side Frames. Do not overtighten.
• Bien attacher les supports des roues (EBJ) aux charpentes latéraux. Ne pas trop serrer.
• Sujetar bien los soportes de las ruedas (EBJ) a los armazones laterales. No apretar demasiado.
• Slide the Front Wheels (AMU) down inside the Side Frames.
• Faire glisser les roues avants (AMU) dedans les charpentes latéraux.
• Deslizar las ruedas delanteras (AMU) dentro de los armazones laterales.

10
TOOLS AND HARDWARE REQUIRED / OUTILS ET QUINCAILLERIE REQUIS / INSTRUMENTAL Y HERRAJE REQUERIDOS
EAQ
EES
EES
EAQ
EAW
EAW
EAS
EAS
EET
EET
EAQ (x2)
EES (x2)
EAW (x8)
EET (x8)
1/2" (x1)
13 mm (x1)
9/16" (x1)
14 mm (x1)
XSECTION 1 (CONTINUED) / SECTION 1 (SUITE) / SECCIÓN 1 (CONTINUACIÓN)
1.5
1.6
• Secure the Front Wheels to the Side Frames. Do not overtighten.
• Bien attacher les roues avants aux charpentes latéraux. Ne pas trop serrer.
• Sujetar bien las ruedas delanteras a los armazones laterales. No apretar demasiado.
• Secure the Rear Wheels (EAS) to the brackets on the back of the Side Frames. Do not overtighten.
• Bien attacher les roues arrières (EAS) aux supports aux extrémités arrières des charpentes latéraux. Ne pas trop serrer.
• Sujetar bien las ruedas traseras (EAS) a los soportes a los extremos traseros de los armazones laterales. No apretar
demasiado.

11
2
EBG (x2)
EBA (x1)
EBE (x2)
EAY (x2)
23.4” (59.4 cm)
vCM
23.4" (59,4 cm)
31.3" (79,5 cm)
1/2" (x1)
13 mm (x1)
DNU
DNU
EAU (x14)
EET (x14)
EBL
UPPER FRAME ASSEMBLY / ASSEMBLAGE DU CADRE SUPÉRIEUR / ENSAMBLE DEL ARMAZÓN
SUPERIOR
2
Blister Pack / Plaquette / Blíster
HARDWARE REQUIRED / QUINCAILLERIE REQUISE / HERRAJE REQUERIDO
Large Parts / Grandes Pièces / Piezas grandes
PARTS REQUIRED / PIÈCES REQUISES / PIEZAS REQUERIDAS
TOOLS REQUIRED / OUTILS REQUIS / INSTRUMENTAL REQUERIDO

12
TOOLS AND HARDWARE REQUIRED / OUTILS ET QUINCAILLERIE REQUIS / INSTRUMENTAL Y HERRAJE REQUERIDOS
EBE
EBE
EAU
EET
EAU (x4)
EET (x4)
1/2" (x1)
13 mm (x1)
DNU
XSECTION 2 (CONTINUED) / SECTION 2 (SUITE) / SECCIÓN 2 (CONTINUACIÓN)
2.1
2.2
• Slide a Rear Vertical Support Tube (EBE) over the Side Frame, and align the holes.
• Faire glisser un tube de support vertical arrière (EBE) sur la charpente latérale, et aligner les trous.
• Deslizar un tubo de soporte vertical trasero (EBE) sobre el armazón lateral, y alinear los agujeros.
• Secure the Tube to the Side Frame. Do not overtighten. Repeat these steps for the second Rear Vertical Support Tube.
• Bien attacher le tube à la charpente latérale. Ne pas trop serrer. Répéter ces étapes pour le deuxième tube de support
vertical arrière
• Sujetar bien el tubo al armazón lateral. No apretar demasiado. Repetir estos pasos para el segundo tubo de soporte vertical
trasero.

13
TOOLS AND HARDWARE REQUIRED / OUTILS ET QUINCAILLERIE REQUIS / INSTRUMENTAL Y HERRAJE REQUERIDOS
EAY
EAY
EAU
EET
EAU (x4)
EET (x4)
1/2" (x1)
13 mm (x1)
DNU
XSECTION 2 (CONTINUED) / SECTION 2 (SUITE) / SECCIÓN 2 (CONTINUACIÓN)
2.3
2.4
• Slide a Front Vertical Support Tube (EAY) over the Side Frame, and align the holes.
• Faire glisser un tube de support vertical avant (EAY) sur la charpente latérale, et aligner les trous.
• Deslizar un tubo de soporte vertical delantero (EAY) sobre el armazón lateral, y alinear los agujeros.
• Secure the Tube to the Side Frame. Do not overtighten. Repeat these steps for the second Front Vertical Support Tube.
• Bien attacher le tube à la charpente latérale. Ne pas trop serrer. Répéter ces étapes pour le deuxième tube de support
vertical avant.
• Sujetar bien el tubo al armazón lateral. No apretar demasiado. Repetir estos pasos para el segundo tubo de soporte vertical
delantero.

14
TOOLS AND HARDWARE REQUIRED / OUTILS ET QUINCAILLERIE REQUIS / INSTRUMENTAL Y HERRAJE REQUERIDOS
EBG
EBG
EAU EET
EET
EAU
EAU (x4)
EET (x4)
1/2" (x1)
13 mm (x1)
DNU
XSECTION 2 (CONTINUED) / SECTION 2 (SUITE) / SECCIÓN 2 (CONTINUACIÓN)
2.5
2.6
• Slide a Horizontal Support Tube (EBG) over the Vertical Tubes, and align the holes.
• Faire glisser un tube de support horizontal (EBG) sur les tubes verticaux, et aligner les trous.
• Deslizar un tubo de soporte horizontal (EBG) sobre los tubos verticales, y alinear los agujeros.
• Secure the Horizontal Tube to the Vertical Tubes. Do not overtighten. Repeat these steps for the second Horizontal Support Tube.
•Bien attacher le tube horizontal aux tubes verticaux. Ne pas trop serrer. Répérer ces étapes pour le deuxième tube de support horizontal.
• Sujetar bien el tubo horizontal a los tubos verticales. No apretar demasiado. Repetir estos pasos para el segundo tubo de soporte horizontal.

15
TOOLS AND HARDWARE REQUIRED / OUTILS ET QUINCAILLERIE REQUIS / INSTRUMENTAL Y HERRAJE REQUERIDOS
EBA
EAU
EAU
EET
EET
EAU (x2)
EET (x2)
1/2" (x1)
13 mm (x1)
DNU
XSECTION 2 (CONTINUED) / SECTION 2 (SUITE) / SECCIÓN 2 (CONTINUACIÓN)
2.7
2.8
• Slide the Handle (EBA) over the Horizontal Tubes, and align the holes.
• Faire glisser le manche (EBA) sur les tubes horizontaux, et aligner les trous.
• Deslizar el mango (EBA) sobre los tubos horizontales, y alinear los agujeros.
• Secure the Handle to the Tubes. Do not overtighten.
• Bien attacher le manche aux tubes. Ne pas trop serrer.
• Sujetar bien el mango a los tubos. No apretar demasiado.

16
3
EAX (x1) EBC (x1) EBD (x1)
DBA (x14)
EET (x14)
EAV (x8)
EAW (x2) EBH (x4)
BASE ASSEMBLY / ASSEMBLAGE DE LA BASE / ENSAMBLE DE LA BASE
3
1/2" (x1)
13 mm (x1)
EBM
Blister Pack / Plaquette / Blíster
HARDWARE REQUIRED / QUINCAILLERIE REQUISE / HERRAJE REQUERIDO
Large Parts / Grandes Pièces / Piezas grandes
PARTS REQUIRED / PIÈCES REQUISES / PIEZAS REQUERIDAS
TOOLS REQUIRED / INSTRUMENTAL REQUERIDO / OUTILS REQUIS

17
TOOLS AND HARDWARE REQUIRED / OUTILS ET QUINCAILLERIE REQUIS / INSTRUMENTAL Y HERRAJE REQUERIDOS
EET
EAV
EBD
EET
DBA
EAV
EET
DBA
EET
EAW EAW
DBA (x4)
EET (x4)
EAV (x2)
DBA
DBA
EAW (x2)
1/2" (x1)
13 mm (x1)
XSECTION 3 (CONTINUED) / SECTION 3 (SUITE) / SECCIÓN 3 (CONTINUACIÓN)
3.1
3.2
• Secure the Rear Panel (EBD) to the Side Frames. Tighten only by hand at this time.
• Bien attacher le panneau arrière (EBD) aux charpentes latéraux. Serrer à la main seulement en ce moment.
• Sujetar bien el panel trasero (EBD) a los armazones laterales. Apretar sólo a mano en este momento.
• Secure the Rear Panel (EBD) to the Side Frame brackets. Tighten only by hand at this time.
• Bien attacher le panneau arrière (EBD) aux supports des charpentes latéraux. Serrer à la main seulement en ce moment.
• Sujetar bien el panel trasero (EBD) a los soportes de los armazones laterales. Apretar sólo a mano en este momento.

18
TOOLS AND HARDWARE REQUIRED / OUTILS ET QUINCAILLERIE REQUIS / INSTRUMENTAL Y HERRAJE REQUERIDOS
EAX
DBA (x2)
EET (x2)
1/2" (x1)
13 mm (x1)
EAV
EET
EET
DBA
DBA
EAV
EAV (x2)
XSECTION 3 (CONTINUED) / SECTION 3 (SUITE) / SECCIÓN 3 (CONTINUACIÓN)
3.3
3.4
• Flip the Cart on its side and secure the Rear Panel to the rear Brace. Tighten only by hand at this time.
• Tourner la charrette sur son côté, et attacher le panneau arrière au support arrière. Serrer à la main seulement en ce moment.
• Dar vuelta la carretilla, y sujetar el panel trasero al soporte trasero. Apretar sólo a mano en este momento.
• Set the Front Panel (EAX) over the Frame. Tighten only by hand at this time.
• Poser le panneau arrière (EAX) aux charpentes latéraux. Serrer à la main seulement en ce moment.
• Colocar el panel delantero (EAX) a los armazones laterales. Apretar sólo a mano en este momento.

19
TOOLS AND HARDWARE REQUIRED / OUTILS ET QUINCAILLERIE REQUIS / INSTRUMENTAL Y HERRAJE REQUERIDOS
EBH (x2)
DBA (x4)
EET (x4)
EAV (x2)
EAV
EAV
1/2" (x1)
13 mm (x1)
EBH
EBH
DBA
EET
EET
EET
EET
DBA
DBA
DBA
XSECTION 3 (CONTINUED) / SECTION 3 (SUITE) / SECCIÓN 3 (CONTINUACIÓN)
3.5
3.6
• Secure the Front Panel to the Brackets. Tighten only by hand at this time.
• Bien attacher le panneau avant aux supports. Serrer à la main seulement en ce moment.
• Sujetar bien el panel delantero a los soportes. Apretar sólo a mano en este momento.
• Secure the Front Panel to front Brace. Tighten only by hand at this time.
• Bien attacher le panneau avant au support avant. Serrer à la main seulement en ce moment.
• Sujetar bien el panel delantero al soporte delantero. Apretar sólo a mano en este momento.

20
TOOLS AND HARDWARE REQUIRED / OUTILS ET QUINCAILLERIE REQUIS / INSTRUMENTAL Y HERRAJE REQUERIDOS
EET
EET
DBA
DBA
EAV
EBC
EAV
EBH (x2)
DBA (x4)
EET (x4)
EAV (x2)
1/2" (x1)
13mm (x1)
EBH
EBH
EET
DBA
DBA
EET
XSECTION 3 (CONTINUED) / SECTION 3 (SUITE) / SECCIÓN 3 (CONTINUACIÓN)
3.7
3.8
• Secure the Second Front Panel to the Side Frames. Tighten only by hand at this time.
• Bien attacher le deuxième panneau avant aux charpentes latéraux. Serrer à la main seulement en ce moment.
• Sujetar bien el segundo panel delantero a los armazones laterales. Apretar sólo a mano en este momento.
• Secure the Front Panel to front Bracket. Tighten all hardware.
• Bien attacher le panneau avant au support. Serrer bien toute la quincaillerie.
• Sujetar bien el panel delantero al soporte. Apretar bien todo el herraje.
Other manuals for 80339
2
Table of contents
Other Lifetime Outdoor Cart manuals

Lifetime
Lifetime 80339 User manual

Lifetime
Lifetime 80193 User manual

Lifetime
Lifetime 65027 User manual

Lifetime
Lifetime 80527 User manual

Lifetime
Lifetime 80976 User manual

Lifetime
Lifetime 65045 User manual

Lifetime
Lifetime 80525 User manual

Lifetime
Lifetime 80193 User manual

Lifetime
Lifetime 6520 Quick start guide

Lifetime
Lifetime 80669 User manual
Popular Outdoor Cart manuals by other brands

Carts Vermont
Carts Vermont 20 manual

Westward
Westward 2CZY4 Operating instructions and parts manual

Numatic
Numatic EcoMatic EM-5 Assembly

Bosch
Bosch XL-Cart Operating/safety instructions

Tennsco
Tennsco Modular Cart Top Component Assembly Assembly Instructions/Parts Manual

Clam
Clam POLAR TRAILER HD MAX manual