manuals.online logo
Brands
  1. Home
  2. •
  3. Brands
  4. •
  5. Lightronics
  6. •
  7. Lighting Equipment
  8. •
  9. Lightronics FXLE1530W User manual

Lightronics FXLE1530W User manual

Page 1 of 4
FXLE1530W LED FIXTURE
Version1.0 OWNERSMANUAL 12/01/2020
www.lightronics.com
Lightronics Inc. 509 Central Drive, Virginia Beach, VA 23454 757 486 3588
FEATURES AND SPECIFICATIONS
LEDs: 150 Watt Array (Warm White)
Color Temperature: 3000 K
Beam Angle: 19º, 26º, 36º or 50º
Control System: DMX512 + Stand Alone
DMX Channels: 1 or 2
DMX Connectors: 3 pin XLR I/O
Power Input: 100-230VAC, 50/60Hz
Max. Power Consumption: 180 Watts @ 120VAC
Standby Power Consumption: 5 Watts @ 120VAC
Body Material: All Metal Construction
Body Color: Black
Reflector: Glass
Gel Frame and Size "M" Gobo Holder Included
FX Accessory Slot
Sliding Yoke Assembly on 12.75” Track
Size: 28"L x 13.5"W x 20"H (with yoke)
Weight: 19 lbs.
DESCRIPTION
The FXLE1530W is an LED ellipsoidal fixture that is
suitable for stage, houses of worship, entertainment
venues and other artistic applications. It has automatic
stand-alone control modes and can operate via an
external DMX512 signal.
A mounting yoke enables the fixture to be installed and
operated in various positions and orientations.
INSTALLATION
LOCATION
The FXLE1530W is rated IP20 and is intended for
INDOOR USE ONLY.
Locate the unit in a well-ventilated area away from
moisture or heat. Maintain a minimum spacing of 20"
between the unit and other objects. The maximum
ambient operating temperature is 40ºC (104ºF). Keep
the vent holes clear. Holes are provided on the yoke to
install a traditional lighting C-clamp for mounting on
batten pipe. Use a safety cable attached to the safety
eye when hanging the fixture.
GOBO/FX SLOT ALIGNMENT
To rotate barrel, loosen the two 3mm hex socket head
cap screws on both sides of body behind shutter
handles. Loosen both adjustment knobs at top and
bottom of fixture behind the shutter handles. Once the
GOBO or FX slot is aligned, retighten screws and
knobs.
LENS TUBE ADJUSTMENT
To focus beam, loosen the knobs on the top and
bottom of barrel, extend/retract lens tube as needed for
intended beam and tighten knobs. Support lens tube in
process.
YOKE ADJUSTMENT
To slide yoke along track, loosen 4 screws on both
side brackets with a #2 Phillips screwdriver, adjust
yoke and retighten screws once in desired location.
POWER CONNECTIONS
The FXLE1530W has a line cord for connection to a
100-230 VAC, 50/60Hz, grounded service. Do not
power the unit from a dimmer pack.
When using 120VAC, only connect a maximum of
six FXLE1530W fixtures together with power
connectors.
The safety ground pin on the power cord must be
used.
DMX CONNECTIONS
A system using DMX control should be connected as a
DANGER
RISK OF ELECTRIC SHOCK
Page 2 of 4
FXLE1530W LED FIXTURE
Version1.0 OWNERSMANUAL 12/01/2020
www.lightronics.com
Lightronics Inc. 509 Central Drive, Virginia Beach, VA 23454 757 486 3588
chain of devices. In other words the control signal
cable should originate at the controller to the first
receiving device and then to others in a continuous
"daisy chain" fashion. An optically isolated DMX splitter
is recommend when installing the FXLE1530W in a
system with various other DMX devices.
The FXLE1530W has a DMX IN and a DMX OUT
connector which are used to connect the DMX data
chain. The control cable can NOT be split into a Y or
multiple run/star arrangement with a cable running
directly from the controller to each receiving device.
DMX CONNECTOR PIN ASSIGNMENTS
Predominantly two connectors are used for connecting
fixtures and other DMX devices to a DMX control
chain. They are both “XLR type” connectors. Some
units use 3 pin connectors, others use 5 pin
connectors. The FXLE1530W receives a DMX signal
on the 3 pin MALE connector on the rear of the unit.
The 3 pin FEMALE connector is used to connect to the
next DMX device on the control chain.
If your console uses a 5 pin XLR connector, an adapter
cable can be purchased or fabricated to accommodate
this conversion. The following table shows the pin
assignments for both 3 pin and 5 pin XLR connectors:
DMX TERMINATION
It is recommended that a DMX data chain be
terminated at the last receiving device on the chain.
This is done by installing a commonly available 1/4
Watt, 120 Ohm resistor across the DATA - and DATA
+ wires at the last device. If you have only a few
fixtures installed very close together and with a short
run of DMX cable to the controller then you may be
able to operate without the terminator.
OPERATION
Power is applied once the power cord is connected to
a live power source. There is not an on/off switch.
Connect power cord to fixture first, then outlet. A
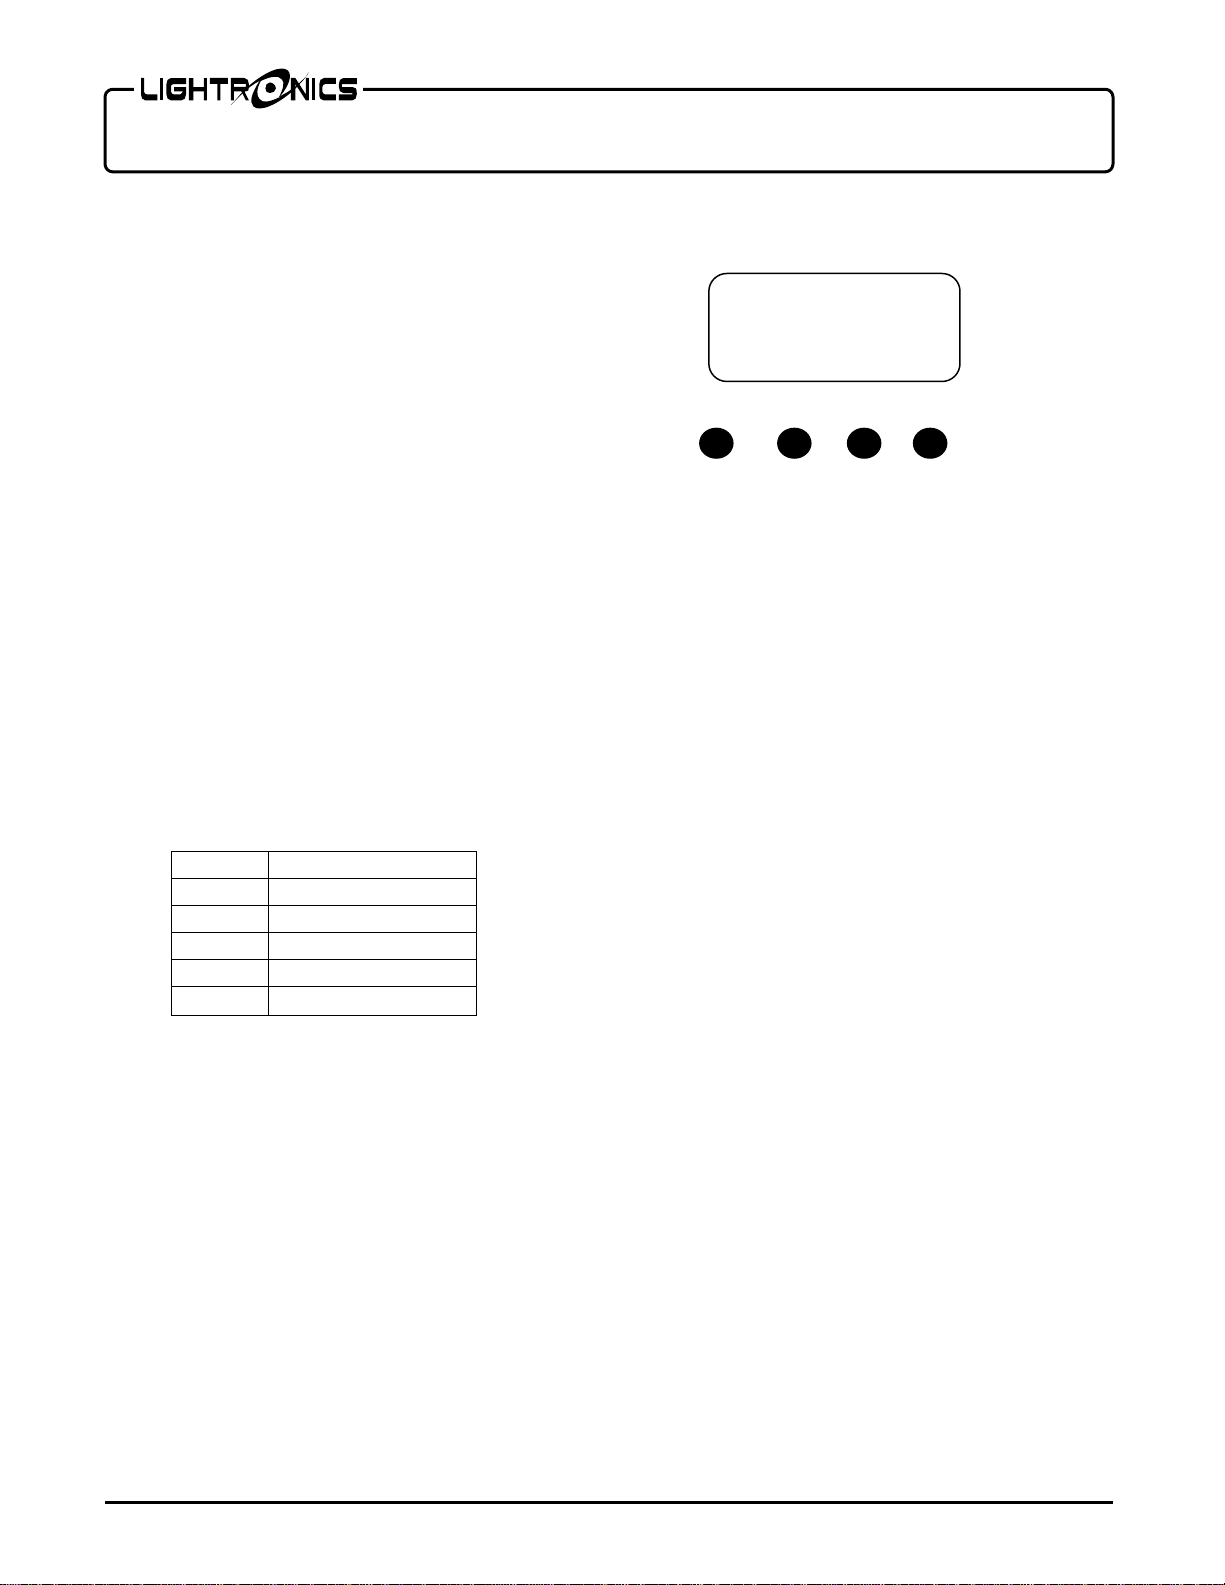
display and user interface is located on the back of the
unit. This interface is used to set the operating options
and settings. It consists of a backlit LCD display and
four buttons (MODE, DOWN, UP, and ENTER).
Use MODE to scroll through the available choices.
Push ENTER when you reach the option you want to
check or set. The current setting for the option will be
shown. Use UP and DOWN until you reach the
desired setting or menu then push ENTER to invoke
the new setting. Use ENTER to exit from the sub
menus.
DMX OPERATION
Use the DMX-Addr menu to set the unit DMX starting
address. The range is 001 - 512. A ‘V’ will be
displayed if a valid DMX signal is present, an ‘x’
represents that no valid DMX signal is present.
For this fixture to operate in DMX mode, the mode
needs to be set for “DMX-Addr” on the LCD display
by pressing the MODE button.
The fixture has 2 DMX modes. 1 channel and 2
channel: Channel 2 is not active in 1 channel mode.
CHANNEL 1: Fixture Intensity (000 - 255).
CHANNEL 2: Strobe Control (000 - 127, 128-255)
000 is Strobe OFF, starts slow and
increases to fastest at 127. From 128-
255 pattern transitions to short light
pulses with longer duration between
pulses as value rises from 128 to 255.
STAND ALONE MODE
You can operate the unit manually using the R-
DIMMER & P-STROBE menu. Use the UP and
DOWN buttons to change the level, Push ENTER
when done. The range is 000 - 255 (See above for
values).
If connecting multiple FXLE1530W fixtures together in
stand-alone mode, set the DMX address on additional
units to d001 to follow the main fixture.
PIN # SIGNAL NAME
1 DMX COMMON
2 DMX DATA -
3 DMX DATA +
4 NOT USED
5 NOT USED
MODE ENTER
UP
DOWN
CONTROL PANEL
Page 3 of 4
FXLE1530W LED FIXTURE
Version1.0 OWNERSMANUAL 12/01/2020
www.lightronics.com
Lightronics Inc. 509 Central Drive, Virginia Beach, VA 23454 757 486 3588
DMX-KEEP: ON/OFF
The DMX-KEEP mode determines the characteristic of
the fixture upon the loss of the DMX input signal. The
LED array will either turn on or off based on the DMX-
KEEP setting when DMX signal is lost.
BK-LIGHT: ON/OFF
The backlight for the LCD display remains on at all
times if this function is set to ON. When Backlight is set
to OFF, then the backlit display will turn off 30 seconds
after the last button push on the control panel.
NOW TEMP
Provides operating temperature in ºC.
MAINTENANCE AND REPAIR
TROUBLESHOOTING
Fixture will not power up.
Check that you have power applied to the
unit.
Check the fuse located on the back panel of
the fixture.
Unable to control fixture.
Check that the LCD display currently
indicates “DMX-addr”.
Check the LCD display on the fixture, if there
is a V after the DMX value, a valid DMX
signal is present. If an ‘x’ is showing, then a
valid DMX signal is not present.
Verify that the fixture is properly addressed.
Check the DMX control cable for continuity
and polarity.
Remove the fixture from the DMX chain and
all other DMX devices.
Check the address settings or patch at the
controller.
CLEANING
DISCONNECT THE POWER CORD BEFORE
HANDLING THE UNIT.
A mild detergent can be used sparingly if needed.
Apply to cloth first, do not apply detergents directly to
fixture. Do not use chemicals or solvents when
cleaning the fixture. Ensure that the unit is dry before
use.
REPAIR
The only FXLE1530W user serviceable part is a 5 mm
x 20 mm externally accessible fuse on the rear panel.
DISCONNECT THE POWER CORD BEFORE
CHECKING OR REPLACING THE FUSE.
Replace fuse ONLY with 5.0 Amp, 250VAC, fast acting
fuse. Use a #2 Phillips screwdriver. Use caution to not
overtighten.
Internal service on the unit by other than Lightronics
authorized agents will void the warranty.
If service is required, contact the dealer from whom
you purchased the item, or contact the Lightronics,
Service Department, 509 Central Drive, Virginia Beach,
VA 23454. Tel: 757 486 3588.
FXLE1530W10Foot20Foot30Foot
Beam(ft.)FCLuxBeam(ft.)FCLuxBeam(ft.)FCLux
19°3748794061861970983900
26°3.7551055707.5125134211.557623
36°6210232012566051926282
50°7.25165177514434622319207
DANGER DO NOT OPEN UNIT
RISK OF ELECTRIC SHOCK
RISK OF FIRE
PHOTOMETRIC CALCULATIONS
This product is warranted for a period of TWO YEARS from the date of purchase against
defects in materials and workmanship.
This warranty is subject to the following restrictions and conditions:
A) If service is required, you may be asked to provide proof of purchase from an
authorized Lightronics dealer.
B) This warranty is valid only for the original purchaser of the unit.
C) This warranty does not apply to damage resulting from abuse, misuse, accidents,
shipping, and repairs or modifications by anyone other than an authorized
Lightronics service representative.
D) This warranty is void if the serial number is removed, altered or defaced.
E) This warranty does not cover loss or damage, direct or indirect arising from the use or
inability to use this product.
F) Lightronics reserves the right to make any changes, modifications, or updates as
deemed appropriate by Lightronics to products returned for service. Such changes
may be made without prior notification to the user and without incurring any
responsibility or liability for modifications or changes to equipment previously
supplied. Lightronics is not responsible for supplying new equipment in accordance
with any earlier specifications.
G)This warranty is the only warranty either expressed, implied, or statutory, upon which
the equipment is purchased. No representatives, dealers or any of their agents are
authorized to make any warranties, guarantees, or representations other than
expressly stated herein.
H) This warranty does not cover the cost of shipping products to or from Lightronics for
service.
I) Lightronics Inc. reserves the right to make changes as deemed necessary to this
warranty without prior notification.
Lightronics Inc. 509 Central Drive Virginia Beach, VA 23454 20100211
WARRANT
Y

Other Lightronics Lighting Equipment manuals

Lightronics AS40D User manual

Lightronics

Lightronics AS40D User manual

Lightronics TPB User manual

Lightronics

Lightronics TPB User manual

Lightronics WVK User manual

Lightronics

Lightronics WVK User manual

Lightronics FXPAR4 User manual

Lightronics

Lightronics FXPAR4 User manual

Lightronics FXLE30C4N User manual

Lightronics

Lightronics FXLE30C4N User manual

Lightronics RINK User manual

Lightronics

Lightronics RINK User manual

Lightronics FXLD2512B5I6 User manual

Lightronics

Lightronics FXLD2512B5I6 User manual

Lightronics RE82 User manual

Lightronics

Lightronics RE82 User manual

Lightronics AT SERIES User manual

Lightronics

Lightronics AT SERIES User manual

Lightronics FXLE3030W User manual

Lightronics

Lightronics FXLE3030W User manual

Lightronics FXLD618FRP2I4 User manual

Lightronics

Lightronics FXLD618FRP2I4 User manual

Lightronics AS40L User manual

Lightronics

Lightronics AS40L User manual

Lightronics RD-121 User manual

Lightronics

Lightronics RD-121 User manual

Lightronics AS Series User manual

Lightronics

Lightronics AS Series User manual

Lightronics TL-3216 User manual

Lightronics

Lightronics TL-3216 User manual

Lightronics FXLE1530W User manual

Lightronics

Lightronics FXLE1530W User manual

Lightronics DI-104 User manual

Lightronics

Lightronics DI-104 User manual

Lightronics FXLD157FR6I User manual

Lightronics

Lightronics FXLD157FR6I User manual

Lightronics FXLE3030W User manual

Lightronics

Lightronics FXLE3030W User manual

Lightronics FXLD548C4O User manual

Lightronics

Lightronics FXLD548C4O User manual

Lightronics RD-122 User manual

Lightronics

Lightronics RD-122 User manual

Popular Lighting Equipment manuals by other brands

DigiPower PRO-EVENT DP-VL180 quick start guide

DigiPower

DigiPower PRO-EVENT DP-VL180 quick start guide

Lightolier SURFACE FEED CONNECTOR Instructions for maintenance reference

Lightolier

Lightolier SURFACE FEED CONNECTOR Instructions for maintenance reference

Visive Hi-Lite 30 Classic installation guide

Visive

Visive Hi-Lite 30 Classic installation guide

Nanoleaf Lines quick start guide

Nanoleaf

Nanoleaf Lines quick start guide

Nauled AL42D/P user guide

Nauled

Nauled AL42D/P user guide

Lightolier Lytespan LLACSW specification

Lightolier

Lightolier Lytespan LLACSW specification

Regent SC1000R instruction manual

Regent

Regent SC1000R instruction manual

MA lighting grandMA3 Quick manual

MA lighting

MA lighting grandMA3 Quick manual

RFR Dynamo TOUR 70 Safety-, Mounting- and Instruction Manual

RFR

RFR Dynamo TOUR 70 Safety-, Mounting- and Instruction Manual

Stage Lighting HC-930A user manual

Stage Lighting

Stage Lighting HC-930A user manual

E2S BExBG21D instruction manual

E2S

E2S BExBG21D instruction manual

ecolight tra ilibri 40/ap quick start guide

ecolight

ecolight tra ilibri 40/ap quick start guide

Cooper Lighting LZR102 Specification sheet

Cooper Lighting

Cooper Lighting LZR102 Specification sheet

Derksen PHOS 45 move INFORMATION FOR USE

Derksen

Derksen PHOS 45 move INFORMATION FOR USE

Simmonsigns PASSAFE installation guide

Simmonsigns

Simmonsigns PASSAFE installation guide

Electus Distribution KJ-8910 Assembly and instruction manual

Electus Distribution

Electus Distribution KJ-8910 Assembly and instruction manual

Vision & Control LDLF30x300-B470/24V/-a Instructions for use

Vision & Control

Vision & Control LDLF30x300-B470/24V/-a Instructions for use

Sunny TM Series user manual

Sunny

Sunny TM Series user manual

manuals.online logo
manuals.online logoBrands
  • About & Mission
  • Contact us
  • Privacy Policy
  • Terms and Conditions

Copyright 2025 Manuals.Online. All Rights Reserved.