manuals.online logo
Brands
  1. Home
  2. •
  3. Brands
  4. •
  5. Lilin
  6. •
  7. Security Camera
  8. •
  9. Lilin Z2R8852AX User manual

Lilin Z2R8852AX User manual

Other Lilin Security Camera manuals

Lilin CMD2422S User manual

Lilin

Lilin CMD2422S User manual

Lilin MR8322 User manual

Lilin

Lilin MR8322 User manual

Lilin SP2034 Series User manual

Lilin

Lilin SP2034 Series User manual

Lilin CMW158X2.2 User manual

Lilin

Lilin CMW158X2.2 User manual

Lilin CMD072 series User manual

Lilin

Lilin CMD072 series User manual

Lilin ZHR8182 User manual

Lilin

Lilin ZHR8182 User manual

Lilin PSR5024EX20 User manual

Lilin

Lilin PSR5024EX20 User manual

Lilin CMR70826 N/P User manual

Lilin

Lilin CMR70826 N/P User manual

Lilin IPD112ESX3 User manual

Lilin

Lilin IPD112ESX3 User manual

Lilin iMEGAPRO IPD2220ES User manual

Lilin

Lilin iMEGAPRO IPD2220ES User manual

Lilin ZMR7442X-P User manual

Lilin

Lilin ZMR7442X-P User manual

Lilin IPR722-IVS User manual

Lilin

Lilin IPR722-IVS User manual

Lilin IPD2322ESX User manual

Lilin

Lilin IPD2322ESX User manual

Lilin iMEGAPRO IPR7922E User manual

Lilin

Lilin iMEGAPRO IPR7922E User manual

Lilin IPS 8264 User manual

Lilin

Lilin IPS 8264 User manual

Lilin PIH - 7000 User manual

Lilin

Lilin PIH - 7000 User manual

Lilin E1 Series User manual

Lilin

Lilin E1 Series User manual

Lilin CMG176 Series User manual

Lilin

Lilin CMG176 Series User manual

Lilin PIH-7635DH Series User manual

Lilin

Lilin PIH-7635DH Series User manual

Lilin CMR7582N/P3.6 User manual

Lilin

Lilin CMR7582N/P3.6 User manual

Lilin IPD6122ESX User manual

Lilin

Lilin IPD6122ESX User manual

Lilin PIH - 7000 User manual

Lilin

Lilin PIH - 7000 User manual

Lilin CMD6182X User manual

Lilin

Lilin CMD6182X User manual

Lilin PIH-2222 User manual

Lilin

Lilin PIH-2222 User manual

Popular Security Camera manuals by other brands

ADEMCO RapidDome Owners Operating & Installation Guide

ADEMCO

ADEMCO RapidDome Owners Operating & Installation Guide

EverFocus EBA2880 user manual

EverFocus

EverFocus EBA2880 user manual

Honeywell OptiCAM-IR Installation and setup guide

Honeywell

Honeywell OptiCAM-IR Installation and setup guide

Uniq UC-600 user manual

Uniq

Uniq UC-600 user manual

OPTICOM NVD-120-S datasheet

OPTICOM

OPTICOM NVD-120-S datasheet

Steren CCTV-221 instruction manual

Steren

Steren CCTV-221 instruction manual

Arm Electronics C420BCDNVFIR Features

Arm Electronics

Arm Electronics C420BCDNVFIR Features

Eneo PLD-2036PTZ installation guide

Eneo

Eneo PLD-2036PTZ installation guide

Axis AXIS M20 Series installation guide

Axis

Axis AXIS M20 Series installation guide

Panasonic KX-HCM230 operating instructions

Panasonic

Panasonic KX-HCM230 operating instructions

COP-USA CC15NV-SL Specifications

COP-USA

COP-USA CC15NV-SL Specifications

Active Silicon HARRIER H.264 quick start guide

Active Silicon

Active Silicon HARRIER H.264 quick start guide

Motorola Avigilon 1.3C-H5SL-BO1-IR installation guide

Motorola

Motorola Avigilon 1.3C-H5SL-BO1-IR installation guide

INSTEON 2864-232 user manual

INSTEON

INSTEON 2864-232 user manual

Wisenet XNB-6002 quick start guide

Wisenet

Wisenet XNB-6002 quick start guide

Axis M5525-E user manual

Axis

Axis M5525-E user manual

Vitek VTC-IR62NZ922 user guide

Vitek

Vitek VTC-IR62NZ922 user guide

Panasonic WV-SF342 Specifications

Panasonic

Panasonic WV-SF342 Specifications

manuals.online logo
manuals.online logoBrands
  • About & Mission
  • Contact us
  • Privacy Policy
  • Terms and Conditions

Copyright 2025 Manuals.Online. All Rights Reserved.

FIG. 5 FIG. 6
FIG. 9 FIG. 10
FIG. 7 FIG. 8
189
69
176
74
φ58
φ70
φ58
3-120°
4
1
23
77
5
3
6
7
Instruction Manual
Part Description & Dimensions
D/N HD AF IR IP CAMERA
66-8822AOOE-1B
Front Cover
Main Body
Bracket Base
Window
Micro SD card slot
Factory default button
Lens
Unit: mm
1
2
3
4
5
6
7
Installation
1. Remove the camera from the box first. Connect the Ethernet cable and power
cable to the camera’s RJ-45 network connector and DC power-in connector
Secure the camera to the wall (FIG.2).
 (FIG.1).
FIG. 2
Connect the RJ-45 Ethernet cable with a waterproof connector
First, remove the waterproof connector and unscrew the waterproof nut.
Insert the Ethernet cable and connect to the RJ-45 connector with proper
tools (FIG.3). Then, tighten the waterproof connector and nut before the
RJ-45 connector is connected to the camera (FIG.4).
FIG.3 FIG.4
2. Adjust the five adjustment screws to move the camera to the desired angle,
and then tighten the adjustment screws (FIG.5~10).
Inserting a Micro SD Card
First remove the screw under the front cover, then rotate the front cover
counterclockwise to remove it and insert a Micro SD card (FIG.11 & 12).
FIG. 11 FIG. 12
System Architectures
PC
LAN LAN / Internet
Non-PoE Switch
DC12V Adaptor
HD IP CAMERA
For connecting D/N HD IP Camera series to the network, please follow one of the
system architectures:
(1). Use DC12V power adaptor and network switch connected to a network.
FIG. 1
Audio OUT
GND
Audio IN
GND
Alarm IN
COM
Alarm OUT
AUDIO
ALARM
NETWORK CABLE
DC POWER INPUT
(3). Use PoE power injector and the network switch connected to the network.
PoE Switch
PC
LAN LAN / Internet
PoE Power Injector
PC
LAN LAN / Internet
AC
Non-PoE Switch
LAN
(2). Use with PoE of the network switch connected to the network.
HD IP CAMERA
HD IP CAMERA
Before accessing the IP camera, make sure that the camera's RJ-45 network,
audio, and power cables are properly connected. To set the IP address, consult
your network administrator for an available IP address. The default IP address for
each IP camera is 192.168.0.200. Users can use the default IP address for
verifying the camera's network connection.
Before Accessing IP Cameras
Universal ActiveX software components are required for web interface display of
JPEG or Full HD video. When you login to the IP camera by Internet Explorer,
the security warning dialog box will prompt the installation of the Universal ActiveX.
Click Install to download it.
Software Requirements
To restore the hardware to factory default settings, please follow these steps:
1.Press and hold “RESET Key” for 10 seconds and release.
2.Wait for about 40 seconds, and the network LED light should turn off, and back
on again.
3.The camera is now restored to factory default settings, and will reboot
automatically.
4.Search for the IP device using the IPScan software.
5.Start the IP device via an Internet browser.
6.Enter the default username “admin” and password “pass” to operate.
For your convenience, the IP address will revert to the default setting
of 192.168.0.200.
NOTE:
Emergency Factory Default
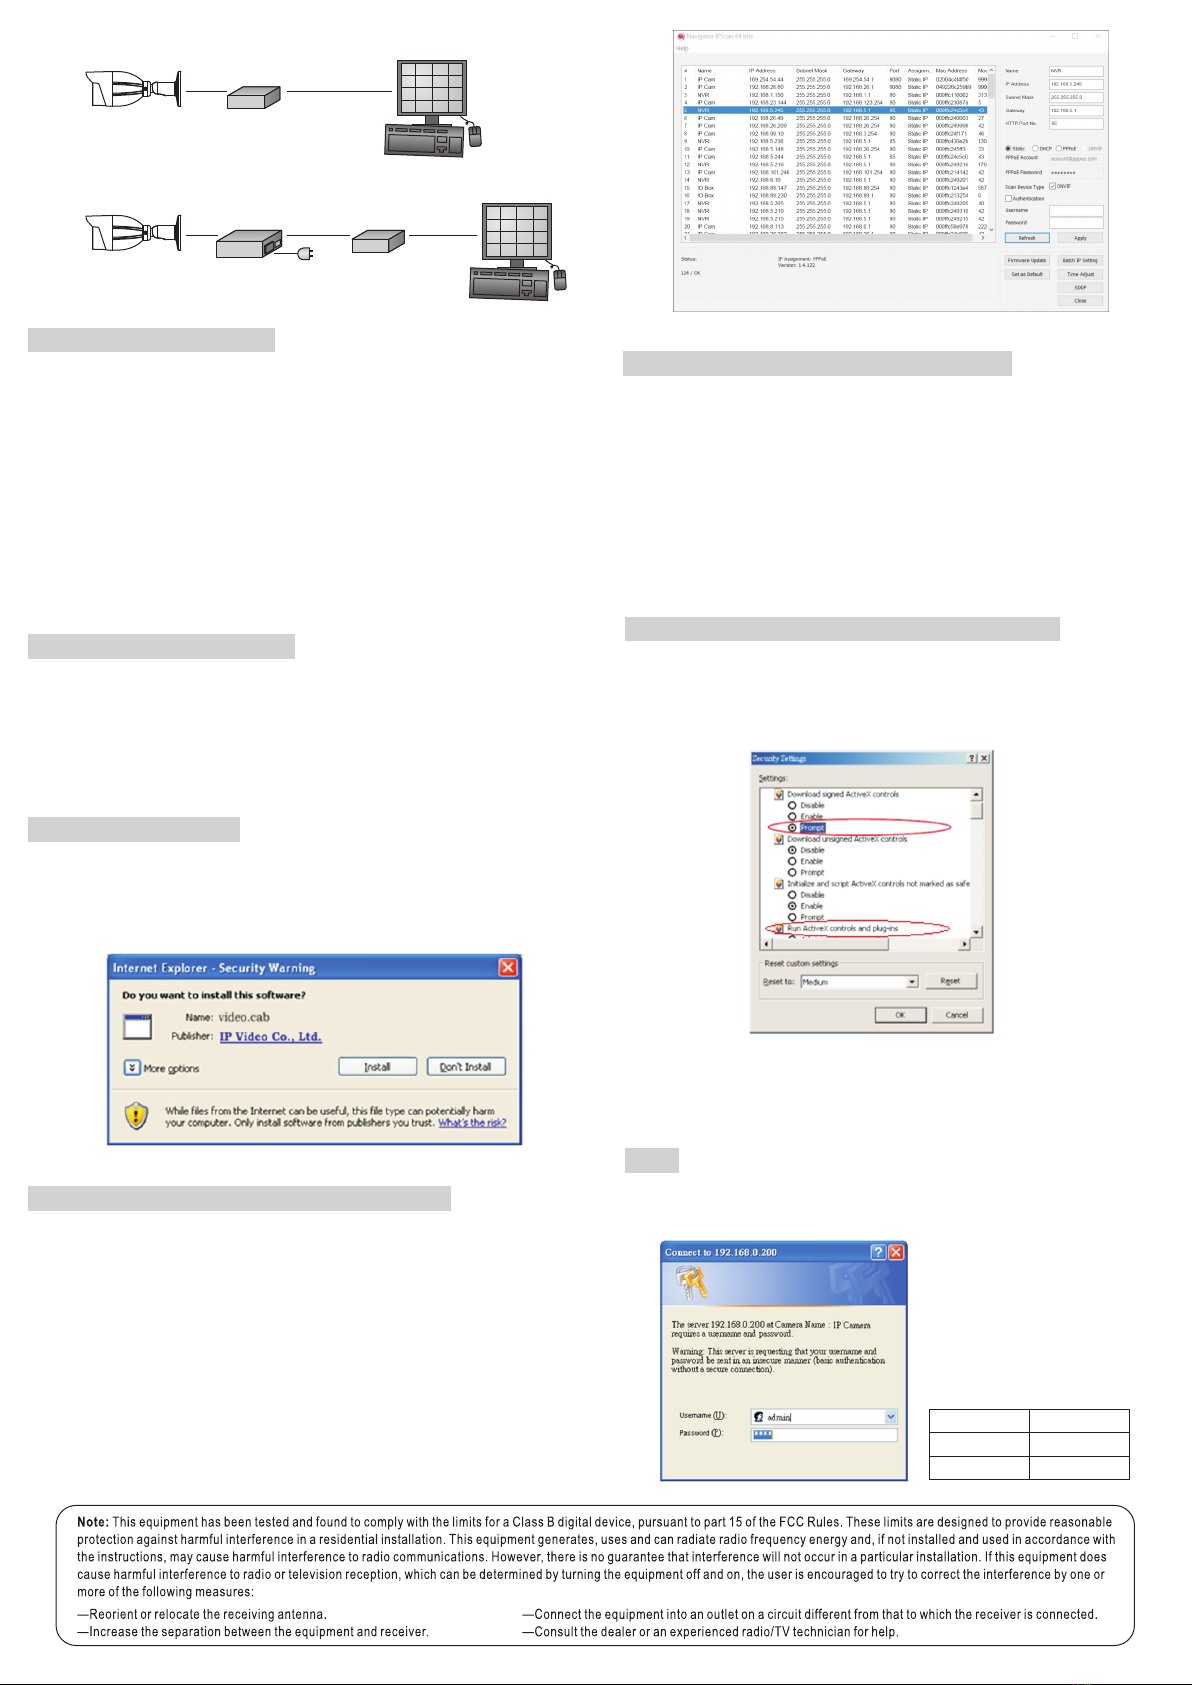
To configure an IP address using the IP scan tool, you can copy the IPScan
software from the installation CD, and paste to your computer. Alternatively, you
can execute the IPScan software from the installation CD. To change the settings
of the IP address, subnet mask, gateway, or HTTP port, you can follow the steps
below:
1. Run the IPScan software.
2. Click Refresh. All available devices should be listed in the device list.
3. Select your device from the list provided.
4. Change the IP address, subnet mask, gateway, or HTTP port for the IP camera.
5. Click Apply to submit the settings.
6. Click Refresh to verify the settings.
Configuring IP Addresses with IPScan Software
To change an IP address via web interface, type the default IP address
(192.168.0.200) in the Internet browser and follow the steps below:
1. Login to the HD IP camera by the default username “admin” and default
password “pass”.
2. Click Basic Mode configuration hyperlink.
3. Click Network->General hyperlink.
4. Change the IP address, subnet mask, gateway, or HTTP port for the IP
camera.
5. Click Submit to verify the settings.
Configuring IP Addresses via Web Interface
Make sure your Internet browser allows the signed ActiveX plug-in to work on
your computer. Set “Download Signed ActiveX plug-in controls” to “Prompt”
and “Run ActiveX control and plug-in” to “Enable”. You can set this option via
Internet Explorer-> Tools-> Options-> Security Settings.
Internet Browser Settings & Application Required
Once complete, you can access the IP camera's live video by entering the
default IP address via your Internet browser. As the security warning dialog
box appears, click OK to download the ActiveX directly from the IP camera.
Login
To logon the HD IP camera, please type username and password in logon
HTML page and click on Submit button to enter the system.
The default username and
password are as follows:
Username admin
Password pass
Administrator