LIMIT 1210 HV User manual

1
Illustrations
Figure1. Figure2.
Figure3 . Figure4 .
The window of upper beam
Emitting beam aperture
Sensor of receipt signal
from Remote Control
keyboard
5/8” screw
Handle
Battery Pack
Lock for battery pack
5/8” screw
The window of down beam
around 20m
AB
AC
0.5m
10m
0.5m

2
1210 HV
English.......................................................................................................................3
Svenska....................................................................................................................6
Norsk ..........................................................................................................................9
Dansk ......................................................................................................................13
Suomi ......................................................................................................................16
Deutsch..................................................................................................................19
Netherlands ..................................................................................................... 23
Français.................................................................................................................26
Italiano....................................................................................................................29
Español..................................................................................................................32
Português.............................................................................................................35
Ελληνικά................................................................................................................38
Polski.......................................................................................................................42
Eesti..........................................................................................................................46
Lietuviškai ............................................................................................................50
Latviski....................................................................................................................53

3
English
LIMIT 1210 HV
Rotating laser with visible light for use both outdoors and indoors. Motorized automatic self-
leveling both horizontally and vertically. The laser has following features.
Scan Mode
Dot mode.
Manual mode. and Manual-Slope mode
Tilt mode.
Calibration function.
Contents: Laser, Remote control, Laser Receiver with clamp, Wall mount bracket, Rechargeable
battery pack with charger and manual.
Technical Specification:
Operation distance (Radius) m 200
Accuracy Horizontal ± 1 mm/10m
Vertically ± 1.5 mm/10m
Self-leveling range ± 5 ⁰
Rotation Speed Sequence: rpm 300-600-0 (in horizontal direction)
0-300-600 (in vertical direction)
Remote distance max m 30
Dust/Waterproof IP 54
Operation time hours 24
Operating temperature ⁰C -10 ... +40
Storage temperature ⁰C -20 ... +60
Weight kg 2.0
Laser diodes Class 2 1mw 635nm.
Security. Do not look directly into the laser beam. It can cause devastating damage to eyes.
Therefore, do not set the instrument at eye level.
Before use. Check that instrument settings have not been disturbed during transportation or if the
instrument has fallen to the ground. The accuracy of your work is completely your responsibility
and you should regularly check your instrument. See control below.
Care and handling. This is a precision instrument and should be treated accordingly. Avoid
shock, drop and vibration. Always transport the laser in its plastic case. Use and store the laser
within the specified temperature range. Always keep the laser dry. Do not let a wet instrument lie
in carrying case longer. Remove the batteries if the laser and accessories will not be used for a
long time. Clean with a soft, dry cloth. Remove the batteries if the laser is to be used for a long
time.
Horizontal. Press . The laser will always start with automatic self-leveling. The laser flashes
while auto-leveling progress. Then the LED is on constantly and the laser begins to rotate.
Vertically. Place the laser with the handle up. Either on the ground or with the wall bracket.
Press . The laser starts 0 rpm. Press to start the rotation.
Shutdown. Press to shutdown the laser when it is on.
Automatic self-leveling. The laser will always start with automatic self-leveling. Stops and

4
English
flashes when it knocked out of his position and restarts automatically after new self-leveling.
Press to enter manual mode and self- leveling off.
Scanning Mode. The laser beam are scanning sideways. The laser beam becomes visually
apparent than during rotation. Press button to start scanning mode. Increase or decrease the
scanning angle with button. The scan area is turned sideways with ▲▼buttons.
Rotation speed. Press to increase or decrease the speed of rotation. At a slow rotation, the
laser beam is visually apparent, while a high speed is preferable when using the laser receiver. At
0 rpm turns the laser spot sideways with the ▲▼buttons.
Slope mode. Press the and at same time at . Tilt the laser along the Y axis with the ▲
▼buttons. Read the inclination towards a level rod. 100 cm level difference at 10 m = 1% incline.
Tilt mode. Is a safety feature to prevent the laser automatically restarts after having been knocked
out of its position and possibly changed the altitude. Under automatic self-leveling mode, press
the . If the laser is disturbed stops, LED flash alarm for 12 seconds and the laser must be
restarted. Check altitude after restarting correspond the altitude before the stop.
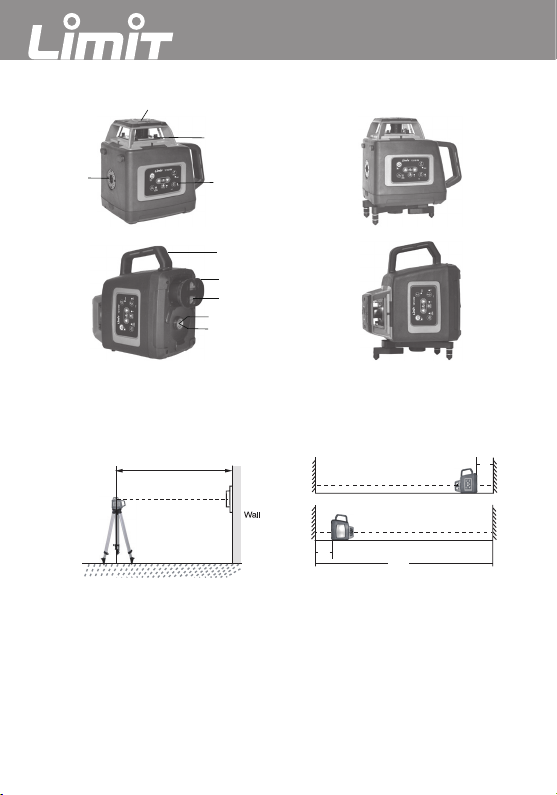
Control. Figure 3. Place the laser about 15 m from a wall and align X axes against the wall. Start
the laser. Mark X1 on the wall. Rotate the laser 180 ⁰without altitude changes. Mark X2 level .
The difference between X1 and X2 may be no more than 3 mm at 15 m distance. Repeat the test
with Y1 and Y2 axis.
Calibration. Press the and keys at same time. Release only and after 3 seconds Y
indicator flashes once and then flashes X indicator, and then X indicator lit constantly. Now
release the button. Adjust the X axis with the ▲▼buttons until the X axis falls between
the earlier marks.
When the adjustment of the X axis is complete, press the to set the Y axis.
Rotate the device 90 ⁰without altitude changes. When Y indicator lights constantly, adjust the Y
axis with the ▲▼buttons in the same way. Press to save the calibration. Calibration is
complete and the unit is powered off.
Control/Calibration of the Z axis. Figure 4. Place the laser in the vertical position between two
walls by about 10 m distance, with the laser bottom side 0.5 m away from one wall. Mark the top
dot and the down dot on the wall. Move the instrument to opposite wall with the bottom side 0.5
m from the wall, adjust the laser height so that the down dot is in the same position with previous
top dot. If the error between the previous down dot and top dot is more than 4 mm, calibration
should be done. Press the and keys at same time. Release only and after 3
seconds X indicator flashes once and then flashes YZ indicator lit constantly. Now release the
button. Adjust with ▲▼buttons Z axis setting. Press to save the calibration.
Calibration is complete and the unit is powered off.

5
English
Batteries. Connect the battery charger with 230 V and to the connector on the laser side panel.
The battery charger LED red when charging and green when fully charged battery. Charging
about 4 hours and 6 hours for a new discharged battery. Operation time approximately 24 hours
per charge. At low battery capacity stops the laser to rotate and start flashing. For optimal battery
life, fully charge the battery after the battery is discharged. Keep in mind that the battery capacity
is affected by temperature.
Remote control. Can be used on a maximum of 30 m. Battery 2 pc. 1.5V AA.
Laser receiver. Screw the holder into the threaded bush on the rear panel of the receiver to be
used with a level rod. Operation time 40 hours. Battery 9V 6F22.
On or off. Automatic shut-off after 10 minutes of laser signal or keystroke.
Choice of accuracy. † narrower reception area ±1,0 mm and ‡ a wider area ± 2,5
mm .
Beep on or off. Always starts with audio on.
Display illumination on or off. The light turns off automatically after 1 minute
without laser signal or keystroke.
Wall Mount / Floor Plate: Figure 2. For wall mounting, mounting bracket on the left side with
hanging hole outwards. For floor placement and vertical rotation, swivel mounting hole inward.
The foot is aligned with the laser dot and can be placed directly on a mark in the floor for easier
adjustment.
Table of contents
Other LIMIT Laser Level manuals