Lippert SureShade Power Bimini User manual

SureShade®
Power Bimini
OWNER'S MANUAL

Rev: 07.27.21 Page 2 CCD-0003658
TABLE OF CONTENTS
Introduction 2
Safety 2
Operation 4
Helm-mounted Switch Positioning 4
Key-Fob (Remote Control) PositioningOptional 9
Programming Additional Key-Fobs (Remotes)Optional 12
Troubleshooting 13
Manual Override 14
Maintenance 17
Fabric Care 17
Wiring Diagram 17
Introduction
The SureShade®Power Bimini delivers improved sun protection and on-board comfort with an automated
telescoping boat shade that can be easily operated by the helm-mounted switch or, if so equipped, by the
convenience of a key-fob remote.
Note: Images used in this document are for reference only when assembling, installing and/or operating
this product. Actual appearance of provided and/or purchased parts and assemblies may differ.
Additional information about this product can be obtained from lci1.com/support or by downloading
the free LippertNOW app. The app is available on Apple App Store® for iPhone® and iPad® and also on
Google Play™ for Android™ users.
Apple App Store®, iPhone® and iPad® are registered trademarks of Apple Inc.
Google Play™ and Android™ are trademarks of Google Inc.
For information on the assembly or individual components of this product, please visit:
https://support.lci1.com/marine-products/ .
Safety
Read and understand all instructions before installing or operating this product. Adhere to all safety labels.
This manual provides general instructions. Many variables can change the circumstances of the instructions,
i.e., the degree of difficulty, operation and ability of the individual performing the instructions. This
manual cannot begin to plot out instructions for every possibility, but provides the general instructions,
as necessary, for effectively interfacing with the device, product or system. Failure to correctly follow the
provided instructions may result in death, serious personal injury, severe product and/or property damage,
including voiding of the LCI limited warranty.

Rev: 07.27.21 Page 3 CCD-0003658
The "WARNING" symbol above is a sign that a procedure has a safety risk involved and may cause
death or serious personal injury if not performed safely and within the parameters set forth in
thismanual.
Failure to follow instructions provided in this manual may result in death, serious personal injury
and/or severe product and property damage, including voiding of the component warranty.
Always wear eye protection when performing service, maintenance or installation procedures.
Other safety equipment to consider would be hearing protection, gloves and possibly a full face
shield, depending on the nature of the task.
The “CAUTION” symbol above is a sign that a safety risk is involved and may cause personal injury
and/or product or property damage if not safely adhered to and within the parameters set forth
in this manual.
Moving parts can pinch, cut or crush. Keep clear and use caution.
Never operate the top while the boat is in motion. Operating the top while the boat is in motion can
cause serious damage to the top's framework, which could cause severe product and/or property
damage including serious personal injury.
Never open or operate the top in excessively high winds. Having the top open or operating the
top in high winds, regardless if the boat is in motion or anchored, can cause serious damage to the
top's framework, which could cause severe product and/or property damage, including serious
personalinjury.
Never trailer or tow the boat without the protective boot properly installed on the top and with the
top in its full down position. Trailering or towing the boat without the top in its full down position
and with the protective boot properly installed can cause serious damage to the top's framework,
which could cause severe product and/or property damage, including serious personalinjury.
Never open the top without the canopy installed. Opening the top without the canopy installed can
cause serious damage to the top's framework, which could cause severe product and/or property
damage, including serious personalinjury.

Rev: 07.27.21 Page 4 CCD-0003658
Helm-mounted Switch Positioning
Fig. 1
Strut
Canvas Top
Female Snap
Securing Strap
Operation
The canvas bimini top has securing straps with female snaps (Fig. 1) located at the bow port and starboard
corners and aft port and starboard corners. Securing straps prevent undue billowing of the bimini top when
installing the boot.
Make sure all four securing straps are in place when installing the boot or operating the bimini top. If
necessary, start at one canvas corner and tightly pull and wrap the securing strap around the bimini top
strut (Fig. 1) and snap in-place. Repeat procedure as necessary for each securing strap.
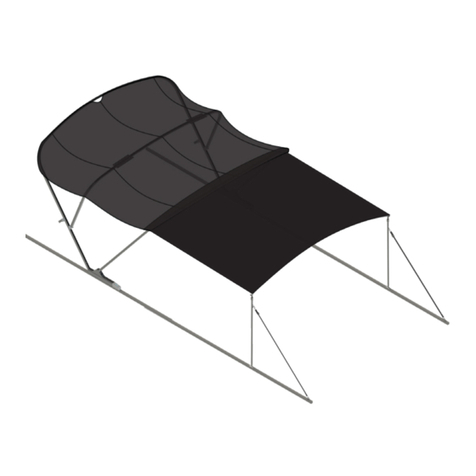
The SureShade Power Bimini top can be operated in four different positions:
• Full Open for maximum shade
• Vari-pitch for shade during low-setting sun conditions
• Radar for aft entry/exit
• Full Down for lifts, bridges and storage
Never operate the top while the boat is in motion. Operating the top while the boat is in motion can
cause serious damage to the top's framework, which could cause severe product and/or property
damage including serious personal injury.
For proper operation of the four available power bimini top positions from the helm-mounted switch,
makesure:
1. The protective boot is properly installed, except for when the top is in the Full Open (Fig. 2) or
Vari-pitch (Fig. 3) position.
2. To press and hold the switch button until the actuator motor turns itself off, then release the switch.
3. The actuator and top are both in the Full Down (Fig. 5) position.
4. The protective boot is properly installed when the top is not inuse.

Rev: 07.27.21 Page 5 CCD-0003658
Fig. 2
Never open or operate the top in excessively high winds. Having the top open or operating the
top in high winds, regardless if the boat is in motion or anchored, can cause serious damage to the
top's framework, which could cause severe product and/or property damage, including serious
personalinjury.
Full Open Position (Fig. 2)
1. Remove the protective boot.
2. Press and hold the switch button until motors turn offdo not release button until both actuator
motors turn off.
Note: Maximum speed limit is 25 MPH.
Note: Do NOT open in excessively high winds.

Rev: 07.27.21 Page 6 CCD-0003658
Fig. 3
1. Remove the protective boot.
2. Press and hold the switch button until desired position is reached, then release button.
Note: Maximum speed limit is 5 MPH.
Note: Do NOT operate or open top when boat is in motion or in excessively high winds.
Vari-pitch Position (Fig. 3)
Never open or operate the top in excessively high winds. Having the top open or operating the
top in high winds, regardless if the boat is in motion or anchored, can cause serious damage to the
top's framework, which could cause severe product and/or property damage, including serious
personalinjury.
Never operate the top while the boat is in motion. Operating the top while the boat is in motion can
cause serious damage to the top's framework, which could cause severe product and/or property
damage including serious personal injury.

Rev: 07.27.21 Page 7 CCD-0003658
Fig. 4
Never operate the top while the boat is in motion. Operating the top while the boat is in motion can
cause serious damage to the top's framework, which could cause severe product and/or property
damage including serious personal injury.
Never open or operate the top in excessively high winds. Having the top open or operating the
top in high winds, regardless if the boat is in motion or anchored, can cause serious damage to the
top's framework, which could cause severe product and/or property damage, including serious
personalinjury.
Radar Position (Fig. 4)
1. With the top in its full down position, make sure the protective boot is properly installed.
2. Press and hold the switch button (Fig. 1A) until desired position is reached, then release button.
Note: Maximum speed limit is 50 MPH.
Note: Do NOT operate top when boat is in motion or in excessively high winds.

Rev: 07.27.21 Page 8 CCD-0003658
Full Down Position (Fig. 5)
Fig. 5
Never operate the top while the boat is in motion. Operating the top while the boat is in motion can
cause serious damage to the top's framework, which could cause severe product and/or property
damage including serious personal injury.
Never open or operate the top in excessively high winds. Having the top open or operating the
top in high winds, regardless if the boat is in motion or anchored, can cause serious damage to the
top's framework, which could cause severe product and/or property damage, including serious
personalinjury.
1. Press and hold the switch button (Fig. 1B) until motors turn offdo not release button until both
actuator motors turn off.
2. Install protective boot.
Note: Maximum speed limit with boot installed is 65 MPH.
Note: Maximum speed limit without boot installed is 5 MPH.
Note: Do NOT operate or open top when boat is in motion or in excessively high winds.

Rev: 07.27.21 Page 9 CCD-0003658
Fig. 6 Fig. 7
Safety
Cover
Before operating the power bimini top, thoroughly inspect the area around the entire bimini
assembly. Verify that all passengers are in a safe position and that nobody is in an area that will
interfere with the motion of the bimini or serious personal injury or severe product damage
mayoccur.
Moving parts can pinch, cut or crush. Keep clear and use caution.
Open Close
Transmit LED
Never operate the top while the boat is in motion. Operating the top while the boat is in motion can
cause serious damage to the top's framework, which could cause severe product and/or property
damage including serious personal injury.
Never open or operate the top in excessively high winds. Having the top open or operating the
top in high winds, regardless if the boat is in motion or anchored, can cause serious damage to the
top's framework, which could cause severe product and/or property damage, including serious
personalinjury.
Key-Fob (Remote Control) PositioningOptional
The Open/Close (/) remote buttons (Fig. 6) are latching buttons, meaning that once a button is pressed,
motion will automatically continue until the commanded position is reached.
Note: While in motion, pressing either button will immediately stop all motion. Keep the key-fob in-hand
and be prepared to stop motion if necessary.
For proper operation of the four available power bimini top positions using the remote control key-fob,
make sure:
1. Inspection of the bimini top area for safe operation is conducted.
2. The protective boot is installed, except for when in the top is in the Full Open (Fig. 2) or Vari-pitch
(Fig.3) position.
3. After the desired position is reached and motion has stopped, slide the safety cover (Fig. 7) up to cover
the buttons and protect against any unintended transmissions.

Rev: 07.27.21 Page 10 CCD-0003658
Full Open Position
Never operate the top while the boat is in motion. Operating the top while the boat is in motion can
cause serious damage to the top's framework, which could cause severe product and/or property
damage including serious personal injury.
Never open or operate the top in excessively high winds. Having the top open or operating the
top in high winds, regardless if the boat is in motion or anchored, can cause serious damage to the
top's framework, which could cause severe product and/or property damage, including serious
personalinjury.

1. Remove the protective boot.
2. Press the Open () button (Fig. 6) until motion begins, then release. Motion will continue and motors
will automatically turn off.
3. Slide safety cover up (Fig. 7).
Note: Maximum speed limit is 25 MPH.
Note: Do NOT open in excessively high winds.
Vari-pitch Position
1. Remove the protective boot.
2. Press the Open () button (Fig. 6) until motion begins, then release. When desired position is reached,
press either button to stop motion.
3. Slide safety cover up (Fig. 7).
Note: Maximum speed limit is 5 MPH.
Note: Do NOT operate or open top when boat is in motion or in excessively high winds.
Never operate the top while the boat is in motion. Operating the top while the boat is in motion can
cause serious damage to the top's framework, which could cause severe product and/or property
damage including serious personal injury.

Rev: 07.27.21 Page 11 CCD-0003658
Never open or operate the top in excessively high winds. Having the top open or operating the
top in high winds, regardless if the boat is in motion or anchored, can cause serious damage to the
top's framework, which could cause severe product and/or property damage, including serious
personalinjury.
Never operate the top while the boat is in motion. Operating the top while the boat is in motion can
cause serious damage to the top's framework, which could cause severe product and/or property
damage including serious personal injury.
Never open or operate the top in excessively high winds. Having the top open or operating the
top in high winds, regardless if the boat is in motion or anchored, can cause serious damage to the
top's framework, which could cause severe product and/or property damage, including serious
personalinjury.

Never operate the top while the boat is in motion. Operating the top while the boat is in motion can
cause serious damage to the top's framework, which could cause severe product and/or property
damage including serious personal injury.
Radar Position
1. With the top in its full down position, make sure the protective boot is properly installed.
2. Press the Open () button (Fig. 6) until motion begins, then release. When desired position is reached,
press either button to stop motion.
3. Slide safety cover up (Fig. 7).
Note: Maximum speed limit is 50 MPH.
Note: Do NOT operate top when boat is in motion or in excessively high winds.
Full Down Position
1. Press the Close () button (Fig. 6) until motion begins, then release. Motion will continue and motors
will automatically turn off.
2. Slide safety cover up (Fig. 7).
3. Install the protective boot.
Note: Maximum speed limit with boot installed is 65 MPH.
Note: Maximum speed limit without boot installed is 5 MPH.
Note: Do NOT operate or open top when boat is in motion or in excessively high winds.

Rev: 07.27.21 Page 12 CCD-0003658
Fig. 8
Status Light
Program Button
Helm Switch Down
Helm Switch Up
Motor #2 Dark Blue Wire
Motor #2 White Wire
Override Switch
Battery Ground (-)
Motor #1 Dark Blue Wire
Motor #1 White Wire
Battery Positive (+)
Programming Additional Key-Fobs (Remotes)Optional
1. Locate the Program Button (Fig. 8) on the RF Receiver.
2. Press the Program Button until the red Status Light (Fig. 8) illuminates, then release the button and the
Status Light will turn off.
3. Within five seconds, press any button on the key-fob (remote) (Fig. 6). Verify that the RF receiver Status
Light blinks.
4. Repeat steps 1 and 2 for each additional remote.
5. Verify that each remote has been successfully programmed.
Note: To delete all key-fob remotes stored in memory, press and old the Program Button for approximately
five seconds until the red Status Light turns off.

Rev: 07.27.21 Page 13 CCD-0003658
What Is Happening? Why? What Should Be Done?
Bimini top will not
open.
Low power. Make sure battery is fully charged.
No power.
Check actuator and helm switch electrical
connections. Reconnect loose or disconnected
connections. Refer to figure 8 and Wiring Diagram.
Inspect electrical connections for nicks and cuts.
Repair or replace as necessary. Refer to figure 8 and
Wiring Diagram.
Bimini top will not
close.
Low power. Make sure battery is fully charged.
No power.
Check actuator and helm switch electrical
connections. Reconnect loose or disconnected
connections. Refer to figure 8 and Wiring Diagram.
Inspect electrical connections for nicks and cuts.
Repair or replace as necessary. Refer to figure 8 and
Wiring Diagram.
Damaged actuator. Perform manual override.
Foreign material
blocking gear handle.
Remove foreign material from gear handle. Inspect
gear handle and actuator for damage. Perform
manual override if necessary.
Bimini top does not
fully open.
Low power. Make sure battery is fully charged.
No power.
Check actuator and helm switch electrical
connections. Reconnect loose or disconnected
connections. Refer to figure 8 and Wiring Diagram.
Inspect electrical connections for nicks and cuts.
Repair or replace as necessary. Refer to figure 8 and
Wiring Diagram.
Damaged actuator. Perform manual override.
Foreign material
blocking gear handle.
Remove foreign material from gear handle. Inspect
gear handle and actuator for damage. Perform
manual override if necessary.
Bimini top does not
completely close.
Low power. Make sure battery is fully charged.
No power.
Check actuator and helm switch electrical
connections. Reconnect loose or disconnected
connections. Refer to figure 8 and Wiring Diagram.
Inspect electrical connections for nicks and cuts.
Repair or replace as necessary. Refer to figure 8 and
Wiring Diagram.
Damaged actuator. Perform manual override.
Foreign material
blocking gear handle.
Remove foreign material from gear handle. Inspect
gear handle and actuator for damage. Perform
manual override if necessary.
Troubleshooting

Rev: 07.27.21 Page 14 CCD-0003658
What Is Happening? Why? What Should Be Done?
Bimini top does not
respond to key-fob.
Weak signal. Move key-fob closer to RF Receiver.
No power.
Check power connections to RF Receiver. Reconnect
power if necessary. Refer to figure 8 and Wiring
Diagram.
Use helm switch. If top responds to helm switch,
replace key-fob battery.
Key-fob transmit LED
does not light up.
Weak signal. Move key-fob closer to RF Receiver.
No power.
Check power connections to RF Receiver. Reconnect
power if necessary. Refer to figure 8 and Wiring
Diagram.
Replace key-fob battery.
Fig. 9
Manual Override
If the power bimini top will not close (retract) into the radar (Fig. 4) or full down position (Fig. 5), a manual
override of the power bimini top must be done before putting the pontoon underway. Perform a manual
override of the power bimini top as follows:
1. Unzip the front pocket of the bimini canvas (Fig. 9). If available, have a second person push forward
on the rear frame to relieve some pressure off of the canvas then hold up the rear and middle frames
when the canvas is unzipped.
Fig. 10
2. Place the rear frame and canvas in the down position (Fig. 10).
Note: Canvas not shown for clarity.

Rev: 07.27.21 Page 15 CCD-0003658
3. Use the provided 5/32" hex wrench (Fig. 11A)—located behind the actuator's end cap (Fig. 11B)—to
remove the two 1/4" hex cap screws (Fig. 11C) located at the bottom of the front frame on both sides.
Fig. 11
4. Lift the front frame off of the gear handles (Fig. 12).
Starboard Side View
A
Fig. 12
B
C
Front Frame
Gear Handle
Note: Canvas not shown for clarity.

Rev: 07.27.21 Page 16 CCD-0003658
5. Place the front frame on top of the rear frame (Fig. 13).
Fig. 13
Note: Canvas not shown for clarity.
Gear Handle
Front Frame
6. Zip the front canvas pockets over the loose front frame to help hold it in-place.
7. Secure the remainder of the front frame in-place with zip ties, hook-and-loop strips or with some other
type of cordage.

Rev: 07.27.21 Page 17 CCD-0003658
Wiring Diagram
Maintenance
Fabric Care
Use clear water to consistently hose off the bimini top fabric during the boating season.
If necessary, do a deeper clean of the bimini top fabric as follows:
1. If necessary, remove the boot and place the bimini top into its full open position (Fig. 2).
2. If the top was stored wet, allow the bimini top and boot to dry.
3. Remove any loose dirt and debris from the bimini top and boot.
4. Hose down the bimini top and boot fabric.
5. Prepare a mixture of 1/4 cup of mild dish soap and five gallons of warm water.
Note: Do not use harsh detergents.
6. Use a soft bristle brush to apply the soapy water to the bimini top and boot fabric to remove stains and
embedded dirt.
7. Allow the solution time to soak completely into the fabric.
8. Hose off the bimini top and boot fabric with fresh water. Repeat if necessary.
9. Allow bimini top and boot to dry before closing the top and installing the protective boot.
NOTE RED DOT
ON OR NEAR
ONE MOTOR
TERMINAL
3/16" FLAG TERMINAL
FULLY INSULATED
(4) REQ'D
DPDT REVERSING TOGGLE SWITCH
PHILMORE #30 - 125
BATTERY
POSITIVE (+)
1/4" SPADE TERMINAL
FULLY INSULATED
(3) REQUIRED
#10 INSULATED
RING TERMINAL
(2) REQUIRED
6 AMP SHORT STOP BREAKER
BUSSMAN #121A06-A2M-HD
NOTE: ALL WIRES TO BE 16 AWG
BATTERY
GROUND (-)
AUX BAT
STATUS
LIGHT
PROGRAM
BUTTON
OVERRIDE
SWITCH

The contents of this manual are proprietary and copyright protected by LippertTM. LippertTM prohibits the
copying or dissemination of portions of this manual unless prior written consent from an authorized Lippert
representative has been provided. Any unauthorized use shall void any applicable warranty. The information
contained in this manual is subject to change without notice and at the sole discretion of LippertTM. Revised
editions are available for free download from lippert.com.
Please recycle all obsolete materials.
For all concerns or questions, please contact
LippertTM
Other manuals for SureShade Power Bimini
3
Table of contents
Other Lippert Boating Equipment manuals