Logia LOWSCB711SAB User manual

7-IN-1 WIRELESS WEATHER
STATION WITH WI-FI®, BUILT-
IN SOLAR PANEL, AND 5.7”
FULL-COLOR LCD DISPLAY
LOWSCB711SAB
™

2
Thank you for purchasing the 7-in-1 Wireless Weather Station with Wi-®, Built-In Solar
Panel, and 5.7" Full-Color LCD Display.This User Guide is intended to provide you with guidelines
to ensure that operation of this product is safe and does not pose risk to the user. Any use that does
not conform to the guidelines described in this User Guide may void the limited warranty.
Please read all directions before using the product and retain this guide for reference. This product is
intended for household use only. It is not intended for commercial use.
This product is covered by a limited one-year warranty. Coverage is subject to limits and exclusions.
See warranty for details.
SAFETY PRECAUTIONS.......................................................................................................3
PRODUCT FEATURES...........................................................................................................4
PACKAGE CONTENTS...........................................................................................................4
PRODUCT OVERVIEW ..................................................................................................5 – 7
INSTALLATION INSTRUCTIONS................................................................................8 – 11
OPERATING INSTRUCTIONS.................................................................................. 11 – 28
CARE/MAINTENANCE.............................................................................................29 – 30
TROUBLESHOOTING......................................................................................................... 30
SPECIFICATIONS.......................................................................................................31 – 33
WARRANTY............................................................................................................... 34 – 35
TABLE OF CONTENTS

3
SAFETY PRECAUTIONS
WARNING! Please read and understand all safety precautions, operating instructions, and
care/maintenance instructions before operating this appliance. Keep this manual for future
reference.
• This product is not a toy. Keep out of the reach of children.
• This product is designed for use in the home only as an indication of weather conditions. This product is
not to be used for medical purposes or public information.
• Do not clean the unit with abrasive or corrosive materials.
• Do not place the appliance near open ames or heat sources. Fire, electric shock, product damage, or
injury might occur.
• Only use fresh, new batteries in the product. Do not mix new and old batteries together.
• Do not disassemble, alter, or modify the product.
• Only use attachments or accessories with this product specied by the manufacturer.
• Do not submerge the unit in water. Dry the product with a soft cloth if liquid spills on it.
• Do not subject the unit to excessive force, shock, duct, extreme temperature, or humidity.
• Do not cover or block the ventilation holes with any objects.
• This console of this product is intended to be used indoors only.
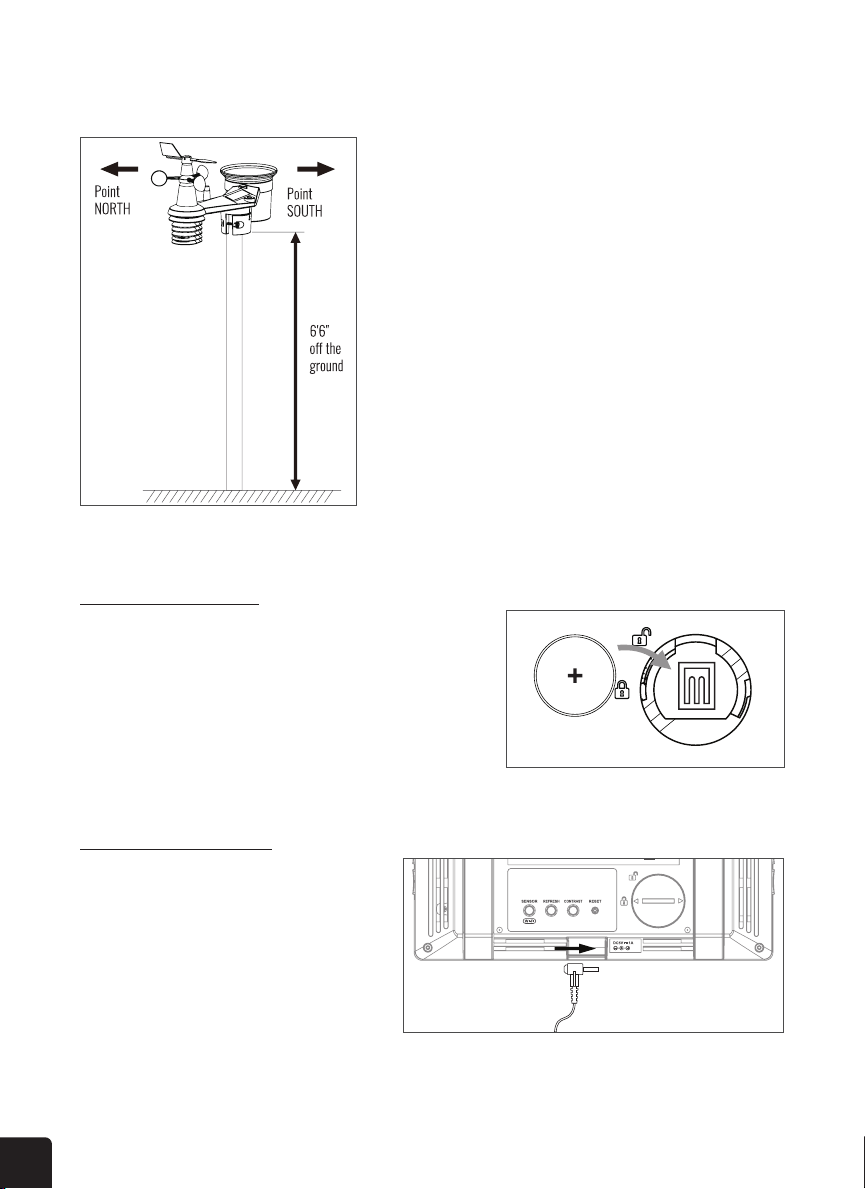
• This product is only suitable for mounting at heights less than 6.6 ft. (2 m).
• Do not tamper with the unit’s internal components. Tampering with the product will void the warranty.
• Batteries are not included. When inserting batteries, make sure that the positive and negative polarities
match with the markings in the compartment.
• Do not mix standard, alkaline, and rechargeable batteries together.
• Leaving a battery exposed to extremely high temperatures in the surrounding environment can result in
an explosion or leakage of ammable liquid or gas.
• Leaving a battery exposed to extremely low air pressure in the surrounding environment can result in an
explosion or leakage of ammable liquid or gas.
TIPS FOR SENSOR SITE SELECTION
• Rain collector must be cleaned every few months.
• Batteries in the sensor must be changed every two to two and a half (2 – 2.5) years.
• Sensor should be installed at least 5ʼ (1.5 m) away from any building or structure.
• Choose a location in an open space under direct sunlight with no obstructions.
• The sensor should remain in line of sight and within 450ʼ(150 m) of the console for consistent, steady
transmission.
• Keep your sensor and console away from household appliances that operate on the same frequency. The
console and sensor should be at least 3ʼ– 7ʼ(1 – 2 m) away from such interferences.
QUESTIONS OR PROBLEMS? CONTACT US!
www.logiaweatherstation.com

4
PACKAGE CONTENTS
1. Weather display console
2. Console power adapter
3. Console CR2032 battery
4. 7-in-1 outdoor weather sensor
5. Mounting clamp
6. 2 x screws (for clamp)
7. 2 x hexagonal nuts (for clamp)
8. 2 x rubber pads (for clamp)
9. User guide
PRODUCT FEATURES
• Wireless 7-in-1 weather sensor measures wind speed, wind direction, rainfall, UV index, light intensity,
temperature, and humidity
• No calibration needed! The product is fully pre-calibrated and mostly assembled; all you need to do is install
and sync it with the included display console
• Provides precise weather and environmental information directly from your backyard, instead of relying on a
national weather station
• 5.7" LCD display screen
• Syncs via Wi-Fi®to online weather servers
• Compatible with the user-friendly WSLink app
1
2
3
4
6 985
7

5
PRODUCT OVERVIEW
WEATHER CONSOLE OVERVIEW
1. Backlight/Snooze button
2. Memory button
3. Alarm button
4. Set button
5. Index button
6. Rain button
7. +/Wind button
8. -/Baro button
9. Display screen
10. Kickstand
11. Sensor/Wi-Fi button
12. Refresh button
13. Contrast button
14. Reset button
15. Power jack
16. Wall mounting hole
17. Battery compartment
1
2
3
6
4
7
5
8
9
10 13 14 15 16 1711 12

6
LCD DISPLAY OVERVIEW
1. Time & date, moon phase
2. Wind speed & direction
3. Rainfall & rain rate
4. Indoor temperature & humidity
5. Weather forecast & pressure
6. Outdoor temperature & humidity
7. UV and light intensity
1
5
2
6
3
7
4

7
WIRELESS SENSOR OVERVIEW
6
1
7
9
10
8
3
4
2
5
6
11
12
13
14
15
1. Rain collector
2. Balance indicator
3. Solar panel
4. UV/Light sensor
5. Wind vane
6. Wind cups
7. Antenna
8. Mounting clamp
9. Radiation shield and hygro-
thermo sensor
10. Red LED indicator
11. Reset button
12. Battery door
13. Drain holes
14. Rain sensor
15. Tipping bucket

8
INSTALLATION INSTRUCTIONS
SETTING UP THE WIRELESS 7-IN-1 OUTDOOR SENSOR
The wireless 7-in-1 outdoor sensor measures wind speed, wind direction, rainfall, UV, light intensity,
temperature, and humidity for you.
Installing the Wind Vane
1. Place and press the wind vane piece down onto the shaft.
2. Fasten the wind vane piece to the shaft using the included
screw and a screwdriver (not included).
Installing the Rain Funnel
1. Align the lock grooves on the rain funnel with the lock
grooves in the rain collector.
2. Lower the rain funnel onto the rain collector. Then, turn
the rain funnel clockwise to lock it in place.

9
Installing the Batteries
1. Unscrew the battery door at the bottom of the 7-in-1 outdoor sensor using
a screwdriver (not included).
2. Insert three (3) AA batteries (not included) into the battery compartment.
3. Close and fasten the battery door back on the compartment.
NOTE: The LED light will ash red every 12 seconds.
Mounting the Sensor on a Pole
1. Stick the rubber pads on the inside of the mounting clamp
and mounting base of the sensor.
2. Insert two (2) screws into the mounting base and clamp.
Then, loosely tighten the screws using included nuts.
3. Place the mounting xture over a pole (not included).
4. Tighten all the screws so the sensor sits rmly and securely
on the pole.
NOTES: Place the mounting base and clamp on a
steel pole or post with a 1.2″ – 1.6″ (30 – 40 mm)
diameter and is a minimum of 6.6′ (2 m) o the
ground.
When setting up the outdoor sensor, make sure the north (N) marker on the sensor is
facing north.
When placing the outdoor sensor, make sure it is within 328′ (100 m) of the display
console.
Pointing the Wireless 7-in-1 Outdoor Sensor to South (Optional)
The outdoor wireless weather sensor is calibrated to be pointed north for maximum accuracy. However, for
your convenience, if you are a user located in the Southern Hemisphere, you can use the sensor with the
wind vane pointing south.
1. Mount and install the wireless weather sensor with the N marker (near the rain collector) pointing
South, instead of North. (Please refer to Mounting the Sensor on a Pole for mounting instructions.)
2. Set hemisphere to South in the Time & Date settings. (Please refer to section for setup details)
NOTES: Changing the hemisphere setting will automatically switch the direction of the moon
phases on the display.

10
Pointing the wireless weather sensor toward the south will allow maximum sunlight on the
solar panel, especially during the winter season in the Southern Hemisphere.
SETTING UP THE DISPLAY CONSOLE
Installing the Batteries
1. Remove the battery door on the back of the console.
2. Insert a CR2032 battery (included) into the
compartment.
3. Place the battery door back onto the compartment and
twist it in place.
NOTE: Remove the battery if you plan to store the
display console for a long period of time.
Powering Up the Console
1. Connect the power adapter to the
console.
2. Plug the other end of the power adapter
into a power outlet to turn on the
console.
NOTE: If nothing appears on the display
after connecting the power adapter,
then press the RESET button using a pin.

11
Pairing the Console with the Wireless 7-in-1 Sensor
1. Once your display console powers on, it should automatically enter AP mode and search for the
wireless weather sensor. If the console does not connect within the rst 15 minutes, press the
SENSOR/WIFI button to manually pair the sensor and console.
2. Once the pairing process is complete, the antenna icon will appear blinking and the readings for
outdoor temperature, humidity, wind speed, wind direction, UV, light intensity, and rainfall will appear
in their designated sections of the LCD display.
Data Clearing
Sensors within the 7-in-1 outdoor sensor may activate incorrectly during installation. Press the RESET
button once to restart the console and clear all erroneous data.
OPERATING INSTRUCTIONS
FORECAST
Based on the data collected, the console indicates the weather forecasts in the coming 12 – 24 hours
within a 19 ~ 31-mile (30 ~ 50 km) radius.

12
1. Pressure drop alert indicator
2. Rate of change graph for the
barometric pressure
3. Barometric pressure reading
4. Barometric pressure trend
5. Average hourly pressure of 3, 6, 12,
or 24 hours ago
1. Outdoor temperature reading
2. Outdoor sensor low battery indicator
3. Outdoor sensor signal indicator to show the
signal receiving strength
4. Outdoor temperature high/low alert
indicator
5. Outdoor temperature trend
6. Temperature index indicator
7. Outdoor humidity high/low alert indicator
8. Outdoor humidity trend
9. Outdoor humidity reading
1
1 2 3 4 5 6 7 8 9
23
4
5
BAROMETRIC PRESSURE
The atmospheric pressure is the pressure at any location of the earth caused by the weight of the
column of air above it.
NOTE: If temperature/humidity is below the measurement range, the reading will show
“Lo”. If temperature/humidity is above the measurement range, the reading will show “HI”.
Viewing Pressure History
In normal mode, press the BARO button to view the average hourly pressure of 3, 6, 12, and 24
hours ago.
Absolute or Relative Barometric Pressure Mode
While in normal mode, press and hold the BARO button for two (2) seconds to switch between
ABSOLUTE and RELATIVE barometric pressure.
• ABS is absolute atmospheric pressure of your location.
• REL is relative atmospheric pressure based on the sea.
TEMPERATURE & HUMIDITY
Outdoor Temperature & Humidity

13
Outdoor Temperature Index
Press the INDEX button to switch between Feels Like, Heat Index, Wind Chill, and
Dew Point.
Feels Like
The Feels Like temperature index determines what temperature it actually feels like outside, taking into
account factors like wind chill and the heat index.
Wind Chill
Wind chill is determined by a combination of the wireless weather sensor’s temperature and wind speed
data.
Dew Point
The dew point is the temperature below which the water vapor in air at constant barometric pressure
condenses into liquid water at the same rate at which it evaporates. The condensed water is called dew
when it forms on a solid surface.
The dew point temperature is determined by the temperature and humidity data from the wireless
weather sensor.
Heat Index
The heat index is determined by the wireless weather sensor’s temperature and humidity readings when
the temperature is between 79 °F (26 °C) and 120 °F (50 °C).
Heat Index Range Warning Explanation
81 °F – 90 °F (27 °C – 32 °C) Caution Possibility of heat exhaustion
91 °F – 104 °F (33 °C – 40 °C) Extreme caution Possibility of heat dehydration
106 °F – 129 °F (41 °C – 54 °C) Danger Heat exhaustion highly likely
≥ 131 °F (≥ 55 °C) Extreme danger Strong risk of dehydration/ heatstroke

14
Indoor Temperature & Humidity
This section can show reading and status of the sensor of the console.
WIND
Wind Speed and Direction Overview
Wind Speed, Gust, and Beaufort Scale Display
Press the WIND button to switch between the average wind speed measurement, gust wind speed
measurement, and BFT measurement.
• AVERAGE: The AVERAGE wind speed will display the average of all wind speed numbers recorded in
the previous 12 seconds.
• GUST: The GUST wind speed will display the highest wind speed recorded in the previous 12
seconds.
• BFT: The Beaufort scale of current wind speed will be displayed.
1
1
5 62
2
3
3
4
4
1. Indoor temperature reading
2. Indoor temperature high/low alert indicator
3. Indoor temperature trend
4. Indoor humidity high/low alert indicator
5. Indoor humidity trend
6. Indoor humidity reading
1. High wind speed alert indicator
2. Gust indicator
3. Real-time wind direction indicator (16 points)
4. Average/gust wind speed or Beaufort scale

15
Beaufort Scale Index
The Beaufort scale below is an international scale of wind velocities from 0 (Calm) to 12 (Hurricane force).
Beaufort Scale Description Wind Speed Land Condition
0Calm
< 1 km/h
Calm. Smoke rises vertically.
< 1 mph
< 1 knots
< 0.3 m/s
1Light air
1.1 ~ 5km/h
Smoke drift indicates wind direction.
Leaves and wind vanes are stationary
1 ~ 3 mph
1 ~ 3 knots
0.3 ~ 1.5 m/s
2Light breeze
6 ~ 11 km/h
Wind felt on exposed skin. Leaves rustle. Wind vanes
begin to move.
4 ~ 7 mph
4 ~ 6 knots
1.6 ~ 3.3 m/s
3Gentle breeze
12 ~ 19 km/h
Leaves and small twigs constantly moving, light ags
extended.
8 ~ 12 mph
7 ~ 10 knots
3.4 ~ 5.4 m/s
4Moderate breeze
20 ~ 28 km/h
Dust and loose paper raised. Small branches begin
to move.
13 ~ 17 mph
11 ~ 16 knots
5.5 ~ 7.9 m/s
5Fresh breeze
29 ~ 38 km/h
Branches of a moderate size move.
Small trees in leaf begin to sway.
18 ~ 24 mph
17 ~ 21 knots
8.0 ~ 10.7 m/s

16
6Strong breeze
39 ~ 49 km/h
Large branches in motion. Whistling heard in
overhead wires. Umbrella use becomes dicult.
Empty plastic bins tip over.
25 ~ 30 mph
22 ~ 27 knots
10.8 ~ 13.8 m/s
7High wind
50 ~ 61 km/h
Whole trees in motion. Eort needed to walk against
the wind.
31 ~ 38 mph
28 ~ 33 knots
13.9 ~ 17.1 m/s
8Gale
62 ~ 74 km/h
Some twigs broken from trees.
Cars veer on road. Progress on foot is seriously
impeded
39 ~ 46 mph
34 ~ 40 knots
17.2 ~ 20.7 m/s
9Strong gale
75 ~ 88 km/h
Some branches break o trees, and some small
trees blow over. Construction /temporary signs and
barricades blow over.
47 ~ 54 mph
41 ~ 47 knots
20.8 ~ 24.4 m/s
10 Storm
89 ~ 102 km/h
Trees are broken o or uprooted, structural damage
likely.
55 ~ 63 mph
48 ~ 55 knots
24.5 ~ 28.4 m/s
11 Violent storm
103 ~ 117 km/h
Widespread vegetation and structural damage likely.
64 ~ 73 mph
56 ~ 63 knots
28.5 ~ 32.6 m/s
12 Hurricane force
≥ 118 km/h
Severe widespread damage to vegetation and
structures. Debris and unsecured objects are hurled
about.
≥ 74 mph
≥ 64 knots
≥ 32.7m/s

17
RAIN
This section shows the rainfall or rain rate information.
Select the Rainfall Display Mode
Press the RAIN button to toggle between:
• RATE: current rainfall rate
• DAILY: total rainfall since midnight
• WEEKLY: total rainfall for the current week
• MONTHLY: total rainfall since the beginning of the current month
• TOTAL: total rainfall since the last reset
• EVENT: continuous rain and resets to zero if rainfall accumulation is less than 0.039" (10 mm) in a
24-hour period
Reset the Rainfall Records
While in normal mode, press and hold the RAIN button for six (6) seconds to reset the rainfall records
UV & LIGHT INTENSITY
This section shows UV index and sunlight intensity.
UV Index & Exposure Level
1
1
2
2
3
1. Rain rate high alert indicator
2. Period of rainfall and rain rate
3. Reading of rainfall or rain rate
1. UV index
2. UV exposure level

18
UV Index VS Sunburn Time Chart
Light Intensity
Sunlight intensity
Exposure level Low Moderate High Very high Extreme
UV index 1 2 3 4 5 6 7 8 9 10 11 12~16
Sunburn time N/A 45 minutes 30 minutes 15 minutes 10 minutes
Recommended
protection N/A
Moderate or high UV level! Suggest to
wear sunglasses, broad brim hat and
long-sleeved clothing.
Very high or Extreme UV level! Suggest
to wear sunglasses, broad brim hat and
long-sleeved clothing, If you have to stay
outdoors, make sure to seek shade.
MAX/MIN
MAX/MIN Data Record
The display console can record the daily MAX/MIN weather data or MAX/MIN data since last reset.
To View the Daily and Since MAX/MIN Records
While in normal operating mode, press the MEMORY button to cycle through the MAX/MIN records.
Records are displayed in the following order:
Since MAX records →Since MIN records →Daily MAX records →Daily MIN records
Reset the Total MAX/MIN Records
Press and hold the MAX/MIN button for two (2) seconds to reset the MAX/MIN records.
The console can record
MAX / MIN readings
since last reset and on
daily basic. MAX reading since
last reset
MIN reading since last
reset
Daily MAX reading Daily MIN reading

19
MOON PHASE
WIRELESS SIGNAL RECEPTION
The display console shows the signal strength for the outdoor wireless sensor:
• If the sensor signal is lost and isn’t recovered within 15 minutes, the signal icon will disappear.
The temperature and humidity will display “Er” for the corresponding channel.
• If the sensor signal isn’t recovered within 48 hours, the “Er” display will become permanent. If
this happens, you need to replace the batteries and then press the SENSOR/WI-FI button to pair
up the sensor again.
The sun-lit area of the moon moves
from right to left in the Northern
Hemisphere, while in the Southern
Hemisphere, it moves from left to
right. This table illustrates how the
moon will appear on the console.
Hemisphere Moon Phase Southern Hemisphere
New Moon
Waxing
Crescent
First quarter
Waxing
Gibbous
Full Moon
Waning
Gibbous
Third quarter
Waning
Crescent
No signal Weak signal Good signal

20
TIME SYNCHRONIZE STATUS
After the console has connected to the time server, it can get the UTC
time. The “SYNC” icon will appear on the LCD with the time.
NOTE: The time will automatically synchronize per hour. Users
can also press the REFRESH button to get the internet time manually within one (1) minute.
WI-FI CONNECTION STATUS
The Wi-Fi icon on the console display indicates the console’s connection status with the Wi-Fi router.
OTHER SETTINGS
Time, Date, Unit, and More
Press and hold the SET button for two (2) seconds to enter the setting mode. Press the +/WIND or -/
BARO button to adjust the setting and press the SET button again to save and proceed with the next
step of the setting. Refer to the chart below for the order of settings.
Stable: Console is connected to the Wi-Fi router
Flashing: Console is trying to connect to the Wi-Fi router
Step Mode How to adjust
1 DST (Daylight Saving Time) Press the +/WIND or -/BARO button to select AUTO/ON/OFF.
AUTO automatically adjusts based on time zone.
ON adds one hour on the current default time.
OFF turns o the DST function.
2 Time Press the +/WIND or -/BARO button to adjust the minute/hour.
3 12/24-hour format Press the +/WIND or -/BARO button to select the 12-hour or 24-hour format.
4 Year Press the +/WIND or -/BARO button to adjust the year.
5 Date Press the +/WIND or -/BARO button to adjust the day/month.
6 M-D/D-M format Press the +/WIND or -/BARO button to select “Month/Day” or “Day/Month” format.
7 Time sync ON/OFF Press the +/WIND or -/BARO button to enable or disable the time sync function.
8 Hemisphere Press the +/WIND or -/BARO button to select North/South hemisphere for moon
phase and wireless sensor array point to direction.
9 Weekday language Press the +/WIND or -/BARO button to select weekday display language.
Table of contents
Other Logia Weather Station manuals

Logia
Logia LOWSC710SWB User manual

Logia
Logia LOWSC715FWB10 User manual

Logia
Logia LOWSC710B User manual

Logia
Logia LOWSC510WB User manual

Logia
Logia LOWSC713SWB User manual

Logia
Logia LOWSB510PB User manual

Logia
Logia LOWSC7110FWB8 User manual

Logia
Logia LOWSC715FWB10 User manual

Logia
Logia LOWSB510PB User manual

Logia
Logia LOWSL710FWB7 User manual
Popular Weather Station manuals by other brands

Lambrecht
Lambrecht INDUSTRY Modbus manual

La Crosse Technology
La Crosse Technology WS-9066U-IT instruction manual

Buienradar
Buienradar BR900 user manual

Minder Research
Minder Research TempMinder MRI-823MXC Quick start gude

TFA
TFA MODUS PLUS instruction manual

DAVIS
DAVIS Rain Collector II installation manual