lopital Amfora User manual

Shower stretcher & changing table
Instructions for use

2 |
Important:
Read these instructions carefully before using the table!
date of rst use
User
Name
Address
Manufactured by:
Lopital Nederland B.V.
Laarakkerweg 9
5061 JR Nederland
T (0031) 13 52 39 300
F (0031) 13 52 39 301
www.lopital.nl

Shower stretcher & changing table | Instructions for use | 3
Index
Introduction 4
Warranty 4
Safety 4
Features 5
Emergency stop 5
Folding up the shower stretcher/changing table 5
Operating the side panel 6
Water drainage 6
Changing the battery 7
Charging the battery 7
Maintenance 8
Technical specications 8
Installation 9

4 | Instructions for use | Shower stretcher & changing table
Introduction
The shower stretcher/changing table is an aid to the ergonomically responsible washing
of residents under running water and/or supporting those who have poor balance while
seated. The shower stretcher/changing table is user-friendly, maintenance-friendly, at-
tractive, generous height-adjustable and, above all, safe for users and carers. The wall
section can be moved up or down electrically and is multifunctional. Placing this ge-
nerously height-adjustable shower stretcher/changing table at the ideal height makes it
easy to transfer from other furniture and aids such as beds, stretchers, shower/toilet and
wheelchairs.
Warranty
Lopital Nederland B.V. is proud that you have chosen a high quality aid. Many years of
experience in the development and production of bathroom, toilet and shower aids have
made Lopital Nederland B.V. a leading company in this sector. The shower stretcher/
changing table meets the CE safety standards. These standards conform to the Medical
Devices Directive of 14 June 1993 no. 93/42 EEG. All Lopital Nederland B.V. shower aids
come with a 2-year manufacturer’s warranty. Normal wear and tear and improper use do
not fall under the terms of this warranty. Lopital Nederland B.V. does not accept any liabil-
ity for personal injury, which is caused by the improper use of the shower stretchers.
Safety
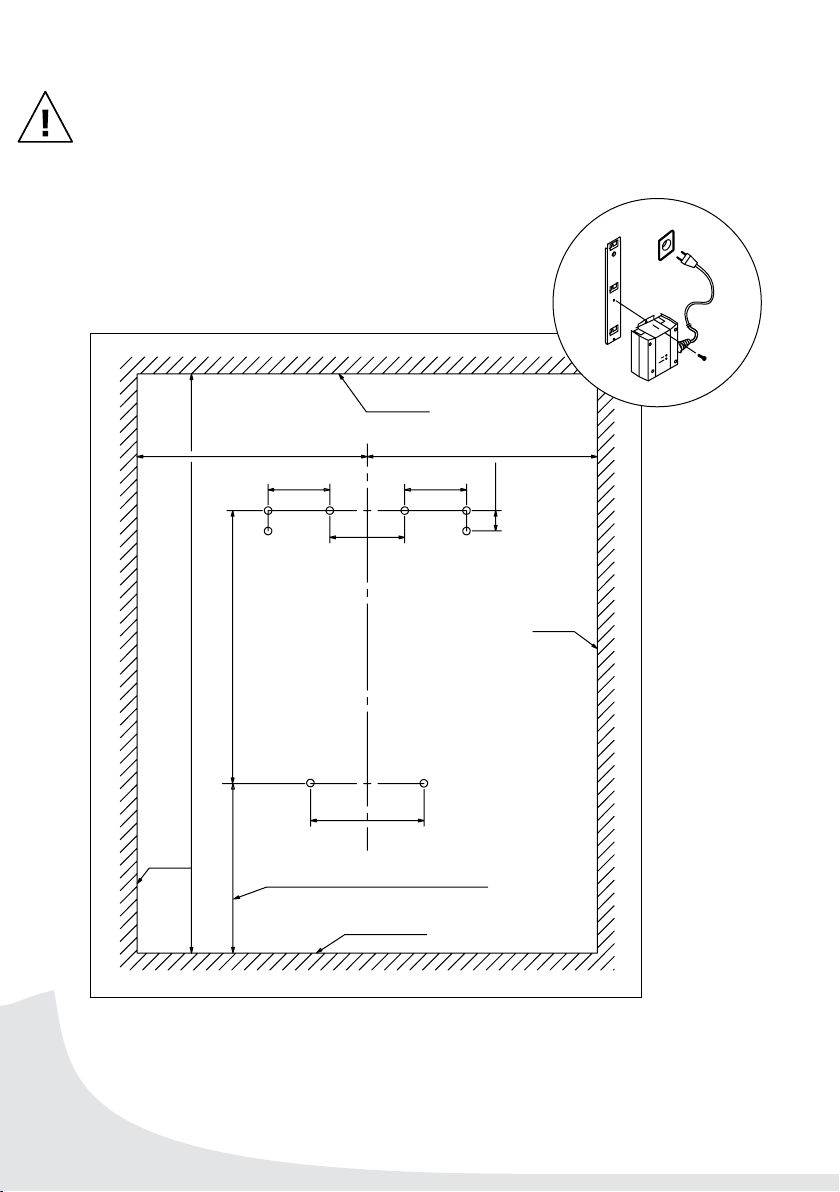
Ensure that the shower stretcher/changing table is installed in accordance with the at-
tached drawings and instructions. It is preferable to have the shower stretcher/changing
table installed by a recognised professional. The shower stretcher can only be mounted
on a wall with sufcient strength. In all other cases you must apply reinforcement of
sufcient strength or fasten the shower stretcher/changing table to the wall with locking
plates (only on walls with sufcient thickness). Lopital Nederland B.V. can also supply
a separate console as a solution for walls with insufcient strength. These are fastened
between the oor and the ceiling.
If you have any questions or repairs are required please contact your dealer.

Shower stretcher & changing table | Instructions for use | 5
Attention: When folding the stretcher and/or the side panel up or down avoid
the hinge point in order to prevent your ngers becoming trapped.
Features
• High/Low wall section can be used universally
• Large range: 60 cm
• Lowest position of the stretcher is approximately 40cm above the oor
• Fast lifting speed
• Modern design
• Low noise production
• Flat surfaces make it simple to clean
• No Sharp edges or protruding parts
• The stretcher is easy to fold up
Emergency stop
• An emergency stop is located on the
control box under the stretcher/chan-
ging table.
• Press the emergency stop during an
emergency. This will immediately halt
the upward or downward motion.
• The high/low control will not function
after the emergency stop has been
pressed.
• To resume control, turn the emergency
stop a quarter turn to the right to unlock it.
Folding up the shower stretcher/changing table
When you need to fold the shower stretcher/changing table up, you must rst fold
the side panel down. When folding the shower stretcher/changing table down, rst pull
the shower stretcher/changing table forward and fold the side panel up. It will fall into
the locked position automatically.
Activate Reset

6 | Instructions for use | Shower stretcher & changing table
Operating the side panel
• The shower stretcher/changing table
can be tted with a side panel as an
option.
• The side panel is tted with a panel
safety feature that prevents users from
lifting the side panel independently.
• Before the side panel can be folded
down the panel safety feature must be
unlocked.
• Unlock the safety feature by pulling the
protruding lip (1) out with one hand
and lifting the middle of the side panel
up with the other hand.
• Turn the unlocked panel outwards.
• With folded down side panels it is pos-
sible for the carer to lean against the
middle of the stretcher/changing table
in order to deliver care more effec-
tively.
• To fold the side panel up, turn the side panel up again. The panel locks automatically.
• 61002400/01: Ensure that the corner aps fall inwards so that they do not become
trapped in the panel lock.
Water drainage
The drainage hose is used to lead the water from the shower stretcher to a drain. Lead
the drainage hose to a drainage point at a low level.
2
3
1
1
2
3

Shower stretcher & changing table | Instructions for use | 7
Changing the battery
• The battery is fully charged when all the boxes in the
display on the control box are black.
• As soon as a plug symbol is displayed the battery must
be changed and charged.
• To remove the battery, unlock the pole (1) on the bat-
tery with one hand and then remove the battery (2).
• Before inserting the fully charged battery, rst place
the battery against the housing of the electronics and
then click it into the holder.
Comments: Ensure that the stretcher/changing
table is always ready for use by having a fully
charged battery in reserve.
Charging the battery
• Place the empty battery on the battery charger.
• A green light indicates that the battery charger is
active, an orange light indicates that charging is
taking place. This light switches off when the battery
is charged.
• The charged battery can remain on the battery charger without this causing damage.
• To remove the battery, unlock the pole on the battery with one hand while supporting
the battery with the other hand.
Comments: Only use the batteries that are supplied with the stretcher/changing
table. Charge batteries that are not in use every six months in order to prevent
damage. Charging batteries before they are completely empty will extend their
life span.
Important!
Never use the battery charger in the bathroom or in a humid environment!
2 1

8 | Instructions for use | Shower stretcher & changing table
Maintenance
• The shower stretcher/changing table must be cleaned with normal household clean-
ing agents after every use. Do not use abrasive or other aggressive solvents (such as
chlorine).
• If the stretcher/changing table must be disinfected we recommend Neoquat combi®,
not combined with alcohol.
• Remove excess soap remnants.
• For optimum and efcient cleaning of the mattress and surface, the mattress can be
lifted and removed. (only 61002400/01)
• Dry the base on which the mattress is lying. (only 61002400/01)
• Ensure that the battery is charged.
• Lopital Nederland B.V. recommends that you take out an annual maintenance contract
for the shower stretcher/changing table.
• Maintenance and repairs should only be executed by authorised staff.
Technical specications
Maximum permitted load: 135 kg
Dead weight: 62005005/10 85 kg
65005015/20 75 kg
61002400/01 80 kg
Wall section data
Wall frame Steel electrolytically galvanised
High/Low proles Stainless steel tube prole
Stretcher suspension point Stainless steel, powder coated
Screw parts Stainless steel
Plastic protective cap ABS
Lifting capacity 135 kg
Travel length 600 mm
Speed minimum 14 mm/s at maximum load
Drive unit data
Utilised capacity 120W
Drive operates on low Voltage 24VDC
Protection factor IP 66

Shower stretcher & changing table | Instructions for use | 9
Installation
Determining the working height
The shower stretcher/changing table allows carers to adjust it to the optimum ergonomic
working height with an adjustment range of 60 cm. The minimum height of the surface of
the stretcher is 40 cm from the oor. The maximum height of the surface depends on the
height of the bathroom.
Maximum height stretcher surface = Height bathroom (minimum 230 cm) – 130 cm. Draw
the hole pattern on the wall in accordance with the attached installation drawing.
We recommend drawing the bottom two holes at a height of 77 cm above the tiled oor,
which creates a working height range for the surface of the stretcher from 40 - 50 cm to
100 - 110 cm from the tiled oor.
Preparation for installation
• The wall where the shower stretcher/changing table is to be mounted must be at least
2.3 metres wide and 2.3 metres high and free of obstacles.
• Draw a plumb line on the bathroom wall where the middle of the shower stretcher/
changing table must be. Keep a minimum of 1.15 metres on both sides of this line free
of obstacles.
• Drill the holes at the locations marked on the wall.
Wall mounting
• Fasten the wall frame with the fasteners that are appropriate for this wall. Ensure that
the tubes of the wall frame are level.
• If you have ordered the 61002400/01 rst t the xed side panel to the black panels of
the wall frame.
• Fit the shower stretcher/changing table to the wall frame. First fasten the gas springs
and then the hinge points.
• Fit the cover cap last and check that the cap does not touch the wall, ceiling, oor or
skirting board, and that cables are not trapped. The stretcher/changing table must not
be obstructed by any obstacle.

10 | Instructions for use | Shower stretcher & changing table
A drain with a minimum diameter of 40 mm must be present under the stretcher
in the bathroom.
To be tted outside the bathroom:
Battery charger with wall panel, near a wall socket 230 V (AC)
Installation plan
Ceiling
Min.1,2m obstacle freeMin.1,2m obstacle free
Max. =Ceiling height -1530mm
Middle of the stretcher
785mmMin. 770mm
Min. height 2, 3m obstacle free
225mm
Wall
Wall
40mm
225mm
200mm
440mm
Tiled floor

For more information, please visit our website: www.lopital.com
Lopital Nederland B.V. Laarakkerweg 9, 5061 JR Oisterwijk, Postbus 56, 5060 AB Oisterwijk
Tel 013 5239300, Fax 013 5239301, E-mail [email protected], www.lopital.nl
USER5005 08/2008
CERTIFIED
I
S
O
9
0
0
1
2
0
0
8
CERTIFIED
I
S
O
1
3
4
8
5
2
0
0
8
Other manuals for Amfora
4
This manual suits for next models
1
Table of contents
Other lopital Medical Equipment manuals

lopital
lopital Lotus User manual

lopital
lopital Amfora Technical manual

lopital
lopital Marina Technical manual

lopital
lopital Elexo 5100 User manual

lopital
lopital Reflex 5100 5600 User manual

lopital
lopital Flexo User manual

lopital
lopital Lotus User manual

lopital
lopital Marina basic hydraulic User manual

lopital
lopital Amfora User manual

lopital
lopital Amfora User manual