manuals.online logo
Brands
  1. Home
  2. •
  3. Brands
  4. •
  5. Lorex
  6. •
  7. Accessories
  8. •
  9. Lorex AM41TK Series User manual

Lorex AM41TK Series User manual

Motion Sensor
AM41TK Series
Quick Start Guide
lorex.com
PIR Sensor Bracket (optional)
Mounting Adhesive
Pin*
Package Contents
AM41TK_QSG_EN_R1
LED Behavior
See the table below for denitions of the
sensor’s LED behaviors:
Lorex products come with a standard 1-year
warranty. For more information about Lorex’s
warranty policy, visit lorex.com/warranty.
WARNING:
CHOKING HAZARD
KEEP OUT OF REACH OF CHILDREN
Behavior Meaning
(solid for 2 seconds) Powered on.
(ashing rapidly) Ready to pair.
(solid for 2 seconds) Pairing successful.
(ashing 3 times) Pairing failed. Try
repeating the setup.
(ashing rapidly) Alarm has been
triggered.
(ashing) Firmware upgrade in
progress.
Battery slot
LED indicator
Pin insert
PIR sensor
Overview
• Environment: Indoor
• Maximum detection distance: 26 feet
• Maximum detection angle: 110°
• Operating temperature: 14°F~113°F
• Operating humidity: 0-95%RH
• Battery: CR2450
• Protocol: Bluetooth 5.0
Specifications
*May include one or more, depending on the package purchased.
To purchase additional sensors, visit lorex.com and/or authorized resellers.
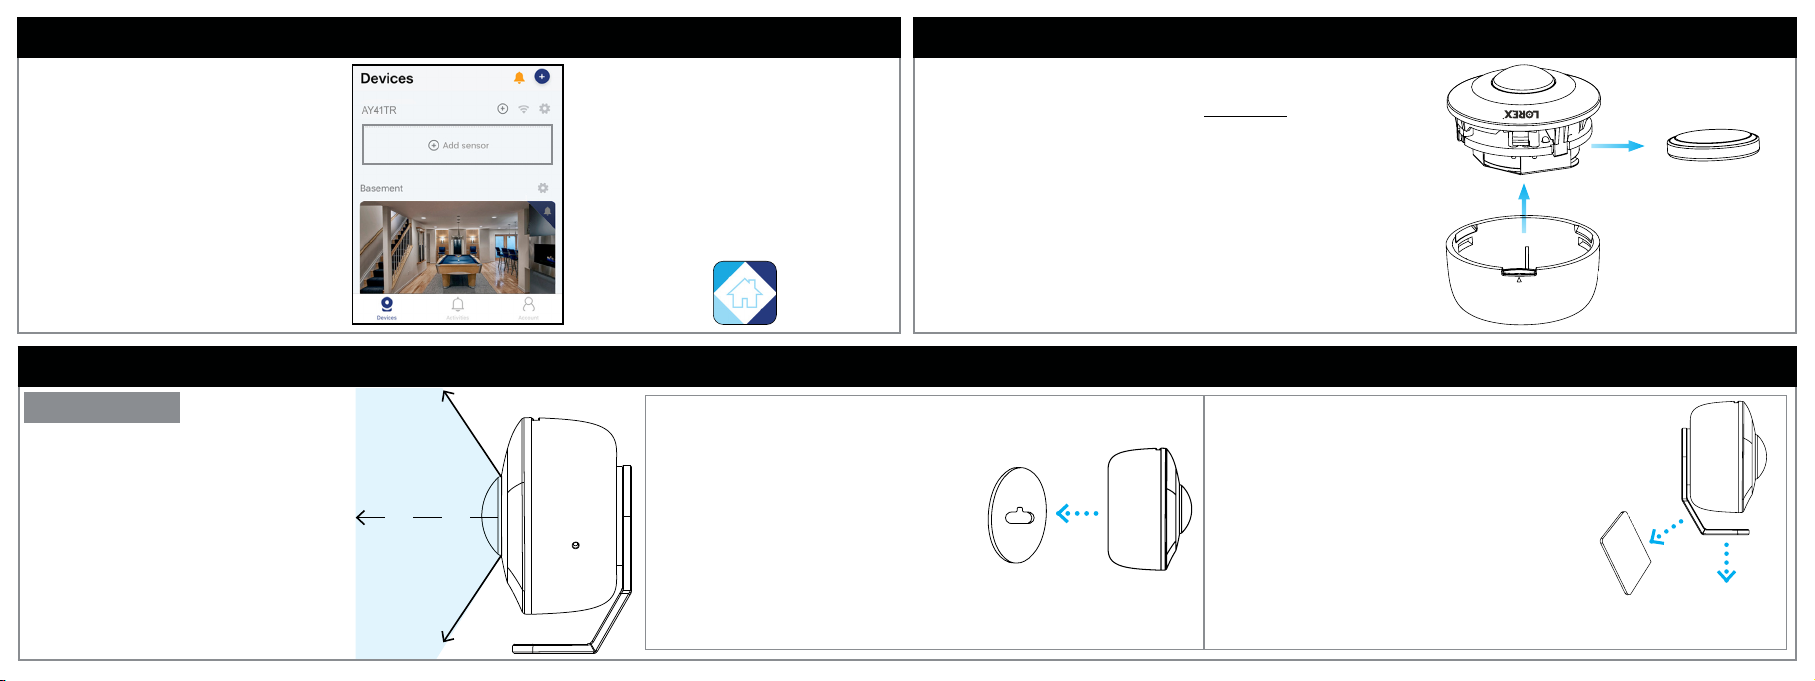
STEP 2: Installing the Motion Sensor
Location tips:
• The motion sensor can be installed
indoors on a wall, ceiling or table, with or
without the included bracket.
• The motion sensor works best when it’s
placed 6 to 8 feet high, to keep safe from
being bumped and out of reach from
children and pets.
• If you want to detect smaller objects, use
one of the angled sides of the bracket.
Keep in mind the range and width of the
sensor.
Option A Option B - Bracket
AM41TK_QSG_EN_R1
NOTE: The bracket offers 2 separate angles for
the sensor to face.
NOTE: The sensor can be mounted on any at surface using the
adhesive. If you prefer to have the sensor on a table or placed in a
45° angle, see Option B for the bracket.
110°
Changing the BatterySTEP 1: Pairing to Your Device
To connect the sensor to your
device:
1. Tap the Lorex Home icon to
launch the app.
2. In the Devices tab, press
+ Add sensor to set up the
sensor.
Tap the +icon on the top right
of the screen to add more
sensors.
NOTE: the screen to the left is
taken from the Sensor Hub.
To change the sensor’s battery:
1. Make sure your system is disarmed.
2. Use the wide part of the pin to open the
sensor from the battery slot.
3. Slide the old battery out and replace it with
the new one.
NOTE: This sensor uses a CR2450 battery.
4. Snap the sensor closed with the battery
slot meeting the Lorex logo at the top.
1. Pick a at surface area to stick the sensor.
2. Test the sensor’s connectivity.
1. Pick a at surface area to stick the sensor.
2. Test the sensor’s connectivity.
3. Peel the circular adhesive and stick to the
back of the sensor. Then stick the other
26 feet
side to the bracket.
4. Peel the other adhesive and stick to the desired bracket angle.
Then stick the other side to the chosen at surface area.
3. Peel the circular mounting
adhesive and stick to the back of
the sensor. Then stick the other
side to the desired area.
3. Follow the on screen prompts
to complete the rest of the
setup. The Lorex Home app will
walk you through the process,
step by step.

Other Lorex Accessories manuals

Lorex B241AJ Series User manual

Lorex

Lorex B241AJ Series User manual

Lorex B463AJ Series User manual

Lorex

Lorex B463AJ Series User manual

Lorex B241AJ Series User manual

Lorex

Lorex B241AJ Series User manual

Lorex VQ2120 User manual

Lorex

Lorex VQ2120 User manual

Lorex ACCL224 User manual

Lorex

Lorex ACCL224 User manual

Lorex AK41TK Series User manual

Lorex

Lorex AK41TK Series User manual

Lorex B451AJD-E User manual

Lorex

Lorex B451AJD-E User manual

Lorex ACCHM2 Series User manual

Lorex

Lorex ACCHM2 Series User manual

Lorex AK41TK-Z User manual

Lorex

Lorex AK41TK-Z User manual

Lorex AM41TK-Z User manual

Lorex

Lorex AM41TK-Z User manual

Lorex B463AJ Series User manual

Lorex

Lorex B463AJ Series User manual

Lorex LNWDB1 Series User manual

Lorex

Lorex LNWDB1 Series User manual

Lorex AK41TK Series User manual

Lorex

Lorex AK41TK Series User manual

Lorex B862AJ Series User manual

Lorex

Lorex B862AJ Series User manual

Popular Accessories manuals by other brands

Panasonic MA3X199 (MA199) Specifications

Panasonic

Panasonic MA3X199 (MA199) Specifications

Takex MW-50L instructions

Takex

Takex MW-50L instructions

Contours ZY002 manual

Contours

Contours ZY002 manual

Vertiv Liebert CRV300 Product documentation

Vertiv

Vertiv Liebert CRV300 Product documentation

Indel B ICEBERG PLUS User instructions

Indel B

Indel B ICEBERG PLUS User instructions

R&S NRQ6 Getting started

R&S

R&S NRQ6 Getting started

Mini Gadgets DV1300M8GB user manual

Mini Gadgets

Mini Gadgets DV1300M8GB user manual

Balluff BMP 01-ZLZPP 1A 00-P S75 Series user guide

Balluff

Balluff BMP 01-ZLZPP 1A 00-P S75 Series user guide

Paradyne 3100 Series installation instructions

Paradyne

Paradyne 3100 Series installation instructions

Philips HF3550/60 user manual

Philips

Philips HF3550/60 user manual

Ecolink TX-E201 Installation sheet

Ecolink

Ecolink TX-E201 Installation sheet

QOLSYS IQ GLASS-S installation manual

QOLSYS

QOLSYS IQ GLASS-S installation manual

GOLDENSEA UV UVT72 quick start guide

GOLDENSEA UV

GOLDENSEA UV UVT72 quick start guide

Omron SIGMA LINEAR AXIS - datasheet

Omron

Omron SIGMA LINEAR AXIS - datasheet

SICK SIM2000ST operating instructions

SICK

SICK SIM2000ST operating instructions

Docking Drawer BLADE Series installation instructions

Docking Drawer

Docking Drawer BLADE Series installation instructions

Huawei RAN12.0 DBS3800 Product description

Huawei

Huawei RAN12.0 DBS3800 Product description

GESTRA NRG 16-36 Original Installation Instructions

GESTRA

GESTRA NRG 16-36 Original Installation Instructions

manuals.online logo
manuals.online logoBrands
  • About & Mission
  • Contact us
  • Privacy Policy
  • Terms and Conditions

Copyright 2025 Manuals.Online. All Rights Reserved.