LORUS W207 User manual

INSTRUCTION MANUAL FOR
WATCH CALIBRE
W207
THIS PRODUCT CONTAINS A BUTTON BATTERY
If swallowed or placed inside any part of the body, the battery can
cause severe or fatal injuries within 2 hours or less.
Button batteries are hazardous whether new or used. Keep batteries out of
reach of children.
If you think the battery may have been swallowed or placed inside any part
of the body, seek immediate medical attention.Contact the Australian
Poisons Information Centre immediately on 13 11 26
(New Zealand 0800 764 766) for 24 / 7 fast, expert advice.

■CHARACTERISTICS
1. Time/calendar display: Hour, minute,
seconds, date, day of the week and month.
2. Automatic calendar adjustment: Calendar
adjusts automatically for odd and even months
except February of leap years.
3. Time indication: Changeover between
12-hour and 24-hour indication is possible.
4. Stopwatch: 24 hour stopwatch with 1⁄100
second readout up to 40 minutes and with
1 second readout after the first 40 minutes.
Split time measurement is available.
5. Alarm: The alarm rings at the designated
hour and minute with “beep, beep” for 30
seconds.
6. Hourly time signal: Can be set to ring
every hour on the hour with a single “beep”.
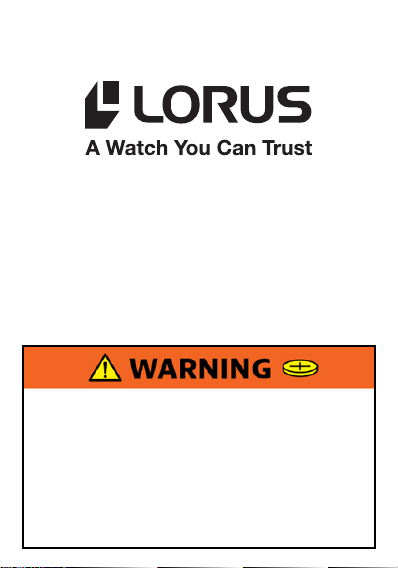
■DISPLAY AND BUTTON OPERATION
Time signal mark Day indicator
PM mark
(only in the
12-hour
indication)
Alarm mark
Hour Minute Second
The selection is made in the following order.
Button A : Selection of the display
B
C
A
Time/calendar display Stopwatch display
▲
▲
A
▲
▲
A
A
Time/calendar setting Alarm setting
▲
A
Depress button
“A” for 2 sec.
▲
A
Button B : •Calendar (month, date and day)
display in the time/calendar display.
•Start/Stop in the stopwatch function.
•Selection of the digits to be adjusted
in the alarm setting function and
the time/calendar setting function.
Button C : •Alarm display in the time/calendar
display.
•Split/Split release/Reset in the
stopwatch function.
•Setting the digits in the alarm
setting function and the time/
calendar setting function.
•Stopping the alarm in any display.
Button B while keepig button C depressed:
Engagement and disengagement
of the alarm and the time signal.
Button C while keeping button B depressed:
Changeover of the calendar (month
and date) display.
Buttons B & C:
Alarm test in the time/calendar
display.
■
HOW TO SET THE DUAL CALENDAR
DISPLAY
1. Depress button “B” to show the calendar
(month, date, and day) display. The calendar
display is shown while button “B” is kept
depressed.
2. The month and the date change places
with each other with each depression of
button “C” while keeping button “B” de-
pressed.
Day Month
* “A” (AM) appears in the morning, and “P”
(PM) in the afternoon.
▲
▲
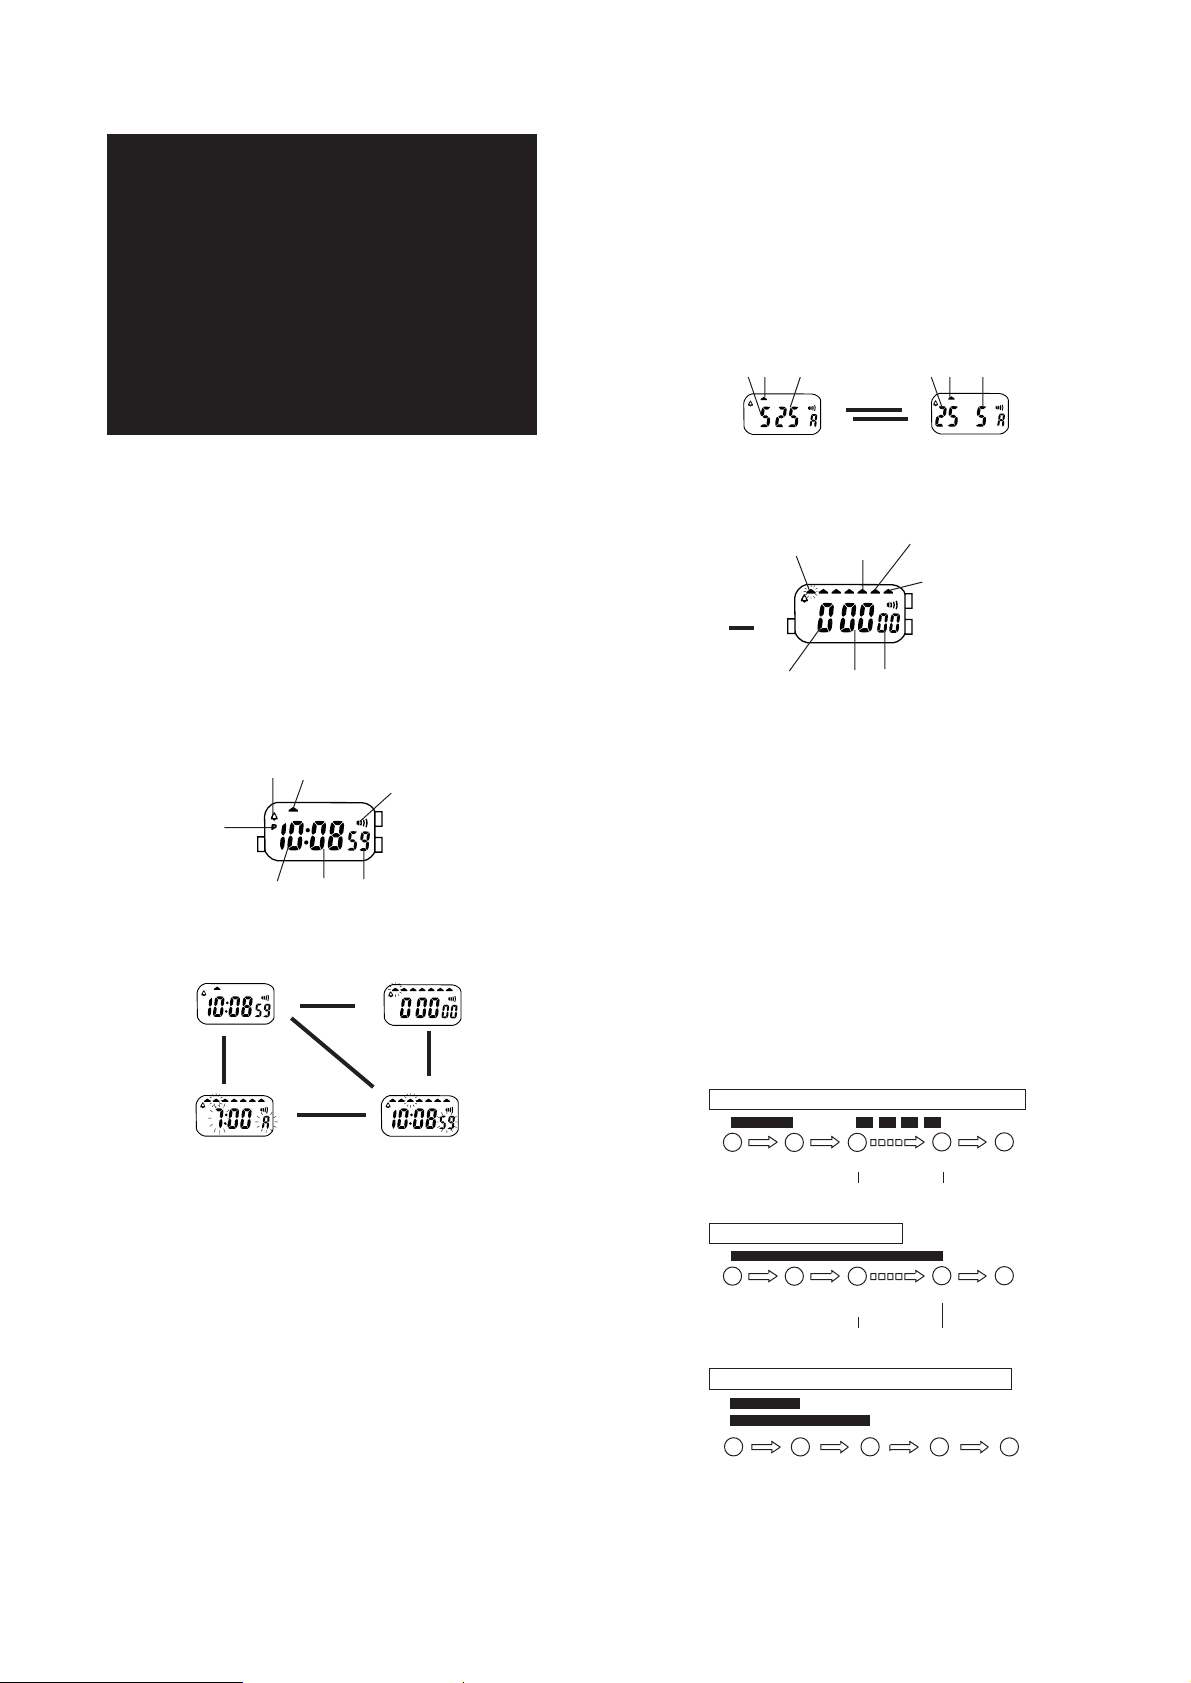
■HOW TO USE THE STOPWATCH
Split
indicator
Stopwatch
indicator
Stop indicator
1/100 second
indicator
B:
Start/Stop
C:
Split/
Split release/
Reset
1/100 secondSecondMinute
▲
A
1. Depress button “A” to show the stopwatch
display. (The stopwatch indicator starts
flashing.)
The stopwatch can measure up to 24 hours
and is displayed in minutes, seconds, and
1/100 second up to 40 minutes, and in
hours, minutes, and seconds after the first
40 minutes. (The 1/100 indicator flashes
during the first 40 minutes.)
When the measurement is over 24 hours,
the stopwatch will be reset to “0:00oo”
and start counting again.
2. Reset the digits to “0:00oo” before using
the stopwatch. When the split and the
stopwatch indicators are flashing, depress
button “B” to check that the stop indicator
starts flashing, and then depress button
“C” twice to reset the digits to zero.
3. When measuring a long period of time,
return the stopwatch to the time/calendar
display after the stopwatch starts to prevent
any possible mistaken operation.
* When button “B” or “C” is depressed in
the stopwatch display, a single beep” sounds
to confirm the operation.
Accumulated elapsed time measurement
Reset
C
RestartStopStart
BBB B
Accumulate repeatedly by
depressing button “B”.
Stop
Split time measurement
Reset
C
SplitStart
BC C B
Stop
Split
release
Can repeat by depressing
button “C”.
Measurement between two competitors
BBCCC
Finish (Second runner)
Finish (First runner)
ResetSplitStart Stop
Split
release
Month Day Date Date

■HOW TO SET THE ALARM
Alarm set indicator
B
C
▲
A
“A” (AM)MinuteHour
1. Depress button “A” for 2 seconds to activate
the alarm setting function. (The alarm
set indicator starts flashing.)
2. Depress button “B” to activate the “Hour”
or “Minute” setting. The display changes
in the following order with each depression
of button “B”.
Hour setting Minute setting
▲
▲
B
3. One digit (flashing) is advanced by each
depression of button “C”. The digits are
advanced quickly by keeping button “C”
depressed.
4. After all adjustments are completed, depress
button “A” to return to the time/calendar
display.
(The display returns directly to the time/
calendar display and not to the time/calendar
setting.)
Note: When setting the hour digits, be sure
to check that the “A” (AM)/“P” (PM)
mark is correctly set.
■HOW TO ENGAGE AND DISENGAGE
THE ALARM AND THE TIME SIGNAL
Hour Minute “A” (AM)/“P” (PM)
B
C
1. Depress button “C” to show the alarm
display. The alarm display is shown while
button “C” is kept depressed.
Alarm display
Alarm and time signal
are disengaged.
▲
▲
▲
Alarm and time signal
are engaged.
▲
Alarm is engaged.
Time signal is disengaged.
Time signal is engaged.
Alarm is disengaged.
■HOW TO STOP THE ALARM
The alarm rings at the designated time for 30
seconds and stops. However, the alarm can
be stopped manually by depressing button
“C” in any display.
■ALARM TEST
The alarm can be tested with a beeping sound
by depressing buttons “B” and “C” at the
same time in the time/calendar display.
■HOW TO SET THE TIME/CALENDAR
Time/calendar setting
indicator
B
AC
1. Depress button “A” for 2 seconds (alarm
setting function will appear), and again
depress the button to activate the time/
calendar setting function (time/calendar
setting indicator and seconds digits start
flashing).
2. Selection of the digits to be adjusted (flashing)
is made in the following order by depressing
button “B”.
Seconds Minute Hour Month
→→
Day
Date
→
←←
↑
3. One digit (flashing) is advanced by each
depression of button “C”. (The digits except
seconds are advanced quickly by keeping
button “C” depressed.)
• Second setting
Depress button “C” in accordance with
a time signal. The seconds are reset to
“00” and start immediately.
When the seconds count any number
from “30” to “59” and button “C” is de-
pressed, one minute is added and the
seconds are immediately reset to “00”.
4. After all adjustments are completed, depress
button “A” to return to the time/calendar
display.
2. Each depression of button “B” while keeping
button “C” depressed repeats the engagement
and disengagement of the alarm and the
time signal as follows:
Note: When setting the hour digits, be sure
to check that the “A” (AM)/“P” (PM)
mark is correctly set.
■HOW TO CHANGE OVER THE 12-
HOUR AND THE 24-HOUR INDICATIONS
In the calendar or the alarm display, each
depression of button “A” changes over the
time indication display from the 12-hour to
the 24-hour and vice versa.

■CARE OF YOUR LORUS WATCH
CAUTION
Do not expose the old battery to
fire or recharge it. Keep it at a
place beyond the reach of chil-
dren. If a child swallows it,
consult a doctor immediately.
• WATER RESISTANT
• BATTERY
No
indication
WATER
RESISTANT
WATER
RESISTANT
(50 M/5 BAR)*
WATER
RESISTANT
100 M/
10 BAR or
above
Condition
of use
Accidental
contact with
water, such
as splashes
and rain
Swimm-
ing and
taking a
shower
Skin
diving
Scuba
diving
Indica-
tion on
the dial/
case back
NO NO NO NO
YES YES NO NO
YES NO NO NO
YES YES YES NO
()
*
* If your watch is 200 M/20 BAR, 100 M/10
BAR or 50 M/5 BAR water resistant, it is so
indicated on the dial/case back.
•Do not operate the buttons when the watch
is wet.
•If the watch is exposed to salt water, rinse
it in fresh water and then wipe it thoroughly
dry.
Caution:
Leather straps are not water resistant except
so indicated, even if the watch head is water
resistant.
• ALLERGIC REACTION
Because the case and band touch the skin
directly, it is important to clean them
regularly. If not, shirt sleeves may be
stained and those with delicate skin may
develop a rash. Please wear the watch
with some play to avoid any possible allergic
reaction. If you develop a rash on your
wrist, stop wearing and consult a physician.
• MAGNETISM
Your watch will not be affected by mag-
netism generated by household electric
appliances.
• SHOCKS AND VIBRATIONS
Your watch may be worn for normal sports
activities, but be careful not to drop it or
hit it on hard surfaces.
• TEMPERATURE
Your watch is preadjusted so that constant
accuracy may be insured at normal tem-
perature.
▲
▲
A
A
•
Changeover in the calendar display
12-hour 24-hour
A
[Keeping button “B” depressed]
•
Changeover in the alarm display
▲
▲
A
A
A
12-hour 24-hour
[Keeping button “C” depressed]
* When the “A” (AM)/“P” (PM) mark disappears,
the calendar or the alarm display is shown
in the 24-hour indication.
■LUMIBRITE WATCH
(dial, hands, buttons, case, bezel, strap,
etc.)
✩If your watch is a LORUS LUMIBRITE watch,
it has following features.
LORUS LUMIBRITE watches absorb and store
light energy from natural and artificial light
sources and emit light in the dark. They are
made of environmentally friendly material,
and therefore, are harmless to human beings
and the environment.
• With a full charge, LORUS LUMIBRITE
watches glow in the dark hours longer than
conventional luminous watches of this type.
If exposed to a light of more than 500 lux
(i.e., the brightness of a typical office) for
approximately 10 minutes, or direct sunlight
for 2 minutes, they will glow for hours.
• Since LORUS LUMIBRITE watches emit
the light they store, the brightness will
decrease gradually over time. The length
of time they will glow may also differ slightly
depending on such factors as the brightness
of and distance from the light source used
to charge the watch.
■BATTERY CHANGE
The miniature battery which powers your watch
should last approximately 2 years for SEIKO
SR726W and 1.5 years for MAXELL SR726W.
However, because the battery is inserted at
the factory, the actual life of the battery once
in your possession may be less than 3years.
Be sure to replace the battery to prevent any
possible malfunction as soon as it runs down.
To replace the battery, we recommend taking
the watch to a local watch repair shop.
When your LORUS watch requires repair
or servicing, please see the enclosed
WARRANTY/GUARANTEE.
■SERVICE
Other LORUS Watch manuals

LORUS
LORUS CAL. 5Y85 (RK8 SERIES) User manual

LORUS
LORUS Y120 User manual

LORUS
LORUS RW23 Series User manual

LORUS
LORUS R23 Series User manual

LORUS
LORUS NREY704E User manual

LORUS
LORUS VX33 User manual

LORUS
LORUS Y182 User manual

LORUS
LORUS NREAQ User manual

LORUS
LORUS R23 Series User manual

LORUS
LORUS PC21 User manual