LRP GRAVIT FPV XTREME 80 User manual

LRP electronic GmbH
Hanfwiesenstraße 15
73614 Schorndorf
Deutschland
HA00100 © LRP electronic GmbH 2017
BEST-NR. 220715
GRAVIT FPV XTREME 80 RTF 2.4GHz
RACE-QUADROCOPTER
Sehr geehrter Kunde,
Vielen Dank für Ihr Vertrauen in dieses LRP-Produkt. Die Gravit FPV Xtreme 80 ist ein hoch-
wertiger ready-to-fly FPV-Racer. Ausgestattet mit einer 5.8GHz-HD-Kamera und einem
LCD-Monitor um den Live-Video-Stream der Kamera zu empfangen, ist dieses LRP-Produkt
Ihre Eintrittskarte in die populäre Welt des FPV-Rennsports. Bitte lesen Sie diese Dokumen-
tation vor der ersten Benutzung des Produkts durch, um so den maximalen Flugspaß aus
Ihrer Gravit herauszuholen.
BITTE BEACHTEN: Es handelt sich bei dieser Anleitung um eine Schnellstart-Anleitung.
Eine ausführliche Hauptanleitung, in denen sämtliche Funktionen Ihrer Gravit ausführlich
beschrieben werden, finden Sie auf der LRP-Homepage unter www.lrp.cc
1. VOR DEM FLUG - AKKU LADEN
Bevor Sie mit Ihrer Gravit fliegen können, sollten Sie immer sicherstellen, daß der Flug-Akku
vollständig geladen ist. Um den Akku zu laden, stecken Sie das mitgelieferte USB-Ladegerät
in ein geeignetes 5V-USB-Netzteil. Stellen Sie sicher, dass das Netzteil in der Lage ist, min-
destens 1A Ladestrom zu liefern.
WICHTIG: LRP rät davon ab, das USB-Ladegerät an den USB-Port eines Laptops oder PCs
anzuschließen, da dies den USB-Port und den Computer unter Umständen beschädigen
könnte.
Nachdem das USB-Ladegerät ins USB-Netzteil gesteckt wurde, wird eine ROTE LED im In-
neren des Lader-Gehäuses DAUERHAFT LEUCHTEN. Schließen Sie nun den Flug-Akk an
das USB-Ladegerät an. Eine GRÜNE LED wird anfangen zu BLINKEN und zeigt somit an,
dass der Akku geladen wird. Sobald der Akku voll geladen ist, hört die GRÜNE LED auf zu
blinken und leuchtet DAUERHAFT GRÜN. Stecken Sie den Akku nun vom Ladergerät ab
und trennen Sie das Ladegerät vom USB-Netzteil.
2. VOR DEM FLUG - DEN LCD-MONITOR ANBRINGEN UND LADEN
Bitte befestigen Sie den LCD-Monitor an Ihrer Fernsteuerung wie in den Bildern gezeigt.
Stellen Sie sicher, dass der Monitor fest auf der Fernsteuerung sitzt.
Laden Sie nun auch den Akku des LCD-Monitors auf, bevor Sie ihn benutzen.
Den LCD-Empfänger laden
1. Verbinden Sie das USB-Ladegerät mit einer USB-Spannungsquelle
2. Verbinden Sie den LCD-Empfänger mit dem USB-Ladegerät, ROTE LED = AN
3. Sobald der LCD-Empfänger voll geladen ist, geht die ROT LED wieder aus
Stellen Sie sicher, dass der LCD-Empfänger während des Ladens AUS ist.
Stellen Sie bitte sicher, daß Sie die mitgelieferte Antenne am LCD-Monitor angebracht ha-
ben. Um das zu tun, schrauben Sie sie einfach aufs Gewinde rechts auf der Oberseite des
LCD-Monitors.
3. VOR DEM FLUG - DIE FERNSTEUERUNG STARTKLAR MACHEN
Öffnen Sie das Batteriefach des Senders und setzten Sie 6xAA Batterien oder Akkus ein.
WICHTIG: Stellen Sie sicher, dass sich alle 5 silbernen Schalter oben an der Fernsteuerung
in der OBEREN Position befinden (= WEG vom Piloten zeigend) UND dass der Gasknüppel
(LINKER Steuerknüppel) KOMPLETT! mach unten geschoben ist.
Öffnen Sie den Sonnenschutz des LCD-Monitors und richten Sie dessen Antenne auf.
4. DIE GRAVIT FPV XTREME 80 STARTEN
Bevor Sie Ihre Gravit FPV Xtreme 80 das erste mal starten, prüfen Sie bitte nach, ob die
Propeller-Muttern ausreichend festgezogen sind. Um dies zu tun, nehmen Sie ein kleines
Werkzeug und stecken Sie es durch die Öffnung in der Propeller-Mutter (zum Beispiel ei-
nen kleinen Hex-Schlüssel) und ziehen dann die Propeller-Mutter ENTGEGENGESETZT zur
Drehrichtung der Propeller mit moderater Kraft an. Die Drehrichtung der Propeller wird auf
jedem Propeller durch zwei kleine Pfeile angezeigt. Stellen Sie sicher, dass Sie die Muttern
nicht zu sehr anziehen, da diese zum Schaden an der Mutter, dem Propeller oder dem Mo-
torschaft führen könnte. Überprüfen Sie die Propeller-Muttern regelmäßig auf ihren festen
Sitz. Ansonsten könnte sich ein Propeller während des Fluges lösen, was zum Absturtz und
zur Beschädigung der Gravit führen würde.
Um Ihre Gravit Xtreme 80 in die Lüfte steigen zu lassen, gehen Sie bitte wie folgt vor:
1. Setzten Sie die Gravit auf einen ebene, flache Oberflächen (vorzugsweise gerader Bo-
den). Wir raten Ihnen aufgrund der Power und Geschwindigkeit DRINGEND davon ab,
die Xtreme 80 indoor zu fliegen. Fliegen Sie sie bitte NUR DRAUSSEN!
2. Schalten Sie zuerst den Sender ein. Überprüfen Sie die Batterien ihres Senders. Stellen
Sie sicher, dass der Gasknüppel (LINKER Steuerknüppel) KOMPLETT nach unten gescho-
ben ist. Ansonsten gibt die Fernsteuerung einen schnellen Alarm-Ton aus.
3. Schalten Sie die Xtreme 80 an, indem Sie einen geladenen Flugakku in das Akkufach
unter der Gravit schieben und den Akku auf der Unterseite einstecken. Stellen Sie sicher,
dass der Stecker vollständig und fest im Quadrocopter steckt. Die Xtreme 80 wird einen
kurzen, einzelnen Piepton ausgeben und die Status-LED der Gravit sollte kurz darauf auf
GRÜN springen.
4. Schalten Sie nun den LCD-Monitor an. Nach ein paar Sekunden bekommen das live
Video-Bild der Kamera Ihrer Gravit zu sehen. Sie sehen jetzt genau das, was die Kamera
Ihrer Gravit gerade sieht.
5. Um abzuheben, schieben Sie langsam und sanft den Gasknüppel (LINKER Steuerknüp-
pel) nach oben. Seien Sie vorsichtig und geben Sie nicht zu viel Gas, Ihre Gravit Xtreme
hat sehr viel Power. Lassen Sie den Quadrocopter in die Luft steigen und etwa einen
Meter über Augenhöhe schweben. Sollten Sie zuviel Gas gegeben haben, nehmen Sie
den Gasknüppel einfach langsam zurück, bis sich der Quadrocopter auf der gewünsch-
ten Höhe befindet.
BITTE BEACHTEN:
Sollten Sie mal ein Rennen mit anderen Piloten planen und beabsichtigen, mit MEHR ALS
EINER XTREME 80 zu fliegen, dann lesen Sie bitte unbedingt das Kapitel „Wenn mehr als
ein Pilot fliegt“
5. DIE GRAVIT FPV XTREME 80 FLIEGEN – STANDARD-FUNKTIONEN
Um Ihre Gravit in der Luft zu steuern, tun Sie bitte folgendes:
. Um an Höhe zu gewinnen oder zu verlieren (respektive um zu beschleunigen oder lang-
samer zu werden) -> Bewegen Sie den LINKEN Steuerknüppel nach oben oder unten
. Um die eigene Achse zu rotieren -> Bewegen Sie den LINKEN Steuerknüppel nach
rechts oder links
. Um seitwärts nach
rechts oder links zu flie-
gen ->Bewegen Sie den
RECHTEN Steuerknüppel
nach rechts oder links. Je
mehr Sie den Steuerknüp-
pel neigen, desto schneller
fliegt die Gravit in die ent-
sprechende Richtung
. Um nach vorne oder
hinten zu fliegen -> Be-
wegen Sie den RECHTEN
Steuerknüppel nach vorne
und hinten. Je mehr Sie den
Steuerknüppel auslenken,
desto schneller fliegt die
DEUTSCH
BEDIENUNGSANLEITUNG

LRP electronic GmbH
Hanfwiesenstraße 15
73614 Schorndorf
Deutschland
HA00100 © LRP electronic GmbH 2017
BEST-NR. 220715
GRAVIT FPV XTREME 80 RTF 2.4GHz
RACE-QUADROCOPTER
Gravit in die entsprechende
Richtung
Natürlich können Sie diese
individuellen Steuerbefehle
zu komplexeren Steuerbe-
fehlen kombinieren. Zum
Beispiel: Wenn Sie den
RECHTEN Steuerknüppel
gleichzeitig nach vorne und
nach links neigen, dann wird
die Gravit nach vorne links
fliegen.
Testen Sie nun vorsichtig
und langsam die Steuerung
der Gravit Xtreme 80. Sie
werden sehen, dass sie sehr
einfach und intuitiv zu steu-
ern ist. Sie werden rasch an Erfahrung gewinnen, die Xtreme besser kontrollieren können
und mit mehr Sicherheit und Können fliegen.
Um Ihre Gravit zu landen, stellen Sie sicher, dass sie sich über einer geeigneten, ebenen
Oberfläche befindet. Dann ziehen Sie langsam das Gas (LINKER STEUERKNÜPPEL) nach
unten. Die Gravit wird langsam an Höhe verlieren und wenn Sie dicht über dem Boden ist,
nehmen Sie das Gas komplett zurück. Die Gravit landet und ihre Motoren schalten ab.
Stellen Sie sicher, die Motoren Ihrer Gravit nicht ungewollt während des Fluges abzustellen.
Sie würde wie ein Stein vom Himmel fallen und die Gefahr eines Schadens wäre so sehr
hoch.
6. DIE GRAVIT GRAVIT FPV XTREME 80 - FORTGESCHRITTENE FUNKTIONEN
BITTE BEACHTEN: Die Fernsteuerung Ihrer Gravit Xtreme ist eine hochwertige Fernsteue-
rung mit vielen Optionen diese zu konfigurieren und zu tunen.
Allerdings wurde die Fernsteuerung bereits ab Werk auf Ihre Xtreme 80 abgestimmt und
WIR EMPFEHLEN NICHT, IRGENDWELCHE EINSTELLUNGEN AN IHRER FERNSTEURUNG
VORZUNEHMEN ODER ZU ÄNDERN.
Wenn Sie die falschen Einstellungen ändern oder einer Einstellung den falschen Wert zu-
weisen, so kann dies in einem unvorhersehbaren, unkontrollierbaren Flugverhalten Ihrer
Gravit resultieren.
LRP übernimmt keine Verantwortung für Schäden, die direkt oder indirekt daraus entstan-
den sind, daß die Einstellungen der Fernsteuerung geändert wurden.
Sollten Sie sich dazu entscheiden, Einstellungen zu ändern, so denken Sie bitte daran, daß
Sie dies VOLLSTÄNDIG auf eigenes Risiko und eigene Verantwortung tun.
Fortgeschrittene Flug-Funktionen
Dieses Kapitel deckt die zusätzlichen Flug-Modi und die Funktionen Ihrer Fernsteuerung im
Detail ab.
WICHTIGE DEFINITION: Wie Sie sehen können, hat die Fernsteuerung eine Menge sil-
berner Metall-Schalter. Diese Schalter können zwei Stellungen haben, oben und unten. Um
etwaige Verwirrung bezüglich der Oben- und Unten-Position der Schalter zu vermeiden:
„Oben“ und „unten“ wird in dieser Anleitung wie folgt definiert:
Schauen Sie sich das Bild an, welches Ihnen die Schalter S1 bis S5 zeigt. Dann halten Sie
die Fernsteuerung so in der Hand, wie Sie es auch tun würden wenn Sie die Gravit fliegen
würden.
Bei den Schaltern S1 und S5 heisst „OBEN“ tatsächlich leicht nach unten zum Boden geneigt
und „UNTEN“ leicht nach oben Richtung Himmel zeigend.
Bei den Schaltern S2,S3 und S4 heisst „OBEN“ vom Piloten leicht wegzeigend, „UNTEN“
zum Piloten leicht hinzeigend.
Das scheint zuerst verwirrend, aber indem wir die Schalter-Positionen derart definieren be-
deutet OBEN und UNTEN für alle 5 Schalter jeweils die gleiche absolute Schalter-Position.
Bitte behalten Sie dies im Kopf wenn Sie die Anleitung lesen und die Schalter bedienen.
Die Schalter haben die folgende Funktion:
S1 -> KEINE Funktion, er ist für zukünftige Funktionen und Updates gedacht, die Position
dieses Schalters spielt KEINE Rolle.
S4 -> Wenn S4 nach UNTEN gelegt wird (ALLE anderen Schalter sind OBEN), geht die
Gravit in den SPEED-MODE. Die Status-LED ist weiterhin grün, aber Sie werden eine leicht
erhöhten, steileren Anstellwinkel der Gravit beim Fliegen bemerken, was in einer leicht hö-
heren Geschwindigkeit resultiert (siehe Beschreibung unten).
S2+S4 -> Wenn sowohl S2 als auch S4 nach UNTEN geschaltet werden (ALLE anderen
Schalter bleiben OBEN), dann wird die Status-LED der Gravit von grün auf rot wechseln. Die
Gravit befindet sich nun im FLIPPING-MODE (siehe Beschreibung unten).
S3 -> Wenn der Schalter S3 nach UNTEN gelegt wird (EGAL in welcher Stellung sich irgend-
ein anderer Schalter befindet), wird die Status-LED des Gravit rot und Sie befinden sich im
ACRO-MODE (siehe Beschreibung unten).
S5 -> Dieser Schalter ist dazu da, die Motoren scharf zu schalten, respektive sie zu deaktivie-
ren. Wenn der Schalter OBEN ist, sind die Motoren scharf und werden anfangen zu drehen,
sobald Sie am linken Steuerknüppel Gas geben. Wenn der Schalter UNTEN ist, dann werden
die Motoren nicht scharf oder schalten sich (falls sie schon drehen) SOFORT ab. Der S5
Schalter ist also eine Art „Notaus“, der die Motoren sofort ausschaltet oder verhindert, daß
sie Gasbefehlen entgegen nehmen und überhaupt erst anlaufen.
Schauen Sie sich auch die nachfolgende Tabelle für die Funktionen der Schalter an:
SPEED-MODE:
Indem Sie den Schalter S4 nach unten legen aktivieren Sie den SPEED-MODE. Technisch
gesehen erhöhen Sie die „Dual Rate“ bestimmter Steuerkanäle um 25% im Vergleich zum
„normalen“ Flug-Modus (mit allen Schaltern in der OBEN-Position). Das Ergebnis ist eine
steilerer maximaler Anstellwinkel der Gravit in die entsprechende Richtung, wenn Sie die
Knüppel bewegen. Der steilere Anstellwinkel wiederum resultiert in einer höheren Ge-
schwindigkeit und diese Einstellung erhöht insgesamt die subjektive Reaktionsschnelligkeit
und Agilität Ihrer Xtreme 80.
In diesem Modus balanciert sich die Gravit selbst automatisch aus („self-leveling“) und der
maximale Anstellwinkel ist immer noch vom Flug-Kontroller aus limitiert. Somit ist es ein
sicherer Modus für alle, die einfach nur ein klein wenig mehr Performance haben wollen.
FLIPPING-MODE:
Wenn S2 UND S4 BEIDE nach unten gedrückt werden, ist der FLIPPING-MODE aktiv. Und so
funktioniert der FLIPPING-MODE:
Sobald der flipping-mode aktiviert ist, können Sie mit der Gravit eine schnelle Serie von Flips
in eine bestimmte Richtung fliegen. Der LINKE Steuerknüppel behält dabei seine normale
Standard-Funktion (was bedeutet Gas ist hoch/runter, um die eigene Achse drehen ist links/
rechts).
Aber die Funktionen des RECHTEN Steuerknüppels werden erweitert. Wenn Sie den rechten
Knüppel bewegen, dann ist die Funktion zunächst wie gewohnt und Sie fliegen rechts/links
und vorwärts/rückwärts. Sobald Sie aber eine bestimmte Auslenkung des Steuerknüppels
überschreiten (= Sie also den rechten Steuerknüppel weit genug bewegen), aktiviert sich
der FLIPPING-MODE. Wenn dies geschieht, DEAKTIVIERT die Gravit ihr „Self-Leveling“ (ba-
lanciert sich also NICHT mehr selbstständig aus) und die Limitierung des maximalen Anstell-
winkels wird ebenfalls aufgehoben.
Als Ergebnis wird die Gravit anfangen, sehr enge Loopings (= Flips) in die Richtung zu flie-
gen, in den Sie den linken Steuerknüppel drücken.
Sobald Sie den rechten Steuerknüppel loslassen oder ihn wieder zurück unter eine gewisse
Schwelle Richtung Neutral-Position bewegen, aktiviert sich das „Self-Leveling“ wieder und
der maximale Anstellwinkel ist wieder limitiert.
DEUTSCH
S1
S2 S3 S4
S5
S1 S2 S3 S4 S5 Description/function
of switch-combination
LED STATUS
(COLOR)
up OR
down DOWN UP UP UP No function RED
up OR
down DOWN UP DOWN UP FLIPPING MODE RED
up OR
down
up OR
down UP DOWN UP SPEED-MODE RED/GREEN
(depending on S2 position)
up OR
down
up OR
down DOWN up OR
down UP ACRO MODE RED
up OR
down
up OR
down
up OR
down
up OR
down DOWN
Motors cannot arm as
soon as S5 is DOWN,
no flying possible
N.A.
BEDIENUNGSANLEITUNG

LRP electronic GmbH
Hanfwiesenstraße 15
73614 Schorndorf
Deutschland
HA00100 © LRP electronic GmbH 2017
BEST-NR. 220715
GRAVIT FPV XTREME 80 RTF 2.4GHz
RACE-QUADROCOPTER
Das bedeutet, daß sich die Gravit wieder selbst „aufrichtet“ und stabilisiert und sich wie-
der wie gehabt fliegen läßt. Dies ist ein toller Flug-Modus, um coole und atemberaubend
aussehende Flug-Manöver zu machen, ohne dabei das Können eines Profi-Piloten haben
zu müssen.
BITTE BEACHTEN: Sobald Sie das Gefühl haben, im FLIPPING-MODE die Kontrolle über
Ihre Gravit zu verlieren, LASSEN SIE EINFACH DEN RECHTEN STEUERKNÜPPEL los und
Ihre Gravit wird sich automatisch in der Luft wieder stabilisieren. Anschließen können Sie
wie gewohnt weiter fliegen.
In diesem Flug-Modus deaktiviert sich also die „Selbst-Stabilisierung“ und die Limitierung
des maximalen Flug-Winkels SOBALD (und solange) Sie mit dem RECHTEN Steuerknüp-
pel eine gewisse Grenze (= ein gewisses Maß an Auslenkung) überschreiten. Solange Sie
INNERHALB dieser Grenze bleiben (= den rechten Steuerknüppel also nur geringfügiger
bewegen), fliegt die Gravit ganz normal. Dieser Flug-Modus ist perfekt zum „Angeben“ und
läßt einen Anfänger aussehen wie einen Profi. Versuchen Sie es!
ACRO-MODE (MANUAL MODE)
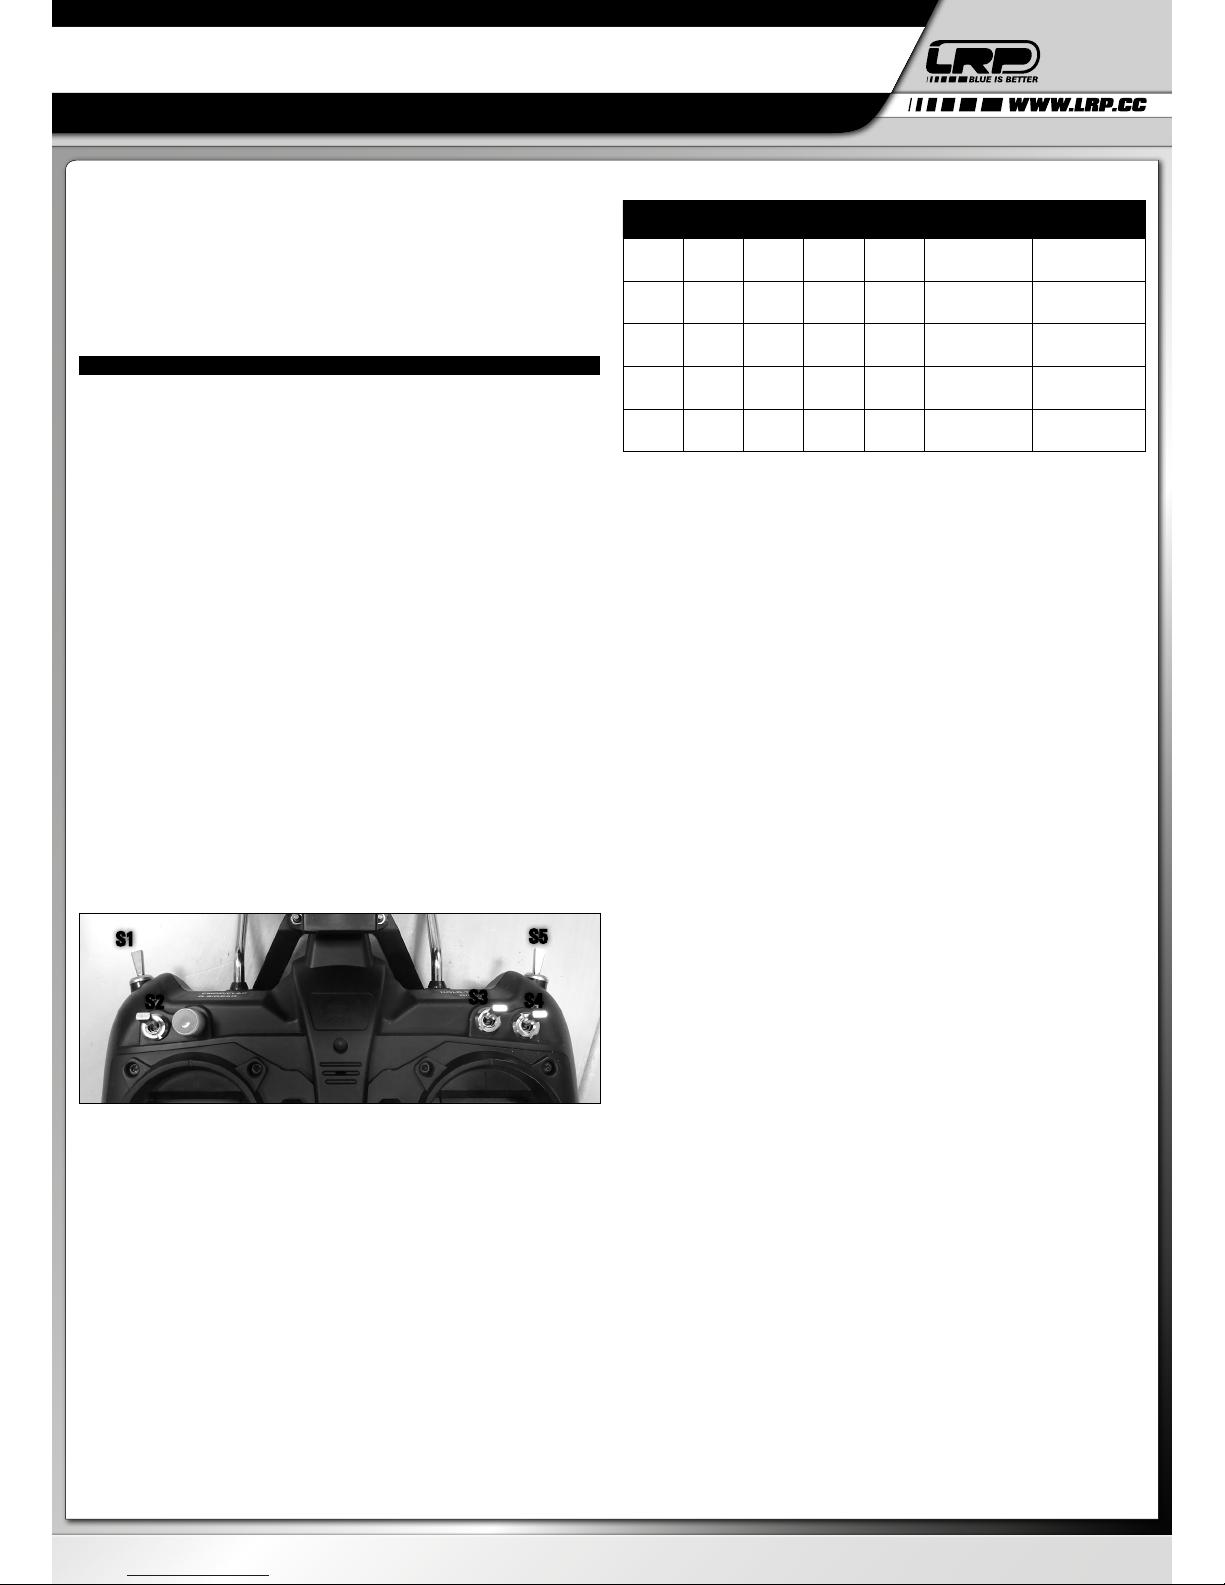
Sobald Sie den Schalter S3 nach UNTEN schieben, ist der ACRO-MODE aktiviert.
WICHTIG! BITTE BEACHTEN: Es spielt KEINE ROLLE, in welcher Position sich ALLE ANDE-
REN Schalter befinden, SOBALD Sie den S3 Schalter nach unten legen, ist der ACRO-MODE
aktiv. Dies bedeutet, daß der Schalter S3 allen anderen Schaltern ÜBERGEORDNET ist. Be-
achten Sie dies wenn Sie fliegen.
Sobald der ACRO-MODE aktiviert ist, zeigt die Xtreme 80 ihr wahres Potential. Die Funkti-
on der beiden Steuerknüppel bleibt dabei erhalten und ist wie im „normalen“ Flug-Modus,
ABER das „Self-Leveling“ und die Limitierung des maximalen Anstellwinkels werden BEIDE
deaktivert. Dies erlaubt Ihnen, die volle manuelle Kontrolle über Ihre Gravit auszuüben und
zieht folgendes nach sich:
1) KEIN „SELF-LEVELING“: Das bedeutet wenn Sie mit Ihrer Gravit in irgendeine Richtung
fliegen und dann den rechten Steuerknüppel loslassen, wird sich die Gravit NICHT selbst-
ständig „aufrichten“ und automatisch in die horizontale Position zurückkehren.
Hier ist ein Beispiel:
Nehmen wir einmal an, daß Sie Ihre Gravit nach vorne geradeaus steuern, indem Sie den
rechten Steuerknüppel nach oben drücken. Die Gravit wird in diese Richtung kippen und
dorthin fliegen. Allerdings wird die Gravit NICHT in eine horizontale Ausrichtung zurück-
kehren, wenn Sie den rechten Steuerknüppel loslassen, sondern sie wird weiterhin ihren
Anstellwinkel beibehalten und vorwärts fliegen. Wenn Sie die Gravit zum Stoppen bringen
wollen (= wenn Sie wollen, daß die Gravit wieder eine „neutrale“, horizontale Ausrichtung
einnimmt), dann müssen die den augenblicklichen Anstellwinkel KONTERN, indem Sie
den rechten Steuerknüppel ENTGEGEN der augenblicklichen Ausrichtung der Gravit über
die Neutralstellung hinaus nach unten bewegen. In unserem Beispiel heisst das, daß Sie
den Steuerknüppel nach unten über die neutrale Stellung hinaus bewegen müssen, um
den Anstellwinkel der Gravit zu reduzieren und die Gravit schließlich wieder in eine hori-
zontale Lage zu bekommen. ABER BEDENKEN SIE: Wenn Sie den rechten Steuerknüppel
zu weit und/oder zu lang nach unten drücken, so kippt die Gravit in die Rückwärtsrichtung
und das Spiel beginnt von vorne. Die Gravit im ACRO-MODE zu fliegen erfordert ständige,
schnelle Steuerbefehle und sollte NUR VON VERSIERTEN PILOTEN PROBIERT WERDEN!
2) KEIN MAXIMALER ANSTELLWINKEL (FLUGWINKEL) MEHR:
Das bedeutet, daß der Flugkontroller KEINEN maximalen Anstellwinkel mehr vorgibt, den
die Gravit einnehmen kann, wenn Sie den rechten Steuerknüppel VOLLSTÄNDIG in ir-
gendeine Richtung auslenken. In den anderen Flug-Modi ist es zum Beispiel nicht möglich,
einen Looping zu fliegen. Der Grund hierfür ist, wenn Sie einen Looping fliegen wollen,
so muss die Gravit in der Lage sein, ohne Limitierung zu fliegen und zu drehen, auch
kopfüber für einen kurzen Moment. In den anderen Flug-Modi ist das nicht möglich. Der
Flugkontroller limitiert den maximalen Flugwinkel Ihrer Gravit und macht somit das Flie-
gen von Loopings unmöglich (nur Flips sind möglich im FLIPPING-MODE). Die Gravit wird
z.B. in einem bestimmten maximalen Winkel nach oben fliegen, aber ihr Anstellwinkel
wird nicht immer größer werden sodaß sie irgendwann einen Looping machen würde.
Ob Sie im ACRO-MODE „echte“ Loopings fliegen oder nur „Flips“ machen, hängt von der
Kombination aus bereitgestelltem Schub und Anstellwinkel der Gravit ab. ZUM BEISPIEL:
- Moderater Schub und moderate Auslenkung des rechten Steuerknüppel werden in
einem Looping mit größerem Durchmesser enden
- Vollgas und maximale Auslenkung des rechten Steuerknüppels hingegen haben eine
schnelle Serie von enggeflogenen Flips in die entsprechende Richtung zur Folge.
-> Das bedeutet, daß Durchmesser und Geschwindigkeit der Flips/Loopings aus der Kom-
bination von Gas und dem Ausmaß der Knüppelauslenkung resultieren.
Der ACRO-MODE läßt Sie die lustigsten, coolsten und schwierigsten Flug-Manöver flie-
gen, aber WIR EMPFEHLEN DRINGLICHST, DEN ACRO-MODE NUR DANN ZU BENUT-
ZEN, WENN ÜBER DIE NÖTIGE FLUGERFAHRUNG VERFÜGEN.
WICHTIG: Sollten Sie während des Fliegens im ACRO-MODE einmal die Kontrolle über
Ihre Gravit verlieren, so bewegen Sie den Schalter S3 einfach wieder nach oben. Sie
befinden sich SOFORT wieder in einem der stabilisierten Flug-Modi. LASSEN SIE DEN
RECHTEN STEUERKNÜPPEL KURZ LOS und die Gravit wird sich fangen und in Ihre hori-
zontal ausgerichtete Position zurückkehren. Obwohl die Gravit Xtreme in der Lage ist, sich
sehr schnell wieder zu fangen wenn Sie sie aus dem ACRO-MODE zurückschalten, so
sollten Sie dennoch UNBEDINGT darauf achten, daß Sie riskantere Flugmanöver in einer
Mindesthöhe von über 30 Metern ausführen. So geben Sie der Gravit Xtreme ggf die Zeit,
sich wieder „neu zu orientieren“ und horizontal auszurichten. Seien Sie sich auch bewußt,
daß das Fliegen im ACRO-MODE einen Absturz sehr viel wahrscheinlicher macht und Sie
Ihre Gravit ggf. beschädigen könnten.
Das 5.8Ghz-FPV-System Ihres Gravit Xteme 80 (5.8GHz-Kamera und -Monitor)
Ihre Gravit Extreme ist ab Werk mit einen HD-5.8GHz-FPV-System ausgestattet. Die-
ses System gestattet es Ihnen nicht nur, Ihre Gravit mithilfe des LCD-Empfängers FPV
(=First Person View) zu fliegen, sondern Sie können über den in der Kamera integrierten
Micro-SD-Kartenschacht auch Videos aufnehmen.
Die Reichweite des Systems beträgt um die 100 Meter. Nichts desto trotz kann die Reichwei-
te aber bedingt durch externe Faktoren (wie Hochstrommasten, andere Funksignale oder
Hindernisse wie Bäume, etc.) drastisch reduziert werden. Beobachten Sie die Reichweite in
Ihrem Fluggebiet also sorgfältig.
Dieses Kapitel wird all die Funktionen und Features Ihres FPV-Systems im Detail erklären.
1) Die 5.8GHz-Kamera
Die Kamera ist bereits vor-
montiert und fertig verkabelt.
Sollten Sie die Kamera nicht
nutzen wollen, so können Sie
sie ausstecken und komplett
vom Chassis entfernen. Ein
Grund dies zu tun mag sein,
daß Sie die Performance und
Flugdauer Ihrer Gravit maxi-
mieren wollen und Sie kein
Kamerabild für den Flug brau-
chen. In diesem Fall wird Ihnen
das Demontieren der Kamera
helfen. Die Gravit ist leichter
ohne die Kamera und Ihr Akku
wird länger halten, da er die
Kamera nicht mit Spannung
versorgen muss. Diese beiden
Tatsachen werden in einer hö-
heren Geschwindigkeit, einer
besseren Gesamt-Flugleistung
und einer längeren Flugzeit resultieren.
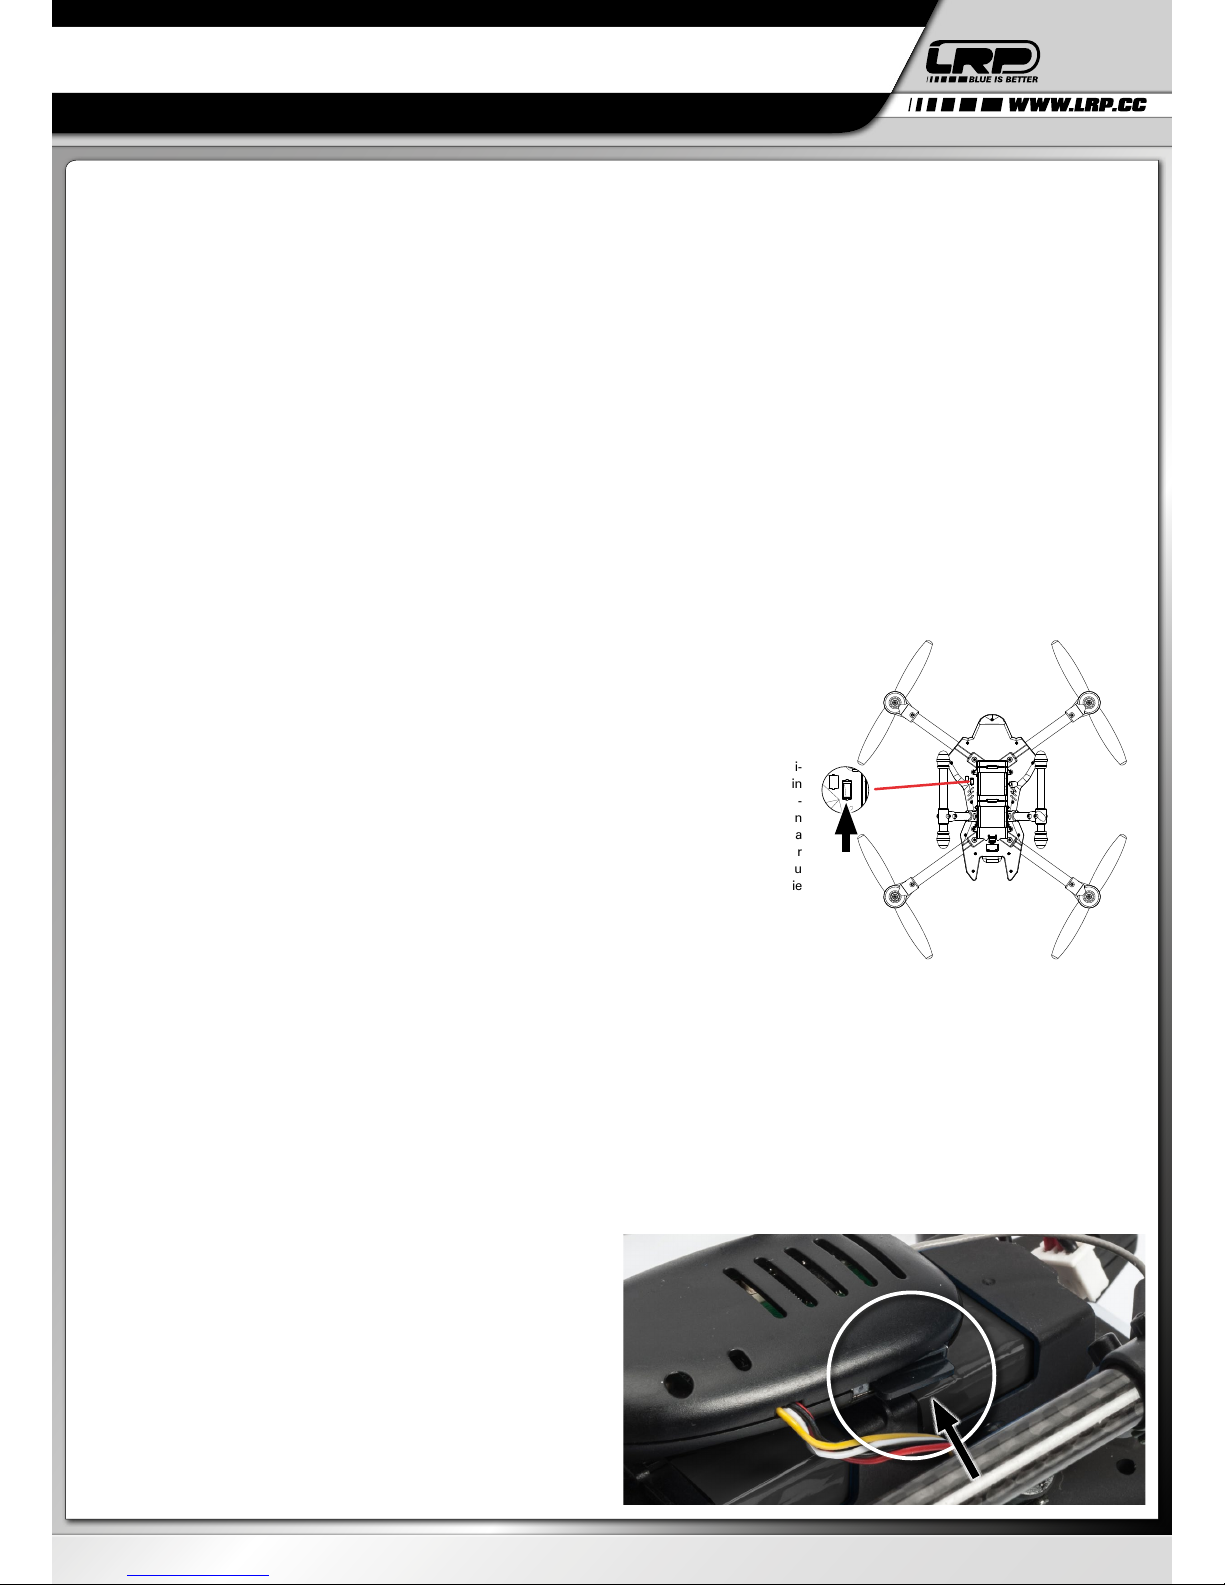
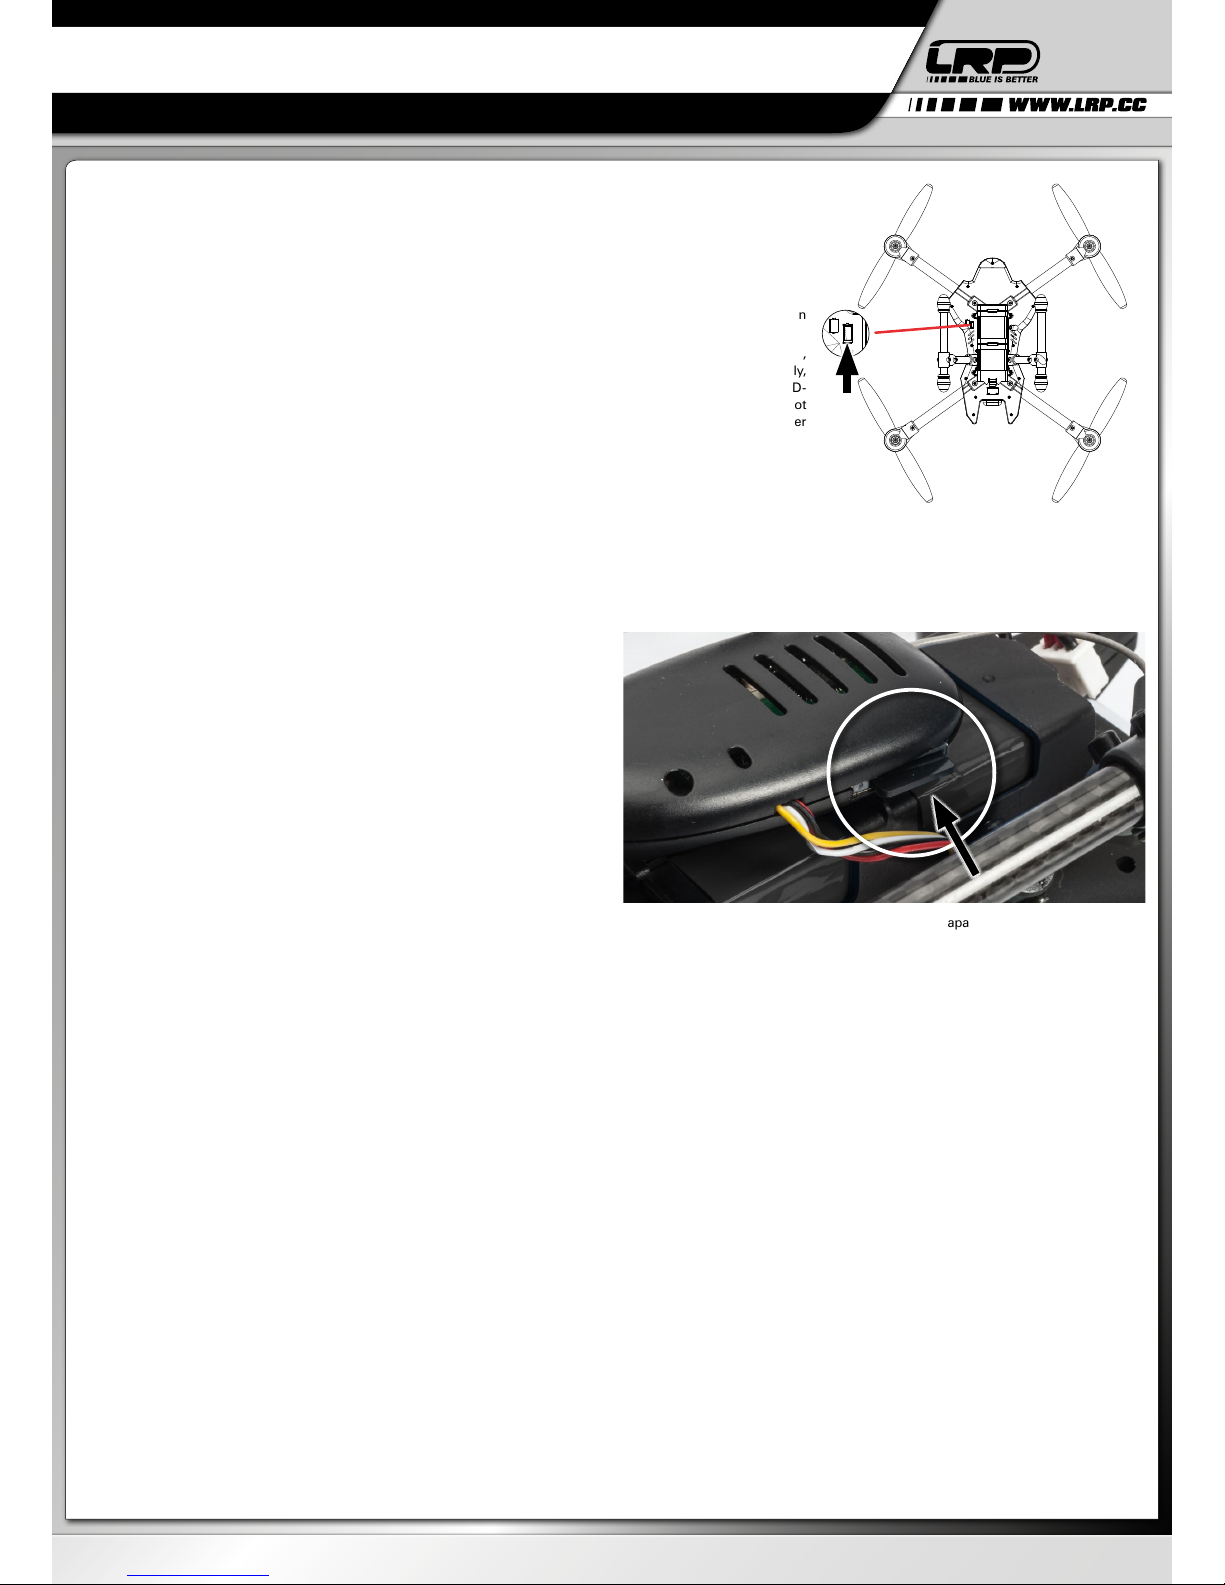
Wenn Sie sie wieder anbringen wollen, stellen Sie einfach sicher, daß Sie die Kamera wieder
korrekt auf ihrer Halterung anbringen und die Anschlusskabel wieder richtig am Chassis
angesteckt werden (siehe Bild).Stellen Sie auch sicher, daß die Antenne, welche aus dem
hinteren Ende der Kamera kommt, sich frei bewegen kann und nicht eingeklemmt oder
direkt verdeckt wird.
Bitte beachten Sie: Wenn Sie die Kamera verpolt ans Chassis der Gravit anschließen, so
wird das zu einem Defekt der Kamera und vermutlich auch der Elektronik-Platine Ihrer Gravit
führen. Passen Sie also immer auf, daß Sie die Kabel richtig herum einstecken.
Bevor Sie die Kamera benutzen, stecken Sie bitte die mitgelieferte Micro-SD-Karte so wie
im Bild gezeigt in den Karten-Schacht Ihrer Kamera. Sie können auch eine eigene Micro-SD-
Karte benutzen, aber LRP gibt KEINE Kombatibilitätsgarantie, probieren Sie dies also bitte
auf eigenes Risiko aus.
DEUTSCH
FCC
Caution: The user is cautioned that changes or modifications not expressly
approved by the party responsible for compliance could void the user's
authority to operate the equipment.
Notice for beginners:
1.If it is your first time to fly, please follow an experienced pilots.
2.Please be familiar with all the functions of TX and the related sticks
before fly.
4.6CH quadcopter is not a toy. To avoid unnecessary loss, please simulate
to fly on the computer firstly.
FCC AUTHENTICATE
-12-
BEDIENUNGSANLEITUNG

LRP electronic GmbH
Hanfwiesenstraße 15
73614 Schorndorf
Deutschland
HA00100 © LRP electronic GmbH 2017
BEST-NR. 220715
GRAVIT FPV XTREME 80 RTF 2.4GHz
RACE-QUADROCOPTER
Um das FPV-System zu nutzen, machen Sie Ihre Gravit startbereit, dann schalten Sie den
Empfänger an. Sollen Sie den LCD-Empfänger noch nicht an der Halterung der Fernsteu-
erung befestigt haben, so machen Sie dies jetzt. Stellen Sie ebenfalls sicher, daß Sie den
eingebauten Sonnen-Schild des LCD-Empfängers aufgefaltet haben, so daß Sie den Bild-
schirm problemlos erkennen können. Innerhalb einiger Sekunden wird die Gravit flugbereit
sein und Sie werden ein Live-Video-Bild der Kamera auf dem Bildschirm sehen können.
Bewegen Sie die Gravit ein wenig herum und überprüfen Sie die korrekte Übertragung des
Video-Signals an Ihren Empfänger.
Der Bildschirm wird in der rechten unteren Seite einen roten Punkt gefolgt von einem wei-
ßen Time-Code zeigen. Der Time-Code zeigt Ihnen die Stunden, Minuten und Sekunden, die
zur Aufnahme noch übrig sind auf Ihrer Micro-SD-Karte. Die hier angezeigt Zahl kann variie-
ren, abhängig von der Kapazität der Karte, die Sie benutzen und der verbleibenden Kapazität
auf der Karte. Die mitgelieferte 4GB Micro-SD-Karte sollte eine verfügbare Aufnahmezeit
von ca, 1 Stunde und 10 Minuten Zeigen (wenige Minuten mehr oder weniger sind normal).
Falls Sie in der Mitte des Bildschirms eine rote Meldung bekommen, die „MEMORY FULL“
(„Speicher voll“) heisst, kann dies entweder bedeuten, daß Ihre Speicherkarten nicht mehr
genug freien Speicherplatz für eine Aufnahme hat ODER daß Sie überhaupt keine Spei-
cherkarte eingesetzt haben. Sollte eine Speicherkarte mit freiem Platz eingesetzt sein und
die Meldung trotzdem auftauchen, bedeutet dies entweder, daß Ihre Speicherkarte nicht
kompatibel mit der Kamera ist oder daß sie nicht passend formatiert wurde. In diesem Fall
benutzen Sie bitte eine andere Speicherkarte oder formatieren Sie sie mit dem FAT32 Dat-
eisystem.
Die Aufnahme starten und stoppen
Um eine Aufnahme zu starten oder zu stoppen, drücken Sie den ROTEN KNOPF in der
oberen linken Ecke Ihrer Fernsteuerung (RECHTS neben dem Schalter S2). Daraufhin wird
der rote Punkt in der LCD-Anzeige anfangen zu blinken und der Time-Code wird seine Farbe
von weiss nach rot ändern und die Zeit anzeigen, die diese Aufnahme bereits läuft. Drücken
Sie den roten Knopf auf der Funke erneut, um die Aufnahme wieder zu stoppen. Der rote
Punkt auf dem Bildschirm wird aufhören zu blinken, der Time-Code wird wieder weiss wer-
den und die Zeit, die auf dem Display angezeigt wird ist die neue, aktualisierte Zeit, die zum
Aufnehmen übrig bleibt.
Eine Aufnahme am PC oder Laptop nutzen
Die Aufnahmen werden als „AVI“ Dateien auf der SD-Karte gesichert. Um diese Aufnahmen
anzuschauen und weiter zu verarbeiten, stecken Sie die Micro-SD-Karte einfach in den mit-
gelieferten USB-Karten-Leser und verbinden diesen mit dem USB-Anschluss Ihrer PCs oder
Laptops. Die Micro-SD-Karte wird als Wechseldatenträger auftauchen (genau so wie eine
externe Festplatte oder ein USB-Stick) und Sie können den Inhalt mit dem Datei-Browser
Ihrer Betriebsytems (welches Windows XP oder höher, genauso wie MacOS oder Linux sein
kann) anschauen. Auf der Micro-SD-Karte werden Sie einen Ordner namens „DCIM“ finden.
Innerhalb dieses Ordners ist ein weiteren Unterordner namens „100DSCIM“ und in diesem
befinden sich Ihre ganzen gemachten Video-Dateien, mit dem Namen „PICT000X.AVI“, wo-
bei X die Nummer der Aufnahme ist. Sie können diese Dateien nun anschauen, kopieren,
löschen oder editieren wie Sie wollen.
2) Der LCD-Empfänger
Der LCD-Empfänger ist recht einfach zu montieren und kann sehr einfach in Betrieb genom-
men werden, es sei denn, Sie wollen mit anderen Xtreme 80-Piloten fliegen. In diesem Fall
bitte lesen Sie bitte das Kapitel „Wenn mehr als ein Pilot fliegt“ weiter unten.
Wenn Sie den Monitor benutzen wollen, stellen Sie sicher, daß er fest in der Halterung der
Funke sitzt, der Sonnenschutz aufgeklappt, der Akku voll geladen und die Antenne aufge-
klappt ist.
Den Empfang der Antenne optimieren
Sie können die Antenne Ihres LCD-Empfängers um 360° drehen und sie ebenfalls in 2 ver-
schiedenen Winkeln justieren. Für Ihren ersten Flug empfehlen wir, die Antenne komplett
aufzurichten, so daß Sie gerade ist. Sollten Sie nun während des Fluges Probleme mit der
Reichweite oder Qualität der Video-Übertragung haben, so können Sie die Antenne anders
ausrichten, um einen optimalen Empfang zu erreichen.
8. WENN MEHR ALS EIN PILOT FLIEGT
Ab Werk senden ALLE Kamera mit der gleichen Frequenz und alle LCD-Empfänger emp-
fangen die GLEICHE Frequenz. Solange Sie alleine fliegen, stellt dies kein Problem dar. Aber
was ist, wenn einige Ihrer Freunde sich auch eine Xtreme gekauft haben und nun mit Ihnen
oder gegen Sie fliegen wollen? Machen Sie sich keine Sorgen, die Frequenz sowohl der
Kamera als auch des LCD-Empfängers kann zwischen 6 unterschiedlichen Kanälen hin und
her geschaltet werden. Das bedeutet, daß bis zu 6 Piloten mit Ihren Xtremes fliegen können,
ohne sich gegenseitig zu stören. Doch wie funktioniert der Wechsel des Funkkanals?
Bitte schauen Sie sich die Grafik unten an. Die Abbildung zeigt die 3 DIP-Schalter, die Sie
genau in der Mitte auf der Rückseite Ihres LCD-Empfängers finden werden. Diese kleinen
Schalter (die man am besten mit einem kleinen, flachen Schraubenzieher oder etwas ähn-
lichem bedient) können in verschiedene Schalterkombinationen gesetzt werden, von der
jede einer anderen Empfänger-Frequenz (einem anderen Empfänger-Kanal) entspricht.
Wie Sie sehen können stehen die DIP-Schalter ab Werk auf CH1 (Kanal 1). Indem Sie nun
das DIP-Schaltermuster entsprechend anders einstellen (siehe Bild), können Sie den Emp-
fangs-Kanal auf Kanal 2 bis 6 (CH2 - CH6) umstellen. Sobald Sie den Kanal eines LCD-Emp-
fängers über die DIP-Schalter einmal geändert haben, wird der Empfänger auch weiterhin
diesen Kanal beibehalten, wenn Sie ihn aus und wieder anschalten. Und das solange, bis
Sie einen anderen Kanal wählen.
Als nächstes schauen Sie bitte auf Ihre Kamera. Ihre Kamera hat KEINE DIP-Schalter, aber
sie hat einen kleinen weißen Tast-Schalter auf der linken, vorderen Unterseite der Kamera
(siehe Photo).
Ab Werk ist die Kamera so eingestellt, daß Sie immer auf CH1 sendet. Wenn Sie ein kleines
Werkzeug nehmen und den Knopf der Kamera einmal drücken, werden Sie ein „Klick“ hören
und fühlen und die Kamera schaltet zum nächsten Kanal, welcher CH2 wäre. Jedes weitere
Drücken des weißen Knopfes läßt die Kamera zum nächst höheren Kanal schalten. Wenn
der letzte Kanal erreicht ist (CH6) und der Knopf erneut gedrückt wird, so springt die Kamera
wieder auf CH1 und das ganze geht von vorne los.
WICHTIG: Im Gegensatz zur Kanalwahl am LCD-Empfänger mittels der DIP-Schalter, ist die
Kanalwahl an der Kamera NICHT permanent. Das bedeutet, wenn Sie die Kamera zum Bei-
spiel auf CH3 eingestellt haben und Sie dann aus und wieder anschalten, so ist sie wieder
auf CH1 (dem Standard-Kanal) eingestellt. Sie müssen also den entsprechenden Kanal (au-
ßer CH1) jedes Mal erneut einstellen, wenn Sie die Kamera einschalten. Da dieser Vorgang
aber sehr schnell mit nur ein paar Klicks eingestellt werde kann, sollte dies kein Problem
darstellen.
Hier ist ein Beispiel, wie Sie vorgehen würden ,wenn Sie mit 2 anderen Freunden (also mit
insgesamt 3 Piloten) zusammen fliegen wollen:
- Sie sind Pilot A, Ihre Freunde die Piloten B und C
- Alle Piloten machen Ihre Gravit Xtremes flugfertig. Der LCD-Empfänger wird noch NICHT
eingeschaltet
- Pilot B setzt seinen LCD-Empfänger auf CH2, Pilot C auf CH3 (sehen Sie sich die Abbildung
an, um die DIP-Schalter-Stellungen zu erfahren)
- Nun schalten alle Piloten ihre LCD-Empfänger an
- Da alle Xtreme-Kameras im Moment auf CH1 senden, wird nur Pilot A ein Videosignal
empfangen (da Ihr LCD-Empfänger ja auf der Standard-Einstellung CH1 steht)
- Pilot A wird höchstwahrscheinlich KEIN vernünftiges Video-Bild empfangen, da im Mo-
ment ALLE 3 Xtreme-Kameras auf CH1 senden und dies zu Signal-Überlagerungen und
Störungen führt.
- Pilot B und C sollten überhaupt kein Bild empfangen, da keine der Kameras augenblicklich
auf CH2 oder CH3 sendet
- Pilot B drückt nun den Kanal-Knopf seiner Kamera EINMAL, was die Kamera von CH1 auf
CH2 schaltet.
- Pilot C drückt den Kanal-Knopf seiner Kamera ZWEIMAL, was seine Kamera von CH1 auf
CH3 schaltet.
- Jetzt nutzen die Kameras der 3 Piloten jeweils die Kanäle, die auch ihre entsprechenden
LCD-Empfänger benutzen und ALLE 3 Piloten sollten eine Video-Bild ihrer Xtreme (und
NUR von ihrer Xtreme) empfangen
- Sollte einer oder mehrere der Piloten irgendwelche „Geister-Bilder“ von den Kameras der
DEUTSCH
Channel CH1 CH2 CH3 CH4 CH5 CH6
DIP-Position
1 2 3 1 2 3 1 2 3 1 2 3 1 2 3 1 2 3
Frequency (GHz) 5745 5765 5785 5805 5825 5845
BEDIENUNGSANLEITUNG

LRP electronic GmbH
Hanfwiesenstraße 15
73614 Schorndorf
Deutschland
HA00100 © LRP electronic GmbH 2017
BEST-NR. 220715
GRAVIT FPV XTREME 80 RTF 2.4GHz
RACE-QUADROCOPTER
anderen Piloten empfangen, so können Sie folgendes testen -> Pilot B stellt seine Kamera
auf CH3 anstelle CH2 und Pilot C stellt seine Kamera auf CH5 anstelle CH3
-> Indem Sie dies tun, nutzen alle 3 Piloten Kanäle, die noch weiter auseinander liegen und
somit ist das Risiko, Störbilder von anderen Kameras zu empfangen, noch geringer.
Nun sollten alle 3 Piloten bereit sein zu starten. Lasst die Schlacht beginnen!
8. DIE PROPELLER TAUSCHEN
Es ist sehr wichtig, daß sich die Propeller immer in unbeschädigtem, absolut intaktem Zu-
stand befinden bevor Sie mit Ihrer Gravit fliegen. Andernfalls wird die Performance und das
Flugverhalten Ihrer Gravit nicht den Erwartungen entsprechen und beschädigte Propeller
können zu einem Absturz und weiteren Schäden führen. Stellen Sie also sicher, daß die
Propeller Ihrer Gravit IMMER in perfektem Zustand sind.
Füher oder später werden Sie einen oder mehrere Ihrer Propeller ersetzen müssen. Wenn
Sie dies machen, machen Sie es bitte wie nachfolgend beschrieben.
Die korrekte Laufrichtung der Propeller ist wie im Bild unten beschrieben:
Links vorne -> CW-Propeller (rechtsdrehend)
Rechts vorne -> CCW-Propeller (linksdrehend)
Links hinten -> CCW-Propeller (linksdrehend)
Rechts hinten -> CW-Propeller (rechtsdrehend).
Stellen Sie sicher, daß Sie IMMER einen Propeller mit einem anderen Propeller der SELBEN
Drehrichtung ersetzen.
- Um den Propeller zu ersetzen, lösen Sie bitte zuerst die Propeller-Mutter, indem Sie ein
kleines, metallenes Werkzeug (zum Beispiel einen kleinen Hex-Schlüssel) durch die Öff-
nung der Mutter schieben
- Dann lösen Sie die Mutter, indem Sie sie in die SELBE RICHTUNG drehen wie die Pfeile auf
den Propellern zeigen.
- Tauschen Sie die Propeller, dann ziehen Sie die Propelller-Mutter wieder an. Drehen Sie
hierfür die Mutter in die ENTGEGENGESETZTE RICHTUNG der Pfeile auf den Propellern.
- Drehen Sie die Mutter mit MÄSSIGER, KEINESFALLS exzessiver Kraft zu. Ansonsten
könnte der Motor-Schaft und/oder die Mutter beschädigt werden.
BITTE BEACHTEN: Wenn Sie sich die Motoren ansehen, werden Sie sehen, daß diese eben-
falls eine Gravur mit „CW“ oder „CCW“ haben.
Diese Gravur gibt NICHT die Rotationsrichtung der MOTOREN an, sondern die Rotations-
richtung der PROPELLER-MUTTER an. Die Drehrichtung des MOTORS ist immer ENTGE-
GENGESETZT zur Drehrichtung der PROPELLER-MUTTER.
Lassen Sie sich also nicht verwirren und behalten Sie dies im Kopf.
NOCHMALS:
CW-Gravur auf dem Motor bedeutet -> Propeller-Mutter für diesen Motor ist CW (rechts-
drehend), ABER Motor- UND Propeller-Drehrichtung sind CCW (linksdrehend)
CCW-Gravur auf dem Motor bedeutet -> Propeller-Mutter für diesen Motor ist CCW (links-
drehend), ABER Motor- UND Propeller-Drehrichtung sind CW (rechtsdrehend)
Was also die Drehrichtung der Motoren angeht, so ist diese die selbe wie bei den Pro-
pellern:
Links vorne -> CW-Motor (rechtsdrehend, aber mit CCW-Gravur)
Rechts vorne -> CCW-Motor (linksdrehend, aber mit CW-Gravur)
Links hinten -> CCW-Motor (linksdrehend, aber mit CW-Gravur)
Rechts hinten -> CW-Motor (rechtsdrehend, aber mit CCW-Gravur)
8. WICHTIG: HINWEISE UND TIPPS
Flugdauer: Die Flugdauer Ihrer Gravit FPV Xtreme 80 hängt stark davon ab, wie Sie die
Gravit fliegen und welche fortgeschrittenen Funktionen Sie benutzen. Wenn Sie zum Bei-
spiel sehr viele Flips machen und schnell fliegen, wird dies eine kürzere Flugdauer zur Folge
haben. Rechnen Sie mit einer Flugzeit von etwa 5-7 Minuten.
Wenn Sie OHNE die 5.8GHz Kamera fliegen, wird sich Ihre Flugzeit merklich erhöhen, da Ihre
Gravit Xtreme weniger wiegt und keine zusätzliche Akku-Kapazität verbraucht wird, um die
Kamera mit Spannung zu versorgen. Wenn Sie also sowieso nur durch den Himmel rasen
und die Kamera nicht benutzen wollen, ist es eine gute Idee, sie zu demontieren. Die Flugzeit
OHNE Kamera beträgt üblicherweise 7-9 Minuten.
Gyro-Kalibrierung: Falls
Ihre Gravit STARK in eine
Richtung driften sollte
ohne dass Sie das entspre-
chende Flugkommando
per Fernsteuerung ge-
geben haben, sollten Sie
versuchen, das Gyro der
Gravit zu kalibrieren und
so ungewolltes Driften zu
verhindern. Um eine Gy-
ro-Kalibrierung durchzu-
führen setzen Sie die Gra-
vit flugfertig auf eine möglichste ebene, horizontale Fläche. Nun bewegen Sie den LINKEN
Steuerknüppel Ihrer Funke in die 7-Uhr-Position. GLEICHZEIT bewegen Sie den RECHTEN
Steuerknüppel in die 5-Uhr-Position. HALTEN Sie die Steuerknüppel für ein oder zwei Se-
kunden dort. Die LEDs an der Unterseite der Motoren fangen an, schnell zu blinken. Sobald
Sie aufhören ist die Kalibrierung abgeschlossen und das Problem sollte gelöst sein.
Bitte beachten: Eine Gyro-Kalibrierung kann nicht verhindern, dass Ihre Gravit driftet wenn
sie zum Beispiel bei windigem Wetter fliegen!
Reichweite des 2.4GHz-Systems: Wie bereits beschrieben, so ist die Reichweite des
5.8GHz-FPV-Systems etwa 100 Meter. Die Reichweite des 2.4GHz Systems Ihrer Gravit (also
Ihre Fernsteuerung und der Quadrocopter selbst) beträgt ungefähr 150 meter. Das bedeutet,
daß Sie Ihre Video-Übertragung verlieren, BEVOR Sie den Kontakt zu Ihrer Gravit verlieren.
Das ist tatsächlich eine sehr geschickte Sache, denn die zuverlässige Beurteilung der Entfer-
nung zum Quadrocopter ist sehr schwierig. Behalten Sie also im Hinterkopf, daß wenn Sie
Ihr Videobild verloren haben, dies eine Warnung sein sollte, die Gravit nicht noch weiter weg
zu fliegen und nicht die Kontrolle über sie zu verlieren.
Natürlich hängt (wie auch beim 5.8GHz-System) die Reichweite Ihres 2.4GHz-Systems maß-
geblich von den Gegebenheiten Ihrer Umwelt und anderen Einflüssen ab. Dinge wie Strom-
masten, andere Antennen oder Signale könnten mit Ihrem Signal kollidieren und somit die
Reichweite reduzieren. Auch Hindernisse wie Bäume, Gebäude und ähnliches haben einen
negativen Einfluss auf die Reichweite. Seien Sie also vorsichtig, wenn Sie die „wirkliche“
Reichweite Ihrer Gravit in Ihrem Fluggebiet ausprobieren und behalten Sie immer im Hin-
terkopf, daß die Reichweite Ihrer Gravit deutlich geringer sein könnte als die „normalen“
150 Meter.
BITTE BEACHTEN: Sollte Ihre Gravit zu igend einem Zeitpunkt die Verbindung zu Ihrer
Fernsteuerung verlieren, wird sie ihre Motoren innerhalb 1 Sekunde abschalten und vom
Himmel fallen. Dies ist eine Sicherheitsfunktion und soll verhindern, daß der Quadrocopter
unkontrolliert davon fliegt. Da ein vom Himmel fallender Quadrocopter potentiell Menschen,
Tieren und Objekten Schaden zufügen kann, stellen Sie bitte sicher, daß Sie in einem Gebiet
fliegen, welches ausreichend offene und freie Fläche besitzt. So kann im Falle eines „Ab-
sturzes“ niemand zu Schaden kommen. Für weitere Tipps, Anmerkungen und Warnung
bezüglich des Fliegens eines Multi-Kopters lesen Sie bitte auch unbedingt das Kapitel „Warn-
hinweise“.
Die Trimmungen Ihrer Fernsteuerung nutzen
Sollte Ihre Gravit Xtreme in irgend eine Richtung driften, ohne daß der entsprechende
Stick-Befehl dazu gegeben wurde, können Sie dieses Problem auf verschiedene Art und
Weise beseitigen:
- Sie können das Gyro kalibrieren (siehe oben) BEVOR Sie die Trimmungen benutzen um
Ihre Gravit stabiler in der Luft zu bekommen. NUR wenn das Kalibrieren des Gyros keinen
Erfolg bringt und Ihre Gravit immer noch inakzeptabel driftet, sollten Sie die Trimmungen
benutzen.
- Sie sollten auch Ihre Rotoren auf einwandfreien Zustand prüfen und sie ggf tauschen
(Siehe Kapitel „Die Propeller tauschen“ weiter oben).
- Sie können Ihre Gravit „trimmen“. Um das zu tun benutzen Sie die 4 Trim-Hebel an Ihrer
Fernsteuerung (siehe Photo). Die Funktion der 4 Trimmer sind wie folgt:
. Gas-Trimmung: Sollten die Motoren Ihrer Gravit laufen, OBWOHL sich der Gas-Knüppel
VOLLSTÄNDIG UNTEN befindet, so können Sie dies austrimmen. Klicken Sie die Gas-Trim-
DEUTSCH
-10-
GYRO CALIBRATION
6G MODE (RATTITUDE)
Temperature change and accumulated error of Gyro can result in yawing of
quadcopter. Calibrating gyro is good for stable flying.
1)Make sure 6G button “ON”, throttle stick at the bottom. Then open TX and
install Lipo battery, Gyro self detection finished when RX indicator long
light.
2)Pull the two sticks as the diagram for 3-4 seconds, then foursquare
navigation LED will fast flash.
3)Loose two sticks, wait till foursquare navigation
LED always on. Then gyro calibration finish.
When aircraft finished the binding, pls make
6G switch is opening and 3G switch is closing,
Tail line on aircraft will be shown green.
Pls move aileron rocker and loose your hands.
Aircraft will keep flying parallel. This is suitable
for beginners to fly.
6G
3D
Propeller CW
Propeller CWPropeller CCW
Propeller CCW
BEDIENUNGSANLEITUNG

LRP electronic GmbH
Hanfwiesenstraße 15
73614 Schorndorf
Deutschland
HA00100 © LRP electronic GmbH 2017
BEST-NR. 220715
GRAVIT FPV XTREME 80 RTF 2.4GHz
RACE-QUADROCOPTER
mung einfach nach UNTEN bis die Motoren stoppen.
Im umgekehrten Fall, wenn die Motoren Ihrer Gravit NICHT starten obwohl Sie den
Gas-Knüppel ein wenig nach OBEN bewegt haben, so drücken Sie die Gas-Trimmung nach
OBEN, bis die Motoren starten wenn Sie aus der Nullstellung heraus (ganz unten) Gas ge-
ben.
. Gier-Trimmung: Sollte sich die Gravit links oder rechts herum um die eigene Achse dre-
hen, ohne dass Sie den Steuerbefehl dazu gegeben haben, so können Sie dieses Verhalten
ebenfalls „weg-trimmen“.
Wenn die Gravit sich IM UHRZEIGERSINN dreht, dann drücken Sie den Trimm-Hebel nach
LINKS, wenn Sie sich GEGEN DEN UHRZEIGERSINN dreht, dann drücken Sie ihn nach
RECHTS. So können Sie die ungewollte Drehung „kontern“ und Ihre Gravit wird absolut
stabil um die Gier-Achse.
. Roll/Querruder-Trimmung: Sollte sich Ihre Xtreme selbstständig nach rechts oder links
bewegen, so kontern Sie dies indem Sie die Querruder-Trimmung in die ENTGEGENGE-
SETZTE Richtung drücken.
. Nick/Pitch-Trimmung: Sollte sich Ihre Xtreme selbstständig nach vorne oder hinten be-
wegen, so kontern Sie dies indem Sie die Nick/Pitch-Trimmung in die ENTGEGENGESETZ-
TE Richtung drücken.
BITTE BEACHTEN: Ihre Trimm-Einstellungen werden gesichert. Das ist eine tolle Sache,
denn Sie müssen die Einstellungen nicht jedes Mal neu vornehmen, wenn Sie Ihre Fernsteu-
erung aus- und wieder anschalten. Bitte bedenken Sie ebenfalls, daß ein bestimmtes Maß
an Drift IMMER auftreten wird, wenn Sie draussen fliegen. Es herrscht quasi NIE ABSOLUTE
Windstille und selbst ein schwacher Wind wird Ihre Gravit langsam driften lassen.
Standard-Einstellung Ihrer Fernsteuerung
Bitte denken Sie daran, daß die Einstellungen und Werte Ihrer Fernsteuerung bereits ab
Werk optimal auf die Gravit Xtreme abgestimmt wurden. Sollten Sie die Werte doch einmal
verstellen (eventuell aus Versehen), finden Sie hier eine Liste von Werkseinstellungen, so-
daß Sie Ihre Fernsteuerung wieder auf diese Werte setzen können:
Bitte beachten Sie, daß LRP keinerlei Verantwortung für Abstürze, Unfälle oder Schäden
übernimmt, die direkt oder indirekt auf das Ändern der Standard-Werte der Fernsteuerung
zurück zu führen sind. Wenn Sie etwas ausprobieren wollen, so können Sie dies tun. Aber
denken Sie daran, daß Sie es auf eigenes Risiko tun.
ALLGEMEINE GEWÄHRLEISTUNGS- UND REPARATURBESTIMMUNGEN
Produkte der LRP electronic GmbH (nachfolgend „LRP” genannt) werden nach strengsten
Qualitätskriterien gefertigt. Wir gewähren die gesetzliche Gewährleistung auf Produktions-
und Materialfehler, die zum Zeitpunkt der Auslieferung des Produkts vorhanden waren. Für
gebrauchstypische Verschleißerscheinungen wird nicht gehaftet. Diese Gewährleistung gilt
nicht für Mängel, die auf eine unsachgemäße Benutzung, mangelnde Wartung, Fremdein-
griff oder mechanische Beschädigung zurückzuführen sind. Dies gilt insbesondere bei be-
reits benutzten Akkus oder Akkus, die deutliche Gebrauchsspuren aufweisen. Schäden oder
Leistungseinbußen aufgrund von Fehlbehandlung und/oder Überlastung sind kein Produkt-
fehler. Abnutzungserscheinungen (Kapazitätsverlust) bei intensivem Einsatz sind ebenfalls
kein Produktfehler. Desweiteren beinhaltet dies folgende Punkte:
Unfall- und/oder Absturzschäden, Ausfall oder übermäßige Abnutzung einzelner Teile als
Folge eines Unfallschadens, Wasserschäden oder Probleme aufgrund von eingedrungenem
Wasser/Feuchtigkeit, lackierte Kabinenhauben, sobald diese benutzt worden sind.
LRP tauscht keine kompletten Produkte, wenn diese bereits benutzt wurden. Senden Sie
nicht das komplette Produkt ein, sondern nur die Teile, für die Sie einen Gewährleistungs-
anspruch geltend machen wollen. Wird das komplette Produkt eingesendet behält sich LRP
vor, die Arbeitszeit zur Demontage und Montage dem Kunden in Rechnung zu stellen.
Bevor Sie dieses Produkt zur Reparatur einsenden, prüfen Sie bitte zunächst alle anderen
Komponenten in ihrem Modell und schauen Sie ggf. in der Fehlerfibel des Produktes (so-
fern vorhanden) nach, um andere Störquellen und Bedienfehler auszuschließen. Sollte das
Produkt bei der Überprüfung durch unsere Serviceabteilung keine Fehlfunktion aufweisen,
müssen wir Ihnen hierfür die angefallenen Bearbeitungskosten laut Preisliste berechnen.
Mit der Einsendung des Produktes muss der Kunde mitteilen, ob das Produkt in jedem Fall
repariert werden soll. Sollte kein Gewährleistungs- oder Garantieanspruch bestehen, erfolgt
die Produktüberprüfung und ggf. Reparatur in jedem Falle kostenpflichtig gemäß unserer
Preisliste. Ein Gewährleistungs- oder Garantieanspruch kann nur anerkannt werden, sofern
eine Kopie des Kaufbelegs beigefügt ist. Auf Ihre ausdrückliche Anforderung erstellen wir
einen kostenpflichtigen Kostenvoranschlag. Wenn Sie nach Zusendung des Kostenvoran-
schlags den Auftrag zur Reparatur erteilen, entfallen die Kostenvoranschlagskosten. An un-
seren Kostenvoranschlag sind wir zwei Wochen ab Ausstellungsdatum gebunden. Für eine
schnelle Abwicklung Ihres Servicefalls legen Sie bitte eine ausführliche Fehlerbeschreibung
und ihre Adressdaten der Einsendung bei.
Falls ein zurückgesandtes, defektes Produkt von LRP nicht mehr produziert wird, und wir
dieses nicht reparieren können, so erhalten Sie statt dessen ein mindestens gleichwertiges
Produkt aus einer der Nachfolgeserien.
Die von LRP angegebenen Werte über Gewicht, Größe oder Sonstiges sind als Richtwert zu
verstehen. LRP übernimmt keine formelle Verpflichtung für derartige spezifische Angaben,
da sich durch technische Veränderungen, die im Interesse des Produkts vorgenommen wer-
den, andere Werte ergeben können.
LRP-WERKS-SERVICE:
- siehe www.LRP.cc
ALLGEMEINE HINWEISE
WEEE Hinweis:
Dieses Symbol weist darauf hin, dass dieses Produkt gemäß Richtlinie über Elektro- und
Elektronik-Altgeräte (2012/19/EU) und nationalen Gesetzen nicht über den Hausmüll ent-
sorgt werden darf. Dieses Produkt kann bei einer vorgegebenen Sammelstelle abgegeben
werden. Dies kann z.B. durch Rückgabe beim Kauf eines ähnlichen Produkts oder durch
Abgabe bei einer autorisierten Sammelstelle für die Wiederaufbereitung von Elektro- und
Elektronikaltgeräten geschehen. Der unsachgemäße Umgang mit Altgeräten kann aufgrund
potentiell gefährlicher Stoffe, die häufig in Elektro- und Elektronik-Altgeräte enthalten sind,
negative Auswirkungen auf die Umwelt und die menschliche Gesundheit haben. Durch die
sachgemäße Entsorgung dieses Produkts tragen außerdem Sie bei Ihrer Stadtverwaltung,
dem öffentlich-rechtlichen Entsorgungsträger, einer autorisierten Stelle für die Entsorgung
von Elektro- oder Elektronik-Altgeräten oder Ihrer Müllabfuhr.
CE Hinweis:
Hiermit erklärt die LRP electronic GmbH, dass dieses Produkt den grundlegenden Anforde-
rungen der europäischen Richtlinie 2014/30/EU erfüllt.
Dieser Artikel entspricht der der Richtlinie 1999/5/EC. Eine Konformitätserklärung finden Sie
unter: http://www.LRP.cc/CE
Entsorgungshinweis:
Laut Batteriegesetz sind Sie zur Rückgabe von Altbatterien gesetzlich verpflichtet. Altbat-
terien sind Sondermüll und müssen entsprechend entsorgt werden. Die Entsorgung der
Altbatterien über den Hausmüll ist gesetzlich verboten. Schützen Sie mit uns unsere Natur
vor umweltschädlichen Belastungen und entsorgen Sie deshalb die Altbatterien nicht im
Hausmüll, sondern bringen Sie sie im entladenen Zustand zu einer geeigneten Sammelstel-
le für Altbatterien.
Versicherungshinweis:
Eine Modellflug Haftpflichtversicherung für Modelle ist seit 2005 gesetzlich vorgeschrieben.
Sprechen Sie mit Ihrem Versicherungsbüro, ob dieses Modell in Ihrer Haftpflicht einge-
schlossen ist oder wenden Sie sich an den Deutschen Modellfliegerverband www.dmfv.de
DEUTSCH
Channel D/R Channel EXP Channel T.Curvc Channel P.Curvc Gyro
1 80 1 0 1 0 1 60
75
2 80 2 0 2 25 2 60
4 80 3 0 3 35 3 60
ALL values for switches S1-S5
in „UP“ position.
4 55 4 75
575 5 100
BEDIENUNGSANLEITUNG

LRP electronic GmbH
Hanfwiesenstraße 15
73614 Schorndorf
Deutschland
HA00100 © LRP electronic GmbH 2017
BEST-NR. 220715
GRAVIT FPV XTREME 80 RTF 2.4GHz
RACE-QUADROCOPTER
ENGLISH
Dear customer,
Thank you very much for choosing a LRP-product. The Gravit FPV Xtreme 80 is a
high-quality ready-to-fly FPV-racer. Equipped with a 5.8GHz-HD-camera and a LCD-Mo-
nitor for receiving the camera‘s live video stream, this LRP product is your entry ticket to
the popular FPV-racing sports. Please read this documentation before flying your Gravit
in order to get the maximum fun out of it.
PLEASE NOTE: This manual is a quick start manual. A more extenisve main manual,
which covers all aspects and functions of your Gravit in detail, can be downloaded from
the LRP homepage www.lrp.cc
1. BEFORE FLYING - CHARGE FLIGHT-BATTERY
Before you can fly your Gravit, you should always make sure that the battery is fully char-
ged. To charge the battery, connect the provided USB-charger to a suitable 5V-USB-po-
wer-supply. Make sure that the USB-power-supply is capable of delivering at least 1A
charging current.
IMPORTANT: LRP does NOT recommend using this USB-charger on a laptop or a PC, as
this may lead to damage of the USB-port and the computer.
After inserting the USB-charger into a suitable power-supply, a SOLID RED LED will come
up inside the chargers housing. Now please connect your flight battery to the USB-char-
ger. As soon as it is connected, a GREEN LED will start to BLINK, indicating that the batte-
ry is being charged. When the battery is fully charged, the GREEN LED will stop blinking
and go SOLID GREEN. Disconnect the LiPo from the charger and disconnect the charger
from the power supply.
2. BEFORE FLYING - MOUNTING AND CHARGING THE LCD-SCREEN
Please mount the LCD-monitor on your transmitter as shown in the pictures. Make sure
it is firmly and tightly attached to your TX.
Please also charge the LCD-monitor‘s LiPo before you use it.
Charging the LCD-monitor
1. Connect the USB-charger to a USB-power-supply
2. Connect the LCD-monitor to the USB-charger, RED LED = ON
3. When the LCD-monitor is fully charged, the RED LED will go out again.
Please make sure that the LCD-monitor is switched OFF while charging. Make sure to at-
tach the provide antenna to the LCD-monitor. To do so, simply scew it onto the LCD-mo-
nitor‘s thread on the right side of the monitor‘s top.
3. BEFORE FLYING - MAKING YOUR TRANSMITTER READY
Open the battery tray on the back of the transmitter and insert 6xAA batteries.
IMPORTANT: Make sure that all of the 5 silver switches on top of the TX are in the UPPER
position (= pointing AWAY from pilot) AND that the throttle stick (LEFT control stick) is
COMPLETELY! down.
Open the sun-screen of your LCD-monitor and flip up its antenna.
4. STARTING THE GRAVIT FPV XTREME 80
Before you start your Gravit FPV Xtreme 80 for the first time, please check whether the
propeller nuts are sufficiently tightened. Do do so, use a small tool to stick through the
hole of the propeller nut (a small hex wrench, for example) and then tighten down the
propeller nut in the OPPOSITE direction of the propeller‘s direction of rotation with mo-
derate force. The propellers‘ direction of rotation is indicated by the two small arrows on
each propeller. Be carefull NOT to overtighten the nuts, as this could damage the nut,
propeller and motor shaft. Check the propeller nuts on regular basis to make sure that
they are always sufficiently tightened. Otherwise you might loose a propeller during flight
which leads to a crash and damage of the Gravit.
To get your Gravit Xtreme 80 in the air, please do the following:
1. Put the Gravit on an even, flat surface (preferably the ground). It is NOT recommended
to fly the Xtreme 80 indoors, because of the power and speed of this quadrocopters.
Please fly OUTDOORS ONYL!
2. Turn on the transmitter FIRST. Check the batteries of your transmitter. Make sure that
throttle (LEFT control stick) is COMPLETELY down. If it is not, the TX will emit a quick,
beeping alarm sound.
3. Turn on the Xtreme 80 by pushing the battery into the battery compartment on the bot-
tom side of the Gravit connecting the battery connector to the copter. Make sure that
the connector is FULLY inserted and is sitting firmly in the Xtreme‘s chassis.
The Xtreme will give a short, single „beep“, and the status LED on the back of the Gravit
should turn GREEN within a second or so.
4. Now turn on the LCD-monitor. After a few seconds, you will see a live video image
from your Xtreme‘s camera. Now you can see what your Xtreme‘s camera is currently
seeing.
5. To take off, gently and slowly push the throttle stick (LEFT control stick) upwards. Be
carefull not to apply too much throttle at a time, the Gravit Xtreme is very powerful!
Let the copter rise into the air until it hovers just a meter above eye-level. In case you
should have applied to much throttle, simply decrease the throttle until the Xtreme is
hovering at the desired height.
5. FLYING THE GRAVIT FPV XTREME 80 – BASIC FUNCTIONS
To control your Gravit in the air, please do the following:
. To gain or loose altitude
(or to accelerate or decele-
rate respectively) -> Move
the LEFT control stick up or
down
. To rotate around your
own axis -> Move the LEFT
control stick left or right
. To fly towards the left
or right side -> Push the
RIGHT control stick to the
left or right. The further you
push the stick, the faster the
Gravit will fly sidewards
. To fly forwards or back-
wards -> Push your RIGHT
control stick to the front or
back. The further you push
the stick, the faster the Gra-
vit will fly forwards/back-
wards.
Of course you can combine
those individual commands
for more complex move-
ments. For example: If you
push the RIGHT controls
stick to the front and left,
the Gravit will fly to the
front left.
Now you can carefully and
slowly test the control of
your Gravit Xtreme. You
will see that it is very easy
USER GUIDE

LRP electronic GmbH
Hanfwiesenstraße 15
73614 Schorndorf
Deutschland
HA00100 © LRP electronic GmbH 2017
BEST-NR. 220715
GRAVIT FPV XTREME 80 RTF 2.4GHz
RACE-QUADROCOPTER
ENGLISH
and intuitive to control.
You will quickly gain experience and you will be able to control the Xtreme 80 better and
with greater confidence and skill.
To land your Gravit, make sure you are flying over a smooth surface, suitable for landing.
Then slowly decrease the throttle until the Gravit is only a few centimeters from the
ground and then pull throttle completely down to shut off the motors.
Make sure not to shut down the motors while flying too high, because the Xtreme will
simply fall from the sky and get damaged most likely....
6. FLYING THE GRAVIT FPV XTREME 80 - ADVANCED FUNCTIONS
PLEASE NOTE: The TX of your Gravit Xtreme is a high-quality, hobby-grade TX and has
many options to configure and fine tune its settings.
However, the TX has already been adjusted to your Xtreme 80 and WE DO NOT RECOM-
MEND CHANGING ANY SETTING OF YOUR TRANSMITTER.
If you change the wrong setting or apply the wrong value to a setting, this may result in
unpredictable and uncontrollable flying behavior.
LRP will not be responsible for any direct or indirect damage that is caused by changing
the default settings of the transmitter.
If you decide to change any of the settings, please keep in mind that you are doing this
COMPLETELY on your own risk and responsibility.
Advanced flight functions
This chapter will describe the additional flight modes and the functions of your transmit-
ter in detail.
IMPORTANT DEFINITION: As you can see, the TX does have a lot of silver metal swit-
ches. Those switches can have two positions, up and down. To avoid any confusion
about a sticks up- and down-position, here is how „up“ and „down“ is defined in this
manual:
Take a look at this picture, which is showing the switches S1 to S5. Now hold the TX in
your hands in front of you, just like you would hold it when you fly your Gravit.
For switches S1 and S5, „UP“ means actually pointing slightly downwards to the ground,
while „DOWN“ means pointing slightly upwards to the sky.
For the switches S2,S3 and S4, „UP“ means pointing away from the pilot, while „DOWN“
means pointing towards the pilot.
This seems a bit confusing at the first moment, but by defining the stick position this way,
UP and DOWN are actually the same absolute stick position for ALL 5 switches.
Please keep this in mind when reading the manual and operating the switches.
The switches have the following function:
S1 -> NO function, reserved for FUTURE functions and upgrades, position of S1 does
NOT matter and can be either up or down.
S4 -> If S4 is switched DOWN (ALL other switches are UP), the Gravit is switched to
SPEED-MODE. The status LED of the Gravit will remain green, but you will have a slightly
increased, steeper angle of attack and the Gravit will fly a bit faster, react a bit quicker
(see description below)
S2+S4 -> If S2 and S4 are switched to DOWN- position (ALL other switches are UP), the
status LED of the Gravit turns from green to red and your are in FLIPPING-MODE (see
description below)
S3 -> If S3 is switched DOWN (NO MATTER which position the other switches are!),
the status LED of the Gravit becomes red and your copter is now in ACRO-MODE (see
description below).
S5 -> This switch is to arm and disarm the motors. When the switch is UP, the motors
are armed and will start to turn as soon as throttle is being applied via the left control
stick. If the switch is in DOWN position, the motors will not arm and in case the motors
are already turning, they will shut down AT ONCE. So you can see at this S5 switch as
some sort of emergency stop, which cuts throttle at once (or prevents throttle from being
applied respectively).
See also this table for the function of the switches:
SPEED-MODE:
By switching down the S4 switch, SPEED-MODE is enabled. Technically, the dual rate of
certain control channels are increased by 25% compared to the „standard“ mode (with
all switches in the default UP-position).
This results in a steeper maximum angle of attack that the copter can achieve when
pushing the control sticks to either direction. The steeper angle results in higher speed
and overall, this setting increases the subjective responsiveness and the agility of your
Xteme 80.
In this mode, the Gravit STILL HAS self-leveling and the maximum angle of attack is
limited by the flight controller. So it is a safe mode to fly for those who just want some
extra speed.
FLIPPING-MODE:
If S2 AND S4 are BOTH pushed down, the FLIPPING MODE is enabled. And here is how
FLIPPING-MODE works and what it does:
When flipping-mode is enabled, you can fly a rapid series of flips into any direction. The
LEFT control stick maintains its standard functionality (which means throttle is up and
down, rotating around the own axis is left and right).
But the functions of the RIGHT control sticks are expanded. If you move the right stick,
AT FIRST the Gravit will function as normal and fly left/right or backwards/forwards as
normal. But if you exceed a certain stick deflection (= if you push the right control stick
into any direction FAR ENOUGH), the flipping mode will be activated. When this happens,
the Gravit will disable its self-leveling and its limitation of the maximum angle of attack.
This will result in the Gravit performing very tight loops (=flips) into the direction the right
control stick is deflected.
As soon as you release the right control stick again or move it back towards neutral below
a certain threshold, the self-leveling will be activated again and the maximum angle of
attack will be limited again. This means that the Gravit rectifies itself again and is put back
to „normal“ operation.
This is a fantastic mode for making cool and stunningly looking flight maneuvers without
the need of being able to fly like a pro.
PLEASE NOTE: If you feel like loosing control of the Gravit, you simply LET GO OFF THE
RIGHT CONTROL STICK and your Gravit will stabilize itself in the air automatically. Then
you may continue to fly normally again.
In this mode, the Gravit deactivates self-leveling and the limitation of the angle of attack
IF (and as long as) a certain threshold is surpassed by the right control stick‘s deflection.
As long as you stay WITHIN this threshold (= make only minor movements of the right
control stick), the Gravit flies like in „normal“ mode. This mode is perfect for „showing
off“ and let‘s a beginner look like a pro. Give it a try!
ACRO-MODE (MANUAL MODE)
As soon as you flip DOWN switch S3, ACRO-MODE is enabled.
IMPORTANT, PLEASE NOTE: NO MATTER what position ALL OTHER switches are, AS
SOON AS you switch S3 down, ACRO-MODE is enabled. This means, that the S3 switch
OVERRIDES all other flight modes. Keep this in mind when flying.
When ACRO-MODE is enabled, the full potential of your Gravit Xtreme 80 will be unleas-
hed. The function of the two control sticks REMAIN THE SAME, BUT self-leveling AND
the limitation of the maximum angle of attack are BOTH deactivated. This allows FULL
MANUAL CONTROL over the Xtreme‘s flight maneuvers and has the following conse-
quences:
1) NO SELF-LEVELING: This means that if your fly into any direction and then let go off
the right control stick, the Gravit will NOT rectify itself and get back to horizontal level
automatically.
S1
S2 S3 S4
S5
S1 S2 S3 S4 S5 Description/function
of switch-combination
LED STATUS
(COLOR)
up OR
down DOWN UP UP UP No function RED
up OR
down DOWN UP DOWN UP FLIPPING MODE RED
up OR
down
up OR
down UP DOWN UP SPEED-MODE RED/GREEN
(depending on S2 position)
up OR
down
up OR
down DOWN up OR
down UP ACRO MODE RED
up OR
down
up OR
down
up OR
down
up OR
down DOWN
Motors cannot arm as
soon as S5 is DOWN,
no flying possible
N.A.
USER GUIDE

LRP electronic GmbH
Hanfwiesenstraße 15
73614 Schorndorf
Deutschland
HA00100 © LRP electronic GmbH 2017
BEST-NR. 220715
GRAVIT FPV XTREME 80 RTF 2.4GHz
RACE-QUADROCOPTER
Here is an example:
Let‘s say that you are piloting your Gravit straight forwards by pushing the right con-
trol stick upwards. The Gravit will tilt forwards and fly into the appropriate direction.
However, if you now let go off the right control stick, the Gravit will NOT neutralize its
angle of attack and return to horizontal level, it will CONTINUE TO FLY AT THE SAME
ANGLE OF ATTACK. If you want to stop the Gravit from moving (= if you want the
Gravit to regain a horizontally level orientation again), you have to COUNTER the actual
angle of attack by moving the right control stick to the opposite way of the Gravit‘s
current angle of attack. In our example, this means you have to move the right control
stick DOWNWARDS (below the neutral position) to have the Gravit reduce her angle of
attack and to finally regain a horizontal orientation again. BUT BEWARE: If you push the
right control stick DOWNWARDS for too long and/or too far, the Gravit will tilt towards
a backwards direction and the game begins again. Flying the Gravit in ACRO-MODE will
require constant stick input to get the copter where you want it and SHOULD BE USED
BY EXPERT PILOTS ONLY!
2) NO MAXIMUM ANGLE OF ATTACK:
This means that the flight controller is NOT limiting the maximum angle of attack that
the Gravit may obtain when the right control stick is FULLY deflected into any direction.
In the other flight modes, it is NOT possible to fly a real looping, for example. The rea-
son for this is that if you want to fly a looping, you need the Gravit to be able to fly and
rotate without any limits, even upside down for a short moment.
In normal mode, this is not possible. The flight controller limits the maximum angle of
attack, thus your Gravit will not be able to fly a looping (only flips are possible in the
flipping mode). It will fly upwards at a certain maximum angle, but it will not constantly
increase the level until it flies a looping. Whether you are flying a „real“ looping or just
doing „flips“ like in the flipping mode depends on the combination of throttle and angle
of attack that you are applying to the Gravit. For example:
- Moderate throttle and moderate deflection of the right control stick will result in a
looping with larger diameter
- Full throttle and maximum deflection of the right control stick will result in a quick
series of flips (with very small radius) into the appropriate direction.
-> This means that the diameter and speed of the flips/loops results from the combina-
tion of the amount of thrust and the level of deflection applied by the right control stick.
ACRO-MODE lets you do the funniest, coolest and most difficult of flight maneuvers,
but WE STRONGLY RECOMMEND TO ONLY USE IT WHEN YOU ARE AN EXPERIEN-
CED PILOT.
IMPORTANT: In case you should loose control over your Gravit while flying it in
ACRO-MODE, please quickly switch UP the S3 switch again. You will be in one of the
stabilized flight modes AT ONCE. Let go off the right control sticks until the Gravit has
stabilized and is horizontally orientated again.
Even though the Gravit is able to recover very quickly when switched back from
ACRO-MODE, you should still make sure that risky flight maneuvers should be only
flown at a height of over 30 meters. By doing so, you give your Gravit enough time to
recover from a piloting error and to stabilize to a horizontal position again. Please also
be aware of the fact, that a crash is much more likely to happen in ACRO-MODE and
that you could damage your Gravit.
The 5.8 GHz-FPV-system of your Gravit Xtreme (5.8 Ghz-camera and LCD-receiver)
Your Gravit Xtreme is ex works equipped with a HD-5.8Ghz-FPV-system. This system
does not only allow you to fly your Gravit FPV (=First Person View) via the LCD-receiver,
but you can also record videos using the camera‘s integrated Micro-SD card slot.
The range of the FPV-system is around 100 meters. However, due to environmental in-
fluences and interferences (like power poles, other radio signal or obstacles like trees,
etc) the range can be reduced drastically. So please carefully check the range in your
flying area.
This chapter will cover all the functions and features of your FPV-system in detail.
1) The 5.8GHz camera
The camera comes already pre-installed and wired. In case you don‘t want to use the
camera, it can be unplugged and detached from the chassis of your Xtreme 80 easily.
One reason to detach the camera for example might be that you want to extend your
performance and flight time to the maximum and do not really need a camera. In this
case, detaching the camera can help you. Without the camera, the Gravit is lighter and
the lipo will last longer because it does not have to provide power to the camera. Both of
these facts will lead to higher speed, better overall performance and longer flight time.
If you re-attach it, just make sure to fit the camera correctly and firmly back into place and
also make sure that you connect the camera correctly to your chassis (see picture). Also
make sure, that the antenna coming out of the rear of your camera‘s chassis can swing
freely and is not jammed or obstructed.
Please note: Connecting the camera plug reverse-polarity may result in the damage or
destruction of your camera and the electronic board of your Xtreme, so always make
sure to connect the camera correctly!
Before using the camera, plea-
se insert the Micro-SD card
which has been provided with
your Xtreme like shown on the
picture. You may also use a
3rd party Micro-SD card, but
LRP does NOT give any com-
patibility guarantee, so please
feel free to experiment here on
your own risk.
In order to use the FPV-system,
make your Xtreme ready to fly,
then turn on the attached LCD-
receiver. In case you have not
yet installed the LCD-receiver
to its mount on the TX, please
do so now. Also make sure you
have unfolded the integrated
sun-shield of your LCD-mo-
nitor, so that you can see the
screen freely. Within a few se-
conds, your Xtreme will be ready to fly and the LCD-monitor will show a live video image
of your camera. Move around the Xtreme to check the correct video transmission.
The LCD will show a red dot followed by a time code in the lower right corner of the
screen. The time code shows the hours, minutes and seconds that are still left on your
Micro-SD-Card.
The number given here may vary, depending on the capacity of the card you are using
and on how much of the capacity is still available for recording. The provided 4 GB Micro-
SD-card should provide a recording time of ROUGHLY 1 hour and 10 minutes if the card
is empty.
In case you receive a red message in the middle of the screen saying „MEMORY FULL“,
this can either mean that your inserted Micro-SD card has not free available space any-
more OR you have not inserted the a memory card at all.
If a memory card with free space IS inserted and the warning is showing up nevertheless,
this means that your memory card is either not compatible with your camera or has not
been formatted properly. In this case, either change or reformat the card, using the FAT32
file system.
Starting and stopping a recording
To start or stop a recording, simply press the RED BUTTON on the upper left corner of
your TX (RIGHT to the S2 switch). The red dot in the right lower corner of the LCD will
start to flash and the color of the time code will change from white to red and count the
number of time the recording is already running. Press the red button again to stop the
recording. The red dot will stop to blink, the time code will turn white again and the time
shown on the display is now the updated time which is still left for recording.
Using a recording on a PC or Laptop
The recordings are saved as „AVI“ files on the SD-card. To watch and edit those movie
files, simply insert the Micro-SD card in the provided card-reader and insert the reader
into a free USB-Port of your PC or laptop. The Micro-SD card will show up as an exchan-
geable data device (just like an external hard drive or a USB-memory-stick) and you can
browse it by using the file browser of your operating system (which can be Windows XP
or higher, as well as MacOS or Linux). On the Micro-SD card, you will find a folder called
„DCIM“. Inside this folder is another folder called „100DSCIM“ and inside that folder are
your video files, named „PICT000X.AVI“, where „X“ is the number of the movie. You can
now copy, edit, delete or watch the movie as you like.
2) The LCD-Monitor
The LCD monitor is pretty much plug and play, you don‘t have to make any adjustments
or settings, UNLESS you want to fly with other pilot using the same equipment. In this
ENGLISH
FCC
Caution: The user is cautioned that changes or modifications not expressly
approved by the party responsible for compliance could void the user's
authority to operate the equipment.
Notice for beginners:
1.If it is your first time to fly, please follow an experienced pilots.
2.Please be familiar with all the functions of TX and the related sticks
before fly.
4.6CH quadcopter is not a toy. To avoid unnecessary loss, please simulate
to fly on the computer firstly.
FCC AUTHENTICATE
-12-
USER GUIDE

LRP electronic GmbH
Hanfwiesenstraße 15
73614 Schorndorf
Deutschland
HA00100 © LRP electronic GmbH 2017
BEST-NR. 220715
GRAVIT FPV XTREME 80 RTF 2.4GHz
RACE-QUADROCOPTER
case, please check the chapter „More than one pilot“ below.
When you want to use the monitor, make sure it is firmly attached to the TX mount, that
the Lipo is fully charged, the sun-screen is unfolded and the antenna is folded up.
Optimizing the antenna‘s reception
You can rotate the antenna by 360 degrees and you can also fold it at two different angles.
For your first flight, please unfold the antenna completely, so that it is straight. During
your flight, in case you should experience problems with the range or the quality of the
video signal, you can try to adjust the antenna by bringing it to different angles and poin-
ting it into different directions. This will help to maximize your range.
8. MORE THAN ONE PILOT
Ex works, the ALL cameras and ALL LCD-monitors will transmit and receive at the SAME
frequency. As long as you are flying alone, this is fine and no problem.
But what happens if some friends of yours have bought their Gravit Xtremes as well and
now want to race with and against you? Don‘t worry, the frequency of BOTH the camera
AND the antenna can be switched between 6 different channels. This means that up to 6
pilots can operate their Xtremes at the same time without interfering with each other. So
how is a channel switch done?
Please have a look at the picture below. The graph shows the 3 DIP-switches which you
will find right in the middle of the backside of your LCD-monitor. Those little switches
(which are best operated with a tiny flat screw-driver) can be set to different combina-
tions, each of them resulting in a different receiver channel. As you can see, ex works the
DIP switches are set to CH1. By adjusting the DIP switch pattern differently (refer to the
picture), you can set the channel of the receiver to CH2 to 6 as well.
Once a channel is selected by the DIP-switch position, the LCD-monitor will continue to
receive on this one channel, until you switch it to a different channel.
Next, please have a look at you camera. Your camera does NOT have any DIP-switches,
but it has a small white button on the left bottom side of its housing, towards the front of
the camera (see photo).
Ex works, the camera is set to transmit on CH1. If you take a small tool and press the
camera button once, you will hear/feel a klick and the camera switches to the next chan-
nel, which is CH2. Every further press on the little button will make the camera switch to
the next higher channel.
If CH6 is reached and you press the button once again, it will be at CH1 again, and so on
and so forth.
IMPORTANT: Contrary to the channel selection of the LCD-receiver, the channel selection
of the camera is NOT! permanent. Which means, if you set the camera to let‘s say CH3
and power-cycle it, it default back to CH1.
This means that you have to set the appropriate channel each time you turn your Gravit
on. But since this is done easily with only a few clicks on the cameras channel-button,
this is no problem.
Here is an example of how to proceed when you want to fly with 2 friends (so we have
3 pilots altogether):
- You are pilot A, your friends are the pilots B and C
- All pilots make their Xtremes ready to run. Do NOT yet turn on your LCD-receivers
- Pilot B sets his LCD-monitor to CH2, pilot C to CH3 (look at graph for DIP-switch settings)
- No all pilots can turn on their LCD-monitors as well
- Since all Xtreme-cameras are transmitting at CH1 at the moment, only pilot A will
receive a video image (since his LCD-monitor is set to the default channel CH1)
- Pilot A will most likely NOT receive a clear image, because 3 different Xtremes are sen-
ding their image at CH1 at the moment. This results in a distorted image.
- Pilots B and C should not receive any image, since none of the Xtremes is sending on
CH2 or 3 at the moment
- Now Pilot B presses the channel-button on his camera ONCE, which should switch his
camera from CH1 to CH2
- Pilot C presses the channel-button on his camera TWICE, which should switch his came-
ra from CH1 to CH3
- Now all 3 pilots use the channels corresponding with the reception channel of their
LCD-monitor and ALL 3 pilots should now receive the video transmission of their
Xtreme (and ONLY of their extreme).
- IN CASE that one or more of the three pilots receive any „ghost-images“ from any of the
other pilots, you can try the following -> Let pilot B use CH3 instead of 2, and let pilot
C use CH5 instead of CH3
-> By doing this, the 3 pilots are using channels which are „further away“ from each
other. So the risk of receiving a ghost image from another Xtreme camera is lower.
Now all 3 pilots should be ready to go. Let the battle begin!
8. REPLACING THE PROPS
It is very important that your propellers are always undamaged and perfectly intact befo-
re you take off with your Gravit. Otherwise, the performance will not be as expected and
damaged propellers may also lead to a crash and further damage. So please make sure
your propellers are ALWAYS perfectly intact.
Sooner or later, you will have to replace one or more of your propellers. If you do this
please make sure to do it like described below.
The correct propeller placement is as shown in the picture below:
Left front -> CW-propeller
Right front -> CCW-propeller
Left rear -> CCW-propeller
Right rear -> CW-Propeller
Make sure that you always replace a propeller with a new propeller of the same orienta-
tion (CW/CCW)
- To replace the propeller, you will first have to unscrew the propeller nut. Do so by
putting an appropriate metal tool (like a small hex-wrench) through the hole of the
propeller nut.
- Then loosen the propeller by rotating it into THE SAME DIRECTION like the arrows on
the propeller are showing.
- Replace the propeller, then tighten the propeller nut again. To do so, rotate the propeller
nut into the OPPOSITE DIRECTION of the arrows on the propellers.
- Tighten down the propeller nut FIRMLY, but NOT with excessive force. Otherwise the
motorshaft and/or the nut could be damaged.
PLEASE NOTE: When you look on the motors, you will see that they also bear an engra-
ving saying either „CW“ or „CCW“.
This engraving is NOT! the rotation direction of the MOTORS, but the orientation of the
ENGLISH
Channel CH1 CH1 CH1 CH1 CH1 CH1
DIP-Position
1 2 3 1 2 3 1 2 3 1 2 3 1 2 3 1 2 3
Frequency (GHz) 5745 5765 5785 5805 5825 5845
Propeller CW
Propeller CWPropeller CCW
Propeller CCW
USER GUIDE

LRP electronic GmbH
Hanfwiesenstraße 15
73614 Schorndorf
Deutschland
HA00100 © LRP electronic GmbH 2017
BEST-NR. 220715
GRAVIT FPV XTREME 80 RTF 2.4GHz
RACE-QUADROCOPTER
PROPELLER NUT. The MOTORS‘ orientation is ALWAYS OPPOSITE of the prop nuts‘ ori-
entation.
So please don‘t get confused and keep this in mind.
AGAIN:
CW-engraving on motor means -> propeller nut used on this motor is CW, BUT motor
AND propeller orientation is CCW
CCW-engraving on the motor means -> propeller nut used on this motor is CCW, BUT
motor AND propeller orientation is CW
So concerning the rotation orientation of the motors, it is the same like the props:
Left front -> CW-motor (with CCW-engraving)
Right front -> CCW-motor (with CW-engraving)
Left rear -> CCW-motor (with CW-engraving)
Right rear -> CW-motor (with CCW-engraving)
8. IMPORTANT: NOTES AND TIPS
Flight time: The flying time of your Gravit FPV Xtreme 80 strongly depends on how
you fly it and what advanced functions you are using. For example, doing a lot of flips
and flying fast will result in shorter flight times. Expect the flying time to be around 5-7
minutes.
Gyro-calibration: In case
that your Gravit should
STRONGLY drift to any
side without any TX-com-
mands being issued into
that direction, you should
try to calibrate the gyro of
the Gravit in order to pre-
vent it from drifting. To do
a gyro-calibration, please
put the Gravit (ready to
take of) on even, flat sur-
face. Then move the LEFT control stick to 7 o‘clock position and the RIGHT control stick to
5 o‘clock position AT THE SAME TIME and HOLD this position. The LEDs on the bottom
side of the Gravit‘s motors will quickly blink for a second or two. When they stop blinking,
the calibration is done and the problem should be solved.
Please note: Gyro calibration does NOT prevent the Gravit from drifting if you are flying
while it is windy.
Flight time: When you are flying WITHOUT the 5.8GHz camera, your flight time will be
significantly increased, because your Xtreme weighs less and no additional capacity is
used up for powering the camera. So if you only want to rip through the sky and don‘t
want to fly using the camera anyway, it is a good idea to detach it. Flight time without the
camera is usually around 7-9 minutes.
Range of the 2.4GHz system: Like described above, the range of the 5.8GHz-FPV-system
is around 100 meters. The range of the 2.4GHz system of your Xtreme (that is your TX
and the copter itself) is around 150 meters. This means that you will lose your video
transmission signal BEFORE you will lose contact to your Gravit Xtreme 80. This is ac-
tually a good thing, because often judging the distance to a multi-roter reliably is very
difficult. So please keep in mind that if your video transmission is completely lost, this
should be a warning not to fly much further in order not to lose control over your Xtreme.
Of course (like with the 5.8GHz-system), the range of the 2.4GHz-system strongly de-
pends on environmental conditions and influences. Things like power poles or other
antennas and signals may interfere with you signal, thus reducing the range. Obstacles
such as trees, buildings etc also have a negative effect on the range. So please be careful
to check out the REAL range of your copter in the area you are flying and always keep in
mind that the range of the Gravit could be MUCH shorter than the „normal“ 150 meters.
PLEASE NOTE: If at any time your Gravit should lose its 2.4GHz connection to the trans-
mitter, it will shut off its motors within 1 second and fall from the sky. This is a safety
feature to prevent the copter from flying away uncontrollably. Since a multirotor falling
from the sky can potentially do damage to people, animals or objects, please make sure
that you are flying in an area with lots of open and free space. By doing so, nobody can
be damaged in case of a crash.
For further tips, notes and warning concerning flying an aircraft, please read our chapter
„Warning Notes“.
Using your TX-trims
In case your Gravit Xtreme should drift to either side without any stick input given, you
can try to eliminate this problems in several ways:
- You can calibrate the gyro (see above). BEFORE you use the trims to get your Xtreme
more stable in the air, use the gyro-calibration. ONLY if the gyro-calibration does not
help and you Gravit is still drifting unacceptably, then you should use the trims.
- You can check your rotors for damages and exchange them if necessary (see chapter
„Replacing the props“ above).
- You can „trim“ your Gravit. To do this, you can use the 4 trim-knobs on your TX (see
photo). Here is the function of the 4 trim-knobs in detail:
Throttle-trim: In case your Xtreme‘s motors should start to run although the left con-
trol stick is COMPLETELY down, you can trim this out. Just push the throttle trim-knobs
DOWN until den motors stop.
In case your Xtreme‘s motors do NOT start when you push up the throttle stick, you can
also correct this with the throttle trim. In this case, move the throttle trim-knob UP, until
den motors begin to start as soon as you begin to push UP the left control stick
Yaw-Trim: In case your Gravit rotates left or right around its own axis by herself, you
can trim this behaviour away as well.
If the Gravit turns CLOCKWISE, then push the trim-knob to the LEFT, if the Gravit turns
COUNTER-CLOCKWISE, then push the knob to the RIGHT. By doing so, you can counter
the undesired movement and get your Gravit perfectly stable around the YAW-axis
Aileron-trim: If your Xtreme drifts to either the left or right side, you can „counter“ this
movement by pushing the aileron-trims to the opposite direction.
Elevator-trim: If you Xtreme drifts either forwards or backwards, you can „counter“
this movement by pushing the elevator-trims to the opposite direction.
PLEASE NOTE: Your trim-settings will be saved. This is a great thing, as you don‘t have
to trim your Gravit each time you power-cycle the transmitter. Please also keep in mind,
that a certain amount of drift is ALWAYS occuring when you fly outside. There is hardly
NEVER no wind at all, and even a mild wind will have your Gravit drift SLOWLY.
Default settings of your TX
Please keep in mind that the settings and values of your transmitter have already been
optimized ex works to give you the best flight experience possible. In case you should
change the values by accident or want to test some other values (do this on your own
risk!), here is a list of DEFAULT values, so you may set back your TX settings to those
values again:
Please note that LRP is NOT taking any responsibility for crashes, accidents or damages
resulting directly or indirectly from changing the preset values of the transmitter. If you
want to experiment with those settings, please go ahead. But keep in mind that you are
doing this on your own risk.
REPAIR PROCEDURES & WARRANTY
All products from LRP electronic GmbH (hereinafter called ”LRP“) are manufactured ac-
cording to the highest quality standards. LRP guarantees this product to be free from
defects in materials or workmanship for 90 days (non-european countris only) from the
original date of purchase verified by sales receipt. This limited warranty doesn´t cover
defects, which are a result of misuse, improper maintenance, outside interference or
mechanical damage.
This especially applies on already used batteries or batteries, which show signs of heavy
usage. Damages or output losses due to improper handling and/or overload are not a
product fault. Signs of wear (loss of capacity) after intensive usage are also no product
ENGLISH
-10-
GYRO CALIBRATION
6G MODE (RATTITUDE)
Temperature change and accumulated error of Gyro can result in yawing of
quadcopter. Calibrating gyro is good for stable flying.
1)Make sure 6G button “ON”, throttle stick at the bottom. Then open TX and
install Lipo battery, Gyro self detection finished when RX indicator long
light.
2)Pull the two sticks as the diagram for 3-4 seconds, then foursquare
navigation LED will fast flash.
3)Loose two sticks, wait till foursquare navigation
LED always on. Then gyro calibration finish.
When aircraft finished the binding, pls make
6G switch is opening and 3G switch is closing,
Tail line on aircraft will be shown green.
Pls move aileron rocker and loose your hands.
Aircraft will keep flying parallel. This is suitable
for beginners to fly.
6G
3D
Channel D/R Channel EXP Channel T.Curvc Channel P.Curvc Gyro
1 80 1 0 1 0 1 60
75
2 80 2 0 2 25 2 60
4 80 3 0 3 35 3 60
ALL values for switches S1-S5
in „UP“ position.
4 55 4 75
575 5 100
USER GUIDE

LRP electronic GmbH
Hanfwiesenstraße 15
73614 Schorndorf
Deutschland
HA00100 © LRP electronic GmbH 2017
BEST-NR. 220715
GRAVIT FPV XTREME 80 RTF 2.4GHz
RACE-QUADROCOPTER
ENGLISH
fault.
Furthermore this includes the following points: Crash damage, Component failure or
premature wear as a result of crash damage, Water damage or problems resulting from
water/moisture intake, Painted canopies, after they have been used.
LRP does not do a warranty change of the whole product, once the product has been
used. Do not send in the whole product. Only send in the defective parts, on which you
want to claim warranty. If the whole product is send in, LRP will charge a service fee for
the Disassembly and Assembly of the product at our discretion.
To eliminate all other possibilities or improper handling, first check all other components
in your model and the trouble shooting guide, if available, before you send in this product
for repair. If products are sent in for repair, which do operate perfectly, we have to charge
a service fee according to our pricelist.
With sending in this product, the customer has to advise LRP if the product should be
repaired in either case. If there is neither a warranty nor guarantee claim, the inspection
of the product and the repairs, if necessary, in either case will be charged with a fee at
the customers expense according to our price list. A proof of purchase including date
of purchase needs to be included. Otherwise, no warranty can be granted. For quick
repair- and return service, add your address and detailed description of the malfunction.
If LRP no longer manufactures a returned defective product and we are unable to service
it, we shall provide you with a product that has at least the same value from one of the
successor series.
The specifications like weight, size and others should be seen as guide values. Due to
ongoing technical improvements, which are done in the interest of the product, LRP does
not take any responsibility for the accuracy of these specs.
LRP-DISTRIBUTOR-SERVICE:
- check www.lrp.cc
GENERAL NOTES
WEEE notes:
This symbol indicates that this product is not to be disposed of with your household
waste, according to the WEEE Directive (2012/19/EU) and your national law. This product
should be handed over to a designated collection point, e.g. on an authorised one-for-
one basis when you buy a new similar product, or to an authorised collection site for
recycling waste electrical and electronic equipment (EEE). Improper handling of this type
of waste could have a possible negative impact on the environment and human health
due to potentially hazardous substances that are generally associated with EEE. At the
same time, your cooperation in the correct disposal of this product will contribute to the
effective usage of natural resources. For more information about where you can drop off
your waste equipment for recycling, please contact your local city office, waste authority,
approved WEEE scheme or your household waste disposal service.
CE notes:
Hereby, LRP electronic GmbH declares that this product is in compliance with the es-
sential requirements and other relevant provisions of the european directive 2014/30/EU.
This item is in accordance with directive 1999/5/EC. For the declaration of conformity
visit: http://www.LRP.cc/CE
The user is cautioned that any changes or modifications not expressly approved by
the party responsible for compliance could void the user’s authority to operate the equip-
ment.
Note: This equipment has been tested and found to comply with the limits for a Class B
digital device, pursuant to Part 15 of the FCC rules. These limits are designed to provide rea-
sonable protection against harmful interference in a residential installation. This equipment
generates, uses and can radiate radio frequency energy and, if not installed and used in ac-
cordance with the instructions, may cause harmful interferen¬ce to radio communications.
However, there is no guarantee that the interference will not occur in a particular installation.
If this equipment does cause harmful interference to radio or television reception, which can
be determined by turning the equipment off and on, the user is encouraged to try to correct
the interference by one or more of the following measures:
Reorient or relocate the receiving antenna.
Increase the separation between the equipment and receiver.
Connect the equipment into an outlet on a circuit different from that of the receiver.
Consult the dealer or an experienced radio/TV technician for help.
Battery disposal notes:
Batteries and accumulators used in this product are to be disposed of separately from
your household waste. Batteries and accumulators must not be disposed of as unsorted
municipal waste. Users of batteries and accumulators must use the available collection
framework for the return, recycling and treatment of batteries and accumulators. Custo-
mer participation in the collection and recycling of batteries and accumulators is import-
ant to minimise any potential effects of batteries and accumulators on the environment
and human health due to substances used in batteries and accumulators.
Insurance notes:
In some countries it is mandatory to have a special liability insurance if you use a radio-
controlled helicopter or airplane. Be sure to check with your insurance if your liability
insurance covers the use of a radio-controlled helicopter or airplane before you use your
model for the first time.
USER GUIDE

LRP electronic GmbH
Hanfwiesenstraße 15
73614 Schorndorf
Deutschland
HA00100 © LRP electronic GmbH 2017
BEST-NR. 220715
GRAVIT FPV XTREME 80 RTF 2.4GHz
RACE-QUADROCOPTER
FRANÇAIS
Cher client,
Nous vous remercions d‘avoir choisi un produit LRP. Le Gravit FPV Xtreme 80 est un
drone FPV de haute qualité prêt à s‘envoler. Équipé d‘une caméra 5,8 GHz HD et d‘un
moniteur LCD pour visualiser les vidéos en direct, ce produit LRP est votre billet d‘entrée
pour les courses FPV populaires. Veuillez lire cette documentation avant de faire voler
votre Gravit afin de l‘apprécier au maximum.
REMARQUE: Ce manuel est destiné au démarrage rapide. Un manuel principal plus com-
plet, couvrant tous les aspects et toutes les fonctions de votre Gravit en détail, peut être
téléchargé sur la page d‘accueil de LRP www.lrp.cc
1. AVANT DE VOLER - CHARGEZ LA BATTERIE DE VOL
Avant de pouvoir faire voler votre Gravit, vous devez toujours vous assurer que la batte-
rie est complètement chargée. Pour charger la batterie, branchez le chargeur USB fourni
à une prise USB 5 V adaptée. Assurez-vous que la prise USB puisse fournir au moins 1
A de courant de charge.
IMPORTANT: LRP recommande de NE PAS utiliser ce chargeur USB sur un ordinateur
portable ou de bureau, car cela peut endommager le port USB et l‘ordinateur.
Après avoir inséré le chargeur USB dans une prise appropriée, un VOYANT ROUGE
CONTINU s‘allumera dans le boîtier du chargeur. Veuillez alors connecter votre batterie
de vol au chargeur USB. Uns fois la connexion établie, un VOYANT VERT se mettra à
CLIGNOTER, indiquant que la batterie est en charge. Lorsque la batterie est complète-
ment chargée, le VOYANT VERT cesse de clignoter et devient VERT CONTINU. Débran-
chez le LiPo du chargeur et le chargeur de la prise.
2. AVANT LE VOL - MONTAGE ET CHARGEMENT DE L'ÉCRAN LCD
Veuillez monter le moniteur LCD de votre émetteur comme indiqué dans les images.
Assurez-vous qu‘il est fermement et solidement fixé à votre TX.
Chargez également le LiPo du moniteur LCD avant de l‘utiliser.
Chargement de l‘écran LCD
1. Connectez le chargeur USB à une alimentation USB
2. Connectez l‘écran LCD au chargeur USB, la LED ROUGE = ON
3. Lorsque le moniteur LCD est complètement chargé, la LED ROUGE s‘éteint à nouveau.
Assurez-vous que l‘écran LCD est éteint pendant la charge. Assurez-vous de fixer l‘anten-
ne fournie au moniteur LCD. Pour ce faire, il suffit de la visser sur le fil du moniteur LCD
sur le côté droit de la partie supérieure du moniteur.
3. AVANT LE VOL - PRÉPARER VOTRE ÉMETTEUR
Ouvrez le tiroir de la batterie à l‘arrière de l‘émetteur et insérez 6 piles AA.
IMPORTANT: Assurez-vous que tous les interrupteurs à 5 contacts en argent sur la partie
supérieure du TX sont en position HAUTE (= s‘éloignant du pilote) et que la commande
des gaz (manette de GAUCHE) est TOTALEMENT en bas.
Ouvrez l‘écran pare-soleil de votre moniteur LCD et relevez son antenne.
4. DÉMARRER LE GRAVIT FPV XTREME 80
Avant de démarrer votre Gravit FPV Xtreme 80 pour la première fois, vérifiez que les éc-
rous de l‘hélice sont suffisamment serrés. Pour ce faire, utilisez un petit outil pour passer
dans le trou de l‘écrou de l‘hélice (une petite clé hexagonale, par exemple), puis serrez
l‘écrou de l‘hélice dans le sens opposé de la direction de rotation de l‘hélice avec une
force modérée. Le sens de rotation des hélices est indiqué par les deux petites flèches sur
chaque hélice. Attention de NE PAS trop serrer les écrous, car cela pourrait endommager
l‘écrou, l‘hélice et l‘arbre du moteur. Vérifiez les écrous de l‘hélice régulièrement pour
vous assurer qu‘ils sont toujours suffisamment serrés. Sinon, vous risquez de perdre une
hélice pendant le vol, ce qui entraînerait des accidents et des dégâts sur le Gravit.
Pour faire voler votre Gravit Xtreme 80, veuillez suivre les étapes suivantes :
1. Placez le Gravit sur une surface plane et uniforme (de préférence le sol). Il est décon-
seillé de faire voler le Xtreme 80 à l‘intérieur, en raison de la puissance et de la vitesse
de ce quadricoptère. Ne faire voler qu‘en EXTÉRIEUR !
2. D‘ABORD allumez l‘émetteur. Vérifiez les piles de votre émetteur. Assurez-vous que
l‘accélérateur (manette de GAUCHE) est COMPLÈTEMENT enfoncé. Dans le cas con-
traire, le TX émettra une alerte sonore rapide.
3. Allumez le Xtreme 80 en poussant la batterie dans le compartiment de la batterie sur
le côté inférieur du Gravit, reliant le connecteur de la batterie à l‘hélicoptère. Assu-
rez-vous que le connecteur est COMPLÈTEMENT inséré et est installé fermement dans
le châssis du Xtreme.
Le Xtreme sonnera un court, simple « bip », et le voyant d‘état au dos du Gravit devrait
devenir VERT après une ou deux secondes.
4. Allumez à présent le moniteur LCD. Après quelques secondes, vous verrez l‘image
vidéo en direct de la caméra de votre Xtreme. Vous pouvez maintenant voir ce que la
caméra de votre Xtreme voit.
5. Pour décoller, poussez doucement et lentement la commande des gaz (manette de
GAUCHE) vers le haut. Attention de ne pas appuyer trop fort sur le gaz, le Gravit
Xtreme est très puissant ! Laissez l‘hélicoptère monter dans les airs jusqu‘à ce qu‘il pla-
ne à un mètre au dessus du niveau des yeux. Dans le cas où vous auriez trop accéléré,
réduisez simplement la vitesse jusqu‘à ce que le Xtreme vole à la hauteur désirée.
REMARQUE:
Si vous envisagez de faire une course avec d‘autres pilotes, qui comprendra donc PLUS
D‘UN XTREME 80, veuillez consulter la section « Plus d‘un pilote » ci-dessous.
5. FAIRE VOLER LE GRAVIT FPV XTREME 80 - FONCTIONS DE BASE
Pour contrôler votre Gravit dans les airs, veuillez suivre les instructions suivantes:
. Pour gagner ou perdre de l‘altitude (ou pour accélérer ou décélérer respectivement)
-> Déplacer la manette GAUCHE vers le haut ou vers le bas
. Pour faire tourner sur son axe -> Inclinez la manette GAUCHE sur la gauche ou sur
la droite
. Pour voler sur le côté gauche ou droit -> Poussez la manette DROITE vers la gauche
ou la droite. Plus vous poussez la manette, plus le Gravit vole sur le côté
. Pour voler vers l‘avant ou vers l‘arrière -> Poussez votre manette DROITE vers l‘avant
ou l‘arrière. Plus vous poussez la manette, plus le Gravit vole vers l‘avant/l‘arrière.
Bien sûr, vous pouvez combiner ces commandes individuelles pour obtenir des mou-
vements plus complexes. Par exemple : Si vous appuyez sur la manette DROITE vers
l‘avant et la gauche, le Gra-
vit volera vers l‘avant gau-
che.
Maintenant, vous pouvez
soigneusement et lente-
ment tester les commandes
de votre Gravit Xtreme.
Vous verrez qu‘il est très
facile et intuitif à contrôler.
Vous acquerrez rapidement
de l‘expérience et vous se-
rez en mesure de mieux
contrôler le Xtreme 80 et
avec plus de confiance et
de compétence.
Pour faire atterrir votre Gra-
MODE D´EMPLOI

LRP electronic GmbH
Hanfwiesenstraße 15
73614 Schorndorf
Deutschland
HA00100 © LRP electronic GmbH 2017
BEST-NR. 220715
GRAVIT FPV XTREME 80 RTF 2.4GHz
RACE-QUADROCOPTER
FRANÇAIS
vit, assurez-vous qu‘il vole
sur une surface lisse, con-
venable pour l‘atterrissage.
Puis décélérez lentement
jusqu‘à ce que le Gravit
soit seulement à quelques
centimètres du sol et tirez
la commande des gaz com-
plètement vers le bas pour
couper les moteurs.
Assurez-vous de ne pas
éteindre les moteurs en vo-
lant trop haut, car le Xtreme
tombera simplement du
ciel et sera très probable-
ment endommagé....
6. FAIRE VOLER LE GRAVIT FPV XTREME 80 - FONCTIONS AVANCÉES
REMARQUE: Le TX de votre Gravit Xtreme est un TX pour amateurs de haute qualité,
doté de nombreuses options permettant de configurer et d‘affiner ses réglages.
Cependant, le TX a déjà été réglé pour correspondre à votre Xtreme 80 et NOUS VOUS
RECOMMANDONS DE NE MODIFIER AUCUN PARAMÈTRE DE L‘ÉMETTEUR.
Si vous modifiez le mauvais paramètre ou appliquez la mauvaise valeur à un paramètre,
cela pourrait entraîner un comportement de vol imprévisible et incontrôlable.
LRP n‘est responsable d‘aucun dommage direct ou indirect causé par la modification des
paramètres par défaut de l‘émetteur.
Si vous décidez de modifier les paramètres, veuillez garder à l‘esprit que vous effectuez
ces modifications en assumant ENTIÈREMENT les risques et la responsabilité.
Fonctions de vol avancées
Ce chapitre décrit les modes de vol supplémentaires et les fonctions de votre émetteur
en détail.
DÉFINITION IMPORTANTE: Comme vous pouvez le voir, le TX possède de nombreux
commutateurs en métal argenté. Ces commutateurs peuvent être placés dans deux po-
sitions, en haut et en bas. Pour éviter toute confusion concernant la position Haut et Bas
d‘une manette, voici comment « Haut » et « Bas » sont définis dans ce manuel :
Regardez cette photo montrant les commutateurs S1 à S5. Maintenant, tenez le TX dans
vos mains devant vous, comme vous le tenez en pilotant votre Gravit.
Pour les commutateurs S1 et S5, « HAUT » signifie en fait pointant légèrement en bas
vers le sol, tandis que « BAS » signifie pointant légèrement en haut vers le ciel.
Pour les commutateurs S2, S3 et S4, « HAUT » signifie pointant en s‘éloignant du pilote,
alors que « BAS » signifie pointant vers le pilote.
Cela semble un peu déroutant au premier abord, mais en définissant la position de la
manette de cette façon, HAUT et BAS représentent en fait la même position absolue de
la manette pour TOUS les commutateurs.
Veuillez garder cela à l‘esprit en lisant le manuel et en utilisant les commutateurs.
Les commutateurs ont la fonction suivante :
S1 -> AUCUNE fonction ; il est réservé pour les fonctions et mises à niveau FUTURES. La
position de S1 n‘a PAS d‘importance et peut être en haut ou en bas.
S4 -> Si S4 est positionné en BAS (TOUS les autres commutateurs étant en HAUT), le
Gravit bascule en MODE SPEED (MODE VITESSE). Le voyant indicateur d‘état DEL du
Gravit reste vert, mais l‘angle d‘attaque est légèrement plus obtus, le Gravit vole un peu
plus vite et réagit un peu plus rapidement (voir la description ci-dessous).
S2+S4 -> Si S2 et S4 sont positionnés en BAS (tous les autres commutateurs étant en
HAUT), le voyant indicateur d‘état DEL du Gravit passe du vert au rouge et vous êtes en
MODE FLIPPING (voir description ci-dessous).
S3 -> Si S3 est positionné en BAS (quelle que soit la position des autres commuta-
teurs !), le voyant indicateur d‘état DEL du Gravit devient rouge et votre quadricoptère se
trouve maintenant en MODE ACRO (voir la description ci-dessous).
S5 -> Ce commutateur sert à armer et désarmer les moteurs. Lorsque le commutateur
est en HAUT, les moteurs sont armés et commencent à tourner dès que la commande
des gaz est activée par la manette de commande de gauche. Lorsque le commutateur
est en BAS, les moteurs ne sont pas armés et si les moteurs sont déjà en marche, ils
s‘arrêteront IMMÉDIATEMENT. Le commutateur S5 fonctionne donc comme une sorte
d‘arrêt d‘urgence, qui arrête la commande des gaz immédiatement (ou l‘empêche d‘être
activée respectivement).
Consultez également ce tableau pour voir la fonction des commutateurs:
MODE SPEED (MODE VITESSE):
Le MODE SPEED est activé en plaçant le commutateur S4 en bas. Techniquement, le
double débattement de certains canaux de commande est augmenté de 25 % par rap-
port au mode « standard » (avec tous les commutateurs en position par défaut HAUT).
Cela produit un angle d‘attaque maximal plus obtus, que le quadricoptère peut atteindre
lorsque vous poussez les manettes de commande dans l‘une des deux directions. Cet
angle plus obtus confère une vitesse plus élevée et dans l‘ensemble, cette configuration
augmente la réactivité subjective et l‘agilité de votre Xtreme 80.
Dans ce mode, la fonctionnalité d‘auto-nivellement du Gravit EST TOUJOURS activée et
l‘angle d‘attaque maximal est limité par le dispositif de commande de vol. Il s‘agit donc
d‘un mode de vol sûr pour ceux qui veulent juste un peu plus de vitesse.
MODE FLIPPING (MODE DE RETOURNEMENT):
Le MODE FLIPPING est activé en abaissant À LA FOIS S2 et S4. Voici comment foncti-
onne le MODE FLIPPING et ce qu‘il permet de réaliser :
Lorsque le mode flipping est activé, vous pouvez effectuer une série rapide de flips dans
toutes les directions. La manette de commande de GAUCHE maintient sa fonctionnalité
standard (ce qui signifie que la commande des gaz correspond à Haut/Bas et la rotation
du Gravit autour de son propre axe correspond à Gauche/Droite).
Mais les fonctions de la manette de commande de DROITE sont augmentées. Si vous
déplacez la manette de droite, TOUT D‘ABORD le Gravit fonctionnera normalement et vo-
lera vers la gauche/vers la droite ou vers l‘arrière/vers l‘avant normalement. Mais au-delà
d‘une certaine déviation de la manette (= si vous poussez SUFFISAMMENT la manette
de commande de droite dans n‘importe quelle direction), le mode flipping sera activé.
Dans ce cas, le Gravit désactivera ses fonctions d‘auto-nivellement et de limitation de
l‘angle d‘attaque maximal. Le Gravit effectuera alors des boucles très serrées (= flips)
dans la direction de déviation de la manette de commande de droite.
Dès que vous relâchez la manette de commande de droite ou que vous la déplacez vers
un niveau neutre en dessous d‘un certain seuil, la fonction d‘auto-nivellement est réac-
tivée et l‘angle d‘attaque maximal est à nouveau limité. Cela signifie que le Gravit corrige
son vol et retourne à un fonctionnement « normal ».
C‘est un mode fantastique pour effectuer des manœuvres de vol stupéfiantes sans savoir
nécessairement voler comme un pro.
REMARQUE: Si vous sentez que vous perdez le contrôle du Gravit, il vous suffit de
RELÂCHER LA MANETTE DE COMMANDE DE DROITE et votre Gravit se stabilisera dans
l‘air automatiquement. Ensuite, vous pouvez continuer à voler normalement.
Dans ce mode, le Gravit désactive ses fonctions d‘auto-nivellement et de limitation de
l‘angle d‘attaque SI (et aussi longtemps que) la manette de commande de droite dépasse
un certain seuil de déviation. Tant que vous restez DANS ce seuil (= tant que vous effec-
tuez uniquement des mouvements mineurs avec la manette de commande de droite),
le Gravit vole comme en mode « normal ». Ce mode est parfait pour les débutants qui
veulent « parader » et voler comme un pro. Essayez-le !
MODE ACRO (MODE MANUEL)
Le MODE ACRO est activé dès que vous positionnez le commutateur S3 en BAS.
S1
S2 S3 S4
S5
S1 S2 S3 S4 S5 Description/function
of switch-combination
LED STATUS
(COLOR)
up OR
down DOWN UP UP UP No function RED
up OR
down DOWN UP DOWN UP FLIPPING MODE RED
up OR
down
up OR
down UP DOWN UP SPEED-MODE RED/GREEN
(depending on S2 position)
up OR
down
up OR
down DOWN up OR
down UP ACRO MODE RED
up OR
down
up OR
down
up OR
down
up OR
down DOWN
Motors cannot arm as
soon as S5 is DOWN,
no flying possible
N.A.
MODE D´EMPLOI

LRP electronic GmbH
Hanfwiesenstraße 15
73614 Schorndorf
Deutschland
HA00100 © LRP electronic GmbH 2017
BEST-NR. 220715
GRAVIT FPV XTREME 80 RTF 2.4GHz
RACE-QUADROCOPTER
REMARQUE IMPORTANTE: QUELLE QUE SOIT la position de TOUS LES AUTRES com-
mutateurs, dès que vous positionnez S3 en bas, le MODE ACRO est activé. Cela signifie
que le commutateur S3 REMPLACE tous les autres modes de vol. Gardez cela à l‘esprit
pendant le vol.
Lorsque le MODE ACRO est activé, tout le potentiel de votre Gravit Xtreme 80 est li-
béré. Les fonctions des deux manettes de commande DEMEURENT LES MÊMES, mais
l‘auto-nivellement ET la limitation de l‘angle maximal d‘attaque sont TOUS LES DEUX
désactivés. Cela vous donne un CONTRÔLE MANUEL COMPLET sur les manœuvres de
vol de l‘Xtreme et a les conséquences suivantes :
1) PAS D‘AUTO-NIVELLEMENT:
Cela signifie que si vous volez dans une direction, puis relâchez la manette de comman-
de de droite, le Gravit ne corrigera PAS son vol et ne retournera PAS automatiquement
au niveau horizontal.
En voici un exemple:
Imaginez que vous pilotiez votre Gravit vers l‘avant en poussant la manette de com-
mande de droite vers le haut. Le Gravit basculera vers l‘avant et volera dans la direction
correcte. Cependant, si vous relâchez la manette de commande de droite, le Gravit ne
neutralisera PAS son angle d‘attaque et ne reviendra PAS au niveau horizontal ; il CON-
TINUERA À VOLER AVEC LE MÊME ANGLE D‘ATTAQUE. Si vous voulez que le Gravit
arrête de se déplacer (= si vous voulez que le Gravit retrouve un niveau horizontal),
vous devez CONTRER l‘angle d‘attaque actuel en déplaçant la manette de commande
de droite dans la direction opposée de l‘angle d‘attaque du Gravit. Dans notre exemple,
cela signifie que vous devez déplacer la manette de commande de droite VERS LE BAS
(en dessous de la position neutre) pour que le Gravit réduise son angle d‘attaque et
retrouve enfin une orientation horizontale. MAIS ATTENTION : Si vous appuyez trop
et/ou trop longtemps sur la manette de commande de droite VERS LE BAS, le Gravit
basculera vers l‘arrière et la même situation se reproduira. Pour faire voler le Gravit en
MODE ACRO, vous devez manipulez la manette constamment pour positionner votre
quadricoptère comme vous le souhaitez et ce mode DOIT ÊTRE UTILISÉ UNIQUEMENT
PAR LES PILOTES EXPÉRIMENTÉS !
2) PAS D‘ANGLE D‘ATTAQUE MAXIMAL:
Cela signifie que le dispositif de commande de vol ne limite PAS l‘angle d‘attaque
maximal que le Gravit peut utiliser lorsque la manette de commande de droite est
COMPLÈTEMENT déviée dans une direction quelconque. Par exemple, dans les autres
modes de vol, il n‘est PAS possible de réaliser un véritable looping. La raison en est
que, pour effectuer un looping, le Gravit doit pouvoir voler et tourner sans restriction,
même à l‘envers pour un instant.
Cela est impossible en mode normal. Le dispositif de commande de vol limite l‘angle
d‘attaque maximal ; votre Gravit ne pourra donc pas réaliser de looping (seuls les flips
sont possibles dans le mode flipping). Il volera vers le haut à un certain angle maximal,
mais il ne pourra pas augmenter constamment son niveau pour pouvoir effectuer un
looping. La combinaison de la commande des gaz et de l‘angle d‘attaque que vous
appliquez au Gravit détermine si vous pouvez réaliser un « véritable » looping ou seule-
ment des « flips » comme dans le mode flipping. Par exemple :
– La commande des gaz en position modérée et la déviation modérée de la manette de
commande de droite permettront d‘effectuer un looping de grand diamètre.
– La commande des gaz en position maximale (plein gaz) et la déviation maximale de la
manette de commande de droite permettront d‘effectuer une série rapide de flips (de
très petit rayon) dans la direction correspondante.
-> Cela signifie que le diamètre et la vitesse des flips/boucles résultent de la combinai-
son entre l‘importance de la poussée et le niveau de déviation appliqués à l‘aide de
la manette de commande de droite.
Le MODE ACRO vous permet d‘effectuer les manœuvres de vol les plus amusantes, les
plus géniales et les plus difficiles, mais NOUS VOUS RECOMMANDONS VIVEMENT DE
L‘UTILISER UNIQUEMENT SI VOUS ÊTES UN PILOTE EXPÉRIMENTÉ.
IMPORTANT: Si vous perdez le contrôle de votre Gravit en volant en MODE ACRO,
veuillez repositionner rapidement le commutateur S3 en HAUT. Vous vous retrouver-
ez IMMÉDIATEMENT dans l‘un des modes de vol stabilisé. Relâchez la manette de
commande de droite jusqu‘à ce que le Gravit se soit stabilisé et soit à nouveau orienté
horizontalement.
Bien que le Gravit puisse récupérer très rapidement en retournant au MODE ACRO,
vous devez tout de même vous assurer d‘effectuer des manœuvres de vol risquées
uniquement à une hauteur de plus de 30 mètres. Ainsi, votre Gravit aura suffisamment
de temps pour récupérer d‘une erreur de pilotage et pour se stabiliser à nouveau en po-
sition horizontale. Soyez également conscient du fait que les accidents sont beaucoup
plus susceptibles de se produire en MODE ACRO et que vous pourriez endommager
votre Gravit.
Le système FPV à 5,8 GHz de votre Gravit Xtreme (caméra à 5,8 GHz et récepteur LCD)
Votre Gravit Xtreme est équipé départ usine d‘un système FPV HD à 5,8 GHz. Ce système
vous permet non seulement de faire voler votre Gravit FPV (= First Person View/Vue à
la première personne) via le récepteur LCD, mais également d‘enregistrer des vidéos en
utilisant la fente pour carte microSD intégrée de la vidéo.
La portée du système FPV est d‘environ 100 mètres. Cependant, les influences et inter-
férences environnementales (telles que les poteaux électriques, les autres signaux radio
ou les obstacles comme les arbres, etc.) peuvent réduire la portée considérablement.
Veuillez donc bien vérifier la portée dans votre zone de vol.
Ce chapitre décrit en détail toutes les fonctions et fonctionnalités de votre système FPV.
1) La caméra à 5,8 GHz
La caméra est livrée préinstallée et câblée. Si vous ne voulez pas utiliser la caméra, vous
pouvez facilement la débrancher et l‘enlever du châssis de votre Xtreme 80. Vous pou-
vez enlever la caméra par exemple lorsque vous voulez maximiser la performance et le
temps de vol de votre Gravit et que n‘avez pas vraiment besoin de caméra. Dans ce cas,
il peut être utile d‘enlever la caméra. Sans la caméra, le Gravit est plus léger et la batterie
LiPo dure plus longtemps, car elle n‘est pas utilisée pour alimenter la caméra. Ces deux
faits permettent d‘obtenir une vitesse plus élevée, une meilleure performance globale et
un de temps de vol plus long.
Si vous désirez fixer la caméra à nouveau, assurez-vous de la placer correctement et
fermement, ainsi que de bien la brancher au châssis (voir la photo). Assurez-vous égale-
ment que l‘antenne sortant de l‘arrière du châssis de la caméra peut osciller librement
et n‘est ni bloquée ni obstruée.
Remarque: Si vous branchez
la prise de la caméra en inver-
sant la polarité, vous risquez
d‘endommager ou de détruire
la caméra et la carte électro-
nique de votre Xtreme. As-
surez-vous donc toujours de
brancher la caméra correcte-
ment !
Avant d‘utiliser la caméra,
veuillez insérer la carte
microSD fournie avec vot-
re Xtreme, comme indiqué
sur l‘image. Vous pouvez
également utiliser une carte
microSD tierce, mais LRP ne
garantit PAS la compatibilité ;
vous pouvez donc essayer,
mais à vos propres risques.
Pour utiliser le système FPV, préparez votre Xtreme au vol, puis allumez le récepteur LCD
fixé. Si vous n‘avez pas encore fixé le récepteur LCD à son support de montage sur le TX,
veuillez le faire maintenant. De plus, assurez-vous que vous avez déployé le pare-soleil
intégré de votre moniteur LCD, afin de voir l‘écran sans problème. Votre Xtreme sera prêt
à voler en quelques secondes et le moniteur LCD affichera une image vidéo en direct de
votre caméra. Déplacez l‘Xtreme pour obtenir une transmission vidéo correcte.
L‘écran LCD affichera un point rouge suivi d‘un code temporel dans le coin inférieur droit.
Le code temporel indique les heures, les minutes et les secondes restantes sur votre
carte microSD.
Le nombre affiché ici peut varier en fonction de la capacité de la carte que vous utilisez et
de la capacité encore disponible pour l‘enregistrement. La carte microSD de 4 Go livrée
devrait fournir un temps d‘enregistrement d‘ENVIRON 1 heure et 10 minutes si la carte
est vide.
Si le message rouge « MEMORY FULL » (MÉMOIRE PLEINE) s‘affiche au milieu de l‘écran,
cela signifie que la carte microSD insérée ne possède plus d‘espace disponible OU que
vous n‘avez pas inséré de carte mémoire.
Si vous AVEZ bien inséré une carte mémoire avec de l‘espace libre et que ce message
s‘affiche tout de même, cela signifie que votre carte mémoire n‘est pas compatible avec
FRANÇAIS
FCC
Caution: The user is cautioned that changes or modifications not expressly
approved by the party responsible for compliance could void the user's
authority to operate the equipment.
Notice for beginners:
1.If it is your first time to fly, please follow an experienced pilots.
2.Please be familiar with all the functions of TX and the related sticks
before fly.
4.6CH quadcopter is not a toy. To avoid unnecessary loss, please simulate
to fly on the computer firstly.
FCC AUTHENTICATE
-12-
MODE D´EMPLOI

LRP electronic GmbH
Hanfwiesenstraße 15
73614 Schorndorf
Deutschland
HA00100 © LRP electronic GmbH 2017
BEST-NR. 220715
GRAVIT FPV XTREME 80 RTF 2.4GHz
RACE-QUADROCOPTER
votre caméra ou n‘a pas été formatée correctement. Dans ce cas, veuillez changer ou
reformater la carte en utilisant le système de fichiers FAT32.
Démarrage et arrêt d‘un enregistrement
Pour démarrer ou arrêter un enregistrement, il vous suffit d‘appuyer sur le BOUTON
ROUGE situé dans le coin supérieur gauche de votre TX (À DROITE du commutateur S2).
Le point rouge situé dans le coin inférieur droit de l‘écran LCD commence à clignoter, le
code temporel passe du blanc au rouge et affiche la durée de l‘enregistrement en cours.
Appuyez à nouveau sur le bouton rouge pour arrêter l‘enregistrement. Le point rouge
arrête de clignoter, le code temporel redevient blanc et le temps indiqué sur l‘écran est
maintenant le temps mis à jour encore disponible pour l‘enregistrement.
Utiliser un enregistrement sur un PC ou un ordinateur portable
Les enregistrements se trouvent sous forme de fichiers « AVI » sur la carte SD. Pour visu-
aliser et modifier ces fichiers vidéo, il vous suffit d‘insérer la carte microSD dans le lecteur
de carte fourni et d‘insérer le lecteur dans un port USB libre de votre PC ou de votre ordi-
nateur portable. La carte microSD sera affichée comme périphérique de données échan-
geables (tel qu‘un disque dur externe ou une clé mémoire USB) et vous pourrez naviguer
son contenu en utilisant le navigateur de fichiers de votre système d‘exploitation (qui
peut être Windows XP ou supérieur, MacOS ou Linux). La carte microSD comporte un
dossier appelé « DCIM ». Ce dossier contient un autre dossier appelé « 100DSCIM » qui
comprend vos fichiers vidéo, appelés « PICT000X.AVI », où « X » représente le numéro
du film. Vous pouvez maintenant copier, modifier, supprimer ou visualiser le film comme
vous le souhaitez.
2) Le moniteur LCD
Le moniteur LCD est de type Plug and play : vous n‘avez pas besoin d‘effectuer de
réglages ni de modifier de paramètre, SAUF si vous désirez voler avec un autre pilote
en utilisant le même équipement. Dans ce cas, veuillez consulter le chapitre « Plus d‘un
pilote » ci-dessous.
Lorsque vous souhaitez utiliser le moniteur, assurez-vous qu‘il est fermement fixé au sup-
port de montage du TX, que la batterie LiPo est complètement chargée, que le pare-soleil
est déployé et que l‘antenne est repliée.
Optimisation de la réception de l‘antenne
Vous pouvez faire pivoter l‘antenne de 360 degrés et vous pouvez également la plier
selon deux angles différents. Pour votre premier vol, veuillez déplier l‘antenne complète-
ment, pour qu‘elle soit droite. Durant le vol, si vous rencontrez des problèmes au niveau
de la portée ou de la qualité du signal vidéo, vous pouvez essayer de régler l‘antenne
en la plaçant à différents angles et en la pointant dans différentes directions. Cela vous
aidera à maximiser la portée.
8. PLUS D‘UN PILOTE
TOUTES les caméras et TOUS les moniteurs LCD départ usine transmettent et reçoivent
les images à la MÊME fréquence. Tant que vous volez seul, cela ne pose aucun problème.
Mais que se passe-t-il si vous avez des amis qui possèdent également des Gravit Xtreme
et veulent faire la course avec et contre vous ? Ne vous inquiétez pas, la fréquence de
la caméra ET celle de l‘antenne peuvent être basculées entre 6 canaux différents. Cela
signifie que 6 pilotes peuvent faire voler leurs Xtreme en même temps sans interférer les
uns avec les autres. Alors, comment s‘effectue une commutation de canal ?
Veuillez regarder l‘image ci-dessous. Ce schéma montre les 3 commutateurs DIP situés
au milieu du dos de votre moniteur LCD. Ces petits commutateurs (qu‘il est préférable de
manipuler à l‘aide d‘un petit tournevis plat) peuvent être réglés à différentes combinai-
sons, chacune d‘entre elles donnant un canal récepteur différent. Comme vous pouvez
le voir, les commutateurs DIP départ usine sont réglés sur CH1 (Canal 1). En ajustant
le schéma des commutateurs DIP différemment (voir l‘image), vous pouvez également
définir le canal du récepteur de CH2 à CH6.
Une fois qu‘un canal est sélectionné par la position des commutateurs DIP, le moniteur
LCD continue à recevoir des images sur ce canal, jusqu‘à ce que vous le changiez de
canal.
Ensuite, veuillez regarder votre caméra. Votre caméra ne possède pas de commutateur
DIP, mais elle est dotée d‘un petit bouton blanc situé sur le côté inférieur gauche de son
logement, vers l‘avant de la caméra (voir la photo).
La caméra départ usine est réglée pour transmettre des images sur CH1. Si vous prenez
un petit outil et que vous appuyez une fois sur le bouton de la caméra, vous entendrez/
sentirez un clic et la caméra basculera au canal suivant, à savoir CH2. Chaque fois que
vous appuyez à nouveau sur le petit bouton, la caméra bascule au canal suivant.
Si vous atteignez CH6 et que vous appuyez à nouveau sur le bouton, la caméra retour-
nera à CH1, et ainsi de suite.
IMPORTANT: Contrairement à la sélection de canal du récepteur LCD, la sélection du
canal de la caméra n‘est PAS permanente. Ce qui signifie que si vous réglez la caméra sur
CH3, par exemple, et que vous la redémarrez, elle retournera par défaut à CH1.
Vous devez donc définir le canal approprié chaque fois que vous mettez votre Gravit en
marche. Mais comme il suffit pour cela d‘appuyer quelques fois sur le bouton de canal
de la caméra, ce n‘est pas un problème.
Voici un exemple de la façon de procéder pour voler avec 2 amis (nous avons donc
3 pilotes au total) :
– Vous êtes le pilote A, vos amis sont les pilotes B et C.
– Tous les pilotes préparent leur Xtreme pour le vol. N‘allumez PAS encore vos récepteurs
LCD.
– Le pilote B règle son moniteur LCD sur CH2, le pilote C sur CH3 (consultez le schéma de
réglage des commutateurs DIP).
– Maintenant, tous les pilotes peuvent activer leurs moniteurs LCD.
– Comme toutes les caméras Xtreme transmettent des images à CH1 actuellement, seul
le pilote A recevra une image vidéo (car son moniteur LCD est réglé sur le canal par
défaut CH1).
– Le pilote A recevra très probablement une image PAS claire, car 3 Xtreme différents
envoient actuellement leur image à CH1. Cela produit une image déformée.
– Les pilotes B et C ne devraient pas recevoir d‘image, car aucun des Xtreme n‘envoie
d‘image à CH2 ni à CH3 actuellement.
– Maintenant, le pilote B appuie UNE FOIS sur le bouton de canal de sa caméra, ce qui
devrait faire basculer sa caméra de CH1 à CH2.
– Le pilote C appuie DEUX FOIS sur le bouton de canal de sa caméra, ce qui devrait faire
basculer sa caméra de CH1 à CH3.
– Maintenant, chacun des 3 pilotes utilise le canal correspondant au canal de réception
de son moniteur LCD et les 3 pilotes devraient TOUS recevoir la transmission vidéo de
leur Xtreme (et UNIQUEMENT de leur Xtreme).
– SI un ou plusieurs des trois pilotes reçoivent des « images fantômes » d‘un autre pilote,
vous pouvez essayer ce qui suit -> Le pilote B utilise CH3 au lieu de CH2 et le pilote C
utilise CH5 au lieu de CH3.
-> Ainsi, les 3 pilotes utilisent des canaux qui sont « plus éloignés » les uns des autres. Le
risque de recevoir une image fantôme d‘une autre caméra Xtreme est donc plus faible.
Maintenant, les 3 pilotes devraient tous être prêts à voler. Que la bataille commence !
8. REMPLACEMENT DES HÉLICES
Il est très important que vos hélices soient toujours en bon état et parfaitement intactes
avant de faire décoller votre Gravit. Sinon, cela diminuera la performance. De plus, des
hélices endommagées peuvent provoquer un accident et d‘autres dommages. Veuillez
donc vous assurer que vos hélices sont TOUJOURS parfaitement intactes.
Tôt ou tard, vous devrez remplacer une ou plusieurs de vos hélices. Veuillez alors vous
assurer de procéder comme décrit ci-dessous.
Le placement correct des hélices est indiqué dans l‘image ci-dessous :
Avant gauche -> hélice CW
Avant droit -> hélice CCW
FRANÇAIS
Channel CH1 CH1 CH1 CH1 CH1 CH1
DIP-Position
1 2 3 1 2 3 1 2 3 1 2 3 1 2 3 1 2 3
Frequency (GHz) 5745 5765 5785 5805 5825 5845
MODE D´EMPLOI

LRP electronic GmbH
Hanfwiesenstraße 15
73614 Schorndorf
Deutschland
HA00100 © LRP electronic GmbH 2017
BEST-NR. 220715
GRAVIT FPV XTREME 80 RTF 2.4GHz
RACE-QUADROCOPTER
Arrière gauche -> hélice CCW
Arrière droit -> hélice CW
Assurez-vous de toujours remplacer une hélice par une nouvelle hélice de la même ori-
entation (CW/CCW – sens horaire/antihoraire).
– Pour remplacer une hélice, vous devez tout d‘abord dévisser son écrou. Pour ce faire,
placez un outil métallique adéquat (tel qu‘une petite clé hexagonale) à travers le trou
de l‘écrou de l‘hélice.
– Ensuite, desserrez l‘hélice en la tournant dans la MÊME DIRECTION que celle indiquée
par les flèches sur l‘hélice.
– Remplacez l‘hélice, puis serrez l‘écrou de la nouvelle hélice. Pour ce faire, tournez l‘éc-
rou de l‘hélice dans la DIRECTION OPPOSÉE de celle indiquée par les flèches sur les
hélices.
– Serrez l‘écrou d‘hélice FERMEMENT, mais SANS force excessive. Sinon, l‘arbre du
moteur et/ou l‘écrou pourraient être endommagés.
REMARQUE : Si vous regardez les moteurs, vous verrez également « CW » ou « CCW »
gravé dessus.
Ceci ne représente PAS le sens de rotation du MOTEUR, mais correspond à l‘orientation
de l‘ÉCROU DE L‘HÉLICE. L‘orientation du MOTEUR est TOUJOURS L‘INVERSE de l‘orien-
tation de l‘écrou de l‘hélice.
Alors, ne vous trompez pas et gardez cela à l‘esprit.
ENCORE UNE FOIS :
CW gravé sur un moteur signifie -> l‘écrou d‘hélice utilisé sur ce moteur est CW, MAIS
l‘orientation du moteur ET de l‘hélice est CCW.
CCW gravé sur un moteur signifie -> l‘écrou d‘hélice utilisé sur ce moteur est CCW,
MAIS l‘orientation du moteur ET de l‘hélice est CW.
Le sens de rotation des moteurs est donc le même que celui des hélices :
Avant gauche -> moteur CW (avec CCW gravé)
Avant droit -> moteur CCW (avec CW gravé)
Arrière gauche -> moteur CCW (avec CW gravé)
Arrière droit -> moteur CW (avec CCW gravé)
8. IMPORTANT : REMARQUES ET CONSEILS
Durée de vol: La durée de vol de votre Gravit FPV Xtreme 80 dépend fortement de la
façon dont vous le faites voler et des fonctions avancées que vous utilisez. Par exemple,
si vous faites beaucoup de loopings et volez rapidement, la durée de vol sera moindre.
La durée de vol moyenne est d‘environ 5-7 minutes.
Gyro-calibration: Dans
le cas où votre Gravit
dériverait FORTEMENT
sur un côté sans utiliser
les commandes TX dans
ce sens, essayez de ca-
librer le gyroscope du
Gravit afin de l‘empêcher
de dériver. Pour procéder
à une calibration gyros-
copique, placez le Gravit
(prêt à décoller) sur sur-
face plane. Déplacez ensuite la manette GAUCHE en position 7 heures et la manette
DROITE à 5 heures EN MÊME TEMPS, et MAINTENEZ cette position. Les voyants sur le
côté inférieur des moteurs du Gravit clignoteront rapidement pendant une ou deux se-
condes. Quand ils cessent de clignoter, la calibration est terminée et le problème devrait
être résolu.
Remarque: la calibration gyro n‘empêche pas le Gravit de dériver si vous êtes en vol
alors qu‘il y a du vent.
Temps de vol: Lorsque vous volez SANS la caméra à 5,8 GHz, votre temps de vol aug-
mente de façon significative, car votre Xtreme est plus léger et la batterie n‘est pas utili-
sée pour alimenter la caméra. Donc, si vous voulez seulement déchirer le ciel sans utiliser
la caméra, il est préférable de l‘enlever. Le temps de vol sans la caméra est habituelle-
ment d‘environ 7 à 9 minutes.
Portée du système à 2,4 GHz: Comme décrit ci-dessus, la portée du système FPV à
5,8 GHz est d‘environ 100 mètres. La portée du système à 2,4 GHz de votre Xtreme (c.-
à-d. votre TX et le quadricoptère lui-même) est d‘environ 150 mètres. Cela signifie que
vous perdrez votre signal de transmission vidéo AVANT de perdre contact avec votre
Gravit Xtreme 80. Ceci est en fait une bonne chose, car il est souvent très difficile d‘évalu-
er la distance à un multirotor de manière fiable. Veuillez donc garder à l‘esprit que si vous
perdez complètement votre transmission vidéo, cela signifie que vous ne devez pas voler
beaucoup plus loin, sinon vous perdrez le contrôle de votre Xtreme.
Bien sûr (tout comme avec le système à 5,8 GHz), la portée du système à 2,4 GHz dépend
fortement des conditions et des influences environnementales. Des éléments tels que
des poteaux électriques ou d‘autres antennes et signaux peuvent interférer avec votre
signal et en réduire la portée. Les obstacles tels que les arbres, les bâtiments, etc. ont
également un effet négatif sur la portée. Veuillez donc vous assurer de vérifier la portée
RÉELLE de votre quadricoptère dans votre zone de vol et de toujours garder à l‘esprit que
la portée du Gravit est peut- être BEAUCOUP plus courte que les 150 mètres « normaux ».
REMARQUE: Si jamais votre Gravit perd sa connexion 2,4 GHz à l‘émetteur, ses moteurs
s‘arrêteront en 1 seconde et il tombera du ciel. Ceci est une mesure de sécurité conçue
pour empêcher le quadricoptère de s‘éloigner de façon incontrôlable. Étant donné qu‘un
multirotor tombant du ciel peut causer des dommages à des personnes, des animaux ou
des objets, veuillez vous assurer de voler dans une zone dotée de beaucoup d‘espace
ouvert et libre. Ainsi, aucun dommage ne se produira en cas de chute du quadricoptère.
Pour d‘autres conseils, notes et avertissements concernant le vol d‘un avion, veuillez lire
attentivement notre chapitre « Notes d‘avertissement ».
Utilisation des compensateurs (trims) de votre TX
Si votre Xtreme Gravit dérive d‘un côté sans que vous ayez touché de manette, vous
pouvez essayer de résoudre ce problème de plusieurs façons :
– Vous pouvez étalonner le gyroscope (voir ci-dessus). AVANT d‘utiliser les compensa-
teurs pour rendre votre Xtreme plus stable dans l‘air, utilisez l‘étalonnage du gyrosco-
pe. Vous devez utiliser les compensateurs UNIQUEMENT si l‘étalonnage du gyroscope
ne résout pas le problème et que votre Gravit se trouve toujours trop à la dérive.
– Vous pouvez examiner vos rotors pour voir s‘ils sont endommagés et les remplacer si
nécessaire (voir le chapitre « Remplacement des hélices » ci-dessus).
– Vous pouvez « compenser (trimer) » votre Gravit. Pour ce faire, vous pouvez utiliser
les 4 boutons de compensateurs situés sur votre TX (voir la photo). Voici la fonction
détaillée des 4 boutons de compensateurs :
. Compensateur de la commande des gaz : si les moteurs de votre Xtreme commen-
cent à fonctionner bien que la manette de gauche soit COMPLÈTEMENT en bas, vous
pouvez arrêter cela. Il vous suffit de pousser le bouton du compensateur de la comman-
de des gaz vers le BAS jusqu‘à ce que les moteurs s‘arrêtent.
Si les moteurs de votre Xtreme ne démarrent pas lorsque vous poussez la manette des
gaz, vous pouvez également corriger cela à l‘aide du compensateur de la commande des
gaz. Dans ce cas, déplacez le bouton du compensateur de la commande des gaz vers
le HAUT, jusqu‘à ce que les moteurs démarrent dès que vous commencez à pousser la
manette de commande de gauche vers le HAUT.
. Compensateur de lacet : si votre Gravit tourne à gauche ou à droite sur son axe par
lui-même, vous pouvez également arrêter cela.
Si le Gravit tourne en sens HORAIRE, appuyez sur le bouton du compensateur vers la
GAUCHE ; si le Gravit tourne en sens ANTIHORAIRE, appuyez sur le bouton vers la DRO-
ITE. Vous pouvez ainsi contrer le mouvement indésirable et stabiliser parfaitement votre
Gravit autour de l‘axe de LACET.
. Compensateur d‘aileron : si votre Xtreme dérive du côté gauche ou droit, vous pou-
FRANÇAIS
-10-
GYRO CALIBRATION
6G MODE (RATTITUDE)
Temperature change and accumulated error of Gyro can result in yawing of
quadcopter. Calibrating gyro is good for stable flying.
1)Make sure 6G button “ON”, throttle stick at the bottom. Then open TX and
install Lipo battery, Gyro self detection finished when RX indicator long
light.
2)Pull the two sticks as the diagram for 3-4 seconds, then foursquare
navigation LED will fast flash.
3)Loose two sticks, wait till foursquare navigation
LED always on. Then gyro calibration finish.
When aircraft finished the binding, pls make
6G switch is opening and 3G switch is closing,
Tail line on aircraft will be shown green.
Pls move aileron rocker and loose your hands.
Aircraft will keep flying parallel. This is suitable
for beginners to fly.
6G
3D
Propeller CW
Propeller CWPropeller CCW
Propeller CCW
MODE D´EMPLOI

LRP electronic GmbH
Hanfwiesenstraße 15
73614 Schorndorf
Deutschland
HA00100 © LRP electronic GmbH 2017
BEST-NR. 220715
GRAVIT FPV XTREME 80 RTF 2.4GHz
RACE-QUADROCOPTER
vez « contrer » ce mouvement en appuyant sur les compensateurs d‘ailerons dans la
direction opposée.
. Compensateur de montée : si votre Xtreme dérive vers l‘avant ou l‘arrière, vous pou-
vez « contrer » ce mouvement en appuyant sur les compensateurs de montée dans la
direction opposée.
REMARQUE: Les réglages de vos compensateurs seront enregistrés. Ceci est très pra-
tique, car cela signifie que vous n‘avez pas besoin de compenser votre Gravit chaque fois
que vous redémarrez l‘émetteur. Veuillez garder à l‘esprit que votre appareil subit TOU-
JOURS une certaine dérive lorsque vous volez à l‘extérieur. Le vent n‘est pratiquement
JAMAIS totalement absent et même un vent léger fera dériver votre Gravit LENTEMENT.
Paramètres par défaut de votre TX
Veuillez garder à l‘esprit que les paramètres et les valeurs de votre émetteur ont déjà
été optimisés départ usine, afin de vous offrir la meilleure expérience de vol possible.
Si vous changez les valeurs par accident ou si vous voulez tester d‘autres valeurs (à vos
propres risques !), voici une liste des valeurs PAR DÉFAUT vous permettant de retourner
les paramètres de votre TX à ces valeurs :
Veuillez noter que LRP n‘est PAS responsable des crashs, des accidents ni des dom-
mages résultant directement ou indirectement de la modification des valeurs prédéfinies
de l‘émetteur. Si vous voulez expérimenter avec ces paramètres, n‘hésitez pas. Mais gar-
dez à l‘esprit que ce sera à vos propres risques.
CONDITION GÉNÉRAL DE GARANTIE ET DE RÉPARATION
Les produits de la société LRP electronic GmbH (abrégé „LRP” plus bas) sont fabriqués
selon des critères de qualité stricts. Nous accordons la garantie légale concernant les
vices de fabrication et de matériaux existants au moment de la livraison du produit. La
garantie ne couvre pas l‘usure normale. Cette garantie ne s‘applique pas aux défauts
dus à un usage non conforme, un entretien incorrect, une intervention externe ou un
endommagement mécanique.
Ceci s‘applique plus spécialement aux accus utilisés ou comportant des marques d‘usure
nettes. Les dommages ou pertes de performance causés par une manipulation incorrecte
et/ou une surcharge ne sont pas considérés comme un défaut du produit. De même, des
signes d‘usure (perte de capacité) lors d‘un usage intense ne sont pas considérés en tant
que défaut du produit.
Ceci est entre autre le cas si: dommages par accident panne ou usure excessive de
composants consécutivement aux dommages par accident dégâts d‘eau ou problème
causés par l‘infiltration d‘eau/humidité carrosseries peintes dès qu‘elles ont été utilisées.
LRP ne remplace pas complètement des autos déjà utilisées. Veuillez ne pas envoyer
le produit complet, mais seulement les pièces que vous désirez réclamer. Si le produit
complet est envoyé, LRP se réserve le droit de facturer au client les heures de travail pour
le démontage et montage.
Avant d‘envoyer ce produit en réparation, veuillez d‘abord contrôler tous les autres com-
posants de votre modèle et consulter le guide de dépannage de votre produit (si dispo-
nible), afin d‘exclure les autres sources de dérangement et erreurs de commande. Si le
produit est exempt de défaut lors de l‘inspection par notre S.A.V., nous devons vous
facturer les frais de travail occasionnés selon notre liste de prix.
Lors de l‘envoi du produit, le client doit communiquer si le produit doit être réparé dans
tous les cas. Si le produit n‘est plus couvert par la garantie, l‘inspection et éventuellement
la réparation seront facturées conformément à notre liste de prix. Les droits de garantie
peuvent uniquement être reconnus si une copie du bon d‘achat est jointe au produit en-
voyé. Sur votre demande explicite, nous pouvons vous établir un devis payant. Les frais
de devis seront déduits si vous nous donnez l‘ordre de réparation après l‘envoi du devis.
Notre devis nous engage pendant deux semaines à partir de sa date de rédaction. Afin
de faciliter l‘exécution de votre réparation, veuillez joindre une description détaillée de la
panne ainsi que vos coordonnées.
Si un produit défectueux renvoyé n‘est plus fabriqué par LRP et qu‘il n‘est plus possible
de le réparer, vous recevrez un produit de caractéristiques au moins identiques d‘une
des séries suivantes.
Les données telles que poids, taille ou autres sont indiquées par LRP à titre indicatif. LRP
se dégage de tout engagement formel concernant ce type de données spécifiques, car
celles-ci peuvent être modifiées dans le cadre d‘améliorations techniques du produit.
SERVICE D‘USINE LRP:
- voir www.lrp.cc
INFORMATION GÉNÉRAL
Avis WEEE:
Ce symbole indique que, selon la directive des équipements électriques et électroniques
(2012/19/EU) et la législation nationale, ce produit ne peut pas être jeté dans les déchets
ménagers. Ce produit doit être remis au centre de recyclage prévu à cet effet. Il peut
également être remis à un magasin l’or d’un achat d’un produit similaire. L’utilisation
incorrecte de vieux équipements électriques ou électroniques peut engendrer des effets
négatifs sur la santé humaine et sur l’environnement. Pour tous renseignements supplé-
mentaires concernant l’élimination correcte veuillez contacter le service de recyclage de
votre commune ou un centre agrée.
Avis CE:
Par la présente LRP electronic GmbH confirme que ce produit est conforme à la directive
européenne 2014/30/EU.
Cet article est conforme à la norme 1999/5/EC. Pour avoir information sur conforme à la
norme: http://www.LRP.cc/CE
Avis de recyclage:
Selon le règlement des déchets de batterie, vous êtes obligé de remettre vos vieilles
batteries à un endroit de recyclage prévu à cet effet. L’élimination des batteries avec les
déchets ménagers est interdite. Protégez votre environnement en donnant vos batteries
usées à un centre de recyclage adapté.
Avis d’assurance:
Selon la loi de 2005 une assurance RC (responsabilité civile) pour avions télécommandé
est obligatoire. Veuillez contacter votre assurance avant la première utilisation de votre
avion ou hélicoptère pour garantir que les possibles dégâts soient couverts.
FRANÇAIS
Channel D/R Channel EXP Channel T.Curvc Channel P.Curvc Gyro
1 80 1 0 1 0 1 60
75
2 80 2 0 2 25 2 60
4 80 3 0 3 35 3 60
ALL values for switches S1-S5
in „UP“ position.
4 55 4 75
575 5 100
MODE D´EMPLOI

LRP electronic GmbH
Hanfwiesenstraße 15
73614 Schorndorf
Deutschland
HA00100 © LRP electronic GmbH 2017
BEST-NR. 220715
GRAVIT FPV XTREME 80 RTF 2.4GHz
RACE-QUADROCOPTER
ESPAÑOL
Estimado cliente,
muchas gracias por elegir un producto LRP. El Gravit FPV Xtreme 80 es un FPV-racer RTF
de alta calidad. Equipado con una cámara HD 5,8GHz y monitor LCD para recibir la trans-
misión de video en directo, este producto de LRP es su tarjeta de acceso al popular mundo
de las carreras FPV. Por favor lea este manual al completo antes de volar su Gravit, con el
fin de obtener la mayor diversión.
TENGA EN CUENTA: Este manual es una guía de inicio rápido. El manual completo y
detallado sobre todos los aspectos y funciones de su Gravit, está disponible en la web de
LRP www.lrp.cc
1. ANTES DE VOLAR - CARGA DE BATERÍA DE VUELO
Antes de volar su Gravit asegúrese de que la batería esté totalmente cargada. Para cargar
la batería, conecte el cargador USB suministrado a una fuente USB de alimentación de 5V.
Asegúrese de que la fuente USB de alimentación es capaz de suministrar al menos 1A de
corriente de carga.
IMPORTANTE: LRP no recomienda conectar este cargador USB en un ordenador o portátil,
ya que podría dañar el puerto USB e incluso el equipo.
Después de insertar el cargador USB en una fuente de alimentación adecuada, un LED de
color rojo situado en la parte interior de la carcasa del cargador se iluminará de forma fija
. Ahora conecte la batería de vuelo al cargador USB. Tan pronto como la batería comience
la carga, un LED de color verde se iluminará y comenzará a parpadear indicando que la
batería se está cargando. Cuando la batería esté totalmente cargada, el LED verde dejará de
parpadear y se iluminará de forma fija. Desconecte la batería del cargador, y a continuación
desconecte el cargador de la fuente de alimentación.
2. ANTES DE VOLAR - MONTAJE Y CARGA DE LA PANTALLA LCD
Monte el monitor LCD de su emisora tal y como se muestra en las imágenes. Asegúrese de
que esté bien conectado y se mantenga firme sobre su emisora.
Cargue la batería LiPo de su monitor LCD antes de usarlo.
Cargar el monitor LCD
1. Conecte el cargador USB a una fuente USB de alimentación
2. Conecte el monitor LCD al cargador USB, RED ROJO = ON/encendido
3. Cuando el monitor LCD esté totalmente cargado, el LED ROJO se apagará.
Asegúrese de que el monitor LCD esté OFF/apagado durante el proceso de carga. Asegúre-
se de instalar la antena incluida en el monitor LCD. Para ello, simplemente enrosquela en la
parte superior derecha del monitor LCD.
3. ANTES DE VOLAR - PREPARACIÓN DE LA EMISORA
Abra el compartimento de baterías de la emisora, e inserte 6 pilas AA.
IMPORTANTE: Asegúrese de que los interruptores plateados situados en la parte superior
de la emisora estén posicionados hacia ARRIBA (apuntando hacia fuera respecto al piloto),
y que el stick de aceleración (stick IZQUIERDO) está posicionado COMPLETAMENTE hacia
abajo.
Abra la pantalla solar del monitor LCD y levante la antena.
4. PRIMEROS PASOS CON EL GRAVIT FPV XTREME 80
Antes de volar su Gravit Xtreme 80 FPV por primera vez, compruebe si las tuercas de las
hélices están completamente apretadas. Para ello, utilice una herramienta pequeña (p. ej.
una llave hexagonal pequeña) para acceder a través del agujero a la cabeza de la tuerca
de la hélice, y apriete la tuerca hacia abajo en el sentido OPUESTO al sentido de giro de la
hélice. El sentido de giro de la hélice viene indicado por dos flechas pequeñas en la misma
hélice. Asegúrese de NO apretar demasiado las tuercas, ya que esto podría dañar la tuerca,
la hélice y el eje del motor. Compruebe las tuercas de las hélices regularmente, para asegu-
rarse de que siempre estén lo suficientemente apretadas. De lo contrario podría perder una
hélice durante el vuelo, y como consecuencia sufrir un choque y daños en el Gravit.
Para despegar su Gravit Xtreme 80, realice lo siguiente:
1. Coloque su Gravit sobre una superficie plana, preferiblemente el suelo. No se recomien-
da volar el Xtreme 80 en interiores, debido a su velocidad y potencia. ¡VUELE SOLO al
aire libre, por favor!
2. PRIMERO encienda la emisora. Compruebe la batería, y asegúrese de que el stick de
aceleración (stick IZQUIERDO) esté posicionado COMPLETAMENTE hacia abajo. Si no es
así, la emisora emitirá un pitido corto como sonido de alarma.
3. Encienda el Xtreme 80, para ello coloque la batería en el compartimento inferior de Gravit
conectando el conector de la batería al cuadricóptero. Asegúrese de que el conector esté
bien insertado y bien colocado dentro del chasis del Xtreme.
El Extreme emitirá un único pitido corto y el LED de estado situado en la parte posterior del
Gravit se iluminará, poco después, en color verde.
4. Ahora encienda el monitor LCD, después de unos segundos se visualizará la imagen de
video de la cámara de su Xtreme. Usted podrá ver lo que la cámara de su Xtreme esté
captando.
5. Para despegar empuje suave y lentamente el stick de aceleración (stick IZQUIERDO) hacia
arriba. ¡Tenga cuidado en no aplicar demasiada aceleración, ya que el Gravit Xtreme es
muy potente! Deje que el cuadricóptero se eleve lentamente en el aire hasta que esté
situado a un metro sobre la altura de sus ojos. En el caso de que usted haya aplicado
excesiva aceleración, simplemente disminuya la aceleración hasta que el Xtreme vuele
a la altura deseada.
TENGA EN CUENTA:
En el caso de que esté planeando volar conjuntamente con otros pilotos o pretende volar
con MÁS DE UN XTREME 80“, lea a continuación la sección „Más de un piloto“.
5. VOLAR EL GRAVIT FPV XTREME 80 – FUNCIONES BÁSICAS
Para controlar el Gravit en el aire, por favor realice lo siguiente:
. Para ganar o perder altura (o acelerar o decelerar respectivamente) -> Mueva el stick
de control IZQUIERDO hacia arriba o hacia abajo.
. Para girar alrededor de su propio eje -> Mueva el stick de control IZQUIERDO hacia la
derecha o izquierda.
. Para volar hacia la derecha o izquierda -> Mueva el stick de control DERECHO hacia
la derecha o izquierda. Cuanto más empuje el stick, más rápido volará el Gravit hacia los
lados.
. Para volar hacía delante o atrás -> Mueva el stick de control DERECHO hacia delante o
atrás. Cuanto más empuje el stick, más rápido volará el Gravit hacia delante o atrás.
Usted puede combinar
estos movimientos indivi-
duales para obtener movi-
mientos más complejos. Por
ejemplo: Si usted empuja el
stick DERECHO hacia arriba
y a la izquierda, el Gravit
volará hacia delante e iz-
quierda.
Ahora puede usted lenta y
cuidadosamente probar el
control de su Gravit Xtreme.
Podrá observar que su
manejo es fácil e intuitivo.
Rápidamente ganará expe-
riencia y podrá controlar
MANUAL DE INSTRUCCIONES

LRP electronic GmbH
Hanfwiesenstraße 15
73614 Schorndorf
Deutschland
HA00100 © LRP electronic GmbH 2017
BEST-NR. 220715
GRAVIT FPV XTREME 80 RTF 2.4GHz
RACE-QUADROCOPTER
ESPAÑOL
mejor su Gravit Xtreme 80,
con mayor confianza y ha-
bilidad.
Para aterrizar su Gravit,
asegúrese de que esté vo-
lando sobre una superficie
plana, adecuada para el
aterrizaje. A continuación,
disminuya lentamente la
aceleración hasta que el
Gravit esté a tan solo unos
pocos centímetros del sue-
lo y luego empuje el acele-
rador completamente hacia
abajo para apagar los mo-
tores.
Asegúrese de no apagar
los motores a demasiado
altura, puesto que el Gravit caerá y probablemente se dañe.
6. VOLAR EL GRAVIT FPV XTREME 80 – FUNCIONES AVANZADAS
TENGA EN CUENTA: La emisora de su Gravit Xtreme 80 es de gran calidad, ofrece multi-
tud de opciones para configurar y mejorar sus ajustes.
Sin embargo, la emisora ya ha sido previamente ajustada a su Xtreme 80, por lo que NO
RECOMENDAMOS CAMBIAR NINGÚN AJUSTE DE SU EMISORA.
Si cambia un ajuste erróneo o aplica un valor incorrecto, esto puede producir un compor-
tamiento de vuelo impredecible e incontrolable.
LRP no se responsabiliza de ningún daño directo o indirecto causado por el cambio de la
configuración predeterminada de la emisora.
Si decide cambiar cualquier ajuste, tenga en cuenta que lo ejecutará COMPLETAMENTE
bajo su propio riesgo y responsabilidad.
Funciones de vuelo avanzadas
Esta sección describe detalladamente los modos de vuelo adicionales y funciones de la
emisora.
INFORMACIÓN IMPORTANTE: Como puede observar, su emisora tiene múltiples inter-
ruptores metálicos plateados, los cuales pueden estar en dos posiciones „arriba“ y „abajo“.
Para evitar cualquier confusión acerca de la posición arriba o abajo, a continuación se ex-
plica como se define „ARRIBA“ y „ABAJO“ a lo largo de este manual:
Observe esta imagen, que muestra los interruptores del S1 al S5, a continuación sostenga
entre sus manos la emisora como si estuviese volando su Gravit.
Para los interruptores S1 y S5, „ARRIBA“ significa que los interruptores adoptan una po-
sición apuntando ligeramente hacia el suelo, mientras que „ABAJO“ significa apuntando
ligeramente hacia el cielo.
Para los interruptores S2, S3 y S4, „ARRIBA“ significa que los interruptores adoptan una
posición apuntando hacia el lado opuesto del piloto, mientras que „ABAJO“ significa apun-
tando hacia el piloto.
En un principio puede parecer un poco confuso, pero al utilizar esta definición, ARRIBA y
ABAJO definen la misma posición absoluta para todos los 5 interruptores.
Tenga en cuenta esta información cuando lea el manual y utilice los interruptores.
Los interruptores tienen la siguiente función:
S1 -> SIN función, reservado para FUTURAS funciones y actualizaciones, la posición del
interruptor S1 NO tiene importancia puede estar hacia arriba o abajo.
S4 -> Cuando S4 está en posición hacía ABAJO (TODOS los demás interruptores están
ARRIBA), el Gravit vuela en MODO-SPEED. El LED de estado del Gravit se iluminará en
verde, el Gravit adquirirá un ángulo de ataque mayor y más inclinado, volará y reaccionará
más rápido (ver descripción a continuación).
S2+S4 -> Cuando S2 y S4 estén en posición hacía ABAJO (TODOS los demás inter-
ruptores están ARRIBA), el Gravit vuela en MODO-FLIPPING, y el LED de estado cambiará
de verde a rojo (ver descripción a continuación).
S3 -> Cuando S3 esté en posición hacia ABAJO (¡NO IMPORTA la posición del resto de
interruptores!), el Gravit vuela en MODO-ACRO, y el LED de estado se iluminará en rojo
(ver descripción a continuación).
S5 -> Este interruptor es para montar y desmontar los rotores. Cuando el interruptor está
en posición hacía ARRIBA, los motores están montados y comenzarán a girar tan pronto
como se mueva el stick de control izquierdo. Si el interruptor está en posición hacia AB-
AJO, los motores no están montados y en el caso de que estén girando, estos se pararán
INMEDIATAMENTE. Puede utilizar este botón como parada de emergencia, ya que anula
inmediatamente la orden de aceleración (o impide que se ejecute el acelerador).
Ver también esta tabla con las funciones de los interruptores:
MODO-SPEED:
Cuando el interruptor S4 está hacia ABAJO, se activa el MODO-SPEED. Técnicamente el
dual rate de ciertos canales de control se incrementa en un 25% comparado con el modo
„estándar“ de vuelo (con todos los interruptores en posición hacia ARRIBA).
Esto produce que el Gravit adopte el ángulo máximo de inclinación de ataque en la direc-
ción apropiada al mover los stick. El ángulo máximo de ataque se traduce en más veloci-
dad, este ajuste también aumenta la capacidad de respuesta subjetiva y la agilidad de su
Xtreme 80.
En este modo, el propio Gravit se estabiliza automáticamente (self-leveling), y el ángulo
máximo de ataque queda limitado por el controlador de vuelo. Por lo que es un modo
seguro de vuelo para aquellos que solo quieren obtener velocidad extra.
MODO-FLIPPING:
Cuando los interruptores S2 y S4 están hacia ABAJO, se activa el MODO-FLIPPING. El
funcionamiento y acciones de este modo son:
Con el modo-flipping activado, usted puede realizar una serie de rizos en cualquier direc-
ción. El stick de control IZQUIERDO conserva su funcionalidad estándar (aceleración: hacia
arriba o abajo, giro alrededor del eje: derecha o izquierda).
Sin embargo las funcionalidad del stick DERECHO se amplia. Al mover el stick derecho el
Gravit funcionará con normalidad, volando hacia la izquierda/derecha o hacia adelante/
detrás. Pero si supera un determinado umbral de empuje del stick de control (= usted
empuja el stick derecho lo suficiente) se activará el modo flipping. Cuando esto sucede el
Gravit desactivará su función de auto-estabilización (self-leveling), así como su limitación
de ángulo máximo de ataque. Como consecuencia el Gravit permitirá realizar rizos muy
ajustados (flips) en la dirección hacia la que mueva el stick derecho.
Al soltar el stick derecho o moverlo por debajo del umbral, las funciones de auto-estabiliza-
ción y la limitación del ángulo máximo de ataque se activarán de nuevo. Esto significa que
el Gravit se auto estabiliza y endereza, para volar de forma normal.
Este es un fantástico modo de vuelo para realizar geniales y sorprendentes maniobras de
vuelo, sin necesidad de tener un nivel profesional.
TENGA EN CUENTA: Si en algún momento tiene la sensación de perder el control de vue-
lo, simplemente SUELTE EL STICK DERECHO y su Gravit se estabilizará automáticamente
en el aire. Podrá seguir volando con normalidad.
En este modo, las funciones de auto-estabilización y limitación del ángulo máximo de
ataque quedan desactivadas, SI (y siempre que) el stick derecho sobrepase el umbral.
Mientras permanezca DENTRO de este umbral (empuje siempre en pequeños movimien-
tos el stick derecho), el Gravit volará como en el modo normal. Este modo es perfecto para
asemejarse a un profesional, incluso teniendo nivel de iniciación. ¡Pruébelo!
MODO-ACRO (MODO MANUAL)
Cuando el interruptor S3 está hacia ABAJO, se activa el MODO-ACRO.
IMPORTANTE, TENGA EN CUENTA: NO IMPORTA es que posición están situados los
OTROS INTERRUPTORES, EN CUANTO mueva el interruptor S3 hacia abajo, el MO-
S1
S2 S3 S4
S5
S1 S2 S3 S4 S5 Description/function
of switch-combination
LED STATUS
(COLOR)
up OR
down DOWN UP UP UP No function RED
up OR
down DOWN UP DOWN UP FLIPPING MODE RED
up OR
down
up OR
down UP DOWN UP SPEED-MODE RED/GREEN
(depending on S2 position)
up OR
down
up OR
down DOWN up OR
down UP ACRO MODE RED
up OR
down
up OR
down
up OR
down
up OR
down DOWN
Motors cannot arm as
soon as S5 is DOWN,
no flying possible
N.A.
MANUAL DE INSTRUCCIONES
This manual suits for next models
1
Table of contents
Languages:
Other LRP Quadcopter manuals