Lucky Reptile Bright Control PRO III 35 W User manual

Bedienungsanleitung
Operating Instructions
Bright Control PRO III
35 / 50 / 70 W

2
Bedienungsanleitung - Bright Control PRO III
Manual - Bright Control PRO III
GB
We are pleased that our new Bright Control PRO III is able to meet the frequently
expressed customer wish for a device that can be operated with 35W, 50W and
70W Bright Sun lamps. You have full exibility and can also easily change lamps
e.g. according to the season. The device can easily be adjusted to the desired
wattage on the side and is even simpler in operation than the predecessor.
As a production partner, we were able to win Philips - one of the leading manuf-
acturers of metal vapor lighting technology. Together we ensure that the Bright
Control PRO III will achieve optimal radiation levels for the animals. Please note
that when other ballasts are used, even from Philips, other radiation values
may occur as the manufacturers optimize their products for other lamps. Espe-
cially concerning with the UV performance this can be responsible for distinct
differences, as independent measurements show.
Lucky Reptile can ensure the optimal function of the Bright Sun and its spectrum
only in combination with Lucky Reptile ballasts and lighting equipment. The lu-
minaire is an important component and must be specially approved for use with
metal vapor lamps. Most porcelain sockets are NOT approved for use with metal
vapor lamps! Correspondingly, we recommend Lucky Reptile Thermo Socket pro-
ducts. Items with a plug-in connection that is suitable for Bright Control can be
identied by the mark „PRO“.
Choosing the wattage
Attention: The wattage can be selected over a switch on the side of
the device. Make sure that the selection corresponds to the wattage
of the used lamp. Changing the wattage must only be done if the
lamp is disconnected from power supply!
Installation using Lucky Reptile Plug and Play
Luminaires
Install the Plug and Play luminaire as described in its manual. Plug the con-
nector (male) of the Plug and Play luminaire into the female connector of the
Bright Control ballast. Potentially available power cables of the Plug and Play
luminaire are not needed.
Screw the Bright Sun UV lamp into the socket. Make sure that it is tting properly
and has good contact to the electrical parts of the socket.
Plug the Bright Control PRO III into the wall socket. The lamp should now ignite
and rise continually in brightness. If the ignition phase takes a long time or
ignition is not possible, check if the lamp is correctly screwed into the socket.
Installation of other lampholders and luminaires must only be done by a pro-
fessional electrician. It is the responsibility of the user to check if such a combi-
nation is permitted and the product safety is maintained. Please note that only
a few lampholders are suitable for use with metal halide lamps. Best to attach
other luminaries by using the connector system. Compatible male connectors
are available separately.
Operating conditions
• It has to be ensured that the device cannot fall into water.
• Secure the device with screws in the destined holes against movement and
accidental drops
• The ambient temperature limit during operation may not fall below and ex-
ceed -20°C and 45°C respectively.
• The device is designed for use in dry and clean rooms.
• At formation of condensed water a period of acclimatisation of up to 2h has
to be ensured.
• Protect the device from moisture, spray water and impact of heat!
• The distance between ballast and lamp may not exceed 2m
Important Information:
• Do not undertake any modication and do not open the case.
• Device and sensor cords have to be checked always for signs of damage. If a
defect is discovered the device has to be put out of operation immediately.
The same applies if the device has come into contact with uids.
• Generally it should be veried if the device is applicable for the application at
hand before putting it into operation!
• In case of doubt consultation of experts or the manufacturer of the employed
devices is required.
• The device is designed for use with metal halide lamps. Make sure that the
correct wattage is used. Ensure that no other lamp types are used.
• The device has to be installed in a way that it cannot be touched during ope-
ration
• Only touch the device if disconnected from main power supply.
• The device gets hot during operation
• Before lamp change the device has to be disconnected from power supply
• The ballast needs to be disconnected from the power supply if the wattage
is supposed to be changed over the switch. During operation the switch must
not be changed!
• During ignition phase voltages of approx. 5 kV can occur
• If the lamp does not ignite that device will power down and will re-try ignition
after 1-2 minutes
Warranty
The warranty expires in case of modication and repair attempts as
well as damaging by force or inappropriate usage.
Neither a guarantee nor any liabilities for detriments or consequen-
tial damages in relation with this product will be assumed.
In case of warranty claims or repairs contact your specialist dealer.
Technical Data
Voltage: 220-240 V~ 50/60 Hz
Max. Ignition Tension Uotw (peak) 3,0 - 5 kV
Max. Operating Temperature tc 80°C
Ambient Temperature ta -20° bis +45°C

3
Wir freuen uns, dass wir mit unserem neuen Bright Control PRO III dem vielfach
geäußerten Kundenwunsch nach einem Gerät entsprechen können, dass so-
wohl mit 35W, 50W und 70W Bright Sun Lampen betrieben werden kann. Damit
haben Sie volle Flexibilität und können z.B. auch problemlos Lampen je nach
Jahreszeit wechseln. Das Gerät kann an der Seite einfach auf die gewünschte
Wattstärke eingestellt werden und ist in der Bedienung nochmal einfacher als
der Vorgänger.
Als Produktionspartner konnten wir mit Philips einen der führenden Hersteller
für Metalldampampentechnologie gewinnen. Gemeinsam gewährleisten wir,
dass bei den Bright Control PRO III optimale Strahlungswerte bei den Tieren
ankommen. Beachten Sie bitte, dass bei Verwendung anderer Vorschaltgeräte,
auch aus dem Hause Philips, andere Strahlungswerte auftreten können, da die
Hersteller ihre Produkte für verschiedene Lampen optimieren. Gerade bei der
UV Leistung kommt es z.T. zu deutlichen Unterschieden, wie unabhängige Mes-
sungen beweisen.
Lucky Reptile kann die optimale Funktion der Bright Sun und deren Spektrum
nur in Kombination mit Lucky Reptile Vorschaltgeräten und Leuchten gewährlei-
sten. Auch die Leuchte ist eine wichtige Komponente und muss speziell für die
Verwendung für Metalldampampen zugelassen sein. Die meisten Porzellan-
fassungen sind NICHT für den Betrieb mit Metalldampampen zugelassen. Ent-
sprechend empfehlen wir Lucky Reptile Thermo Socket Produkte. Produkte mit
zum Bright Control passender Steckverbindung erkennen Sie am „PRO“ Zusatz.
Einstellung der Wattage
Achtung: Über den Schalter an der Seite des Geräts kann die Wattage
eingestellt werden. Achten Sie darauf, dass die Einstellung mit dem
verwendeten Leuchtmittel übereinstimmt. Der Wechsel der Watta-
gen darf nur bei gezogenem Netzstecker erfolgen !
Installation bei Verwendung von Lucky Reptile
Plug and Play Leuchten
Installieren Sie die Plug and Play Leuchte wie in deren Anleitung beschrieben.
Stecken Sie den Stecker der Plug and Play Leuchte in die Steckverbindungsbuch-
se des Bright Control Vorschaltgeräts. Eine eventuell vorhandene Stromzulei-
tung der Plug and Play Leuchte wird nicht benötigt.
Schrauben Sie den BrightSun UV-Strahler in die Fassung. Stellen Sie sicher,
dass dieser richtig sitzt und guten Kontakt zu den stromführenden Teilen der
Fassung hat.
Stecken Sie den Stecker des Bright Control PRO III in die Wandsteckdose. Die
Lampe sollte jetzt zünden und langsam an Helligkeit gewinnen. Sollte der Zünd-
vorgang sehr lange dauern oder eine Zündung gar nicht möglich sein, prüfen
Sie, ob die Lampe richtig in die Fassung geschraubt ist.
Die Installation anderer Lampenfassungen oder Leuchten ist nur durch einen
Fachmann durchzuführen. Es ist obliegt in diesem Fall dem Anwender zu prüfen,
ob der Betrieb zulässig und die Betriebssicherheit gewährleistet ist. Beachten
Sie bitte, dass nur sehr wenige Fassungen für den Betrieb mit Metalldampam-
pen geeignet sind. Am besten werden andere Leuchten durch Verwendung des
Stecksystems angeschlossen. Kompatible Stecker sind separat erhältlich.
Betriebsbedingungen
• Das Gerät ist so zu betreiben, dass es nicht ins Wasser fallen kann!
• Sichern Sie das Gerät mit Schrauben an den vorgesehenen Halterungen gegen
Verrutschen und Herunterfallen
• Die zulässige Umgebungstemperatur darf während des Betriebes -20°C und
45°C nicht unter-, bzw. überschreiten. Für eine ausreichende Belüftung ist
zu sorgen!
• Das Gerät ist für den Gebrauch in trockenen und sauberen Räumen bestimmt.
• Bei Bildung von Kondenswasser muss eine Akklimatisierungszeit von bis zu 2
Stunden abgewartet werden.
• Schützen Sie das Gerät vor Feuchtigkeit, Spritzwasser und Hitzeeinwirkung!
• Der Abstand zwischen Vorschaltgerät und Lampe darf 2m nicht überschreiten
Sicherheitshinweise:
• Nehmen Sie keine Änderungen am Gerät vor und öffnen Sie nicht das Ge-
häuse!
• Es ist vor der Inbetriebnahme eines Gerätes generell zu prüfen, ob dieses
Gerät grundsätzlich für den Anwendungsfall, für den es verwendet werden
soll, geeignet ist!
• Im Zweifelsfalle sind Rückfragen bei Fachleuten, Sachverständigen oder dem
Hersteller der verwendeten Geräte notwendig!
• Das Gerät ist zur Verwendung mit Metalldampampen bestimmt. Achten Sie
darauf, dass nur Lampen der richtigen Wattstärke verwendet werden. Es dür-
fen keine anderen Leuchtmitteltypen verwendet werden.
• Das Gerät ist so zu installieren, dass es während des Betriebs nicht berührbar
ist
• Berühren Sie das Gerät nur, wenn der Netzstecker gezogen ist.
• Das Gerät wird während des Betriebs heiß
• Vor dem Lampenwechsel muss das Vorschaltgerät vom Stromnetz getrennt
werden
• Zur Änderung der Wattage durch Umlegen des Schalters an der Eingangsseite
muss das Vorschaltgerät vom Stromnetz getrennt werden. Während des Be-
triebs dürfen keine Änderungen vorgenommen werden.
• Bei Zündung der Lampe treten Spannungen von bis max. 5 kV auf
• Bei nicht zündender Lampe wird der Zündversuch unterbrochen und die Zün-
dung nach ca. 1-2 Minuten erneut versucht.
Gewährleistung
Die Gewährleistung erlischt bei Veränderung und Reparaturver-
suchen am Gerät sowie bei Beschädigung durch Gewalteinwirkung
oder unsachgemäßen Gebrauch.
Es wird weder eine Gewähr noch irgendwelche Haftung für Schäden
oder Folgeschäden im Zusammenhang mit diesem Produkt übernom-
men.
Bei Gewährleistungsansprüchen oder Reparaturen wenden Sie sich
an Ihren Fachhändler.
Technische Daten
Betriebsspannung: 20-240 V~ 50/60 Hz
Max. Zündspannung Uotw (peak) 3,0 - 5 kV
Max. Betriebstemperatur - tc 80°C
Umgebungstemperatur - ta -20° bis +45°C
Bedienungsanleitung - Bright Control PRO III
D

4
Avec notre nouvelle Bright Control PRO III, nous nous réjouissons de pouvoir ré-
pondre au souhait exprimé à de multiples reprises par les clients d‘un appareil
pouvant fonctionner aussi bien avec des lampes Bright Sun de 35, 50 et 70 watts.
Cela vous donne ainsi une exibilité totale, vous permettant aussi de changer
les lampes sans problème en fonction de la saison, par exemple. La puissance
souhaitée en watts peut être simplement réglée sur le côté de l‘appareil, dont
l’utilisation est encore plus simple que son prédécesseur.
En qualité de partenaire de production, nous avons pu, avec Philips, gagner l‘un
des leaders dans la fabrication de la technologie des lampes aux halogénures
métalliques. Nous garantissons ensemble que, pour les Bright Control PRO III,
des valeurs de rayonnement optimales atteignent les animaux. Veuillez noter
la possibilité que d‘autres valeurs de rayonnement peuvent survenir en cas
d’utilisation d‘autres ballasts, même de la maison Philips, car les fabricants op-
timisent leurs produits pour des lampes différentes. La puissance UV peut par-
fois varier nettement, comme des mesures indépendantes peuvent le prouver.
Lucky Reptile ne peut garantir le fonctionnement optimal de la Bright Sun et de
son spectre qu’en combinaison avec des ballasts et des lampes Lucky Reptile.
L‘ampoule est aussi un composant important et elle doit être agréée spéciale-
ment pour l‘utilisation dans les lampes aux halogénures métalliques. Les prin-
cipales douilles en porcelaine NE sont PAS agréées pour l’utilisation avec des
lampes aux halogénures métalliques.
Nous recommandons en conséquence d‘utiliser des produits Lucky Reptile Ther-
mo Socket. Les produits avec une connexion par che adaptée à la Bright Control
sont reconnaissables à la mention « PRO ».
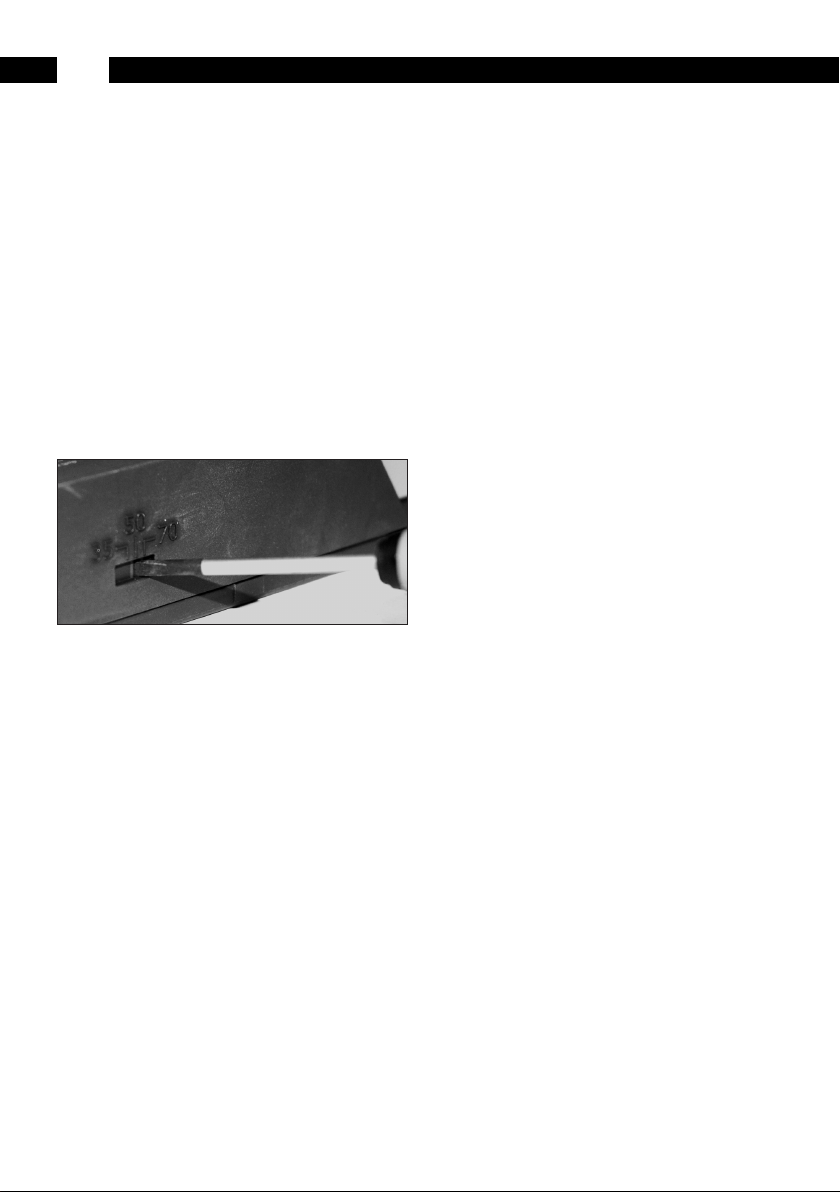
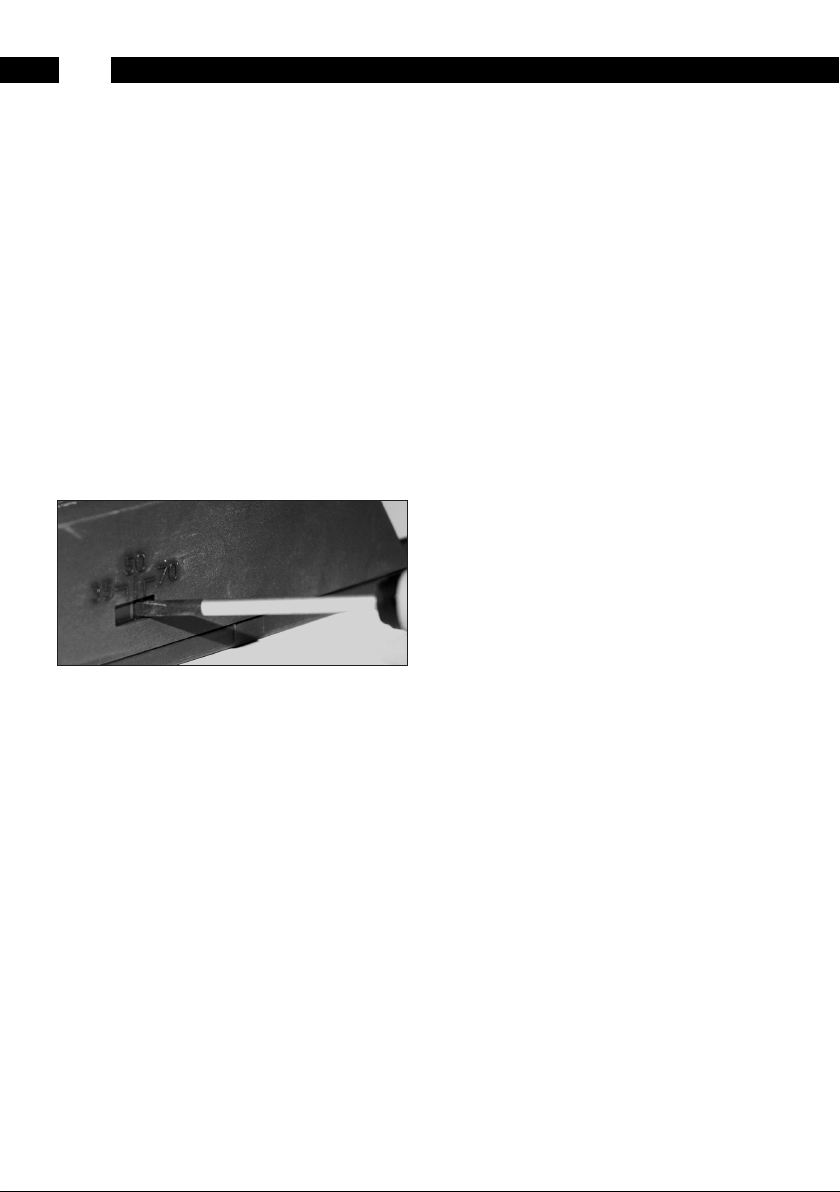
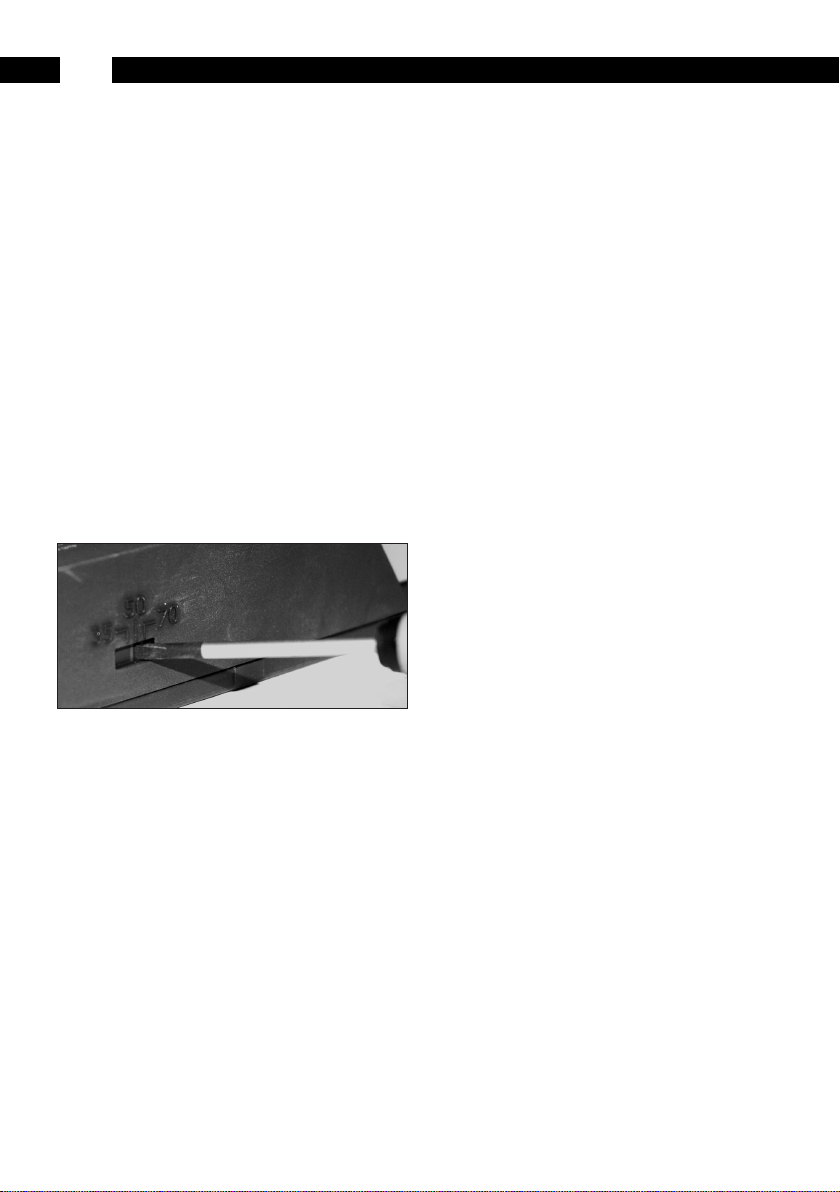
Régulation de la puissance en watt
Attention : L’interrupteur sur le côté de l’appareil permet la régu-
lation de la puissance. Veiller à ce que la régulation corresponde à
l’agent lumineux utilisé. Le changement de puissance ne doit être
effectué qu’après avoir retiré la che réseau !
Installation pour l‘utilisation des lampes Plug
and Play de Lucky Reptile
Installez la lampe Plug and Play comme décrit dans ces instructions. Branchez
la prise de la lampe Plug and Play sur le bloc d’alimentation dans la prise pour
connecteur à ches. Une amenée de courant éventuellement existante vers la
lampe Plug and Play n’est pas requise.
Vissez le projecteur UV de la BrightSun UV dans la douille. Assurez-vous que
celui-ci soit posé correctement et qu‘il soit bien en contact avec les éléments de
la douille conducteurs de courant.
Branchez la prise de la Bright Control PRO II I dans la prise murale. La lampe
devrait à présent se déclencher et gagner lentement de la luminosité. Si le pro-
cessus de déclenchement devait durer très longtemps ou si le déclenchement
s‘avérait totalement impossible, vériez que la lampe soit bien vissée dans la
douille.
L‘installation d‘autres douilles de lampes ou d‘autres éclairages doit être ef-
fectuée par un spécialiste uniquement. En ce cas-là, il incombe à l’utilisateur
de vérier que l’emploi est admissible et la sécurité assurée. Veuillez noter que
très peu de douilles s’adaptent à l’utilisation avec des lampes à vapeur métal-
lique. Au mieux, d‘autres éclairages sont raccordés, en utilisant le système
d‘enchage. Des prises compatibles sont disponibles séparément.
Conditions d‘utilisation
• La place de l’appareil est arbitraire. L‘appareil doit être actionné defaçon à
ce qu‘il ne tombe pas à l‘eau !
• Sécurisez l‘appareil contre glissements et chutes à l‘aide de vis sur les xa-
tions prévues à cet effet
• La température ambiante admise peut pendant le fonctionnement variée de
-20°C à 45°C pas au delà ni en dessous.
• L‘appareil est destiné à l‘utilisation dans les secteurs secs et propres.
• Lors de la condensation de l‘eau, un temps d’acclimatation doit être attendu
jusqu‘à 2 heures.
• Protégez l‘appareil de humidité, de la brume et de l’effet de chaleur !
• L‘écart entre le bloc d‘alimentation et la lampe ne doit pas dépasser 2 m
Conseils de sécurité :
• Ne pas modier l‘appareil et ne pas l’ouvrir !
• L‘appareil et des conduites de sonde doivent être examinés. Lors d‘une
constatation d‘une erreur, l‘appareil doit être repris immédiatement de
l‘entreprise. La même chose est en vigueur, si l‘appareil à été en contact de
liquide. Un réexamen et éventuellement une réparation de l‘appareil doivent
être effectué par un spécialiste qualié !
• Avant le démarrage d‘un appareil, il faut examiner si cet appareil est appro-
prié pour l’utilisation voulue.
• En cas de doute, on trouve les renseignements chez des spécialistes, experts
ou fabricants des appareils utilisés !
• Seules les lampes à vapeur métalliques dont doivent être utilisées. N’utilisez
pas autres lampes !
• L‘appareil doit être installé de sorte qu‘il ne puisse pas être touché lors du
fonctionnement
• Touchez l‘appareil uniquement lorsque la prise est débranchée.
• L‘appareil s‘échauffe au cours du fonctionnement
• Avant de remplacer la lampe, le bloc d‘alimentation doit être déconnecté du
secteur
• Pour changer de puissance au moyen de l’interrupteur au côté avant,
l’appareil en amont doit être déconnecté du réseau électrique. Pendant le
fonctionnement, les modications ne sont pas admissibles.
• Tensions de 5 kV environ lors du déclenchement de la lampe
• Si la lampe ne se déclenche pas, la tentative de déclenchement doit être inter-
rompue. Le déclenchement sera tenté à nouveau après 1-2 minutes.
Garantie
La garantie expire avec une modication et des tentatives de répa-
ration de l‘appareil ainsi que lors des dégâts par un impact ou une
utilisation inadéquate.
Ni une garantie n‘est prise en charge des dommages en rapport avec
ce produit.
Avec des exigences de garantie, veuillez vous adresser à votre com-
merçant spécialisé pour d’éventuelles réparations.
Caractéristiques techniques
Tension de régime : 220-240 V~ 50/60 H
Tension de mise en service maxi Uotw (peak) 3,0 - 5 kV
Température de service maxi tc 80°C
Température ambiante tade -20° bis +45°C
Mode d´emploi - Bright Control PRO III
F

5
Manuale d’uso - Bright Control PRO III
IT
Siamo felici di poter soddisfare, con il nostro nuovo Bright Control PRO III, il de-
siderio più volte esternato dai nostri clienti di un apparecchio che possa essere
azionato con lampade Bright Sun sia da 35W e 50W che da 70W. La essibilità
in tal modo è completa ed è anche possibile p.es. sostituire le lampade senza
problemi a seconda della stagione. L’apparecchio può essere impostato lateral-
mente e con semplicità sulla potenza in Watt desiderata ed è ancora più facile
da utilizzare del suo predecessore.
In qualità di partner di produzione abbiamo potuto aggiudicarci con Philips uno
dei produttori leader nel campo della tecnologia delle lampade ad alogenuro
metallico. Insieme, garantiamo che con Bright Control PRO III gli animali rice-
vano valori ottimali di irradiazione. Si prega di notare che utilizzando altri bal-
last, anche della Philips, possono generarsi altri valori di irradiazione, poiché
i produttori ottimizzano i propri prodotti per varie lampade. Già nel caso della
potenza UV, si vericano in parte delle nette differenze come dimostrato da
misurazioni indipendenti.
Lucky Reptile può garantire il funzionamento ottimale della Bright Sun e del
relativo spettro solo in combinazione con i ballast e le lampade Lucky Reptile.
Anche la lampada è una componente essenziale e deve essere abilitata in modo
particolare all’utilizzo per lampade ad alogenuro metallico. La maggior parte di
portalampade in porcellana NON sono abilitati al funzionamento con lampade
ad alogenuro metallico. Di conseguenza, consigliamo i prodotti Lucky Reptile
Thermo Socket. I prodotti che dispongono di un collegamento a spine compatibi-
le con Bright Control sono riconoscibili dalla sigla "PRO".
Impostazione del wattaggio
Attenzione: È possibile regolare il wattaggio tramite l‘interruttore
posizionato sul lato dell‘apparecchio. Vericare che la regolazione
corrisponda con la lampada utilizzata. Il cambio di wattaggio può
avvenire solo a spina estratta!
Installazione del lampadas Plug and Play
Installare la lampada Plug and Play come descritto nelle relative istruzioni.
Inserire la spina della lampada Plug and Play nella presa dell’alimentatore
Bright Control. Non serve la linea elettrica eventualmente disponibile della
lampada Plug and Play.
Avvitare il radiatore UV BrightSun nel portalampada. Assicurarsi che questo
sia posizionato correttamente nella sede e abbia un buon contatto con le parti
sotto tensione.
Inserire la spina del Bright Control PRO III nella presa del muro. Ora la lampada
dovrebbe accendersi e aumentare gradualmente la luminosità. Se il processo
di accensione dovesse durare troppo a lungo o non essere possibile, controllare
se la lampada è avvitata correttamente nel portalampada.
L’installazione di portalampada o lampade diverse deve essere eseguita da un
esperto. In tal caso spetta all‘utente vericare che il funzionamento e la sicu-
rezza di funzionamento siano garantiti. Occorre tener conto del fatto che solo
pochissimi portalampada sono idonei al funzionamento con lampade a vapori
metallici. Il modo più facile per collegare lampade diverse è utilizzando il si-
stema ad innesto. Spine compatibili possono essere acquistate separatamente.
Condizioni d’esercizio
• La posizione è a scelta dell’utilizzatore. Prestare la massima attenzione per
evitare cadute accidentali in acqua!
• Fissare l’apparecchio mediante le viti agli appositi supporti in modo tale da
evitare che scivoli o cadi
• La temperatura di utilizzo deve essere compresa tra -20°C e 45°C.
• L’apparecchio è espressamente indicato per l’uso in ambienti asciutti e puliti.
• In caso di sviluppo di condensa, bisognerà prevedere un tempo di acclimatiz-
zazione di circa due ore.
• Proteggere l’apparecchio da umidità, spruzzi d’acqua e surriscaldamento!
• Non superare la distanza prevista di 2m tra alimentatore e lampada
Indicazioni di sicurezza:
• Non modicate né aprite l’apparecchio!
• Vericare periodicamente l’integrità dei cavi dell’apparecchio e dei sensori.
Nel caso si riscontrassero danneggiamenti, bisognerà immediatamente to-
gliere l’apparecchio dall’uso. Lo stesso vale nel caso l’apparecchio sia entrato
in contatto con liquidi. Il controllo e l’eventuale riparazione dell’apparecchio
dovranno essere effettuati solo da personale qualicato!
• Prima dell’utilizzo di un apparecchio, vericare che sia effettivamente adatto
ed indicato per l’uso che se ne intende fare!
• In caso di dubbio, chiedere chiarimenti a personale qualicato, esperti del
settore o al produttore dell’apparecchio!
• Utilizzare solo lampade a vapori metallici! Fate attenzione che è possibile
utilizzare solo lampade con la corretta potenza in watt. Non è consentito
l‘utilizzo di nessun altro tipo di lampadina.
• L’apparecchio deve essere installato in modo tale da non poter essere toccato
durante l’esercizio
• Toccare l’apparecchio solo dopo aver staccato la spina di rete.
• L’apparecchio si surriscalda durante l’esercizio
• Prima di sostituire le lampade si raccomanda di staccare l’alimentatore dalla
rete elettrica
• Per modicare il wattaggio tramite spostamento dell‘interruttore sul lato
input è necessario che il ballast sia staccato dalla rete di alimentazione. Du-
rante il funzionamento non si possono apportare modiche.
• Durante l’accensione della lampada si vericano tensioni di ca. 5 kV
• Nel caso in cui la lampada non si accende il tentativo di accensione viene
interrotto e ripetuto dopo ca. 1-2 minuti.
Garanzia
La garanzia decade in caso di modiche, manomissioni, dan-
neggiamenti, tentativi di riparazione o utilizzo non corretto
dell’apparecchio.
Non sono riconosciuti i danni o le responsabilità causati
dall’apparecchio.
Nel caso dobbiate ricorrere alla garanzia, rivolgetevi al vostro ri-
venditore di ducia.
Dati tecnici
Tensione d’esercizio: 220-240 V~ 50/60 Hz
Tensione massima di accensione Uotw (peak) 3,0 - 5 kV
Temperatura massima d'esercizio tc 80°C
Temperatura ambiente ta da -20° bis +45°C

6
Guia de Empleo - Bright Control PRO III
ES
Nos alegramos de poder satisfacer, con nuestro nuevo Bright Control PRO III, el
deseo ampliamente expresado de los clientes por un dispositivo que se pueda
accionar con lámparas Bright Sun de 35W, 50W y 70W. De esta manera dispondrá
de una plena exibilidad y podrá cambiar, por ejemplo, también sin problemas
las lámparas en función de la estación del año. El dispositivo se puede ajustar
sencillamente a la potencia en vatios deseada y su manejo resulta todavía más
fácil que el de su predecesor.
Como socio de producción hemos conseguido con Philips uno de los fabricantes
líderes en la tecnología de lámparas de vapor metálico. Conjuntamente garan-
tizamos que los animales recibirán unos valores de radiación óptimos con el
Bright Control PRO III. Tenga en cuenta que en caso de emplear otros cebadores
electrónicos distintos, aunque sean de la casa Philips, se pueden producir valo-
res de radiación distintos puesto que los fabricantes optimizan sus productos
para lámparas diferentes. Precisamente en el caso de la potencia UV pueden
aparecer notables diferencias parcialmente, tal como lo demuestran las medi-
ciones independientes.
Lucky Reptile puede garantizar la función óptima de Bright Sun y su espectro
únicamente en combinación con cebadores electrónicos y luminarias Lucky Rep-
tile. También la luminaria es un componente importante y debe estar especial-
mente autorizada para el uso con lámparas de vapor metálico. La mayoría de
portalámparas de porcelana NO están autorizadas para el funcionamiento con
lámparas de vapor metálico. Por consiguiente recomendamos productos Lucky
Reptile Thermo Socket. Los productos con conexión enchufable apta para Bright
Control se reconocen por medio del suplemento «PRO».
Ajuste de la potencia
Tenga en cuenta: A través del interruptor en el lado del aparato se
puede ajustar la potencia. Asegúrese de que el ajuste coincida con
el alumbrado utilizado. ¡El cambio de potencia sólo se permite con el
enchufe de red desconectado!
Instalación al usar las lámparas Plug and Play
de Lucky Reptile
Instale la lámpara Plug and Play como se describe en el manual. Colocar el en-
chufe del la lámpara Plug and Play en el casquillo de unión del reactor Bright
Control. No se precisa una conducción de corriente del Plug and Play.
Atornillar el foco BrightSun UV al engaste. Asegurar que esté correctamente
asentado y tenga un buen contacto con las piezas electricadas de dicho en-
gaste.
Colocar el enchufe del Bright Control PRO III en la caja de empalme. La lámpara
debería encenderse ahora y aumentar lentamente en luminosidad. Si el proceso
de encendido durase demasiado o no se encendiese, comprobar si la lámpara
está correctamente atornillada al engaste.
Sólo un técnico debe instalar otros engastes o focos. En este caso, es respon-
sabilidad del usuario garantizar el funcionamiento y la seguridad del aparato.
Tenga en cuenta que sólo se precisan pocas monturas para el funcionamiento
con lámparas de halogenuros metálicos. Lo mejor es conectar otras lámparas,
usando el sistema de empalme. Pueden adquirirse enchufes compatibles extra.
Condiciones de funcionamiento
• La posición de empleo del equipo puede ser elegida. Utilice el equipo de tal
manera que no se moje!
• Asegurar el aparato con tornillos en las sujeciones previstas para que no se
deslice ni se caiga.
• La temperatura del ambiente permitida debe estar entre -20 y 45°C, ni más,
ni menos!
• El equipo está destinado al uso en sitios secos y limpios.
• Al formarse agua de condensación, hay que esperar un período de aclimata-
ción hasta dos horas.
• Tenga Ud. cuidado a que el equipo no tenga contacto con humedad, agua y
calor!
• No debería superarse la distancia de 2 m entre el reactor y la lámpara.
Instrucciones de seguridad:
• No modique Ud. el equipo ni abra su cuerpo!
• El equipo tal como las lineas del sensor tienen que ser examinados con regu-
laridad respecto a posibles averías y daños. Al constatar cualquier defecto,
el equipo tiene que ser inmediatamente retirado del uso. Lo mismo vale
en caso de que el equipo haya tenido contacto con liquidos. Inspecciones y
eventuales reparaciones del equipo son tarea exclusiva de un especialista
profesional y calicado!
• Antes de la puesta en servicio del equipo hay que controlar si este equipo
es adecuado y apto en general para el caso de empleo, para el que está
previsto!
• En caso de dudas es recomendable recurrir a consultas de especialistas, pro-
fesionales, péritos o del productor del equipo empleado!
• Sólo deben utilizarse Para lámparas de vapor metálico. Asegúrese de que
sólo se utilicen lámparas con una potencia apropiada. No se deberían utilizar
otras fuentes luminosas
• El aparato debe instalarse de tal manera que no pueda tocarse mientras
funciona.
• Sólo debe tocarse el aparato, después de haberlo desenchufado de la corrien-
te. El aparato se calienta durante la marcha.
• Antes de cambiar de lámpara debe desconectarse el reactor de la corriente.
• Para cambiar la potencia cambiando el interruptor en el lado de la entrada se
debe separar el aparato intercalador de la red eléctrica. Durante el funciona-
miento no deben realizarse cambios.
• Durante el encendido se producen tensiones de aprox. 5 kV.
• Si la lámpara no se enciende, se interrumpe el encendido y se intenta de
nuevo al cabo de aprox. 1 a 2 minutos.
Garantía
La garantía caduca en caso de modicaciones técnicas e intentos de
reparaciones del equipo así como en caso de deterioros y daños a
causa de fuerza o uso impropio.
No se garantiza ni se responsabiliza de cualquier forma de daños o
daños consecutivos en relación con este producto.
En caso de reclamaciones, reivindicaciones de garantía o reparaci-
ones diríjanse a su especialista.
Características técnicas
Tensión de servicio 220-240 V~ 50/60 Hz
Tensión de encendido máx. Uotw (pico) 3,0 - 5 kV
Temperatura de funcionamiento máx. tc 80°C
Temperatura ambiente ta -20° bis +45°C
Handleiding - Bright Control PRO III

7
Handleiding - Bright Control PRO III
NL
We zijn verheugd dat we met onze nieuwe Bright Control PRO III kunnen voldoen
aan een veelgehoorde vraag van onze klanten, namelijk dat hij kan worden ge-
bruikt met Bright Sun-lampen van zowel 35W, 50W als 70W. Zo hebt u volledige
exibiliteit en kunt u bv. ook probleemloos de lampen uitwisselen naargelang
het seizoen. Het apparaat kan aan de zijkant simpelweg in de gewenste wattage
worden ingesteld en is nog gebruiksvriendelijker dan zijn voorganger.
Als productiepartner voor deze lampen konden we rekenen op Philips, een van
de belangrijkste fabrikanten van metaaldamplampen. Samen garanderen we
dat de Bright Control PRO III de dieren een optimale straalwaarde geven. Houd
er rekening mee dat bij gebruik van andere voorschakelapparaten, zelfs die
van Philips, andere stralingswaarden kunnen optreden, omdat de fabrikanten
hun producten voor verschillende lampen optimaliseren. Net bij de UV-waarden
kan dit leiden tot duidelijke verschillen, zoals onafhankelijke metingen hebben
bewezen.
Lucky Reptile kan de optimale werking van de Bright Sun en zijn spectrum alleen
garanderen in combinatie met Lucky Reptile-voorschakelapparaten en lampen.
Ook de tting is een belangrijk component en moet speciaal voor het gebruik
van metaaldamplampen bedoeld zijn. De meeste porseleinen ttingen zijn NIET
bedoeld voor gebruik met metaaldamplampen. Daarom raden we de Lucky
Reptile Thermo Socket-producten aan. Producten met steekverbindingen die bij
Bright Control passen, herkent u aan de referentie "PRO".
Instelling van de wattage
Let op: Via de schakelaar aan de zijkant van het apparaat kan de
wattage worden ingesteld. Zorg ervoor dat de instelling overeen-
komt met de gebruikte lampen. Het verwisselen van de wattages
is alleen toegestaan wanneer de stekker uit het stopcontact is ge-
haald!
Installatie bij gebruik van de Lucky Reptile
Plug and Play-lamps
Installeer de Plug and Play-lamp volgens de beschrijving in de handleiding.
Steek de stekker van de Plug and Play-lamp in het contactvoetje van de steek-
verbinding van het Bright Control voorschakelapparaat. Een eventuele beschik-
bare stroomtoevoer voor de Plug and Play-lamp is niet noodzakelijk.
Schroef de BrightSun UV-straler in de lamphouder. Zorg er beslist voor dat deze
juist zit en goed contact met de stroomvoerende onderdelen van de lamphouder
heeft.
Steek de stekker van de Bright Control PRO III in het stopcontact. De lamp dient
nu aan te gaan en langzaam aan lichtsterkte te winnen. Indien het ontstekings-
procédé zeer lang duurt of indien een ontsteking al helemaal niet mogelijk is,
kijkt u na, of de lamp correct in de lamphouder geschroefd is.
De installatie van andere lamphouders of van projectoren mag uitsluitend door
een vakman doorgevoerd worden. In dit geval is het de verantwoordelijkheid
van de gebruiker om te beoordelen of de werking toelaatbaar is en de veiligheid
van de werking is gewaarborgd. Houd er rekening mee dat slechts enkele t-
tingen geschikt zijn voor de werking met metaaldamplampen. Het best worden
er andere projectoren door gebruikmaking van het steeksysteem aangesloten.
Compatibele stekkers zijn apart verkrijgbaar.
Gebruiksomstandigheden
• De positie van het apparaat tijdens het gebruik is naar believen. Het ap-
paraat zal echter zodanig moeten worden geplaatst dat het niet in het water
kan vallen!
• Borg het apparaat met schroeven aan de daarvoor bestemde houders tegen
het wegglijden en neervallen
• De toegestane omgevingstemperatuur mag tijdens het gebruik niet lager dan
-20°C respectievelijk niet hoger dan 45°C zijn.
• Het apparaat is gemaakt voor het gebruik in droge en schone ruimtes.
• Bij vorming van condenswater moet een acclimatiseringtijd tot aan 2 uur
worden afgewacht.
• Bescherm het apparaat tegen vocht, spatwater en invloed van hitte!
• De afstand tussen voorschakelapparaat en lamp mag niet meer dan 2 m
bedragen
Veiligheidsinstructies:
• Brengt u geen wijzigingen aan aan het apparaat, en open de behuizing niet!
• Controleer het apparaat en de sensorleidingen altijd op beschadigingen. Bij
vaststelling van een fout dient u het apparaat onmiddellijk buiten gebruik
te stellen. Dit geldt ook indien het apparaat met vloeistof in aanraking is
gekomen. Een controle en zonodig reparatie van het apparaat moet door een
gekwaliceerde vakman worden uitgevoerd!
• Vóór het gebruik van het apparaat dient altijd gecontroleerd te worden of het
apparaat principieel geschikt is waarvoor het gebruikt zal worden!
• Bij twijfel is het inwinnen van informatie bij vakmensen, deskundigen of de
fabrikant van het gebruikte apparaat noodzakelijk!
• Er mogen uitsluitend metaaldamplampen gebruikt worden. Zorg ervoor dat u
alleen lampen van de juiste wattage gebruikt. Gebruik nooit andere soorten
lampen.
• Het apparaat dient zodanig geïnstalleerd te worden, dat het tijdens de wer-
king niet aangeraakt kan worden
• Raak het apparaat slechts aan als de netstekker uitgetrokken is. Het ap-
paraat wordt tijdens de werking heet
• Vóór een wissel van de lampen moet het voorschakelapparaat van het
stroomnet verbroken worden
• Voor veranderingen van de wattage door het omdraaien van de schakelaar
aan de ingangszijde, moet het voorschakelapparaat van het elektriciteitsnet
worden ontkoppeld. Tijdens de werking mogen geen veranderingen worden
aangebracht.
• Bij ontsteking van de lamp doen er zich spanningen van ca. 5 kV voor
• Als een lamp niet aangaat, wordt de poging tot ontsteking onderbroken en
tracht men na ca. 1-2 minuten opnieuw, de lamp te laten aangaan.
Garantie
De garantie vervalt bij verandering en/of reparatiepogingen aan
het apparaat, evenals bij beschadiging door invloed van geweld of
onjuist gebruik van het product.
De fabrikant staat niet in en stelt zich niet aansprakelijk voor scha-
de of gevolgschade van dit product.
In het geval van garantie-eisen of reparaties neemt u contact op
met uw dealer.
Technische gegevens
Bedrijfsspanning: 220-240 V~ 50/60 Hz
Max. ontsteekspanning Uotw (peak) 3,0 - 5 kV
Max. Bedrijfstemperatuur tc 80°C
Omgevingstemperatuur ta -20° bis +45°C

Lucky Reptile
August-Jeanmaire-Straße 12
D-79183 Waldkirch
Germany
www.lucky-reptile.com
Distributed by:
S0915
This manual suits for next models
2
Table of contents
Languages:
Other Lucky Reptile Pet Care Product manuals
Popular Pet Care Product manuals by other brands

Kurgo
Kurgo LOFT BOOSTER SEAT Instructions and care

impact
impact CAS Series Assembly instructions

Carlson Pet Products
Carlson Pet Products 0618 owner's manual

PawHut
PawHut D00-158V00 manual

Jewett-Cameron
Jewett-Cameron CMB 10122 Assembly instructions

Vivog
Vivog D3300 Instructions for Use, Maintenance and Safety

Havahart
Havahart 5165 Training guide & owner's manual

High Tech Pet Products
High Tech Pet Products SOUND BARRIER SB-1 operating instructions

Dogtra
Dogtra 280NCP Tlatinum Series owner's manual

juwel
juwel Rio 240 instruction manual

UGO BASILE
UGO BASILE 7025 Series instruction manual

Vision
Vision S01 Quick start instructions