LumenRadio CRMX Luna User manual

CRMX Luna/Aurora
User Manual
LumenRadio AB
2022-01-25

CRMX Luna/Aurora 2022-01-25
Contents
Safety information 4
English .............................................. 5
Deutsch.............................................. 6
Introduction 7
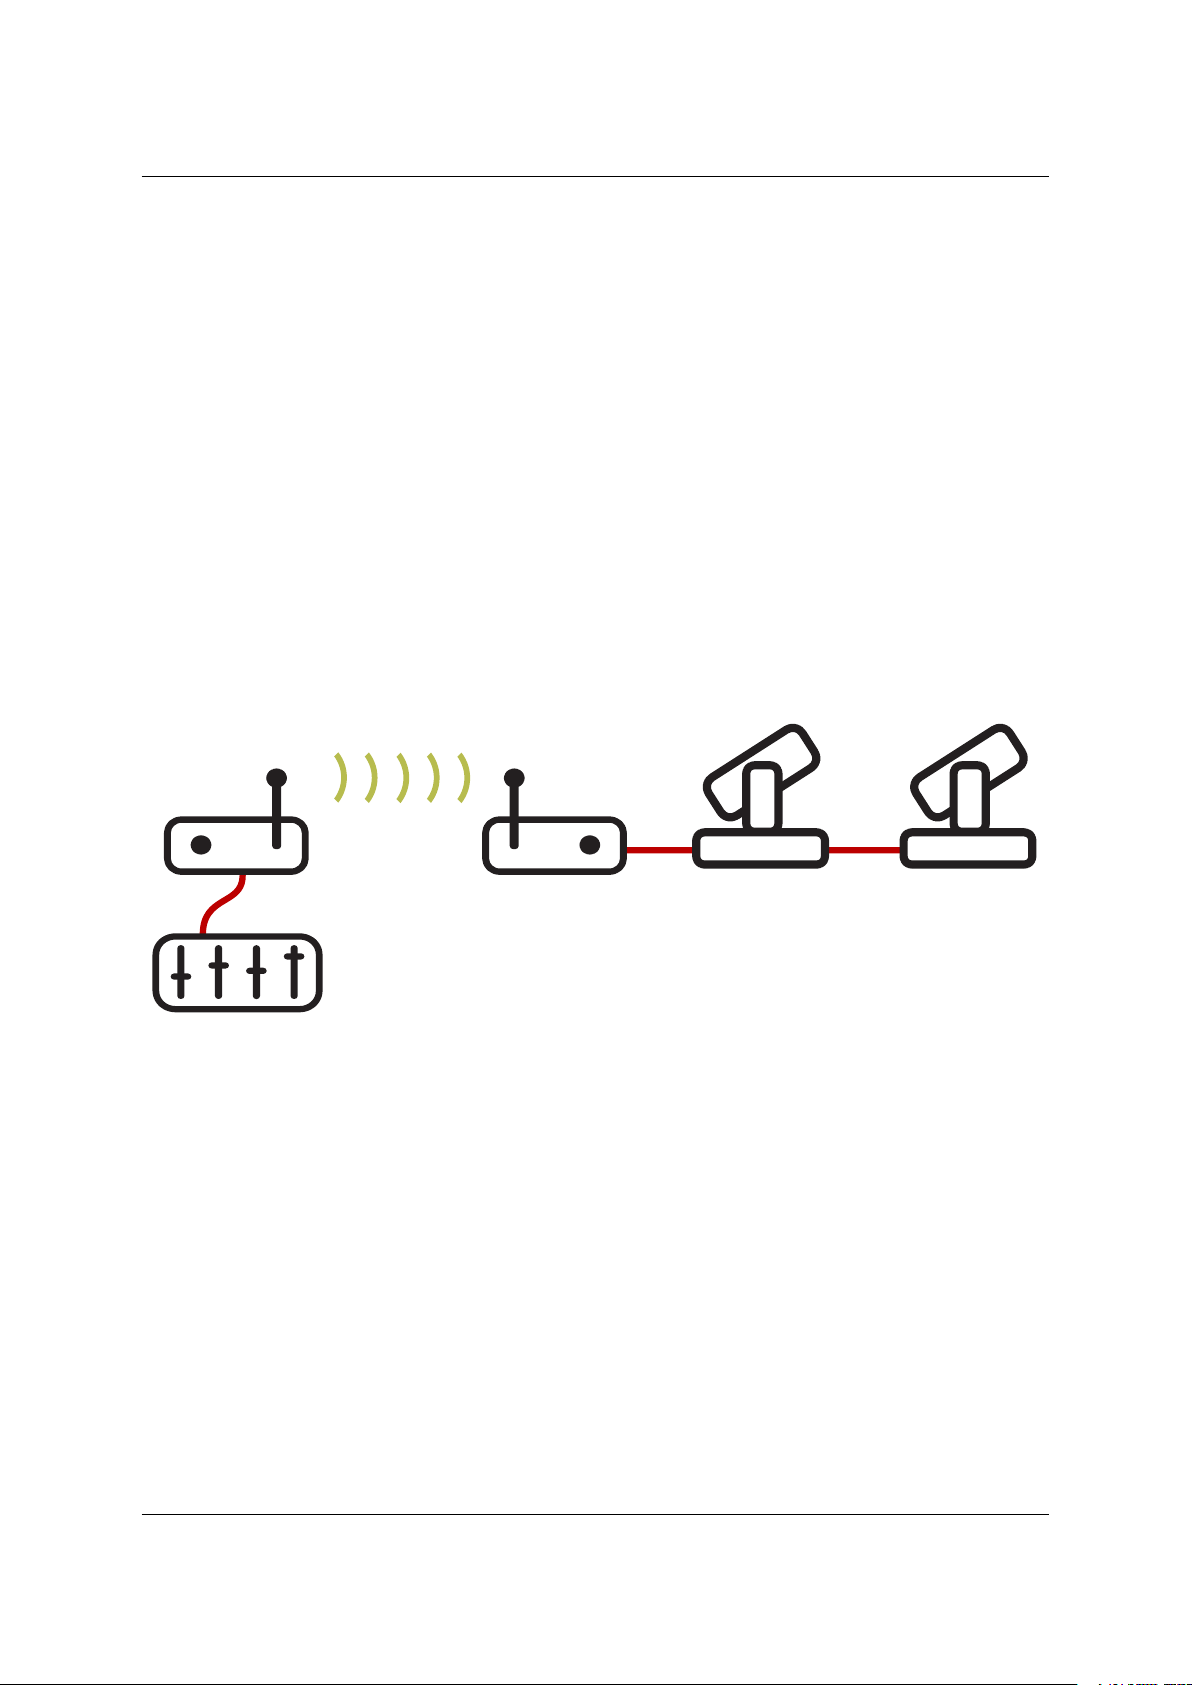
WirelessDMXinanutshell .................................... 7
Cognitivecoexistence ...................................... 9
Compatibility........................................... 9
Your device 11
AuroraOverview ......................................... 11
LunaOverview .......................................... 11
Mounting ............................................. 12
M10and3/8”holes..................................... 12
Rackmounting ....................................... 12
Wallmounting ....................................... 12
Settings and operation 13
Lunafrontpanel ......................................... 13
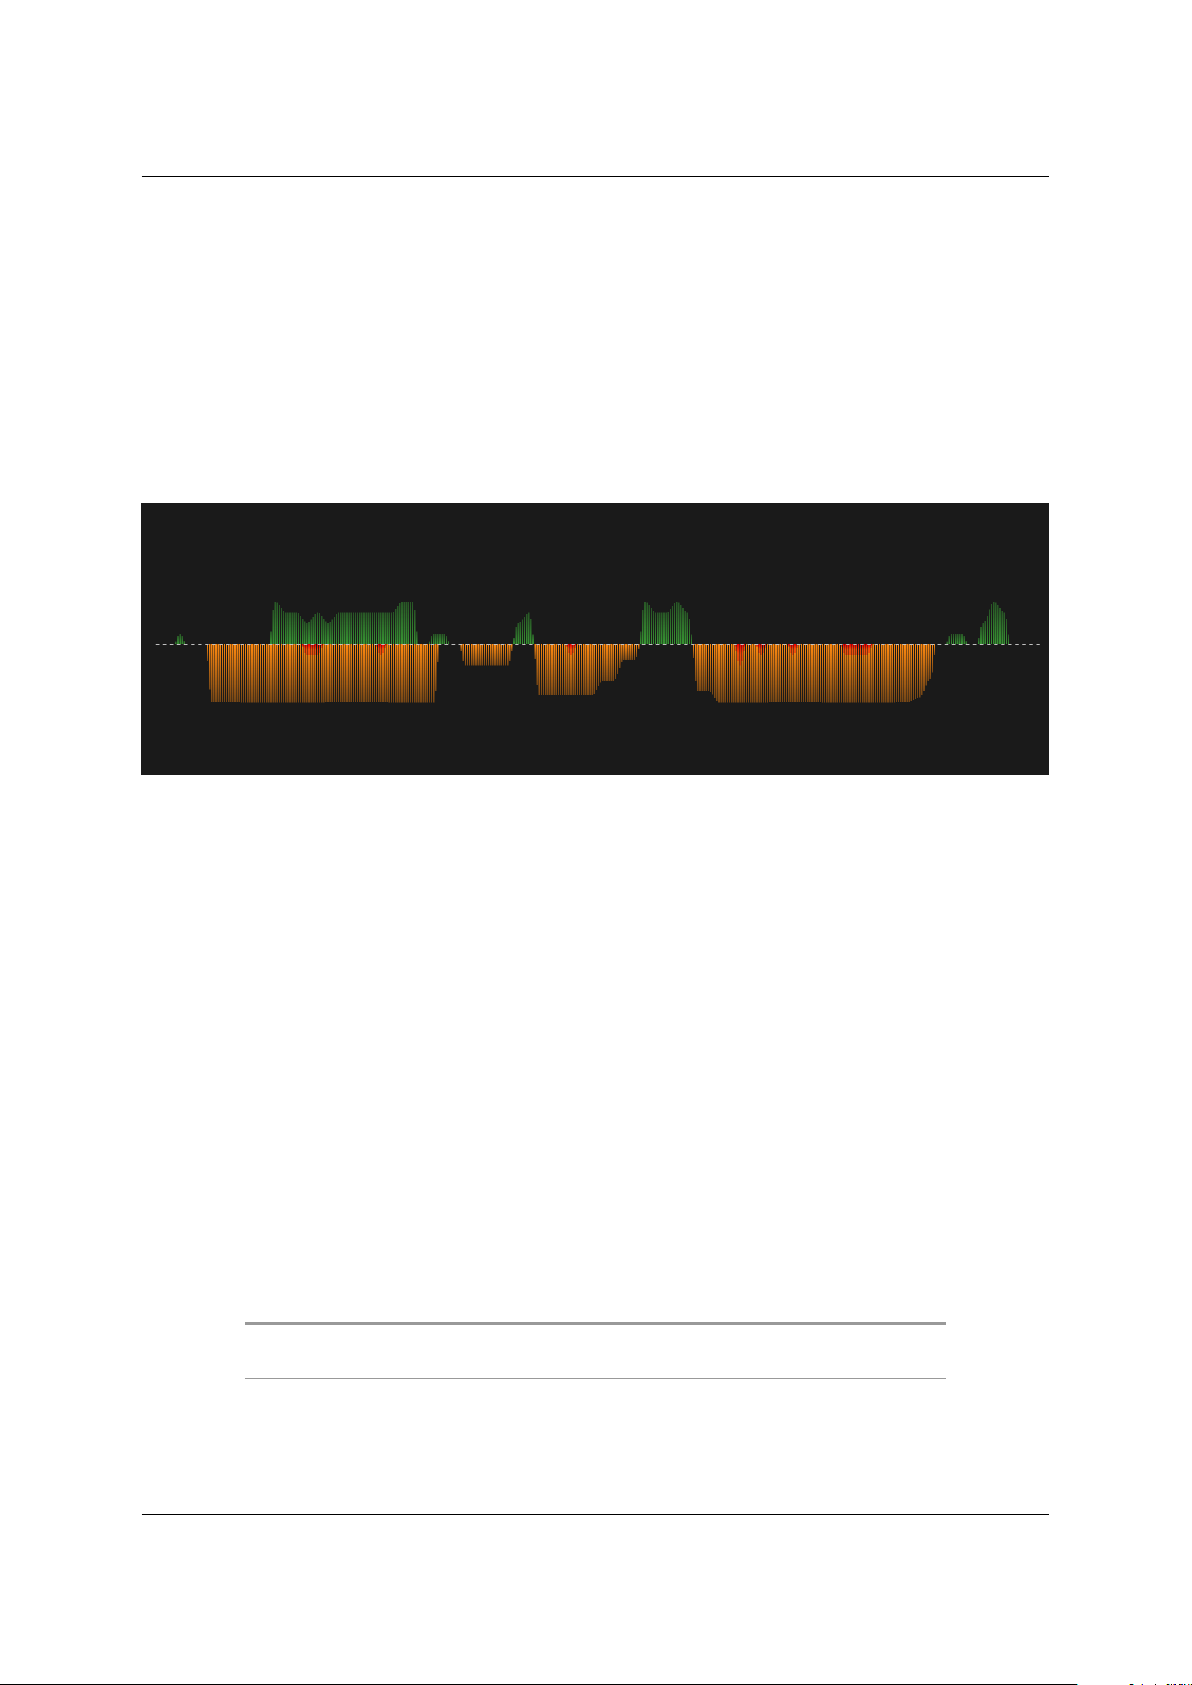
Signalquality........................................ 13
MODE ............................................ 13
RFLINK ........................................... 13
DATA............................................. 14
POWER ........................................... 14
ChangingbetweenRX/TX ................................. 14
Changing transmission protocol . . . . . . . . . . . . . . . . . . . . . . . . . . . . . . 15
Aurorafrontpanel ........................................ 15
Statusscreen ........................................ 15
Mainmenu ......................................... 16
Linking ........................................... 16
ChangingbetweenRX/TX ................................. 16
Changing transmission protocol . . . . . . . . . . . . . . . . . . . . . . . . . . . . . . 16
WiFi ................................................ 16
AccessPoint(APmode) .................................. 17
Disabled........................................... 17
Bluetooth............................................. 17
Configuration........................................ 17
LumenRadio AB 2

CRMX Luna/Aurora 2022-01-25
DMXdata .......................................... 17
PINcode .......................................... 17
TurningBluetoothon/o.................................. 18
Firmwareupgrades........................................ 18
Howtoupdate ....................................... 18
Compliance information 20
CE ................................................. 20
UKCA ............................................... 20
FCC ................................................ 20
FCCInformationtoUser .................................. 20
FCC Guidelines for Human Exposure . . . . . . . . . . . . . . . . . . . . . . . . . . . . 20
FCC Declaration of Conformity . . . . . . . . . . . . . . . . . . . . . . . . . . . . . . . 21
FCC Radio Frequency Interference Warnings & Instructions . . . . . . . . . . . . . . . 21
IndustryCanada ......................................... 21
Accessories 22
LumenRadio AB 3

CRMX Luna/Aurora 2022-01-25
Safety information
WARNING / WARNUNG / ATTENTION / ADVERTENCIA /
VARNING / ADVARSEL / VAROITUS / ADVARSEL
This product must be earthed.
Das Gerät muss an eine geerdete Steckdose angeschlossen werden.
Cet appareil doit être branché à une prise de terre.
Este aparato se debe conectar a una toma de tierra.
Apparaten skall anslutas till jordat uttag.
Apparatet må tilkoples jordet stikkontakt.
Laite on liitettävä suojakoskettimilla varustettuun pistorasiaan.
Apparatets stikprop skal tilsluttes en stikkontakt med jord.
LumenRadio AB 4

CRMX Luna/Aurora 2022-01-25
English
1. Please read these instructions and safety instructions carefully before using this product.
2. Keep these instructions for future reference.
3.
Never plug the product into the mains supply while it is still in its packaging. Never cover during
use.
4. Only use indoors and in dry spaces, except where otherwise explicitly stated.
5. Verify that the product has not been damaged in transport before you make use of it.
6. Keep the product out of the reach of animals, children and persons who require supervision.
7. This product is intended for professional use only.
8. Always place the product on a stable, solid and flat base or safely secure it.
9. Do not use the product near hot surfaces or objects.
10.
The mains cable must be regularly and carefully checked for damage to the cable, the plug and
other parts. In the event of damage, the product must not be used until the mains cable has been
replaced. If the product needs to be cleaned, the adapter or mains cable must be disconnected
from the mains supply.
11. Repairs must only be carried out by a qualified person.
12. Note that the connected voltage and current corresponding to the sticker on the product.
13.
Never submerge the product or the mains cable in water or any other liquid, in order to prevent
electric shocks, fire, injury and other hazards.
14. Never carry the product by the cables and do not put the cord around sharp edges.
LumenRadio AB 5

CRMX Luna/Aurora 2022-01-25
Deutsch
1.
Bitte lesen Sie diese Hinweise und Sicherheitshinweise sorgfältig durch, bevor Sie dieses Produkt
verwenden.
2. Bewahren Sie diese Anleitung zum späteren Nachschlagen auf.
3.
Das Produkt nie anschließen, wenn es sich in der Verpackung befindet- Außerdem darf das
Produkt beim betrieb nicht abgedeckt werden.
4. Nur in trockenen Innenräumen verwenden sofern nicht ausdrücklich anders angegeben!
5.
Versichern Sie sich vor der Verwendung, das dieses Produkt beim Transport nicht beschädigt
wurde.
6.
Produkt außerhalb der Reichweite von Kindern, Tieren und zu beaufsichtigenden Personen
aufbewahren.
7. Dieses Produkt ist nur für den professionellen Gebrauch bestimmt.
8. Stellen Sie das Produkt immer auf eine stabile, feste und flache Fläche auf.
9. Verwenden Sie das Produkt nicht in der Nähe von warmen Oberflächen oder Objekten.
10.
Das Netzkabel muss regelmäßig und sorgfältig auf Schäden am Kabel, Stecker und anderen
Teilen kontrolliert werden. Bei einem Schaden darf das Produkt erst wiederverwendet werden,
wenn das Netzkabel repariert/ersetzt ist. Wenn das Produkt gereinigt werden soll, muss das
Netzkabel vom Stromnetz getrennt werden.
11. Eventuell anfallende Reparaturen müssen von einer qualifizierten Person ausgeführt werden.
12.
Beachten Sie, dass die angeschlossene Spannung und Strom dem entsprechen, was auf dem
Typenschild angegeben ist.
13.
Tauchen Sie das Produkt oder das Anschlusskabel niemals in Wasser oder in andere Flüssigkeiten
ein, um einen Stromschlag, Brand, Verletzungen oder andere Gefahren zu vermeiden.
14. Das Produkt nicht am Netzkabel tragen und das Netzkabel nicht um scharfe Kanten legen.
LumenRadio AB 6

CRMX Luna/Aurora 2022-01-25
Introduction
Welcome to the large family of users of LumenRadio’s world-leading wireless DMX system. We hope
that you will enjoy your brand new devices. We, at LumenRadio, have tailored this wireless DMX system
to deliver reliability at its best. No matter if you’re using them at a night-club, a community theatre or
on the set of a feature film, you should be able to trust its cable-like reliability, but without the hassle
of cables.
Wireless DMX in a nutshell
Wireless DMX can be used in many dierent setups, may it be one single universe being transmitted
from one point over a distance to one receiver. This is what is called point-to-point, and is a common
scenario when shooting wireless DMX over a distance where cable is not possible. The cable is simply
replaced with a wireless cable with a fixed latency of 5 ms.
Figure 1: One DMX universe in a point-to-point setup
It is simple to just add more receivers to a universe of wireless DMX to create a wireless splitter, where
the same DMX data is outputted with a synchronisation of less than 0.1 ms. This is what is called a
point-to-multipoint setup.
LumenRadio AB 7

CRMX Luna/Aurora 2022-01-25
Figure 2: One universe in a point-to-multipoint setup
It is possible to have multiple universes being transmitted simultaneously in what’s called a multipoint-
to-multipoint setup. Simply link each receiver to the transmitted universe you want it to output. The
system will automatically exchange encryption keys and other security parameters. The system will
coordinate the frequency usage to avoid collisions so that multiple universes can be transmitted
simultaneously.
Figure 3: Multipoint-to-mutlipoint setup
LumenRadio AB 8

CRMX Luna/Aurora 2022-01-25
Cognitive coexistence
Cognitive Coexistence is LumenRadio’s patented technology for real-time adaptive frequency hopping.
It’s the foundation of our CRMX
®
technology and the main reason why we are perceived as the most
reliable and resilient wireless DMX system on the market.
CRMX systems automatically scan and adapt to the RF environment 1500 times per second. If distur-
bances are detected, the system will move to frequencies that are currently not disturbed. This is how
the cable-like reliability can be achieved, trusted by users in the most demanding sets.
Figure 4: Cognitive coexistence
Compatibility
There has been two major wireless DMX systems on the market for a while - CRMX
®
and W-DMX
TM
.
They have historically not been fully compatible due to dierent technologies being used. But CRMX
receivers have been able to receive the W-DMX G3 protocol. However, your new CRMX Aurora or CRMX
Luna can be operated in dierent modes when in transmitter mode;
1. CRMX - transmit CRMX data to compatible receivers.
2. W-DMX G3 - transmit W-DMX G3 protocol.
3. W-DMX G4S - transmit W-DMX G4S protocol.
For W-DMX receivers, please use the W-DMX G3 mode for maximum compatibility. Note: This mode can
also be used with CRMX receivers, but security and DMX fidelity is not as good as when running CRMX
mode.
Mode CRMX receivers Older CRMX receivers W-DMX receivers
CRMX Yes Yes No
LumenRadio AB 9

CRMX Luna/Aurora 2022-01-25
Mode CRMX receivers Older CRMX receivers W-DMX receivers
W-DMX G3 Yes Yes Yes
W-DMX G4S Yes No Yes
When operated as receivers, CRMX Aurora and CRMX Luna will automatically detect and link using the
protocol used by the transmitter at the time of linking.
LumenRadio AB 10

CRMX Luna/Aurora 2022-01-25
Your device
Aurora Overview
Figure 5: Aurora back and front
1. Antenna
2. IPS TFT display for menu system
3. Control knob
4. Decorative lights
5. DMX in/out with auto terminate
6. WiFi antenna
7. WiFi Link/Data LEDs
8. DC inlet (10-20V DC)
9. AC inlet (90-240 VAC) (PowerCON TRUE1)
Luna Overview
Figure 6: Luna back and front
1. Antenna
2. Signal level indication
3. Status LEDs
4. Link button
5. DMX in/out with auto terminate
6. DC inlet (10-20V DC)
LumenRadio AB 11

CRMX Luna/Aurora 2022-01-25
7. AC inlet (90-240 VAC) (PowerCON TRUE1)
Mounting
Your Aurora/Luna is designed to be able to be mounted in a number of dierent ways;
1. Truss mounted - using a clamp with either M10 or 3/8” thread.
2. Rack mounted - using the rack mounting kit accessory.
3. Tripod mounted - using a M10 or 3/8” spigot or the yoke accessory.
4. Wall mounted - using the wall mount kit accessory.
M10 and 3/8” holes
On either side of your Aurora/Luna unit you’ll find holes for M10 (1.5 mm pitch) and 3/8” (UNC). These
can be used with any standard truss mounting clamps or spigots, for instance a standard TV spigot.
Rack mounting
You can use the rack mounting kit (sold separately) to mount a Aurora/Luna in a standard 19 inch
rack.
To mount the rack brackets, loosen four (4) of the M4 screws on each side of the unit, place the rack
bracket, and fasten it in place using the M4 screws. Tighten firmly.
Wall mounting
Aurora/Luna can be mounted to a wall using the wall mounting kit (sold separately). Loosen the lower
two M4 screws on each side of the unit, place the brackets and fasten them using the M4 screws. Tighten
firmly.
LumenRadio AB 12

CRMX Luna/Aurora 2022-01-25
Settings and operation
Luna front panel
Figure 7: Luna front panel
Signal quality
When operating as RX, the signal quality indicator shown how good the signal reception is.
When operating as TX, these LEDs are always o.
MODE
The MODE LED shows what transmission protocol the device is using. When operating as RX this follows
the mode of the TX. This LED is o if Luna is unlinked as RX.
•White: CRMX
•Green: W-DMX G3
•Red: W-DMX G4
•Violet: W-DMX G4S
•Amber: W-DMX G5
Bluetooth
•Bluetooth is on: this LED blinks once every few seconds.
•Bluetooth is connected: this LED blinks twice every few seconds.
•Bluetooth is o: this LED has no blue blinks.
RF LINK
The RF LINK LED shows the status of the RF LINK:
LumenRadio AB 13

CRMX Luna/Aurora 2022-01-25
Figure 8: RX: Unlinked
Figure 9: RX: Linked and active RF link, TX: normal active RF link
Figure 10: RX: Linking or linked but no active RF link, TX: linking
Figure 11: TX: unlinking
Universe color
The RF LINK LED will be lit in the selected universe color.
DATA
•O: No data
•Green: DMX data
•Red: RDM activity
POWER
Lit when device is on.
Changing between RX/TX
Changing between RX and TX can be done from the app, or by following this procedure:
1. Press the link button 5 times rapidly.
2. Press and hold the link button for more than 3 seconds.
3. Now the RF LINK LED will flash to indicate what mode is selected: RX: fast blink, TX: slow blink.
LumenRadio AB 14

CRMX Luna/Aurora 2022-01-25
4. Press the link button momentarily to step between the modes.
5. Press and hold the link button for more than 3 seconds to save the selected setting.
Changing transmission protocol
Changing between the available transmission protocols can be done from the app, or by following this
procedure:
1. Press the link button 3 times rapidly.
2. Press and hold the link button for more than 3 seconds.
3. Now the MODE LED will flash and indicate what protocol is selected.
4. Press the link button momentarily to step between the supported protocols.
5. Press and hold the link button for more than 3 seconds to save the selected setting.
As TX, the following protocols can be selected:
•CRMX
•W-DMX G3
•W-DMX G4S
Aurora front panel
Status screen
The status screen collects the most needed status information.
Figure 12: Aurora status screen
•Signal level: When in RX, the received signal quality is shown.
•Mode: RX or TX (and what protocol - CRMX, W-DMX - when in TX).
•Status: Shows the status of the radio link.
•Universe name: Shows the wireless universe name.
•Universe color: The text is shown in the selected universe color.
LumenRadio AB 15

CRMX Luna/Aurora 2022-01-25
Main menu
The operation of Aurora can be performed from the front panel menu system. Linking, WiFi settings,
Bluetooth, etc is all done from here.
Figure 13: Aurora main menu
Linking
Linking and unlinking receivers is done from the Linking menu.
Changing between RX/TX
Changing between RX and TX is done under the Settings menu.
Changing transmission protocol
It’s possible to change what wireless protocol the Aurora shall transmit. In the settings menu it’s
possible to select between the following protocols:
•CRMX
•W-DMX G3
•W-DMX G4S
When operating as RX the protocol is automatically detected at the time of linking.
WiFi
The built-in WiFi on Aurora operates as an ArtNet or sACN to DMX node.
LumenRadio AB 16

CRMX Luna/Aurora 2022-01-25
Access Point (AP mode)
In access point mode Stardust will create a WiFi network that your phone, tablet, etc could connect to.
This is handy for instance for iPad based lighting control apps, that can send data to Aurora directly
over WiFi.
Any controller soware that supports ArtNet or Streaming ACN (sACN) can be used.
In AP mode you need to do the following settings:
•SSID (the device’s Device Label is used as SSID)
•Password
•IP settings
•DHCP (if the DHCP server shall be enabled or not)
Disabled
When WiFi is disabled, the is turned o and no DMX is generated.
Bluetooth
Configuration
Both Aurora and Luna supports being configured via Bluetooth using the CRMX Toolbox app, available
from App Store on iOS and Google Play on Android.
Search for “CRMX Toolbox” on App Store or Google Play.
DMX data
Aurora and Luna supports receiving DMX data with limited refresh rate over the Bluetooth interface.
This can be used with apps that supports this interface natively.
PIN code
A PIN code can be used to protect against unauthorised access via the Bluetooth interface.
LumenRadio AB 17

CRMX Luna/Aurora 2022-01-25
On Aurora PIN code can be set and disabled from the menu system. Setting a PIN code of 000000
disables PIN code.
To disable the PIN code on Luna: 1. Press the link button rapidly 7 times. 2. Press and hold the link
button for at least 3 seconds. 3. The device will reboot with the PIN code disabled.
Turning Bluetooth on/o
On Aurora, Bluetooth is turned on or o via the menu system.
On a Luna, the MODE LED will flash with a blue light every few seconds when Bluetooth is enabled.
When Bluetooth is disabled no blue flashes will appear on the MODE LED.
To turn Bluetooth on/o on a Luna device: 1. Press the link button rapidly 2 times. 2. Press and hold the
link button for at least 3 seconds. 3. The device will now reboot with the Bluetooth mode toggled.
Firmware upgrades
You can expect firmware updates to be released on a regular basis for your new Stardust unit. Even
though we take pride in quality, we probably have overlooked something. Also, there will be many
more features added to the firmware in the new weeks and months.
How to update
1. Start the CRMX Toolbox app on your iOS or Android device.
2.
Click Connect and you will be presented with a list of nearby devices. The list is sorted by an
approximated distance.
3. Click a device in the list and choose Identify Device if you are unsure which unit to connect to.
4. Click Connect Device to connect to the desired device.
5.
In the My Device view, you will be able to click the Update Firmware button if there is a new
firmware available.
LumenRadio AB 18

CRMX Luna/Aurora 2022-01-25
Figure 14: CRMX Toolbox
LumenRadio AB 19

CRMX Luna/Aurora 2022-01-25
Compliance information
CE
This product complies with the Essential Requirements of RED (Radio Equipment Directive) of the Euro-
pean Union (2014/53/EU). This product meets the requirements of relevant conformance standards.
A detailed Declaration of Conformity is available upon request from the manufacturer.
UKCA
This product complies with the relevant statutory requirements in the United Kingdom. This product
meets the requirements of relevant conformance standards.
A detailed Declaration of Conformity is available for market surveillance upon request from the manu-
facturer.
FCC
FCC IDENTIFIERS: XRSTIMOMWAN301, 2ACSVHF-LPD1001
FCC Information to User
This product does not contain any user serviceable components and is to be used with approved anten-
nas only. Any product changes or modifications will invalidate all applicable regulatory certifications
and approvals.
FCC Guidelines for Human Exposure
This equipment complies with FCC radiation exposure limits set forth for an uncontrolled environment.
This equipment should be installed and operated with minimum distance of 20 cm between the radiator
and your body. This transmitter must not be co-located or operating in conjunction with any other
antenna or transmitter.
1For Aurora only.
LumenRadio AB 20
This manual suits for next models
1
Table of contents
Other LumenRadio Lighting Equipment manuals
Popular Lighting Equipment manuals by other brands

Linergy
Linergy EI58SA/E quick start guide

Wortmann
Wortmann wofi 428602 9000 Series installation instructions

Vistosi
Vistosi LUCCIOLA PT M-P manual

Lumoon Group
Lumoon Group Lumoon 75.000 lm user manual

Sealite
Sealite SL-RL Series Installation & service manual

Revolution Micro
Revolution Micro Avici 750 owner's manual