lumishore LUMI-LINK COMMAND CENTER Safety guide

www.Lumishore.com
Lumishore UK Unit 3, Technium 1, Kings Road, Swansea, SA1 8PH, UK | +44(0)208 144 1694 | Info@Lumishore.com
Lumishore USA 7137 24TH Court East Sarasota, Florida 34234 |(941) 405-3302 | Sales@LumishoreUSA.com 1
45-0138 - Rev 2
Lumi-Link Command Center - Setup and User Guide
First Time use…
When rst installed the system needs to be setup. Setup is a quick and easy process and is only performed upon inial
installaon or aer a system SD card change.
Setup discovers lights that are aached to the network and allows the user to select between a Single Zone or Mul
Zone mode display.
Underwater lights can be setup as a “Single Zone” or as a “Mul Zone”
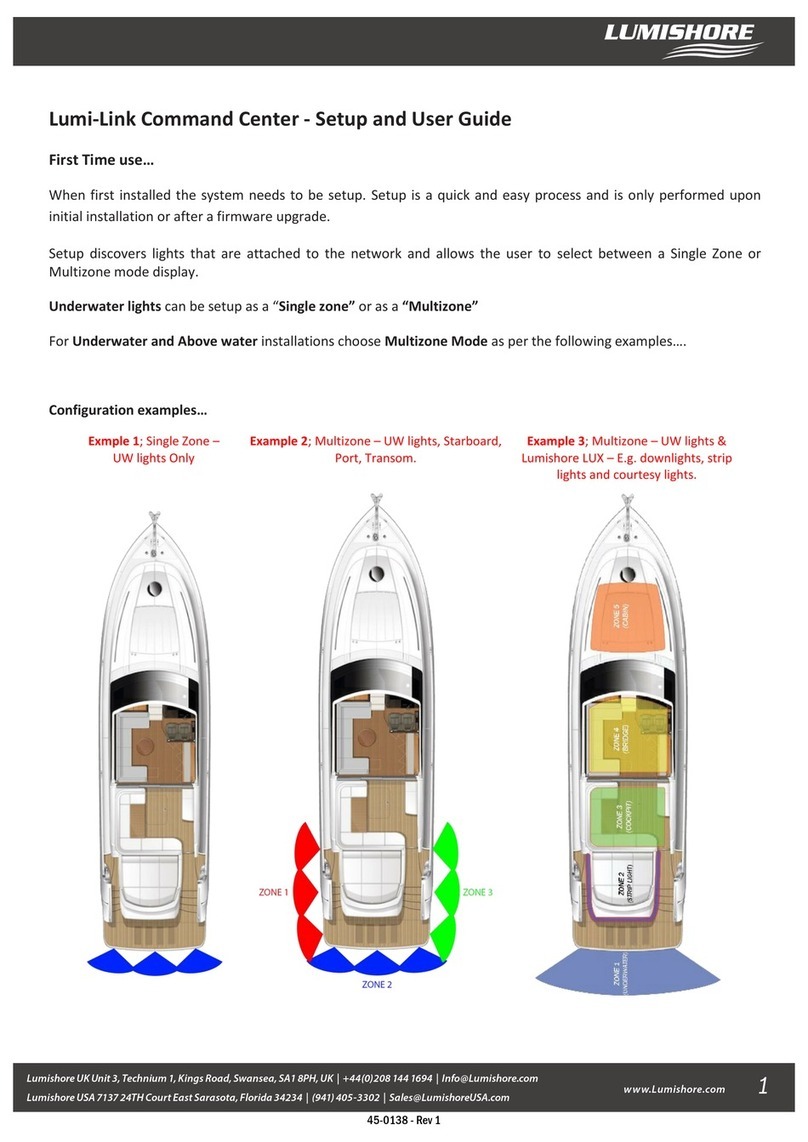
For underwater and above water installaons choose Mul Zone mode as per the following examples.
Conguraon Examples…
* FOR FIRMWARE VERSION 1.9 AND ABOVE *
Example 1; Single Zone – UW lights only Example 2; Mul Zone – UW lights,
Starboard, Port, Transom.
Example 3; Mul Zone – UW lights &
Lumishore LUX (e.g, downlights, strip
lights and courtesy lights).

www.Lumishore.com
Lumishore UK Unit 3, Technium 1, Kings Road, Swansea, SA1 8PH, UK | +44(0)208 144 1694 | Info@Lumishore.com
Lumishore USA 7137 24TH Court East Sarasota, Florida 34234 |(941) 405-3302 | Sales@LumishoreUSA.com
www.Lumishore.com
Lumishore UK Unit 3, Technium 1, Kings Road, Swansea, SA1 8PH, UK | +44(0)208 144 1694 | Info@Lumishore.com
Lumishore USA 7137 24TH Court East Sarasota, Florida 34234 |(941) 405-3302 | Sales@LumishoreUSA.com 2
The posion of the lights around the vessel can also be
setup. This ensures that sweep mode works in the
correct order.
Above water zones do not require posion informaon
but can be set if desired.
Light Discovery Process…
Upon rst installaon and before choosing single vs mul zone, the lights connected to the Lumi-Link network need
to be discovered. NOTE: Default Password = “0000”
Perform these steps on rst use or if new lights have been added or deleted from the Lumi-Link network.
Select Setup icon Select “Preferences” Enter default password = 0000
Select “Light Setup” Select “Light Discovery” Check that all lights have been found
Note – if the number of lights found does not match the expected number, check connecons and that each light
has power.

www.Lumishore.com
Lumishore UK Unit 3, Technium 1, Kings Road, Swansea, SA1 8PH, UK | +44(0)208 144 1694 | Info@Lumishore.com
Lumishore USA 7137 24TH Court East Sarasota, Florida 34234 |(941) 405-3302 | Sales@LumishoreUSA.com 3
Single Zone setup…(Skip if seng up as Mul Zone)
Select “Setup as Single Zone”
The next step allows the posion of the underwater lights to
be set around the vessel. This ensures the lights are sent
informaon in the correct order and color change in the
correct sequence. This ensures that sweep mode operates
in the desired sequence.
To set the posions use the following steps and the example posions shown below.
“Wink Light” to idenfy it on the
vessel – the light will ash RGB
Use the diagram above as a guide, edit the
light posion relave to the vessel.
Repeat for all lights and then press “Save”
Light setup is now complete! The lights can be controlled from the Lumi-Link control panel.
www.Lumishore.com
Lumishore UK Unit 3, Technium 1, Kings Road, Swansea, SA1 8PH, UK | +44(0)208 144 1694 | Info@Lumishore.com
Lumishore USA 7137 24TH Court East Sarasota, Florida 34234 |(941) 405-3302 | Sales@LumishoreUSA.com

www.Lumishore.com
Lumishore UK Unit 3, Technium 1, Kings Road, Swansea, SA1 8PH, UK | +44(0)208 144 1694 | Info@Lumishore.com
Lumishore USA 7137 24TH Court East Sarasota, Florida 34234 |(941) 405-3302 | Sales@LumishoreUSA.com
www.Lumishore.com
Lumishore UK Unit 3, Technium 1, Kings Road, Swansea, SA1 8PH, UK | +44(0)208 144 1694 | Info@Lumishore.com
Lumishore USA 7137 24TH Court East Sarasota, Florida 34234 |(941) 405-3302 | Sales@LumishoreUSA.com 4
Lumi-Link Control Panel...
System Power
Setup Menu
- Colour Pale�es
- Preset Colour & Favourites
- Cycle
- Strobe
- Sweep
- Sound to Light

www.Lumishore.com
Lumishore UK Unit 3, Technium 1, Kings Road, Swansea, SA1 8PH, UK | +44(0)208 144 1694 | Info@Lumishore.com
Lumishore USA 7137 24TH Court East Sarasota, Florida 34234 |(941) 405-3302 | Sales@LumishoreUSA.com 5
Mul-Zone Setup and Create new Zone…
Select “Setup as Mul Zone”
Lighng zones can be created for dierent areas of the vessel. A
zone could contain underwater lights, strip lights, downlights,
courtesy lights or a mixture of the above. The zone names can be
edited and an icon selected for easy idencaon.
Select Setup icon Select “Create Zone” Rename the zone and choose a suitable icon
Use the name of the light or “Wink Light”
to idenfy each light on the network. Select
which lights to allocate to the zone and then
save the selecon.
(Oponal) – Light posions can be assigned.
This ensures the sweep mode will work in
the correct sequence. E.g. , for underwater
lights.
The lights in this zone will appear, change
their posion as required and then press
save.
NOTE: A light can exist in one zone only, it cannot be placed in mulple zones.
The new zone will appear on the zone home
screen.
Press the power icon to turn each zone
on/o press the right hand side of tab to
enter main control page.
Main control page.
www.Lumishore.com
Lumishore UK Unit 3, Technium 1, Kings Road, Swansea, SA1 8PH, UK | +44(0)208 144 1694 | Info@Lumishore.com
Lumishore USA 7137 24TH Court East Sarasota, Florida 34234 |(941) 405-3302 | Sales@LumishoreUSA.com

www.Lumishore.com
Lumishore UK Unit 3, Technium 1, Kings Road, Swansea, SA1 8PH, UK | +44(0)208 144 1694 | Info@Lumishore.com
Lumishore USA 7137 24TH Court East Sarasota, Florida 34234 |(941) 405-3302 | Sales@LumishoreUSA.com 6
www.Lumishore.com
Lumishore UK Unit 3, Technium 1, Kings Road, Swansea, SA1 8PH, UK | +44(0)208 144 1694 | Info@Lumishore.com
Lumishore USA 7137 24TH Court East Sarasota, Florida 34234 |(941) 405-3302 | Sales@LumishoreUSA.com
To Edit or Delete a Zone…
Note: When a zone is created, edited or deleted all zones default to green at 25% intensity. This indicates that any
changes have been successful.
Creang Lighng Scenes…
Once each zone has been setup the user can select the colour, eect and intensity for each of these lighng zones.
These preferences can then be saved as a lighng “Scene”.
Scenes can include a single zone or mulple zones, they can also include a zone “set to o”.
More than one scene can be acve at a me, if zones are shared between scenes, the zones will follow the last scene
command.
In the example below each of the ve zones has been allocated a dierent colour and zone 5 is set to o. To create
this as a new scene e.g. “Docking Mode” follow the steps below…
Create the ve separate lighng
zones and select the desired color
and intensity for each one.
Select “Save as Scene” from the
setup menu
Rename the scene and select an icon.
Ensure the zones to be included
are checked.
To edit or delete this zone long
press (>3sec) the zone tab.
Rename, change icon, re-assign lights,
save, cancel or delete zone.

www.Lumishore.com
Lumishore UK Unit 3, Technium 1, Kings Road, Swansea, SA1 8PH, UK | +44(0)208 144 1694 | Info@Lumishore.com
Lumishore USA 7137 24TH Court East Sarasota, Florida 34234 |(941) 405-3302 | Sales@LumishoreUSA.com
www.Lumishore.com
Lumishore UK Unit 3, Technium 1, Kings Road, Swansea, SA1 8PH, UK | +44(0)208 144 1694 | Info@Lumishore.com
Lumishore USA 7137 24TH Court East Sarasota, Florida 34234 |(941) 405-3302 | Sales@LumishoreUSA.com 7
Note: Zones that are o are not
automacally included in the scene
Tick the zone to include it in its “O” state.
Then save the scene.
The new scene will appear on the scenes
home page.
Eding a lighng scene…
To edit a lighng scene, long press (>3sec) the scenes tab from the home page. In the example below zone 5 will be
edited in the scene to turn on in “warm white”.
The updated color and intensity will
display on the tab – press save to
nish.
Change the color and intensity for
this zone, press the back buon when
done.
Press the zone to edit Long press (>3sec) the scene tab

www.Lumishore.com
Lumishore UK Unit 3, Technium 1, Kings Road, Swansea, SA1 8PH, UK | +44(0)208 144 1694 | Info@Lumishore.com
Lumishore USA 7137 24TH Court East Sarasota, Florida 34234 |(941) 405-3302 | Sales@LumishoreUSA.com 8
www.Lumishore.com
Lumishore UK Unit 3, Technium 1, Kings Road, Swansea, SA1 8PH, UK | +44(0)208 144 1694 | Info@Lumishore.com
Lumishore USA 7137 24TH Court East Sarasota, Florida 34234 |(941) 405-3302 | Sales@LumishoreUSA.com
Password Protect (Oponal)…
Once setup, zones and scenes have been created, they can be password protected to prevent accidental eding or
deleon. Default password is “0000”
There are two levels of password protecon, “Full Lock” and “Paral Lock” as explained below;
Full Lock: This disables the zone edit / zone create / scene edit scene create features.
Paral Lock: This will disable the zone edit / zone create features but will sll allow the user to create or edit
lighng scenes.
Set Password: change the default password “0000” to a custom 4 digit number.
Choose “Preferences“
Select “Lock/Unlock”
Enter password
Choose “Full Lock”, “Paral Lock”
or “Set Password”

Backup & Restore...
The system backup and restore feature allows you to make a copy of the current zone or scene conguraon to
return to at a later me. All zone or scene changes made aer this can be reverted back to the backup conguraon.
The backup can also be exported to a smart device or laptop as an o site copy or downloaded to another Command
Center to make a replica of the conguraon. This feature is useful for boat builders who wish to make mulple
copies of the same boat model.
To create a local backup or restore from backup go to the preferences menu, enter the password and then choose
System Maintenance…
To export or import this backup on a smart device or laptop rst follow the instrucons Control from Smart Device or
Web Browser to connect your device to the Command Center via Wi-Fi.
Using the connected device navigate to the backup menu and select “Export Backup”
www.Lumishore.com
Lumishore UK Unit 3, Technium 1, Kings Road, Swansea, SA1 8PH, UK | +44(0)208 144 1694 | Info@Lumishore.com
Lumishore USA 7137 24TH Court East Sarasota, Florida 34234 |(941) 405-3302 | Sales@LumishoreUSA.com
www.Lumishore.com
Lumishore UK Unit 3, Technium 1, Kings Road, Swansea, SA1 8PH, UK | +44(0)208 144 1694 | Info@Lumishore.com
Lumishore USA 7137 24TH Court East Sarasota, Florida 34234 |(941) 405-3302 | Sales@LumishoreUSA.com 9
Select “System Maintenance” Select “Backup / Restore” Select “Backup”
Select “Create” to save a local copy
Select “Create Backup”
Note : To Restore from local
Backup follow these steps but
select “Restore“ followed by
“Restore Backup“.
This will save a le called “Backup.rpp” this le can be renamed and stored in a folder for future use or transferred to
another Command Center.
To import a backup from an external device, “Restore“ followed by “Import Backup“ followed by “Restore Backup“
Note: If transferring to another Lumi-Link Command Center the backup feature copies the zone and scene
informaon only. As every light has a unique ID, a system discovery would sll be required with lights allocated to
the zones.

www.Lumishore.com
Lumishore UK Unit 3, Technium 1, Kings Road, Swansea, SA1 8PH, UK | +44(0)208 144 1694 | Info@Lumishore.com
Lumishore USA 7137 24TH Court East Sarasota, Florida 34234 |(941) 405-3302 | Sales@LumishoreUSA.com
10
Control from Smart Device or Web Browser…
Ensure your smart device is connected to the same network as the Lumi-Link Command Centre. Depending on
installaon this may be the vessels on-board Wi-Fi, the MFD Wi-Fi or the Lumishore Lumi-Link Display Wi-Fi. The
following example shows the Lumi-Link Command Center connected to the MFD Wi-Fi.
Ensure the MFD Wi-Fi is switched on and the smart device or laptop is connected to it.
Using the MFD – launch the Lumi-Link app
Note - from me to me the MFD or network router may change the IP address automacally. If the Lumi-Link app
does not display, ensure you are connected to the correct Wi-Fi network and that you have entered the correct IP
address.
www.Lumishore.com
Lumishore UK Unit 3, Technium 1, Kings Road, Swansea, SA1 8PH, UK | +44(0)208 144 1694 | Info@Lumishore.com
Lumishore USA 7137 24TH Court East Sarasota, Florida 34234 |(941) 405-3302 | Sales@LumishoreUSA.com
Make a note of the IP address
Note: it may be dierent to the
example below.
Type the IP address into the browser
on the smart device or laptop.
You can now control the lights
remotely using the Lumi-Link app.
Select “Setup” icon Select “About”

www.Lumishore.com
Lumishore UK Unit 3, Technium 1, Kings Road, Swansea, SA1 8PH, UK | +44(0)208 144 1694 | Info@Lumishore.com
Lumishore USA 7137 24TH Court East Sarasota, Florida 34234 |(941) 405-3302 | Sales@LumishoreUSA.com
www.Lumishore.com
Lumishore UK Unit 3, Technium 1, Kings Road, Swansea, SA1 8PH, UK | +44(0)208 144 1694 | Info@Lumishore.com
Lumishore USA 7137 24TH Court East Sarasota, Florida 34234 |(941) 405-3302 | Sales@LumishoreUSA.com
11
Update via SD card…
WARNING – Lumi-Link Command Center rmware updates via SD card will erase ALL user sengs and setup
informaon. The system setup procedure described at the start of this manual will be required aer the rmware
update. All zones and scenes will need to be recreated or restored from backup.
To update the system without errasing the system sengs please refer to “Update OVER THE AIR (OTA)”
Check that the latest rmware is installed on the Lumi-Link Command Center.
To nd the server and controller rmware version on the Lumi-Link Command Center follow the steps below…
Contact Lumishore for the latest SD card.
NOTE: Do not remove or replace SD card with power connected. Disconnect power before removing the SD card
from the Lumi-Link Command Center.
With power disconnected, unscrew the SD card cover then use long nose pliers to remove the SD card. Replace with
the new card and ensure the waterproof cap is put back in place. Please note orientaon of SD when reinstalling.
Gold contact should be poinng upwards when inserng into SD slot.
Re connect power and the rmware update is complete.
Select “Setup” icon Select “About”
Select “Setup“ icon Select “About“
Make a note of the Controller FW
Version number and the Server FW
Version number Contacts up

www.Lumishore.com
Lumishore UK Unit 3, Technium 1, Kings Road, Swansea, SA1 8PH, UK | +44(0)208 144 1694 | Info@Lumishore.com
Lumishore USA 7137 24TH Court East Sarasota, Florida 34234 |(941) 405-3302 | Sales@LumishoreUSA.com 12
Update OVER THE AIR (OTA)...
The OTA feature allows the system to update using a connected laptop or PC. The system can be updated without the
loss of sengs and user data. Note: Lumishore recommends using a laptop or PC for this feature with power saving
features and screen saver turned o.
To update the rmware using a laptop or PC, rst contact Lumishore for the latest rmware and save this le to the
desktop.
Next, follow the instrucons Control from Smart Device or Web Browser to connect your device to the Lumi-Link
Command Center via Wi-Fi.
Using the connected device navigate to the “System Maintenance” menu and select “Firmware Update”
www.Lumishore.com
Lumishore UK Unit 3, Technium 1, Kings Road, Swansea, SA1 8PH, UK | +44(0)208 144 1694 | Info@Lumishore.com
Lumishore USA 7137 24TH Court East Sarasota, Florida 34234 |(941) 405-3302 | Sales@LumishoreUSA.com

www.Lumishore.com
Lumishore UK Unit 3, Technium 1, Kings Road, Swansea, SA1 8PH, UK | +44(0)208 144 1694 | Info@Lumishore.com
Lumishore USA 7137 24TH Court East Sarasota, Florida 34234 |(941) 405-3302 | Sales@LumishoreUSA.com
www.Lumishore.com
Lumishore UK Unit 3, Technium 1, Kings Road, Swansea, SA1 8PH, UK | +44(0)208 144 1694 | Info@Lumishore.com
Lumishore USA 7137 24TH Court East Sarasota, Florida 34234 |(941) 405-3302 | Sales@LumishoreUSA.com 13
Next select “Upload Firmware” and then choose the saved le from your desktop.
Select “Upload” (the upload process can take 40-60 minutes), please ensure the PC or laptop and Lumi-Link
Command Center are le uninterrupted during this me.
Once the le has uploaded you can choose to install now or install at a later me. Select install now to complete the
rmware update. (the process can take 30-50 minutes), please ensure the PC or laptop and Lumi-Link Command
Center are le uninterrupted during this me.
Other manuals for LUMI-LINK COMMAND CENTER
1
This manual suits for next models
1
Other lumishore Marine Equipment manuals