Español
Instalación unipolar
Atenuador halógeno/ incandescente con receptor infrarrojo
MIR-600 120 V 60 Hz 600 W
Control remoto universal Maestro IRTM Lutron
MIR-600UR 3 V 150 mA
Instalaciones con varios componentes
Cuando se instala más de un control en la misma caja de pared, puede ser necesario retirar todas las
secciones laterales internas antes de cablear (ver más abajo). Utilizando pinzas, doble las secciones laterales
hacia arriba y hacia abajo hasta que se quiebren. Repita para cada sección lateral que se desee retirar. La
remoción de las secciones laterales del atenuador reduce la capacidad de carga máxima. Consulte el
diagrama de capacidad de los atenuadores, más abajo.
Quiebre de las
secciones
laterales
Tabla de reducción de la potencia nominal de los atenuadores
A cada control se
le ha quitado la
sección interior.
Al control del medio se le
han quitado las secciones
laterales de ambos lados.
No retire las
secciones
exteriores.
Notas importantes:
Por favor lea antes de instalar.
1. Precaución: Para evitar el recalentamiento y posibles daños a otros equipos, no utilice para controlar
receptáculos, instalaciones de iluminación fluorescente o electrodomésticos a motor o transformador.
2. La instalación se debe realizar de acuerdo con todas las reglamentaciones de los códigos eléctricos
nacionales y locales.
3. Cuando dentro de la caja de pared no hay “medios de conexión a tierra” el artículo 404.9 de
NEC®2008 permite la instalación de un atenuador sin conexión a tierra como reemplazo, siempre y
cuando se utilice una placa de pared plástica e incombustible. Para efectuar este tipo de instalación, tape
o retire el cable verde de conexión a tierra del atenuador y use una placa de pared adecuada como las
de la serie ClaroTM de Lutron.
4. No pinte los atenuadores.
5. No lo utilice si la carga total de las lámparas está por debajo de los 60 W o si supera los 600 W (consulte
la tabla de reducción del atenuador para obtener más detalles).
6. Es posible que el atenuador no funcione con lámparas de diodos (SylvaniaTM Designer 16 o Philips®PAR-16).
7. Mantenga a una temperatura de entre 0 °C (32 °F) y 40 °C (104 °F).
8. Es posible que el atenuador esté caliente al tacto durante el funcionamiento normal.
9. La profundidad de caja recomendada es de 64 mm (2,5 pulgadas) mínimo.
10. Limpie el atenuador con un
paño suave húmedo solamente
. No utilice productos químicos de limpieza.
Sin laterales
Extraídos
Modelo
MIR-600
Carga
Un lateral
Extraído
Dos laterales
Extraídos
IRTM
Garantía Limitada
(Válido solamente en los E.U.A., Canadá, Puerto Rico, y el Caribe.)
Lutron, a discreción propia, reparará o reemplazará las unidades con fallas en sus materiales o fabricación dentro del
año posterior a la compra de las mismas. Para obtener el servicio de garantía, remita la unidad al lugar donde la
adquirió o envíela a Lutron, 7200 Suter Rd., Coopersburg, PA 18036-1299, con servicio postal prepago.
ESTA GARANTÍA REEMPLAZA A TODA OTRA GARANTÍA EXPRESA Y LA GARANTÍA IMPLÍCITA DE
COMERCIABILIDAD ESTÁ LIMITADA A UN AÑO DESDE LA FECHA DE COMPRA. ESTA GARANTÍA NO CUBRE
EL COSTO DE INSTALACIÓN, DE REMOCIÓN NI DE REINSTALACIÓN, NI LOS DAÑOS PROVOCADOS POR USO
INCORRECTO O ABUSO NI LOS DAÑOS RESULTANTES DE UN CABLEADO O UNA INSTALACIÓN
INCORRECTOS. ESTA GARANTÍA NO CUBRE DAÑOS INCIDENTALES O INDIRECTOS. LA RESPONSABILIDAD
DE LUTRON ANTE UNA DEMANDA POR DAÑOS CAUSADOS POR O RELACIONADOS CON LA FABRICACIÓN,
VENTA, INSTALACIÓN, ENTREGA O USO DE LA UNIDAD NO EXCEDERÁ EN NINGÚN CASO EL PRECIO DE
COMPRA DE LA UNIDAD.
La presente garantía le otorga derechos legales específicos y usted puede tener otros derechos que varían
según el estado. Algunos estados no admiten la exclusión o limitación de los daños incidentales o indirectos, ni
las limitaciones en la duración de las garantías implícitas, de modo que las limitaciones anteriores pueden no
ser aplicables en su caso.
Este producto está cubierto por una o más de las siguientes patentes de E.U.A.: 5,248,919; 5,399,940;
5,637,930; 5,909,087; 6,169,377; 6,300,727; 6,380,696; 7,142,932; 7,190,125; 7,365,282; 7,546,473 y las
correspondientes patentes en el extranjero. Patentes de E.U.A. e internacionales en trámite. Lutron y Maestro
son marcas registradas y FASS, Maestro IR, y Claro es una marca comercial de Lutron Electronics Co., Inc. NEC
es una marca comercial registrada de National Fire Protection Association, Quincy, Massachusetts. Sylvania es
una marca comercial de Osram Sylvania, Inc. PHILIPS es una marca comercial registrada de KONINKLIJKE
PHILIPS ELECTRONICS N.V. © 2009 Lutron Electronics Co., Inc.
Asistencia Técnica
Para consultas acerca de la instalación o funcionamiento de este producto, llame a Lutron.
Por favor provea el número de modelo exacto cuando llame.
E.U.A. y Canadá (24 horas/7 días a la semana)
1.800.523.9466
México
+1.888.235.2910
Otros países 8am – 8pm (Hora del Este)
+1.610.282.3800
Fax +1.610.282.6311
http://www.lutron.com
Instalación
11
Remover la placa y el interruptor
• Retire la placa y los tornillos de montaje del interruptor.
• Retire el interruptor de la pared con cuidado (no saque los cables).
22
Apagado
•Desconecte la alimentación en el cortacircuito (o quite el fusible).
Desconexión de los cables del interruptor
33
Bornes de tornillo:
Afloje el tornillo.
Bornes a presión:
Introduzca el destornillador y
extraiga el cable.
Nota importante:
Su interruptor de pared puede tener dos cables conectados al mismo borne de tornillo
(vea los ejemplos ilustrados abajo). Una ambos cables con cinta adhesiva antes de
desconectarlos.
Un cable en
el orificio de
cableado posterior
y uno al tornillo.
Un cable
continuo al
tornillo.
Cable atado:
Afloje el tornillo.
Remoción de la placa de pared
• El atenuador viene con una placa de pared
Lutron Claro
preinstalada. Retire la placa de
pared antes de comenzar la instalación, de manera que los orificios para montaje
queden expuestos.
44
Cuando se hagan las conexiones de los cables, la sección sin aislamiento debe respetar las
combinaciones y longitudes recomendadas para el conector de cable provisto. Nota: Todos los
conectores de cable ya provistos son para
cable de cobre solamente.
Para cable de aluminio,
consulte a un electricista.
Conector de cable:
Úselo para unir el cable de descarga a tierra 1,5 mm2(14 AWG) o 2,5 mm2(12 AWG) al cable a
tierra 0,75 mm2(18 AWG) del atenuador. Recorte o pele los cables de la caja de empotrar hasta la
medida indicada en el reverso del atenuador.
Bornes a presión: Inserte los cables completamente. Las terminales a presión sólo se utilizan con
cables de cobre sólido 1,5 mm2 (14 AWG)
.
NO utilice cable retorcido ni trenzado.
Bornes de tornillo: Ajuste los tornillos de forma segura. Las terminales de tornillo deben usarse
solamente con
cable de cobre sólido
2,5 mm2(12 AWG) o 1,5 mm2 (14 AWG)
.
NO utilice cable
retorcido ni trenzado.
Encendido
• Conecte la alimentación en el cortacircuito (o coloque de nuevo el fusible).
77
Montaje del atenuador en la caja de pared
• Coloque los cables cuidadosamente en la caja de empotrar, monte y alinee el
atenuador. No ajuste de más los tornillos de montaje.
• Vuelva a colocar la placa de pared
Claro
.
66
Cableado
• Consulte la sección Instalaciones con varios componentes cuando tenga más de un
control en una caja de empotrar.
55
Cableado del atenuador:
• Utilice el conector de cables provisto para conectar el
cable de descarga a tierra verde del atenuador al cable de
descarga a tierra de cobre sin aislamiento, o al cable a
tierra verde de la caja de empotrar. No lo conecte a
ningún otro cable. (Vea la Nota Importante Nº 3.)
• Conecte uno de los cables desconectados del interruptor
extraído a uno de las terminales de tornillo de latón del
atenuador, o insértelo completamente en la terminal a
presión. Si su interruptor tenía dos cables conectados a la
misma terminal de tornillo, conecte ambos cables a la
terminal del atenuador.
• Conecte el cable restante, desconectado del interruptor
extraído, a la otra terminal de tornillo de latón del
atenuador o insértelo completamente en la terminal de
presión.
Tierra
Cable verde
Tornillo
de latón
Vivo
120 V~
60 Hz Neutro
Instalación
de luz
Latón
Latón
Cable verde
Tierra
Caja de pared
Atenuador
Atenuador
Tornillo de latón
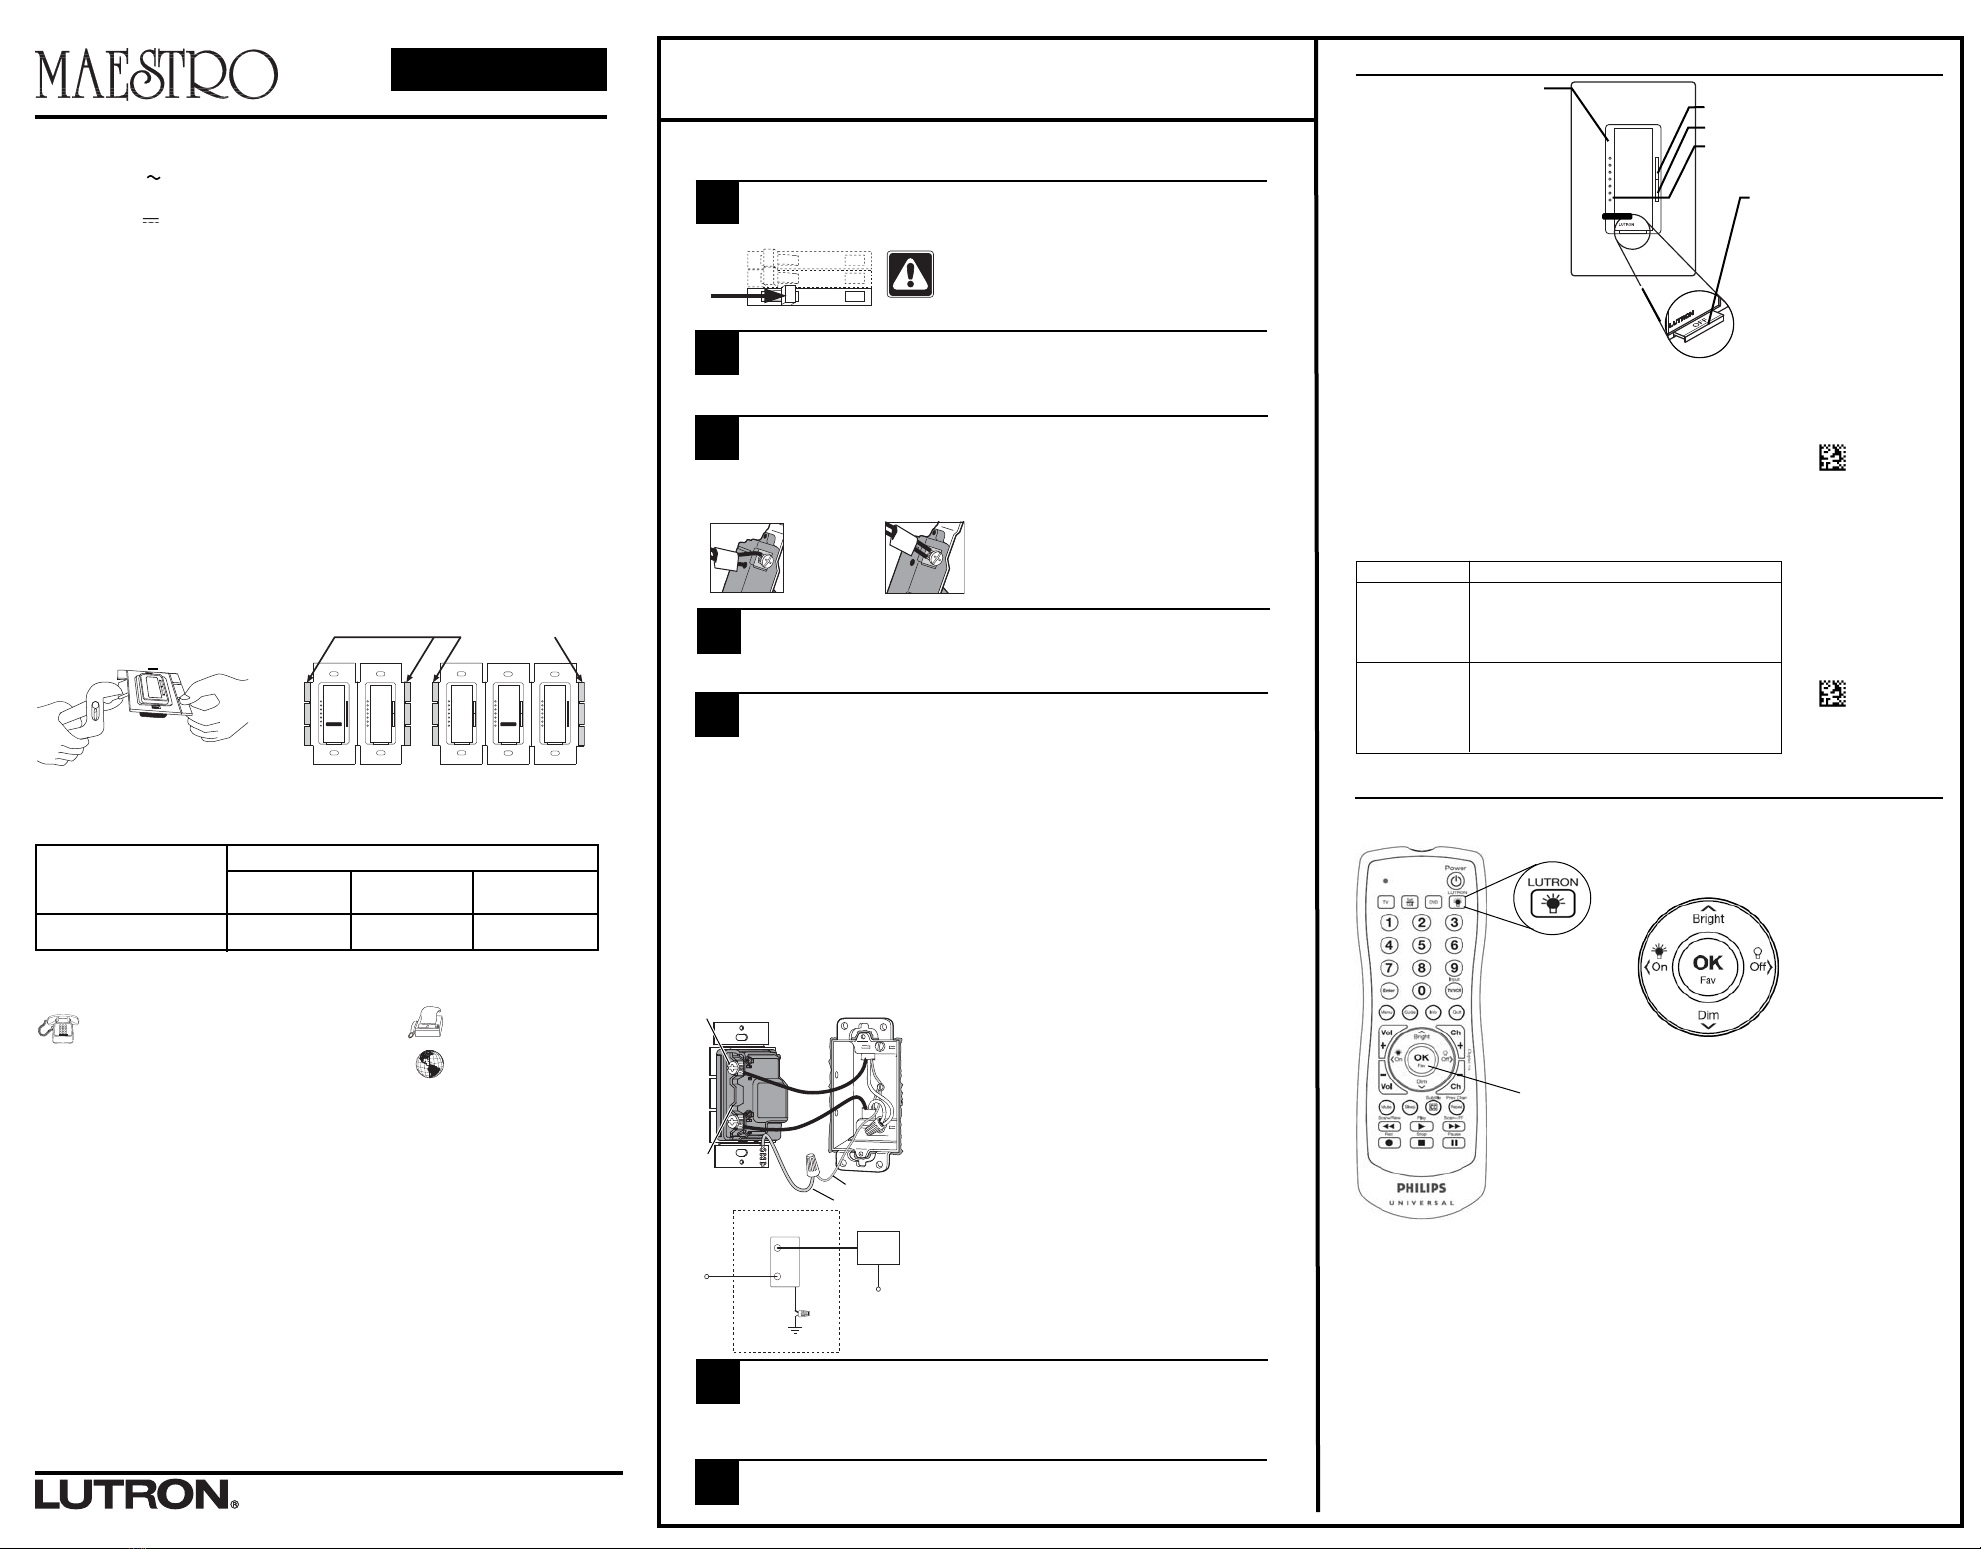
Uso del atenuador
Opciones de botones a presión
•Presione una vez cuando la
unidad se encuentra apagada -
Las luces aumentarán su
intensidad suavemente hasta
alcanzar el nivel prefijado.
•Presione una vez cuando la
unidad esté encendida - Las
luces se irán atenuando hasta
apagarse.
•Presione dos veces rápidamente -
Las luces iluminarán rápidamente
hasta alcanzar la intensidad máxima.
FASSTM - Interruptor de servicio de
acceso frontal
Nota importante:
Para reemplazar lámparas, se puede
desconectar la alimentación
cómodamente sacando el interruptor
FASS
hacia afuera en el atenuador.
Para cualquier otro procedimiento
que no sea el reemplazo rutinario de
lámparas, debe desconectarse la
alimentación en el panel eléctrico
principal.
Control oscilante de atenuación:
Presione para aumentar la intensidad
Presionar para atenuar
Indicadores LED:
Indican el nivel de luz
Nota:
Para obtener más información sobre el uso del control remoto, consulte la hoja de instrucciones
del control remoto universal
Lutron Maestro IR
incluida en este paquete.
Uso del control remoto universal
Apunte el transmisor al atenuador
Maestro IR
, presione la tecla de modo de
Lutron
y luego use
los botones como se indica más abajo.
ON (Encendido):
Presione una vez -
las luces
aumentarán su
intensidad
suavemente hasta
alcanzar el brillo
máximo.
OFF (Apagar):
Presione una vez:
3 segundos de
desvanecimiento hasta
apagar.
Presione y sostenga:
10–60 segundos de
retardo para desvanecer
hasta apagar.
Dim (Atenuar):
Presionar para
atenuar las luces.
Bright (Iluminar):
Presione para aumentar
la intensidad de las luces.
Botón Fav:
Presione una vez para activar su nivel de iluminación favorito.
Para almacenar su nivel favorito, fije la luz en el nivel deseado,
y luego oprima y mantenga oprimido durante
aproximadamente 3 segundos hasta que el indicador LED del
atenuador comience a parpadear. (Apagado es un nivel
predeterminado válido).
Aplicación con instalaciones múltiples
Si se instalan múltiples atenuadores
Maestro IR
en el mismo lugar, se comportarán como
se describe:
• Al oprimir el botón de encendido, todos los atenuadores alcanzarán la intensidad máxima,
independientemente de que algunos estén encendidos y otros apagados.
• Presionar el botón de apagado hará que todos los atenuadores se desvanezcan hasta apagarse.
• Si presiona los botones Aumentar o Atenuar, cambiará el nivel de iluminación de todos los
atenuadores al mismo ritmo hasta que suelte el botón o las luces alcancen el nivel mínimo o
máximo. Si un atenuador está apagado cuando presiona el botón Aumentar, el atenuador
encenderá al nivel de intensidad mínimo.
• Para guardar su nivel de luz favorito, ajuste todos los atenuadores al nivel deseado y, luego,
oprima y sostenga el botón Fav durante unos 3 segundos hasta que el indicador LED del
atenuador comience a parpadear. Una vez ajustado su nivel de luz favorito, presione el botón
Fav para que todos los atenuadores retornen a su nivel favorito de luz.
030-1102 030-1102
Centro de Soporte Técnico de Lutron
+1.888.235.2910 24 horas/7 días www.lutron.com