Macvision MA823T User manual

MA823T OPERATION MANUAL

THIS DEVICE COMPLIESWITH PART15 OF THEFCC RULES. OPERATION IS
SUBJECT TOTHE FOLLOWING TWOCONDITIONS : ( 1) THIS DEVICESMAY NOT
CAUSE HARMFUL INTERFERENCE, AND (2) THIS DEVICEMUST ACCEPTANY
INTERFERENCE, RECEIVED, INCLUDINGINTERFERENCE THAT MAY CAUSE
UNDESIRED OPERATION.
Note: This equipment hasbeen tested andfound to comply with the limits for a Class
B digital device,pursuant to part15 of theFCC Rules.These limitsare designed to
provide reasonable protection against harmful interference in a residential installation.
This equipment generates,uses and canradiate radio frequency energy and, if not
Installed and usedin accordance withthe instructions, may cause harmful interference
to radio ommunications.However, thereis no guaranteethat interference will not
occur in aparticular installation. If this equipment doescause harmful interference
to radio ortelevision reception, whichan be determined by turning the equipment
off and on,the user isencouraged to tryto correct theinterference by oneor more
of the followingmeasures:
-Reorient or relocatethe receiving antenna.
-Increase the separationbetween the equipment and receiver.
-Connect the equipmentinto an outleton a circuitdifferent from thatto which the
receiver is connected.
-Consult the dealeror an experiencedradio/TV technician for help.
NOTE: THEMANUFACTURER ISNOT RESPONSIBLEFORANY RADIO ORTV
INTERFERENCE CAUSED BYUNAUTHORIZED MODIFICATIONSTO THIS
EQUIPMENT.SUCH MODIFICATIONSCOULD VOID THEUSER'S AUTHORITY
TO OPERATE THE EQUIPMENT.
FCC Certification

Table of Contents
1. Function summary 1
Display synchronized lyrics(Karaoke function) 10
Sound effect mode 9
Simple operation 9
6. Play music 8
5. Operation 6
Press PLAY 5
Key lock function 5
Adjust volume 5
Start up/shutdown 3
Use different functionmodes 4
Browse Tracks 3
Enter a menu 3
4. Basic functions 3
Display screen 3
3. Getting toknow the player 2
2. Announcement 2
Appearance andkeystroke 2
Music mode ,Play mode 6
Record mode 7
FM mode 7
Add anddelete files 8

Choose record type 11
Record mode 11
7. Voicerecorder 10
16. Definition 25
15. Important recommendation 24
Replay separation (playsubmenu) 23
Replay times (playsubmenu) 23
Replay mode (playsubmenu) 22
Temporate (play submenu) 21
Play mode (playsubmenu) 21
17. Troubleshooting 26
18. Technical specifications 27
9. Transferrecorded file ofACT intoWAVon your PC 12
8. Play recordedfiles 12
11. SystemSetup 14
Choose different directories(stop submemu) 20
14. Miscellaneous settings 20
13. Upgrade player 19
New folder 18
12. Use USBdisk 18
Detailed operating instructions 15
Brief introduction toevery options 14
How to enter 14
10. How touse FM 13

1
Digital Audio formats
MP1, MP2, MP3,WMA, WMV, ASF, WAV (Easy to work with Windows Media Player).
1. Function summary
Firmware upgrades (Check periodically)
www.macvision.com willprovide the latestsoftware upgrades and functions.
Function of free-drive U disk
Manipulate files viathe "mobile disk"in "My PC" without any additional programs on
your PC(drive programneeds to be installed for operatingsystems prior toWIN2000).
"Dream-space" disk mode
Enables you toseparate the storagedisk via the "mobile disk" in "My PC" into two
disks using theutilities included onthe accompanying CDand encrypt oneof those
disks to hidethe disk space.This encrypted spacecan then notbe read byothers.
Record/Replay
Record your voicewith the microphoneand save asWAVor ACT. You can then choose
to replay thatall such recordingsor to replayselected recordings.
Seven tone equalizer
Can be setto Natural, rock,pop, classical, soft,jazz or heavybass.
various play modes
Can be setto Natural, cyclesingle song, play directories, cycle directories,cycle all,
shuffle or browse.
Shutdown timer
Sleep mode andpower-save mode tosimplify and extendbattery use.
Full-cartoon menu
Graphic menus withcorresponding text display.

2
USB connection
Quick connection toUSB port.
2. Announcement
Thanks for purchasingour MP3 player. Before using the unit please read this
manual carefully toobtain the best possible performance from your player and
keep it forfuture reference.
3. Getting to know the player
Appearance and keystroke
Built-in FM radio
Youmay easily listen to FM stations and set your favourite stations by using Auto
Preset or ManualPreset. The playercan save 40(20 for each Band) local stations
at different frequency.
USB Volume+
Volume-
Next
Mode(Push-in)
Prev
Hold
LCD display
Power/Play/
Pause/Stop

3
Start up/shutdown
Start up orshutdown player bypress and hold"PLAY".
Display screen
4. Basic functions
Enter a menu
Menus: Main menu(entered by momentarilyholding Mode keywhen not playing),
Play submenu (enteredby pressing Modekey while playing), and Stop submenu
(entered by pressingMode key whennot playing).
Browse Tracks
Browse forward bysliding Mode key clockwise and backwardby sliding Mode
key anti-clockwise;
Skip track forwardor backward while playing song by sliding and holdingMode
key clockwise oranti-clockwise;
Skip to nexttrack or backto previous track while playing song by sliding and
Mode key clockwiseor anti-clockwise.
Play state Song number
Singer/Name of song
Sound effect mode/Replay mode/Follow and contrast
Play time
Display electric quantity
Cycle mode
Work mode
Aqua Barbie girl.mp3

4
Go into differentmodes from mainmenu by slidingMode key clockwiseor
anti-clockwise then pressingMode key:
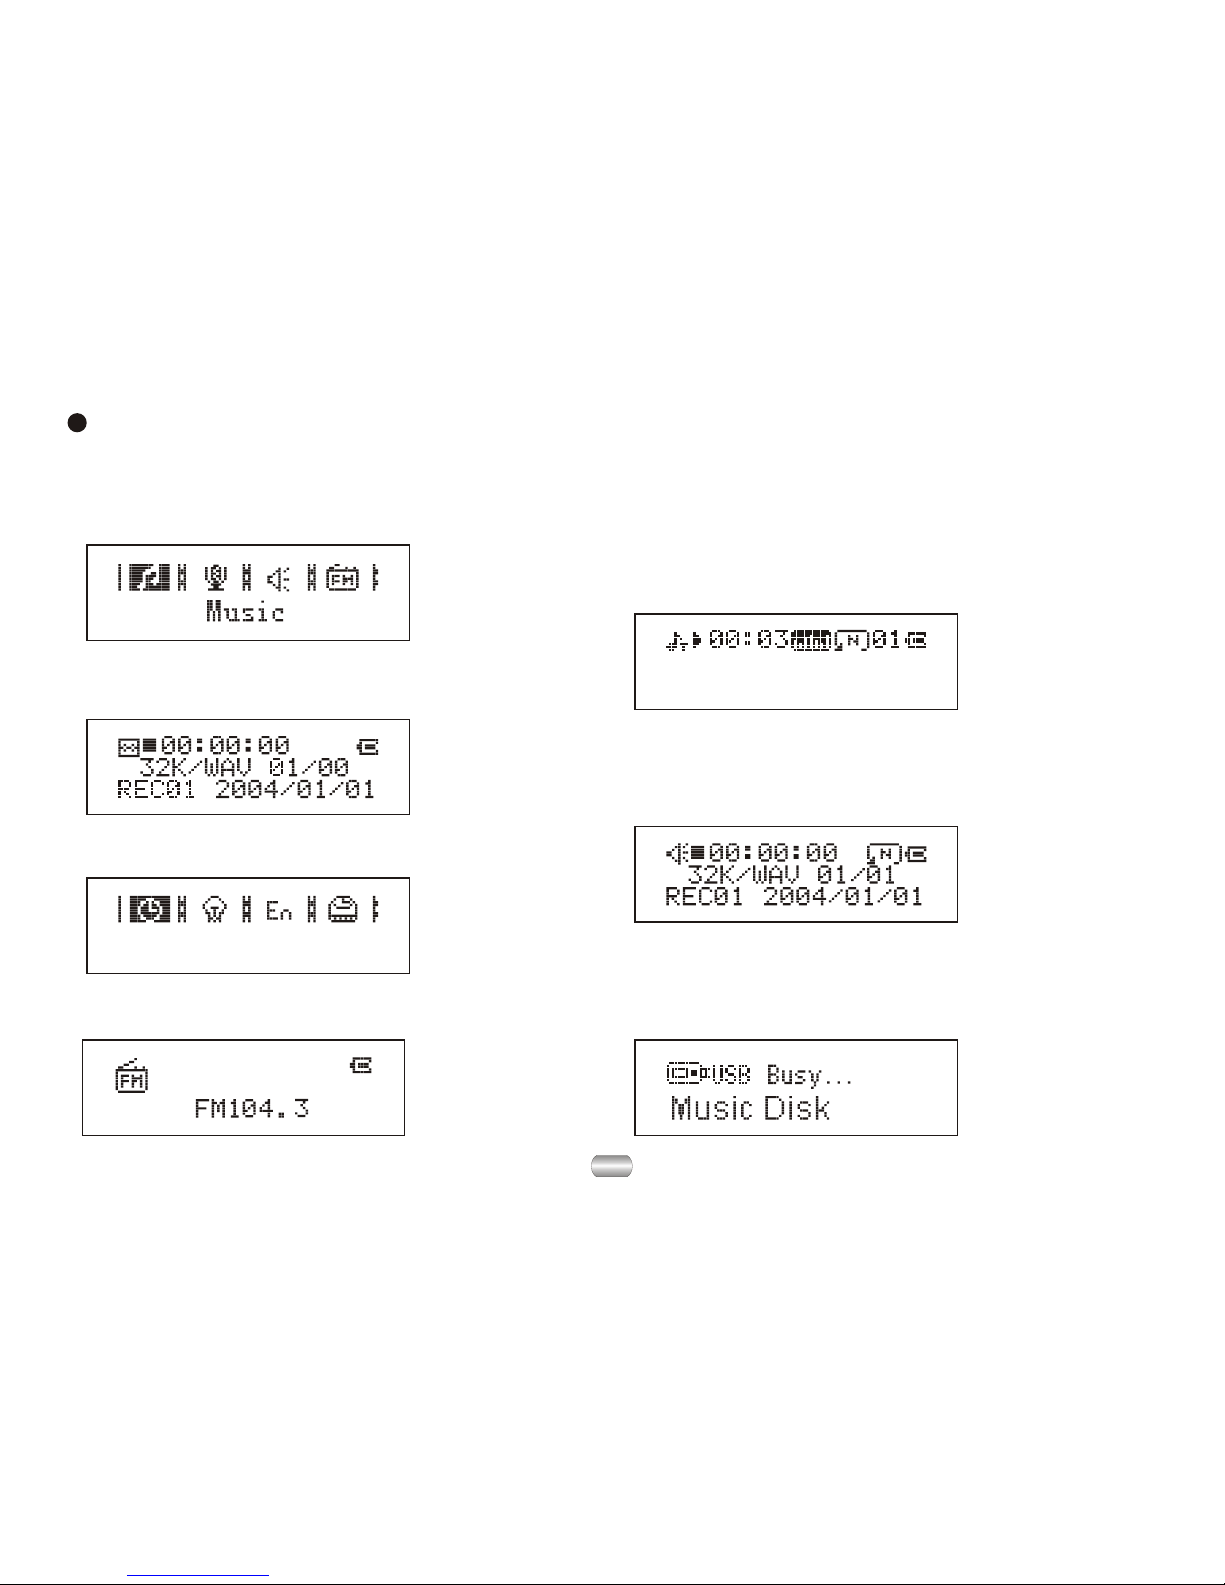
Use different function modes
Select Record mode,display
shows something like this:
Select Play mode, display
shows something like this:
Select System setup,display
shows this:
Record Time
Select Music mode, display
shows something like this:
Aqua Barbie girl.mp3
Enter USB mode by connecting
with PC:
Select FM mode, display
shows something like this:
Main menu:

5
Dial HOLD switchto the positionof lock.
When Hold isON, any operationson buttons willbe displayed as:
Key lock function
Press PLAY
Play or stop(or pause whilerecording); exit fromsubmenu.
Adjust volume
Decrease volume bypressing VOL-; increasevolume by pressingVOL+.
When Hold isON, USB modewill be displayedas:

5. Operation
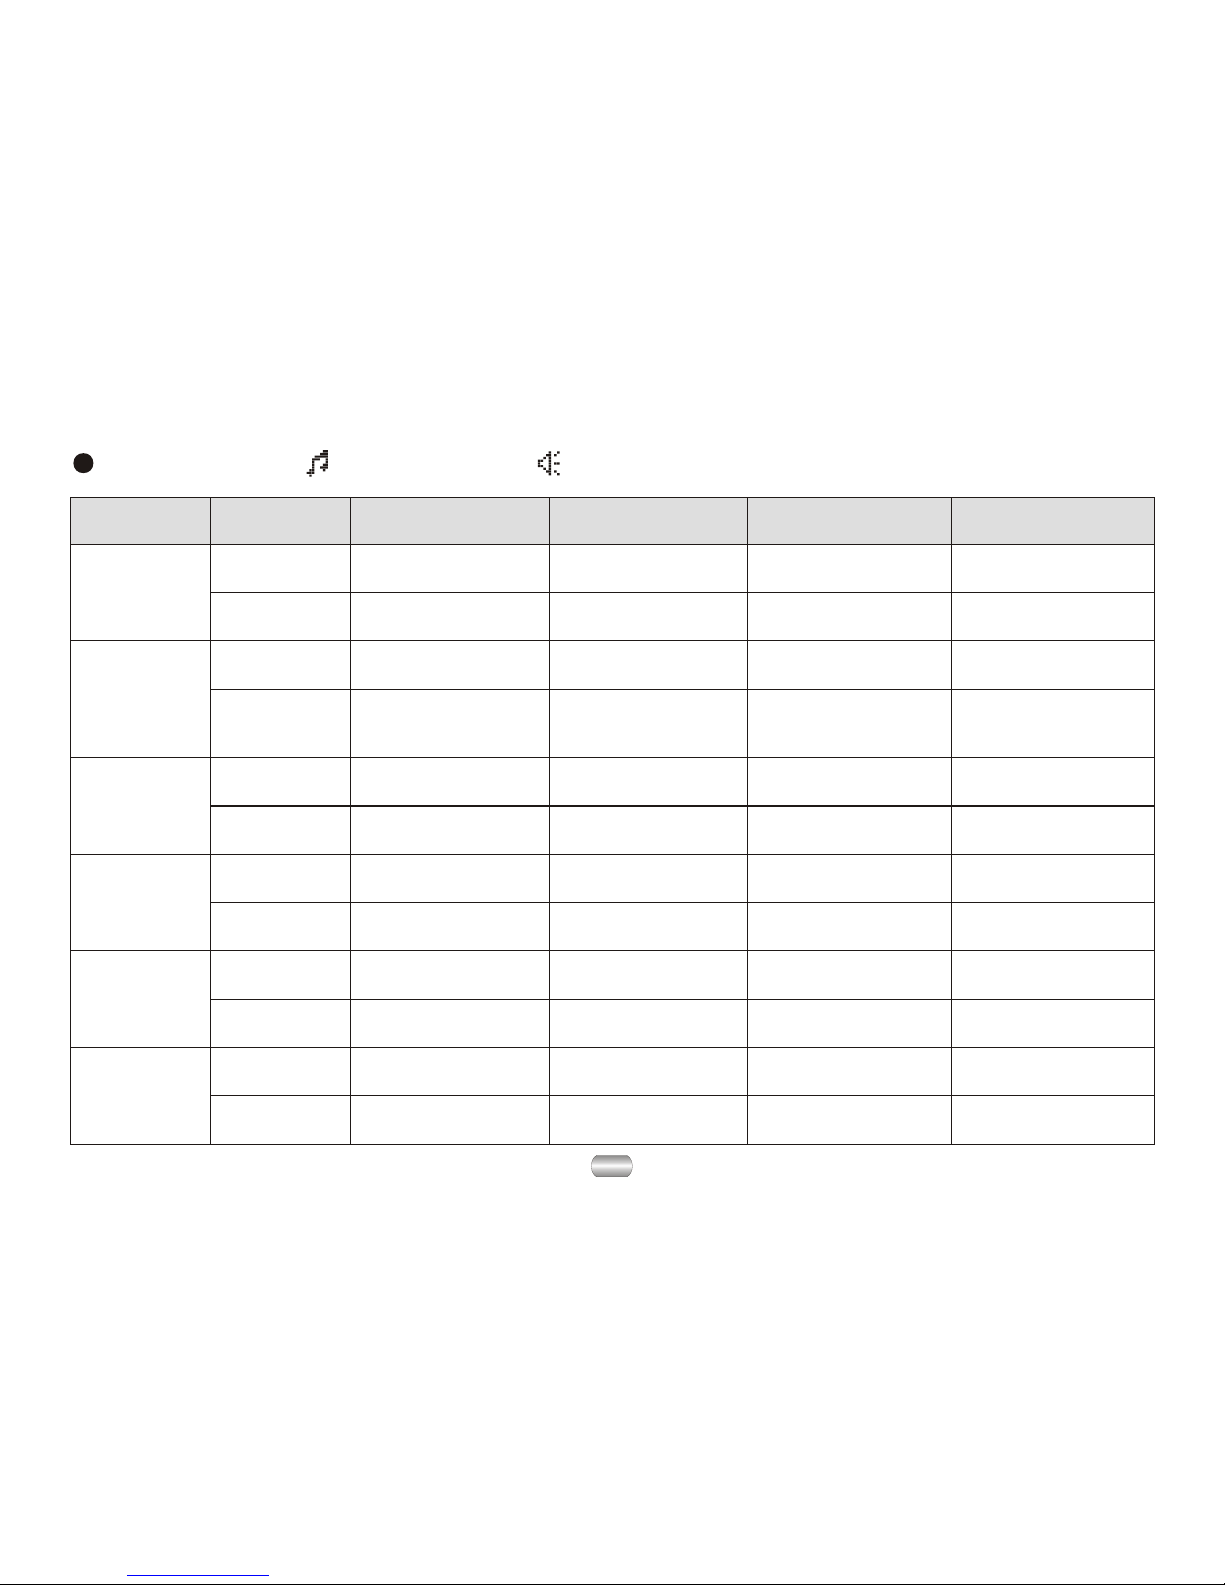
Music mode , Play mode
6
KEY Action Stop state Play state Play submenu Stop submenu
Play
Shutdown ShutdownShutdown Shutdown
Hold
Play Stop Exit from menu Exit menu
Mode
Enter main menu Enter main menu Enter main menuEnter main menu
Enter/stop
submenu
Select option or
enter next level
Enter/play
submenu
Long press
Press
Press
Next
Last
Vol+
Vol-
Dial Next song Next song and
play it Move submenu Move submenu
Browser forward
continuously Skip forward
Press
Last song Last song and
play it Move submenu Move submenu
Browser backward
continuously Skip backward Move backward
continuously
Increase volume
continuously
Decrease volume
continuously
X
X
X
X
X
X
X
X
Decrease volume
continuously
Press
Move forward
continuously
Increase volume
by one step
Hold Move forward
continuously
Dial
Hold Move backward
continuously
Hold
Hold
Increase volume
continuously
Increase volume
by one step
Decrease volume
by one step
Decrease volume
by one step
Select option or
enter next level

FM mode
7
Play
Mode
Record mode
Key Action Stop state Record state
Hold Shutdown Stop record
Press Start to record Pause record
X
Enter main menuHold
X
Enter record submenuPress
Play
Mode
Next
Last
Vol+
Vol- X
X
X
X
Key Action FM status FM submenu
Hold Shutdown Shutdown
Press Channels have beensaved: Next channel
Channels have notbeen saved: X Exit menu
Enter main menuEnter main menu
Enter submenu Confirm current option or enter submenu
Dial
Hold
Increase 100KHz graduallyor stop Move submenu
Increase 100KHz searchcontinuously Move forward continuously
Hold
Decrease volume continuously
Decrease volume byone step
Increase volume continuously
Increase volume byone step
Decrease 100KHz searchcontinuously Move backward continuously
Decrease 100KHz graduallyor stop
Press
Long press
Dial
Hold
Press
Press
Hold
Move submenu

8
Files can bedeleted under theirrespective modes.
Add and Delete files
Delete file in (stop submenu) mode
6). Dial Modeto confirm
and begin deleting.
1). On Stopmode. 2). Press Modeto enter
"stop submenu".
3). Dial Nextor Last tochoose "delete
one" or "deleteall". 4). Press Modeto enter deleteinterface.
5). Dial Nextto
select "YES".
Local folder
Delete file
Aqua Barbie girl.mp3
6. Play music
"Delete all" willdelete all filesof the currentmode under the current directory.
(For example, onlymusic files willbe deleted ifyou choose Delete All under the
music mode).
Toadd and deletemusic file onyour PC orNotebookcomputer to your MP3 player,
simply connect theunit to theUSB port ofyour PC orNotebook computer, click open
the "RemovableDisk" drivethen you canadd or deletefiles.
Before you disconnectthe player,please follow thesesteps or it may result in lost of
files:
1). Double clickthe "Safely RemoveHardwareicon" in thedialog box.
2). Click stopand the nextdialog box appearson the display.
3). Click "OK",then you canunplug the unitsafely.

9
Rock
Natural
Equalizer
Sound effect mode
5). Dial Next tochoose, press Mode to
select.
1). Playing music 2). Enter playsubmenu by
pressing MODE.
3). Dial Next to
choose "Equalizer".
4). Enter "Equalizer"by
pressing MODE.
6). Instruction forall kinds of soundeffect (EQ):
(Heavy bass, DBB)
(Natural effect, Natural)
(Rock effect, Rock)
(POP effect, Pop)
(Classical effect, Classical)
(Soft effect, Soft)
(Jazz effect, Jazz)
Repeat
Aqua Barbie girl.mp3
Simple operation
Attention:
All keyshave no effectif keyboard islocked;
Player will shutdown automatically at set
"Power Off/power- savemode" time.
1). Connect earphoneplugging the pin of
earphone into earphone jack. 2). Please makesure keyboard is unlocked.
3). Start upplayer and enter "Music mode"
by holding PLAY momentarily; pressPLAY
to play music.
5). Control volume
VOL+: increase volume
VOL-: decrease volume
4). Choose music
Last: choose lastsong
Next: choose nextsong
Attention: you must ejectplayer from USB if you delete files on PC, or it will tell
you "the filesare not deleted".

7. Voice recorder
Make sure batteries have enough energy for recording.
Save ninety-nine recorded files in every directory.
Display synchronized lyrics (Karaoke function)
This player supports"LRC" files. (Search online for "LRC lyrics", play song and
lyrics simultaneously.)
10
How to displaythe lyrics:
4). Return tomusic mode
by pressing Mode.
1). Find lyricmatch with song: 2). Press andhold Mode toenter
lyric interface.
3). Display lyrics.
5). Cycle lyricsmanually: Turnlyrics forward orbackward by pressing VOL+ or VOL-
Aqua Barbie girl.mp3
All of your time spent,
Every time we're down.
How to knowwhether a songhas lyrics:
If there isa lyric file matching the song,the icon onthe upper leftcorner of music
mode should changeto " ".
How to uselyric files:
Keep the namesof lyric fileand song thesame.
Such as:
Name of song:Jay-Sky.mp3
Name of lyricfile: Jay-Sky.lrc

11
If "The spaceis full" displays, there is no more space for new files; delete other
files to openmore space.
If "The directoryis full" displays, there are 99 record files in the current directory;
delete files orswitch to anotherdirectory.
Record mode
5). Other operationsuse steps 1through 3.
1). Enter mainmenu. 2). Dial Next tochoose
record mode.
3). Press Modeto enter
record mode. 4). Press Playto start recording.
6). Voicerecordings are savedin the current
directory; set in"stop record/submenu/ directories
of main disk"
REC type
Choose record type
1). Atthe interface of
stop record.
2). 2 Press Mode toenter
record submenu.
3). Dial Next,choose the
submenu "record type":
4). Press Modeto enter theoption:
ROOT
Fine REC
5). Dial Nextto choose recordtype. 6). Press Modeto confirm yourchoice.
7). Press Playto start recording
(VOR can pause recording).
8). Record type:
: high-quality,WAVformat
: long recordingsACT format
: high-quality,sound control, WAV
: long records,sound control,ACT

12
9. Transfer recorded file of ACT into WAV on your PC
8. Play recorded files
6). Control volume:
VOL+: increase volume
VOL-: decrease volume
1). Enter mainmenu. 2). Dial Next tochoose
"Voice mode".
3). Press Mode to
enter Voicemode.
4). Press Playto start playing.
5). Choose recordfile:
Last: choose lastrecord file
Next: choose nextrecord file
Files recorded intothe player in ACT formatcan be changed into WAV format with
the installation program:
1). Run "SoundConverter", click "open"
2). Choose theACT filesyou want to change
3). Click "Transform" to starttransforming to WAV files
Besides transformingACT into WAV, this toolcan also play files of WAV andMP3.

10. How to use FM
1). Enter mainmenu. 2). PushNext to selectFM Mode.
3). Press Modebutton to enterFM Mode. 4). Searchautomatically
Push on Last/Nextfor 2 seconds,the player
search forward orbackward with 100Khzand
stop the searchedchannel. Stop searchingby
pressing Last/Next if youwant to stop it.
5). Minitrim
Push Last: backwardone step with100KHz
Push Next: forwardon step with100KHz
6). Save thefrequency has beensearched:
Press Mode buttonto enter FMsubmenu.
Press Mode button againto
save the channel.
Fine REC
9). FM Innerrecord
Press Mode buttonto enter FMsubmenu
and select RecordMode.
7). Select tune thechannel has been saved
Tune backward with theorder by pressing
Play button if thereare more than onechannel
have been saved.
8). Control Volume:
VOL+: to increasevolume
VOL-: to decreasevolume
Attention: Select "Normal Band"(FM 87 - 108MHz)
and "Japanese Band" (FM76 - 90MHz) tosuit with
different region. (Press Modebutton to enter FM
submenu, Push Next tochoose right band range.)
"STEREO" should show onthe screen if thecurrent
channel is dimensional soundchannel.
13

14
Brief introduction to every option
3). Press Mode toenter "System setup".
1). Enter mainmenu. 2). Dial Next tochoose
"System setup".
Record time Set save timeand date forrecord files
Backlight The number ofseconds the displaylight stays on
Language Set different language
Power Off Set a timerto shut playerdown automatically
Replay mode Set the replayto manual orautomatic
Contrast Adjust the contrastof display screen
Online mode Set the "dreamspace" function
Memory Info View the memoryspace filled (megabytesand percent)
Firmware version Display the versionof installed firmware
Firmware Upgrade Exclusively used forupgrading firmware
Exit Exit the currentinterface
11. System Setup
How to enter
Set system parametershere; every option should change with firmware upgrade.
Record Time

15
Backlight
Set Backlight time
1). Interface forsystem setup. 2). Press Modeto enter therecord time interface.
3). Press VOL+/- toselect number to
change: 4). Dial Next/Last to increase/decrease number:
5). Exit bypressing Mode afterchange.
Detailed operating instruction
Set "Record time"
5). To exit pressMode after change.
1). Interface forsetting system. 2). Dial Next tochoose
"Backlight".
3). Press Modeto enter interface. 4). Dial Next/Lastto adjust time.
Record Time
Record Time

16
Set Language
Language
2). Dial Next toselect "Language".1). Interface forsetting system.
5). To exit pressMode after change.
Set Power off
Power-save mode shutsit down automatically if in the set time no key is
pressed and playeris stopped;
"0" denotes thatthis function has been closed;
"Sleep mode" shutsit down automatically if in the set time no key is pressed
whether player isstopped or playing.Works once afterbeing set.
See "Backlight time",operations are the same, then:
Record Time
3). Press Modeto enter interface.
English
4). Dial Next/Lastto select language.
French
Set Replay
Press Mode toenter interface, Dialto choose:
"Manual mode" denotesthat you seta pause manually;
"AUTO mode" denotesthat it canpause automatically inreplay.
Table of contents
Other Macvision MP3 Player manuals