Madelux Classic Programming manual

DACHNAYA-ECO
SIMPLIFIED VERSION OF GREENHOUSE
DACHNAYA -2 DUM
honeycomb polycarbonate greenhouse
Technical certificate
Assembling manual
p.2-6
p.7-22
ength: 4.04 m; 6.12 m; 8.2 m
width 3.07 m
height 2м
QUALITY
«STANDARD DURABILITY»
design 2013
Система менеджмента качества (СМК)
ООО «Воля» сертифицирована
на соответствие
требованиям
стандарта
ISO 9001:2008
Сертифицировано
Русским Регистром
www.serrashop.it
CLASSIC

3
2
contents dimensions, mm
weight, kg no
more than
1 package - balks, straight elements and manual 70х50х1090 13,5
2 package - arc elements 145х50х1220 11
3 package - straight end elements 85х50х1260 14,0
4 package - fixtures and component parts 180х130х80 3,0
5 package* - sealing profile 350х300 1,5
6 package - “Insert - Eco” 2.08 m frame elongation
190х50х1220 12,5
7 package * - arc reinforcing elements 30х50х1250 2,5
Technical certificate Technical certificate
Continued on page 4
Perform assembling and operation of the greenhouse in strict accordance
with the manual and operating rules stated in the technical certificate.
Please keep this technical certificate for further reference.
Contents of packages
Dachnaya - Eco detailed parts list
marking
name quantity (pcs)
1 package
1stay brace 14
2runner 18
2-к outermost runner 10
2-1к outermost runner 8
3support 18
2 package
4ВК outermost upper arc 4
4НК outermost lower arc 4
4НС connecting lower arc 2
4ВО upper arc 10
4Н lower arc 8
3 package
8end bottom strainer 4
9-1л door opening vertical element 2
9-1п door opening vertical element 2
9-2л door opening vertical element 2
9-2п door opening vertical element 2
9-3 door opening cover plate 4
9-4 door opening cover plate 4
10 door opening horizontal element 4
11-1 end side brace 4
11-2л end side brace 2
11-2п end side brace 2
12фл end small window vertical element 2
12фп end small window vertical element 2
12дл door vertical element 2
12дп door vertical element 2
13м door and end small window horizontal element 10
14м door and end small window diagonal 6
21л end top strainer 2
21п end top strainer 2
long hold-down 8
short hold-down 6
“Dachnaya – Eco” greenhouse is designed for creation of microclimate favorable
for growing garden crops on cottage and household plots. The greenhouse
may have various lengths depending on a wish of a buyer. Required length of
the greenhouse is provided by purchase of packages with extending inserts
in addition to 4 m base length (table 1). Area of covered ground depends on
length of the greenhouse. Height of installed frame is 2 m.
The frame of the greenhouse is made of galvanized iron and is to be assembled
with screws and nuts. Foundation is not required.
Greenhouse is fixed on the ground by digging special frame endings. Complete
set includes all that is needed for fastening of covering. The greenhouse may
be completed with covering on buyer’s request. The greenhouse has two door
openings in opposite ends and each door opening has a door and a small
window.
Table 3
Completing with packages
Greenhouse
lengh
package number
№ 1 № 2 № 3 № 4 № 5*№ 6 № 7*
4 м
+ +
+ + — — In
accordance
with 4.
6 м
+ +
+ + —+
8 м
+ +
+ + —++
Table 1
Description
Table 2
* Packages 5 and 7 are not included in “Dachnaya – Eco” completing and are purchased
on buyer’s request. Information about completing and installation packages 5 and 7
is on p.21-22.

5
4
Technical certificateTechnical certificate
Before use of the greenhouse, assemble
and install it on the ground in accordance
with the manual.
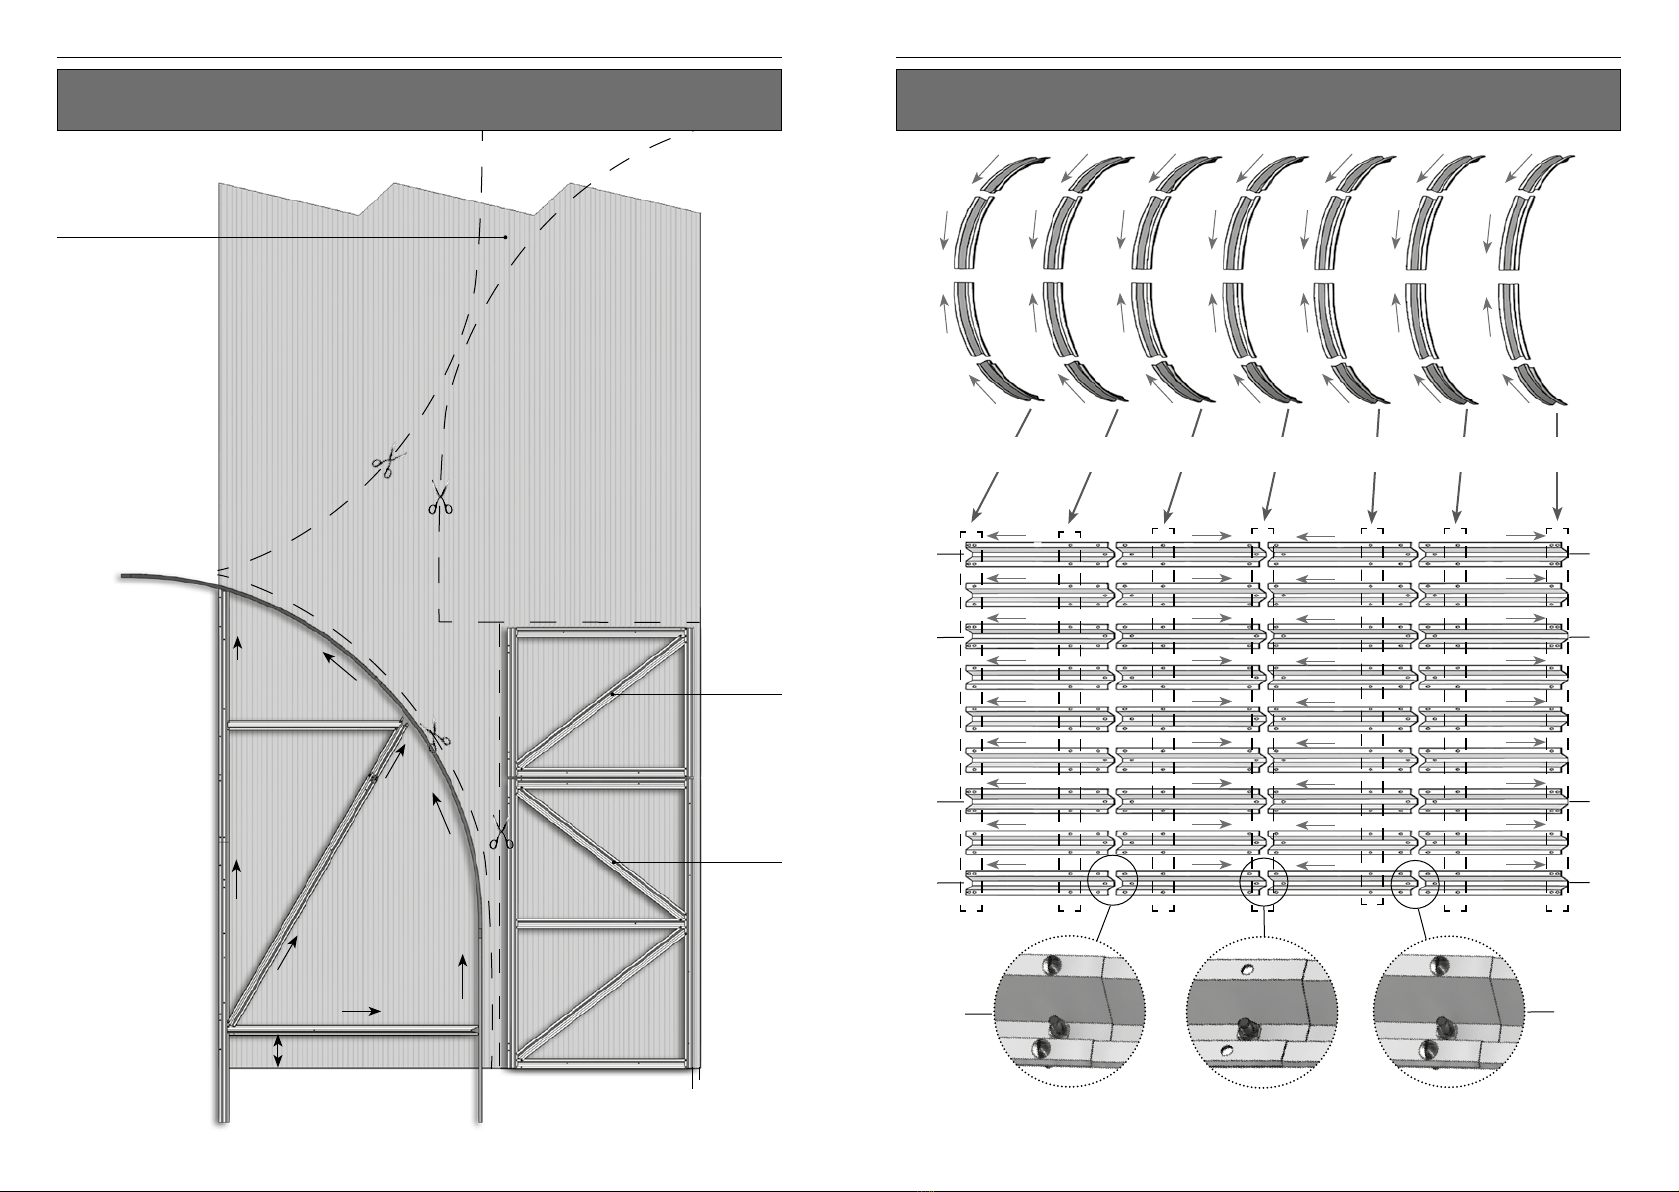
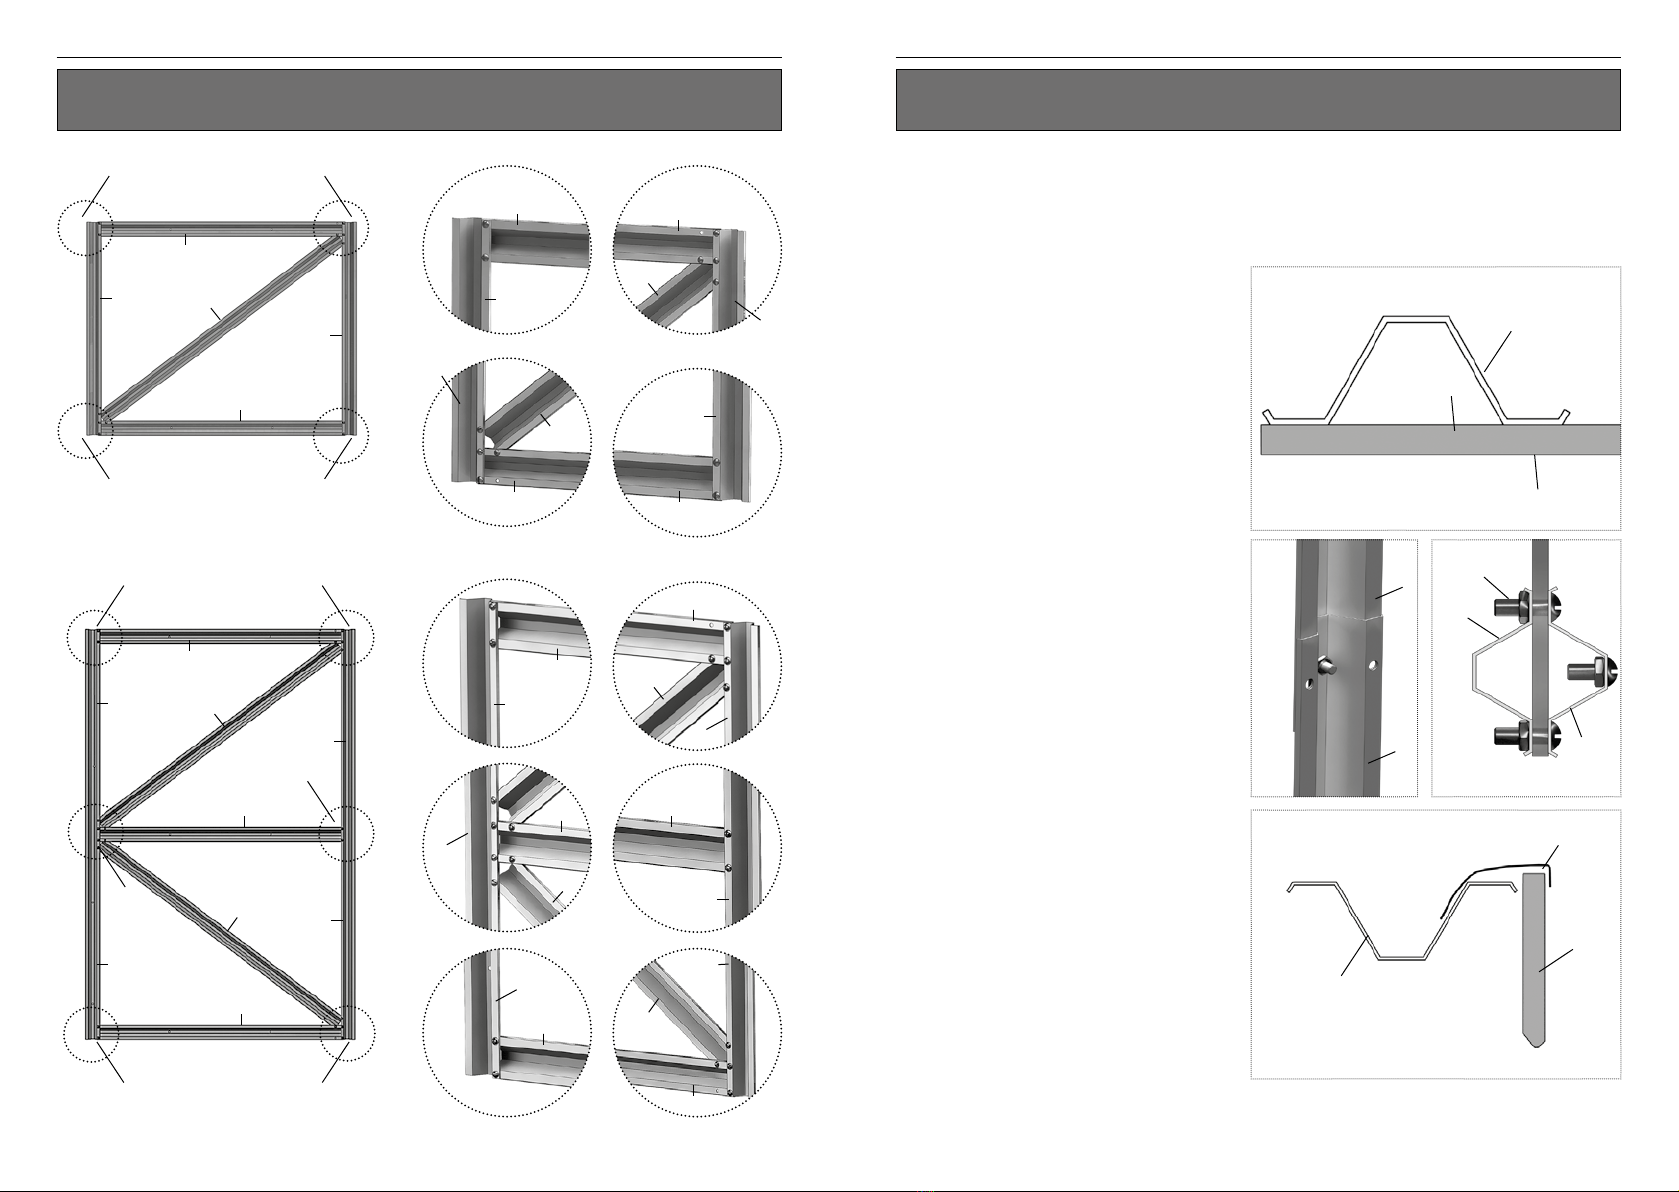
When assembling the frame, connect elements using all provided
bores. “Simplified” connection with one or two screws is considered to
be a violation of the assembly rules and cause for removal warranty by
manufacturer.
When installing the greenhouse
by third parties, a buyer should
supervise compliance of assembling
with the manual.
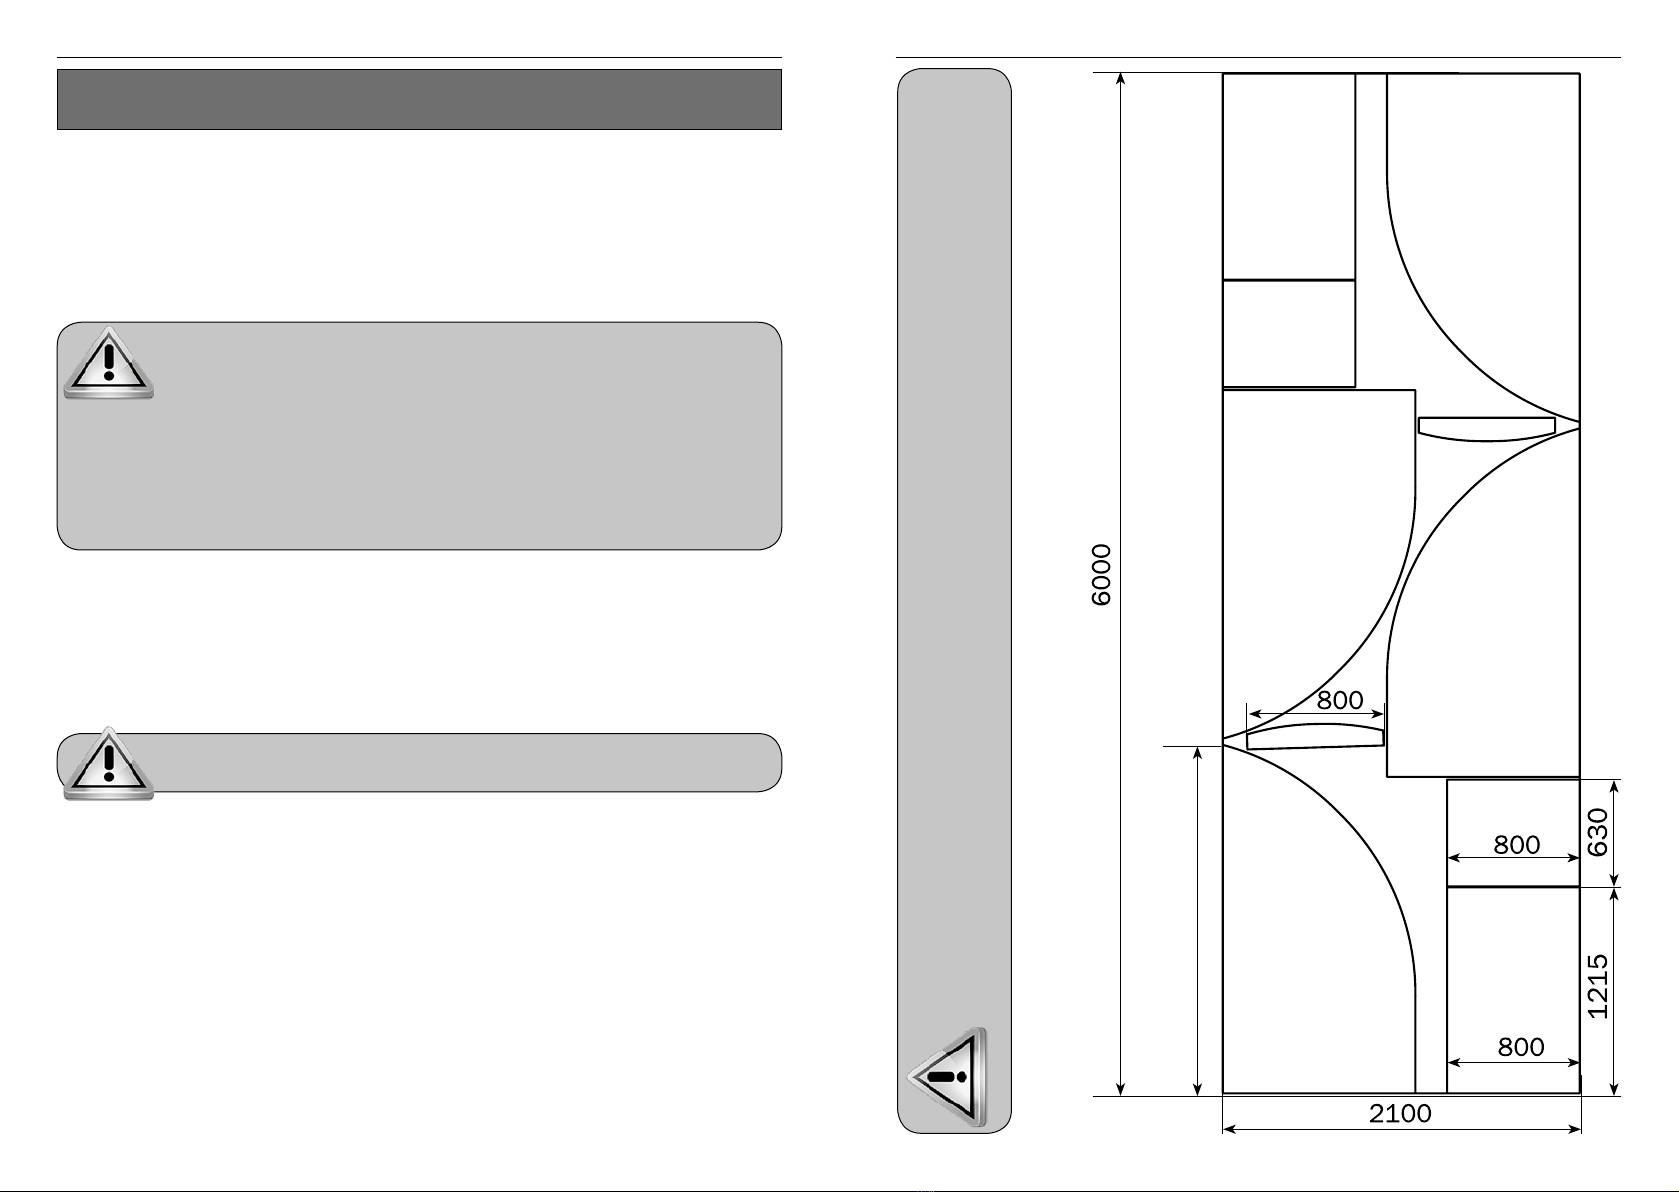
The greenhouse is designed to
withstand wind speed up to 20 m/s.
Depending on a service level of the
greenhouse in winter and a region, a
buyer can select one of the structural
reinforcement levels. Refer to table 2
and table 4.
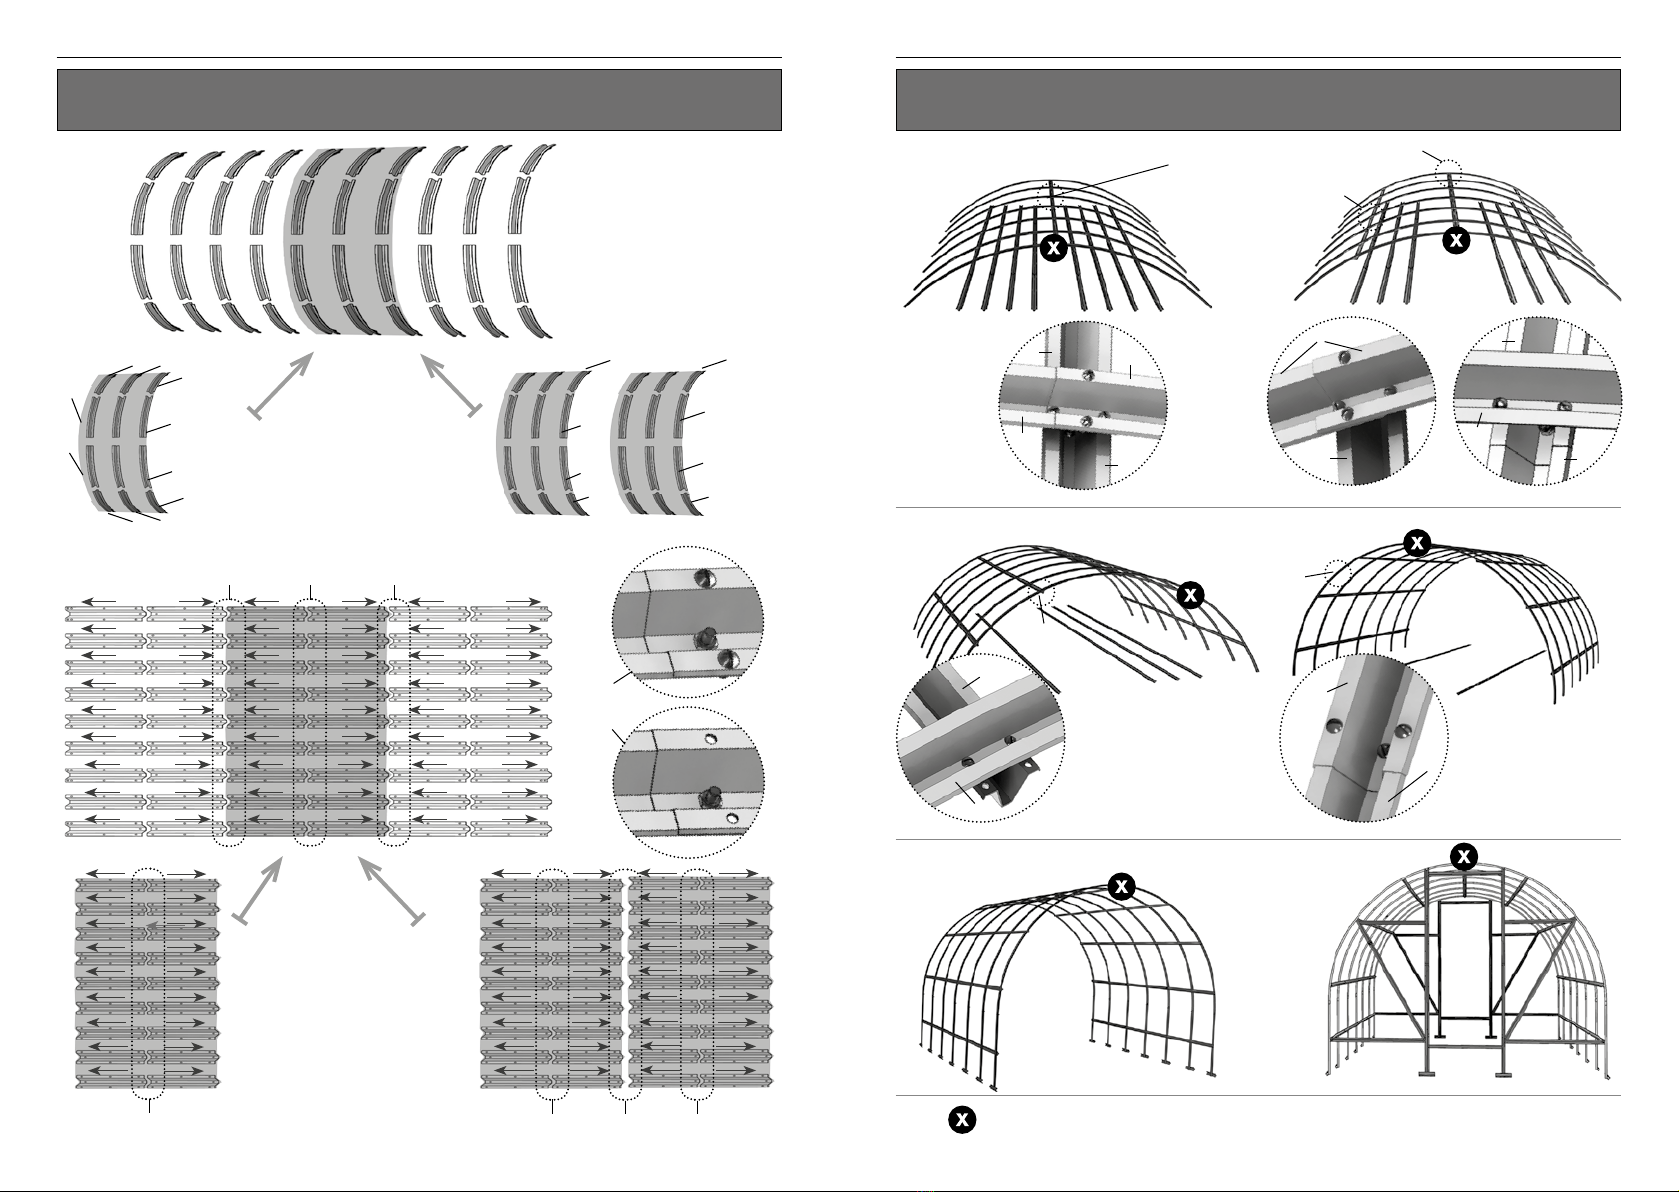
Given greenhouse is a simplified
version of the “Dachnaya – 2DUM”
greenhouse and there are no arc
reinforcing elements in the set, so
a buyer should either remove the
covering for winter time or cleanse
snow from the greenhouse, or estimate
possible snow load and reinforce the
frame with additional arc reinforcing
elements, or reinforce frame with self-
made braces. In case of using the
self-made braces the manufacturer
is not responsible for durability of
the greenhouse. Extreme snow loads
for different quantity of installed arc
reinforcing elements are presented in
Table 4.
1.
2.
Operating Rules
marking
name quantity (pcs)
4 package
door and small window hinge 8
door and small window hook 4
bracket for the hook 8
screw М4 х 8 530
screw М4 х 14 40
screw М4х25 72
screw М4х35 40
screw М4х40 20
nut М4 712
washer 80
blank part for locking (rotator with 2 elastic headers)
4
special wrench 1
tube for bending a wire rotator 1
6 package «INSERT-ECО»
1stay brace 6
2runner 18
3support 6
4НС connecting lower arc 2
4ВО upper arc 6
4Н lower arc 4
screw М4 х 8 120
screw М4х25 8
screw М4х35 8
nut М4 136
washer 16
Limit loads
Special aspects of
On every
arc***
Next but one
arc **
*
Next
but two
arcs***
Without reinforcing elements
(component parts list “Eco”)
Number of arc reinforcing elements for
“Dachnaya – Eco”-4 5 2 1 -
NUMBER OF ARC REINFORCING
ELEMENTS FOR ONE “INSERT-ECO” 3 2 1 -
Snow load, kg/m2 ** 80 60 40 15
Corresponding thickness of fresh snow,
cm. 40 30 20 7
Corresponding thickness of settled
snow, cm. 20 15 10 4
** - weight of snow blanket on 1 m2 of horizontal surface of the ground.
*** - additional arc reinforcing elements are available for extra charge (package7)
Table 4
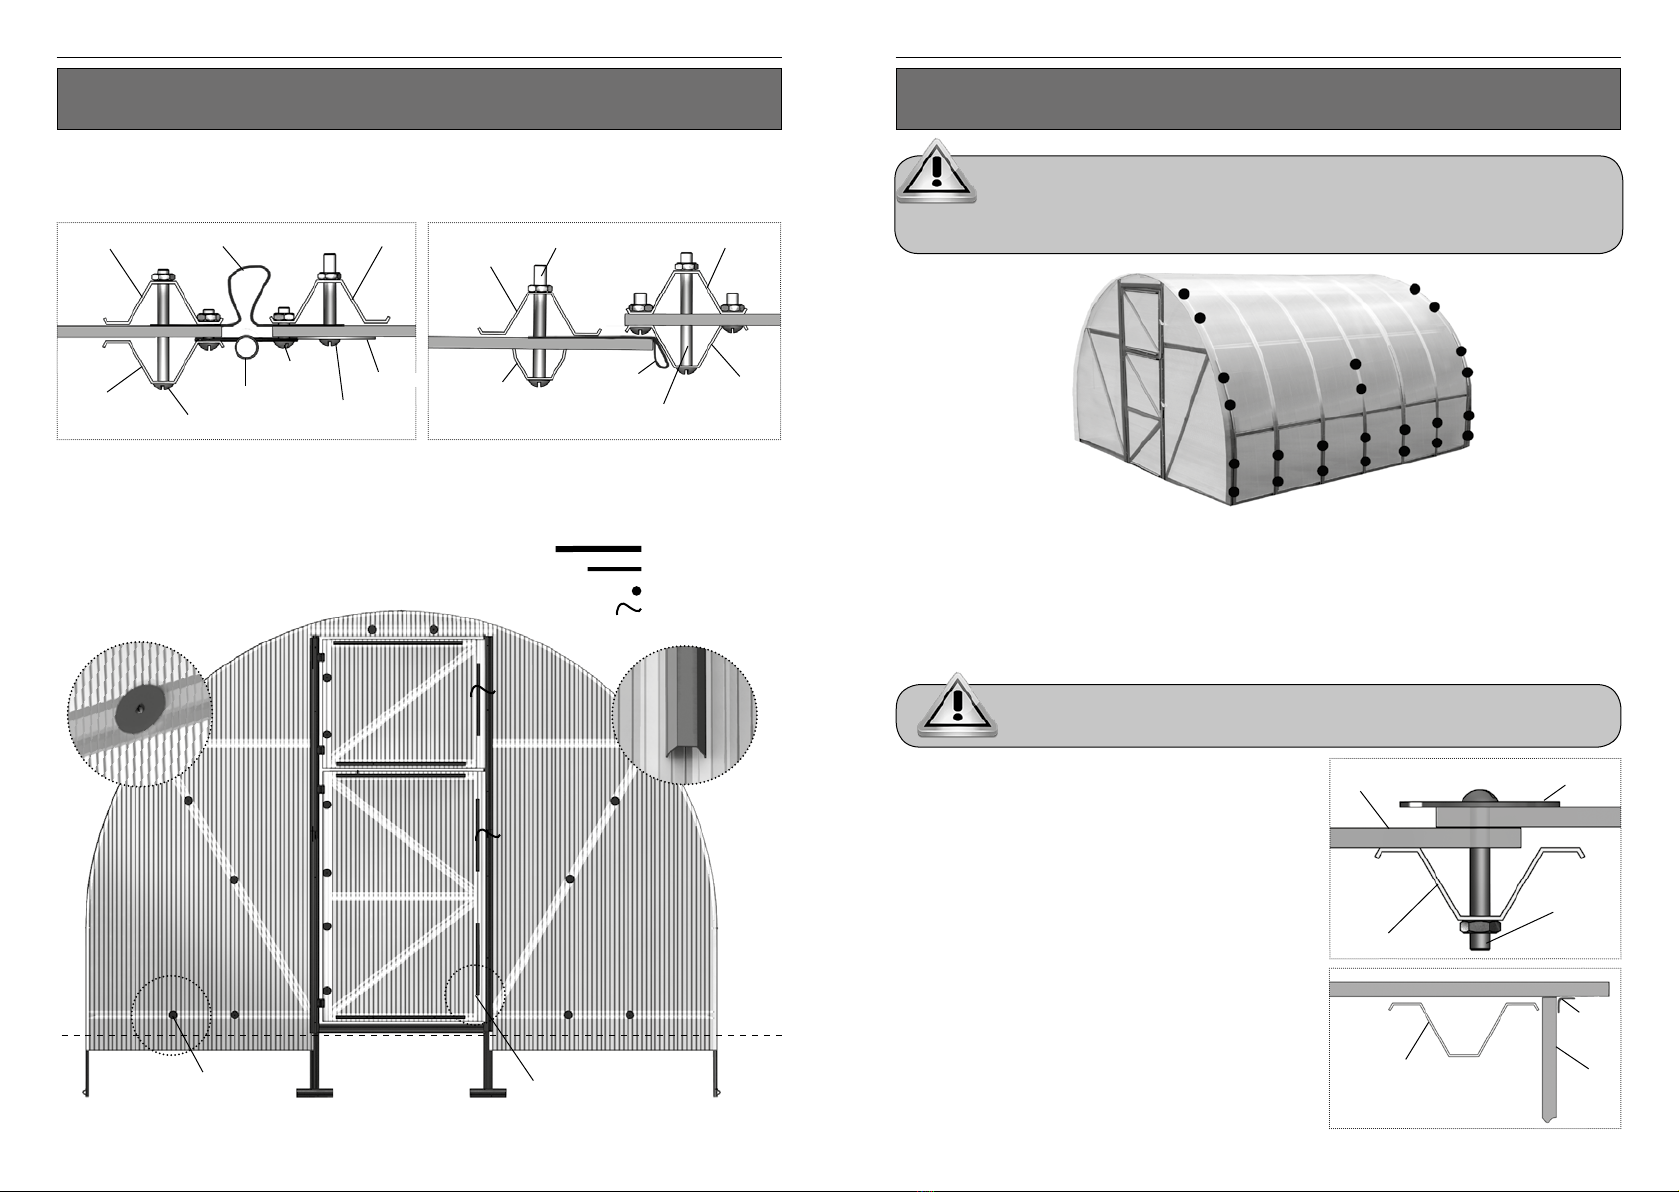
Do not install the greenhouse close
to buildings and trees from which
snow can fall down. Recommended
distance is no less than 1 m.
When installing the greenhouse on the
ground without a foundation, deformation
of the greenhouse may occur due to
seasonal solid shear. Deformation of the
frame is removed by the rules of frame
aligning written in the manual.
Table 3 (continuation)

7
6
Dachnaya – Eco”-4 greenhouse installation manual
Technical certificate
General view of the frame is represented in fig. 1. Install parts in such a way
to make profile side shelves facing covering. The frame is constructed from
numbered elements and some of the elements consist of several parts, which
have the same number but different indexes.
Indexes.
К - end (along the length of greenhouse);
С - joint (a joint of covering panels);
Н - bottom;
В - top;
П - right;
Л - left;
О - additional small side window;
- сthe arrow indicates installation direction according to manuals’ schemes.
Terminology:
Left side is from the left when standing outside of the greenhouse in front of
the door.
Right Side is from the right when standing outside of the greenhouse in front
the door.
Parts are to be assembled through profile overlapping and fastening with
screws and nuts through the holes. When assembling the greenhouse, do not
tighten the screws completely (except assemblage of parts 1 and 3) because
joint play is needed for aligning the greenhouse on the place of installation.
When assembling, be careful not to damage the part since they are not rigid
enough until they are fully assembled. Use supports (e.g. chairs) at intermediate
stages of assemblage for uniform lift of the assembled frame. For the hole
aligning use a nail of 4 mm in diameter or a drift pin with a tapered end
1.
2.
3.
4.
5.
Some parts have free
holes resulted from
uniformity of parts.
Manual
Introduction
Warranty liabilities
1. The manufacturer bears responsibility for the greenhouse frame complete
setup.
2. The manufacturer bears responsibility for the greenhouse assemblability in
accordance with the manual.
3. The manufacturer bears responsibility for the greenhouse durability under
specified magnitude of atmospheric actions.
4. Claim presentation period is 12 months from the date of purchase.
Warranty conditions
Warranty liabilities do not apply to cases of:
1. Greenhouse installation with violation of requirements of the manual.
2. Violation of the rules of operation.
3. Inappropriate use of the greenhouse.
4. Floods, hurricanes and other natural disasters.
5. Deformation of the greenhouse as a result of seasonal solid shear.
Manufacturer: VOLYA LLC, per. Severny, 8, Dubna, Moscow region, 141983, Russia
The manufacturer bears responsibility for quality of products in accordance with RF CC. The
manufacturer reserves the right for greenhouse engineering design changes.
Date of manufacture:
Warranty liabilities
Be careful while assembling! Parts have sharp angles. Avoid hand cuts!
Work in protective gloves.

9
8
Manual
Г
(outside view)
Д
(outside view)
Е
(outside view)
Manual
General view of “Dachnaya – Eco”-4 greenhouse with extending
inserts
А
(inside view)
Б
(outside view)
В
(inside view)
2-1к
11-1
2-1к
21
10
11-2
9 - 1 4НК
18
8
10
9-2
4ВК
2
3
1
4
General view of “Dachnaya – Eco”-4 greenhouse frame
parts 4 and 2 - ref. Fig.5,6
parts 12...14 (a door and a small window) - ref.
Fig.13,14
А
ГД
Е
В
2-1к
38
1
10
9-1
9-2
21
13
14
12
10
11-2
11-1
2-1к
2-1к
4Н
4ВК
4НК
2
2к
4НС
4ВО
2к 4ВО
4ВК
2
Б
Fig. 1
one “Insert-Eco” extends the
greenhouse by 2.08 m
two “Inserts-Eco” extend the
greenhouse by 4.16 m
Fig. 2
4НС
4НС
4НС
4ВО
4ВО
4ВО
4НС

11
10
Align the frame by filling or deepening the trench to make side members
straight, horizontal and parallel to each other and to make arcs straight from
the side view. Completely tighten all the screws.
Perform assembling next to the place of installation of the greenhouse.
Assembled half of an end is aligned with the edge of the sheet along the outer
edge of parts 9-1П, 9-2П and is outlined along parts 1, 4НК and 4ВК. Outline
assembled door and a small window, adding 15 mm to one lateral edge (fig.4).
Cut out oversized pieces of covering being convinced of marking (fig.3) and
that contours are not overlapped. Pieces of covering above the small window
are cut in situ.
Cut the sheets using a fret saw or a fine-pitch arm saw.
Assemble the greenhouse in accordance with photographs of assembling
stages and units, represented in fig. 5…14.
Dig a spade-deep trench on perimeter of the frame on the place of installation
of a greenhouse. Install the frame on the trench. Check equality of frame
diagonals using a cord. Total subsidence of the greenhouse into the ground
should be made so that bottom elements 10 of a doorway touch the ground
and parts 2 are approximately 10 cm above the ground. Again, check the
equality of the diagonals using a cord and level position of angles of the
frame.
Manual
Fig.3. Cutting list of honeycombpolycarbonate
Left end
side
Left end
side
Right end
side
Right end
side
CUT POLYCARBONATE SHEET IN STRICT ADHERENCE TO FIG.3 and FIG. 4
Honeycomb polycarbonate sheet size 2100 х 6000 mm
Manual
Installation sequence
1.
2.
3.
4.
5.
Install honeycomb polycarbonate with a specified side facing outwards
(sunward); this side has a covering layer (make sure to clarify it on buying
or prior to installation). Covering layer is usually placed on the side with
notations on the shipping film. The film is transparent on the opposite
side of a sheet. After marking the sheet but prior to cutting it, mark the
side with the covering layer on each piece of the sheet: when the shipping
film is removed sheet sides look the same. Shipping film shall be removed
from the both sides immediately before fastening covering on the frame.
At first, cut covering sheet for the ends. For this purpose, assemble doors,
small windows (fig.13, fig.14) and a half of the frame of an end, using parts
of arcs 4ВК, 4НК and straight-lined parts of elements 1, 8П, 11-1, 11-2П,
21П, 9-1П, 9-2П, having temporarily fixed clinching ends of parts 11-2 to
holes of the arc. Mark out the covering sheet in accordance with fig.3 and
fig.4 without removing a covering layer from the honeycomb polycarbonate.
2070

13
12
ManualManual
Расположение дуг для «Дачная-2ДУМ»-4, и «ВСТАВКИ»
8 П
Fig. 4
Parts location in
pattern cutting.
small window
assembly
door assembly
15мм
110мм
honeycomb polycarbonate
(covering layer is above)
Location of runners and arcs of the frame of the “Dachnaya-
Eco”-4 greenhouse
4ВК
4ВК
4НК 4Н
4ВО 4ВО
4ВО 4ВО
4ВО
4ВО
4ВО
4ВО
4ВО
4ВО
4Н
4Н
4Н
4НС
4НС
4Н
4Н
4Н
4Н
4НК
4НК4НК
4ВК
4ВК
Fig. 5 Location of runners and arcs of the frame of the “Dachnaya-Eco”-4
greenhouse (parts are shown schematically)
Units view, when
assembling
runners
Units view, when
assembling
runners
1
4 Н К
1 1 - 1 П 1 1 - 2 П
9 - 1 П
2 1 П
4ВК
9 - 2 П
Cutting list of covering of an end
Right end
side
Left end side
Left end side
Places of installation arcs to runners (Fig.8, Б and В)
2-1
к
2-
к
2-1
к
2-
к
2-
к
2-
к
2-1
к
2-
к
2-1
к
2
2
2
2
2
2
2
2
2
2
2
2
2
2
2
2
2
2
2-1
к
2-
к
2-1
к
2-
к
2-
к
2-
к
2-1
к
2-
к
2-1
к
To unit Г
In fig. 1
To unit Г
In fig. 1
To unit E
In fig. 1
To unit E
In fig. 1
To unit Г
In fig. 1
To unit Г
In fig. 1
To unit E
In fig. 1
To unit E
In fig. 1
Cut only after the whole sheet is marked!

15
14
ManualManual
Assembly stages
Fig. 7
Fig. 11
- attaching point of the central runner
Fig. 12
Fig. 9
Fig. 6
Fig. 10
Fig. 8
Б
Б Б
Б
Б
В
В
А
А
А
АА
А
А
Г
Г
Д
Д
4ВК
4НК
4НК
2-1к
4ВО
4ВО
2
2
4ВО
2
2
Б
4ВК
2К
Location of runners and arcs of the frame of the greenhouse
with extending inserts
one “Insert-Eco” extends
the greenhouse by 2.08 m
two “Insert-Eco” extend
the greenhouse by 4.16 m
one “Insert-Eco” extends
the greenhouse by 2.08 m
two “Insert-Eco” extend
the greenhouse by
4.16m
4НС
4ВО 4ВО
OR
OR
4НС
4ВО
4НС
4Н4Н
4НС 4НС 4НС
4ВО 4ВО 4ВО
4Н4Н
4ВО
4ВО
Units view, when
assembling
runners

17
16
ManualManual
Fastening of covering
Number of honeycomb polycarbonate sheets that are necessary for making
covering for the greenhouse:
For “Dachnaya-Eco”-4: 3 sheets;
For “ Dachnaya-Eco”+ one “INSERT-Eco”: 4 sheets;
For “ Dachnaya-Eco”+ two “INSERT-Eco”: 5 sheets (thickness 4 mm, size 2.1
х 6 m);
1.
2.
3.
4.
Fasten pieces of covering to
small windows and doors on the
side of hanging of hinges - with
washer and on the other sides
- with hold-downs w(fig.21),
having preliminarily covered
honeycombs (glue them with
scotch tape). On the sides
that are opposite to the hinges
covering must overlap the frame
by 15 mm (fig.20).
5.
9-4
9-1
9-2
9-3 9-3
9-4
Fig.18
elements 4ВК, 4НК
and 1
Scotch tape
Door and a small window assembly
Fig. 13
Small window (inside view)
Fig.14
Door (outside view)
А А
В
ДД
К
К
З
З
ИИ
ЖЖ
Л
Л
В
Б Б
Г
Г
12фл
12дл
12дл
12фл
14м
14м
14м
14м
14м
14м
14м
14м
13м
13м
13м
13м
13м
13м
13м
13м
13м
13м
13м
13м
13м
13м
13м
12фп
12дп
12дп
12дп
12дп
12дл
12дл
12дл
12дп
12фп
1 2 ф п
12фл
Fig.15
Fig.16 Fig.17
Covering layer
End coverage
screw М4х14
покрытие торца
Using a knife, adjust covering
pieces to arcs 4НК and 4ВК
and a stay brace 1, and then put
Scotch tape over the resulting
cut in accordance with fig.18.
Install end sides of covering
in accordance with fig.15.
Holding a piece of covering,
fasten it with screws and
washers to elements 11 and
8 (Fig.21). Holes for screws
are drilled by a boring bit
of 4 mm in diameter from
inside of greenhouse through
available holes in the frame
elements.
Joint elements 9-3 and 9-4
(fig.16) and install them in
accordance with fig.17 and
fig.20, keeping holes for
wire rotators. Cut pieces of
covering for installing above
doorways and install them,
fastening with washers
(fig.21).
elements 9-1, 9-2
End
covering

19
18
Manual Manual
Fastening of covering Fastening of covering
Fig. 19
Fig. 22
Ground level
АБ
Washers and hold-downs are installed to the end in accordance with Fig. 21.
-
long hold-down
-
short hold-down
- washer
-- wire rotator
А
Б
Covering is fastened with screws and washers in accordance with fig.22.
Some parts have free holes but do not mount screws with washers in
these holes!
door or window
short hold-down
element 12
film
element 9-1,9-2
element 9-3,9-4
Fig. 20
Gaps in a doorway are covered with polyethylene film or “Isolone”
polyethylene foam (fig.19). For door sealing in closed position make lip
seals from strips of film or “Isolone”(fig.20).
7.
Top of the greenhouse “Dachnaya-Eco”-4 is covered with two sheets 6 x 2.1 m in size
and every extending insert is covered with one sheet. Fasten panels to elements 1
with screws and washers, having taken up slack between the frame and the sheet.
Mount screws at an angle in such a way that, while tightening nuts, a screw would
pull the edge of a panel down. In order to do that, while drilling sheets through a hole
in the element 1, set a bore to the angle of 300 to the horizontal. Start fastening
of covering from the center across the width of the sheet, moving gradually towards
the edges.
Put Scotch tape over a joint of ends
of the greenhouse and top panels
(fig.24).
At first, mount a sheet in such a way
that its edges are mounted on elements
4HC (fig.23).Fasten bottom edges to
elements 1 with screws and washers,
except elements along the edges.
After that, mount another sheet with
overlapping the previous one, having
mounted screws and washers in places
of overlapping in accordance with
fig.23. Last of all, mount screws and
washers to edge arcs 4НК and 4ВК
and elements 1.
Before fastening of a sheet put Scotch tape over edges of the sheet to
prevent it from getting dust, moisture and insects inside.
covering washer
screw
М4х35
element 4НС Fig. 23
7.
9.
8.
6.
Fig. 19
element 9-1, 9-2
washer
hinge
element 12
screw М4х14
screw М4х25
screw М4х35
screw М4х40 screw М4х40
film
element 9-3,9-4
Scotch
tape
element 4НК, 4ВК
and 1
edge panel
End
panel
Fig. 24

21
20
Manual
9.
Install a bracket with hooks for latching doors and small windows in
accordance with fig.26.
А
А
Б
Б
Fig. 26
A wire rotator for closing doors and small windows is inserted through holes in stay
braces of a doorway by a straight part against the stop from outside. Use a tube to bend
the inner linear part (fig.25). Such a design enables to close tightly doors and small
windows, being whether outside or inside the greenhouse.
Manual
10.
Fig. 25
Fastening of covering
9-3,9-4
rotator
a tube for
bending
9-1,9-2
Extra 5 package (parts list and installing)
long hold-down
long hold-down
door
element 13м
element 13м
element 13м
Fig. 28
Fig. 31 short hold-down
.
element 10
element 12
element 13м
element
9-1,9-2
Fig. 29
Door sealing
Door sealing
door sealing
door sealing
door or window
long hold-down
Scotch tape
Scotch tape
Scotch
tape
Scotch
tape
Scotch tape
long hold-down
element
9-3,9-4
hinge sealing
element 9-1, 9-2
element 9-3,9-4
washer
hinge
element 12
Fig. 27
screw М4х14
screw М4х25
element 10
screw М4х14
screw М4х40
screw М4х35
screw М4х35
screw М4х35
screw М4х35
screw М4х40
screw М4х35
5 package (sealing profile) consist of a door profile -
8.5m; a hinge profile – 3.76m; a profile for the ends -12m.
Sealing profiles are installed along the doors and small windows outline
in accordance with figures 27...31.
Cleaning and washing of polycarbonate sheets
1. Rinse sheet with warm water.
2. To remove dirt, wash it with mild soap solution or domestic detergent using a soft
cloth or sponge.
3. To remove water, rinse the sheet with cold water and wipe it with a soft cloth.
Never use abrasives or high-alkali detergents for cleaning polycarbonate
sheets. Dry wiping damages covering layer of the covering and shortens
its service life. Never rub surface of polycarbonate sheets with a brush,
metalized fabric or other abrasive materials.
sulphur cartridges for disinfecting greenhouse against fungal and
bacterial agents in order to prevent corrosion (darkening) of frame.
A door or a small window
а) б)
в)
Outermost panel
element
4НК, 4ВК and 1
End covering
End sealing
Fig. 30
screw М4х25
door
window
window

22
Manual
Extra 7 package (parts list and installing)
7 package (arc reinforcing elements) consist of: 22 (a horizontal
strainer) – 2pcs.; 23 (side brace elements) – 4pcs.; 25 (side
brace elements) – 2pcs.
Installation diagram of arc reinforcing elements
Arc reinforcing elements are installed with regular
intervals along the length of the greenhouse. Arc
reinforcing elements consist of a top horizontal strainer
and two side braces. The horizontal strainer is assembled
of two elements 22. The side brace is assembled of two
elements 23 and one element 25.
ВВ
Д
Д
22
23
25
23
Г
Е
Г
Е
25

Технический паспорт
24
This manual cannot be reproduced in any form, in whole or in part, without
written permission of “Volya” Company
EN
Manufacturer:
Volya LLC, Dubna, Moscow region
phone/fax: 8 (495) 598-5-999 www.perchina.ru www.domflora.ru
e-mail: info@perchina.ru
Table of contents
Other Madelux Greenhouse Kit manuals