manuals.online logo
Brands
  1. Home
  2. •
  3. Brands
  4. •
  5. Madelux
  6. •
  7. Greenhouse Kit
  8. •
  9. Madelux PREMIUM User manual

Madelux PREMIUM User manual

DACHNAYA STRELKA-3
any length multiple to 2 m
width 3,0 m
height 2,4 m
Сертифицировано
Русским Регистром
cellular polycarbonate greenhouse
Technical certicate
Installation manual
page 2-6
page 7-22
www.serrashop.it
PREMIUM
2
Table 2 Package completing
green-
house
length
Package number
Vstavka insert
2 m
4 m
6 m
8 m
Table 3 Package contents
contents dimensions, mm
weight, no
more kg
Frame (2 m base length)
1 package – balks, straight elements and manual 105х980х65 19,0
2 package – arc and end elements 170х1500х65 18,5
3 package – straight end elements, arc reinforcing elements
100х1290х65 20,0
4 package – ridge profi le 40х1100х750 1,2
5 package – sealing profi le 350х300 1,0
6 package – fi xtures and component parts 85х270х200 4,5
7* package – side small window 5
Vstavka insert (2 m frame extension)
1 package - balks 80х980х65 12,5
2 package – arcs elements and straight elements 135х1480х65 14,7
3 package – ridge profi le 40х1100х750 1,2
4 package – fi xtures and component parts 85х200х200 1,2
Table 1 Parameters of greenhouse
Length (m) Covered area (m2) Polycarbonate sheets 2100 x 6000, pcs.
2 6 2
412 3
618 4
824 5
DACHNAYA-STRELKA-3 greenhouse is designed for creation of microclimate favorable for growing
garden crops on cottage and household plots. Area of covered soil depends on length of the
greenhouse (table 1). Height of installed frame is 2.4 m, width is 3.0 m. The greenhouse may
have various length depending on desire of buyer. Required length of greenhouse is provided by
purchase of additional Vstavka packages adding 2 m to the base length (Table 2).
Frame of greenhouse is made of galvanized steel and assembled using screws and nuts.
Greenhouse is  xed on the ground by digging special frame endings or on foundation using
mounting angles. The complete set includes all that is needed for fastening of coverage.
Greenhouse may be completed with coverage on buyer’s request. It has two door openings and
two small windows in opposite ends. The greenhouse may be completed with side small windows
on buyer’s request.
Perform installation and operation of the greenhouse in strict
accordance with the manual and operating rules stated in the technical
certi cate. Please keep this technical certi cate for further reference.
DESCRIPTION
* - additional packages supplied on buyer’s request
Technical certi cate
Dachnaya-Strelka-3 detailed parts list
marking
name quantity (pcs)
1st package (balks and straight elements)
2balk 20
14 door diagonal 4
15 door diagonal cover plate 4
19 small window horizontal element 4
20 small window vertical element 4
hooks 4
2nd package (arc elements)
4н bottom arc 6
4в top arc 6
8top door opening stand 4
12 door vertical element 4
3rd package (end straight elements and arc reinforcing elements)
1stand 10
3support 10
5top end strainer 2
6bottom end strainer 2
6к bottom end strainer 4
7bottom door opening stand 4
9horizontal strainer 1
10 side brace 4
11 brace strut liner 2
13 horizontal door element 6
16 end cover plate 2
17 door cover plate for rotator 4
18 stiffening boom 2
21 middle strainer 4
left tubular reinforcing element 2
right tubular reinforcing element 2
4th package (ridge pro le)
ridge pro le 2
5th package (sealing pro le)
hinge pro le (m) 3,6
door pro le (m) 10
end pro le (m) 12
6th package( xtures and component parts)
angle 28
ridge cover plate 3
arm 12
screw M4х10 2
screw M5х10 374
screw M5х14 22
screw M5х35 120
screw M5х50 18
tap screw 8
nut M4 2
nut M5 534
washer 136
top wire bandage 3
bottom wire bandage 6
hinges 8
semi nished rotator (with two elastic headers)
4
bending tube 1
adhesive tape 1
handle 8
pin 4
Table 4
6th package( xtures and component parts)
Technical certi cate
4
Vstavka insert detailed parts list
1st package
2balk 20
2nd package
3
support
4
1
stand
4
4н
bottom arc
4
4в
top arc
4
9
horizontal strainer
2
10
side brace
8
11
brace strut liner
4
18 stiffening boom 4
3rd package
ridge prole
2
4th package
angle
8
ridge cover plate
2
bottom wire bandage
4
top wire bandage
2
screw M5x10
150
screw M5x14
4
screw M5x35
16
screw M5x50
4
nut
174
washer
16
Table 5
Small window detailed parts list – 7th package
Name
Quantity
1st package
ф1
long bar
2
ф2
short bar
2
ф3
long diagonal
1
ф4
short diagonal
1
wire stop 1
wire extender
1
2nd package
arm
1
polycarbonate
0,95x0,43
sealer
0,95 m
heave-off hinge
2
screw M5x10
25
screw M5x35
8
washer 32х5
8
nut M5 37
clamp 2
Table 6
Technical certicate
5
1.
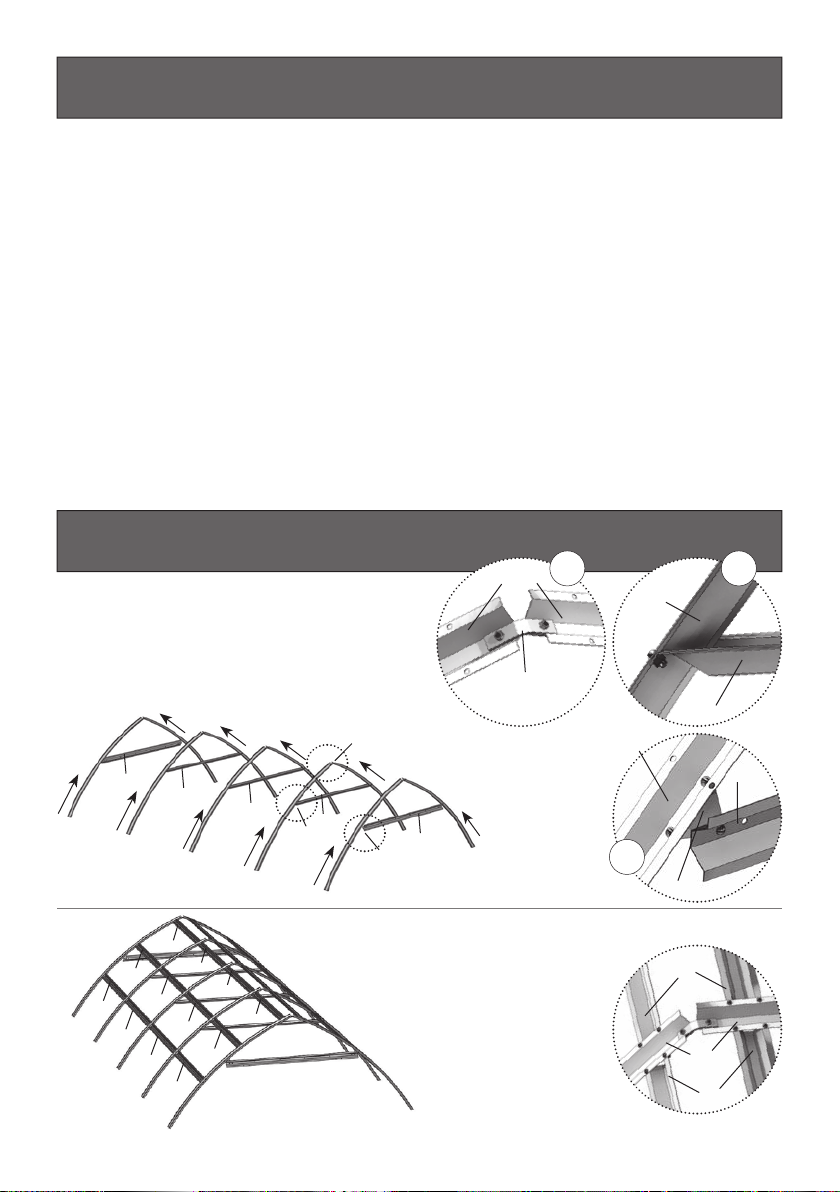
Before use of greenhouse, assemble
and install it in accordance with the
manual.
When installing the greenhouse by
third parties, buyer should supervise
compliance of installation with the
manual.
Operating rules
Cleaning and washing of polycarbonate sheets
1. Rinse sheet with warm water.
2. To remove dirt, wash it with mild soap solution or domestic detergent using a soft
cloth or sponge.
3. To remove water, rinse the sheet with cold water and wipe with a soft cloth.
To prevent corrosion (darkening) of frame, do not use fungicidal and
antibacterial sulphur cartridges for disinfecting the greenhouse.
Never use abrasives or high-alkali detergents for cleaning polycarbonate
sheets. Dry wiping damages protective layer of the coverage and shortens its
service life. Never rub surface of polycarbonate sheets with a brush, metalized
fabric or other abrasive materials.
2. In winter, coverage of greenhouse
should not be removed provided that
snow load is limited. Should greenhouse
be unattended all winter period, buyer
should either remove the coverage or
estimate possible snow load. Ultimate
load for the frame having complete
package with installed drawbars and
side braces appears under 360 kg
snow cover per 1 m2 of horizontal
ground surface corresponding to 1.8
m fresh snow layer or 0.9 m packed
snow layer. Recommended 4 mm
depth of polycarbonate is enough for
Russian midland. In case of regions
Do not install greenhouse close to
buildings and trees from which snow or
ice can fall down. Minimal 2 m distance
is recommended.
with snow cover exceeding 0.6 m,
thicker polycarbonate should be used
for coverage of greenhouse top in
accordance with local conditions.
Maximum wind pressure for this
greenhouse is 25m/sec
Technical certi cate
6
Warranty
1. Manufacturer is responsible for full completing frame elements of
greenhouse.
2. Manufacturer is responsible for assemblability of the greenhouse in
accordance with the manual.
3. Manufacturer is responsible for durability of the greenhouse under specied
values of weather impact.
4. Warranty period – 12 months from date of purchase.
Warranty conditions
The warranty does not cover cases of:
1. Installation of greenhouse with violation of manual’s requirements.
2. Violation of operating rules.
3. Unintended use of greenhouse.
4. Greenhouse deformation over ground subduction.
5. Floods, hurricanes, other natural disasters.
Manufacturer: Volya LLC
8 Severnyi Pereulok, Dubna, Moscow Oblast 141983
Manufacturer is responsible for quality of products in accordance with RF Civil Code.
Manufacturer reserves right to change design of greenhouse
Date of manufacture:
Warranty
Technical certicate
7
Manual
Dachnaya Strelka-3 greenhouse installation manual
General view of frame is represented in Fig. 1. Mount details in such a way
to make side shelves facing coverage. Assemble the frame from numbered
elements.
Legend:
- arrow indicates installation
direction according to manuals’
schemes
Connect elements using pro les, screws and nuts. In this case, no matter
what element is on top.
Be careful not to damage elements, because they don’t have enough rigidity
before  nal assembling.
Use supports (for example, chairs) on temporary stages of installation for
uniform lifting of frame assembled. To coincide holes in complicated joints
use a nail of 5 mm diameter or a drift pin with tapered end.
1.
2.
3.
4.
Some elements have free
holes resulted from elements’
uniformity.
Introduction
Be careful! Elements have sharp angles. Guard against cutting. Work in safety
gloves.
gloves.
When assembling the frame, connect elements using all available holes.
Simpli ed connection with one or two screws is a violation of installation
rules and a ground for warranty waiver.
8
Manual
General view of DACHNAYA-STRELKA greenhouse frame
Б (inside view)А (outside view)
4В
angle
angle
4В
2 2
4Н
6к 2
1
arm
4Н
Е (outside view)
4В
5
arm
7
1
6к
6
В (inside view)
4Н
2
3
1
Fig. 1
Г (outside view) Д (inside view)
А
Д
В
Б
ЕГ
arm
2
2
22
2
2
2
2
2
2
2
2
4в
4н
4н
4в
8
8
5
6к
6
77
6к
10
10
10
21
18
18
9
9
9
18
5
21
11
11
3
3
1
1
ridge cover
9
Manual
General view of DACHNAYA-STRELKA-3 greenhouse frame
Dachnaya Strelka-3
extended by any number
of inserts
Fig. 2
Fig. 3
858
4060
1000100010001000
3000
Greenhouse foundation support
layout plan.
Fig. 4
1071
60
21
General view of Vstavka
insert for Dachnaya Strelka-3
greenhouse.
Each insert extends
greenhouse length by 2 m.
10
Assemble arcs 4в in pairs using ridge cover
plate and strainer 9. Connect end elements 5
to arcs 4в using arm.
Connect balks 2to
assembled arcs.
2
2
4в
Assembling stages
Fig. 5
Fig.6
Level the frame using  lling or deepening of pits to make longitudinal elements straight,
horizontal and parallel to each other and to make arcs even at side view. If arc planes
require leveling, loosen connections of balks with arcs, complete leveling on the ground and
tight screws again. Fill frame supports with soil after fastening bottom wire bandages on
element 3 (Fig. 10).
Perform the installation close to location of the greenhouse.
Install greenhouse in accordance with photographs of installation stages and units
represented in Fig. 5…12. The  gures show installation of greenhouse of 4 m length.
Required length is reached using attachment of appropriate number of Vstavka insert
packages. Use M5x10 screws for connection of elements.
Dig pits on the site selected for greenhouse installation at a depth of shovel blade
according to Fig. 4. Install frame into the pits. Check equality of frame diagonals using a
cord. Total draft of greenhouse into the ground should be so that bottom elements 6 of
door opening touch the ground. Check equality of the diagonals using a cord again and
correct position of the frame angles.
1.
2.
3.
4.
Installation sequence
4в
5
5
5
2
2
2
2
2
2
2
2
2
2
2
2
arm
Manual
ridge cover
plate
4в
4в 4в
4в 4в 4в
4в
4в
4в
4в
4в
Б
4в
9
999
А
Б
В
А Б
В
11
When installing the greenhouse through digging (without
foundation), connect elements 1and 3to the frame. Fasten
bottom wire bandage in free hole of element 3. Install end
elements 6, 6к, 7, 8, 21.
Fig.10
2
6к
4н
2
1
arm
6к
Fig. 7
Connect arcs 4н to arcs
4в from one side of
greenhouse.
Connect balks 2to arcs 4н
Fig.9
Connect arcs 4н and balks
2from the other side of
greenhouse in the same
way.
Assembling stages
Manual
4н
4н
4в
4в
4в
4в
4в
4н
4н
4н
4н
4н
4н
4н
4н
4н
4н 4н 4н 4н 4н
4в
(inside view) (outside view)
arm
Fig. 8
4н
2
2
4н 2
2
2
6к
8
21
21
8
7
7
66к 3
1
222
2
2
2
bottom wire
bandage
3
1
АБА А
Б
12
Install side braces 10 on each arc inside of greenhouse frame. Assemble side brace
assembled from two elements 10. Mount side brace liner 11 on the joint of elements
10 and connect it to arc 4н.
9
9
18
18
10
4в
10
2
2
Assembling stages
Manual
4н
4в
Fig. 11
Е
Д
А
Б
ВГ
11
10
10
4н
А
Г
EД
Б В
13
Door
Manual
Assembled door and end small window
Assemble door and
end small window from
elements 12, 13, 14, 15
(Fig.12)
14
14
14
12
12
12 12
12
13
15
15
15
15
19
19
20 20
14
15
Б
Fig. 12
А
12
13
14
13
13
13
13
15
15
14
14
14
12
13
Small window
19
20
А
Б
14
Manual
Cutting and fastening of coverage
1. Cut a sheet for end coverage. To do this, cut a piece from polycarbonate sheet
(see cutting lines on Fig. 13а or 13б). To make a stencil of coverage, put the cut
piece to assembled end of greenhouse and, without removal of protective  lm from
polycarbonate, deposit stencil marking on the coverage sheet by elements 4н and 4в
with allowance (Fig. 14). When marking a sheet, align its edge strictly with edges of
CUT POLYCARBONATE SHEET STRICTLY IN ACCORDANCE WITH Fig. 13(а) or 13(б)
и Fig. 14
2100 x 600 mm cellular polycarbonate sheet
Fig. 13а
Vertical position of cellular on ridge
panel
Fig. 13б
Horizontal position of cellular on ridge
panel
6000
Door
Нижняя
полоса
Door
Small window
Small
window
Left end
side
Left end
side
Right end
side
Right
end side
(template)
14901940
1940
2100
1110
800
800
310310
Cutting line
Ridge panel
Ridge panel
CUT POLYCARBONATE SHEET STRICTLY IN ACCORDANCE WITH
Cutting line
Cutting line
A power jigsaw or
fi ne tooth arm saw is
recommended for cutting.
Be careful!
In windy weather, load polycarbonate sheet edges with burdens.
Left end
side
Left end
side
Door
Door
Small window
Small
window
Right end
side
Right
end side
(template)
15
Manual
Attention! Coverage sheet side edge is aligned by elements 7, 8, and top edge
on 30 mm above bottom edge of element 5. Mark by elements 4н and 4в with
allowance.
Mount cellular polycarbonate strictly facing sun with a side having protective layer
(by all means, clarify it under purchase or before mounting). Protective layer usually
is on the side with inscriptions on transport  lm. On the other side of sheet  lm
is clear. After marking the sheet but before its cutting make marks on protective
side of each piece of sheet: after removal of transport  lm sheet sides have no
visual differences. Transport  lm is removed from both sides immediately before fastening
coverage on the frame.
Fig. 14
8
5
2
4в
coverage
marking
2100
Fig. 14
marking
2100
8
4в
30 мм
marking
- points for mounting of arms
for coverage fastening
angle
(inside view)
1940
elements 7and 8, and top edge at 30 mm above bottom edge of element 5. Cut a
stencil. Mark the rest of sheet using the stencil in accordance with cutting scheme (Fig.
13а or 13б).
16
Manual
Раскрой и крепление покрытия торца
Fig. 15
2. Cut ridge coverage pieces located above the door at
the place of installation from remaining pieces. Mark
coverage by elements 4в with allowance aligning bottom
edge of the sheet with bottom edge of element 5 (Fig.
15).
marking 4в
5
Cutting and fastening of coverage
coverage
Avoid excessive tightening of fastening screws to prevent crumbling of
polycarbonate and destruction of cellular.
Fig.16
3. Mount side pieces of coverage in accordance with
Fig.16. Holding a piece of coverage, fasten it with screws
and washers by elements 6к, 7, 8б 21 and by angles
using tap screws with washers. Holes for screws are
drilled by boring bit of 5 mm diameter from inside of
greenhouse through holes in frame elements. Mount
top pieces of coverage fastening them on angles with
washers and tap screws. Cut overlapping with side
pieces.
4. Even coverage pieces by arcs 4н and 4в using a
knife and mount sealing pro le in accordance with Fig.
17.
5. Fasten pieces of coverage on door with washers
(Fig.18,19), making runoff by one side (Fig.23), closing
cellular beforehand (with adhesive tape). Mount sealing
pro les along the door contour in accordance with
Figures 19,21,22.
Fig.17
elements
4В, 4Н
and 1
end
coverage
end sealer
coverage
washer
screw М5х35
protective layer
17
Manual
Cutting and fastening of coverage
Fig.19
adhesive
tape
door sealer
door sealer
hinge sealer
hinge sealer
coverage
coverage
coverage
17
screwМ5х14
handle
handle
coverage
adhesive
tape
door sealer
hinge
adhesive
tape
door sealer
hinge sealer coverage
door sealer
door sealer
coverage
hinge
hinge
adhesive
tape
adhesive
tape
adhesive
tape
tape
tape
Fig.18
angle washer
handle
pin
washer
18
Manual
Cutting and fastening of coverage
7. . Install assembled doors and small
windows on ends mounting sealer in
accordance with Fig. 22. When mounting
small windows, prevent its further
slackening. When tightening the screws,
lift the opposite end of small window to
remove screw gaps in the holes.
Fig.23
end coverage
20..25mm
(coverage run out of door contour)
Door
washer
element 12
element 8
screw М5х35
screw
М5х35
door
coverage
small
window
coverage
door
coverage
ridge panel
element 16
screw
М5х50
screw
М5х35
element 5
door sealer
door sealer
door sealer
element 19
element 19
element 13
element 13
element 6
Small window
Fig.20
end coverage
screw М5х35
screw М5х10 screw М5х10
hinge sealer
hinges
washer washer
washer
washer
washer
element 12
Door
Fig.21
6. Mount end cover plate 16 on end coverage and fasten it on element 5through
coverage (Fig. 20 and 24). Joint of end coverage pieces is under element 16.
door sealer
door sealer
screw
М5х35
screw
М5х35
screw
М5х35
screw
М5х35
Fig.22
19
Manual
Cutting and fastening of coverage
8. Install end washers and hooks in accordance with Fig.24.
Fig.24
washer
washer hook
end coverage
angle
angle
screw М4х10
screw М5х35
ground
level
16
2
8
Install tubular reinforcing elements of door
opening in accordance with Fig. 25
Fig.25
tubular reinforcing
element
Manual
20
10. Align elements of ridge pro le lengthwise mounting
screw threaded ends outside (Fig. 27).
Put polycarbonate sheet halves connected by adhesive
Fig.27
9. 9. For top coverage,
cut 6x2.1 m sheets in
halves per 3x2.1 m pieces
keeping right angle of
cutting line to sheet side
edge. Then put halves
together by cutting line
with aligning the side
edges and positioning
protective layer outside.
Eliminate mismatch
of edges after cutting
halves and putting them
together by cutting of
outstanding edge.
If edges’ outstanding
(cutting error) exceeds 5
mm, level both edges by
ruler to provide right angle
of cutting edge to side
Fig.26
adhesive
tape
adhesive
tape
3000
2100
edges. Remove protective
 lm from polycarbonate
without violation of relative
position of sheet halves.
Cover polycarbonate
cellular with adhesive tape
and then join the halves
with adhesive tape by
cutting edges. (Fig. 26).
Cutting and fastening of coverage

Other Madelux Greenhouse Kit manuals

Madelux VOLCAN User manual

Madelux

Madelux VOLCAN User manual

Madelux COMPACT Programming manual

Madelux

Madelux COMPACT Programming manual

Madelux Classic Programming manual

Madelux

Madelux Classic Programming manual

Popular Greenhouse Kit manuals by other brands

Vitavia VA0029-US Assembly instructions

Vitavia

Vitavia VA0029-US Assembly instructions

Johnny's Selected Seeds Quick Hoops 7617 instruction manual

Johnny's Selected Seeds

Johnny's Selected Seeds Quick Hoops 7617 instruction manual

HI 62369 Directions for use and safety instructions

HI

HI 62369 Directions for use and safety instructions

GrowSpan 500 Series manual

GrowSpan

GrowSpan 500 Series manual

DrivhusSenter Forta Assembly manual

DrivhusSenter

DrivhusSenter Forta Assembly manual

St Helens GH350 user manual

St Helens

St Helens GH350 user manual

Growers SOLUTION DAKOTA Installation

Growers SOLUTION

Growers SOLUTION DAKOTA Installation

FarmTek Aquaponics System I Series manual

FarmTek

FarmTek Aquaponics System I Series manual

AeroGarden 1-Season user guide

AeroGarden

AeroGarden 1-Season user guide

GREEN PROTECT 28105 Assembly instructions

GREEN PROTECT

GREEN PROTECT 28105 Assembly instructions

Exaco VI23 Mounting instructions

Exaco

Exaco VI23 Mounting instructions

GREEN PROTECT 5601 Assembly instruction

GREEN PROTECT

GREEN PROTECT 5601 Assembly instruction

Harbor Freight Tools OneStopGardens 04819 Assembly & operating instructions

Harbor Freight Tools

Harbor Freight Tools OneStopGardens 04819 Assembly & operating instructions

Elite Greenhouses TITAN K800 Instructions & Illustrations

Elite Greenhouses

Elite Greenhouses TITAN K800 Instructions & Illustrations

Riverstone Networks Monticello 180701V manual

Riverstone Networks

Riverstone Networks Monticello 180701V manual

Grandio ASCENT GRA-812-GR user manual

Grandio

Grandio ASCENT GRA-812-GR user manual

greenhouse sensation Quadgrow Assembly instructions

greenhouse sensation

greenhouse sensation Quadgrow Assembly instructions

Vitavia 5900 Assembly instructions

Vitavia

Vitavia 5900 Assembly instructions

manuals.online logo
manuals.online logoBrands
  • About & Mission
  • Contact us
  • Privacy Policy
  • Terms and Conditions

Copyright 2025 Manuals.Online. All Rights Reserved.