Magefesa mageplus User manual

Mod.: MAGEPLUS
ATTENTION-ATTENTION
ATENÇÃO- ACHTUNG
PRIOR TO USING PLEASE READ INSTRUCTIONS CAREFULLY
AVANT D'UTILISER VOTRE AUTOCUISEUR,
VEUILLEZ LIRE ATTENTIVEMEN CE MODE D'EMPLOI
ANTES DE UTILIZAR A PANELA, LEIA COM ATENÇÃO AS INSTRUÇÕES
BEVOR SIE DEN SCHNELLKOCHTOPF BENUTZEN,
BEACHTEN SIE DIE GEBRAUCHSANWEISUNGEN
Directiva Europea
para Ollas a Presión
TUV
DIN EN ISO 9001
ZN: 0110088193
Certificado de Empresa
ISO-9001-2000
SUPER FAST PRESSURE COOKER
AUTOCUISEUR ULTRA-RAPIDE
PANELA SUPER RAPIDA
SCHNELLKOCHTOPF
INSTRUCTION MANUAL - MODE D’EMPLOI
LIVRO DE INSTRUÇÕES - GEBRAUCHSANWEISUNG
• Stainless Steel 18/10
• Acier inoxydable 18/10
• Aço inoxidável 18/10
• Edelstahl rostfrei 18/10
Fabricado en España
Asociación Española de Fabricantes
de Cuberterias y Menaje
Made in Spain

10 Lid •Couvercle • Tampa • Deckel
26 Gasket • Joint de fermeture • Junta de fecho •
Verschlußdichtung
35 Lid handle • Manche couvercle • Cabo da tampa •
Deckelgriff
36 Body long handle • Manche cuve • Cabo do corpo •
Topfgriff
37 Pressure regulating valve • Soupape de décompression •
Válvula pressurizadora • Druckabbauventil
38 Body • Cuve • Corpo • Topf
40 Body grab handle • Anse cuve • Asa do corpo •
Gegengriff am Topf
41 Pressure indicator valve •Soupape indicatrice de pression •
Válvula indicadora de pressão • Druckanzeigeventil
SOLD SEPARATELY • VENDUS SÉPARÉMENT • VENDE-SE SÉPARADO • GESONDERT
51 Basket support (Optional) •Support panier (Optionnel) • Suporte (Opcional) • Einsatzfuß (Wahlweise)
60 Steaming basket (Optional) • Panier (Optionnel) • Base (Opcional) • Einsatz (Wahlweise)
24
40
21
23
22
25
TO DISMANTLE THE INDICATOR-TOP
USE A SCREWDRIVER
POUR DÉCOINCER LE BOUCHON
INDICATEUR, FAIRE CONTREPOIDS
AVEC UN TOURNEVIS
PARA DESMONTAR A TAMPA
INDICADORADESMONTAR COM UMA
CHAVE PARA FUSOS
UM DEN ANZEIGESTÖPSEL
AUSEINANDERZUNEHMEN MIT EINEN
SCHRAUBENZIEHER BEWEGEN
41
10
26
60
40
38
36
51
35
37
DESCRIPTION / DESCRIPTION / DESCRIÇAO / BESCHREIBUNG
ABCDE
FGHI J
KLM
NOP
2

3
IMPORTANT SAFEGUARDS
A - Read all the instructions carefully.
B - Do not allow children near the area where the
Pressure Cooker is being used.
C - Do not place the Pressure Cooker in a hot oven.
D - When the Pressure Cooker is pressurised it
should only be moved with maximum precaution.
Do not touch the hot surfaces. Use the handles.
If necessary use gloves.
E - Do not use the Pressure Cooker for any other
use than the one established.
F - The Pressure Cooker cooks under pressure.
Injuries can be caused from scalding through
incorrect use. Make sure it is correctly closed
before placing on the heat.
G - Never open the Pressure Cooker using force.
Do not open the Pressure Cooker until you
are sure that the pressure inside has been
completely released.
H - Never use the Pressure Cooker without water,
as this would severely damage it.
I - Do not fill the Pressure Cooker to more than
2/3 of its capacity. For foods that swell during
cooking, such as rice, dry pulses or stewed
fruit, only fill to half its volume.
J - Use the heat sources in accordance with their
instructions for use.
K - After cooking meat with skin (i.e. tongue),
which has a risk of swelling due to the high
temperature, do not pierce it whilst the skin
has a swollen appearance, as injuries can be
caused from scalding.
L - When cooking thick foods gently shake the
Pressure Cooker before opening the lid to
avoid splashing.
M - Always check that the valves are not blocked
before every use.
N - Never use the Pressure Cooker to fry foods
under Pressure.
O - Be sure to follow the maintenance and cleaning
instructions in your instruction manual supplied
with your Pressure Cooker.
P - Only use genuine parts in
accordance with the instructions that came
with your Pressure Cooker. It is important that
you only use genuine the
sealing gaskets appropiate for your model of
Pressure Cooker.
Q - Keep these Instructions in a safe place.
PRIOR TO EACH USE
Fig. 1 Fig. 2
PRESSURE INDICATOR:
From the underside of the lid check that it slides easily,
pressing the valve indicator with a rod as far as it will go
(Fig. 1). If you note any friction, take it apart and clean it
(see CLEANING AND MAINTENANCE section A).
PRESSURE DETECTOR AND SAFETY VALVE:
From the underside of the lid check that it is working cor-
rectly by pressing the closing knob with a rod. If it moves
easily, this is correct (Fig. 2)
.
FILLING YOUR PRESSURE COOKER:
- For safety reasons, the Pressure Cooker can only be
filled to a maximum of 2/3 of its capacity.
- If you are cooking food which tends to swell or produce
foam (such as chickpeas, lentils, leeks, pasta, rice or
vegetables), fill it up halfway only to avoid the risk of
obstructing the safety valves mentioned above.
- The minimum amount of liquid in the Pressure Cooker
should be 1/4 litre.
ADVANTAGES OF
SUPER FAST PRESSURE COOKER:
GREATER SAFETY
has made its Pressure Cooker the safest on
the market. Help us to maintain this position by refusing
any NON ORIGINAL spare part (particulaly “Sealing Gaskets”
which alter this safety).
FASTER
Specially designed to cook as quickly as possible while
maintaining all the vitamins and flavours of the food.
ENERGY SAVING
The cooking is done more quickly thereby economising any
kind of energy used in the kichen.
5 SAFETY SYSTEMS
This Pressure Cooker has five safety systems:
1 and 2 High security opening and closing device function:
This is a mechanism situated in the “body long handle”
which stops the Pressure Cooker being opened if there is
pressure inside it, however little, in which case the
“Pressure Detector” will be visible and THE LID CANNOT
BE OPENED (Fig. N).
On the other hand, if there is no pressure, the “Pressure
Detector”will be hiddenin theholein thehandle (Fig. J).In this
case the Pressure Cooker may be opened, by pushing the
blue push button forwards. If the Pressure Cooker has not
been closed properly this device will not allow it to come to
pressure.
®
®
®

Safety during operation:
3 Pressure regulator valve function:
Maintains working pressure at all times in the Pressure
Cooker and allows any excess steam to escape (Fig. A)
.
4 Pressure detector and safety valve function:
Acts if an increase in pressure is generated (Fig. B). If this
valve is in operation it is because the “Pressure
Indicator” is not working correctly.
5 Lid window:
If both safety function devices described above are
obstructed, the lid window allows the “Gasket” to
expand outwards, expelling all the steam. (Fig. C).
If this happens, take it to an Approved Service
Centre. Both of the above safety systems will have to
be checked.
The “Gasket” is manufactured with special materials which
make it possible for this safety system to work. If you use
any “Gasket” which is not a genuine one
you run the real risk of cancelling out this safety system.
OPERATING INSTRUCTIONS
- Do not leave your Pressure Cooker unattended,
keep an eye on what the “Indicator” is doing, it
should be rising.
- For the Pressure Cooker to come under pressure, it
always has to contain water. It cannot be used with
oil only.
- Do not make any modifications to the safety systems
or use non original parts.
- Before opening the Pressure Cooker after cooking
has finished, shake it a little to avoid splashing.
CLOSING YOUR PRESSURE COOKER
-Using a cloth or pastry brush, smear a little olive oil around
the underside of the lip of the body of the Pressure Cooker
as this will aid in the removal of the lid after cooking,
specially when new. Do not try to force the lid close.
-Place the lid over the body so the arrow which is engraved
on the lid aligns with that of the body handle (Fig. D),
fleetingly inserting downward press on the lid at the
point opposite the lid handle making sure the lid is properly
fitted onto the body. Do not touch hot surfaces. Use the
handles. Always use heat resistant gloves.
Turn the lid clockwise until it stops (Fig. E).
Push the button backwards as far as it will go (Fig F).
The “High Security Device” will prevent the Pressure
Cooker from coming under pressure if the lid has
not been closed correctly.
COOKING WITH YOUR PRESSURE COOKER
OPERATING PRESSURES
- Place the Pressure Cooker on the heat set to maximum.
- You then have two options:
1.- If you want to use low pressure, wait for the first ring
to appear in the “Pressure Indicator”. Then reduce the
heat until this ring remains steady. You can use this to
soften food, finish off a meat stew, etc.
2.- If you want to use high pressure, and therefore higher
temperaturesandlesscookingtime,waitforthe secondring
to appear in the “Pressure Indicator” (Fig. G) and then lower
the heat as in the first case above.
This position is the best one for super fast cooking.
Cooking times are counted from the time when the
second ring appears in the “Pressure Indicator”.
- During cooking, it is NORMAL to observe slight losses of
steam through the safety valves.
- If you are cooking with gas, control the flame right from the
start, making sure it does not rise up from the base of the
cooker and placing the Pressure Cooker in the centre of the
heat. This will save energy and avoid the handles and gasket
becoming damaged.
END OF COOKING.
OPENING THE PRESSURE COOKER
- Once cooking has finished, remove the Pressure Cooker
from the heat, even if you have switched it off.
- Wait for the “Pressure Indicator” to go down (Fig. H) to
the bottom naturally.
- Move the “Opening Control” to the decompression
position (Fig. I) until all the steam has come out.
- Check that the PRESSURE DETECTOR is hidden in the “lid
handle”(Fig.J)andyoumaythenopenthePressureCooker.
- If not, put the Pressure Cooker into the sink and run
a little coldwater over ituntil the PRESSURE DETECTOR
can no longer be seen (Fig. K).
NEVER IMMERSE THE PRESSURE COOKER IN WATER.
Move the button to the OPEN position (Fig. O) and
keeping it pressed down turn the lid to the right as
far as it will go (Fig. P).
Never force the lid to open it.
PRACTICAL ADVICE
You will save energy if, once you have turned off the
heat, you keep the Pressure Cooker on the hob to make
use of the residual heat until the pressure goes down.
If a lot of steam comes out of the lid or the valve and no
pressure is obtained, this is a sign that the lid is not closed
correctly.
There may be various reasons for this:
a) The lid is not completely closed.
b) The“OpeningControl”is forwards,move it to the“CLOSED”
position (Fig. F).
c)
Ifthe“PressureRegulatorValve”(Fig.I)hasbeendismantled,
itmay nothavebeenreplacedcorrectlyorthe“ValveHolder
Screw” may not be tightened properly. Check this.
d) It has gone past the second “Pressure Indicator” signal
(Fig. A). Reduce the heat.
e) The “Gasket” is worn out. It will have to be replaced with
an original “Gasket”.
f) The “Gasket” is not correctly fitted to the lid.
CLEANING AND MAINTENANCE
To keep your Pressure Cooker in mint condition, we
recommend washing it after each use with warm soapy
water, following these instructions:
A- LID
- Do not wash in the dishwasher PRESSURE REGULATOR
VALVE (Fig. L).
- Loosen the “Screw” (25) and take out the ensemble.
- Remove the “Indicator” (22) and wash it in soapy water
usingasponge.Dothesame with the hole inthe “Pan”(40).
- Replace in reverse order to the way you removed the
parts and bearing in mind that the “Pan” (40) has a flat
area in the groove which should align with the one in the
hole in the lid. Make sure that before you start to assem-
bleit again the“Gasket” (21 and the“Spring” (23) arefit-
ted correctly.
Once you have reassembled it, the “Screw” (25) has to be
tightened manually and the “Indicator” should move fre-
ely up and down.
4
®
®
®

This Pressure Cooker conforms to the
EU directive 97/23/CE Pressure Equipment
Directive. The CE stamp is proof of
compliamce with this directive.
SUPER FAST PRESSURE COOKERS
Registered Trademark:
Type: 001 - 220 Capacity 2.7-3-4-6-8 litres
SALES ESTABLISHMENT
NAME OF THE PURCHASER
ADDRESS
TOWN
PROVINCE
DATE OF PURCHASE.................../...................../.................../
STAMP
The company warrants that
thisproductwillbe freefrom
defects in materials and
workmanship for a period of
two years (or for another
period that may be stated on
a specific product) under
normal household use from the date of the original purchase.
During the period of validity of this warranty:
a) The defective product shall be replaced or repaired free of charge
if a defective item is returned with original sales receipt.
b) C.M.D. S.L. entitles the original purchaser to repair or replace at
C.M.D. S.L. choice (a substitute of equal value will be supplied
when a warranted item is no longer in production) any defective
piece or article during the warranty term. The new item shall
then be warranted to be free from defects in materials and
workmanship for the unexpired term of original warranty. This
warranty does not apply to:
-Any damage resulting from improper use of the Pressure Cooker.
- Not complying strictly to the instructions for use that appear in
the instruction manual relative to use.
- Handling, maintenance and cleaning, misuse and overheating.
- Any damage caused by improper repair carried out by
non-authorised people or the use of non-original spare parts,
nor those parts that due to recurring use suffer deterioration
such as the silicone gasket and bakelite parts.
- Incidental or consequential damages are excluded by this warranty.
This section of the warranty to be kept by the purchaser.
THIS WARRANTY CARD WILL ONLY BE EFFECTIVE, IF IT IS FULLY
COMPLETED BY THE SELLING ESTABLISHMENT,
AT THE TIME OF PURCHASE.
WARRANTY CERTIFICATE
SUPER FAST PRESSURE COOKER Mod...
ompañía enaje oméstico S.L.
C/ Astintze nº6 - Apartado 23 - 48160 Derio (Vizcaya) - España
Tel. 944 544 222 - Fax 944 542 558 - 944 541 447
http://www.magefesa.com
®
NOTE: You do not have to clean the valve every time you use
your Pressure Cooker. It is enough to clean it on a regular
bsis when it gets dirty.
PRESSURE DETECTOR AND SAFETY VALVE
- Check that it is working correctly, pressing the closing
knob with a rod inside the lid. If it gives way, this is
correct (Fig. 2).
B- BODY
- Can be washed by hand or in the dishwasher.
- Sometimes, depending on the food and additives used
for cooking, as well as the calcium content of the water,
bluish or white stains may appear in the bottom of the
pan. These are deposits on the stainless steel and therefore
do not affect the properties of your Pressure Cooker.
Anystains like thiswilldisappear if yourub them withvinegar.
Do not leave bleach inside the pan (not even diluted in
water), or tomato sauce or salt water for long periods
of time to avoid corrosion.
C- GASKET
- This is specially made of long-life silicone (over 500 hours
of use). Wash it after every use, taking it out of its housing.
Once it is dry, replace it correctly (Fig. M).
- After a long period of use it should be replaced with
another original gasket.
To avoid steam escaping from the Pressure Cooker and
ensure that it operates correctly.
WARNINGS
Once you have cleaned your Pressure Cooker, store it with the
lid upside down on top of the pan so that the parts are aired.
If you note anything unusual in the operation of your
Pressure Cooker, take it to the nearest Approved Service
Centre for it to be checked. It is, anyway, advisable to take it to
oneof these ServiceCentresafter prolongeduse (approximately
every 2 years) to check that it is working correctly.
PLEASE NOTE
The gasket is considered worn out when, due to use,
the Pressure Cooker starts to lose steam through it and
does not reach the required pressure.
CMD-S.L. is only responsible for correct operation of all its
manufactured goods when they are fitted with:
ALWAYS AND EXCLUSIVELY USE
ORIGINAL REGISTERED
TRADEMARK SPARE PARTS
FOR YOUR OWN SAFETY!
5
Model
Type
Position Operating Pressure
Indicator down O kgs / cms2
Mageplus 001 - 220 Capacity 2.7-3-4-6-8 litres 1st indicador ring 0,55 kgs / cms2
2nd indicador ring 0,80 kgs / cms2
OPERATING PRESSURES
®
®

PRECAUTIONS IMPORTANTES AVANT CHAQUE UTILISATION
A - Lire toutes les instructions.
B - Ne pas permettre que les enfants s'approchent
du lieu où l'autocuiseur est utilisé.
C - Ne pas mettre l'autocuiseur dans un four
surchauffé.
D - Déplacer l'autocuiseur, lorsqu'il est empli de
vapeur, avec la plus grande précaution. Ne pas
toucher les surfaces chaudes. Utiliser les anses
et le manche. Si nécessaire, utiliser des gants.
E - Ne pas utiliser l'autocuiseur à des fins autres
que celles pour lesquelles il est destiné.
F - L'autocuiseur cuit sous pression. Une mauvaise
utilisation pourrait entraîner des blessures par
ébouillantage. S'assurer qu'il est convenablement
fermé avant de le chauffer.
G - Ne jamais ouvrir l'autocuiseur en le forçant.
Ne pas ouvrir l'autocuiseur avant d'être sûr
que la vapeur à l'intérieur a complètement dis-
paru.
H - Ne jamais utiliser l'autocuiseur sans eau, car il
en serait gravement endommagé.
I - Ne pas remplir l'autocuiseur au-delà des 2/3
de sa capacité. Pour les aliments qui se dilatent
durant la cuisson comme le riz, les légumes
secs ou la compote, ne remplir que jusqu'à la
moitié de son volume.
J - Utiliser les sources de chaleur conformément
au mode d'emploi.
K - Après avoir cuisiné des viandes à peau (par
exemple de la langue) ayant un risque de gon-
fler à la température, ne pas piquer la viande
tant que la peau présente un aspect gonflé car
cela pourrait entraîner des blessures par
ébouillantage.
L - En cuisinant des aliments pâteux, remuer
doucement l'autocuiseur avant d'ouvrir le cou-
vercle afin d'éviter les éclaboussements.
M - Vérifier toujours, avant chaque utilisation, que
les soupapes ne sont pas obstruées. Consulter
le mode d'emploi.
N - Ne jamais utiliser l'autocuiseur pour frire les
aliments sous pression.
O - Ne manipuler aucun des systèmes de sécurité
au-delà de ce qui est stipulé dans les instruc-
tions de maintenance exposées dans le manuel
d'utilisation.
P - Utiliser uniquement des pièces de rechange
d'origine, conformément au modèle
correspondant. Notamment, utiliser la
cuve, le couvercle et le joint de fermeture
désignés par la marque .
Q - Conserver ces instructions.
6
INDICATEUR DE PRESSION:
Vérifiez qu'il glisse doucement, en poussant l'indicateur de la
soupape avec une tige vers l'intérieur du couvercle, jusqu'au
bout (Fig. 1). Si vous sentez un frottement, démontez-le et
nettoyez-le (Cf. ENTRETIEN ET NETTOYAGE Chapitre A).
SOUPAPE DÉTECTRICE DE PREESSION ET SÉCURITÉ
:
Vérifiez son fonctionnement correct en poussant la
bille de fermeture avec une tige à l'intérieur du couvercle;
si elle cède, son fonctionnement est correct (Fig.2).
REMPLISSAGE DE L’AUTOCUISEUR:
- Pour des raisons de sécurité, le remplissage maximum de
l’autocuiseur est des 2/3 de sa capacité.
- Si vous cuisinez des aliments ayant tendance à gonfler ou
à produire de la mousse (pois chiches, lentilles, poireaux,
pâtes, riz ou légumes), ne remplissez que jusque la moitié
afin d'éviter tout risque d'obstruction des soupapes de
sécurité antérieurement citées.
- La quantité minimum de liquide dans l’autocuiseur doit
être de 1/4 litre.
AVANTAGES DE
L’AUTOCUISEUR SUPER RAPIDE
PLUS SÛR
L’autocuiseur de marque a réussi à
s'imposer comme l’autocuiseur le plus sûr du marché.
Aidez-nous à maintenir cet avantage en refusant toute
pièce de rechange NON ORIGINALE (surtout les "joints de
fermeture") altérant cette sécurité.
PLUS RAPIDE
Spécialement conçu pour cuisiner le plus rapidement
possible, tout en conservant toutes les vitamines et le
goût des aliments.
PLUS ÉCONOMIQUE
La cuisson est plus rapide, permettant d'économiser tout
type d'énergie utilisée dans votre cuisine.
5. SYSTÈMES DE SÉCURITÉ
Cet autocuiseur dispose de cinq systèmes de sécurité:
1 et 2- Dispositif de haute sécurité à l'ouverture et à
la fermeture:
Ils'agitd'unmécanismesituédansle"mancheducouvercle"
chargé d'éviter l'ouverture de l’autocuiseur si il a de la
pression à l'intérieur, aussi faible soit-elle. Dans ce cas, le
"Détecteur de pression" est visible et IL EST IMPOSSIBLE
D'OUVRIR LE COUVERCLE (Fig. N).
®
®
Fig. 1 Fig. 2

Par contre, s'il n'y a pas de pression, il sera caché dans le
trou du manche (Fig. J). Dans ce cas, l’autocuiseur peut
s'ouvrir, le " JOINT DE FERMETURE " étant impulsé par le
pivot porteur du POUSSOIR.
Si l’autocuiseur est mal fermé, ce dispositif ne lui permet
aucun type de pression.
Sécurité pendant le fonctionnement.
3 Soupape régulatrice de pression:
Elle maintient à tout moment la pression de travail de
l’autocuiseur, en laissant sortir la vapeur restante (Fig. A).
4 Soupape détectrice de pression et sécurité:
Elle agit en cas d'augmentation de pression (Fig. B). Cette
soupapefonctionnesil'"indicateurdepression"nefonctionne
pas correctement.
5 Fenêtre du couvercle:
Au cas où un des deux dispositifs de sécurité antérieurs
s'avérait bouché, la fenêtre du couvercle permet la sortie du
"Joint de fermeture" en expulsant toute la vapeur (Fig. C).
Dans ce cas, apportez l’autocuiseur à un Service
d'Assistance Technique. Il convient de réviser les deux
systèmes de sécurité antérieurs.
Ce "joint de fermeture" est fabriqué avec des matériaux
spéciaux permettant le bon fonctionnement de ce système.
Si vous utilisez tout autre type de joint non original, vous
courrez le risque d'annuler ce système de sécurité.
INSTRUCTIONS DE FONCTIONNEMENT
-Ne laissez pas l’autocuiseur sans surveillance,
surveillez la montée de "l'indicateur".
- Pour que l’autocuiseur obtienne de la pression, il
doit toujours avoir de l'eau. On ne peut pas utiliser
seulement de l'huile.
-N'effectuez aucune modification des systèmes de
sécurité et n'utilisez aucun joint falsifié, qui ne soit pas
de la marque .
-Avant d'ouvrir l’autocuiseur, après la cuisson, agitez-le
légèrement afin d'éviter tout risque d'éclaboussure.
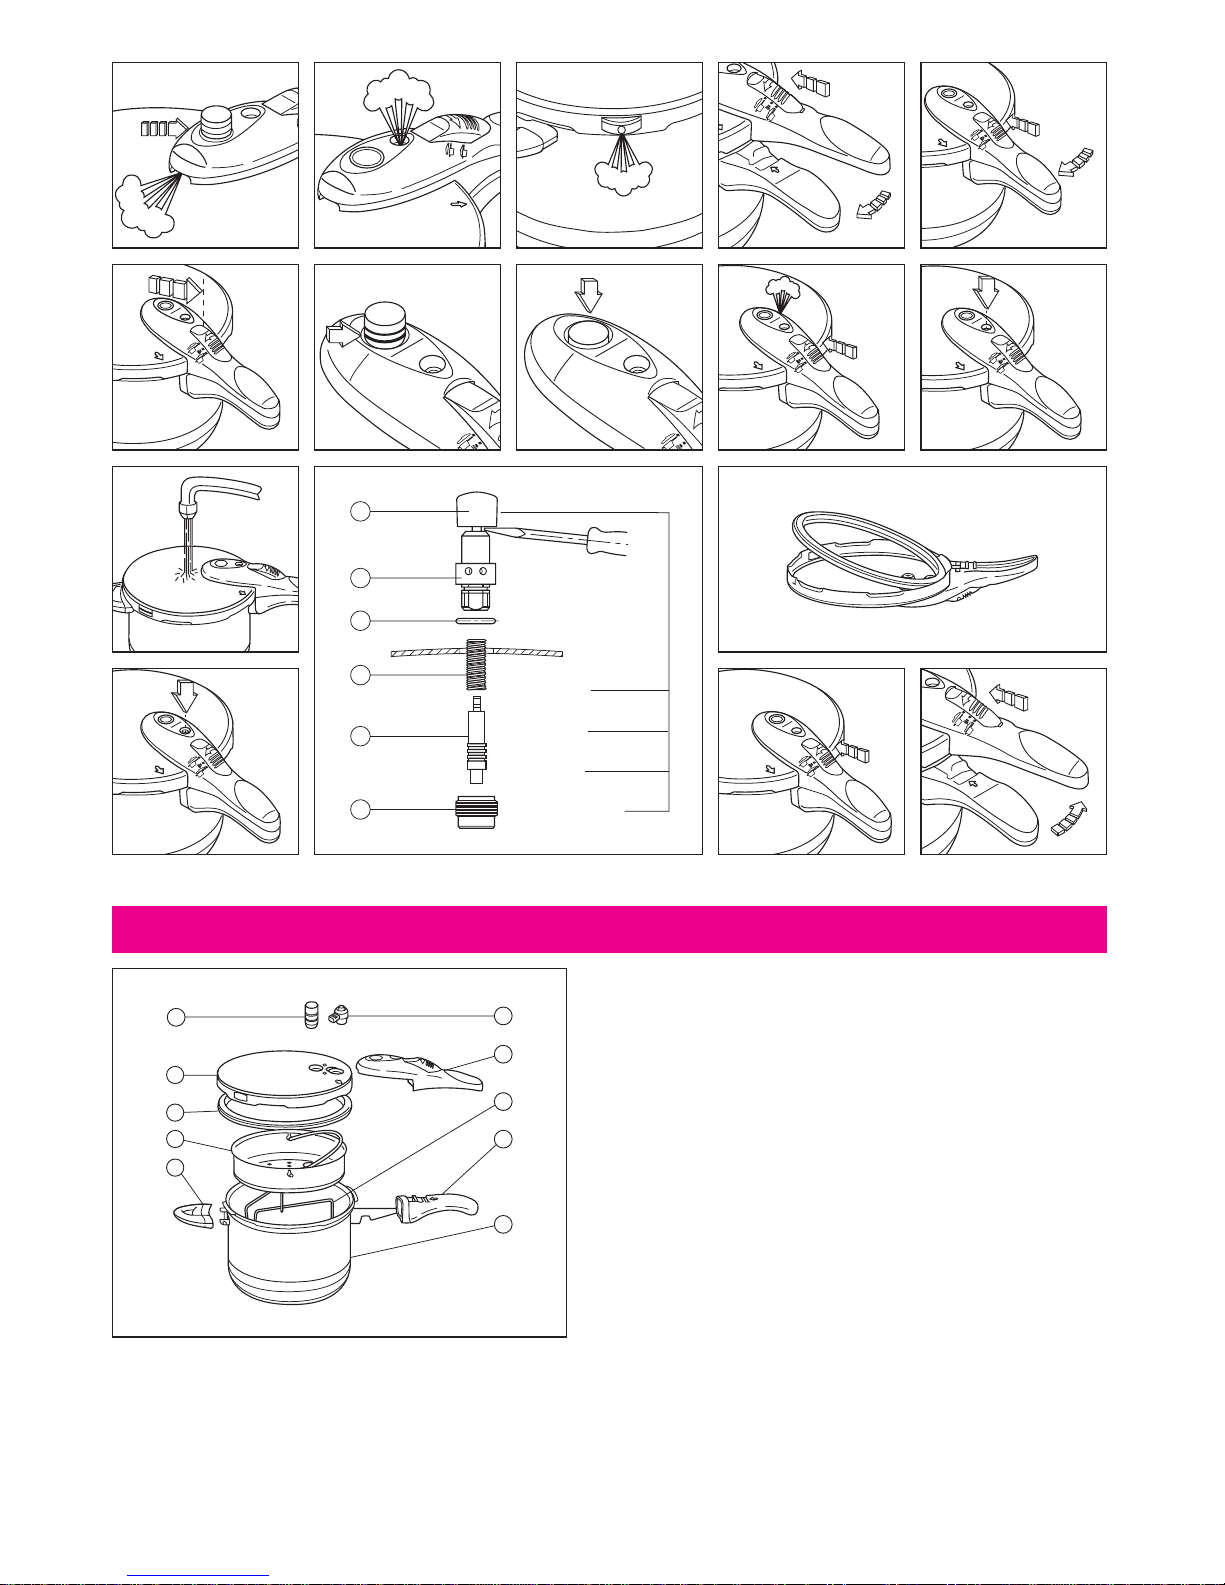
POUR FERMER L’AUTOCUISEUR
-Déplacez le poussoir sur la position OUVERT, placez le
couvercle sur la cuve en faisant coïncider la flèche
gravée sur le couvercle avec celle du manche (Fig. D)
et emboîtez le couvercle avec la cuve.
Faites tourner le couvercle dans le sens des aiguilles
d'une montre jusqu'au bout (Fig. E).
Déplacez le poussoir en arrière jusqu'au bout
(Fig. F). le "dispositif de haute sécurité" empêche
l’autocuiseur de prendre la pression si le couvercle
n'a pas été fermé correctement.
CUISSON AVEC L’AUTOCUISEUR
PRESSIONS DE FONCTIONNEMENT
-Placez l’autocuiseur sur le feu, au maximum.
- Vous pouvez alors suivre deux voies:
1. Si vous souhaitez utiliser la pression faible, attendez
que sur "l'indicateur de pression" apparaisse le premier
signal.Baissezensuitelefeujusqu'à ce que cette marque
se maintienne. Dans ce cas, vous pouvez ramollir les
aliments, terminer un ragoût, etc.
2. Si vous souhaitez utiliser la haute pression, et donc
une température plus élevée et un temps de cuisson
plus court, attendez le second signal de "l'indicateur
de pression" (Fig. G) et baissez l'intensité de la chaleur
comme dans le cas antérieur.
-Cette position est indiquée pour une cuisson super
rapide. Les temps de cuisson commencent à compter
-à partir du moment où le second signal apparaît sur
"l'indicateur de pression".
- Pendant la cuisson, il est normal d'observer de petites
pertes de vapeur par les soupapes de sécurité.
-Si vous utilisez le gaz, contrôlez la flamme dès le début,
évitant qu'elle ne dépasse le fond et placez l’autocuiseur
bien centré sur le feu; vous économiserez de l'énergie et
éviterezla détériorationdes ansesetdu joint defermeture.
FIN DE CUISSON, OUVERTURE DE L’AUTOCUISEUR
-Une fois la cuisson terminée, retirez l’autocuiseur du
feu, même s'il est éteint.
-Laissez descendre "l'indicateur de pression" (Fig. H)
tout seul jusqu'au bout.
-Placez la "commande d'ouverture" sur la position de
décompression (Fig. I) jusqu'à ce que sorte toute la
vapeur.
-Vérifiez quele DÉTECTEUR DE PRESSIONest bien caché
dans l'orifice du "manche couvercle" (Fig. I). Vous
pourrez ensuite ouvrir l’autocuiseur.
-Sinon, placez
l’autocuiseur
dans l'évier, en laissant
tomber sur le couvercle un petit fil d'eau jusqu'à ce que
le "DÉTECTEUR DE PRESSION" se cache (Fig. K).
NE JAMAIS SUBMERGER L’AUTOCUISEUR DANS L'EAU.
Placez le poussoir sur la position OUVERT (Fig. O) et en le
laissant poussé, tournez le couvercle vers la droite jusqu'au
bout (Fig. P).
Ne forcez jamais le couvercle pour l'ouvrir.
CONSEILS PRATIQUES
Vous économiserez plus d'énergie si, une fois le feu éteint,
vouslaissez
l’autocuiseur
surlacuisinière en profitantainsi
de la chaleur résiduelle jusqu'à ce que la pression baisse.
Au cas où beaucoup de vapeur sortait du couvercle ou de la
soupape,celaindiqueque
l’autocuiseur
n'estpasbienfermé.
Les causes peuvent être diverses:
a) Le couvercle n'est pas allé jusqu'au bout au moment de la
fermeture.
b) Le "Manche d'ouverture" est vers l'avant ; placez-le sur la
position FERMÉ (Fig. F).
c)-Au cas où la "soupape régulatrice de pression" ait été
démontée(fig.I),celle-ci n'est pas bien montée, ou"lavisde
fixation de soupape" (25) n'est pas bien serrée. Révisez-la.
d)-Le signal de sécurité de "l'indicateur de pression" a été
dépassé (Fig. A). Réduisez la puissance calorifique du feu.
e)-Le "Joint de fermeture" est usé ; remplacez-le par un joint
original .
f)-Le "Joint de fermeture" n'est pas bien emboîté dans le couvercle.
ENTRETIEN ET NETTOYAGE
Pour maintenir
l’autocuiseur
comme au premier jour,
nous vous recommandons, avec chaque utilisation, de la
nettoyer à l'eau tiède en suivant les instructions suivantes:
A. COUVERCLE
-Ne pas le mettre au lave-vaisselle
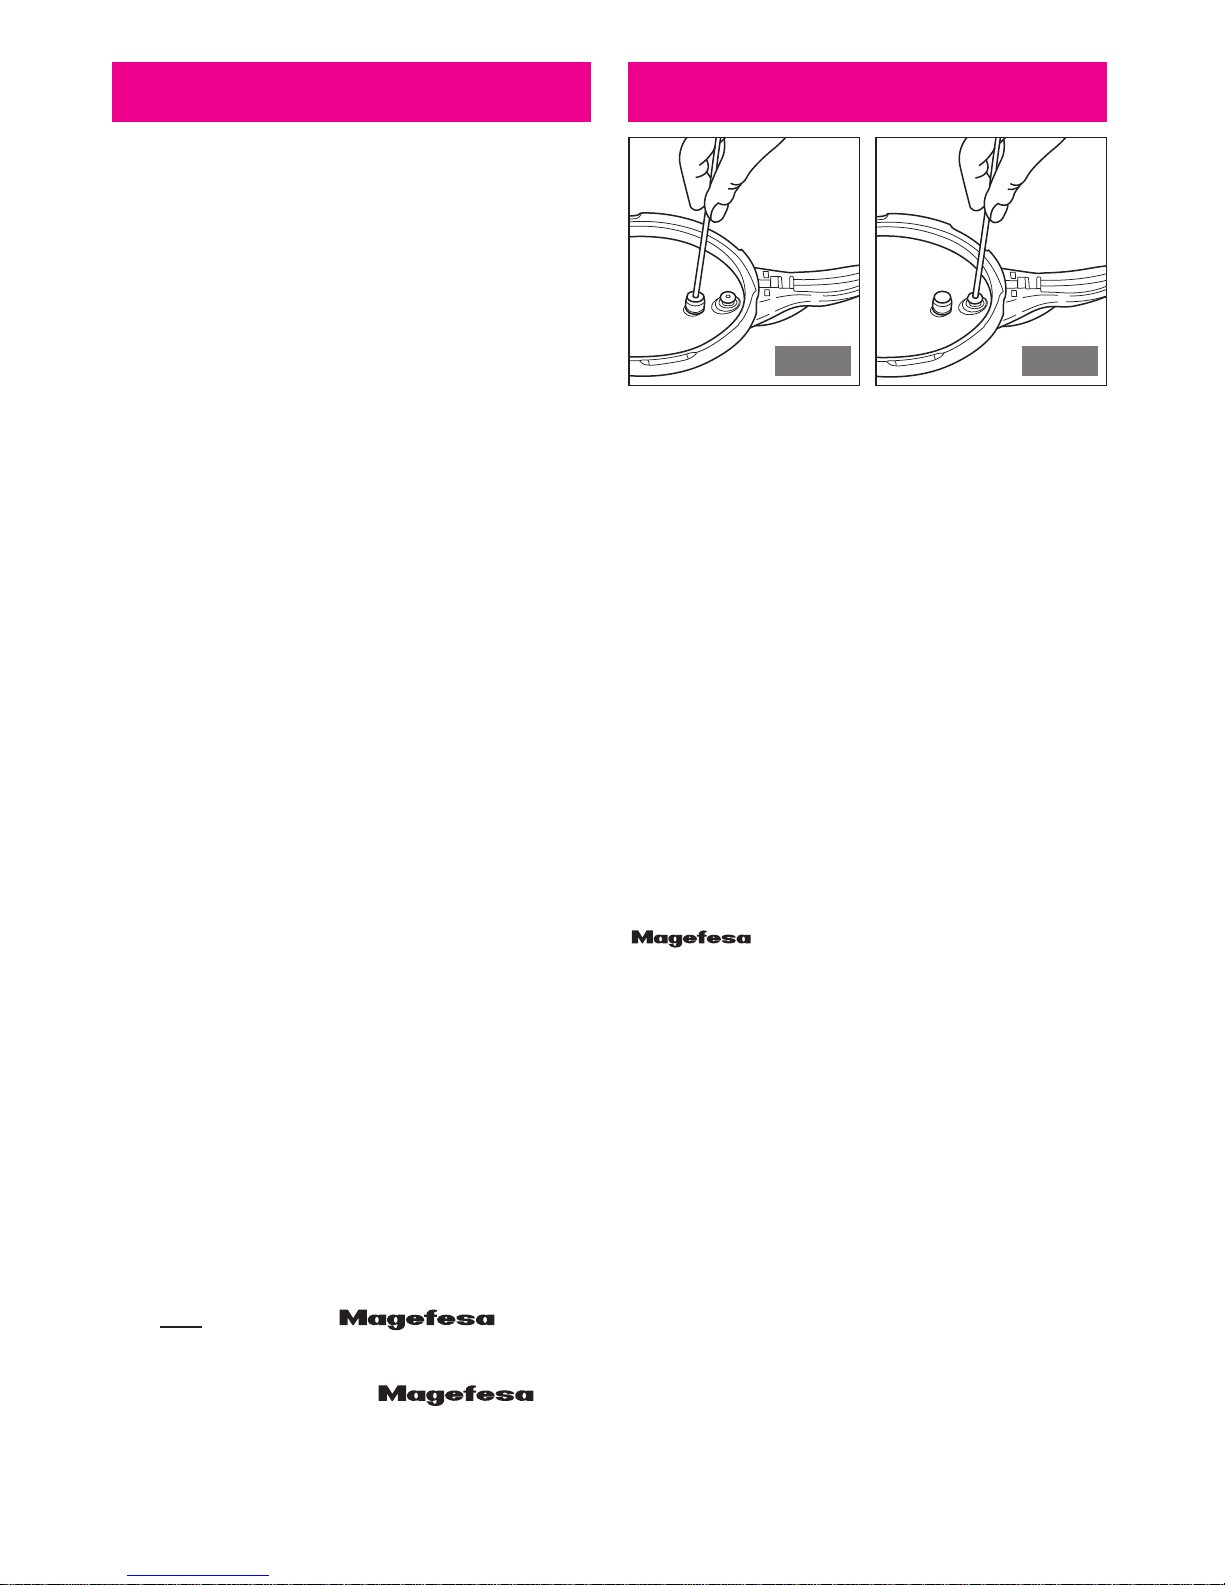
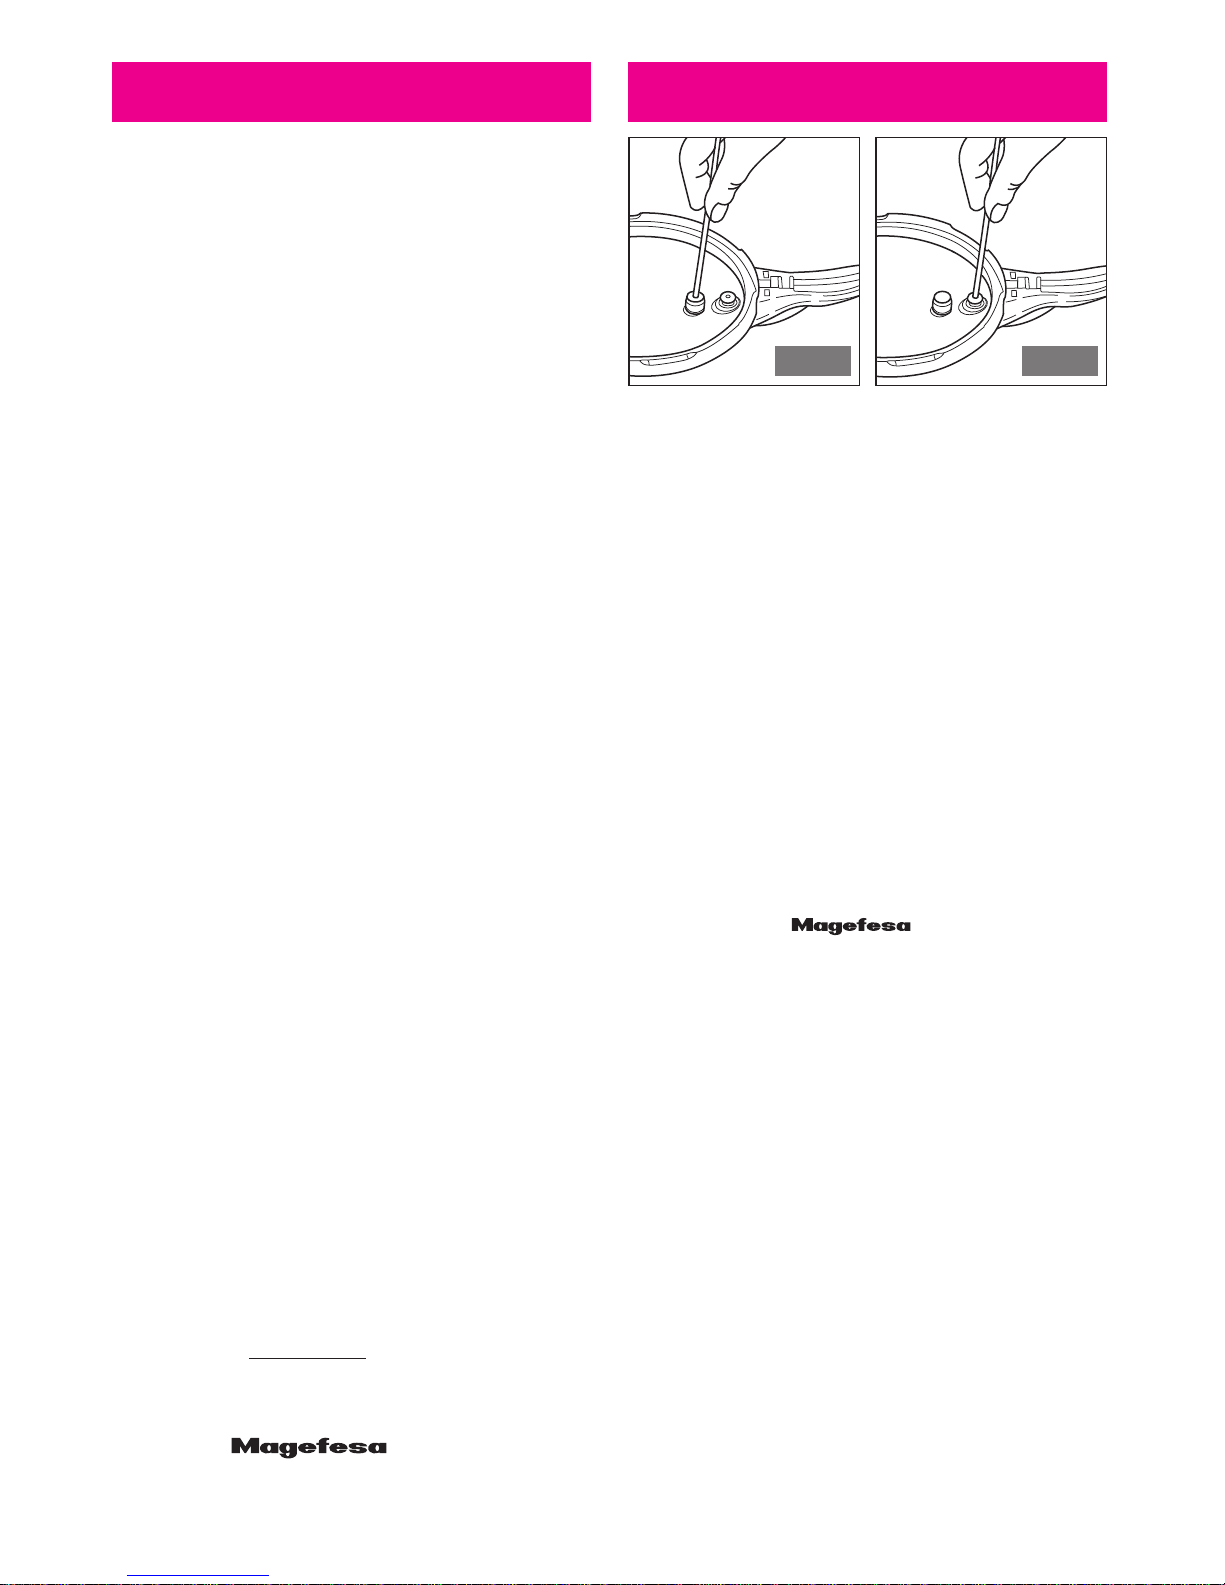
SOUPAPE RÉGULATRICE DE PRESSION (Fig. L).
-Relâchez la "Vis" (25) et extraire l'ensemble.
-Sortez "I'indicateur" (22) et lavez-le à l'eau, avec détergent et
une éponge. Faites la même chose avec l'orifice du "corps" (40).
-Remontez dans le sens inverse tout en tenant compte du
fait que le "corps" (40) possède dans la vis une zone plate
quidoit coïncideravec celledel'orifice ducouvercle. Assurez-
vous que, avant de procéder au montage, le "joint" (21) et
le "ressort" (23) sont bien placés.
7
®
®

Cet appareil A LA GARANTIE
DE DEUX ANS, à partir de la
date d'achat, contre tout
défaut de fabrication.
Pendant cette periode de
temps, LES RECHANGES ET
LA REPARATION SERONT
COMPLETEMENT GRATUITS.
La garantie ne comprend pas les pannes produites par une incorrecte utilisation de l’appareil, reparations effectuées par personnel
non autorisé, inclusion de pièces de réchange non originaux, ni des pièces que, par l’utilisation habituelle, ont une détérioration pro-
pre de l’usage.
Partie de la garantie à conserver par le client.
LA GARANTIE SERA EFFECTIVE SEULEMENT DANS LE CAS OÙ ELLE SOIT COMPLÉTEMENT CUMPLIMENTÉE PAR
L'ÉTABLISSEMENT VENDEUR, DANS LE MOMENT DE L'ACHAT.
Après le montage, la "vis" (25) doit rester bien serrée
manuellement et "l'indicateur" (22) doit monter et
descendre sans difficulté.
NOTE: Il n'est pas nécessaire de nettoyer la soupape après
chaque utilisation de l’autocuiseur; il suffit de le faire
régulièrement à chaque trace de saleté.
SOUPAPE DÉTECTRICE DE PRESSION ET SÉCURITÉ
-Vérifiez son fonctionnement correct en poussant la bille de
fermeture avec une tige à l'intérieur du couvercle; si elle
cède, son fonctionnement est correct (Fig. 2).
B. CUVE
-Lavez-la à la main ou au lave-vaisselle.
- Parfois, et ceci en fonction des aliments et additifs utilisés,
ainsi que du contenu calcaire de l'eau utilisée, des taches
bleutées ou blanches peuvent apparaître au fond de
l’autocuiseur, des dépôts sur l'acier. Ceci n'affecte en
aucun cas ses propriétés. Toutes ces taches disparaissent
en frottant au vinaigre.
Ne laissez à l'intérieur ni eau de javel (pas même diluée
en eau), ni sauce tomate, ni eau salée pendant des
périodes de temps prolongées afin d'éviter la rouille.
C. JOINT DE FERMETURE
-Spécial en silicone de longue durée (supérieure à 500
heures de fonctionnement). Lavez-le après chaque
utilisation en le sortant de son emplacement; une fois
sec, replacez-le correctement (Fig. M).
-Après un long temps d'usage, le faire remplacer par une
pièce d’origine , afin d’éviter de possibles
fuites de vapeur et garantir un fonctionnement correct
de l’autocuiseur.
AVERTISSEMENTS
Une fois l’autocuiseur propre, rangez-le avec le couvercle
placé à l'envers, sur la cuve pour que les pièces s'aèrent.
Si vous observez quelque anomalie dans le fonctionnement
de l’autocuiseur, apportez-le au Service d'Assistance techni-
que officiel le plus proche afin d'effectuer une révision per-
tinente. De toute façon, il est conseillé, après une utilisation
prolongée (tous les 2 ans environ) de l'apporter à un de ces
services afin de vérifier son fonctionnement correct.
ATTENTION
Le joint de fermeture est considéré usé lorsque, dû à
l'usage, l’autocuiseur commence à perdre et n'atteint
pas la pression suffisante.
C.M.D.-S.L. ne se responsabilise du fonctionnement parfait
de tous ses produits fabriqués que lorsque ils sont conve-
nablement utilisés.
UTILISEZ TOUJOURS ET UNIQUEMENT
DES RECHANGES
ORIGINAUX MARQUE
¡POUR VOTRE SÉCURITÉ!
8
®
®
Modèle
Type
Position Pression fonctionnement
Indicateur en bas O kgs / cms2
Mageplus 001 - 220 Capacité 2,7-3-4-6-8 litres 1er signal de l’indicateur 0,55 kgs / cms2
2ème signal de l’indicateur 0,80 kgs / cms2
PRESSIONS DE FONCTIONNEMENT
Cet appareil est conforme à la Directive
EU 97/23/CE Directive d’équipements
sous pressión. La marque CE atteste
la conformité avec la dite directive.
AUTOCUISEUR ULTRA RAPIDE
MARQUE:
Type: 001 - 220 Capacité 2,7-3-4-6-8 litres
®
ÉTABLISSEMENT VENDEUR
NOM DU CLIENT
ADDRESSE
LOCALITÉ
PROVINCE
DATE D’ACHAT.................../...................../.................../
TIMBRE
CERTIFICAT DE GARANTIE
AUTOCUISEUR Mod...
ompañía enaje oméstico S.L.
C/ Astintze nº6 - Apartado 23 - 48160 Derio (Vizcaya) - España
Tel. 944 544 222 - Fax 944 542 558 - 944 541 447
http://www.magefesa.com

9
PRECAUÇÕES IMPORTANTES
A - Ler todas as instruções.
B - Não permita que as crianças se aproximem do
local onde se está a utilizar a panela de pressão.
C - Não colocar a panela num forno quente.
D - Desloque a panela com a máxima precaução
quando esta tenha pressão. Não toque nas
superficies quentes. Utilize as asas e os cabos.
Caso seja necessário, use luvas.
E - Não utilizar a panela de pressão para um uso
distinto ao que está destinada.
F - A panela coze sob pressão. Podem-se provocar
lesões, por escaldadura, por um uso inadequado.
Assegure-se de que está convenientemente fechada
antes de a aquecer. Consultar as instruções de uso.
G - Não abrir nunca a panela de pressão forçando-a.
Não abrir a panela antes de ter a certeza de que a
pressão no interior desapareceu completamente.
Consultar as instruções de uso.
H - Não utilizar nunca a panela sem água, pois
poderia danificá-la gravemente.
I - Não encher a panela mais de 2/3 da sua
capacidade. Para a cocção de alimentos que se
dilatam durante a cozedura como o arroz, os
legumes secos ou a compota, encha apenas até
a metade do seu volume.
J - Utilizar as fontes de calor segundo as
instruções de uso.
K - Depois de cozinhar carnes com pele (por
exemplo língua) com risco de ficarem
inchadas pelo efeito da temperatura, não
pique a carne enquanto a pele apresentar um
aspecto inchado pois pode produzir lesões por
escaldadura.
L - Ao cozinhar alimentos pastosos, agitar
suavemente a panela de pressão antes de
abrir a tampa para evitar salpicaduras.
M - Verificar sempre, antes de cada uso, se as
válvulas não estão obstruidas.
N - Não utilizar nunca a panela para fritar
alimentos à pressao.
O - Não manuseie nenhum dos sistemas de
segurança além do estipulado nas instruções
de manutenção precisadas no manual de
utilização.
P - Utilizar unicamente peças de reposição
originais segundo o modelo correspondente.
Especialmente, utilize um corpo, uma tampa
e uma junta de fecho designados por da
marca .
Q - Conservar estas instruções.
ANTES DE CADA UTILZAÇÃO
INDICADOR DE PRESSÃO:
Verifique se desliza suavemente, pulsando o indicador da
válvula com uma vareta pelo interior da tampa, até atingir
o limite (fig. 1). Se notar atrito desmonte-a e proceda com
a sua limpeza (Ver MANUTENÇÃO E LIMPEZA, parágrafo A).
VÁLVULA DETECTORA DE PRESSÃO E SEGURANÇA:
Verifique o seu correcto funcionamento, pulsando a
esfera de vedação com uma vereta pelo interior da
tampa, se ceder é correcto (fig.2).
PREENCHIMENTO DA PANELA:
- Por razões de segurança o preenchimento máximo da
panela é de 2/3 da sua capacidade.
-Se cozinhar alimentos que tendam a inchar-se ou a
produzir espuma (como grãos de bico, lentilha, alhos
porros, massas, arroz ou verduras) encha somente até a
metade, para evitar riscos de obstrução das válvulas de
segurança mencionadas anteriormente.
- A mínima quantidade do líquido na panela deve ser de
1/4 litro.
VANTAJENS DA PANELA SUPER RÁPIDA:
MAIS SEGURANÇA
A panela da marca consegue ser a panela
mais segura do mercado. Ajude-nos a continuar a sê-lo,
recusandoqualquerpeçadereposiçãoqueNÃOSEJAORIGINAL
(sobretudo "juntas de vedação") que alteram tal segurança.
MAIS RAPIDEZ
Elaboradaespecialmenteparacozinharomaisrápidopossível,
conservando os alimentos, as suas vitaminas e sabores.
MAIS ECONOMIA
A cocção é realizada com mais rapidez, permitindo econo-
mizar qualquer tipo de energia que utilize no seu fogão.
5. SISTEMAS DE SEGURANÇA
Esta panela dispõe de cinco sistemas de segurança:
1 e 2 Dispositivos de alta segurança, para a abertura e
fechamento:
Este mecanismo, situado no "cabo da tampa", tem como
objectivo evitar que se abra a panela quando houver
pressão no interior, por menor que seja, em cujo caso o
"detector de pressão", saltará e NÃO SE PODE ABRIR A
TAMPA (Fig. N).
Caso contrário, se não tiver pressão, estará oculto no orifício
docabo (FigJ). Neste casopode-se abrir,sendo quea "junta
de vedação" será impulsionada pelo pivot do "botão".
Se a panela estiver mal fechada, este dispositivo não permite
que tenha pressão.
®
®
Fig. 1 Fig. 2

Segurança durante o funcionamento:
3. Válvula reguladora de pressão:
Mantém em todo momento a pressão de trabalho da
panela, deixando sair o vapor sobrante (Fig. A).
4. Válvula detectora de pressão e segurança:
Actua se se gera um aumento de pressão (Fig. B).
Estaválvulaactivar-se-á, caso o"indicadordepressão" não
actue correctamente.
5. Janela da tampa:
Nocaso de queseobstruam os doisdispositivosde segurança
anteriores, a janela da tampa permite a saída da "junta
de vedação" expulsando todo o vapor. (Fig. C).
Se isto acontecer leve-a a um Centro de Assistência
Técnica. É necessário revisar os dois sistemas de
segurança anteriores.
Esta "junta de vedação" foi fabricada com materiais
especiais que tornam possível o funcionamento deste
sistema de segurança. Se você utilizar qualquer outra
junta no original, correrá o risco de anular este sistema
de segurança.
INSTRUÇÕES DE FUNCIONAMENTO
-Não deixe de observar a panela, preste atenção à
subida do "Indicador".
- Para que a panela tenha pressão, sempre deve conter
água. Não pode ser utilizada só com óleo.
-Não faça adaptações nos sistemas de segurança, nem
utilize juntas falsificadas, ou outras que não forem as
originais da marca .
-Antes de abrir a panela, depois de cozinhar, agite-a
ligeiramente para evitar salpicaduras.
PARA FECHAR A PANELA
-Accione o botão até a posição ABERTO, coloque a tampa
sobre o corpo fazendo coincidir a seta gravada na tampa
com a do cabo (Fig. D) e
encaixando a tampa no corpo.
Gire a tampa no sentido horário, até o limite (Fig. E).
Accione o botão para trás até o limite (Fig. F). O
"dispositivo de alta segurança" impede que a
panela tenha pressão se a tampa não for fechada
correctamente.
COCÇÃO NA PANELA
PRESSÕES DE FUNCIONAMENTO
-Coloque a Panela no fogo, com o foco calorífico regulado
ao máximo.
-Depois pode-se seguir dois caminhos.
1. Se deseja utilizá-la à baixa pressão, espere que no
"indicador de pressão" apareça o primeiro sinal. Diminua
depois a intensidade do fogo até que se mantenha tal
marca. Deste modo, você pode amaciar os alimentos,
terminar um cozido de carne, etc.
2. Se desejar usá-la à alta pressão, portanto com maiores
temperaturas e menor tempo de cocção, espere sair o
segundosinal do "Indicadordepressão"(Fig. G) ediminua
a intensidade do calor como no caso anterior.
Esta posição é a indicada para um fogão super rápido.
-Os tempos de cocção começam a contar desde o
momento que aparece o segundo sinal do "indicador
de pressão".
Durante a cocção é NORMAL observar pequenas perdas
de vapor pelas válvulas de segurança.
-Se utilizar um fogão a gás, controle a chama desde o
princípio, evitando que ultrapasse o fundo e coloque a
panela centrada no fogo, com isso economizará energia e
evitará que se deteriorem as asas e junta de vedação.
FIM DE COCÇÃO. ABERTURA DA PANELA
-Uma vez terminada a cocção, retire a panela do fogo,
ainda que esteja apagado.
-Deixe abaixar o "indicador de pressão" (Fig. H) até o final,
de maneira natural.
-Accione o "comando de abertura" na posição de
descompressão (Fig. 1) até que saia todo o vapor do
interior.
- Verifique se o DETECTOR DE PRESSÃO está oculto no
orifício do "cabo da tampa" (fig. J), então você poderá
abrir a pressão.
-Se não for assim, ponha a panela na pia, deixando cair
sobre a tampa um pequeno jacto de água, até que se
oculte o "detector de pressão" (Fig. K).
NO SUBMIRJA NUNCA A PANELA NA ÁGUA.
-
Accione o botão até a posição ABERTO (Fig. 0), e
mantendo-o apertado gire a tampa à direita, até o
limite (Fig. P).
Não force nunca a tampa para abri-la.
CONSELHOS PRÁTICOS
Economizará energia se, uma vez apagado o lume, mantiver
a panela sobre o fogão, aproveitando o calor residual do
mesmo até diminuir a pressão.
No caso de sair muito vapor pela tampa ou pela válvula e
nãoapanhe pressão, háum indício de que apanela nãoestá
bem fechada.
As causas podem ser várias:
a) A tampa, ao fechá-la, não chegou ao limite.
b) O "comando de abertura" está virado para frente. Leve-o
à posição FECHADO (Fig. F).
c) No caso de se desmontar a "válvula de regulagem de
pressão" (Fig. 1) não está bem montada ou a "porca de
sujeição válvula" (25) não está bem apertada. Revise-a.
d) Sepassouo segundo sinaldo"indicadorde pressão"(Fig. A).
Reduza a potência calorífica do fogo.
e) A "junta de vedação" está gasta, em cujo caso é preciso
substitui-la por uma original da marca .
f) A "junta de vedação" não está bem encaixada na tampa.
MANUTENÇÃO E LIMPEZA
Para manter a panela como nova, recomendamos, depois
de usá-la, lavá-la com água morna, seguindo as seguintes
ilustrações:
A- TAMPA
-Não a coloque na lava-loiças.
VÁLVULA REGULADORA DE PRESSÃO (Fig. L).
- Solte a "porca" (25) e extraia o conjunto.
-Retire o "indicador" (22) e limpe-o com água, sabão e uma
esponja. Faça o mesmo com o orifício do "corpo" (40).
- Volte a montar no sentido contrário ao descrito anteriormente,
mastendoemcontaqueo"corpo"(40)temumazonaplanana
rosca que deve coincidir com a do orifício na tampa.
Certifique-se de que, antes de proceder com uma nova
montagem, a "porca" (25) está bem apertada manualmente
e que o "indicador" sobe e desce sem dificuldade.
NOTA: não é necessário proceder com a limpeza da válvula cada
vez que se utiliza a panela. Bastará fazê-lo periodicamente
quando se verifique sujidade.
10
®
®

Garanteestapanela durante
um prazo de 2 anos a partir
da data da compra,contra
todos os defeitos de fabrico.
Duranteoperíododegarantia
o proprietário tem direito a:
a) Reparação totalmente gratuita dos defeitos ou imperfeições
de origem.
b) No caso da reparação efectuada não for satisfatória e o objecto
não estiver em perfeitas condições para cumprir o uso a que se
destina, o proprietário da garantia terá direito à substituição do
objecto adquirido,por outro de idênticas características, ou à
devolução do dinheiro pago.
NÃO ENTRA NA GARANTIA:
-Defeito produzidos por um mal uso do objeto, como podem ser:
golpes, ação do fogo ou reações electroquimicas por a água,
água sanitária, ou produtos de limpeza.
- Reparaçõs efetuadas por pessoal não autorizado ou utilização
de recâmbios não originais, nem aquelas peças que por seu uso
habitual sofrem um desgaste propio de sua utilização, como
junta do fecho, peças de bakelita, etc.
Parte de garantia a conservar o usuário
VÁLVULA DETECTORA DE PRESSÃO E SEGURANÇA
- Verifique o seu funcionamento correcto, pulsando a esfera
de vedação com uma vareta pelo interior da tampa, se
ceder é correcto (Fig. 2).
B- CORPO
- Lavá-lo normal ou na lava-loiças.
- Em algumas ocasiões, dependendo dos alimentos e
aditivos para cozinhar, assim como do conteúdo calcário
da água utilizada, podem aparecer no fundo da panela
manchas azuladas ou brancas, que são depósitos sobre o
aço, portanto, este não se vê em absoluto afectado nas
suas propriedades.
Todas estas manchas desaparecem frotando com vinagre.
Não deixe lixívia no interior (nem sequer diluída em
água) nem molho de tomate, nem água salgada
durante um período prolongado, para evitar
corrosões
.
C- JUNTA DE VEDAÇÃO
- É especial, de silicone de longa duração (superior a 500
horas de funcionamento). Lave-a depois de cada uso
retirando-a do seu alojamento, uma vez seca coloque-a
correctamente no seu lugar (Fig. M).
11
Depois de longo tempo de uso, deve trocá-la por outra
nova ORIGINAL da marca .
A fim de evitar possíveis vazamentos na panela e garantir
o seu correcto funcionamento.
ADVERTÊNCIAS
Uma vez limpa a panela, guarde-a com a tampa colocada ao
contrário, sobre o corpo para que se arejem as peças.
Se observar qualquer anomalia no funcionamento da panela,
leve-a ao Serviço de Assistência Técnica Oficial mais próximo
para efectuar a sua revisão pertinente. De qualquer modo, é
aconselhável, depois de um uso prolongado (a cada 2 anos,
aproximadamente) levá-la a um dos centros de assistência
para verificar o seu correcto funcionamento.
ATENÇÃO
A junta de vedação considera-se gasta quando, devido
ao uso, a panela começa a vazar e não atinge a pressão
suficiente.
C.M.D.-S.L. só se responsabilizará do perfeito funcionamento
de todos os seus produtos, unicamente quando se:
UTILIZE SEMPRE E
EXCLUSIVAMENTE PEÇAS
ORIGINAIS MARCA ,
¡PELA SUA PRÓPRIA SEGURANÇA!
®
A GARANTIA SÓ TERÁ EFEITO, NO CASO DE QUE SEJA
TOTALMENTE PREENCHIDAPOR O ESTABELECIMENTO
VENDEDOR, NO MOMENTO DA COMPRA.
®
Modelo
Tipo
Posição Pressão Funcionamento
Indicador para baixo 0 kgs / cms2
Mageplus 001 - 220 Capacidade 2,7-3-4-6-8 litros 1º sinal do indicador 0,55 kgs / cms2
2º sinal do indicador 0,80 kgs / cms2
PRESSÃO DE FUNCIONAMENTO
Esta panela está conforme a directiva
EU 97/23/CE. Directiva de equipamentos
a pressão. O selo CE atesta conformidade
com a citada directiva.
PANELAS A PRESIÓN SUPER RÁPIDAS
Marca:
Tipo: 001 - 220 Capacidade 2,7-3-4-6-8 litros
ESTABLECIMENTO VENDEDOR
NOME DO COMPRADOR
ENDEREÇO
CIDADE
ESTADO
DATA DA COMPRA.................../...................../.................../
CARIMBO
CERTIFICADO DE GARANTIA
PANELA A PRESIÓN SUPER RÁPIDA Mod...
ompañía enaje oméstico S.L.
C/ Astintze nº6 - Apartado 23 - 48160 Derio (Vizcaya) - España
Tel. 944 544 222 - Fax 944 542 558 - 944 541 447
http://www.magefesa.com
®

12
WICHTIGE VORSICHTSMASSNAHMEN
A -
Lesen Sie alle Anweisungen aufmerksam durch.
B -
Während des Gebrauchs lassen Sie Kinder nicht
in die Nähe des Schnellkochtopfs kommen.
C -
Schnellkochtopf nicht in einen warmen Ofen
stellen.
D -
Bewegen Sie den Schnellkochtopf mit großer
Vorsicht, wenn im Inneren Druck herrscht.
Berühren Sie nicht die heißen Oberflächen.
Verwenden Sie die Griffe. Falls erforderlich,
ziehen Sie sich Schutzhandschuhe an.
E -
Verwenden Sie niemals den Schnellkochtopf für
andere als für die vorgesehenen Zwecke.
F -
Der Schnellkochtopf kocht unter Druck. Bei einem
nicht angemessenen Umgang können Verletzungen
durch die heißen Brühflüssigkeiten erlitten werden.
Überzeugen Sie sich, daß der Schnellkochtopf
entsprechend geschlossen ist, bevor Sie ihn aufwär-
men. Ziehen Sie die Gebrauchsanweisungen heran.
G -
Öffnen Sie den Schnellkochtopf niemals mit
Gewalt. Öffnen Sie ihn niemals, ohne vorher
sicher zu stellen, daß überhaupt kein Druck
mehr im Inneren vorhanden ist. Ziehen Sie die
Gebrauchsanweisungen heran.
H -
Niemals Schnellkochtopf ohne Wasser benutzen,
denn dies würde ihn schwer beschädigen.
I -
Schnellkochtopf nicht mehr als 2/3 seines
Inhalts auffüllen. Bei Speisen die während des
Kochvorgangs aufquellen, wie zum Beispiel, Reis,
trockene Hülsenfrüchte oder Kompott, nur bis
zur Hälfte des Topfinhalts füllen.
J -
Heizquellen entsprechend den Gebrauchsan-
weisungen verwenden.
K -
Wenn Sie Fleisch mit einer aufgrund der
Temperatur aufblähenden Haut (zum Beispiel
Zunge) kochen, dann stechen Sie niemals in die
Haut während diese ein aufgeblasenes Aussehen
aufweist, denn Sie könnten dadurch
Brandwunden erleiden.
L -
Werden cremige Speisen gekocht, dann rütteln
Sie sanft den Schnellkochtopf bevor Sie ihn
öffnen, um Spritzer zu vermeiden.
M -
Überprüfen Sie immer vor jedem Gebrauch, daß
die Ventile nicht verstopft sind. Ziehen Sie die
Gebrauchsanweisungen heran.
N -
Schnellkochtopf niemals als Bratpfanne zum
Braten von Speisen verwenden.
O -
Hantieren Sie niemals an den Sicherheitssystemen
über den in der Gebrauchsanleitung vorgeschriebe-
nen Pflegeanweisungen hinaus.
P -
Als Ersatzteile verwenden Sie AUSSCHLIESSLICH
Originalteile gemäß dem
entsprechenden Modell. Insbesondere sind der
von angegebene Korpus,
Deckel und Verschlußdichtung zu verwenden.
Q - B
EWAHREN SIE DIESE ANWEISUNGEN AUF
.
VOR JEDEM GEBRAUCH
Abb. 1 Abb. 2
DRUCKANZEIGER:
Überprüfen Sie ob er sanft gleitet, hierzu mit einem Stab an der
Deckelinnenseite auf den Ventilanzeiger, bis auf Anschlag ein-
drücken (Abb. 1). Sollten Sie eine gegenwirkende Reibung bemer-
ken, dann bauen Sie das Ventil ab und reinigen Sie es (Siehe PFLE-
GE UND REINIGUNG Absatz A).
VENTIL ZUR SICHERHEIT UND DRUCKERKENNUNG:
ÜberprüfenSiedasVentilaufordnungsgemäßeFunktion.Hierzu
drücken Sie an der Deckelinnenseite mit einem Stab auf die
Verschlußkugel;gibtdiese nach,dannist sieinOrdnung(Abb. 2).
FÜLLEN DES SCHNELLKOCHTOPFS:
-Aus Sicherheitsgründen soll der Schnellkochtopf maximal bis
2/3 seines Inhalts gefüllt werden.
-Falls Sie aufblähende oder schaumbildende Speisen kochen
(wie Kichererbsen, Linsen, Porree, Nudeln, Reis oder Gemüse)
dann füllen Sie nur bis zur Hälfte, um Verstopfungsgefahren
an den oben genannten Sicherheitsventilen zu vermeiden.
-Die einzufüllende Mindestmenge hat 1/4 l. zu betragen.
VORTEILE DES SUPER-SCHNELLKOCHTOPFS:
ERHÖHTE SICHERHEIT
Dem Schnellkochtopf der Marke ist es gelungen
sich zum sichersten Schnellkochtopf des Marktes zu gestalten.
Helfen Sie uns bitte diesen Zustand so weiter zu erhalten,
indem Sie NICHT ORIGINALE Ersatzteile ablehnen (insbesondere
"Verschlußdichtungen"), die diese Sicherheit beeinträchtigen.
ERHÖHTE SCHNELLIGKEIT
Besonders entworfen, um so rasch wie möglich zu kochen,
wobeizugleichalle Vitamine und Geschmäcker erhalten bleiben.
WIRTSCHAFTLICHER
Der Kochvorgang erfolgt schneller, so daß Sie bei allen, von Ihrem
Kochherd geleisteten Energiearten sparen werden.
5 SICHERHEITSSYSTEME
Dieser Schnellkochtopf besitzt über fünf Sicherheitssysteme:
1 und 2 Hochsicherheitssystem beim Öffnen und Schliessen:
Es handelt sich um einen im "Topfgriff" eingebauten.
Mechanismus, dessen Aufgabe es ist, ein Öffnen des
Schnellkochtopfszu vermeiden, sofernimInneren,seiauchnur
in winzigem Maße, Druck herrschen würde. In diesem Fall ist
der Druckdetektor sichtbar und DER DECKEL KANN NICHT
GEÖFFNET WERDEN (Abb. N).
Andernfalls, wenn im Inneren kein Druck vorhanden ist,
befindet er sich im Loch des Griffs verborgen (Abb.I). In diesem
Fall kann der Schnellkochtopf geöffnet werden, wobei die
"VERSCHLUSSDICHTUNG" vom Stift des "DRUCKKNOPFS"
angestoßen verbleibt.
Sollte der Schnellkochtopf nicht richtig geschlossen werden,
dann verhindert diese Vorrichtung den Druckaufbau im Inneren.
®
®
®

13
Sicherheit während des Gebrauchs:
3 Druckregelventil
Hält jederzeit den Arbeitsdruck im Schnellkochtopf aufrecht
und läßt überschüssigen Dampf heraus (Abb. A).
4 Ventil zur Druckerkennung und Sicherheit
Reagiert bei einer Druckerhöhung (Abb. B). Sollte dieses
Ventil auslösen, geschieht dies, weil der "Druckanzeiger"
nicht richtig funktioniert.
5- Deckelfenster
Sollten beide oben genannten Sicherheitsvorrichtungen
ausfallen, dann gestattet das Deceklfenster den Austritt
der "Verschlußdichtung" und läßt den gesamte Druck
heraustreten (Abb. C).
Falls sich derartiges ereignen würden, bringen Sie bitte den
Schnellkochtopf zu einem Technischen Kundendienst. Es ist
erforderlich beide obigen Sicherheitssysteme zu überprüfen.
Diese "Verschlußdichtung" ist mit Spezialmaterialien hergestellt
worden, die die Wirksamkeit dieses Sicherheitssystems
ermöglichen. Wenn Sie andere nicht originale Dichtungen
einsetzen, besteht die Gefahr dieses Sicherheitssystem zu
annullieren.
GEBRAUCHSANWEISUNGEN
- Verlassen Sie den Schnellkochtopf niemals ohne
Aufsicht, achten Sie auf die Anhebung des "Anzeigers".
-Damit sich der Druck im Schnellkochtopf aufbauen kann,
muß dieser immer Wasser enthalten. Man darf nicht
allein mit Öl kochen.
-Nehmen Sie keine Änderungen an den Sicherheitssystemen
vor, verwenden Sie keine gefälschten Dichtungen, die
nicht Originalteile der Marke sind.
-Bevor Sie den Schnellkochtopf öffnen, nach dem
Kochvorgang, schütteln Sie ihn etwas hin und her, um
Spritzer zu vermeiden.
ZUM SCHLIESSEN DES SCHNELLKOCHTOPFS
-Bestätigen Sie den Druckknopf bis zur Stellung AUF, legen
Sie den Deckel auf den Topf bis der Pfeil auf dem Deckel mit
dem des Griffs übereinstimmt (Abb.D) und Topf und Deckel
einrasten.
DrehenSiedenDeckelbisaufAnschlagimUhrzeigersinn(Abb.E).
Schieben Sie den Druckknopf nach hinten bis auf
Anschlag (Abb. F) Die "Hochsicherheitsvorrichtung"
vermeidet, daß sich im Schnellkochtopf Druck aufbaut,
soweit der Deckel nicht richtig geschlossen wurde.
KOCHVORGANG IM
SCHNELLKOCHTOPF KOCHDRÜCKE
-Stellen Sie den Schnellkochtopf auf die Kochstelle und
schalten sie die maximale Wärmeabgabe ein.
- Anschließend können Sie zwei Wege befolgen:
1.-Falls Sie den niedrigen Druck wünschen, warten Sie, daß am
"Druckanzeiger" die erste Markierung erscheint. Stellen Sie
anschließend die Wärmeleistung soweit herunter, bis diese
Markierung erhalten bleibt. Auf dieser Stellung können Sie
Speisen aufweichen, ein Fleischgericht fertigkochen, usw.
2.-Falls Sie den hohen Druck, und demzufolge höhere
Temperaturen und kürzere Kochzeit wünschen, warten Sie bis
die zweite Markierung des "Druckanzeigers"(Abb.G) erscheint
und stellen Sie die Wärme herunter, so wie im obigen Fall.
DieseStellungistfürdasSuperschnelle Kochen vorgewiesen.
Der Ablauf der Kochzeiten beginnt ab dem Zeitpunkt zu
welchem die zweite Markierung am "Druckanzeiger"
erscheint.
-Während des Kochvorgangs ist es NORMAL kleine Druckverluste
an den Sicherheitsventilen zu erblicken.
-Bei Gasherden überwachen Sie die Flammen von Anfang an,
vermeiden Sie dabei, daß sie am Topfboden hervortreten und
stellen Sie den Schnellkochtopf zentriert über das Herdfeuer,
Sie werden somit Energie sparen und eine Beschädigung an
Griffen und Verschlußdichtung vermeiden.
ENDE DES KOCHVORGANGS.
SCHNELLKOCHTOPF ÖFFNEN
-NachbeendetemKochvorgang,entfernenSiedenSchnellkochtopf
von der Herdplatte, auch wenn diese abgestellt wurde.
-LassenSie den "Druckanzeiger" vollkommen vonalleineabsinken
(Abb. H).
-Stellen Sie den "AUF-Knopf" auf Druckabbaustellung (Abb. I),
bis der Dampf das Topfinnere vollständig verlassen hat.
-Überprüfen Sie, daß der DRUCKANZEIGER sich im Loch des
"Deckelgriffs" verborgen befindet (Abb. J), dann können Sie
den Schnellkochtopf öffnen.
-Sollte dies nicht geschehen, stellen Sie den Schnellkochtopf in
das Spülbecken und lassen Sie auf den Deckel einen kleinen
Wasserstrahl fließen, bis der "DRUCKANZEIGER" sich verkriecht.
NIEMALS SCHNELLKOCHTOPF
IN WASSER EINTAUCHEN.
Drücken Sie den Druckknopf auf die Stellung AUF (Abb. O),
halten Sie ihn eingedrückt und drehen Sie den Deckel nach
rechts bis zum Anschlag (Abb. P).
Zwängen Sie niemals gewaltsam den Deckel, um ihn zu
öffnen.
PRAKTISCHE HINWEISE
Sie sparen Energie, wenn Sie nach Abschalten der
Wärmequelle den Schnellkochtopf auf der Herdplatte lassen
und deren Restwärme ausnutzen.
Sollte eine hohe Dampfmenge durch den Deckel oder am
Ventil austreten und kein Druck zustande kommen ist dies ein
Anzeichen eines nicht gut geschlossenen Schnellkochtopfs.
Die Ursachen können verschieden sein:
a) Beim Schließen hat der Deckel den Anschlag nicht erreicht.
b) Der "AUF-Knopf" steht vorne, bringen Sie ihn bis auf die
Position ZU (Abb. F).
c) Falls Sie das "Druckregelventil" (Abb.I) ausgebaut hätten, ist es
eventuell nicht wieder richtig eingebaut worden oder die
"Ventilbefestigungsmutter" (25) ist nicht richtig angezogen.
Überprüfen Sie dies.
d) Die zweite Markierung des "Druckanzeigers" wurde überschritten
(Abb.A). Reduzieren Sie die Hitzeleistung der Herdplatte.
e) Die "Verschlußdichtung" ist abgenutzt, in diesem Fall ist sie
mit einer Originaldichtung der Marke zu
ersetzen.
f) Die "Verschlußdichtung" ist nicht richtig im Deckel angeordnet.
PFLEGE UND REINIGUNG
Um den Schnellkochtopf so wie am ersten Tag zu erhalten,
empfehlen wir, ihn nach dem Gebrauch mit lauwarmem
Wasser zu spülen und dabei folgende Hinweise zu befolgen:
A-DECKEL
-Niemals in die Spülmaschine legen DRUCKREGELVENTIL (Abb. L).
-"Mutter" (25) lösen und den gesamten Bausatz herausnehmen.
-"Anzeiger" (22) herausnehmen und mit Wasser, Spülmittel
und einem Schwamm spülen. Ebenso mit dem Loch am
"Korpus" (40) vorgehen.
-In umgekehrter Reihenfolge wieder einbauen, hierbei jedoch
beachten, daß der "Korpus" (40) am Gewinde einen flachen
Bereich besitzt, der mit dem des Deckellochs übereinstimmen muß.
Überzeugen Sie sich vor dem Einbau, daß die "Dichtung" (21) und
die "Feder" (23) richtig angeordnet sind. Nach erfolgtem Einbau, ist
die"Mutter"(25) mitderHandfestanzuziehen und
der"Anzeiger"
(22) hat ohne Schwierigkeiten hoch und runter zu gleiten.
®
®

ANMERKUNG: Es ist nicht erforderlich, das Ventil nach jedem
Gebrauchzureinigen,esgenügtdieReinigunginregelmäßigen
Zeitabständendurchzuführen,wennVerschmutzungenfestgestellt
werden.
VENTIL ZUR DRUCKERKENNUNG UND SICHERHEIT
-Überprüfen Sie das Ventil auf ordnungsgemäße Funktion.
Hierzu drücken Sie an der Deckelinnenseite mit einem Stab
auf die Verschlußkugel; gibt diese nach, dann ist sie in
Ordnung (Abb. 2).
B- TOPF
- Spülen Sie ihn wie gewöhnlich oder in der Spülmaschine
- Gelegentlich kann abhängig von den gekochten Speisen und
Zugaben, sowie vom Kalkinhalt des Wassers am Boden des
Schnellkochtopf bläuliche oder weiße Flecken erscheinen; es
handelt sich um Ablagerungen auf dem Stahl, dessen
Eigenschaften in keiner Weise beeinflußt werden.
All diese Flecken verschwinden, wenn sie mit Essig abgerieben
werden.
Lassen Sie im Inneren niemals längere Zeit Laugen (auch nicht
in Wasser gelöst), sowie auch nicht Tomatensoßen oder
Salzwasser um Korrosionen zu vermeiden.
C- VERSCHLUSSDICHTUNG
-
Spezial in Silikon für lange Dauer (über 500
Gebrauchsstunden) ausgeführt. Spülen Sie sie nach jedem
Gebrauch. Nehmen Sie sie hierzu heraus und nachdem sie
trockenist,bringenSiesiewiederrichtiganihrenPlatz(Abb.M).
14
Nach einer langen Gebrauchszeit müssen Sie sie durch eine
neue ORIGINALE der Marke ersetzten, um
eventuelle Dampfundichtheiten am Schnellkochtopf zu
vermeiden und dessen ordnungsgemäße Funktion
sicherzustellen.
WARNUNGEN
Einmal sauber, bewahren Sie den Schnellkochtopf mit
umgekehrt aufliegenden Deckel auf, damit die Bauteile sich
belüften können.
Falls Sie irgendwelche Fehlfunktionen am Schnellkochtopf
feststellen würden, bringen Sie ihn zum nächstliegenden
Offiziellen Technischen Kundendienst, um dort die entspre-
chenden Überprüfungen durchzuführen. Jedenfalls ist es
zwechmäßig nach einem längeren Gebrauch (ungefähr jede
2 Jahre) ihn zu einen solcher Kundendienstezubringen,umdie
ordnungsgemäße Funktion überprüfen zu lassen.
ACHTUNG
Die Verschlußdichtung gilt als abgenutzt, wenn aufgrund
des Gebrauchs, am Schnellkochtopf Verluste auftreten
und nicht mehr ausreichender Druck erreicht wird.
C.M.D.-S.L. haftet für den einwandfreien Betrieb aller ihrer
Fabrikate,nurwenndieseauchzusammenverwendetwerden:
VERWENDEN SIE IMMER UND
AUSSCHLIESSLICH
ORIGINALE ERSATZTEILE DER
MARKE
FÜR IHRE SICHERHEIT!
®
®
Modell
Typ
Position Betriebsdruck
Anzeiger unten O kgs / cms2
Mageplus 001 - 220 Inhalt 2,7-3-4-6-8 Liter 1ºAnzeigersignal 0,55 kgs / cms2
2ºAnzeigersignal 0,80 kgs / cms2
BETRIEBSDRUCK
Auf diesen Schnellkochtopf
geben wir eine Garantie für
die Dauer ZWEIJAHRE vom
Kaufdatuman gerechnet,gegen
alle Herstellungsmängel.
Während der Garantiezeit sind
MATERIALE UND ARBEITSZEITEN
VOLLLKOMMEN KOSTENFREI.
Nicht der Garantie unterliegen Schäden, die auf unsachgemäße Nutzung vom Schnellkochtopf zurückzuführen sind, sowie auf Reparaturen
durch nicht dazu ermächtigte Personen, Nichtverwendung von Originalersatzteilen, sowie alle Teile, die durch normalen Gebrauch einem
natürlichen Verschleiß unterliegen.
Für den Käufer bestimmter Teil der Garantie-Urkunde.
DIE GARANTIE IST NUR DANN GÜLTIG, WENN DIE URKUNDE IM AUGENBLICH DES VERKAUFES
VOM HÄNDLER VOLLSTÄNDIG AUSGEFÜLLT WURDE.
Es ist gemäss zur europäische
Anleitung 97/23/CE
Prüfung CE von Art N (Modul B)
TÜV Rheinland ON
SUPER SCHNELLKOCHTOPF
Marke:
Typ: 001 - 220 Inhalt 2,7-3-4-6-8 Liter
®
VERKAUFSSTELLE
NAME DES KÄUFERS
ANSCHRIFT
ORT
PROVINZ
VERKAUFSDATUM.................../...................../.................../
STEMPEL
GARANTIE-URKUNDE
SUPER-SCHELLKOCHTOPF Mod...
ompañía enaje oméstico S.L.
C/ Astintze nº6 - Apartado 23 - 48160 Derio (Vizcaya) - España
Tel. 944 544 222 - Fax 944 542 558 - 944 541 447
http://www.magefesa.com

COOKING TIME GUIDELINE TABLES
- This Pressure Cooker's cooking system reduces energy consumption since less time is required than in other cooking systems, including
traditional or normal.
- Times should be counted from when the second signal appears in the 'pressure indicator'. They are to be used as a guideline and may
vary depending on the hardness of the food, the size of the pieces, the amount of water used and, definitively, individual tastes.
TABLEAUX ORIENTATIFS DE TEMPS DE CUISSON
-Le système de cuisson de cet l'autocuiseur réduit la consommation d'énergie grâce aux besoins de temps inférieurs à d'autres
systèmes de cuisson, traditionnel ou normal.
-Les temps doivent commencer à compter au moment du deuxième signal de "l'indicateur de pression"; ils sont orientatifs et peuvent
varier en fonction de la dureté des aliments, leur coupe, l'eau utilisée et finalement du goût de chacun.
TABELAS ORIENTADORAS DE TEMPO DE COCÇÃO
- O sistema de cocção desta panela reduz o consumo de energia devido ao facto de necessitar menos tempo que os outros sistemas
de cozinha, inclusive o tradicional ou normal.
- Os tempos devem ser contados a partir do momento em que apareça o segundo sinal do "indicador de pressão"; são orientadores e
poderão variar segundo a dureza dos alimentos, corte, água utilizada e, definitivamente, segundo o gosto de cada um.
RICHTTABELLEN KOCHZEITEN
-Das Kochsystem dieses Schnellkochtopfs reduziert den Energieverbrauch, da er weniger Zeit benötigt als andere Kochsysteme,
einschließlich das traditionelle oder normale System.
-Die Kochzeiten sind ab dem Zeitpunkt zu dem die zweite Markierung des "Druckanzeigers" erscheint zu zählen; es handelt sich um
Richtwerte, Sie können abhängig von der Härte der Speisen, des Schnitts, des verwendeten Wassers und letzten Endes vom
Geschmack jedes einzelnen, verschieden sein.
The recipes shown below are designed for 4 people. • Les recettes ci-joint sont conçues pour 4 personnes.
As receitas apresentadas a seguir foram elaboradas para 4 pessoas. • Die nachstehenden Kochrezepte sind für 4 Personen konzipiert.
15
SOUPS • SOUPES • SOPAS • SUPPEN
Min.
Garlic • Soupe à l’ail • De alho • Knobauch-Suppen
4
Onion • Soupe à l’oignon • De cebola • Zwiebel-S.
4
Noodles with ham •
Soupe au vermillece avec du jambon •
De presunto • Schinken-S.m. Nudeln
5
Pasta • Soupe aux pâtes • De massa • Nudel-S.
5
Fish • Soupe de poissons • De peixe • Fisch-S.
5
Vegetables (juliana) • Soupe aux légumes •
De juliana • Gemüse-S. (Julienne)
5
Rice • Soupe au riz • De arroz • Reis-S.
6
Chicken • Bouillon de poulet • De pollo • Hühner-S.
6
SAUCES • SAUCES • MOLHOS • SOSSEN
Hunter • Gibier • Caçador • Jägersosse
4
Bordeaux • Bordelaise • Bordalesa • Bordelaise
4
Spanish • Espagnole • Espanhol • Spanische Sosse
8
Vizcaina • Biscayenne • Biscaino • Bizkaiasosse
12
VEGETABLES • LÉGUMES FRAIS • VERDURAS • GEMÜSE
Broccoli • Brocoli • Beterraba • Brokkoli
1
Brussels sprouts • Chous de Bruxelles •
Couve de Bruxelas • Rosenkohl
4
Leeks • Poireaux • Alho porro • Porrestangen
4
Spinach • Epinards • Espinafres • Spinat
4
Broad beans • Fèves • Favas • Saubohnen
4
Cabbage • Chou blanc • Repolho • Kohl (Weisskohl)
5
Cauliflower • Chou fleur • Couve flor • Blumenkohl
5
Artichokes • Artichauts • Alcachofras • Artischoken
6
Runner beans • Haricots verts • Feijão verde • Grüne Bohnen
6
Carrots • Carottes • Cenouras • Möhren
6
Asparagus • Asperges • Espargos • Spargel
7
PASTAS • PATES • MASAS • TEIGWAREN
Spaghetti • Spaghetti • Esparguete • Spaghetti
5
Macaroni • Macaroni • Macarrão • Makkaroni
6
Rice with chicken • Poulet au riz • Arroz de frango • Reis mit Huhn
7
Withe rice • Riz blanc • Arroz branco • Reis
7
POTATOES • POMMES DE TERRE • BATATA • KARTOFFELN
Leek and potato soup • Avec des poireaux
5
Steamed • Vapeur • Cozidas a vapor • Brühkartoffeln
6
Rioja style • A la façon de la Rioja • A moda da Rioja • Mit Chorizo
6
With cod • Avec de la morue • Com bacalhau • Mit Dorsch
7
PULSE VEGETABLES • LEGUMES SECS • LEGUMES • EINTÖPFE
Min.
Lentils • Lentilles • Lentilhas • Linsen
12
Red beans • Haricots rouges • Feijão encarnado • Rote Bohnen
15
White bean • Haricots blancs • Feijão branco • Weisse Bohnen
15
Chick peas • Pois chiche • Grão de bico • Kirchererbsen
20
FISH • POISSONS • PEIXES • FISCH
Steamed mussels • Moules vapeur • Mexihões ao vapor •
Gedünst Miesmuscheln
2
Hake • Colin • Pescada • Seehecht/Dorsch
4
Trout • Truite • Truta • Forellen
4
Squid • Calamars • Lulas • Tintenfische
6
Marmitako • “Marmitako” • Marmitako • Marmitako
10
Uctopus • Poulpe • Pulvo • Krake
12
MEAT •VIANDES et VOLAILLES • CARNES • FLEISCH
Kidneys drenched in Sherry • Rognons au Xérès •
Rins ao Jerez • Nierchen in Sherry
6
Chicken drenched in Sherry • Poulet au Xérès •
Frango ao Jerez • Sherryhuhnin
9
Partridges in sauce • Cailles en sauce • Codornizes • Wachteln
10
Lyonnese rabbit • Agneau • Coelho • Hase Lyonaisse
12
Meat balls • Lapin Lyonnaise • Almondegas • Fleischklösschen
12
Shepherdess lamb • Croquettes de viande • Cabrito • Lamm
12
Chilindron chicken • Poulet basquaise • Frango • Huhn
13
Stews • A l’étouffée • Estufados • Schmorfleisch
15
Chicken in pepper • Fricassée de Poule • Galhina • Hühnerfrikassee
16
Beef sirloin steak • Faux filet de boeuf • Acém de boi • Ochsenlende
16
Snails • Escargots • Caracois • Weinbergschnecken
16
Veal Ragoût • Ragoût de veau • Vitela • Kalbsragout
20
Roast beef • Rôti • Reçondo asado • Roastbeef
22
Tripe • Tripes • Mãos de cordeiro • Mangenwand
30
Pig’s trotters • Pieds de porc • Tripas • Schweinehaxe
30
DESSERTS • DESSERTS • POSTRES • NACHSPEISEN
Plums drenched in wine • Prunes au vin•
Ameixas com vino • Pflaumen Weinsosse
2
Banana gâteau • Galette de bananes • Tarte de banana • Bananen Torte
2
Apples drenched in cider • Pommes au cidre •
Maçãs com sidra • Äpfel in Apfelwein
3
Crème Caramel • Flan • Pudim flan • Milchpudding
5
Stewed apples • Pommes cuites • Maçãs cozidas • Gebratene Äpfel
7

®
RECAMBIO ORIGINAL
OLLAS SUPER RAPIDAS
REGISTRO SANITARIO N-39.01.773/VI
La materia prima de este producto es de SILASTIC ©
junta de silicona, fabricada por Dow Corning STI.
SILASTIC es una marca registrada de la Dow Corning Corporation, MI, USA.
tipo 2365 D
Ref.: 919086 - E/Revisión: 0
ORIGINAL SPARE PARTS - PIÈCES DE RECHANGE ORIGINALES
PEÇAS ORIGINAIS - ORIGINALERSATZTEILE
This in the only original
marke seal valid for
your Pressure Cooker
You must always request this BLISTER exclusively,
rejecting any imitation.
ORIGINAL MARKE
SPARE PARTS
The use of any other spare part may cause serious
problems in the functioning of your Pressure Cooker.
Voici le seul joint d'étancheité
original valable pour
votre Autocuiseur
Vous devez toujours exiger ce BLISTER et refuser
toute imitation
PIÈCES DE RECHANGE
ORIGINALES
L'utilisation de toute autre pièces de rechange
pourrait entraîner de graves problèmes de
fonctionnement de votre Autocuiseur
C/Astintze,nº 6 - Apartado 23 - 48160 Derio (Vizcaya) España
Telf.: (0034) 944 544 222 - Fax:(0034) 944 542 558 - (0034) 944 541 447
http://www.magefesa.com
HEALTH REGISTRATION N-39.01.773/VI
REGISTRE SANITAIRE N-39.01.773/VI
Esta é a única junta original
marca válida
para a sua Panela
Deverá sempre solicitar exclusivamente este
BLISTER, rejeitando todo tipo de imitações.
PEÇAS ORIGINAIS
MARCA
A utilização de qualquier outra peça pode originar
graves problemas no funcionamento de sua Panela.
Sie müssen immer diese Verpackung verlangen,
lehnen Sie Fälschungen ab.
ORIGINALERSATZTEILE
Wenn Sie ein anderes Ersatzteil benutzen, können
Sie Probleme mit dem Schnellkochtopf haben.
REGISTRO SANITARIO N-39.01.773/VI
GESUNDHEITSREGISTER N-39.01.773/VI
ompañía enaje oméstico S.L.
®
®
®
Dieser ist der einzige
Originaldichtungsring gültig für den
Schnellkochtopf
®
®
®
®
®
Other manuals for mageplus
1
This manual suits for next models
1
Table of contents
Languages:
Other Magefesa Electric Pressure Cooker manuals