Makita 2414B User manual

INSTRUCTION MANUAL
Portable Cut-Off
2414B
ENGLISH: Original instructions
DOUBLE INSULATION
Read before use.

2ENGLISH
SPECIFICATIONS
Model 2414B
Wheel diameter 355 mm
Hole diameter 25.4 mm
No load speed (min-1)3,800
Dimensions (L x W x H) 500 mm x 280 mm x 600 mm
Net weight With full type lower safety
guard
17.5 kg
With half type lower safety
guard
16.1 kg
With center cover/center cap 15.9kg
Safety class /II
• Due to our continuing program of research and development, the specications herein are subject to change with-
out notice.
• Specications may differ from country to country.
• Weight according to EPTA-Procedure 01/2003
Symbols
The following show the symbols used for the equip-
ment. Be sure that you understand their meaning before
use.
Read instruction manual.
DOUBLE INSULATION
Only for EU countries
Do not dispose of electric equipment
together with household waste material!
In observance of European Directive
2002/96/EC on waste electric and elec-
tronic equipment and its implementation
in accordance with national law, electric
equipment that have reached the end of
their life must be collected separately and
returned to an environmentally compatible
recycling facility.
Intended use
The tool is intended for cutting in ferrous materials with
appropriate abrasive cut-off wheel. Follow all laws and
regulations regarding dust and work area health and
safety in your country.
Power supply
The tool should be connected only to a power supply of
the same voltage as indicated on the nameplate, and
can only be operated on single-phase AC supply. They
are double-insulated and can, therefore, also be used
from sockets without earth wire.
SAFETY INSTRUCTIONS
WARNING! When using electric tools, basic safety
precautions, including the following, should always
be followed to reduce the risk of re, electric shock
and personal injury. Read all these instructions
before operating this product and save these
instructions.
For safe operations:
1. Keep work area clean.
Cluttered areas and benches invite injuries.
2. Consider work area environment.
Do not expose power tools to rain. Do not use
power tools in damp or wet locations. Keep work
area well lit. Do not use power tools where there is
risk to cause re or explosion.
3. Guard against electric shock.
Avoid body contact with earthed or grounded sur-
faces (e.g. pipes, radiators, ranges, refrigerators).
4. Keep children away.
Do not let visitors touch the tool or extension cord.
All visitors should be kept away from work area.
5. Store idle tools.
When not in use, tools should be stored in a dry,
high or locked up place, out of reach of children.
6. Do not force the tool.
It will do the job better and safer at the rate for
which it was intended.
7. Use the right tool.
Do not force small tools or attachments to do
the job of a heavy duty tool. Do not use tools for
purposes not intended; for example, do not use
circular saws to cut tree limbs or logs.
8. Dress properly.
Do not wear loose clothing or jewellery, they can
be caught in moving parts. Rubber gloves and
non-skid footwear are recommended when work-
ing outdoors. Wear protecting hair covering to
contain long hair.
9. Use safety glasses and hearing protection.
Also use face or dust mask if the cutting operation
is dusty.
10. Connect dust extraction equipment.
If devices are provided for the connection of dust
extraction and collection facilities ensure these are
connected and properly used.
11. Do not abuse the cord.
Never carry the tool by the cord or yank it to dis-
connect it from the socket. Keep the cord away
from heat, oil and sharp edges.

3ENGLISH
12. Secure work.
Use clamps or a vice to hold the work. It is safer
than using your hand and it frees both hands to
operate the tool.
13. Do not overreach.
Keep proper footing and balance at all times.
14. Maintain tools with care.
Keep cutting tools sharp and clean for better and
safer performance. Follow instructions for lubrica-
tion and changing accessories. Inspect tool cord
periodically and if damaged have it repaired by an
authorized service facility. Inspect extension cords
periodically and replace, if damaged. Keep han-
dles dry, clean and free from oil and grease.
15. Disconnect tools.
When not in use, before servicing and when chang-
ing accessories such as blades, bits and cutters.
16. Remove adjusting keys and wrenches.
Form the habit of checking to see that keys and
adjusting wrenches are removed from the tool
before turning it on.
17. Avoid unintentional starting.
Do not carry a plugged-in tool with a nger on the
switch. Ensure switch is off when plugging in.
18. Use outdoor extension leads.
When tool is used outdoors, use only extension
cords intended for outdoor use.
19. Stay alert.
Watch what you are doing. Use common sense.
Do not operate tool when you are tired.
20. Check damaged parts.
Before further use of the tool, a guard or other part
that is damaged should be carefully checked to
determine that it will operate properly and perform
its intended function. Check for alignment of mov-
ing parts, free running of moving parts, breakage
of parts, mounting and any other conditions that
may affect its operation. A guard or other part
that is damaged should be properly repaired or
replaced by an authorized service center unless
otherwise indicated in this instruction manual.
Have defective switches replaced by an autho-
rized service facility. Do not use the tool if the
switch does not turn it on and off.
21. Warning.
The use of any accessory or attachment, other than
those recommended in this instruction manual or the
catalog, may present a risk of personal injury.
22. Have your tool repaired by a qualied person.
This electric tool is in accordance with the relevant
safety requirements. Repairs should only be car-
ried out by qualied persons using original spare
parts, otherwise this may result in considerable
danger to the user.
ADDITIONAL SAFETY RULES FOR
TOOL
1.
Wear protective glasses. Also wear hearing
protection during extended periods of operation.
2. Use only wheels recommended by the man-
ufacturer which have a maximum operating
speed at least as high as "No Load RPM"
marked on the tool’s nameplate. Use only
berglass-reinforced cut-off wheels.
3. Check the wheel carefully for cracks or dam-
age before operation. Replace cracked or
damaged wheel immediately.
4. Secure the wheel carefully.
5. Use only anges specied for this tool.
6. Be careful not to damage the spindle, anges
(especially the installing surface) or bolt, or
the wheel itself might break.
7.
KEEP GUARDS IN PLACE and in working order.
8. Hold the handle rmly.
9. Keep hands away from rotating parts.
10. Make sure the wheel is not contacting the
work-piece before the switch is turned on.
11. Before using the tool on an actual workpiece,
let it simply run for several minutes rst.
Watch for utter or excessive vibration that
might be caused by poor installation or a
poorly balanced wheel.
12. Watch out for ying sparks when operating.
They can cause injury or ignite combustible
materials.
13. Remove material or debris from the area
that might be ignited by sparks. Be sure that
others are not in the path of the sparks. Keep
a proper, charged re extinguisher closely
available.
14. Use the cutting edge of the wheel only. Never
use side surface.
15. If the wheel stops during the operation, makes
an odd noise or begins to vibrate, switch off
the tool immediately.
16. Always switch off and wait for the wheel to
come to a complete stop before removing,
securing workpiece, working vise, changing
work position, angle or the wheel itself.
17. Do not touch the workpiece immediately after
operation; it is extremely hot and could burn
your skin.
18. Store wheels in a dry location only.
SAVE THESE INSTRUCTIONS.
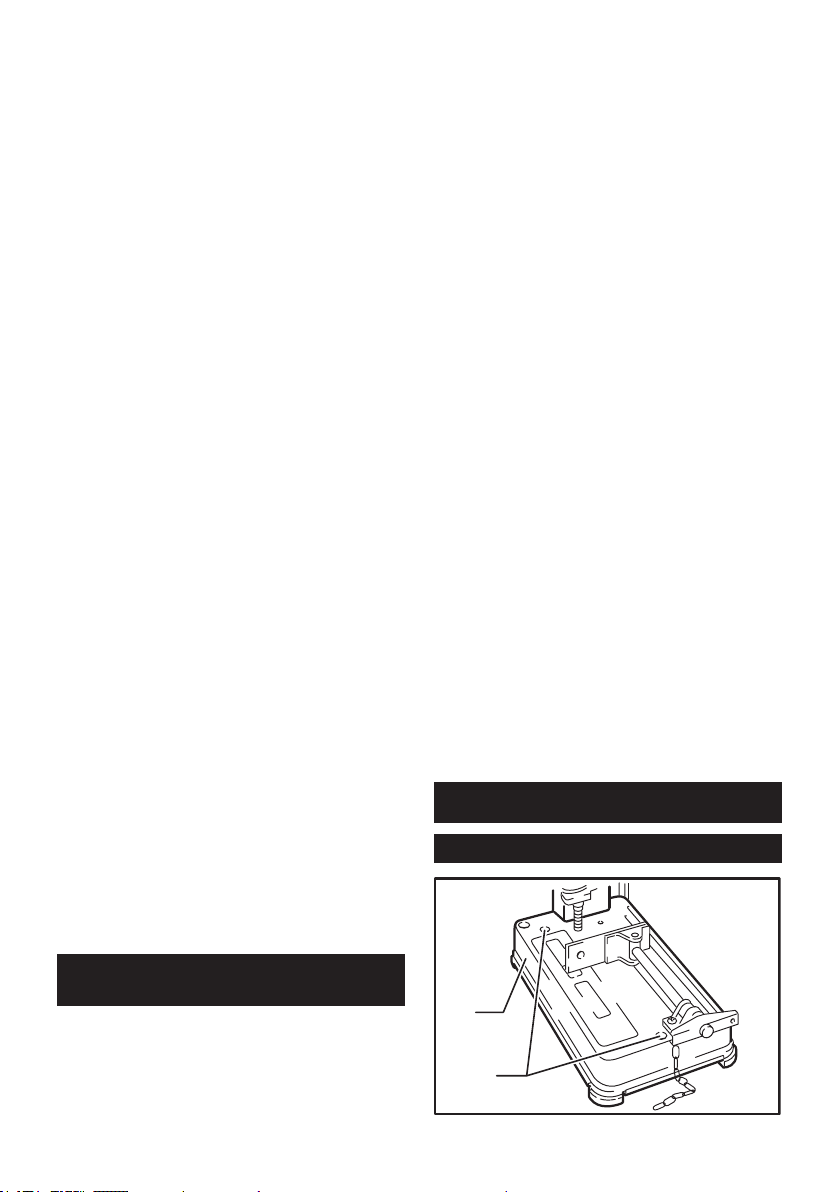
INSTALLATION
Securing cut-off
1
2
► 1. Base 2. Bolt holes

4ENGLISH
This tool should be bolted with two bolts to a level and
stable surface using the bolt holes provided in the tool's
base. This will help prevent tipping and possible per-
sonal injury.
FUNCTIONAL
DESCRIPTION
CAUTION:
• Always be sure that the tool is switched off and
unplugged before adjusting or checking function
on the tool.
Switch action
1
2
► 1. Lock button / Lock-off button 2. Switch trigger
CAUTION:
• Before plugging in the tool, always check to see
that the switch trigger actuates properly and
returns to the "OFF" position when released.
For tool with lock button
To start the tool, simply pull the switch trigger. Release
the switch trigger to stop. For continuous operation, pull
the switch trigger and then push in the lock button. To
stop the tool from the locked position, pull the switch
trigger fully, then release it.
For tool with lock-off button
To prevent the switch trigger from being accidentally
pulled, a lock-off button is provided.
To start the tool, depress the lock-off button and pull the
switch trigger. Release the switch trigger to stop.
Spark guard
1
2
► 1. Screw 2. Spark guard
The spark guard is factory-installed with its lower edge
contacting the base. Operating the tool in this position
will cause many sparks to y around. Loosen the screw
and adjust the spark guard to a position at which mini-
mum sparks will y around.
Stopper plate
1
(A)
(B)
► 1. Stopper plate
The stopper plate prevents the cut-off wheel from con-
tacting the workbench or oor. When a new wheel is
installed, set the stopper plate to position (A). When the
wheel wears down to the extent that the lower portion
of the workpiece is left uncut, set the stopper plate to
position (B) to allow increased cutting capacity with a
worn down wheel.

5ENGLISH
Interval between vise and guide
plate
1
2
3
4
► 1. Socket wrench 2. Guide plate 3. Move 4. Hex
bolts
The original spacing or interval between the vise and
the guide plate is 0 - 170 mm. If your work requires
wider spacing or interval, proceed as follows to change
the spacing or interval.
Remove the two hex bolts which secure the guide plate.
Move the guide plate as shown in the gure and secure
it using the hex bolts. The following interval settings are
possible:
35 - 205 mm
70 - 240 mm
CAUTION:
• Remember that narrow workpieces may not be
secured safely when using the two, wider inter-
val settings.
Setting for desired cutting angle
1
2
3
► 1. Socket wrench 2. Guide plate 3. Hex bolts
To change the cutting angle, loosen the two hex bolts
which secure the guide plate. Move the guide plate to
the desired angle (0° - 45°) and tighten the hex bolts
securely.
CAUTION: Never perform miter cuts when the
guide plate is set at the 35 - 205 mm or 70 - 240 mm
position.
CAUTION: Do not operate the tool when
the material is not rmly secured with the vise
because of the cutting angle.
ASSEMBLY
CAUTION:
• Always be sure that the tool is switched off and
unplugged before carrying out any work on the
tool.
Removing or installing cut-off wheel
For tools with safety guard
1
2
3
► 1. Shaft lock 2. Safety guard 3. Socket wrench
To remove the wheel, raise the safety guard. Press the
shaft lock so that the wheel cannot revolve and use
the socket wrench to loosen the hex bolt by turning it
counterclockwise.
Other manuals for 2414B
3
Table of contents
Other Makita Saw manuals

Makita
Makita LS1040 User manual

Makita
Makita DPB183 User manual

Makita
Makita 5037NBA User manual

Makita
Makita LS1013F User manual

Makita
Makita JR3050TZ User manual

Makita
Makita LS1017L Manual

Makita
Makita LS1017 User manual

Makita
Makita 5740NB User manual

Makita
Makita 2702 User manual

Makita
Makita DPB180 User manual

Makita
Makita LS1016 User manual

Makita
Makita JR103D User manual

Makita
Makita 5077B Quick start guide

Makita
Makita LS1017 User manual

Makita
Makita 5604R User manual

Makita
Makita SD100D User manual

Makita
Makita 5104S User manual

Makita
Makita 2705 User manual

Makita
Makita 2107F User manual

Makita
Makita 5007NH Quick start guide