Makita UH200D User manual

GB Cordless Hedge Trimmer Instruction manual
F Taille-haie sans fil Manuel d’instructions
D Akku-Heckenschere Betriebsanleitung
I Tagliasiepi a batteria Istruzioni per l’uso
NL Accuheggenschaar Gebruiksaanwijzing
E Cortasetos inalámbrico Manual de instrucciones
P Aparador de cerca viva a Manual de instruções
bateria
DK Batteridrevet hækkeklipper Brugsanvisning
GR Ψαλίδι μπορντούρας μπαταρίας Οδηγίες χρήσης
UH200D
010965

2
1013678 2013014
3013026 4010878
5010879 6010880
7010881 8010966
1
2
3
4
5
67
8
9

3
9010967 10 010968
11 013022 12 013024
13 013023 14 010890
15 010891 16 010892
10 11
12 13
14
15
16
17 18
19
20
17

4
17 010893 18 010894
19 010904 20 010905
21 015809 22 010907
23 010908 24 010909
21
22
23
22 17
23
24 25
27
22
26
25
28
29
30
16
31

5
25 010910 26 010911
27 010912 28 010913
29 013025
30 011042
21
18
17
32
18
33
34
35 36 37

6
31 013015 32 013016
33 010895 34 010896
35 010897 36 010898
37 010899 38 010900
23
37
16
22 17 23
16
23
24 25
27
25
22
26
30
29
28

7
39 010901 40 010902
41 010903 42 010887
43 010888 44 010889
17 18
32
18
16
17 18
19
20
17
23
22

8
45 011043 46 010872
47 013018 48 013017
49 013019 50 013020
51 013021
36
38 37
39
40 37
39
40 37

9
ENGLISH (Original Instructions)
Explanation of general view
SPECIFICATIONS
• Due to our continuing program of research and development, the specifications herein are subject to change without
notice.
• Specifications and battery cartridge may differ from country to country.
• Weight, with battery cartridge, according to EPTA-Procedure 01/2003
Symbols END010-4
The following show the symbols used for the equipment.
Be sure that you understand their meaning before use.
............... Take particular care and attention.
...... Read instruction manual.
............... Danger; be aware of thrown objects.
............... Keep bystanders away.
............... Cutting means continues to run after the
motor is switched off.
............... Do not expose to moisture.
......... Only for EU countries
Do not dispose of electric equipment or
battery pack together with household
waste material!
In observance of the European
Directives, on Waste Electric and
Electronic Equipment and Batteries and
Accumulators and Waste Batteries and
Accumulators and their implementation in
accordance with national laws, electric
equipment and batteries and battery
pack(s) that have reached the end of
their life must be collected separately and
returned to an environmentally
compatible recycling facility.
Intended use ENE014-1
The tool is intended for trimming hedges.
General Power Tool Safety
Warnings GEA010-1
WARNING Read all safety warnings and all
instructions. Failure to follow the warnings and
instructions may result in electric shock, fire and/or
serious injury.
Save all warnings and
instructions for future reference.
1. Battery cartridge
2. Buttons
3. Lock-off button
4. Switch trigger
5. Indication lamp
6. Trimming direction
7. Tilt the blades
8. Hedge surface to be trimmed
9. String
10. Clamping nuts
11. Chip receiver
12. Screws on the shear blades
13. Blade cover to be always installed
before installing the chip receiver
14. Brush
15. Machine oil
16. Blade cover
17. Undercover
18. Locking lever
19. Press
20. Turn
21. Screws
22. Crank
23. Shear blades
24. Basic alignment line on the tool
housing
25. Pins
26. Apply grease
27. Recessed part of crank
28. Oval holes that are overlapped
29. Hole in the base plate of shear
blades
30. Base plate
31. Bent part of the base plate of
shear blades
32. Groove in the undercover
33. Hook hole
34. Grass shear blade
35. Grass shear blade cover
36. Storage case
37. Base frame
38. Groove
39. Change lever
40. Protrusion on base frame
Model UH200D
Blade length 200 mm
Strokes per minute (min-1) 1,250
Overall length 460 mm
Net weight 1.2 kg
Rated voltage D.C. 10.8 V
Battery cartridge BL1013
Battery charger DC10WA
Cd
Ni-MH
Li-ion

10
CORDLESS HEDGE TRIMMER
SAFETY WARNINGS GEB062-5
1. Keep all parts of the body away from the cutter
blade. Do not remove cut material or hold material
to be cut when blades are moving. Make sure the
switch is off when clearing jammed material. A
moment of inattention while operating the hedge
trimmer may result in serious personal injury.
2. Carry the hedge trimmer by the handle with the
cutter blade stopped. When transporting or
storing the hedge trimmer always fit the cutting
device cover. Proper handling of the hedge trimmer
will reduce possible personal injury from the cutter
blades.
3. Hold the power tool by insulated gripping surfaces
only, because the cutter blade may contact hidden
wiring. Cutter blades contacting a “live” wire may
make exposed metal parts of the power tool “live” and
could give the operator an electric shock.
4. Do not use the hedge trimmer in the rain or in wet or
very damp conditions. The electric motor is not
waterproof.
5. First-time users should have an experienced hedge
trimmer user show them how to use the trimmer.
6. The hedge trimmer must not be used by children or
young persons under 18 years of age. Young persons
over 16 years of age may be exempted from this
restriction if they are undergoing training under the
supervision of an expert.
7. Use the hedge trimmer only if you are in good physical
condition. If you are tired, your attention will be
reduced. Be especially careful at the end of a working
day. Perform all work calmly and carefully. The user is
responsible for all damages to third parties.
8. Never use the trimmer when under the influence of
alcohol, drugs or medication.
9. Work gloves of stout leather are part of the basic
equipment of the hedge trimmer and must always be
worn when working with it. Also wear sturdy shoes
with anti-skid soles.
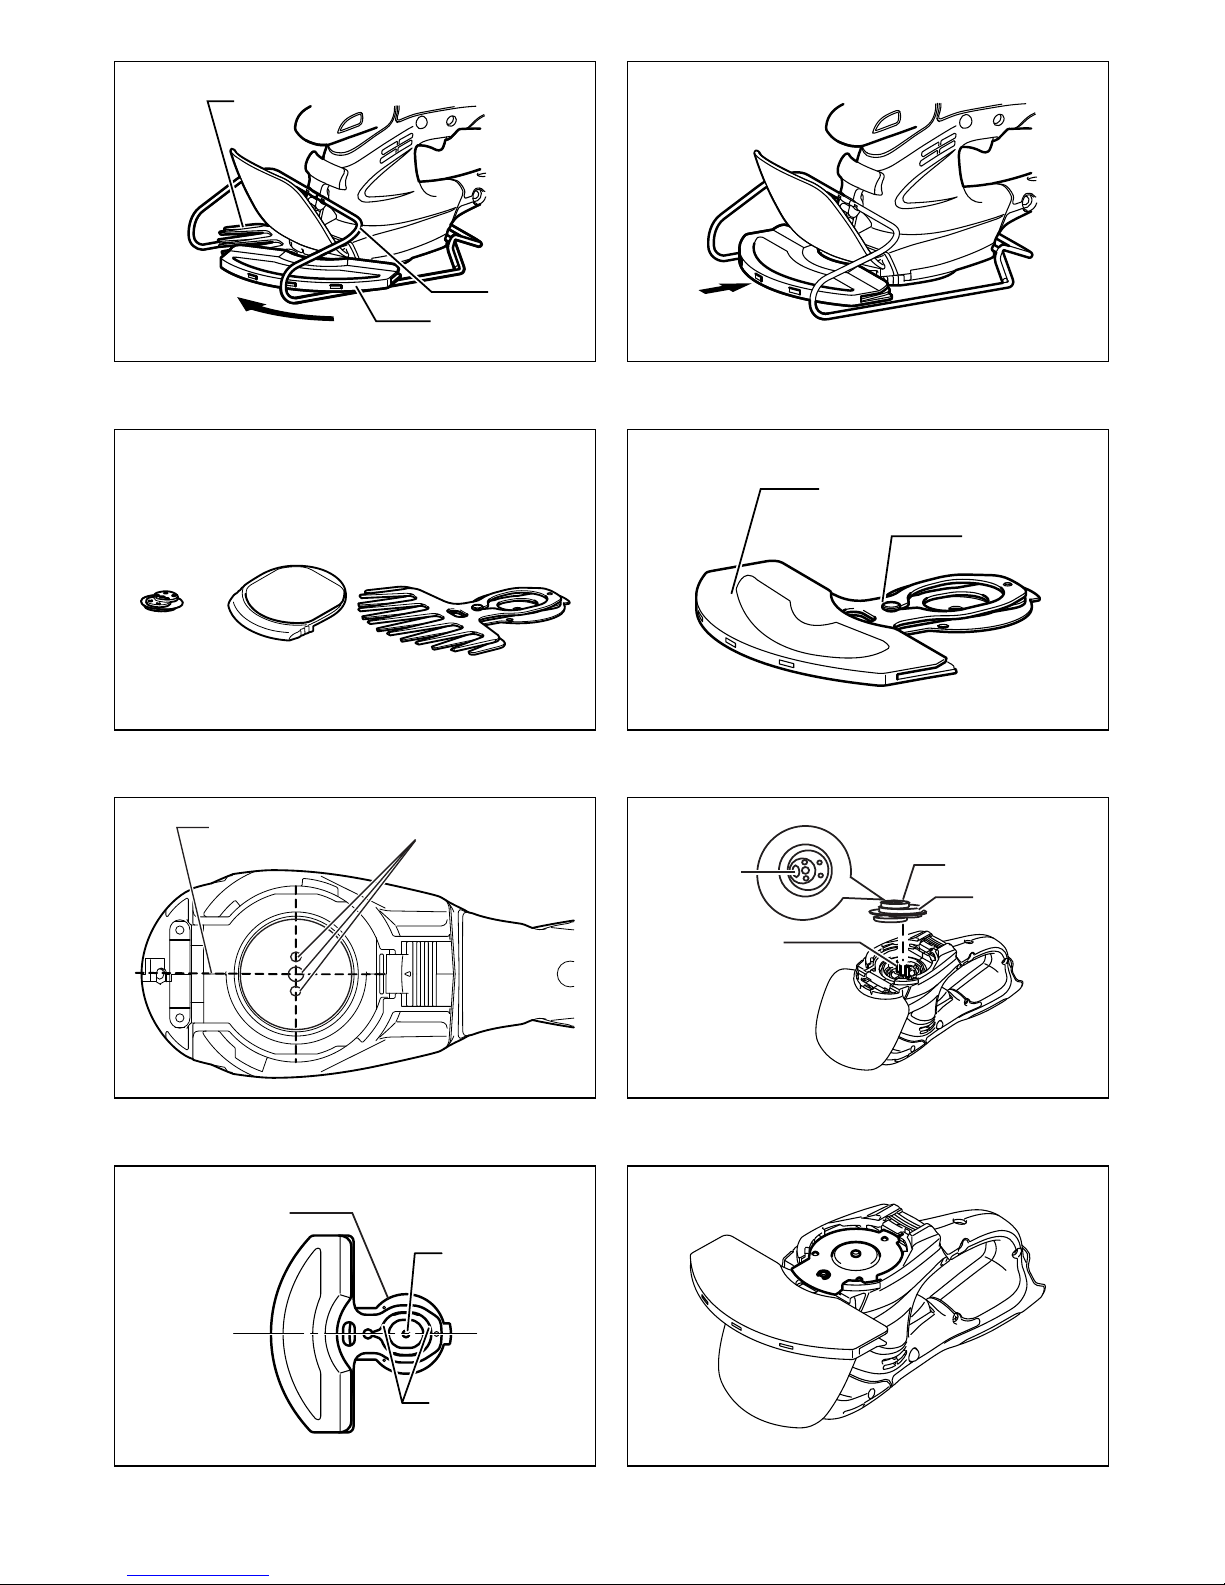
10. Before starting work check to make sure that the
trimmer is in good and safe working order. Ensure
guards are fitted properly. The hedge trimmer must
not be used unless fully assembled.
11. Make sure you have a secure footing before starting
operation.
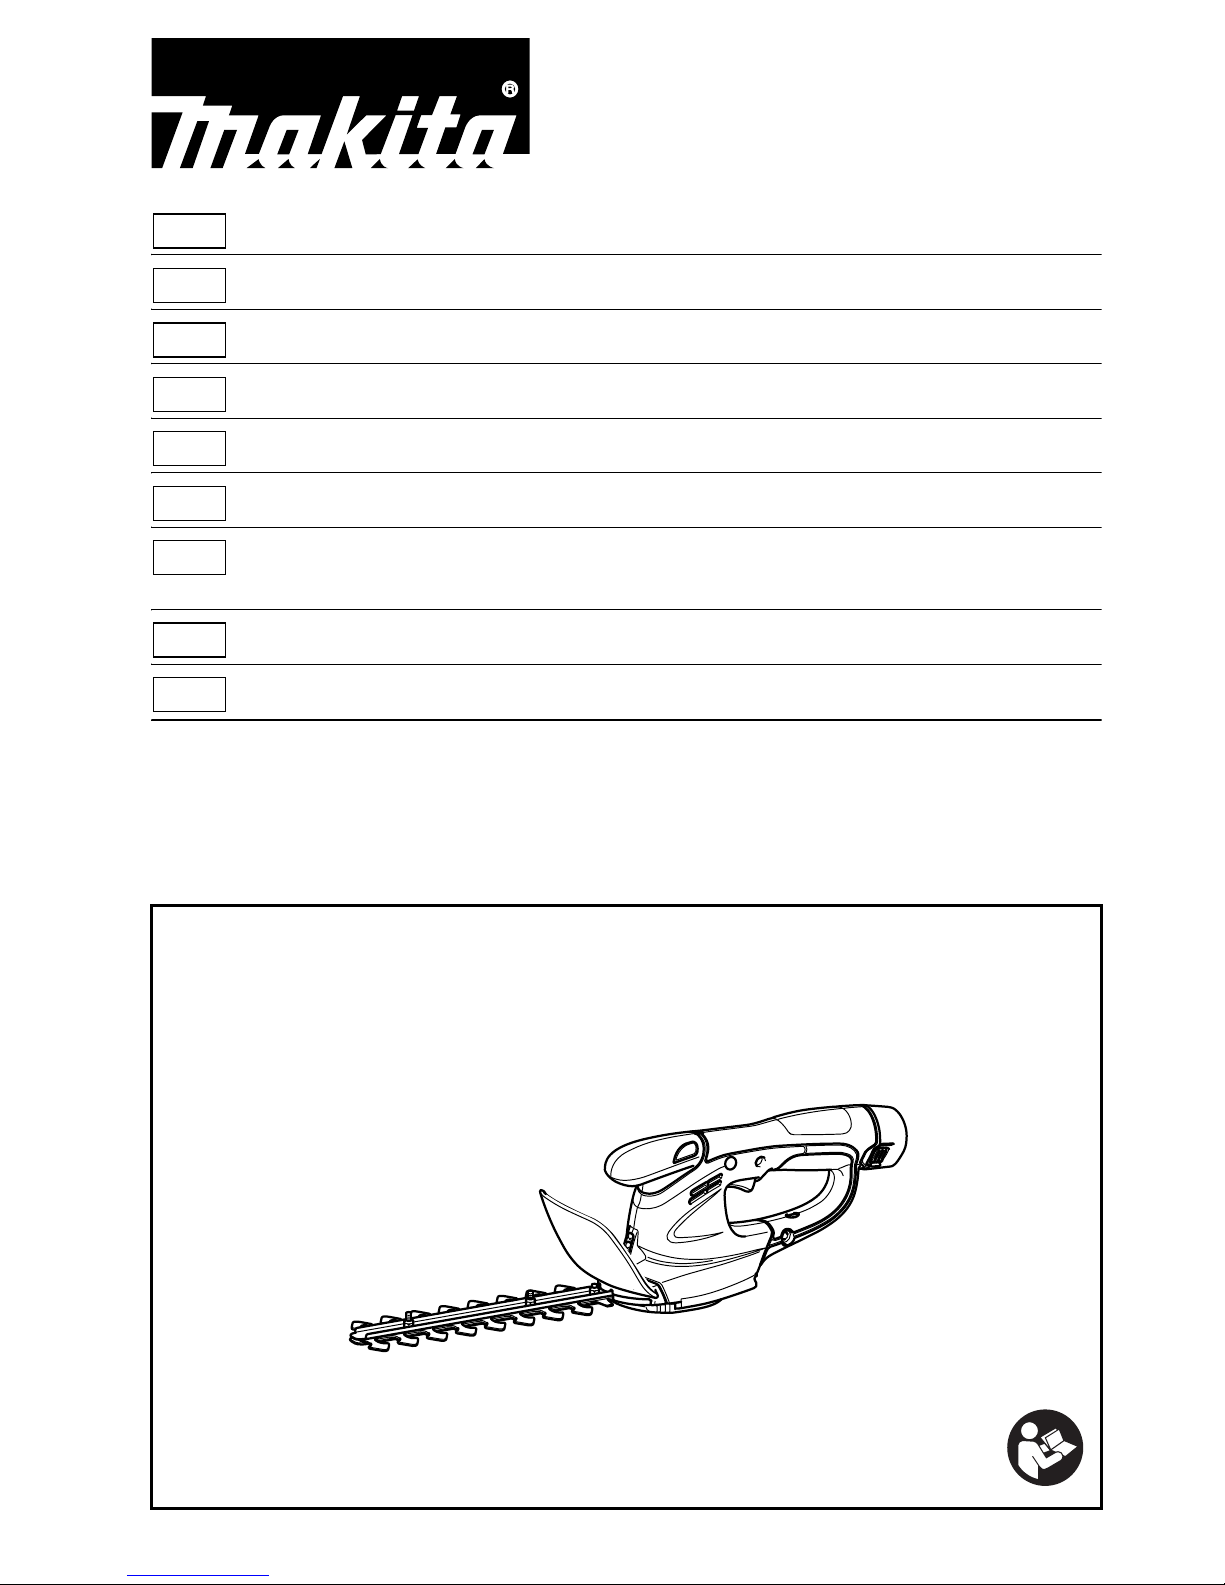
12. Hold the tool firmly when using the tool.
13. Do not operate the tool at no-load unnecessarily.
14. Immediately switch off the motor and remove the
battery cartridge if the cutter should come into contact
with a fence or other hard object. Check the cutter for
damage, and if damaged repair immediately.
15. Before checking the cutter, taking care of faults, or
removing material caught in the cutter, always switch
off the trimmer and remove the battery cartridge.
16. Switch off the trimmer and remove the battery
cartridge before doing any maintenance work.
17. When moving the hedge trimmer to another location,
including during work, always remove the battery
cartridge and put the blade cover on the cutter blades.
Never carry or transport the trimmer with the cutter
running. Never grasp the cutter with your hands.
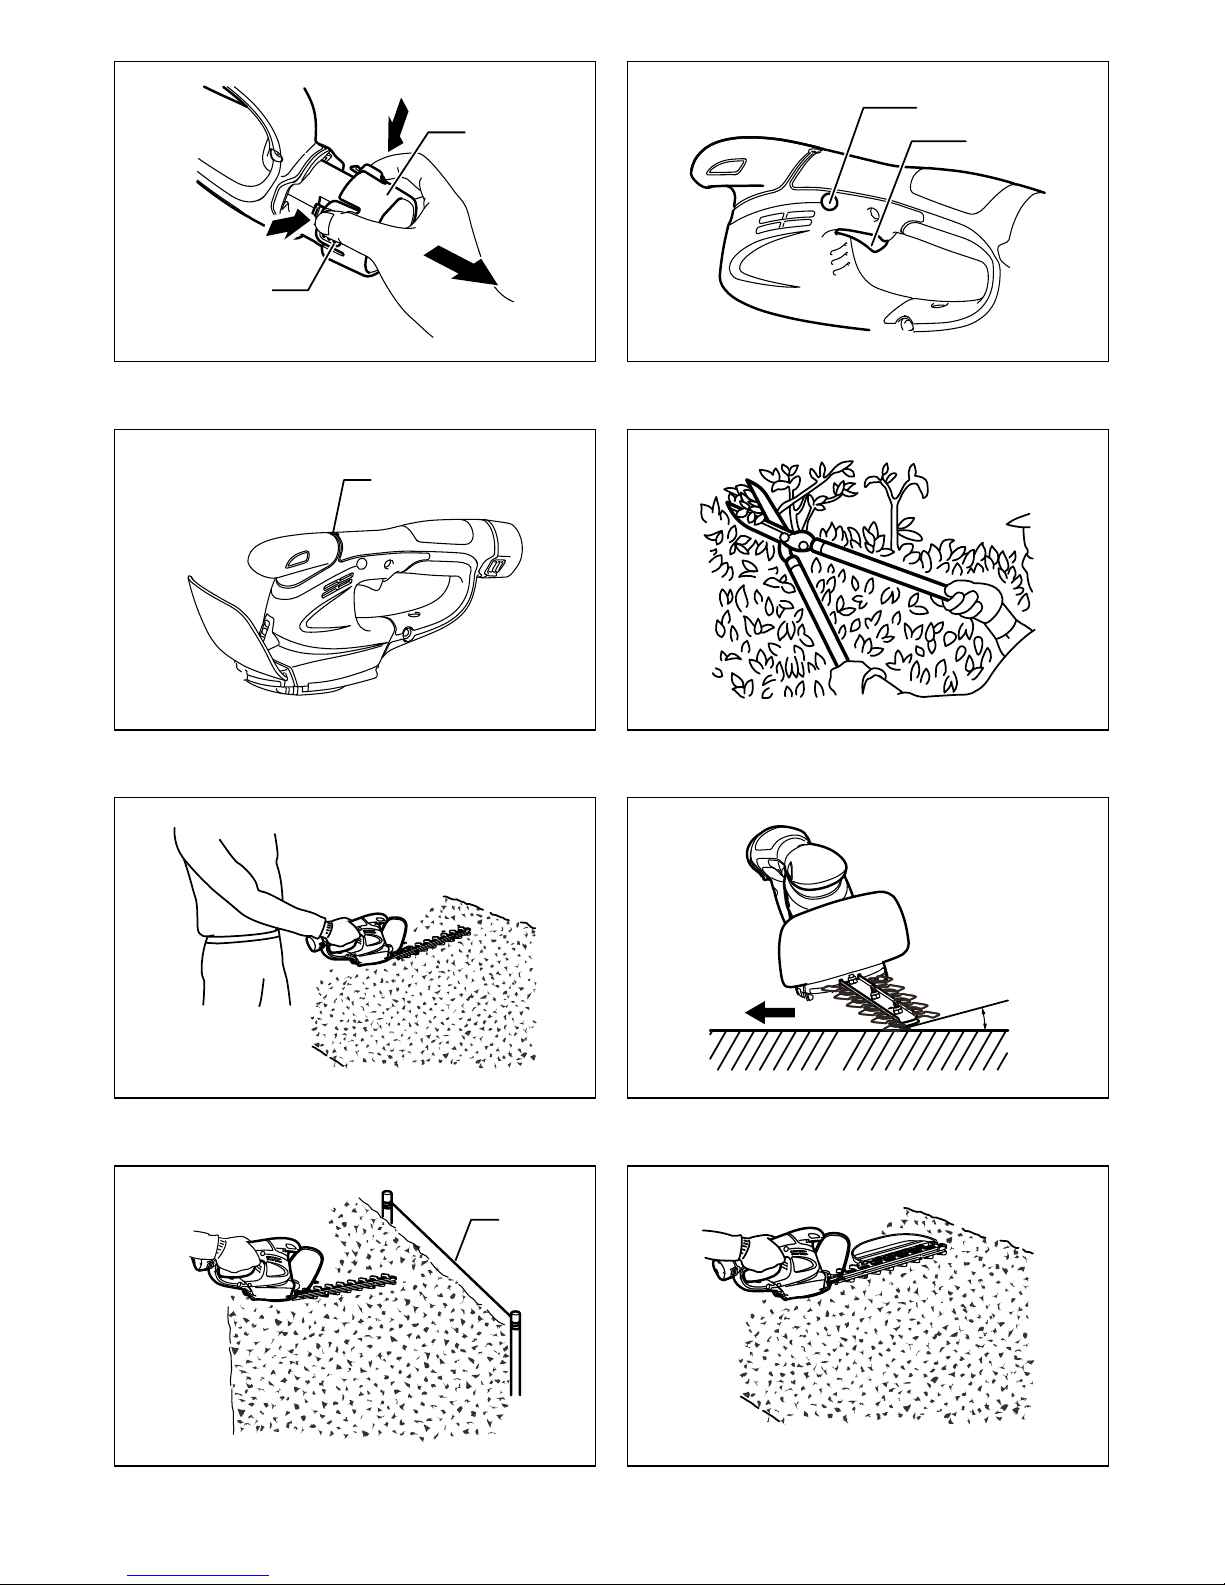
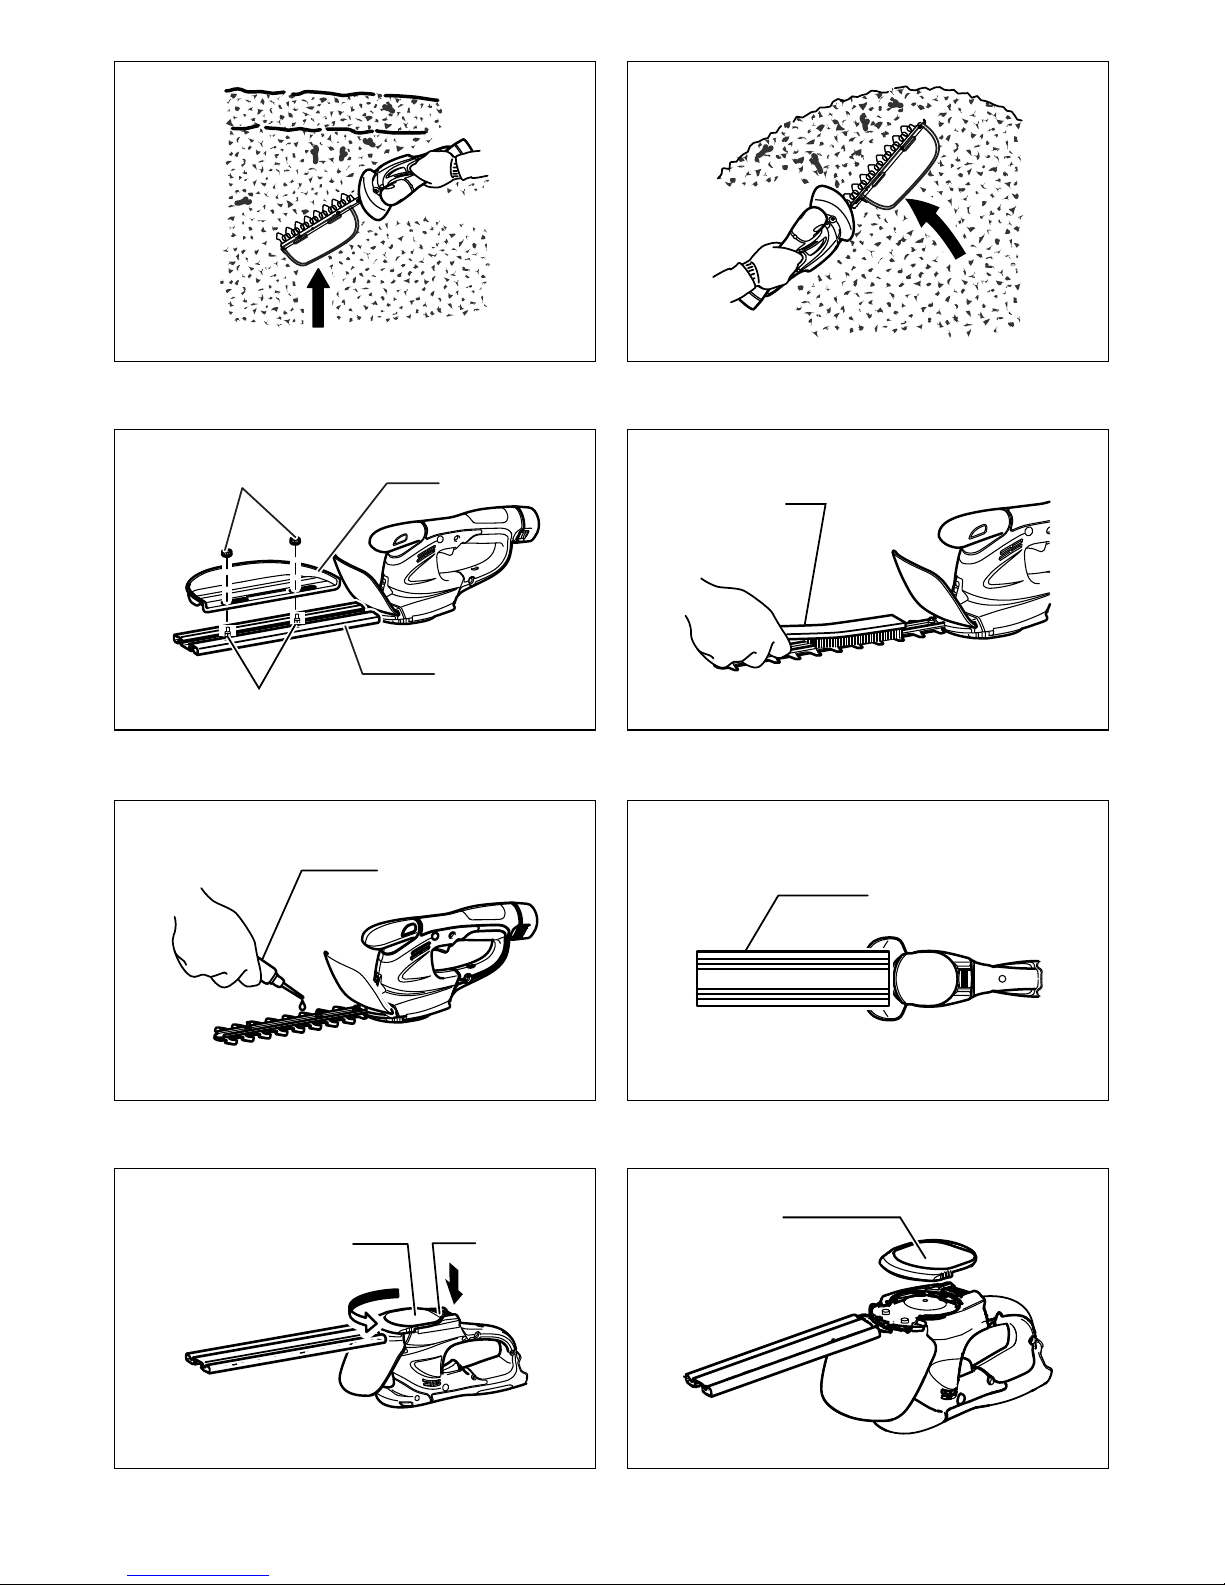
18. Clean the hedge trimmer and especially the cutter
after use, and before putting the trimmer into storage
for extended periods. Lightly oil the cutter and put on
the cover. The cover supplied with the unit can be
hung on the wall, providing a safe and practical way to
store the hedge trimmer.
19. Store the hedge trimmer with the cover on, in a dry
room. Keep it out of reach of children. Never store the
trimmer outdoors.
SAVE THESE INSTRUCTIONS.
WARNING:
DO NOT let comfort or familiarity with product (gained
from repeated use) replace strict adherence to safety
rules for the subject product. MISUSE or failure to
follow the safety rules stated in this instruction
manual may cause serious personal injury.
CORDLESS GRASS SHEAR
SAFETY WARNINGS GEB070-4
WARNING! IMPORTANT READ CAREFULLY all
safety warnings and all instructions BEFORE USE.
Failure to follow the warnings and instructions may result
in electric shock, fire and/or serious injury.
Save all warnings and
instructions for future reference.
General instructions
1. To ensure correct operation, user has to read this
instruction manual to make himself familiar with the
handling of the equipment. Users insufficiently
informed will risk danger to themselves as well as
others due to improper handling.
2. Never allow children, persons with reduced physical,
sensory or mental capabilities or lack of experience
and knowledge or people unfamiliar with these
instructions to use the machine, local regulations may
restrict the age of the operator.
3. Use the equipment with the utmost care and attention.
4. Operate the equipment only if you are in good physical
condition. Perform all work calmly and carefully. Use
common sense and keep in mind that the operator or
user is responsible for accidents or hazards occurring
to other people or their property.
5. Never operate the machine while people, especially
children, or pets are nearby.
6. Never use the equipment after consumption of alcohol
or drugs, or if feeling tired or ill.
7. The motor is to be switched off immediately in case
that the equipment shows any problem or abnormal
sign.
8. Switch off and remove the battery cartridge when
resting and when leaving the equipment unattended,
and place it in a safe location to prevent danger to
others or damage to the equipment.
9. Don’t force the equipment. It will do the job better and
with less likelihood of a risk of injury at the rate for
which it was designed.
10. Don’t overreach. Keep proper footing and balance at
all times.

11
11. Avoid using the machine in bad weather conditions
especially when there is a risk of lightning.
Personal protective equipment
1. Dress Properly. The clothing worn should be
functional and appropriate, i.e. it should be tight-fitting
but not cause hindrance. Do not wear either jewelry or
clothing which could become entangled. Wear
protective hair covering to contain long hair.
2. Wear eye protection and stout shoes at all times while
operating the machine.
3. Always wear substantial footwear and long trousers
while operating the machine.
Electrical and battery safety
1. Avoid dangerous environment. Don’t use the
equipment in damp or wet locations or expose it to
rain. Water entering an equipment will increase the
risk of electric shock.
2. Recharge only with the charger specified by the
manufacturer. A charger that is suitable for one type of
battery pack may create a risk of fire when used with
another battery pack.
3. Use power tools only with specifically designated
battery packs. Use of any other battery packs may
create a risk of injury and fire.
4. When battery pack is not in use, keep it away from
other metal objects, like paper clips, coins, keys, nails,
screws or other small metal objects, that can make a
connection from one terminal to another. Shorting the
battery terminals together may cause burns or a fire.
5. Under abusive conditions, liquid may be ejected from
the battery; avoid contact. If contact accidentally
occurs, flush with water. If liquid contacts eyes,
additionally seek medical help. Liquid ejected from the
battery may cause irritation or burns.
6. Do not dispose of the battery(ies) in a fire. The cell
may explode. Check with local codes for possible
special disposal instructions.
7. Do not open or mutilate the battery(ies). Released
electrolyte is corrosive and may cause damage to the
eyes or skin. It may be toxic if swallowed.
Starting up the equipment
1. Make sure that there are no children or other people
nearby, also pay attention to any animals in the
working vicinity. Otherwise stop using the equipment.
2. Before use always check that the equipment is safe
for operation. Check the security of the cutting tool
and the guard and the switch trigger/lever for easy and
proper action. Check for clean and dry handles and
test the function of the start/stop.
3. Check damaged parts before further use of the
equipment. A guard or other part that is damaged
should be carefully checked to determine that it will
operate properly and perform its intended function.
Check for alignment of moving parts, binding of
moving parts, breakage of parts, mounting, and any
other condition that may affect its operation. A guard
or other part that is damaged should be properly
repaired or replaced by our authorized service center
unless indicated elsewhere in this manual.
4. Switch on the motor only when the hands and feet are
away from the cutting tool.
5. Before starting make sure that the cutting tool has no
contact with any objects.
Method of operation
1. Only use the equipment in good light and visibility.
During the winter season beware of slippery or wet
areas, ice and snow (risk of slipping). Always ensure a
safe footing on slopes and be sure to walk and never
run.
2. Take care against injury to feet and hands from the
cutting tool.
3. Never stand on a ladder and run the equipment.
4. Never climb up into trees to perform cutting operation
with the equipment.
5. Never work on unstable surfaces.
6. Remove sand, stones, nails etc. found within the
working range. Foreign particles may damage the
cutting tool and can cause dangerous kick-backs.
7. Should the cutting tool hit stones or other hard objects,
immediately switch off the motor and inspect the
cutting tool.
8. Inspect the cutting tool at short regular intervals for
damage (detection of hairline cracks by means of
tapping-noise test).
9. Before commencing cutting, the cutting tool must have
reached full working speed.
10. The cutting tool has to be equipped with the
appropriate guard. Never run the equipment with
damaged guards or without guards in place!
11. All protective installations and guards supplied with
the equipment must be used during operation.
12. Always remove the battery cartridge from the
equipment:
- whenever leaving the equipment unattended;
- before clearing a blockage;
- before checking, cleaning or working on the
equipment;
- after striking a foreign object;
- whenever the equipment starts vibrating abnormally.
13. Always ensure that the ventilation openings are kept
clear of debris.
14. Cutting means continues to run after the motor is
switched off.
Cutting Tools
1. Employ only the correct cutting tool for the job in hand.
Maintenance instructions
1. The condition of the equipment, in particular of the
cutting tool of the protective devices must be checked
before commencing work.
2. Turn off the motor and remove the battery cartridge
before carrying out maintenance, replacing cutting
tools or cleaning the equipment or cutting tool.
3. Check loose fasteners and damaged parts such as
cracks in the cutting attachment.
4. Follow instructions for lubricating and changing
accessories.
5. When not in use, store the equipment indoors in dry
and high or locked-up place - out of the reach of
children. Clean and maintain before storage.
6. Use only the manufacturer’s recommended
replacement parts and accessories.
7. Inspect and maintain the equipment regularly,
especially before/after use. Have the equipment
repaired only by our authorized service center.
8. Keep handles dry, clean and free from oil and grease.

12
KEEP FOR FUTURE REFERENCE
WARNING:
DO NOT let comfort or familiarity with product (gained
from repeated use) replace strict adherence to safety
rules for the subject product. MISUSE or failure to
follow the safety rules stated in this instruction
manual may cause serious personal injury.
IMPORTANT SAFETY
INSTRUCTIONS ENC009-3
FOR BATTERY CARTRIDGE
1. Before using battery cartridge, read all
instructions and cautionary markings on (1)
battery charger, (2) battery, and (3) product using
battery.
2. Do not disassemble battery cartridge.
3. If operating time has become excessively shorter,
stop operating immediately. It may result in a risk
of overheating, possible burns and even an
explosion.
4. If electrolyte gets into your eyes, rinse them out
with clear water and seek medical attention right
away. It may result in loss of your eyesight.
5. Do not short the battery cartridge:
(1) Do not touch the terminals with any
conductive material.
(2) Avoid storing battery cartridge in a container
with other metal objects such as nails, coins,
etc.
(3) Do not expose battery cartridge to water or
rain.
A battery short can cause a large current flow,
overheating, possible burns and even a
breakdown.
6. Do not store the tool and battery cartridge in
locations where the temperature may reach or
exceed 50°C (122°F).
7. Do not incinerate the battery cartridge even if it is
severely damaged or is completely worn out. The
battery cartridge can explode in a fire.
8. Be careful not to drop or strike battery.
9. Do not use a damaged battery.
10. Follow your local regulations relating to disposal
of battery.
SAVE THESE INSTRUCTIONS.
CAUTION: Only use genuine Makita batteries.
Use of non-genuine Makita batteries, or batteries that
have been altered, may result in the battery bursting
causing fires, personal injury and damage. It will also void
the Makita warranty for the Makita tool and charger.
Tips for maintaining maximum battery life
1. Charge the battery cartridge before completely
discharged.
Always stop tool operation and charge the battery
cartridge when you notice less tool power.
2. Never recharge a fully charged battery cartridge.
Overcharging shortens the battery service life.
3. Charge the battery cartridge with room
temperature at 10°C - 40°C (50°F - 104°F). Let a hot
battery cartridge cool down before charging it.
FUNCTIONAL DESCRIPTION
CAUTION:
• Always be sure that the tool is switched off and the
battery cartridge is removed before adjusting or
checking function on the tool.
Installing or removing battery cartridge
(Fig. 1)
CAUTION:
• Always switch off the tool before installing or removing
of the battery cartridge.
•Hold the tool and the battery cartridge firmly when
installing or removing battery cartridge. Failure to
hold the tool and the battery cartridge firmly may cause
them to slip off your hands and result in damage to the
tool and battery cartridge and a personal injury.
To remove the battery cartridge, withdraw it from the tool
while pressing the buttons on both sides of the cartridge.
To install the battery cartridge, hold it so that the battery
cartridge front shape fits to that of the battery installment
opening and slip it into place. Insert it all the way until it
locks in place with a little click.
CAUTION:
• Always insert the battery cartridge all the way until it
locks in place. If not, it may accidentally fall out of the
tool, causing injury to you or someone around you.
• Do not install the battery cartridge forcibly. If the
cartridge does not slide in easily, it is not being inserted
correctly.
Battery protection system
The tool is equipped with a battery protection system. This
system automatically cuts off power to the motor to extend
battery life.
The tool will automatically stop during operation if the tool
and/or battery are placed under one of the following
conditions:
• Overloaded:
The tool is operated in a manner that causes it to
draw an abnormally high current.
In this situation, release the switch trigger on the tool
and stop the application that caused the tool to
become overloaded. Then pull the switch trigger
again to restart.
• Low battery voltage:
The remaining battery capacity is too low and the tool
will not operate. If you pull the switch trigger, the
motor runs again but stops soon. In this situation,
remove and recharge the battery.
Switch action (Fig. 2)
CAUTION:
• Before inserting the battery cartridge into the tool,
always check to see that the switch trigger actuates
properly and returns to the “OFF” position when
released.

13
To prevent the switch trigger from being accidentally
pulled, a lock-off button is provided.
To start the tool, depress the lock-off button and pull the
switch trigger. Release the switch trigger to stop. The
lock-off button can be pressed from either right or left side.
Indication lamp (Fig. 3)
Running the tool allows the indication lamp to show the
battery cartridge capacity status.
When the tool is also overloaded and has stopped during
operation, the lamp lights up in red.
Refer to the following table for the status and action to be
taken for the indication lamp.
010970
Note 1: The time at which the indication lamp lights up varies by the temperature around the work area and the battery
cartridge conditions.
OPERATION
Refer to the Safety Warnings before operation.
CAUTION:
• Be careful not to accidentally contact a metal fence or
other hard objects while trimming. The blade will break
and may cause serious injury.
• Also, be careful for the shear blade not to contact the
ground.
• Overreaching with a hedge trimmer, particularly from a
ladder, is extremely dangerous. Do not work from
anything wobbly or infirm. (Fig. 4)
Do not attempt to cut branches thicker than 10 mm
diameter with this trimmer. These should first be cut with
shears down to the hedge trimming level.
CAUTION:
• Do not cut off dead trees or similar hard objects. Failure
to do so may damage the tool.
• Do not trim the grass or weeds while using hedge
shear blade. The shear blade may entangle the grass
or weeds. (Fig. 5)
Hold the trimmer with one hand, depress the lock-off
button and pull the switch trigger and then move it in front
of your body. (Fig. 6)
As a basic operation, tilt the blades towards the trimming
direction and move it calmly and slowly at the speed rate
of 3 - 4 seconds per meter. (Fig. 7)
To cut a hedge top evenly, it helps to tie a string at the
desired hedge height and to trim along it, using it as a
reference line. (Fig. 8)
Attaching the chip receiver (accessory) on the tool when
trimming the hedge straight can avoid cut off leaves’ being
thrown away. (Fig. 9)
To cut a hedge side evenly, it helps to cut from the bottom
upwards. (Fig. 10)
Trim boxwood or rhododendron from the base toward the
top for a nice appearance and good job.
Installing or removing chip receiver
(accessory)
CAUTION:
• Always be sure that the tool is switched off and the
battery cartridge is removed before installing or
removing chip receiver.
NOTE:
• When replacing the chip receiver, always wear gloves
so that hands and face does not directly contact the
blade. Failure to do so may cause personal injury.
• When replacing the chip receiver, always be careful not
to contact the shear blades.
• The chip receiver receives cut-off leaves and alleviates
collecting thrown-away leaves. This can be installed on
either side of the tool. (Fig. 11)
Place the chip receiver on the shear blades so that its slits
overlap with the screws on the shear blades and secure it
using two clamping nuts.
To remove the chip receiver, loosen and remove the two
clamping nuts and then take it out.
MAINTENANCE
CAUTION:
• Always be sure that the tool is switched off and the
battery cartridge is removed before attempting to
perform inspection or maintenance.
Cleaning the tool
Clean out the tool by wiping off dust with a dry or soap-
dipped rag.
CAUTION:
• Never use gasoline, benzine, thinner, alcohol or the
like. Discoloration, deformation or cracks may result.
Shear blade maintenance (Fig. 12)
Smear the blade before and once per hour during
operation using machine oil or similars. (Fig. 13)
After operation, remove dust from both sides of the blade
with wired brush, wipe off it with a rag and then apply
Indication lamp Status Action to be taken
The lamp blinks in red. This indicates the appropriate time to
replace the battery cartridge when the
battery power becomes low.
Recharge the battery cartridge as soon
as possible.
The lamp lights up in red. (Note 1) This function works when the battery
power is almost used up. At this time,
tool stops immediately.
Recharge the battery cartridge.
The lamp lights up in red. (Note 1) Autostop due to overload. Turn off the tool.

14
enough low-viscosity oil, such as machine oil etc. and
spray-type lubricating oil.
CAUTION:
• Do not wash the blades in water. Failure to do so may
cause rust or damage on the tool.
Removing or installing hedge shear
blades
CAUTION:
• Before removing or installing shear blades, always be
sure that the tool is switched off and the battery
cartridge is removed.
• When replacing the shear blades, always wear gloves
without removing blade cover so that hands and face
do not directly contact the blade. Failure to do so may
cause personal injury.
NOTE:
• Do not wipe off grease from the gear and crank. Failure
to do so may cause damage to the tool.
• For specific way of removing and installing shear
blades refer to the reverse of a package for accessory
shear blades.
Removing the hedge shear blades (Fig. 14)
CAUTION:
• Install the blade cover before removing or installing the
shear blades.
Reverse the tool. (Fig. 15)
To remove the shear blades, press the locking lever and
with the locking lever pressed turn the undercover
counterclockwise until the symbol on the undercover is
aligned with the symbol on the locking lever. (Fig. 16)
Take out the undercover from the tool. (Fig. 17)
Loosen two screws with a coin and similars and remove
the shear blades.
NOTE:
• Do not remove the screws. Without removing the
screws loosened, shear blades can be removed.
(Fig. 18)
Remove the crank from the shear blades.
NOTE:
• The crank may remain in the tool.
Installing the hedge shear blades (Fig. 19)
Prepare the crank, the undercover and new shear blades.
(Fig. 20)
Adjust the three detent pin position so that these three
pins are aligned with the basic alignment line on the tool
housing. (Fig. 21)
Fit the crank with its recessed part facing downward onto
the detent pins. At this time, apply a small amount of
grease to the periphery of the crank using grease that the
shear blades as optional accessory are provided with or
that remains inside gear housing. (Fig. 22)
Overlap the oval hole in the upper blade with that in the
lower one. Move the shear blades so that the hole in the
base plate of shear blades are positioned in the center of
these overlapped oval holes. (Fig. 23)
Take out the blade cover from the old shear blades and fit
it onto the new ones for easy handling during the
replacement of blades. (Fig. 24)
Turn the shear blades upside down and install it so that
pin on the tool fit in the hole in the shear blades. Fit the
bent part of the base plate of the shear blades to the
groove in the tool housing. Then make sure that the base
plate of the shear blades is set in place. (Fig. 25)
Tighten two screws with a coin or similars firmly. (Fig. 26)
Place the undercover so that the symbol on the
undercover is aligned with the symbol on the locking
lever. (Fig. 27)
Press the undercover down and with the undercover
pressed down turn the undercover clockwise until the
symbol on the label is aligned with the symbol on the
locking lever (the undercover is completely locked).
(Fig. 28)
At this time, make sure that the locking lever fits in the
groove in the undercover.
CAUTION:
• Never use the tool without installing the undercover on
it.
Remove the blade cover and then turn on the tool to
check it for proper movement.
NOTE:
• When the shear blades does not operate properly,
there is a poor fit between the blades and crank. Redo
from the beginning.
Storage (Fig. 29)
The hook hole in the tool bottom is convenient for hanging
the tool from a nail or screw on the wall.
Put the blade cover on the shear blades so that the blades
are not exposed. Store the tool out of the reach of children
carefully.
Store the tool in the place not exposed to water and rain.
To maintain product SAFETY and RELIABILITY, repairs,
carbon brush inspection and replacement, any other
maintenance or adjustment should be performed by
Makita Authorized Service Centers, always using Makita
replacement parts.
OPTIONAL ACCESSORIES
CAUTION:
• These accessories or attachments are recommended
for use with your Makita tool specified in this manual.
The use of any other accessories or attachments might
present a risk of injury to persons. Only use accessory
or attachment for its stated purpose.
If you need any assistance for more details regarding
these accessories, ask your local Makita Service Center.
• Hedge shear blade cover
• Hedge shear blade assembly
• Chip receiver for hedge trimming
• Makita genuine battery and charger
For cordless grass shear use (Fig. 30)
This tool can be used as a grass shear by using the grass
shear blade (optional accessory) and 2-way change set.
To use this tool as a grass shear, replacing the hedge
shear blades with the grass shear blades is required.
For removing the hedge trimmer blades, refer to the
aforementioned section titled “Removing the hedge shear
blades”.

15
For installing the grass shear blade, refer to the section
below titled “Installing or removing grass shear blades”.
• Grass shear blade assembly (for Grass Shear)
• 2-way change set consisting of the following three
accessories
• Grass shear blade cover (for Grass Shear)
• Storage case (for blade bottom section)
• Base frame (for Grass Shear)
• Long handle attachment (for Grass Shear)
NOTE:
• Some items in the list may be included in the tool
package as standard accessories. They may differ from
country to country.
ASSEMBLY
CAUTION:
• Always be sure that the tool is switched off and the
battery cartridge is removed before carrying out any
work on the tool.
Installing or removing blade cover
(Fig. 31 & 32)
CAUTION:
• Be careful not to contact the shear blade when
installing or removing the blade cover. Contacting the
shear blade may cause personal injuries.
Slide the blade cover from the tool’s side until the shear
blade completely hides itself and then push in it lightly
towards the tool from the front.
To remove the blade cover, take the above installation
procedure in reverse.
Installing or removing grass shear blades
CAUTION:
• Always be sure that the tool is switched off and the
battery cartridge is removed before installing or
removing shear blades. Failure to switch off and
remove the battery cartridge from the tool may result in
serious injury from accidental start-up.
• When replacing the shear blade, always wear gloves
without removing blade cover so that hands and face
do not directly contact the blade. Failure to do so may
cause personal injury.
NOTE:
• Do not wipe off grease from the gear and crank. Failure
to do so may cause damage to the tool.
• For specific way of removing and installing shear
blades refer to the reverse of a package for accessory
shear blades. (Fig. 33)
To install the grass shear blade, prepare the crank,
undercover and new grass shear blade. (Fig. 34)
Take out the blade cover from the old shear blades and fit
it onto the new ones for easy handling during the
replacement of blades. (Fig. 35)
Adjust the three detent pin position so that these pins are
lined up at right angle in relation to the basic alignment
line on the tool housing. (Fig. 36)
Fit the crank with its recessed part facing upwards onto
the detent pins. At this time, apply a small amount of
grease to the periphery of the crank using grease that the
shear blades as optional accessory are provided with or
that remains inside gear housing. (Fig. 37)
Overlap the oval hole in the upper blade with that in the
lower one. Move the shear blades so that the hole in the
base plate of shear blades are positioned in the center of
these overlapped oval holes. (Fig. 38)
Turn the shear blades upside down and install it so that
the detent pins on the tool fit in the hole in the shear
blades. Make sure that the shear blades are set in place
securely as far as they reach the base plate. (Fig. 39)
Place the undercover so that the symbol on the
undercover is aligned with the symbol on the locking
lever. (Fig. 40)
Press the undercover down and with the undercover
pressed down turn the undercover clockwise until the
symbol on the label is aligned with the symbol on the
locking lever (the undercover is completely locked).
(Fig. 41)
At this time, make sure that the locking lever fits in the
groove in the undercover.
Remove the blade cover and then turn on the tool to
check it for proper movement.
NOTE:
• When the shear blades does not operate properly,
there is a poor fit between the blades and crank. Redo
from the beginning. (Fig. 42)
Remove the base frame and place the tool upside down.
CAUTION:
• Before placing the tool upside down, be sure to remove
the base frame (only for the tool changed to the grass
shear mode). (Fig. 43)
To remove the shear blade, press the locking lever and
with the locking lever pressed turn the undercover
counterclockwise until the symbol on the undercover is
aligned with the symbol on the locking lever. (Fig. 44)
Take out the undercover, shear blade and crank in order
from the tool. (Fig. 45)
NOTE:
• In the 2-way usage, the removed hedge shear blade
need to be sheared in the blade storage case and then
stored for future use.
Installing or removing base frame
CAUTION:
• Before installing or removing base frame, be sure to
install the blade cover.
• When installing or removing base frame, take care that
your fingers are not be pinched between the tool and
base frame. (Fig. 46)
To remove the base frame, upset the tool and take it out of
the groove grabbing its bottom. (Fig. 47)
To install the base frame, fit the protrusion of base frame
near the change lever into the hole for the sheared grass
height setting. With the base frame so fitted, pull the lower
part of base frame and fit the other part of the base frame
in the groove in the tool.
Adjusting the shearing height (Fig. 48)
Changing the position of holding the change lever allows
three-stepped setting for sheared grass height (10 mm,
15 mm, 25 mm).

16
To change setting, tilt the change lever for the base frame
position and with the change lever tilted move it up or
down along the tool surface until the protrusion on base
frame fits in one of the holes in the tool and release it.
OPERATION
WARNING:
• Keep hands away from blades.
CAUTION:
• Smear the blade before and once per hour during
operation using machine oil or similars.
• Avoid operating the tool under the scorching sunlight
as much as practicable. When operating the tool, be
careful of your physical conditions.
• Hold the tool with one hand. Do not hold the front bulge
of the tool as a grip. (Fig. 49)
Turn the tool on after adjusting the shearing height and
hold it so that the foot of the tool rest on the ground. Then
gently move the tool forward into the area to be cut.
(Fig. 50)
When trimming around curb, fence or trees, move the tool
along them. Be careful for the blade not to contact them.
(Fig. 51)
When trimming sprouts or foliage of a small tree, remove
the base frame from the tool and cut little by little.
Shear big branches to your desired height beforehand
using branch scissors before using this tool.
CAUTION:
• When trimming twigs and foliage, do not attempt to trim
too much at a time. Proceed gently. Also do not attempt
to cut thick branches.
• Do not let the shear blades contact the grounds during
operation. The blades will be dulled, causing poor
performance.
• Do not trim wet grass or foliage of small trees.
Noise ENG905-1
The typical A-weighted noise level determined according
to EN60745:
Sound pressure level (LpA): 73.7 dB (A)
Uncertainty (K): 2.5 dB (A)
The noise level under working may exceed 80 dB (A).
Wear ear protection.
Vibration ENG900-1
The vibration total value (tri-axial vector sum) determined
according to EN60745:
Vibration emission (ah): 2.5 m/s2or less
Uncertainty (K):1.5 m/s2
ENG901-1
• The declared vibration emission value has been
measured in accordance with the standard test method
and may be used for comparing one tool with another.
• The declared vibration emission value may also be
used in a preliminary assessment of exposure.
WARNING:
• The vibration emission during actual use of the power
tool can differ from the declared emission value
depending on the ways in which the tool is used.
• Be sure to identify safety measures to protect the
operator that are based on an estimation of exposure in
the actual conditions of use (taking account of all parts
of the operating cycle such as the times when the tool
is switched off and when it is running idle in addition to
the trigger time).
Grass shearing operation with optional
grass shear blades
Noise ENG905-1
The typical A-weighted noise level determined according
to IEC60335:
Sound pressure level (LpA): 75.9 dB (A)
Uncertainty (K): 2.5 dB (A)
The noise level under working may exceed 80 dB (A).
Wear ear protection.
Vibration ENG900-1
The vibration total value (tri-axial vector sum) determined
according to IEC60335:
Vibration emission (ah): 2.5 m/s2or less
Uncertainty (K):1.5 m/s2
ENG901-1
• The declared vibration emission value has been
measured in accordance with the standard test method
and may be used for comparing one tool with another.
• The declared vibration emission value may also be
used in a preliminary assessment of exposure.
WARNING:
• The vibration emission during actual use of the power
tool can differ from the declared emission value
depending on the ways in which the tool is used.
• Be sure to identify safety measures to protect the
operator that are based on an estimation of exposure in
the actual conditions of use (taking account of all parts
of the operating cycle such as the times when the tool
is switched off and when it is running idle in addition to
the trigger time).
For European countries only ENH021-8
EC Declaration of Conformity
Makita declares that the following Machine(s):
Designation of Machine:
Cordless Hedge Trimmer
Model No./Type: UH200D
Specifications: see “SPECIFICATIONS” table.
Conforms to the following European Directives:
2000/14/EC, 2006/42/EC
They are manufactured in accordance with the following
standard or standardized documents:
EN60745
The technical file in accordance with 2006/42/EC is
available from:
Makita, Jan-Baptist Vinkstraat 2, 3070, Belgium
The conformity assessment procedure required by
Directive 2000/14/EC was in Accordance with annex V.
Measured Sound Power Level: 81.8 dB (A)
Guaranteed Sound Power Level: 84 dB (A)
30. 9. 2015
Yasushi Fukaya
Director
Makita, Jan-Baptist Vinkstraat 2, 3070, Belgium

17
For European countries only ENH003-15
EC Declaration of Conformity
Makita declares that the following Machine(s):
Designation of Machine:
Cordless Grass Shear
Model No./Type: UH200D
Conforms to the following European Directives:
2006/42/EC
They are manufactured in accordance with the following
standard or standardized documents:
EN60335, EN60745
The technical file in accordance with 2006/42/EC is
available from:
Makita, Jan-Baptist Vinkstraat 2, 3070, Belgium
30. 9. 2015
Yasushi Fukaya
Director
Makita, Jan-Baptist Vinkstraat 2, 3070, Belgium

18
FRANÇAIS (Instructions d’origine)
Descriptif
SPÉCIFICATIONS
• Étant donné l’évolution constante de notre programme de recherche et de développement, les spécifications
contenues dans ce manuel sont sujettes à des modifications sans préavis.
• Les spécifications et la batterie peuvent varier d’un pays à l’autre.
• Poids, batterie incluse, selon la procédure EPTA 01/2003
Symboles END010-4
Les symboles utilisés pour l’outil sont indiqués ci-
dessous. Assurez-vous d’avoir bien compris leur
signification avant d’utiliser l’outil.
............... Usez d’attention et de soins particuliers !
...... Reportez-vous au manuel d’instructions.
............... Danger ; faites attention au risque de
projection d’objets.
............... Éloignez les spectateurs.
............... L’organe de coupe continue à fonctionner
une fois le moteur éteint.
............... Tenez l’appareil à l’abri de l’humidité.
......... Pour les pays européens uniquement
Ne pas jeter les appareils électriques et
les bloc-batteries dans les ordures
ménagères !
Conformément aux directives
européennes relatives aux déchets
d’équipements électriques ou
électroniques (DEEE) ainsi qu’aux
batteries, aux accumulateurs et aux
batteries et accumulateurs usagés et à
leur transposition dans la législation
nationale, les appareils électriques, les
batteries et les bloc-batteries doivent être
collectés à part et être soumis à un
recyclage respectueux de
l’environnement.
Utilisations ENE014-1
Cet outil est conçu pour le taillage des haies.
Consignes de sécurité générales
des outils électriques GEA010-1
AVERTISSEMENT Veuillez lire toutes les
consignes de sécurité et les instructions. Il y a un
risque de choc électrique, d’incendie et/ou de blessure
1. Batterie
2. Boutons
3. Bouton de sécurité
4. Gâchette
5. Voyant
6. Sens de la taille
7. Inclinez les lames
8. Surface de la haie à tailler
9. Ficelle
10. Écrous de serrage de collier
11. Récepteur de copeaux
12. Vis sur les lames de cisailles
13. Couvercle de protection de la
lame à installer
systématiquement avant
d’installer le récepteur de
copeaux
14. Brosse
15. Huile pour machine
16. Couvercle de protection de la
lame
17. Couvercle supérieur
18. Levier de verrouillage
19. Appuyez
20. Tournez
21. Vis
22. Bielle
23. Lames de cisailles
24. Repère d’alignement de base sur
le carter de l’outil
25. Clous
26. Appliquez de la graisse
27. Partie encastrée de la bielle
28. Orifices ovales qui se
chevauchent
29. Orifice dans la plaque de base
des lames de cisailles
30. Plaque de base
31. Partie incurvée de la plaque de
base des lames de cisailles
32. Rainure dans le couvercle
supérieur
33. Orifice du crochet
34. Lame de cisailles à gazon
35. Couvercle de protection de la
lame de cisailles à gazon
36. Étui de rangement
37. Châssis
38. Rainure
39. Levier de changement
40. Saillie sur le châssis
Modèle UH200D
Longueur de la lame 200 mm
Passes par minute (min-1) 1 250
Longueur totale 460 mm
Poids net 1,2 kg
Tension nominale 10,8 V C.C.
Batterie BL1013
Chargeur de batterie DC10WA
Cd
Ni-MH
Li-ion

19
grave si les consignes et les instructions ne sont pas
toutes respectées.
Conservez toutes les consignes
et instructions pour référence
ultérieure.
CONSIGNES DE SÉCURITÉ
CONCERNANT LE TAILLE-HAIE
SANS FIL GEB062-5
1. Maintenez toutes les parties du corps éloignées de
la lame de coupe. Ne retirez pas et ne retenez pas
le matériau à couper lorsque les lames sont en
mouvement. Assurez-vous que l’outil est éteint
lors du dégagement des matériaux enchevêtrés.
Tout moment d’inattention pendant l’utilisation du
taille-haie comporte un risque de blessure corporelle
grave.
2. Portez le taille-haie par la poignée après avoir
arrêté la lame de coupe. Lors du transport ou du
stockage du taille-haie, fermez toujours le
couvercle du dispositif de coupe. Une utilisation
correcte du taille-haie permettra de réduire les risques
éventuels de blessures corporelles par la lame de
coupe.
3. Tenez l’outil par ses surfaces de prise isolées
uniquement car la lame de coupe risque d’entrer
en contact avec des fils cachés. Il est possible que
le contact avec un fil sous tension mette les parties
métalliques exposées de l’outil sous tension, risquant
ainsi de provoquer un choc électrique chez
l’utilisateur.
4. N’utilisez pas le taille-haie sous la pluie ou dans des
conditions d’humidité importante. Le moteur électrique
n’est pas étanche.
5. Les personnes utilisant le taille-haie pour la première
fois doivent demander à un utilisateur expérimenté de
leur indiquer la procédure d’utilisation du taille-haie.
6. Le taille-haie ne doit pas être utilisé par les enfants ni
les jeunes âgés de moins de 18 ans. Cette restriction
ne s’applique pas aux jeunes de 16 ans ou plus ayant
reçu une formation sous la supervision d’un
spécialiste.
7. Utilisez le taille-haie uniquement si vous êtes en
bonne condition physique. Si vous êtes fatigué(e),
votre attention sera réduite. Soyez particulièrement
prudent(e) à la fin d’une journée de travail. Effectuez
tout le travail avec calme et prudence. L’utilisateur est
responsable de tous les dommages causés aux tiers.
8. N’utilisez jamais le taille-haie après avoir consommé
de l’alcool, de la drogue ou des médicaments.
9. Les gants de travail en cuir épais font partie de
l’équipement de base du taille-haie et vous devez
toujours les porter lorsque vous travaillez avec l’outil.
Portez également des chaussures solides munies de
semelles anti-dérapantes.
10. Avant de commencer à travailler, assurez-vous que le
taille-haie est en état de fonctionnement correct et sûr.
Assurez-vous que les garde-corps sont correctement
installés. Vous pouvez utiliser le taille-haie
uniquement s’il est entièrement monté.
11. Assurez-vous d’avoir une bonne prise au sol avant de
commencer à travailler.
12. Maintenez l’outil fermement lors de son utilisation.
13. Ne faites pas fonctionner inutilement l’outil à vide.
14. Coupez immédiatement le moteur et retirez la batterie
si la lame entre en contact avec une clôture ou un
autre objet dur. Vérifiez que la lame n’est pas
endommagée ; dans le cas contraire, réparez-la
immédiatement.
15. Avant de vérifier la lame, corriger les problèmes ou
retirer les matériaux happés par la lame, éteignez
toujours le taille-haie et retirez la batterie.
16. Mettez le taille-haie hors tension et retirez la batterie
avant d’effectuer toute tâche d’entretien.
17. Lors du déplacement du taille-haie dans un autre lieu,
notamment pendant son utilisation, retirez toujours la
batterie et placez l’étui de protection sur la lame de
coupe. Ne déplacez et ne transportez jamais le taille-
haie alors que la lame est en mouvement. Ne
saisissez jamais la lame dans les mains.
18. Nettoyez le taille-haie et en particulier la lame après
utilisation et avant de ranger le taille-haie pendant une
période prolongée. Lubrifiez légèrement la lame et
mettez l’étui de protection. Vous pouvez suspendre
l’étui fourni avec l’appareil au mur, ce qui vous permet
de ranger le taille-haie de manière sûre et pratique.
19. Placez le taille-haie dans son étui avant de le ranger
et mettez-le dans une pièce sèche. Conservez-le hors
de portée des enfants. Ne rangez jamais le taille-haie
à l’extérieur.
CONSERVEZ CES
INSTRUCTIONS.
AVERTISSEMENT :
NE vous laissez PAS tromper (au fil d’une utilisation
répétée) par un sentiment d’aisance et de familiarité
avec le produit, en négligeant le respect rigoureux
des consignes de sécurité qui accompagnent l’outil.
Une UTILISATION INCORRECTE de l’outil ou le non-
respect des consignes de sécurité indiquées dans ce
manuel d’instructions peuvent causer des blessures
graves.
AVERTISSEMENTS DE SÉCURITÉ
CONCERNANT LE TAILLE-
HERBES SANS FIL GEB070-4
AVERTISSEMENT ! IMPORTANT LISEZ
ATTENTIVEMENT toutes les consignes de sécurité et
toutes les instructions AVANT D’UTILISER L’OUTIL. Il
y a un risque de choc électrique, d’incendie et/ ou de
blessure grave si les consignes et les instructions ne sont
pas toutes respectées.
Conservez toutes les consignes
et instructions pour référence
ultérieure.
Instructions générales
1. Pour une utilisation correcte, lisez ce mode d’emploi
afin de vous familiariser avec le fonctionnement de
l’appareil. Sans ces informations, vous risquez de ne

20
pas utiliser l’appareil correctement et de vous mettre
en danger ou de blesser d’autres personnes.
2. Ne laissez jamais les enfants, les personnes dont les
capacités physiques, sensorielles ou mentales sont
réduites, n’ayant aucune expérience ni compétence,
ou ne connaissant pas les présentes instructions
utiliser l’appareil. Les réglementations locales peuvent
limiter l’âge de l’opérateur.
3. N’utilisez l’appareil qu’avec une précaution et une
attention extrêmes.
4. Utilisez l’appareil uniquement si vous êtes en bonne
condition physique. Effectuez tout le travail avec
calme et prudence. Faites preuve de bon sens et
gardez à l’esprit que l’opérateur ou l’utilisateur est
responsable des accidents ou blessures infligés à
d’autres personnes ou à leurs biens.
5. N’utilisez jamais l’appareil lorsque des personnes,
particulièrement des enfants, ou des animaux se
trouvent à proximité.
6. N’utilisez jamais l’appareil après avoir consommé de
l’alcool ou de la drogue, ou bien si vous vous sentez
fatigué ou malade.
7. Éteignez immédiatement le moteur si vous constatez
un problème ou une anormalité avec l’appareil.
8. Lorsque vous rangez l’appareil et que vous le laissez
sans surveillance, mettez-le hors tension, retirez la
batterie et placez-le en lieu sûr pour protéger les
autres et éviter que l’appareil ne s’abîme.
9. N’utilisez pas l’appareil au-dessus des capacités pour
lesquels il a été conçu : cela pourrait nuire à la qualité
du travail et provoquer un risque de blessures.
10. Ne tendez pas le bras de manière excessive.
Assurez-vous d’une bonne prise au sol et d’une bonne
position d’équilibre à tout moment.
11. Évitez d’utiliser l’appareil lorsque les conditions
météorologiques sont mauvaises, en particulier en
cas de risque d’orage.
Dispositif de protection individuelle
1. Portez des vêtements adéquats. Les vêtements que
vous portez doivent être fonctionnels et appropriés,
c’est-à-dire qu’ils doivent être près du corps, sans
pour autant gêner vos mouvements. Ne portez pas de
bijoux ou de vêtements susceptibles d’être happés par
l’appareil. Portez un filet de protection pour
envelopper les cheveux longs.
2. Portez toujours des lunettes de protection et des
chaussures solides lors de l’utilisation de l’appareil.
3. Portez toujours des chaussures résistantes et des
pantalons longs lors de l’utilisation de l’appareil.
Sécurité électrique et de la batterie
1. Évitez les environnements dangereux. N’utilisez pas
l’appareil dans des lieux humides et ne l’exposez pas
aux intempéries. Le risque de choc électrique
augmente lorsque de l’eau pénètre dans un appareil
électrique.
2. N’utilisez que le chargeur spécifié par le fabricant. Un
chargeur qui convient à un type de batterie peut créer
un risque d’incendie s’il est utilisé avec un autre type
de batterie.
3. Utilisez les outils électriques uniquement avec les
batteries désignées. L’utilisation d’autres types de
batterie peut créer un risque de blessures et
d’incendie.
4. Lorsque le bloc-batterie n’est pas utilisé, gardez-le
éloigné de tout objet métallique, comme les
trombones, pièces, clefs, clous, vis ou autres petits
objets métalliques, qui peuvent faire office de
connexion d’une borne à l’autre. Court-circuiter les
bornes de la batterie peut provoquer des brûlures ou
un incendie.
5. En cas de mauvaise utilisation, du liquide peut fuir de
la batterie ; évitez tout contact. Si un contact
accidentel se produit, nettoyez avec de l’eau. Si le
liquide entre en contact avec les yeux, consultez un
médecin. Le liquide émis par la batterie peut
provoquer une irritation ou des brûlures.
6. Ne jetez pas les batteries au feu. Elles risqueraient
d’exploser. Consultez la réglementation locale pour
connaître les éventuelles consignes de mise au rebut
spéciales.
7. N’ouvrez pas les batteries et n’essayez pas de les
démonter. L’électrolyte libéré est corrosif et risquerait
de blesser vos yeux ou votre peau. Si vous l’avalez, il
peut se révéler toxique.
Démarrage de l’appareil
1. Assurez-vous qu’aucun enfant ou adulte ne se trouve
à proximité et faites attention aux animaux situés dans
la zone de travail. Le cas échéant, arrêtez l’appareil.
2. Avant d’utiliser l’appareil, vérifiez toujours qu’il ne
présente aucun danger. Vérifiez la sécurité de l’outil
tranchant et de son protège-lame, ainsi que le
fonctionnement de la gâchette et du levier. Vérifiez
que les poignées sont propres et sèches, ainsi que le
bon fonctionnement de l’interrupteur marche/arrêt.
3. Recherchez les éventuelles pièces endommagées
avant de continuer à utiliser l’appareil. Un protège-
lame ou une autre pièce endommagé(e) doit être
inspecté(e) soigneusement pour déterminer s’il/si elle
va fonctionner correctement. Assurez-vous que les
pièces en mouvement sont alignées et se déplacent
librement, qu’aucune pièce n’est cassée, que les
pièces sont correctement montées et qu’aucune
anomalie ne risque d’affecter le fonctionnement de
l’appareil. Un protège-lame ou toute autre pièce
endommagé(e) doit être correctement réparé(e) ou
remplacé(e) par un centre de service agréé, sauf
indication contraire dans ce manuel.
4. Ne mettez le moteur sous tension que lorsque vos
mains et vos pieds sont éloignés de la lame.
5. Avant de commencer, assurez-vous que l’outil de
coupe ne touche aucun objet.
Mode d’emploi
1. N’utilisez l’appareil que dans des conditions
d’éclairage et de luminosité suffisantes. En hiver,
soyez attentif aux zones glissantes ou mouillées, au
verglas et à la neige (risque de glissade). Assurez-
vous toujours d’avoir une bonne prise au sol sur les
pentes ; marchez et ne courrez pas.
2. Faites attention à ne pas vous blesser les pieds et les
mains avec l’outil de coupe.
3. N’utilisez jamais l’appareil sur une échelle.
4. Ne montez jamais dans un arbre pour utiliser
l’appareil.
5. Ne travaillez jamais sur des surfaces instables.
6. Enlevez le sable, les pierres, les clous, etc., trouvés à
l’intérieur du périmètre de travail. Des corps étrangers
Other manuals for UH200D
7
Table of contents
Languages:
Other Makita Trimmer manuals

Makita
Makita DUR364L User manual

Makita
Makita DUR361U User manual

Makita
Makita DUR365UPM2 User manual

Makita
Makita ER2600L User guide

Makita
Makita DUR190U User manual

Makita
Makita UR008G User manual

Makita
Makita RBC280 User manual

Makita
Makita DRT50 User manual

Makita
Makita DUH604S User manual

Makita
Makita BUH48 User manual

Makita
Makita HNU01 User manual

Makita
Makita RT0702C User manual

Makita
Makita DUH551 User manual

Makita
Makita DUH506 User manual

Makita
Makita ER2650LH Manual

Makita
Makita XRU11 User manual

Makita
Makita EM404MP User guide

Makita
Makita DUH751 User manual

Makita
Makita DUH506 User manual

Makita
Makita DUH604S User manual