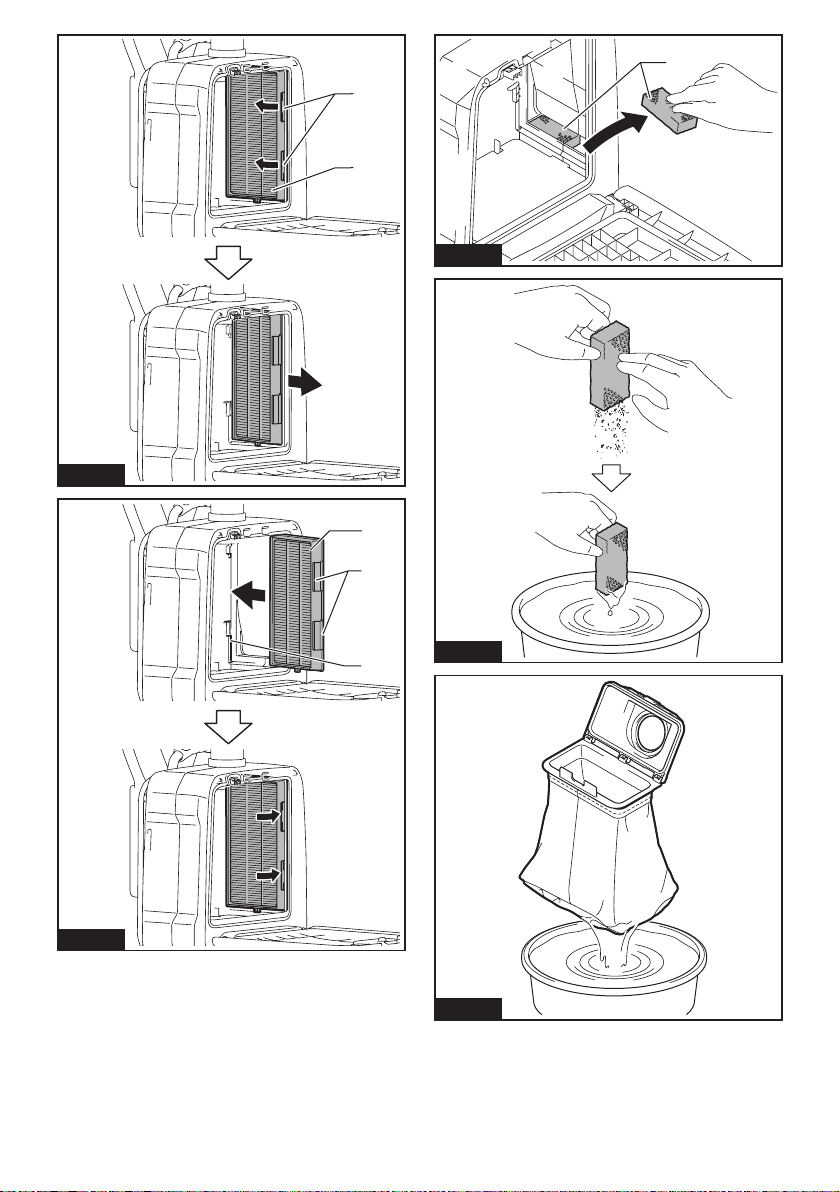
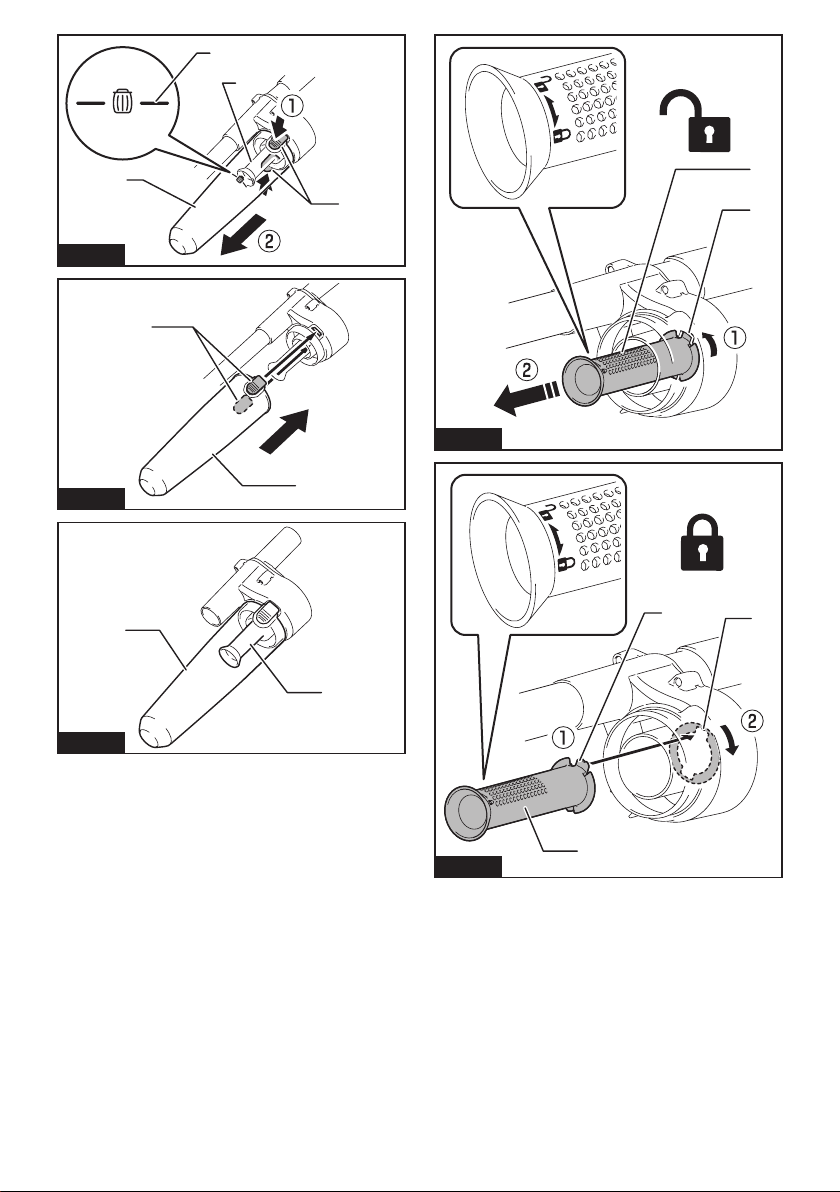
Makita VC011G User manual

VC011G
EN Cordless Backpack Vacuum
Cleaner INSTRUCTION MANUAL 11
FR Aspirateur Dorsal Sans Fil MANUEL D’INSTRUCTIONS 22
DE Akku-Rucksackstaubsauger BETRIEBSANLEITUNG 35
IT Aspirapolvere spalleggiato a
batteria ISTRUZIONI PER L’USO 48
NL Ruggedragen accustofzuiger GEBRUIKSAANWIJZING 61
ES Aspiradora de mochila a
batería
MANUAL DE
INSTRUCCIONES 74
PT Aspirador Costal a Bateria MANUAL DE INSTRUÇÕES 87
DA Akku rygstøvsuger BRUGSANVISNING 99
EL
111
TR KULLANMA KILAVUZU 125

2
2
3
4
11
Fig.1
1
2
Fig.2
1
2
Fig.3
1
1
2
2
Fig.4
1
2
Fig.5
1
2
Fig.6

3
2
1
Fig.7
1
Fig.8
1
2
Fig.9
Fig.10
1
23
Fig.11
11
22
Fig.12
2
3
1
Fig.13
Fig.13
1
2
Fig.14

4
1
2
3
Fig.15
4
1
3
2
Fig.16
1
23 4
Fig.17
1
1
2
3
Fig.18
1
2
34
Fig.19
1
Fig.20
1
23
3
Fig.21

5
1
Fig.22
1
3
2
4
Fig.23
3
1
2
Fig.24
1
2
Fig.25
1
2
3
Fig.26
1
2
3
4
Fig.27

6
Fig.28
2
1
Fig.29
1
2
Fig.30
2
3
1
Fig.31
11
2
3
4
Fig.32

7
Fig.33
Fig.34
Fig.35
Fig.36
Fig.37
1
2
Fig.38
1
Fig.39
1
Fig.40

8
1
2
Fig.41
1
2
3
Fig.42
1
Fig.43
Fig.44
Fig.45

9
1
Fig.46
1
Fig.47
2
3
1
Fig.48
2
1
3
Fig.49
1
Fig.50

10
2
3
1
4
Fig.51
2
1
Fig.52
1
2
Fig.53
1
2
Fig.54
2
1
3
Fig.55

11 ENGLISH
ENGLISH (Original instructions)
WARNING
• For users in Europe: This appliance can be used by children aged from 8 years and above and persons with
reduced physical, sensory or mental capabilities or lack of experience and knowledge if they have been given
supervision or instruction concerning use of the appliance in a safe way and understand the hazards involved.
Children shall not play with the appliance. Cleaning and user maintenance shall not be made by children with-
out supervision.
• For users in areas other than Europe: This appliance is not intended for use by persons (including children)
with reduced physical, sensory or mental capabilities, or lack of experience and knowledge, unless they have
been given supervision or instruction concerning use of the appliance by a person responsible for your safety.
• Children must be supervised to ensure that they do not play with the appliance.
• CAUTION: Before carrying out any maintenance operation, disconnect the appliance from the power supply.
Perform maintenance on the appliance periodically.
• Rechargeable batteries must be removed from the device before charging.
• To remove or install the battery, slide the cartridge out of the tool while pressing the button on the front of the
cartridge.
• Exhausted batteries must be removed from the device and disposed of safely. Follow local regulations regard-
ing battery disposal.
• If the device is to be stored unused for a long period, the batteries should be removed.
• The power terminals must not be short-circuited.
Applicable battery cartridge and charger
Battery cartridge BL4020 / BL4025 / BL4040 / BL4040F / BL4050F / BL4080F
Charger DC40RA / DC40RB / DC40RC
• Some of the battery cartridges and chargers listed above may not be available depending on your region of
residence.
WARNING: Only use the battery cartridges and chargers listed above. Use of any other battery cartridges
SPECIFICATIONS
Model: VC011G
Capacity Filter bag 6.0 L
Dust bag 5.5 L
Maximum air volume
(With hose ø32 mm x 1.0 m)
2.4 m3/min
Vacuum 20 kPa
Dimensions (L x W x H)
(excluding the harness, with BL4050F)
336 mm x 185 mm x 543 mm
Rated voltage D.C. 36 V - 40 V max
Net weight 6.4 - 9.5 kg
without notice.
• The weight does not include accessories but battery cartridge(s). The lightest and heaviest combination weight
of the appliance and battery cartridge(s) are shown in the table.
• The length of supplied hose varies depending on the countries.
WARNING: Do not use a corded power supply such as battery adapter or portable power pack with
this appliance. The cable of such power supply may hinder the operation and result in personal injury.

12 ENGLISH
Symbols
The followings show the symbols which may be used
for the equipment. Be sure that you understand their
meaning before use.
Read instruction manual.
Take particular care and attention.
A representative battery applicable to this
product.
Ni-MH
Li-ion
Only for EU countries
Due to the presence of hazardous com-
ponents in the equipment, waste electrical
and electronic equipment, accumulators
and batteries may have a negative impact
on the environment and human health.
Do not dispose of electrical and electronic
appliances or batteries with household
waste!
In accordance with the European Directive
on waste electrical and electronic equip-
ment and on accumulators and batteries
and waste accumulators and batteries,
as well as their adaptation to national law,
waste electrical equipment, batteries and
accumulators should be stored separately
and delivered to a separate collection point
for municipal waste, operating in accor-
dance with the regulations on environmen-
tal protection.
This is indicated by the symbol of the
crossed-out wheeled bin placed on the
equipment.
Intended use
The appliance is intended for collecting dry dust. The
appliance is suitable for commercial use, for example in
rental businesses.
Noise
The typical A-weighted noise level determined accord-
ing to EN60335-2-69:
Sound pressure level (LpA) : 70 dB(A) or less
Uncertainty (K) : 2.5 dB (A)
The noise level under working may exceed 80 dB (A).
NOTE: The declared noise emission value(s) has
been measured in accordance with a standard test
method and may be used for comparing one tool with
another.
NOTE: The declared noise emission value(s)
may also be used in a preliminary assessment of
exposure.
WARNING: Wear ear protection.
WARNING: The noise emission during actual
value(s) depending on the ways in which the
tool is used especially what kind of workpiece is
processed.
WARNING: Be sure to identify safety mea-
sures to protect the operator that are based on an
estimation of exposure in the actual conditions of
use (taking account of all parts of the operating
cycle such as the times when the tool is switched
trigger time).
Vibration
The vibration total value (tri-axial vector sum) deter-
mined according to EN60335-2-69:
Work mode: operation without load
Vibration emission (ah,D) : 2.5 m/s2or less
Uncertainty (K) : 1.5 m/s2
NOTE: The declared vibration total value(s) has been
measured in accordance with a standard test method
and may be used for comparing one tool with another.
NOTE: The declared vibration total value(s) may also
be used in a preliminary assessment of exposure.
WARNING: The vibration emission during
declared value(s) depending on the ways in which
the tool is used especially what kind of workpiece
is processed.
WARNING: Be sure to identify safety mea-
sures to protect the operator that are based on an
estimation of exposure in the actual conditions of
use (taking account of all parts of the operating
cycle such as the times when the tool is switched
trigger time).
Declarations of Conformity
For European countries only
The Declarations of conformity are included in Annex A
to this instruction manual.
SAFETY WARNINGS
Cordless vacuum cleaner safety warnings
WARNING: IMPORTANT! READ CAREFULLY
all safety warnings and all instructions BEFORE
USE. Failure to follow the warnings and instructions
1. Before use, make sure that this cleaner must
be used by people who have been adequately
instructed on the use of this cleaner.
2.

13 ENGLISH
3.
metal chips, sharp materials such as razors,
needles, broken glass or the like.
4. NEVER USE THE CLEANER IN THE VICINITY
OF GASOLINE, GAS, PAINT, ADHESIVES OR
OTHER HIGHLY EXPLOSIVE SUBSTANCES.
The switch emits sparks when turned ON
and OFF. And so does the motor commutator
during operation. A dangerous explosion may
result.
5. This cleaner is not suitable for picking up
hazardous dust.
6. Never vacuum up toxic, carcinogenic, com-
bustible or other hazardous materials such
as asbestos, arsenic, barium, beryllium,
lead, pesticides, or other health endangering
materials.
7. Never use the cleaner outdoors in the rain.
8. For Finland, this machine is not to be used
outdoors at low temperature.
9. Do not use close to heat sources (stoves, etc.).
10. Do not block cooling vents. These vents per-
mit cooling of the motor. Blockage should be
carefully avoided otherwise the motor will burn
out from lack of ventilation.
11. Keep proper footing and balance at all times.
12. Do not fold, tug or step on the hose.
13. Stop the cleaner immediately if you notice
poor performance or anything abnormal
during operation.
14. DISCONNECT THE BATTERIES. When not in
use, before servicing, and when changing
accessories.
15. Clean and service the cleaner immediately
after each use to keep it in tiptop operating
condition.
16. MAINTAIN THE CLEANER WITH CARE. Keep
the cleaner clean for better and safer per-
formance. Follow instructions for changing
accessories. Keep handles dry, clean, and free
from oil and grease.
17. CHECK DAMAGED PARTS. Before further use
of the cleaner, a guard or other part that is
damaged should be carefully checked to deter-
mine that it will operate properly and perform
its intended function. Check for alignment of
moving parts, binding of moving parts, break-
age of parts, mounting, and any other condi-
other part that is damaged should be properly
repaired or replaced by an authorized service
center unless otherwise indicated elsewhere
in this instruction manual. Have defective
switches replaced by authorized service cen-
ter. Don’t use the cleaner if switch does not
18. REPLACEMENT PARTS. When servicing, use
only identical replacement parts.
19. When not in use, always store the cleaner
indoors.
20. Be kind to your cleaner. Rough handling can
cause breakage of even the most sturdily built
cleaner.
21. Do not attempt to clean the exterior or interior
with benzine, thinner or cleaning chemicals.
Cracks and discoloration may be caused.
22. Do not use cleaner in an enclosed space where
23. Do not operate the cleaner while under the
24. As a basic rule of safety, use safety goggles or
safety glasses with side shields.
25. Use a dust mask in dusty work conditions.
26.
Never handle battery(ies) and cleaner with wet hands.
27. Use extreme caution when cleaning on stairs.
28. Do not use the cleaner as a stool or work
bench. The machine may fall down and may
result in personal injury.
Battery tool use and care
1.
the manufacturer. A charger that is suitable for
when used with another battery pack.
2. -
nated battery packs. Use of any other battery
3. When battery pack is not in use, keep it away
from other metal objects, like paper clips,
coins, keys, nails, screws or other small metal
objects, that can make a connection from one
terminal to another. Shorting the battery termi-
4. Under abusive conditions, liquid may be
ejected from the battery; avoid contact. If con-
liquid contacts eyes, additionally seek medical
help. Liquid ejected from the battery may cause
irritation or burns.
5. Do not use a battery pack or tool that is dam-
may exhibit unpredictable behaviour resulting in
6.
excessive temperature.-
perature above 130 °C may cause explosion.
7. Follow all charging instructions and do not
charge the battery pack or tool outside the
-
tions. Charging improperly or at temperatures
Service
1.
repair person using only identical replacement
parts. This will ensure that the safety of the power
tool is maintained.
2. Never service damaged battery packs. Service
of battery packs should only be performed by the
manufacturer or authorized service providers.
3. Follow instruction for lubricating and chang-
ing accessories.
4. Keep handles dry, clean and free from oil and
grease.

14 ENGLISH
Important safety instructions for
battery cartridge
1. Before using battery cartridge, read all instruc-
tions and cautionary markings on (1) battery
charger, (2) battery, and (3) product using
battery.
2. Do not disassemble or tamper with the battery
cartridge.
or explosion.
3. If operating time has become excessively
shorter, stop operating immediately. It may
result in a risk of overheating, possible burns
and even an explosion.
4. If electrolyte gets into your eyes, rinse them
out with clear water and seek medical atten-
tion right away. It may result in loss of your
eyesight.
5. Do not short the battery cartridge:
(1) Do not touch the terminals with any con-
ductive material.
(2) Avoid storing battery cartridge in a con-
tainer with other metal objects such as
nails, coins, etc.
(3) Do not expose battery cartridge to water
or rain.
A battery short can cause a large current
breakdown.
6. Do not store and use the tool and battery car-
tridge in locations where the temperature may
reach or exceed 50 °C (122 °F).
7. Do not incinerate the battery cartridge even if
it is severely damaged or is completely worn
8. Do not nail, cut, crush, throw, drop the battery
cartridge, or hit against a hard object to the
battery cartridge. Such conduct may result in a
9. Do not use a damaged battery.
10. The contained lithium-ion batteries are subject
to the Dangerous Goods Legislation require-
ments.
For commercial transports e.g. by third parties,
forwarding agents, special requirement on pack-
aging and labeling must be observed.
For preparation of the item being shipped, consult-
ing an expert for hazardous material is required.
Please also observe possibly more detailed
national regulations.
battery in such a manner that it cannot move
around in the packaging.
11. When disposing the battery cartridge, remove
it from the tool and dispose of it in a safe
place. Follow your local regulations relating to
disposal of battery.
12. Use the batteries only with the products
Installing the batteries to
-
sive heat, explosion, or leak of electrolyte.
13. If the tool is not used for a long period of time,
the battery must be removed from the tool.
14. During and after use, the battery cartridge may
take on heat which can cause burns or low
temperature burns. Pay attention to the han-
dling of hot battery cartridges.
15. Do not touch the terminal of the tool imme-
diately after use as it may get hot enough to
cause burns.
16. Do not allow chips, dust, or soil stuck into the
terminals, holes, and grooves of the battery
cartridge.
burst and malfunction of the tool or battery car-
tridge, resulting in burns or personal injury.
17. Unless the tool supports the use near
high-voltage electrical power lines, do not use
the battery cartridge near high-voltage electri-
cal power lines. It may result in a malfunction or
breakdown of the tool or battery cartridge.
18. Keep the battery away from children.
SAVE THESE INSTRUCTIONS.
CAUTION: Only use genuine Makita batteries.
Use of non-genuine Makita batteries, or batteries that
have been altered, may result in the battery bursting
also void the Makita warranty for the Makita tool and
charger.
Tips for maintaining maximum
battery life
1. Charge the battery cartridge before completely
discharged. Always stop tool operation and
charge the battery cartridge when you notice
less tool power.
2. Never recharge a fully charged battery car-
tridge. Overcharging shortens the battery
service life.
3. Charge the battery cartridge with room tem-
perature at 10 °C - 40 °C (50 °F - 104 °F). Let
a hot battery cartridge cool down before
charging it.
4. When not using the battery cartridge, remove
it from the tool or the charger.
5. Charge the battery cartridge if you do not use
it for a long period (more than six months).

15 ENGLISH
FUNCTIONAL DESCRIPTION
CAUTION:
Always be sure that the appliance is
before adjusting or checking function on the appliance.
Installing or removing battery cartridge
CAUTION:
before installing or removing of the battery cartridge.
CAUTION: Hold the appliance and the bat-
battery cartridge. Failure to hold the appliance and
your hands and result in damage to the appliance and
battery cartridge and a personal injury.
To install the battery cartridges, align the tongues on the
battery cartridges with the grooves in the housing and slip
them into place. Insert them all the way until they lock in
place with a little click. If you can see the red indicators as
To remove the battery cartridges, slide them out of the battery hous-
ing while pressing and holding the buttons in front of the cartridges.
Fig.1: 1. Red indicator 2. Button 3. Right battery
cartridge 4. Left battery cartridge
CAUTION: Always install the battery cartridge
fully until the red indicator cannot be seen. If not,
it may accidentally fall out of the appliance, causing
injury to you or someone around you.
CAUTION: Do not install the battery cartridge
forcibly. If the cartridge does not slide in easily, it is
not being inserted correctly.
The cleaner has double battery slots. You can choose with either
double batteries or single battery according to your needs.
With double batteries
Continuous drive with two batteries allows longer runtime
-
ing empty, the cleaner automatically switches a power
source, so it continues working with the second battery.
NOTE:
The right battery slot (when facing the front of
the cleaner) has priority over the left battery slot. The
either when no battery is installed in the right battery slot
or the battery in the right battery slot becomes empty.
NOTE:
You can remove the battery from the right battery
slot and recharge it after the cleaner has switched its
power source from the right battery slot to the left without
ceasing operation. To give priority back to the right battery
slot after installing a recharged battery, restart the cleaner.
NOTE:
When the cleaner switches the power source
temporary halt in operations, causing a slight loss of
suction. This is not malfunction so the cleaner recovers
and resumes operations immediately after the pause.
With a single battery
Only one battery is required as a power source in either
the right or left battery slot. The cleaner automatically
determines which battery slot is available.
Indicating the remaining battery
capacity
Press the check button on the battery cartridge to indi-
cate the remaining battery capacity. The indicator lamps
light up for a few seconds.
Fig.2: 1. Indicator lamps 2. Check button
Indicator lamps Remaining
capacity
Lighted Blinking
75% to 100%
50% to 75%
25% to 50%
0% to 25%
Charge the
battery.
The battery
may have
malfunctioned.
NOTE: Depending on the conditions of use and the
from the actual capacity.
NOTE:
the battery protection system works.
Indicating the remaining battery
capacity on the switch box
The remaining battery capacity can be checked on the
switch box. Press the button to indicate the remain-
ing battery capacities.
"L" and "R" on the switch box correspond to the left and
right battery cartridges, respectively. Follow the indica-
tion when you replace the battery cartridge.
Fig.3: 1. Battery indicator 2. Battery check / LED
light button
Battery indicator status Remaining
battery
capacity
On Blinking
50% to 100%
20% to 50%
0% to 20%
Charge the
battery

16 ENGLISH
Appliance / battery protection
system
The appliance is equipped with appliance / battery
power to the motor to extend appliance and battery
life. In this situation, the battery indicator lights up as
following table.
Battery indicator status Status
On Blinking
Overload
protection
(battery) /
Overheat
protection
(battery) /
Overdischarge
protection
Overheat
protection
(appliance)
The appliance and the LED light will automatically stop
during operation if the appliance or battery is placed
under one of the following conditions:
Overload protection
When the appliance / battery is operated in a manner
that causes it to draw an abnormally high current, the
appliance automatically stops. In this situation, turn the
appliance to become overloaded. Then turn the appli-
ance on to restart.
Overheat protection
When the appliance / battery is overheated, the appli-
ance stops automatically. In this situation, let the appli-
ance / battery cool down before turning the appliance
on again.
Overdischarge protection
When the battery capacity becomes low, the appliance
stops automatically. If the product does not operate
even when the switches are operated, remove the bat-
teries from the appliance and charge the batteries.
Protections against other causes
Protection system is also designed for other causes that
could damage the appliance and allows the appliance to
stop automatically. Take all the following steps to clear
the causes, when the appliance has been brought to a
temporary halt or stop in operation.
restart.
2. Charge the battery(ies) or replace it/them with
recharged battery(ies).
3. Let the appliance and battery(ies) cool down.
If no improvement can be found by restoring protection
system, then contact your local Makita Service Center.
Switch box position
The switch box can be hooked on either side of the lower
belt. Arrange the cord so that the switch box comes to
your desired side. To prevent the cord from being dam-
aged, pass the cord through the groove as illustrated.
Fig.4: 1. Groove 2. Cord
Adjusting belts
The tightness of the shoulder belts, upper and lower
belts can be adjusted. Put your arms through the shoul-
To tighten, pull the end of the strap as illustrated. To
loosen, pull up the end of the fastener.
Lower belt
Fig.5: 1. Strap 2. Fastener
Shoulder belts
Fig.6: 1. Strap 2. Fastener
Upper belt
Fig.7: 1. Strap 2. Fastener
Carrying hook
Always grab the carrying hook when handling the vac-
uum cleaner body.
Fig.8: 1. Carrying hook
Switch action
To start the cleaner, simply press button. To switch
button again.
You can change the suction power of the cleaner in four
steps by pressing button. Each press on this button
repeats the 1 to 4 mode in a cycle.
Fig.9: 1. Suction power change button 2. ON/
OFF button
Level Indication Mode
1Quiet mode
2Normal speed
mode
3High speed mode
4Max speed mode
NOTE: You can change the suction power before
turning on the cleaner.
NOTE: The cleaner starts the operation with the
same suction power as the last operation.
NOTE: If you remove the battery immediately after
the cleaner may not start the operation with the same
suction power as the last operation.

17 ENGLISH
LED light
LED light is installed in the head of the switch box to ease
the operations in dark places. Press and hold button to
button again.
Fig.10
CAUTION: Do not look in the light or see the
source of light directly. Never aim the light to
other people's eyes.
NOTE:
the vacuum cleaner is not operated for more than 10
minutes.
Hose band
rubber nozzle.
To secure the hose to the vacuum cleaner body, pass
the hose band through the slot on the body. You can
attach the hose band on either side.
Fig.11: 1. Hose band 2. Slot 3. Hose
The loops on the lower belt can be used for carrying
nozzles as illustrated.
Fig.12: 1. Loop 2. Nozzle
Hose hook
When you suspend the operation, the hook on the bent
pipe assembly can be used for hanging the wand on the
hanging part of the lower belt.
Fig.13: 1. Hook 2. Lower belt 3. Hanging part
ASSEMBLY
CAUTION: Always be sure that the appli-
is removed before carrying out any work on the
appliance.
Assembling hose
turn it clockwise.
Fig.14: 1.2. Vacuum cleaner body
Using as a cleaner
Attaching bent pipe assembly
Optional accessory
NOTE: You don't need to perform this procedure
if your model comes with the bent pipe assembly
attached to the hose.
NOTE: There are two types of bent pipe assembly;
the one for slide-type extension wand and the one for
ring-type extension wand. If you prepare the bent pipe
assembly, choose the one for your desired extension
wand type.
The bent pipe assembly is used for connecting the
extension wand or nozzle for vacuum cleaning to this
product.
If you want to use this product as the vacuum cleaner,
attach the bent pipe assembly to the hose.
For the screw-in type bent pipe assembly
fasten the sleeve of bent pipe assembly onto the hose.
To remove, loosen the sleeve of bent pipe assembly
from the hose.
Fig.15: 1. Hose 2. Bent pipe assembly 3. Sleeve
For the snap-on type bent pipe assembly
To attach, insert the hose end into the bent pipe assem-
bly. Make sure that the tabs on the hose end snap into
the holes on the bent pipe assembly.
To remove, pull the bent pipe assembly while pressing
both of the tabs on the hose end.
Fig.16:
1. Hose end 2. Tab 3. Hole 4. Bent pipe assembly
Assembling nozzle and wand
Optional accessory
NOTE: The type of the nozzle and wand included in
the product varies depending on countries. In some
countries, the nozzle and wand are not included.
1. Twist and insert the nozzle to the extension wand.
Fig.17: 1. Extension wand 2. Flexible rubber nozzle
3. Corner nozzle 4. Floor/carpet switching
t-nozzle
change the mode depending on the place.
—
— Carpet mode: suitable for a shaggy place such as
a carpet or a rug
Fig.18: 1. Mode switching button 2. Floor mode
3. Carpet mode
NOTE: By twisting the nozzle while inserting, the noz-
zle can be attached to the extension wand securely.
NOTE: For the model with ø38 mm hose and front
bent pipe / aluminum straight pipe.
2. Follow the procedures below, depending on the
type of the extension wand:
NOTE: The slide-type extension wand and the ring-
type extension wand are not compatible with each
other. If you want to change the slide-type extension
wand to the ring-type extension wand or vice versa,
change the bent pipe assembly also.
For the slide-type extension wand
Shoulder the vacuum cleaner body then insert the
extension wand into the bent pipe assembly until it
clicks. To disconnect, extract the extension wand with
pressing the button.
Fig.19: 1. Bent pipe assembly 2. Button 3. Slide-
type extension wand 4. Flexible rubber
nozzle
The length of the wand can be adjusted.
With pressing the slide button, adjust the wand length.
The length is locked when releasing the slide button.
Fig.20: 1. Slide button

18 ENGLISH
For the ring-type extension wand
Shoulder the vacuum cleaner body then twist and insert
the extension wand into the bent pipe assembly. To
disconnect, twist and extract it.
Fig.21: 1. Bent pipe assembly 2. Ring-type exten-
sion wand 3. Flexible rubber nozzle
NOTE:
the bent pipe assembly without pipe lock directly.
The length of the wand can be adjusted.
Loosen the ring on the wand and adjust the wand
length. Tighten the ring at your desired length.
Fig.22: 1. Ring
For the aluminum bent pipe / aluminum straight
pipe
Shoulder the vacuum cleaner body then twist and insert
extract it.
Fig.23: 1.2. Aluminum bent pipe
3. Aluminum straight pipe 4. Nozzle
For the two aluminum straight pipes
Shoulder the vacuum cleaner body then twist and insert
the pipes. To disconnect, twist and extract it.
Fig.24: 1. Bent pipe assembly 2. Aluminum straight
pipe 1 3. Aluminum straight pipe 2
Connecting the tool
NOTE: If the bent pipe assembly is attached to the
hose, remove it beforehand.
To connect a tool to the cleaner, the dedicated hose
and/or additional parts are required. Depending on your
cleaner model, you need to replace the hose and/or
prepare additional parts.
Refer to the following table for details.
Supplied
hose
diameter
Hose end type Action
ø28 mm
without part
with snap-on part
Replace the hose end
(snap-on part) with the front
The hose end can be removed
by turning it counterclockwise.
ø32 mm
with snap-on part
Replace the hose with the one
for dust extraction (ø28 mm,
Supplied
hose
diameter
Hose end type Action
ø38 mm
with snap-on part
Replace the hose with the one
for dust extraction (ø28 mm,
Attach the joint 22-38 or the
NOTE:
connected to the hose.
Fig.25: 1.2.
When using ø28 mm dust extraction
hose
1.
securely screwed on the hose.
2.
Fig.26: 1.2. Extraction outlet 3. Hose
-
clockwise while holding the hose.
When using ø38 mm hose with front
1.
inlet part on the hose, depending on the tool that you
are going to connect.
2.
Fig.27: 1. Joint 2.3. Extraction outlet
4. Hose
-
tion procedures in reverse.
Optional accessory
CAUTION:
properly installed. Otherwise the vacuumed dust
or particles may be exhausted from the cleaner
and they may cause respiratory disease to the
operator.
— Dust bag is usable many times repeatedly by
cleaning it out.
— Filter bag is a throw-away type. Throw away the
become full.

19 ENGLISH
NOTICE:
replace with new one. When the dust bag is
already full, empty it.
bag/dust bag full results in reduced suction power.
NOTICE: To prevent dust from getting into the
motor:
—
installed before use.
— Do not use a broken or ripped bag.
Otherwise the motor may be broken.
NOTICE: Do not fold the cardboard at its open-
NOTICE:
is an important component for maintaining the
bag/dust bag may cause smoke or ignition.
NOTE:
the cleaner, the front cover does not close completely.
Fig.28
1. Unlock the lever and open the front cover.
Fig.29: 1. Lever 2. Front cover
2.
the room as illustrated.
Fig.30: 1. Slit 2. Filter bag
When using the dust bag, insert the brim of the dust bag
into the slit.
Fig.31: 1. Slit 2. Brim 3. Dust bag
3.
and push the cardboard portion to the end. Make sure
Fig.32: 1.2. Rim on
3. Cardboard portion of the
4.
4. Lock the front cover certainly.
CAUTION: -
gers when hooking the latch, and when closing
the front cover.
Harness cover
Optional accessory
When using the harness cover, follow the procedure
below to attach it.
NOTE: When installing the harness cover, do not
mistake the front and back of the harness cover.
NOTE: The harness cover is washable. Follow the
washing instructions on the tag.
Fig.33
1. Spread the harness cover on the harness.
Fig.34
2. Secure the harness shoulder straps with the hook
and loop fasteners of the harness cover. Hook the band
of the harness cover on the harness.
Fig.35
OPERATION
WARNING: Operators shall be adequately
instructed on the use of the vacuum cleaner.
WARNING: This vacuum cleaner is not suit-
able for picking up hazardous dust.
CAUTION: This cleaner is for dry use only.
CAUTION: During operation, be conscious
of the vacuum cleaner on your back. You may
lose your balance if the vacuum cleaner body bumps
against a wall or the hose is hooked by an obstacle.
1. Shoulder the vacuum cleaner body and fas-
ten upper and lower belts. Adjust the tightness as
necessary.
Fig.36
2. Press
button to start vacuuming. If you want
to change the suction power, press button until the
desired suction power is selected. Press button to
stop.
Fig.37
During the operation, hook the switch box on the D-ring
or the hanging part of the lower belt. The hook can be
slanted for lighting forward when hooked on the hang-
ing part.
Fig.38: 1. D-ring 2. Hanging part
3.
Fig.39: 1. Strip
When using a dust bag, take out the dust bag and dis-
pose of the dust by releasing the latch.
Fig.40: 1. Latch
NOTICE:
heavy objects on the front cover. The appliance
may fall down.
NOTICE:
Continuous use with
NOTICE:
-
damage to the cleaner. If you want to use the bag
repeatedly, use a dust bag.

20 ENGLISH
MAINTENANCE
CAUTION:
Always be sure that the appliance is
attempting to perform inspection or maintenance.
NOTICE: Never use gasoline, benzine, thinner,
alcohol or the like. Discoloration, deformation or
cracks may result.
To maintain product SAFETY and RELIABILITY,
repairs, any other maintenance or adjustment should
be performed by Makita Authorized or Factory Service
Centers, always using Makita replacement parts.
CAUTION: Do not use the vacuum cleaner
-
exhausted from the cleaner and they may cause
respiratory disease to the operator.
NOTICE: To keep optimum suction power and
enough suction power is not obtained even after
NOTICE:
not use following tools and similar items for cleaning:
— Air duster
— High pressure washer
—
Tools made of hard materials such as a wire brush
1.
from the vacuum cleaner body.
Fig.41: 1. Hook 2.
2.
well-ventilated place to prevent unpleasant odor or malfunctions.
3.
Fig.42: 1. Groove 2.3. Hook
CAUTION:
be sure to install them to the vacuum cleaner.
If washed in water, dry them up thoroughly before
shorten the service life of the motor.
from getting into the motor.
1.
Fig.43: 1.
2.
Fig.44
3.
Cleaning the dust bag
Regularly clean the dust bag with soap and water. Turn
the dust bag inside out and remove the sticky dust.
Wash lightly by hand and rinse well with water. Dry
completely before installing to the vacuum cleaner.
Fig.45
NOTICE: Wet dust bag lowers the vacuuming per-
formance as well as the life of the motor.
Cleaning the clog
When cleaning the clog, remove the hose or the exten-
sion wand, or the bent pipe assembly to check inside.
Refer to the section for attaching bent pipe assembly.
dust bag
This appliance is equipped with a dust beating system.
As you walk while carrying the cleaner, springs under-
and wipe the board inside.
Fig.46: 1. Board
Removing the board
1.
2. Push down the board, and slide it to left until the
board touches the wall.
3. Lift the right side of the board up and take it out.
Fig.47: 1. Board
The board is supported by three springs.
them as illustrated.
Fig.48: 1. Long spring 2. Short spring 3. Projection
NOTE: Attach the springs securely so that the springs
touch the root of the projections.
Attaching the board
1. Insert the straight side of the board into the
catches in the lower left side of the room.
2. Put the right side of the board in place.
Fig.49: 1. Board 2. Straight side 3. Catch
CYCLONE ATTACHMENT
Optional accessory
NOTE: When using the cyclone attachment with this
appliance, the bent pipe is also required.
Fig.50: 1. Cyclone attachment
Other manuals for VC011G
4
Table of contents
Languages:
Other Makita Vacuum Cleaner manuals

Makita
Makita DCL284F User manual

Makita
Makita VC006GM User manual

Makita
Makita DVC660 User manual

Makita
Makita CL070D Series User manual

Makita
Makita BCL140 User manual

Makita
Makita VC008GZ User manual

Makita
Makita 4093D User manual

Makita
Makita CL117FD User manual

Makita
Makita DVC862L User manual

Makita
Makita DCL500 User manual

Makita
Makita VC2000L User manual

Makita
Makita VC009G User manual

Makita
Makita VC2000L User manual

Makita
Makita VC006GM User manual

Makita
Makita VC1310L User manual

Makita
Makita CL117FD User manual

Makita
Makita VC008G User manual

Makita
Makita VC4210MX3 User manual

Makita
Makita VC1310L User manual

Makita
Makita DVC750L User manual