Makita VC3211H User manual

INSTRUCTION MANUAL
Vacuum Cleaner
VC3211H
ENGLISH: Original instructions
Read before use.

2ENGLISH
SPECIFICATIONS
Model VC3211H
Countries EU Switzerland UK
Voltage Volt 230-240 230-240 110 230-240
Power consumption Watt 1050 1050 1050 1050
Connected load for appliance
socket Watt at symbol mode 2400 1100 600 1900
Watt at symbol mode 2600 1400 850 2100
Total connected load Watt 3450 2150 1650 2950
Model VC3211H
Countries Middle East countries and Africa
Voltage Volt 110-120 230-240 220-240
Power consumption Watt 1050 1050 1050
Connected load for appliance
socket Watt at symbol mode 550 1900 2200
Watt at symbol mode 850 2100 2500
Total connected load Watt 1600 2950 3250
Model VC3211H
Volume ow (air) With ϕ28mm X 3.5m hose 2.0 m3/min
With ϕ38mm X 2.5m hose 3.5 m3/min
Vacuum 22 kPa
Type of protection IP X4 (splash-proof)
Recoverable capacity Dust 32 L
Water 27 L
Dimensions (L x W x H) 552 mm x 398 mm x 685 mm
Net weight 17.0 kg
Safety class Class I
•
Due to our continuing program of research and development, the specications herein are subject to change without notice.
• Specications may differ from country to country.
• Weight according to EPTA-Procedure 01/2003
Symbols
The following show the symbols used for the equipment.
Be sure that you understand their meaning before use.
Read instruction manual.
Take particular care and attention.
Warning! The cleaner may contain hazard-
ous dust.
Never stand on the cleaner.
The cleaners are capable of picking up
dust class L,M and H. Follow your county's
regulations relating to dusts and to occupa-
tional health and safety.
Warning! This machine contains dust
hazardous to health. Emptying and mainte-
nance operations, including removal of the
dust collection means, must only be carried
out by authorised personnel wearing suit-
able personal protection. Do not operate
without the full ltration system tted.
Only for EU countries
Do not dispose of electric equipment
together with household waste material!
In observance of the European Directive,
on Waste Electric and Electronic
Equipment and its implementation in
accordance with national law, electric
equipment that have reached the end of
their life must be collected separately and
returned to an environmentally compatible
recycling facility.
Intended use
The tool is intended for collecting both wet and dry dust.
The tool is suitable for commercial use, for example in
hotels, schools, hospitals, factories, shops, ofces and
rental businesses.
Power supply
The tool should be connected only to a power supply
of the same voltage as indicated on the nameplate,
and can only be operated on single-phase AC supply.
This tool should be grounded while in use to protect
the operator from electric shock. Use only three-wire
extension cords which have three-prong grounding-type
plugs and three-pole receptacles which accept the
tool's plug.

3ENGLISH
Noise
The typical A-weighted noise level determined accord-
ing to EN/IEC60704:
Sound pressure level (LpA) : 72.5 dB (A)
Uncertainty (K) : 2.5 dB (A)
The noise level under working may exceed 80 dB (A).
Wear ear protection
Vibration
The vibration total value (tri-axial vector sum) deter-
mined according to EN/IEC60335:
The vibration emission value is below 2.5 m/s2.
For European countries only
EC Declaration of Conformity
Makita declares that the following Machine(s):
Designation of Machine:
Vacuum Cleaner
Model No./ Type: VC3211H
Conforms to the following European Directives:
2006/42/EC
They are manufactured in accordance with the following
standard or standardized documents:
EN60335
The technical le in accordance with 2006/42/EC is
available from:
Makita, Jan-Baptist Vinkstraat 2, 3070, Belgium
31.7.2014
Yasushi Fukaya
Director
Makita, Jan-Baptist Vinkstraat 2, 3070, Belgium
VACUUM CLEANER SAFETY
WARNINGS
WARNING! IMPORTANT READ CAREFULLY all
safety warnings and all instructions BEFORE USE.
Failure to follow the warnings and instructions may
result in electric shock, re and/or serious injury.
1. Before use, make sure that this cleaner must
be used by people who have been adequately
instructed on the use of this cleaner.
2. Only use the socket outlet on the cleaner for
purposes specied in the instructions.
3. If foam/liquid comes out, switch off
immediately.
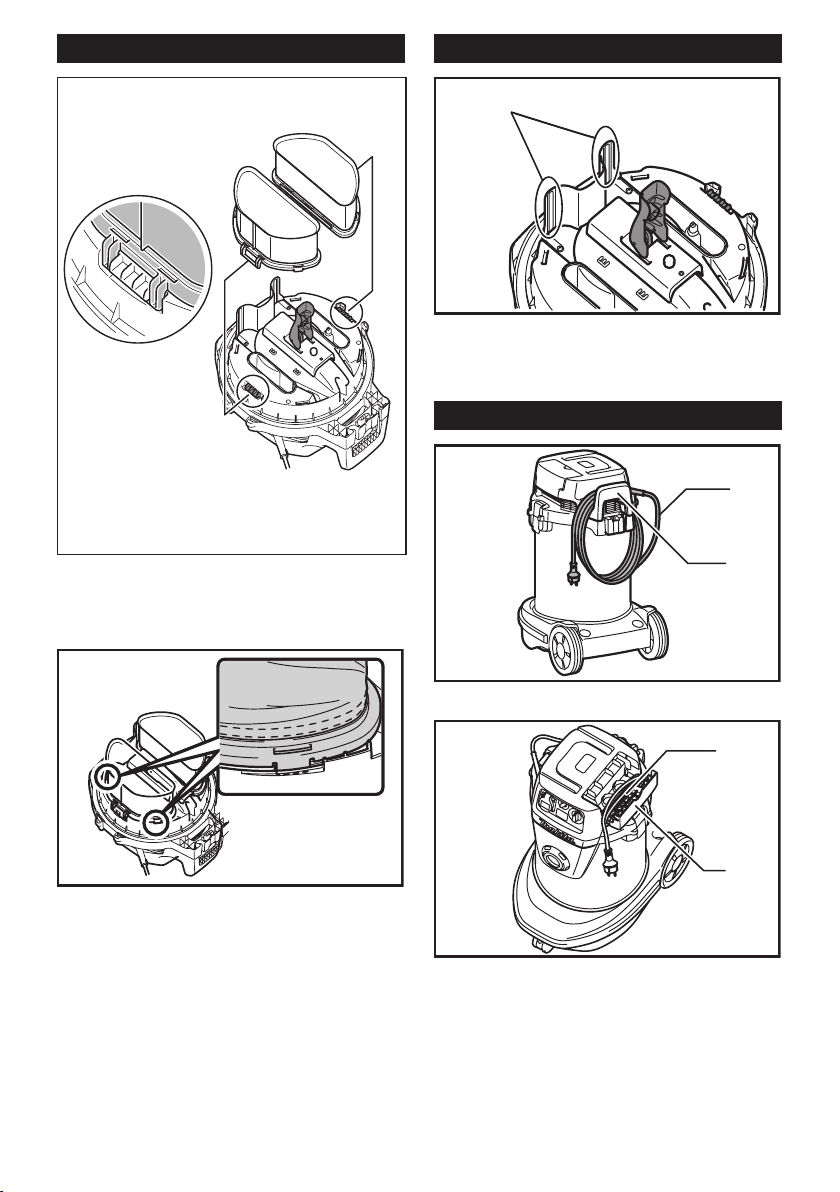
4. Clean the water level limiting device regularly
and examine it for signs of damage.
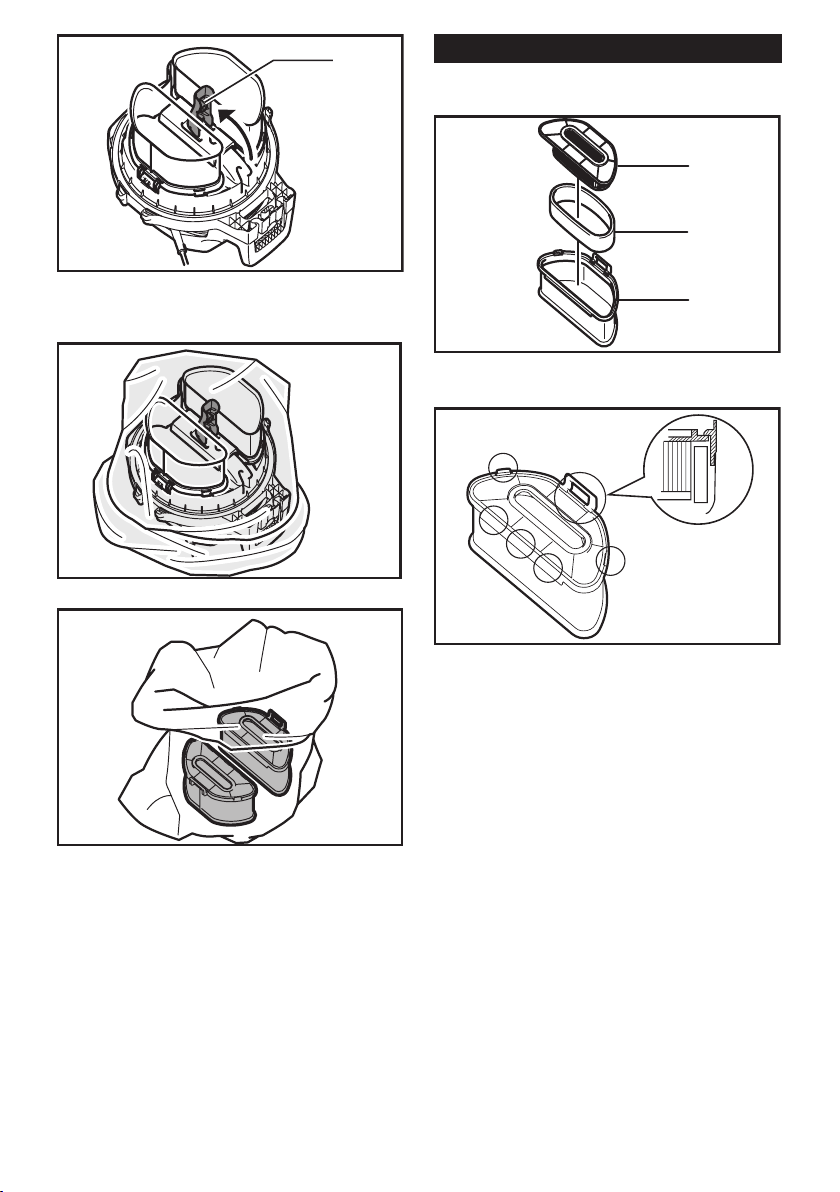
5. Do not use the cleaner without the lter.
Replace a damaged lter immediately.
6. USE OF EXTENSION CORD. When using an
extension cord because of the great distance
to your power source, try to employ a cord that
is sufciently thick but not too long, or cleaner
performance will be adversely affected. For
outdoor applications use an extension cord
suitable for outdoor use.
7. VOLTAGE WARNING: Before connecting the
cleaner to a power source (receptacle, outlet,
etc.) be sure the voltage supplied is the same
as that specied on the nameplate of the
cleaner. A power source with voltage greater
than that specied for the cleaner can result
in SERIOUS INJURY to the operator as well
as damage to the cleaner. If in doubt, DO NOT
PLUG IN THE CLEANER. Using a power source
with voltage less than the nameplate rating is
harmful to the motor.
8. AVOID UNINTENTIONAL STARTING. Be sure
switch is OFF when plugging in.
9. Do not attempt to pick up ammable materials,
re works, lighted cigarettes, hot ashes, hot
metal chips, sharp materials such as razors,
needles, broken glass or the like.
10.
NEVER USE THE CLEANER IN THE VICINITY
OF GASOLINE, GAS, PAINT, ADHESIVES OR
OTHER HIGHLY EXPLOSIVE SUBSTANCES.
The switch emits sparks when turned ON and
OFF. And so does the motor commutator during
operation. A dangerous explosion may result.
11.
After vacuuming up toxic, carcinogenic or patho-
genic, or other hazardous materials such as
asbestos, arsenic, barium, beryllium, lead, pes-
ticides, or other health endangering materials,
bring the machine to authorised institution for
cleaning and disposal of those hazardous dusts
in accordance with your country’s regulation.
12.
Never vacuum up combustible dusts or materials.
13. Never use the cleaner outdoors in the rain.
14. Do not use close to heat sources (stoves, etc.).
15. GUARD AGAINST ELECTRIC SHOCK. Prevent
body contact with grounded surfaces. For
example; pipes, radiators, ranges, refrigerator
enclosures.
16. Do not block cooling vents. These vents per-
mit cooling of the motor. Blockage should be
carefully avoided otherwise the motor will burn
out from lack of ventilation.
17. Keep proper footing and balance at all times.
18. DO NOT ABUSE CORD. Never carry the cleaner
by cord or yank it to disconnect from recepta-
cle. Keep cord away from heat, oil, and sharp
edges. Inspect cleaner cords periodically and
if damaged, have repaired by authorized ser-
vice facility. Inspect extension cords periodi-
cally and replace if damaged.
19. Do not fold, tug or step on the hose.
20. Stop the cleaner immediately if you notice
poor performance or anything abnormal
during operation.
21. DISCONNECT THE CLEANER. When not in
use, before servicing, and when changing
accessories.
22. Clean and service the cleaner immediately
after each use to keep it in tiptop operating
condition.
23. MAINTAIN THE CLEANER WITH CARE. Keep
the cleaner clean for better and safer per-
formance. Follow instructions for changing
accessories. Keep handles dry, clean, and free
from oil and grease.

4ENGLISH
24. CHECK DAMAGED PARTS. Before further use
of the cleaner, a guard or other part that is
damaged should be carefully checked to deter-
mine that it will operate properly and perform
its intended function. Check for alignment of
moving parts, binding of moving parts, break-
age of parts, mounting, and any other condi-
tions that may affect its operation. A guard or
other part that is damaged should be properly
repaired or replaced by an authorized service
center unless otherwise indicated elsewhere
in this instruction manual. Have defective
switches replaced by authorized service cen-
ter. Don’t use the cleaner if switch does not
turn it on and off.
25. REPLACEMENT PARTS. When servicing, use
only identical replacement parts.
26. STORE IDLE CLEANER. When not in use, the
cleaner should be stored indoors.
27. Be kind to your cleaner. Rough handling can
cause breakage of even the most sturdily built
cleaner.
28. Do not attempt to clean the exterior or interior
with benzine, thinner or cleaning chemicals.
Cracks and discoloration may be caused.
29. Do not use cleaner in an enclosed space where
ammable, explosive or toxic vapors are given
off by oil-base paint, paint-thinner, gasoline,
some mothproong substances, etc., or in
areas where ammable dust is present.
30. Do not leave the cleaner cord lying on the oor
after you have nished a cleaning job. It can
become a tripping hazard or may cause dam-
age to the cleaner.
31. Do not operate this or any tool while under the
inuence of drugs or alcohol.
32. As a basic rule of safety, use safety goggles or
safety glasses with side shields.
33. Use a dust mask in dusty work conditions.
34. This machine is not intended for use by per-
sons including children with reduced physical,
sensory or mental capabilities, or lack of expe-
rience and knowledge.
35. Young children should be supervised to
ensure that they do not play with the cleaner.
36. Never handle plug cord or cleaner with wet
hands.
37. Use extreme caution when cleaning on stairs.
38. Do not use the cleaner as a stool or work
bench. The machine may fall down and may
result in personal injury.
KEEP FOR FUTURE
REFERENCE
WARNING: DO NOT let comfort or famil-
iarity with product (gained from repeated
use) replace strict adherence to safety
rules for the subject product. MISUSE or
failure to follow the safety rules stated in
this instruction manual may cause serious
personal injury.
FUNCTIONAL
DESCRIPTION
WARNING:
• Before plugging the cleaner, always make
sure that the cleaner is switched off. Plugging
the cleaner with the switch on may cause an
unexpected start resulting in serious personal
injury.
Switch action
1
2
3
► 1. Suction force adjusting knob 2. Hose diameter
selection dial 3. Switch lever
To start the cleaner, rotate the switch lever to the "I"
side. To stop it, rotate the switch lever to the "O" side.
1
23
► 1. Suction force adjusting knob 2. Hose diameter
selection dial 3. Switch lever
The suction force can be adjusted according to your
work need.
Suction force can be increased by turning the suc-
tion force adjusting knob from the symbol to
the symbol.
Also, set the hose diameter selection dial to the hose's
diameter that you are going to use.
Hose diameter selection dial
Turn the dial direction in accordance with the hose you
use.
NOTE: Do not set the dial at the middle. Always turn
either side according to the hose diameter.

5ENGLISH
Warning beep
There are two types of beeping sound. One is short
beeps, and the other is long beep.
When the air ow speed falls under 20 m/s, the cleaner
emits short warning beeps for safety reasons. When it
sounds, check the hose diameter selection dial or if the
suction force is not too low. If the beeps keep sounding,
perform maintenance or ask your local service center.
When the tank is lled with liquid, the cleaner emits long
warning beep.
When the tank is full and the beep sounds, switch off
the cleaner and empty the tank.
Connecting electric power tools
WARNING:
• Make sure that both the cleaner and the electric
power tool are switched off before connecting
or disconnecting. Connecting the power tool to
the cleaner with both of them being switched on
may cause unexpected and sudden start result-
ing serious personal injury.
• Never connect an electric power tool with an
input power exceeding that specied in the
"SPECIFICATIONS" to the socket of the cleaner
by turning the suction force adjusting knob.
Connecting the electric power tool exceeding
the specied input power may cause overheat
and damage to the cleaner.
• When connecting a grounded tool, insert a
plug with a grounding plate to the socket of the
cleaner.
The cleaner can be connected to an electric power tool
up to input power shown in the "SPECIFICATIONS".
1
2
3
4
5
► 1. Outlet cap 2. Power supply cord 3. Hose diam-
eter selection dial 4. Suction force adjusting knob
5. Switch lever
1
2
3
► 1. Suction force adjusting knob 2. Hose diameter
selection dial 3. Switch lever
1. To connect an electric power tool, open the outlet
cap and insert the power tool plug into the socket
of the cleaner.
1
► 1. Hose band
2. When connecting an electric power tool, secure
the power supply cord and hose by the hose
bands at regular distance. It prevents the hose
from entangling the power supply cord.
3. Rotate the switch lever to the "AUTO" position.
4. Move the suction force adjusting knob to the
position suitable for the input power of the electric
power tool you intend to use.
5. Switching on and off of the connected electric
power tool simultaneously brings the cleaner
switching on and off action. The cleaner still works
for a few seconds even after the electric power
tool is switched off.
6. After use, disconnect the power tool from the
socket of cleaner.
7. Switch off the cleaner after use.
Auto-suction stop during suction
operation
WARNING:
• Do not pick up foam or soapy liquid. Picking
up foam or soapy liquid can cause foam to
come out of air exit before the auto-suction stop
works. Continuing to using in this condition may
cause an electric shock and breakage of the
cleaner.

6ENGLISH
The cleaner has a mechanism that prevents water from
immersing into the motor when picking up more than a
certain amount of water.
When the tank is full with liquid, the cleaner emits long
warning beep. Switch off the cleaner and empty the
tank when this beep sounds.
Usage of base hook
CAUTION:
• Be careful not to pinch your ngers when
closing the base hook. Failure to do so may
cause personal injury.
NOTICE:
• Do not apply an excessive force on the base hook.
The excessive force on the base hook may dam-
age the base hook. Close the base hook when not
in use.
Opening the base hook allows the following usage.
1. Storing the power supply cord
1
2
► 1. Base hook 2. Power supply cord
NOTICE:
• Do not use the cleaner or a connected electric
power tool with a power supply cord wound
on the base hook. Using the cleaner or the con-
nected electric power tool with power supply cord
may cause damage the power supply cord.
2. Storing the front cuffs
1
► 1. Front cuffs
Front cuffs 22, 24 and 38 can be stored (up to two at a
time).
3. Storing the hose
1
► 1. Hose
4. Resting a reasonable size of
electric power tool for the base hook,
such as circular saw
Locking or unlocking the caster
1
2
3
4
► 1. FREE position 2. LOCK position 3. Stopper lever
4. Caster
To lock the caster with a stopper, lower the stopper
lever and the caster no longer will rotate. To release the
caster from the locked position, raise the stopper lever.
Locking the caster is convenient when storing the
cleaner, stopping the work on the way and keeping the
cleaner still.
To operate the stopper, move it by hand.

7ENGLISH
NOTICE:
• When moving the cleaner, make sure that the
caster is unlocked. Moving the cleaner with the
caster in the locked position may cause damage
to the caster.
Cap
There is a cap on the mounting port. The cap prevents
the vacuumed dust from getting out from the cleaner.
ASSEMBLY
WARNING:
• This unit may contain hazardous dust. When
replacing lter elements and dust bag, always
use a P2-respirator.
• Always be sure that the cleaner is switched off
and unplugged before carrying out any work on
the cleaner.
• Never switch on until all lters and dust bag are
completely installed and the volume ow control
is tested.
Warning sticker
Put the warning sticker of your language in the frame of
warning label on the cleaner.
Installing and disposing the
lter bag
WARNING:
• Always use a P2-respirator.
• When using the lter bag, also use the air lter
together that is preinstalled on the tool. Failure
to use the air lter together may cause unusual
noise and heat, resulting in a re.
CAUTION:
• Never pick up water or other liquids or wet dusts
when using the lter bag. Picking up such things
may cause the lter bag breakage.
1
► 1. Filter bag
1. Extend the lter bag.
1
► 1. Filter bag
2. Align the lter bag opening with the dust suction
opening of the cleaner.
3. Insert the cardboard of the lter bag onto the
tool so that it is positioned at the end beyond the
detent protrusion.
When disposing the lter bag, pull the edge on the lter
bag's mouth so that the mouth is closed by a paper.
Connecting a hose
CAUTION:
• Never force the hose for bending or stamp it.
Never move the cleaner by a hose. Forcing,
stamping and pulling the hose may cause a
breakage or deformation of the hose.
• When picking up large wastes such as planer
carvings, concrete dusts or similar other than
small wastes, use the 38 mm inner diameter
hose (optional accessory). Using the 28 mm
inner diameter hose may cause a hose stufng
and damage.
• Always put the cap on the mounting port when-
ever you remove the hose from the tool.

8ENGLISH
1
► 1. Cap
Remove the cap from the mounting port. You can place
the cap in multi hook while the hose is connected to the
tool.
Insert the hose onto the mounting port of the tank and
turn it clockwise until it locks.
OPERATION
WARNING:
• Always use a P2-respirator.
CAUTION:
• If foam or liquid escapes from the tool, switch off
immediately. Continuing to using in this condi-
tion may cause an electric shock and breakage
of the cleaner.
MAINTENANCE
WARNING:
• Always use a P2-respirator during performing
maintenance.
• Never reuse the air lter after removal of the
machine.
CAUTION:
• Always be sure that the tool is switched off and
unplugged before attempting to perform inspec-
tion or maintenance.
•
Never use gasoline, benzine, thinner, alcohol or the
like. Discoloration, deformation or cracks may result.
•
Please check with your local authorities for any reg-
ulations regarding the use of these vacuum cleaners
when working with toxic materials such as Asbestos.
•
Before any repair or maintenance always check
what materials the vacuum cleaner has been work-
ing with. If in doubt, always have professionally
cleaned by licensed asbestos / toxic cleaning com-
pany before conducting any repair or maintenance.
• A technical inspection, including inspection of
lters, air tightness, and control mechanism,
must be performed by an instructed person at
least once a year, or more frequently as may be
specied by national requirements.
•
During maintenance, all contaminated items which
cannot be satisfactorily cleaned must be disposed.
Such items must be disposed of in impervious
hags which accord with your country's regulations.
•
After the operation in the hazardous area, the
outside of the tool must be decontaminated by
vacuum cleaning methods and wiped clean or
treated with sealant before you take the tool out
of a hazardous area. All the parts of the tool must
be regarded as contaminated when removed
from the hazardous area, and appropriate action
must be taken to prevent dust dispersal.
•
Change the air lter when the air lter is clogged with
dust or you feel that the cleaner's performance declined.
• Check the lters periodically. If there is a tear on
it, replace it immediately.
Removing the air lter
CAUTION:
• Wait for about 5 minutes so that dust in the tank
completely settles down.
• Make sure that the tool is unplugged.
• Be careful not to let the dust enter inside the
tank cover when removing the air lter.
1
► 1. Stopper lever
Unhook the tank cover and remove it carefully. Put it up
side down.

9ENGLISH
1
► 1. Stopper lever
Remove the screw on the stopper lever.
Unlock the lter hooks by ipping the stopper lever.
Cover the air lters with a plastic bag.
Remove the air lters from the tank cover carefully and
tie the plastic bag rmly.
Assembling the air lter
When you get the air lter components separately,
assemble them as follows.
1
2
3
► 1. Powder lter 2. Damper 3. Prelter
Put the prelter over the powder lter.
Make sure that the borders of prelter and powder lter
are set properly.

10 ENGLISH
Installing the air lter
Wipe off the seal face.
Set the new air lters and x them with the lter hooks.
Flip the stopper lever to lock the air lters.
Lock the lter hooks with the screws.
Set the tank cover onto the tank and lock it with hooks.
NOTICE:
• Make sure the hooks on the lters are set at the
correct position.
Cleaning the level sensors
1
► 1. Level sensors
The level sensors detect liquid when the tank becomes
full with liquid. Clean the level sensors with a soft cloth
from time to time when changing the air lters.
Storage of power supply cord
1
2
► 1. Power supply cord 2. Multi-hook
1
2
► 1. Power supply cord 2. Base hook
Wind up the power supply cord around the multi-hook or
the base hook.

11 ENGLISH
Storage of accessories
NOTE:
• Do not apply an excessive force to the accesso-
ries that are held by the pipe holder. Applying an
excessive force to these accessories may cause
damage to the pipe holder.
Pipe rest can be used to store straight pipe, bent pipe
and others by just inserting these accessories.
The pipes can be placed into the pipe holder when also
stopping using the cleaner on the way for a while.
You can place the cap in multi hook while the hose is
connected to the tool.
Storage of hose
1
► 1. Hose
The hose can be placed on either base hook or multi-hook.
To maintain product SAFETY and RELIABILITY, repairs, any
other maintenance or adjustment should be performed by Makita
Authorized Service Centers, always using Makita replacement parts.
OPTIONAL ACCESSORIES
CAUTION:
•
These accessories or attachments are recom-
mended for use with your Makita tool specied in this
manual. The use of any other accessories or attach-
ments might present a risk of injury to persons. Only
use accessory or attachment for its stated purpose.
If you need any assistance for more details regarding
these accessories, ask your local Makita Service Center.
• Hose
• Front cuffs (22, 24, 38)
• Straight pipe
• Corner nozzle
• Round brush
• Powder lter
• Damper
• Prelter
• Nozzle assembly
• Bent pipe
• Filter bag
• Hose band

• Belt hook complete
• Cap
NOTE:
• Some items in the list may be included in the
tool package as standard accessories. They
may differ from country to country.
www.makita.com
Makita Europe N.V.
Makita Corporation
3-11-8, Sumiyoshi-cho,
Anjo, Aichi 446-8502 Japa
n
Jan-Baptist Vinkstraat 2,
3070 Kortenberg, Belgium
885232E224
EN
20180508
Other manuals for VC3211H
6
Table of contents
Other Makita Vacuum Cleaner manuals

Makita
Makita DCL500Z User manual

Makita
Makita DRC300 User manual

Makita
Makita DVC261 User manual

Makita
Makita DCL283F User manual

Makita
Makita VC3011L User manual

Makita
Makita DRC300 Parts list manual

Makita
Makita DVC866L User manual

Makita
Makita DRC200Z User manual

Makita
Makita DCL182Z User manual

Makita
Makita DCL180 User manual

Makita
Makita CL106FD User manual

Makita
Makita DVC340 User manual

Makita
Makita DVC867L User manual

Makita
Makita VC006GM User manual

Makita
Makita DCL142 User manual

Makita
Makita VC3211H User manual

Makita
Makita GCV02 User manual

Makita
Makita BCL140 User manual

Makita
Makita VC3211M User manual

Makita
Makita DVC665 User manual