stayer VAC2050C User manual

www.grupostayer.com
ES
IT
GB
FR
P
Manual de instrucciones
Istruzioni d’uso
Operating instructions
Instructions d´emploi
Manual de instruções
Área Empresarial Andalucía - Sector 1
C/ Sierra de Cazorla, 7
28320 - Pinto (Madrid) SPAIN
Email: sales@grupostayer.com
Email: info@grupostayer.com
VAC2050C
TR İnverter Kaynak Makinesi

VAC2050C
11
18
19
20
14
15
16
10
11
12
2
3
1
17
7
13
10
16
6
8
45
3
13
916
7
13
15

6.1.
VAC 2050 C
WIn1200/ Out 2000
KPa 17
L30
m3/h 166
m4.5
mm Ø 38
Kg 11
LPA dB(A) 69
LWA dB(A) 80
ahm/s2EN 60745, K = 3dB (LPA LWA) K = 1,5 m/s2(ah)

ENGLISH
4
4
This manual is consistent with the date of manufacture of
your machine, you will nd information on the technical
data of the machine acquired manual check for updates
of our machines on the website: www.grupostayer.com
For Your Safety
Working safely with this machine is possible
only when the operating and safety information
are read completely and the instructions
contained therein are strictly followed.
1. Contents page
2. Specic safety instructions...........................12
3. Instructions for use........................................12
3.1 Placement........................................................... 12
3.2 Assembly............................................................. 12
3.3 Ilustrated description........................................... 12
4. Operating instructions...................................13
4.1 Placement and testing ........................................ 13
4.2 Tool change......................................................... 13
4.3 Tuning operations ............................................... 13
4.4 General Instructions for use................................ 13
5. Maintenance and service instructions ......... 13
5.1 Cleaning.............................................................. 13
5.2 Repair service..................................................... 14
5.3 Warranty ............................................................. 14
5.4 Disposal and recycling........................................ 14
6. Regulations.....................................................14
6.1 Technical Data .................................................... 14
6.2 EU declaration of conformity............................... 15
2. Specic safety instructions
Never vacuum: hot ash , liquid or explosive vapors,
undiluted acids and solvents, mud, gasoline, thinners for
varnishes and fuel oil, ammable or toxic liquids, such
as “toner” photocopiers or other volatile substances
(substances that entrained vortex with air drawn, can
cause explosive vapors or hazardous mixtures), acetone,
acids and solvents undiluted (substances that corrode
the material used in construction of the apparatus), coal
burning or the like asbestos or asbestos dust .
- Avoid this vacuum cleaner placed very close to sensitive
organs such as ears, mouth, eyes, wear appropriate
protection for these.
- Do not leave the vacuum cleaner without custody of
children or people with disabilities to use .
- Never leave the plug connected to the network
unnecessarily if you are not using .
- When cleaning, maintenance or in case of replacement
parts, switch o the engine and remove the mains plug.
3. Instructions for use
The unit is intended for pick-up and vacuuming of non
hazardous materials and non-ammable liquids. BIA lter
category C.
3.1 Placement
Place the apparatus in its working position; when
necessary, fasten it by means of chain 14 that is located
at the bottom portion of the machine.
Check the lling level of the dirt tank before
starting to work and empty the tank if necessary.
Make sure that you correctly insert the dust
collecting bag 11 so as to allow the machine
to operate.
3.2 Assembly
Do never remove the dust collecting bag 11
as the vacuum cleaner will not work without
it; it must be there for suctioning both dry and
liquid matter.
Unlock the latches 10 and remove the vacuum top 3.
Make sure that the collecting bag 11 is well seated along
its whole length against the inner wall of the tank 9.
Reattach the vacuum top 3.
Secure fasteners 10.
Insert suction hose 8into housing 7, such that it remains
rmly fastened and turn it clockwise up to the stop.
Firmly t suction tubes one 8in the other 17. Flexible drain
tube 13 must be mounted in housing 16 so that it may
suction liquids.
3.3 Illustrated description
1. Transport base.
2. Transport handle.
3. Upper part of vacuum cleaner (motor).
4. Switch.
5. Power outlet for electrical tools.
6. Wheels.
7. Housing for suction hose (tting).
8. Suction hose.
9. Tank.
10. Fasteners.
11. Dust collecting bag.
12. Fluted lter.
13. Flexible drain tube.
14. Static load chain..
15. Tank lock/unlock.
16. Housing for drain hose.
17. Telescopic tube.
18. 2-position brush.
19. Round brush.
20. Flat nozzle.

ENGLISH
5
5
4. Operating instructions
4.1 Placement and testing
Initial operation
Observe correct mains voltage: The voltage of the power
source must agree with the voltage specied on the
nameplate of the machine.
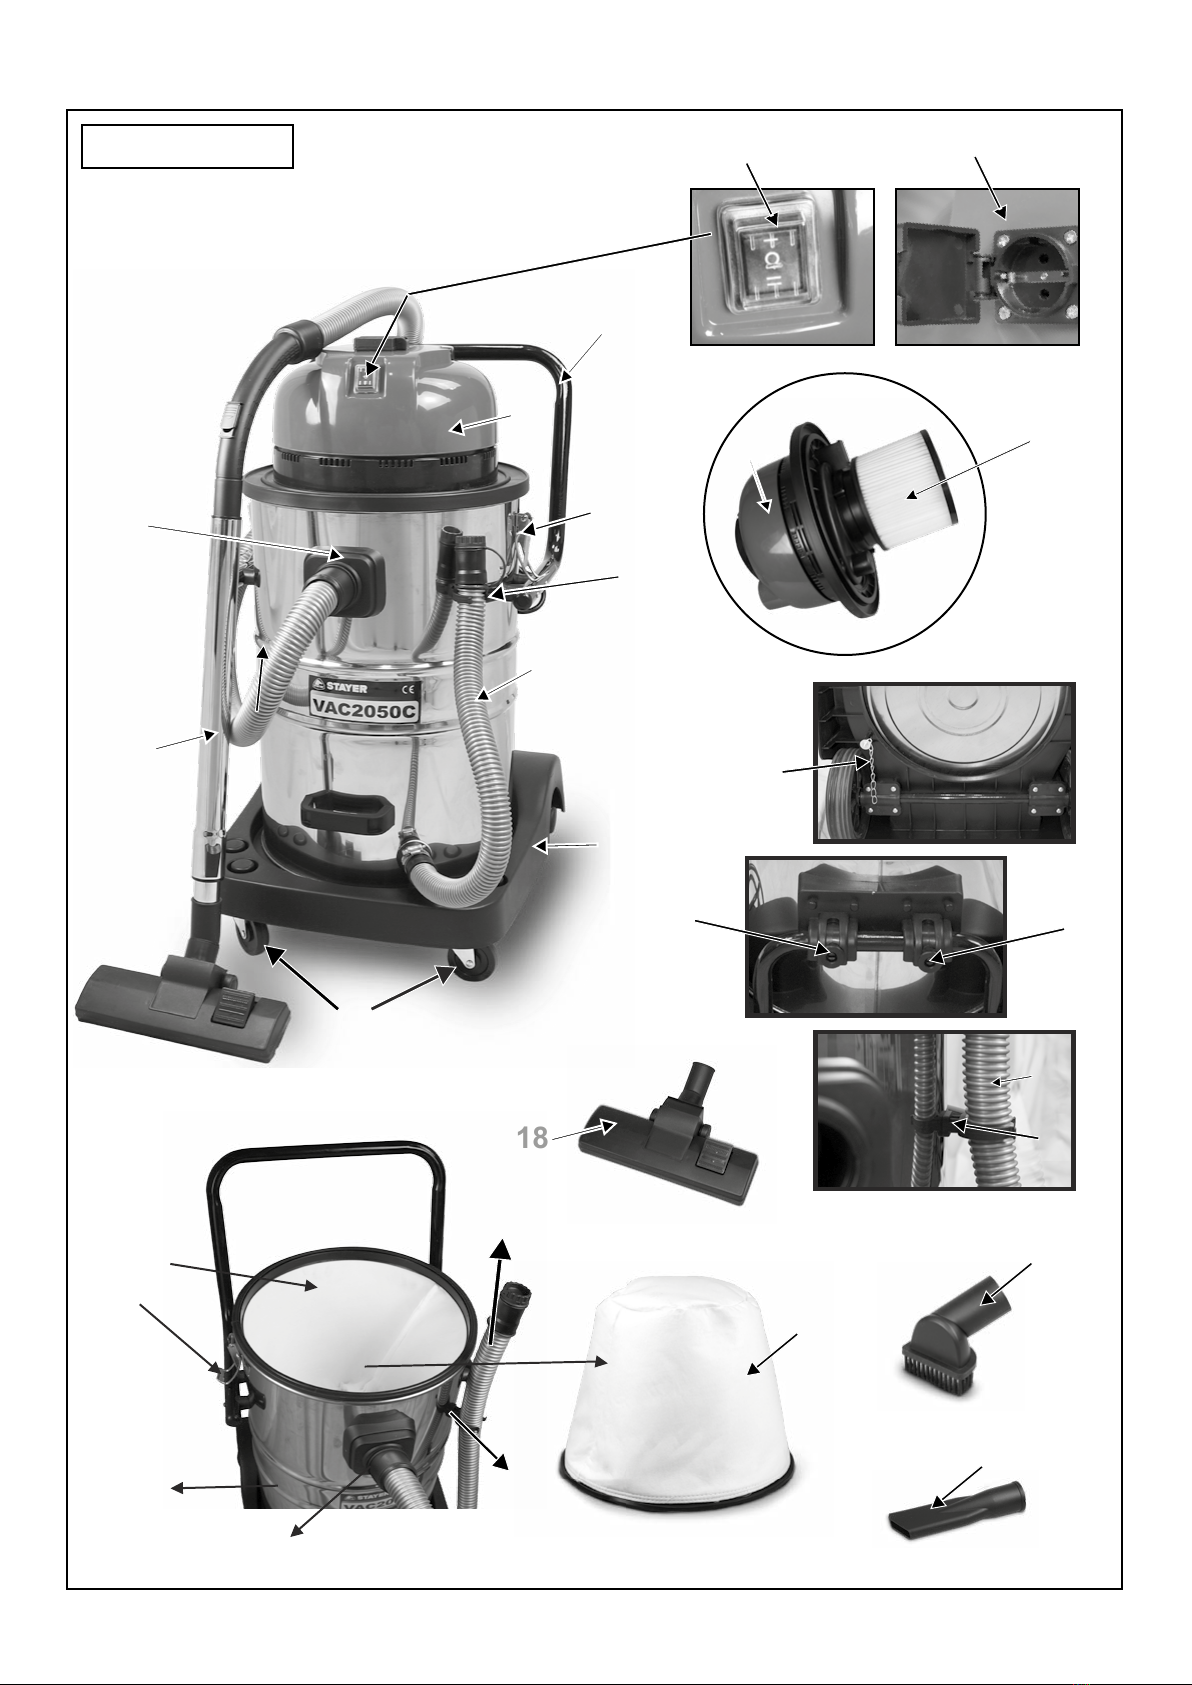
Antistatic chain (Fig 14)
Always connect the chain of static discharge (g.14) to
the bottom of the vacuum cleaner. This will eliminate the
possibility to 100% unpleasant electric shock (cramps)
due to accumulation of static electricity when aspirated
into carpets, rugs and the like.
Switching On and O
To start the suction cleaner, place operation mode switch
4 ON (-).
To disconnect the vacuum cleaner, place operation mode
switch 4 OFF (O).
Operation with remote automatic Switching
Place switch 4to the operation symbol with remote
automatic connection (=).
The vacuum cleaner automatically starts operating after
4 seconds after the electrical tool has been switched on.
To terminate the vacuum cleaner’s work, switch o
the electrical tool. The vacuum cleaner will disconnect
automatically after approx. 4 seconds. Once turned o,
place switch (o).
4.2 Tool change
Replace a damaged lter immediately.
Insert new or cleaned folded lter and ensure rm seating.
4.3 Tuning operations
Wet Vacuuming
Danger of explosion and re! Do not vacuum
inammable or explosive uids; for example,
benzene, oil, alcohol, solvents. Do not vacuum
hot or burning dust. Do not operate the
machine in rooms where the danger of an explosion
exists.
- Open the fasteners 10 at both sides, raise and remove
the upper part 3of the vacuum cleaner.
- Before vacuum cleaning liquids, the HEPA dust lter 12
must be removed.
- Empty and clean the suction tank 9 before vacuuming
liquids.
- Before opening and emptying must indispensably
removed the plug in the socket.
- Position collecting bag 11 correctly so that vacuum
cleaner may operate correctly.
- Place the upper part 3of the vacuum cleaner once the
collecting bag has been positioned, and close using
the clips 10 at both sides.
Dry vacuum cleaning
1. Open fasteners 10 at both sides, raise and remove the
upper part of the vacuum cleaner.
2. Conrm that the uted lter 12 and the collecting bag
11 are positioned correctly.
3. Place the upper part 3of the vacuum cleaner, close
using the clips 10 at both sides.
For dry and wet operation always the lter 12
and bag 11 must be positioned correctly.
4.4. General instructions for use
In the case of inadequate vacuuming performance, check
the following:
– Is the vacuum top 3attached properly?
– Are the extension wands connected rmly?
– Is the container full?
– Is uted lter 12 saturated with dust?
– Is bag 11 positioned correctly?
The 2-position brush 18 has a pedal for its use for hard
oors (with the brush outwards for better cleaning) and
carpets (with the brush inwards for more ecacious
cleaning).
The round brush 19 is used on narrow and hard surfaces,
e.g. shelves, tables, etc.
The at nozzle 20 is used in narrow spaces such as
corners, furniture, etc.
5. Maintenance and service instructions
5.1 Cleaning
Before any work on the machine itself, pull the
mains plug.
Always keep the machine clean.
Use compressed air or a damp cloth to keep clean the
vacuum cleaner.
Container
Wipe out the container 9 from time to time with a
commercially available, non-scouring cleaning agent and
allow to dry.
5.2 Repair service
Our after-sales service responds to your questions
conceming maintenance and repair ofyour product as well
as spare parts. Exploded views and information on spare
parts can also be found under: info@grupostayer.com
Our customer consultants answer your questions
conceming best buy, application and adjustment of
productsand accessories.

ENGLISH
6
6
5.3 Warranty
Warranty card
lncluded in the documentation that accompanies this
equipment, you should nd the warranty card. You should
ll out the card completely and retum to vendar with a copy
of purchasing receipt or invoice and you should receive a
receipt.
Note: lf you cannot nd the warranty card within the
documentation,youmust ask for it through your supplier.
The warranty is limited only to manufacturing defects and
expire if pieces have been removed or manipulated or
repaired otherthan themanufacturer.
5.4 Disposal and recycling
The machine, accessories and packaging should be
sorted for environmental-friendly recycling.
OnlyforEC countries:
Do not dispose of power tools into household waste!
According the European Guideline 2002/96/
EC for Waste Electrical and Electronic
Equipment and its implementation into
national right,power tools that are no longer
usable must be collected separately and
disposed of in an environmentally correct
manner.
Subject to change wlthout notlce.
6. Regulations
6.1 Technical Data
= Power input.
= Suction capacity.
= Container capacity.
= Flow.
= Cable length.
= Pipe diameter.
= Weight.
LWA = Sound power level.
LPA = Sound pressurelevel.
= Vibration.
The values given are valid for nominal voltages [U]
230/240 V ~ 50/60 Hz - 110/120 V ~ 60Hz. For lower
voltage and models for specic countries, these values
can vary. Please observe the article number on the type
plate of your machine. The trade names of the individual
machines may vary.
Noise Vibration Information
Measured values determined according to EN 23 744
(1.60 m height, 1 m distance).
Typically the A-weighted sound pressure level of the
product is 69 dB (A).
Wear hearing protection!
Total vibration Ah values (vector sum of three directions)
and uncertainty K determined according to EN 60745:
ah= 4 m/s2, K <1.5 m/s2
The vibration emission level given in this
information sheet has been measured in
accordance with a standardised test given in EN
60745 and may be used to compare one tool with another.
lt may be used for a preliminaryassessment of exposure.
The declared vibration emission level represents the
main applications of the tool. However if the tool is used
for dierent applications,with dierent accessories or
poorly maintained, the vibration emission may dier. This
may signicantly increase the exposure leveloverthe
totalworking period.
An estimation of the levelof exposure to vibration should
also take into account the times when the tool is switched
o or when it is running but not actually doing the job. This
may signicantly reduce theexposure leveloverthetotal
working period.
ldentify additional safety measures to protect the operator
from the eects of vibration such as: maintain the tool
and the accessories,keepthe hands warm,organisationof
work pattems.

ENGLISH
7
7
6.2 EU declaration of conformity
The undersigned:
STAYER IBERICA,S.A.
With address at:
Calle Sierra de Cazorla, 7
Área EmpresarialAndalucra - Sector 1
28320 PINTO (MADRID)
Tel.: +34 91 691 86 30 / Fax: +34 91 691 86 31
CERTIFIES
That the machine:
Type: UNIVERSAL VACUUM CLEANER
Models: VAC2050C
We declare under our sole responsibility that this product
is in conformity with the following standards or standardi-
zation documents: EN 60335-2-69: 2013 according to the
provisions of the directives 2006/42/EEC, 2006/95/EEC,
2004/108/EEC
January 5, 2017
Ramiro de la Fuente
Managing Director

www.grupostayer.com
Área Empresarial Andalucía - Sector 1
C/ Sierra de Cazorla, 7
28320 - Pinto (Madrid) SPAIN
Email: sales@grupostayer.com
Email: info@grupostayer.com
Other manuals for VAC2050C
1
Table of contents
Other stayer Vacuum Cleaner manuals

stayer
stayer VVAC2075 User manual

stayer
stayer BC800 User manual

stayer
stayer VAC1200 User manual

stayer
stayer VAC 2050 User manual

stayer
stayer VAC2030 User manual

stayer
stayer CV12B User manual

stayer
stayer BVAC 2200 E User manual

stayer
stayer BVAC 2200 E User manual

stayer
stayer BC1200B User manual

stayer
stayer CV12B User manual