Manitou MATTTOC PRO User manual

MATTOC / JUNIT 34 / CIRCUS 34 SERVICE GUIDE
JUNIT 34 PRO & EXPERT
MATTTOC PRO, EXPERT, & COMP
CIRCUS 34 PRO
3
MATTOC / JUNIT 34 / CIRCUS 34 SERVICE GUIDE
This manual is intended to guide the user through the steps necessary to fully service and maintain
the Mattoc Pro, Expert, and Comp, along with Junit 34 Pro and Expert & Circus Pro suspension fork.
mechanic. Failure to follow instructions presented in this manual could lead to
serious injury or death. Any questions about the servicing of this fork or the
manual itself should be directed to Hayes Customer Support at:
WARNING
! !
Hayes
Bicycle
USA
5800 W Donges Bay Road Mequon WI 53092
Phone: 888.686.3472
Email: techsupport@hayesbicycle.com
Hayes
Bicycle
Europe
Dirnismaning 20 a 85748 Garching (b. Munich) Germany
Phone: +49 89 203237450
Email: techsupportEU@hayesbicycle.com
Hayes
Bicycle
Asia
16F, No. 37, Sec. 3 Mincyuan E. Rd. Zhongshan District
Taipei City 10476 Taiwan ROC
Phone: 886-2-2518-1108
5800 W Donges Bay Rd
Mequon, WI 53092
manitoumtb.com
888.686.3472
Support: manitoumtb.com/support
MANITOU
For full warranty information please
visit hayesbicycle.com/warranty
WARRANTY
INTRODUCTION

4 5
MATTOC / JUNIT 34 / CIRCUS 34 SERVICE GUIDE MATTOC / JUNIT 34 / CIRCUS 34 SERVICE GUIDE
SECTION PAGE NUMBER
Required Tools 5
Casting Removal & Service 6
Air Spring Service 9
MC2 Sealed Damper Service 16
Mattoc Pro Casting Installation 20
Mattoc Pro Compression Knob Installation 23
VTT6 Damper Service 24
ABS+ Damper Service 26
Mattoc, JUnit, & Circus Casting Installation 28
VTT6 & ABS+ Damper Installation 31
Travel Change (Optional) 34
Travel Spacers & IVA Settings 36
Exploded Views 44
Below is a list of tools necessary for changing the travel on the Mattoc, JUNIT
34, and Circus Pro forks:
• Safety Glasses
• Nitrile Gloves
• Lint-Free Rags
• Torque Wrench (6-220 in-lb [0.7-25 Nm])
• 2mm Hex Wrench
• 8mm Hex Wrench
• 14mm Box End Wrench
• Shock Pump
• Cassette Lockring tool* (e.g. Park tool FR-5.2)
• 1” socket
• 8mm Socket *
• 24mm Socket *
• (Optional, replaces items above with*) Manitou Tool Kit - Manitou part number
ground 24mm socket)
• Travel Spacer kit 141-36713-K032
Below is a list of additional tools necessary for a full service of the Mattoc,
JUNIT 34, and Circus Pro forks:
• 11mm Socket (Pro and Expert Only)
• Plastic or non-marring pick
•
• 5wt Maxima Fork oil (85-0023) or 3wt Maxima Fork oil (141-34078-K016)
• Semi-bath Oil, 5/40w Synthetic - Manitou part number 85-0022
• Slickoleum™ Grease
• Isopropyl alcohol
• 34mm seal install tool 172-37540-K002
• Cartridge Damper Bleed Kit 141-30694-K020 (Pro Only)
• 34mm seal kit 141-39022-K020 (Pro) or 141-34000 (Exp/Comp)
• Air piston Seal Kit 141-32155-K012 (Pro/Exp) or 141-32156-K011 (Comp) or
Rebuild kit 141-39022-K021
TABLE OF CONTENTS REQUIRED TOOLS
6 7
MATTOC / JUNIT 34 / CIRCUS 34 SERVICE GUIDE MATTOC / JUNIT 34 / CIRCUS 34 SERVICE GUIDE
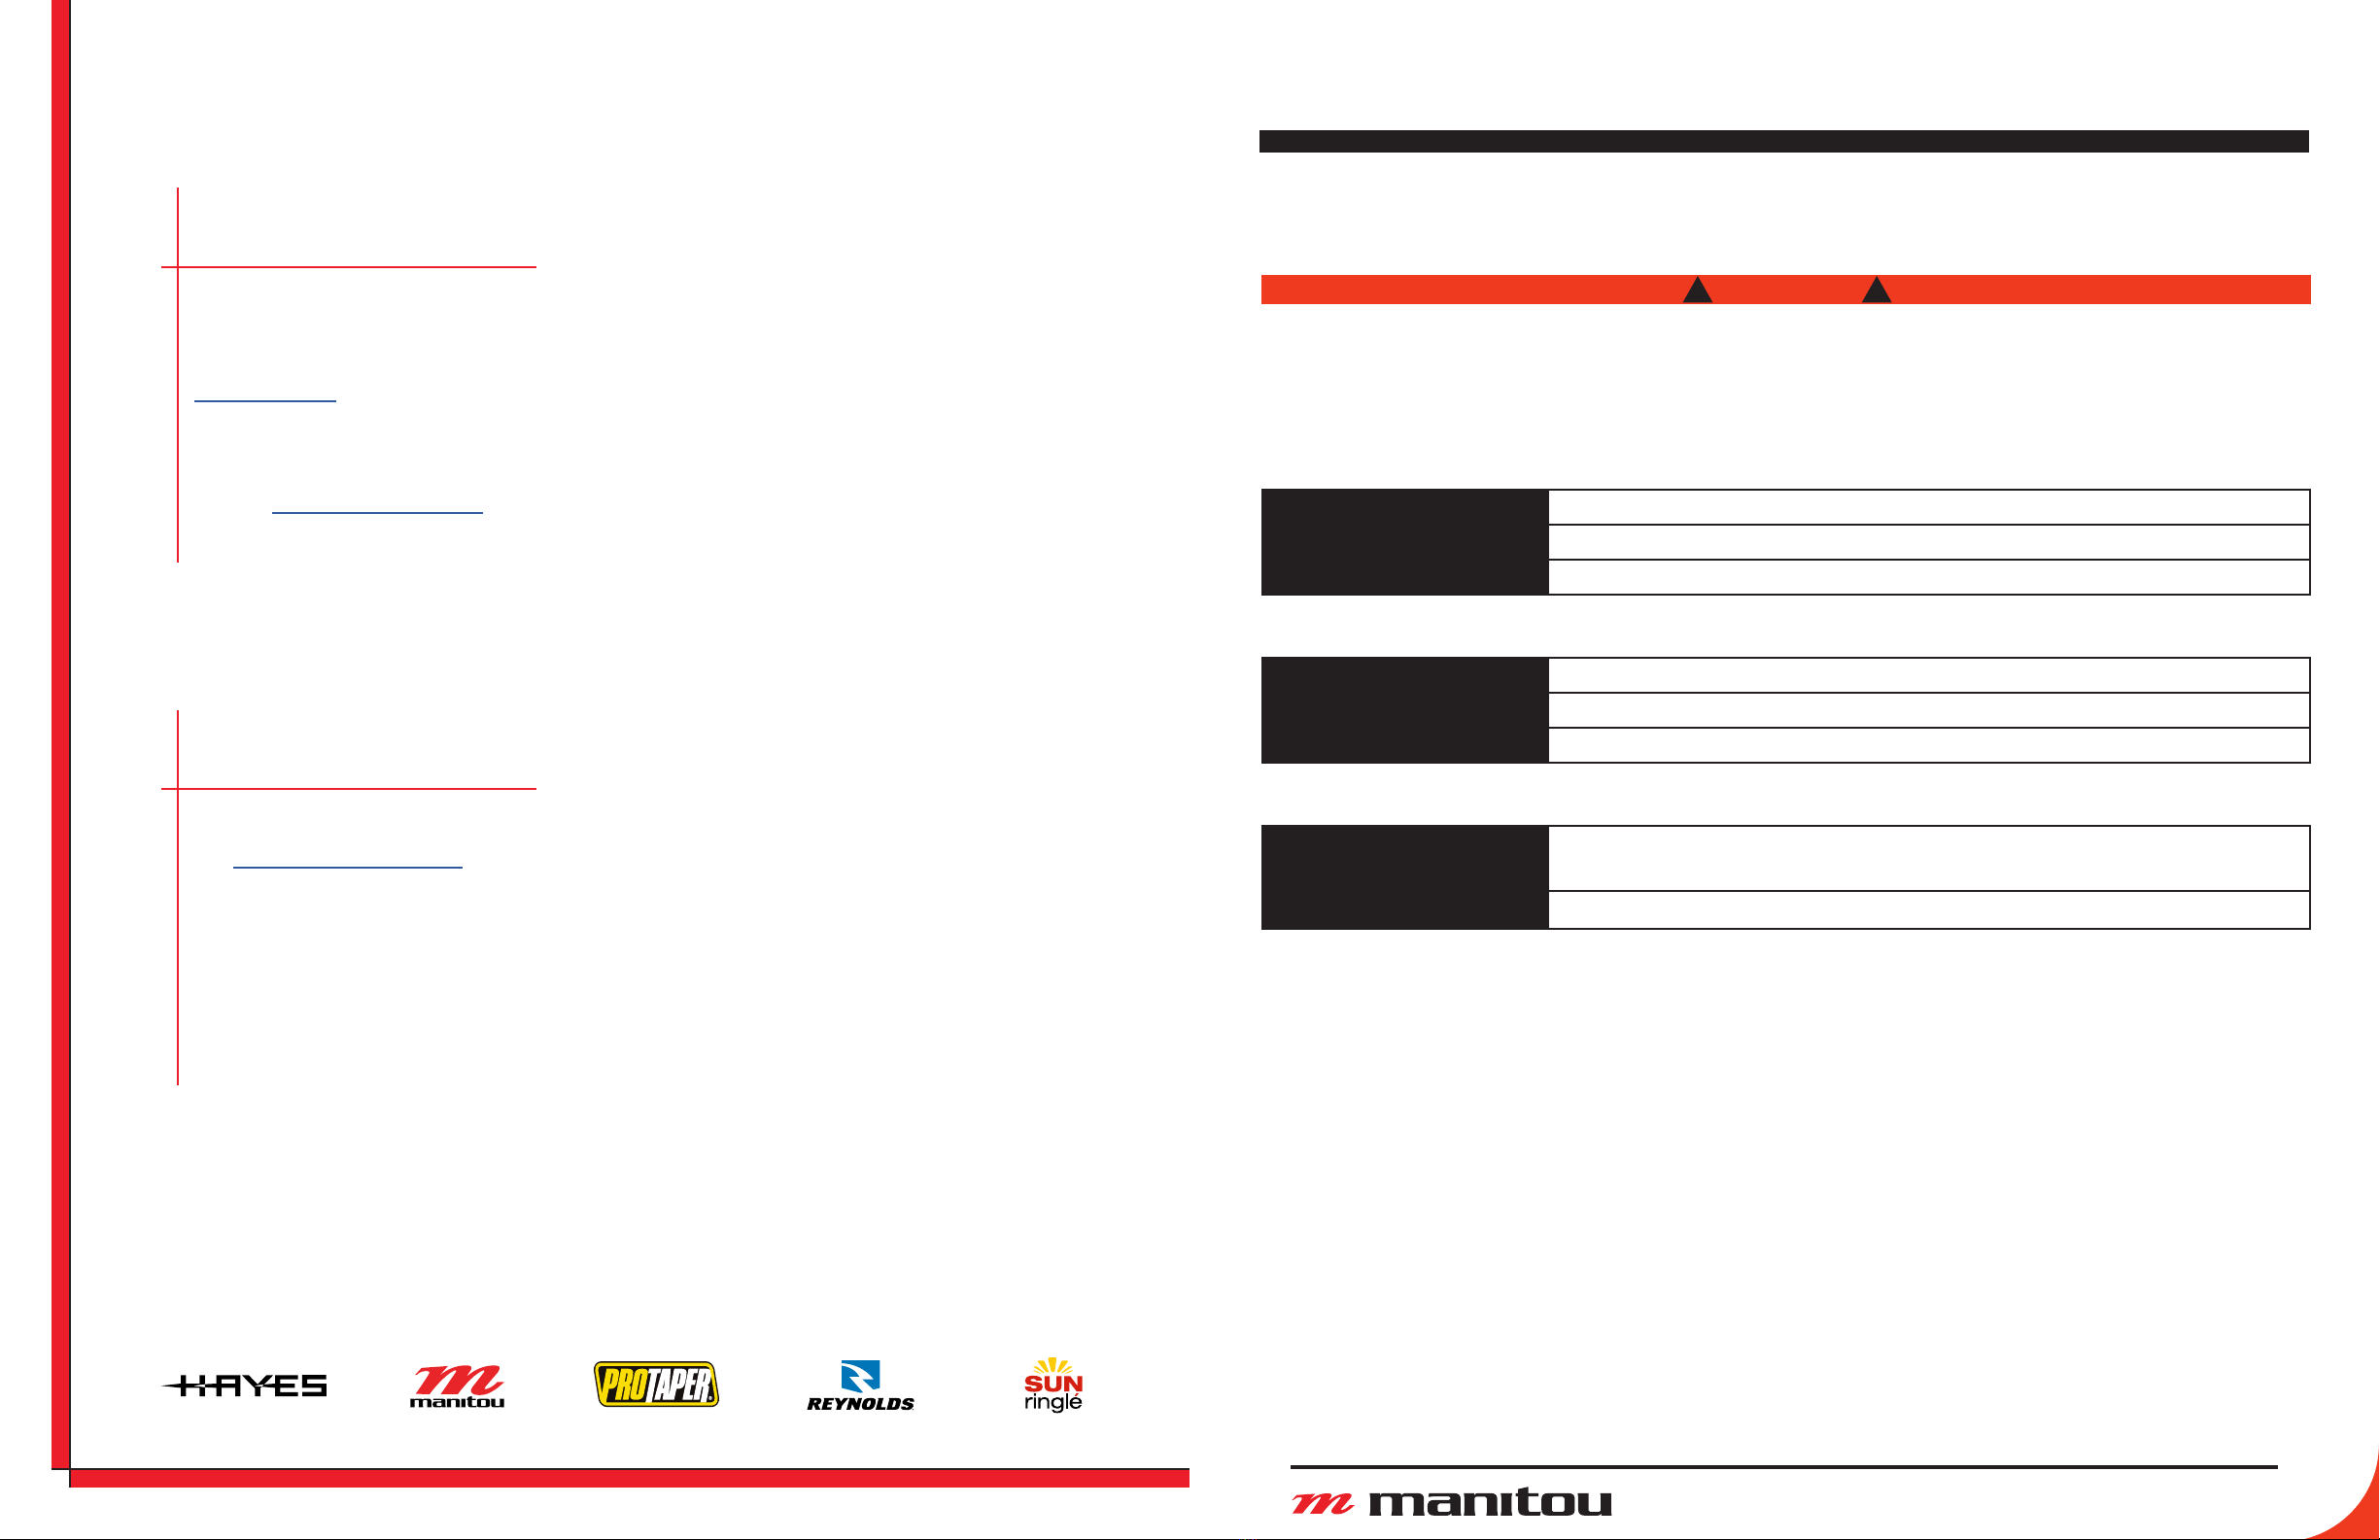
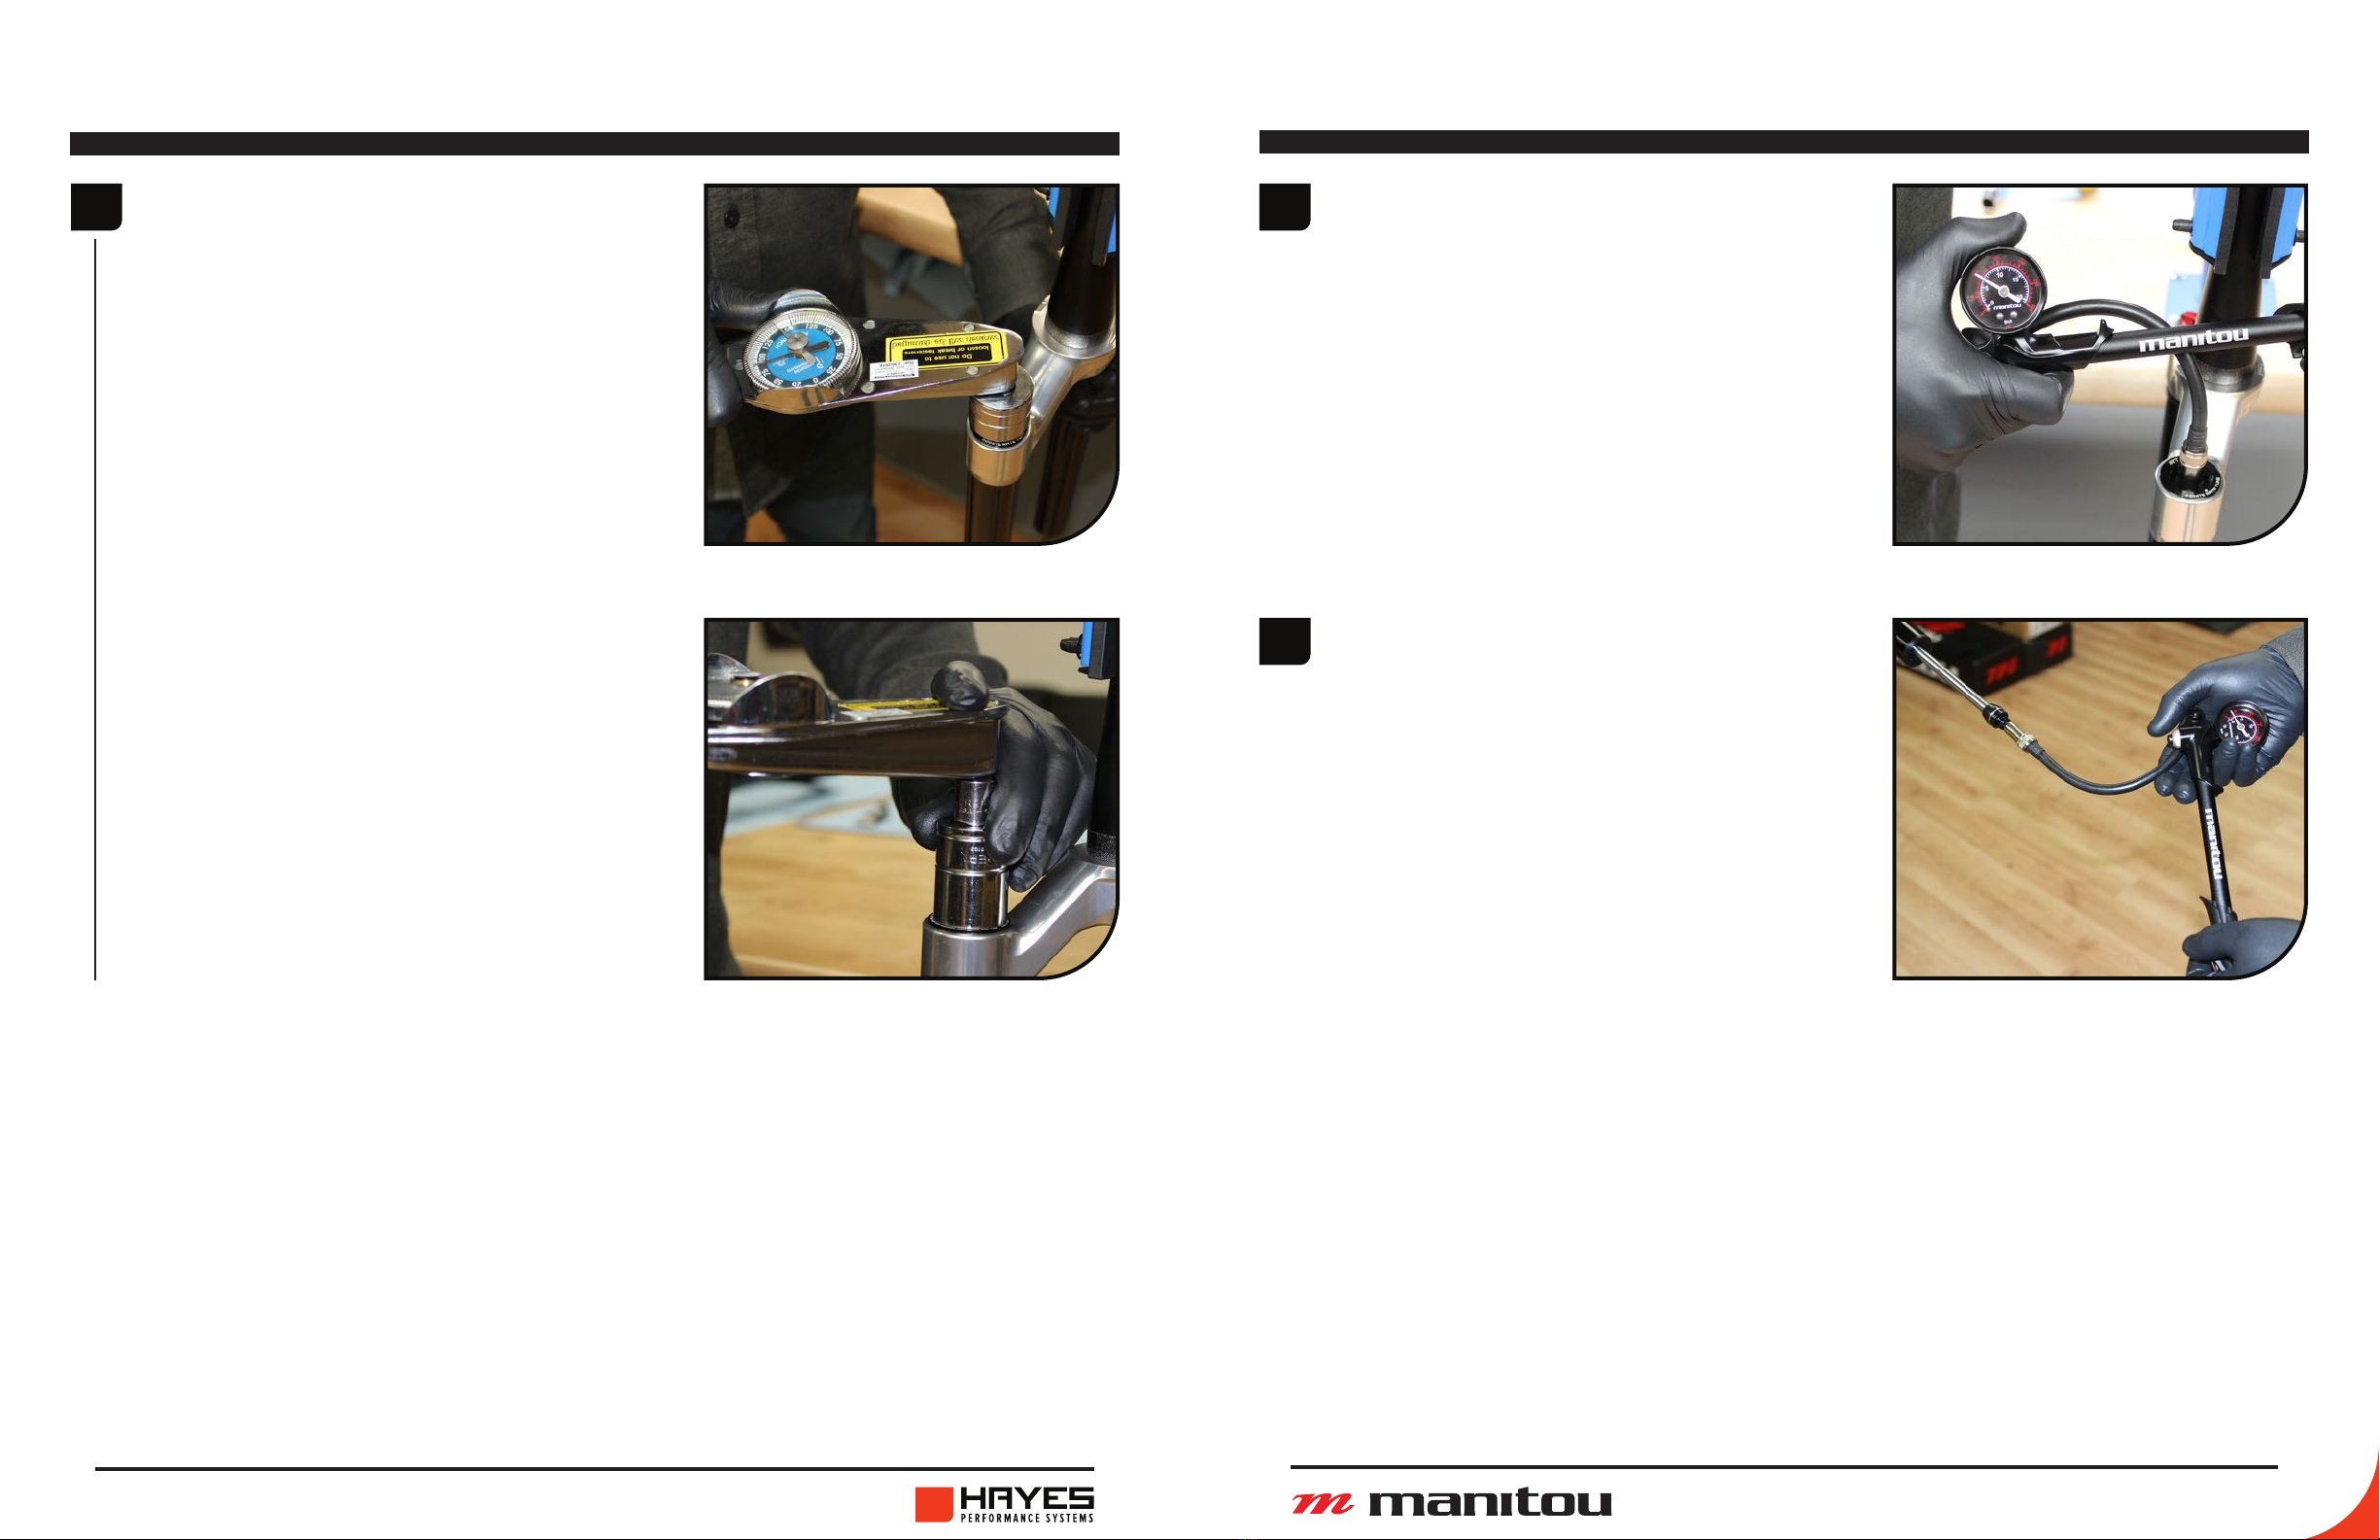
1Remove rebound knob using a 2mm
Hex wrench.
Note: Be sure to hold the knob
still while removing the screw. The
damper adjuster may be damaged
if the knob is over torqued.
Hold lock-nut with 14mm end
wrench for Pro & Expert, or a
19mm end wrench for Comp.
Insert a 8mm Hex wrench into
the end of the rebound rod and
loosen clockwise until rebound rod
disengages from the lock-nut.
2
3Unscrew air cap and attach shock
pump. Depress pressure bleed
button until pump reads “Zero”.
Depress Schrader Valve a few times
with 2mm hex wrench to ensure all
air is released.
Manitou recommends a full service anytime the
casting is removed. If the fork is new and only
a travel change is needed, follow instructions
1-4 then skip to page 34 for Travel change
instructions.
Hold lock-nut with a 14mm (Pro/
Expert) or 19mm (Comp) box end
wrench. Using 8mm Socket, turn
the compression rod clockwise
until compression rod is disengaged
from the lock-nut.
Remove casting from fork. It is
recommended this be done over
a drain pan as the lower casting
contains semi-bath oil. Allow oil
in casting to drain out before
continuing to next step.
4
5
6Using a downhill tire lever or similar
tool, gently pry the dust seals out
of the casting.
CASTING REMOVAL & SERVICE CASTING REMOVAL & SERVICE
8 9
MATTOC / JUNIT 34 / CIRCUS 34 SERVICE GUIDE MATTOC / JUNIT 34 / CIRCUS 34 SERVICE GUIDE
8
9
7Remove old foam wiper rings.
Thoroughly saturate new foam
install into fork casting.
Remove springs from outer lip of
new leg seals. Clean casting seal
press area with Isopropyl alcohol.
Using the Manitou 34/37mm Seal
Press, press in the dust seals.
Reinstall springs onto seals.
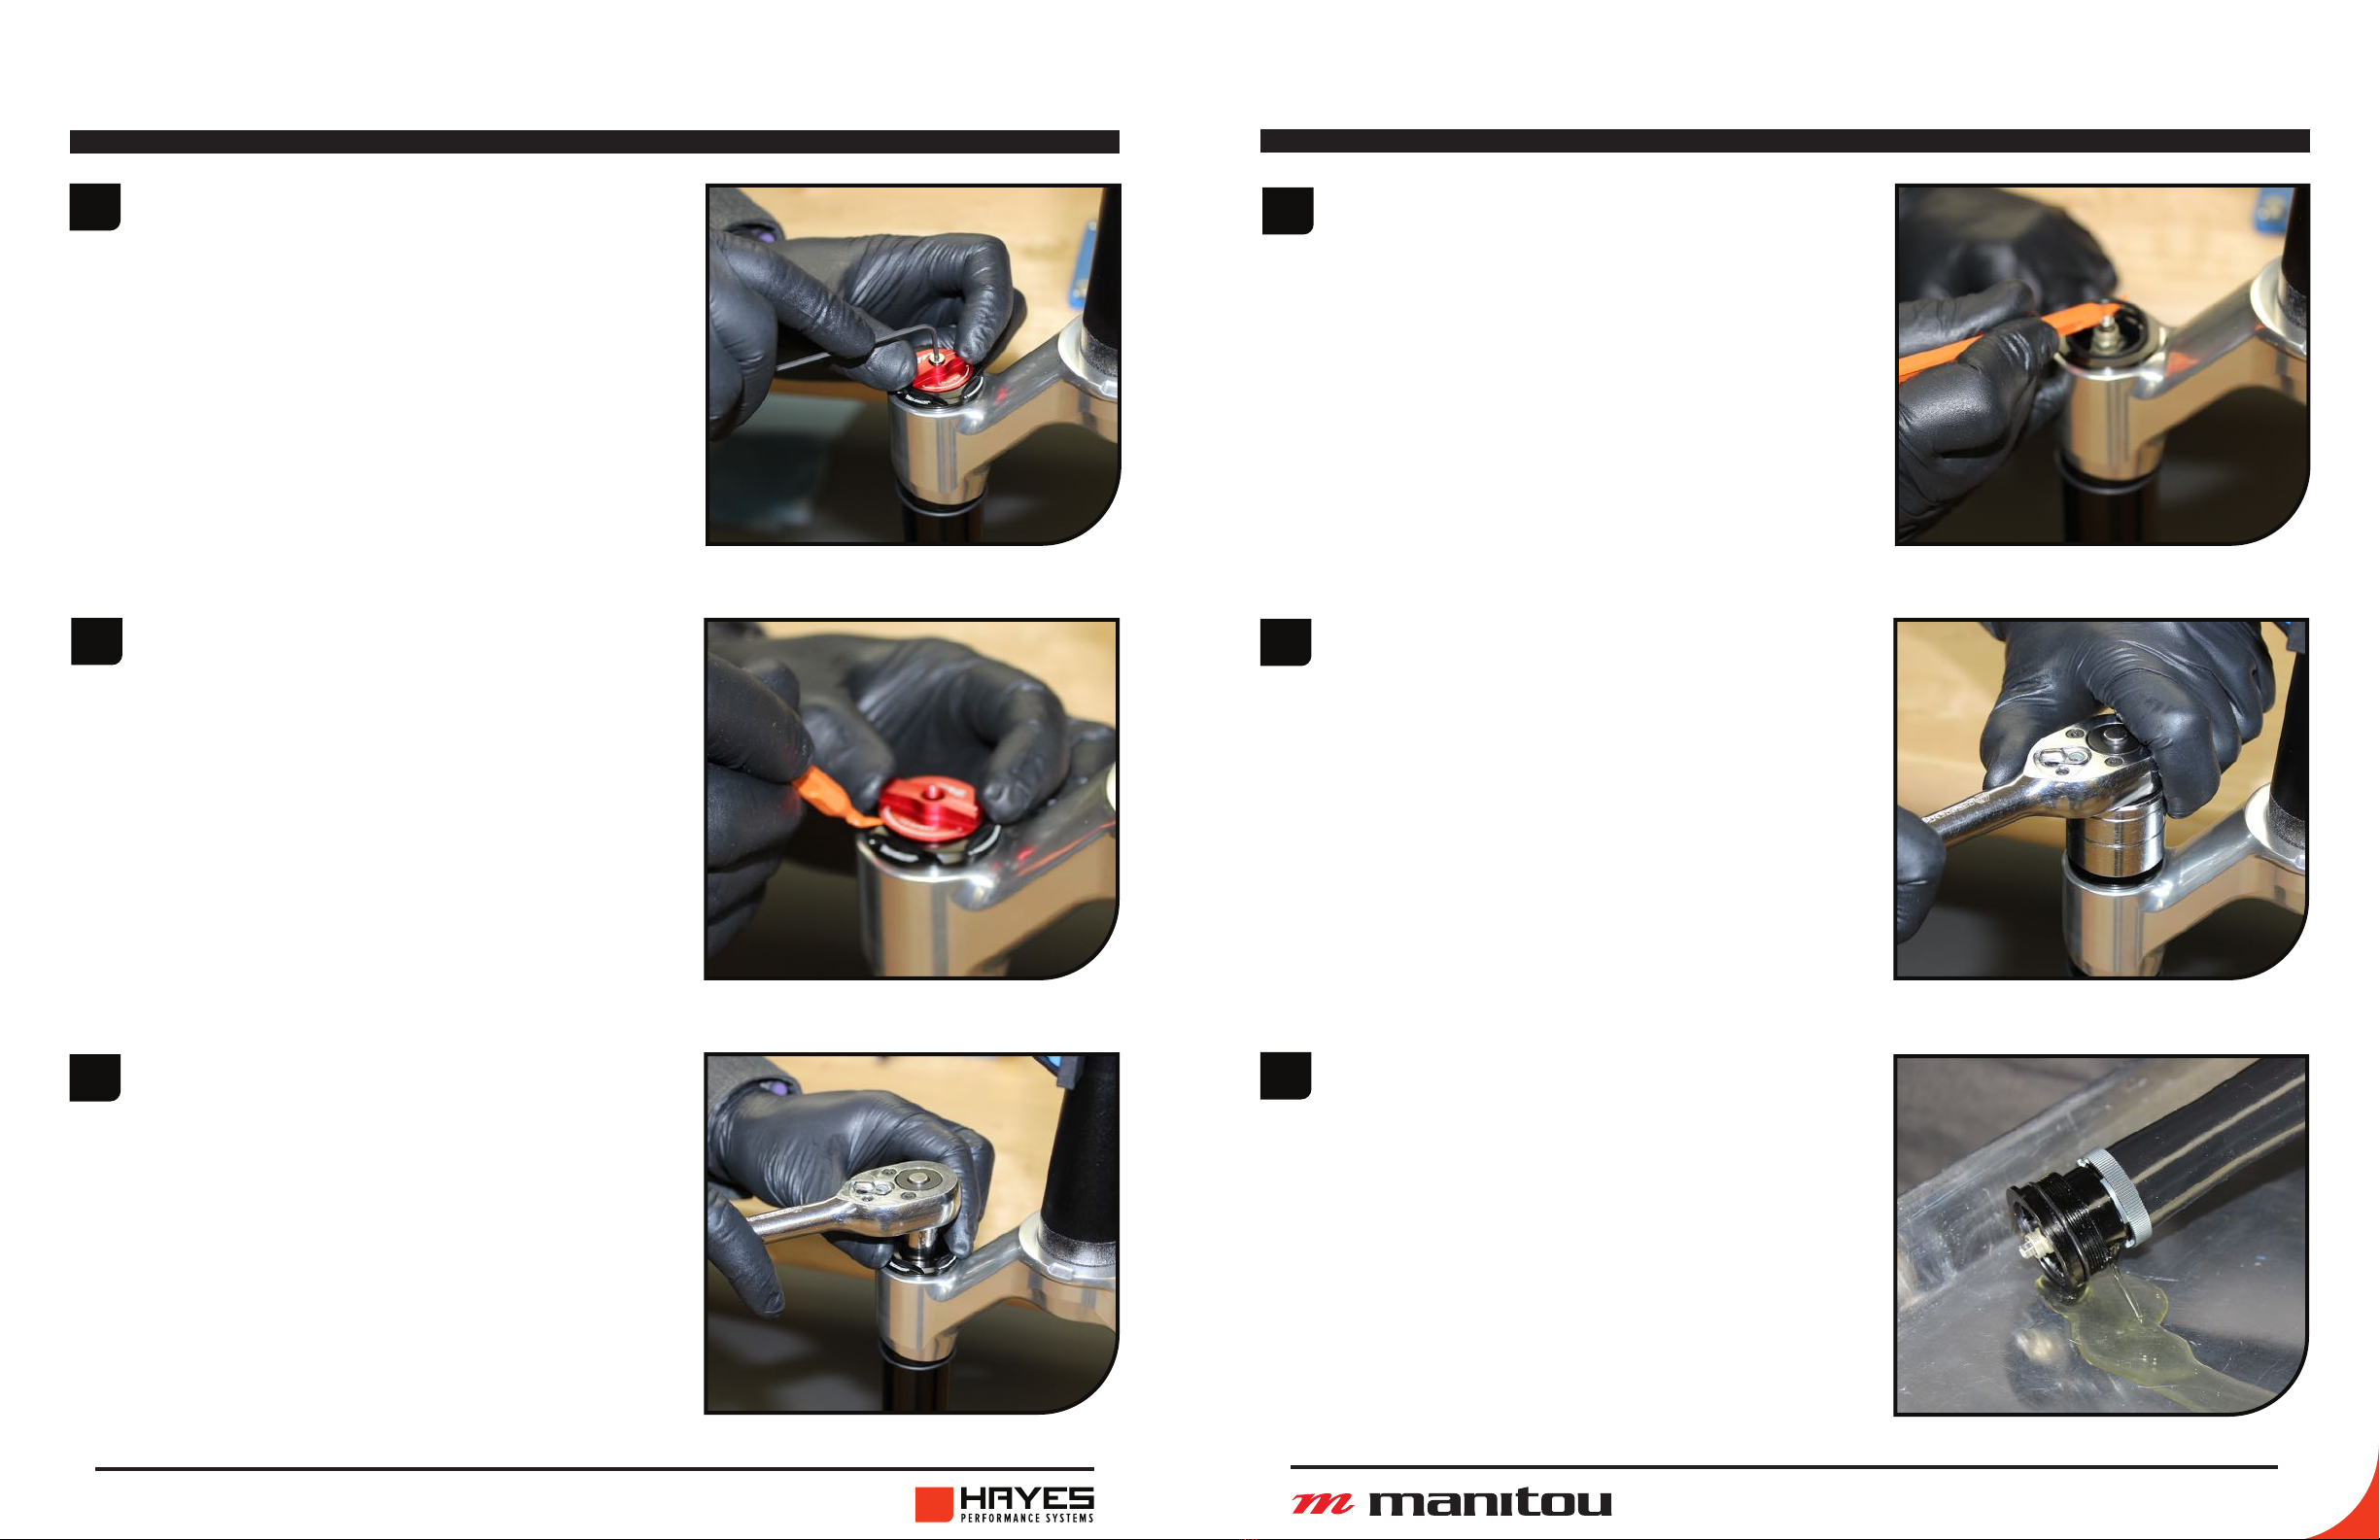
1
2
Mattoc / JUNIT Pro:
Mattoc / JUNIT Pro:
Using a standard cassette tool
and 1” socket loosen IRT cap until
threads are free from leg.
CASTING REMOVAL & SERVICE AIR SPRING SERVICE
Mattoc Expert / Comp, JUnit 34
Expert, Circus Pro:
Using a 24mm socket, loosen IVA
cap until threads are free from leg.
WARNING
! !
MAKE SURE THE AIR IS
RELEASED FROM THE FORK.
Remove IRT air cap. Depress IRT
Schrader Valve with a 2mm hex
a few times to ensure all air is
released.
Mattoc Expert / Comp, JUnit 34
Expert, Circus Pro:
Skip to Step 2.

10 11
MATTOC / JUNIT 34 / CIRCUS 34 SERVICE GUIDE MATTOC / JUNIT 34 / CIRCUS 34 SERVICE GUIDE
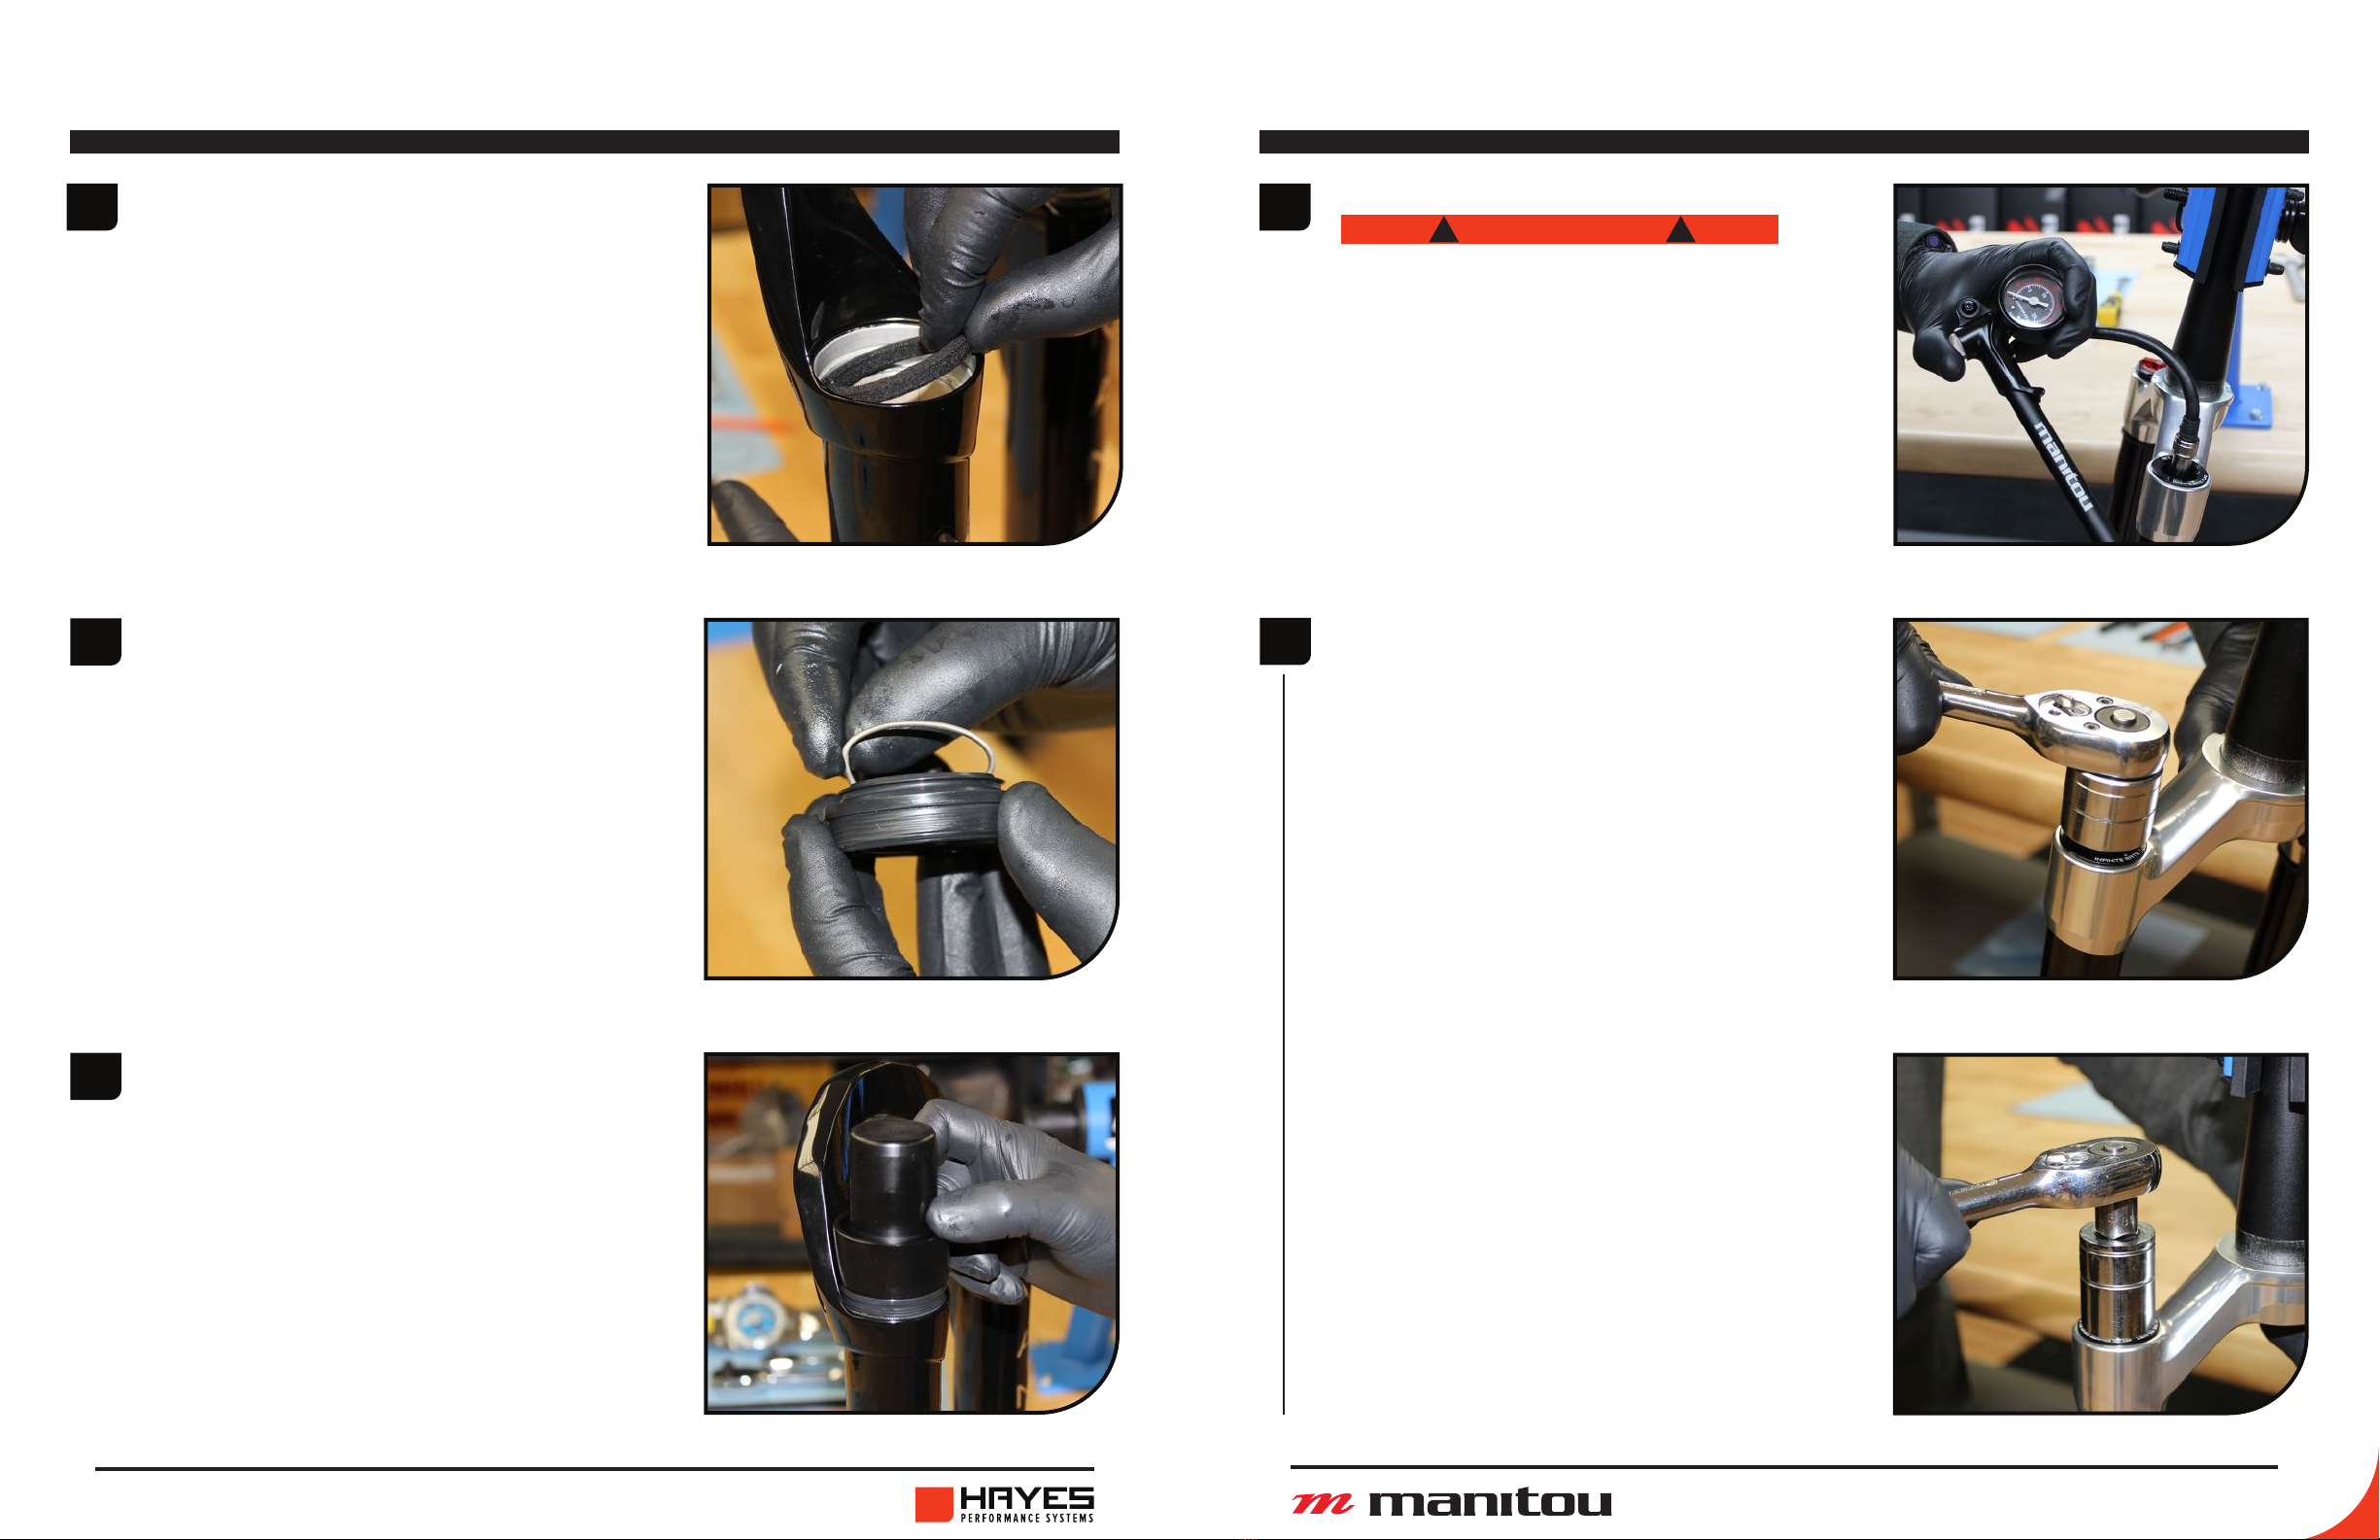
3Mattoc / JUNIT Pro:
Pull IRT assembly straight out,
Clean with isopropyl, Inspect seal
for damage. If needed Replace IRT
piston seals.
Mattoc Expert / Comp, JUnit 34
Expert, Circus Pro:
Pull IVA assembly straight out,
Clean with isopropyl, Inspect seal
for damage. If needed replace IVA
piston seals.
4Invert the fork and use Manitou
cassette tool with adjustable
wrench to unthread the air spring
assembly from the stanchion.OR
depress valve on end of comp-rod
with 2mm hex and stroke rod to
bottom. Slide standard cassette
lock-ring tool over threaded
adapter and unthread the air spring
assembly from the stanchion.
5
6
Remove Air Spring Assembly, clean
with isopropyl, Inspect seal for
damage. Replace air piston seal
141-32155-K012 (Pro/Exp) or 141-
32156-K011 (Comp). If Travel
change is need see page 34
before moving on.
Once the air spring assembly is
removed clean the inside of the
stanchion with isopropyl alcohol
and a lint free towel (Be careful
to not scratch the inner surface of
the stanchion). Inspect the inside
and outside of the stanchion for
scratches or other damage.
7Liberally apply Slickoleum™ grease
to the piston seal, outer piston
surface, and spring shaft. Add 3cc’s
of Slickoleum™ grease to the top of
the air piston.
AIR SPRING SERVICEAIR SPRING SERVICE
12 13
MATTOC / JUNIT 34 / CIRCUS 34 SERVICE GUIDE MATTOC / JUNIT 34 / CIRCUS 34 SERVICE GUIDE
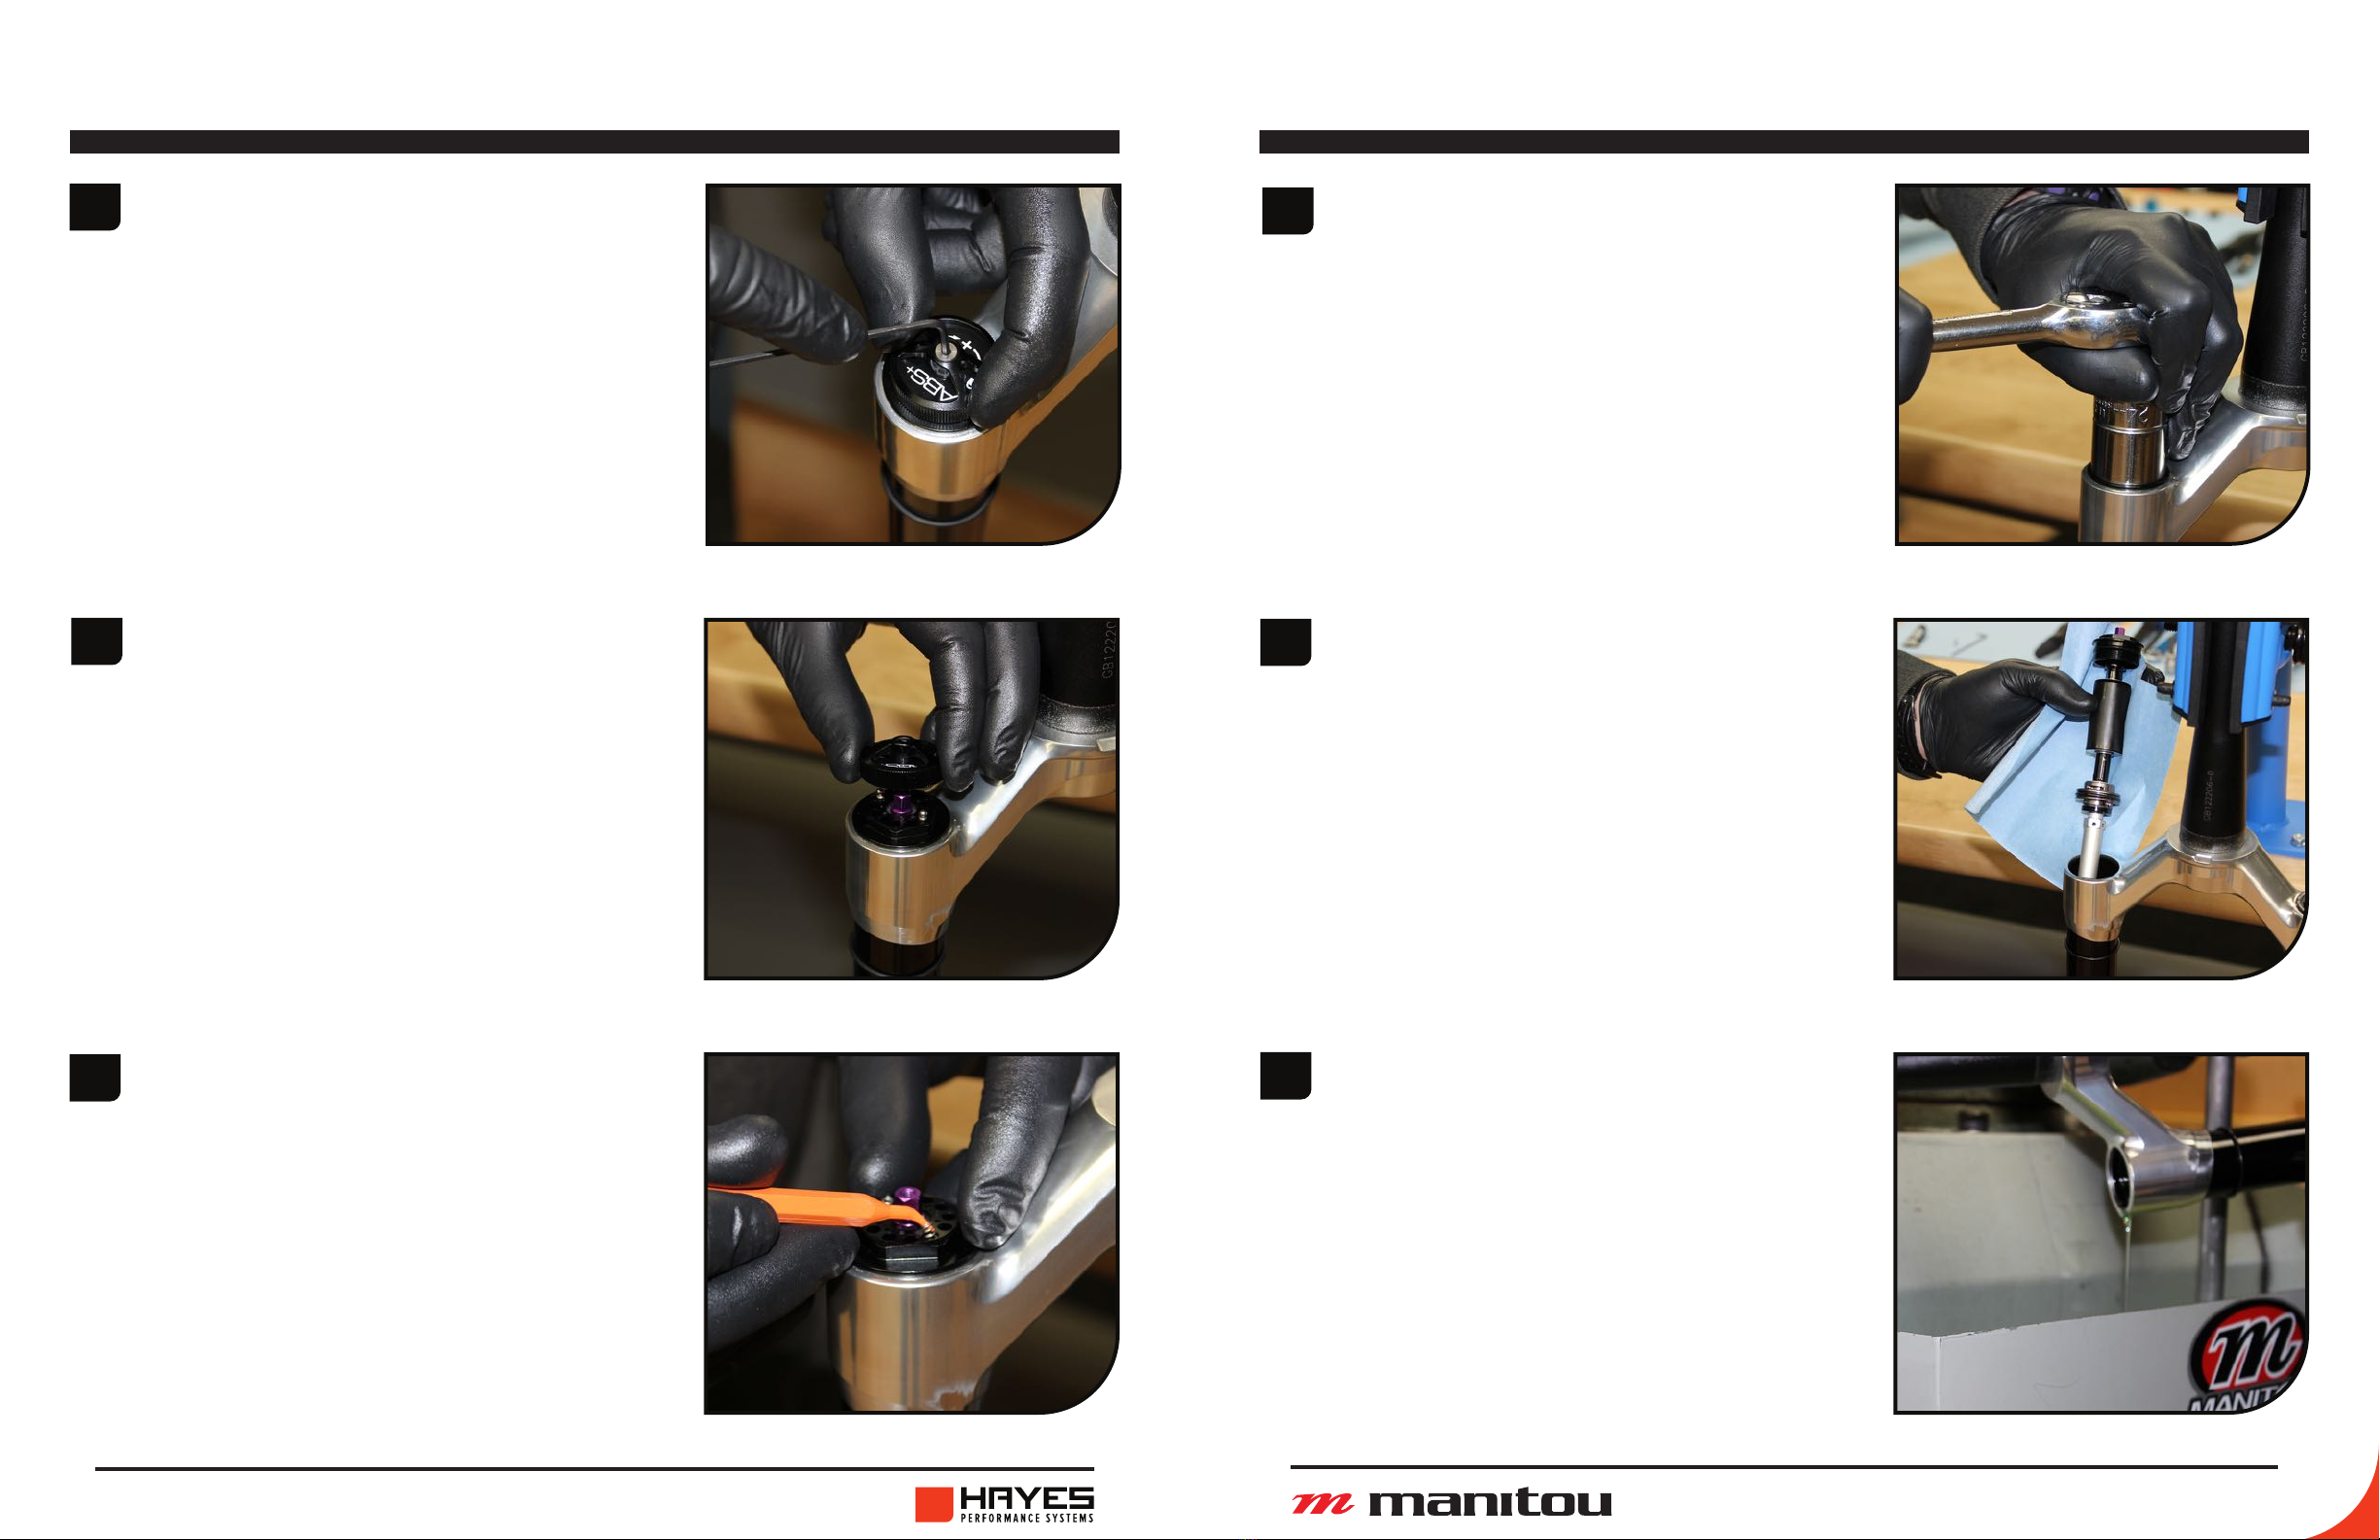
AIR SPRING SERVICE
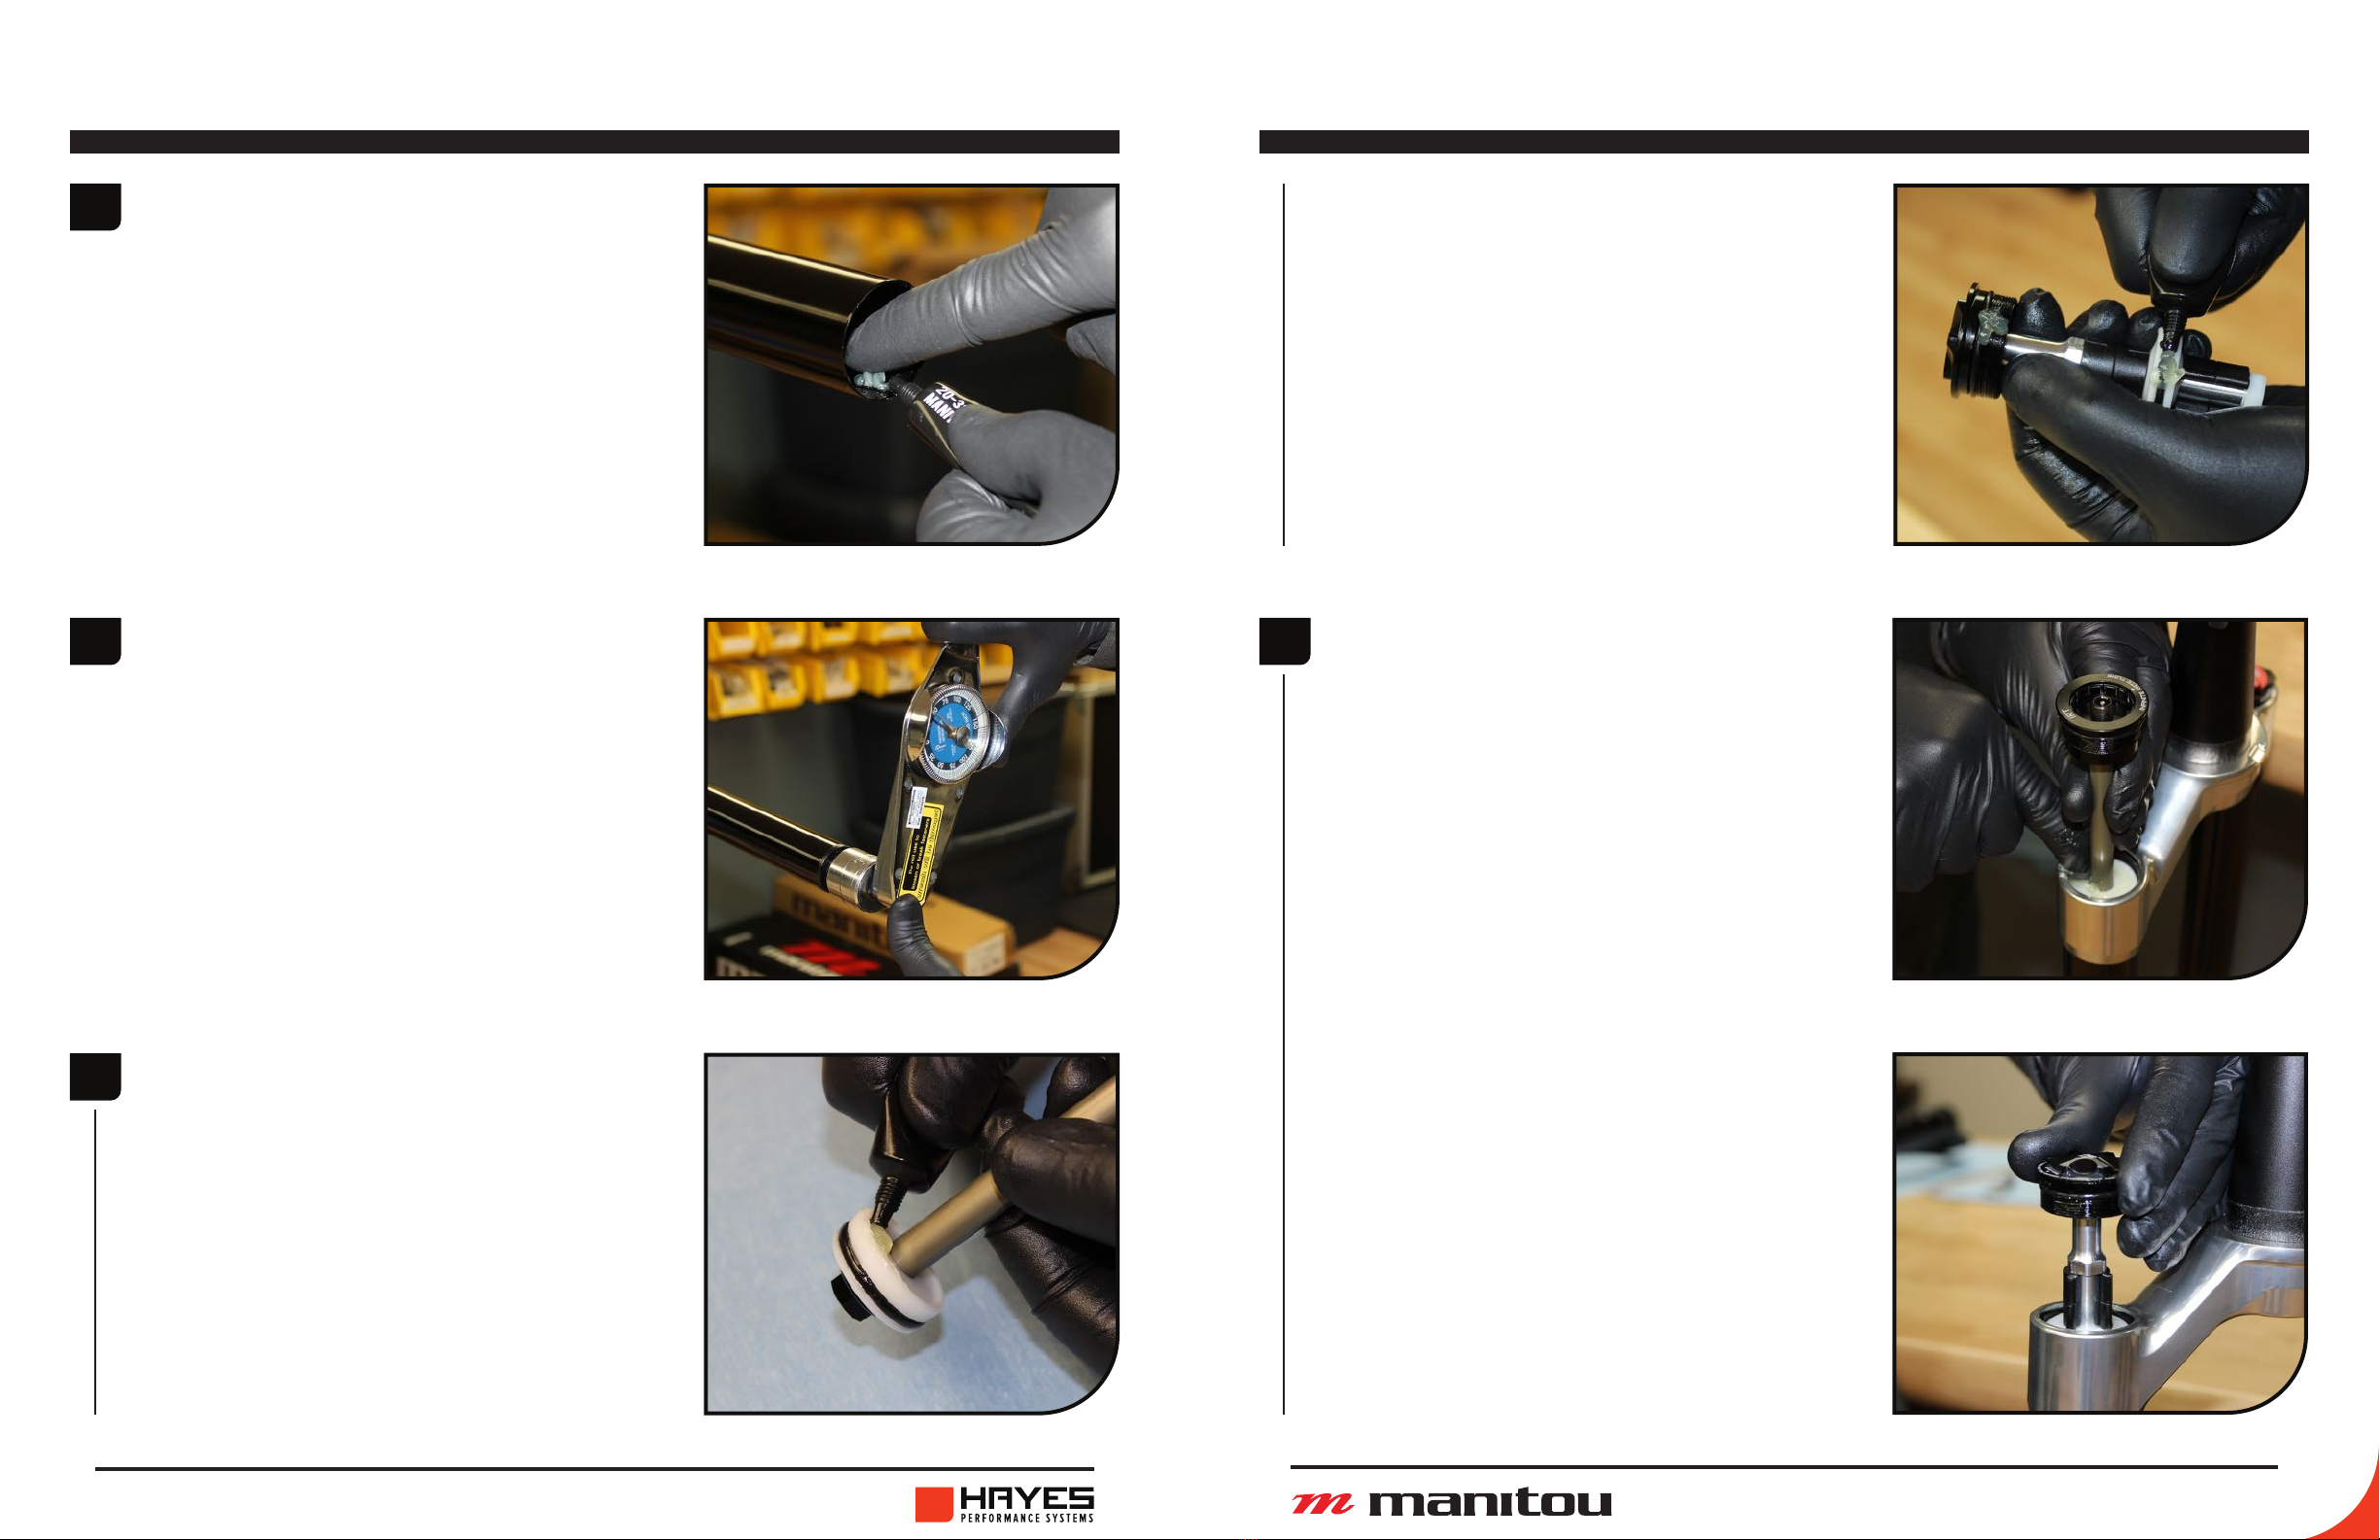
8Add Slickoleum™ grease to the
stanchion threads before inserting
the air spring assembly. Spread
grease across entire thread
surface.
9Install air spring assembly into
stanchion. Using a 26mm crow’s
foot and Manitou cassette tool OR
1” Socket and Standard cassette
tool torque to 40-45 LB-IN [4.5-
5.1 Nm]. If rod is bottomed, attach
shock pump to valve and draw the
rod out until fully extended.
AIR SPRING SERVICE
Mattoc / JUNIT Pro:
Liberally apply Slickoleum™ grease
to the IRT piston seal, outer piston
surface, and IRT shaft. Apply
Slickoleum™ grease to the threads
of the stanchion.
Mattoc Expert / Comp, JUnit 34
Expert, Circus Pro:
Liberally apply Slickoleum™ grease
to the IVA piston seal and outer
piston surface. Apply Slickoleum™
grease to the threads of the
stanchion.
10
11 Mattoc / JUNIT Pro:
Insert IRT piston into stanchion.
Apply even pressure to piston
surface as you work the piston seal
past the stanchion threads.
Mattoc Expert / Comp, JUnit 34
Expert, Circus Pro:
Insert IVA Piston into the stanchion.
14 15
MATTOC / JUNIT 34 / CIRCUS 34 SERVICE GUIDE MATTOC / JUNIT 34 / CIRCUS 34 SERVICE GUIDE
12 Mattoc / JUNIT Pro:
Install IRT cap into stanchion.
Torque to 200-220 LB-in [22.6-25
Nm] using standard cassette lock-
ring tool.
Mattoc Expert / Comp, JUnit 34
Expert, Circus Pro:
Install IVA cap into stanchion.
Torque to 200-220 LB-in [22.6-25
Nm] using a 24mm socket.
AIR SPRING SERVICE
13
14
Mattoc / JUNIT Pro:
IRT to 100PSI.
NOTE: ALWAYS SET IRT PRESSURE
(TOP OF FORK) BEFORE DORADO
AIR PRESSURE (BOTTOM OF FORK)
Mattoc Expert / Comp, JUnit 34
Expert, Circus Pro:
Skip to step 14.
main air chamber to 30 PSI. This
will aid in installing the casting
later.
AIR SPRING SERVICE
16 17
MATTOC / JUNIT 34 / CIRCUS 34 SERVICE GUIDE MATTOC / JUNIT 34 / CIRCUS 34 SERVICE GUIDE
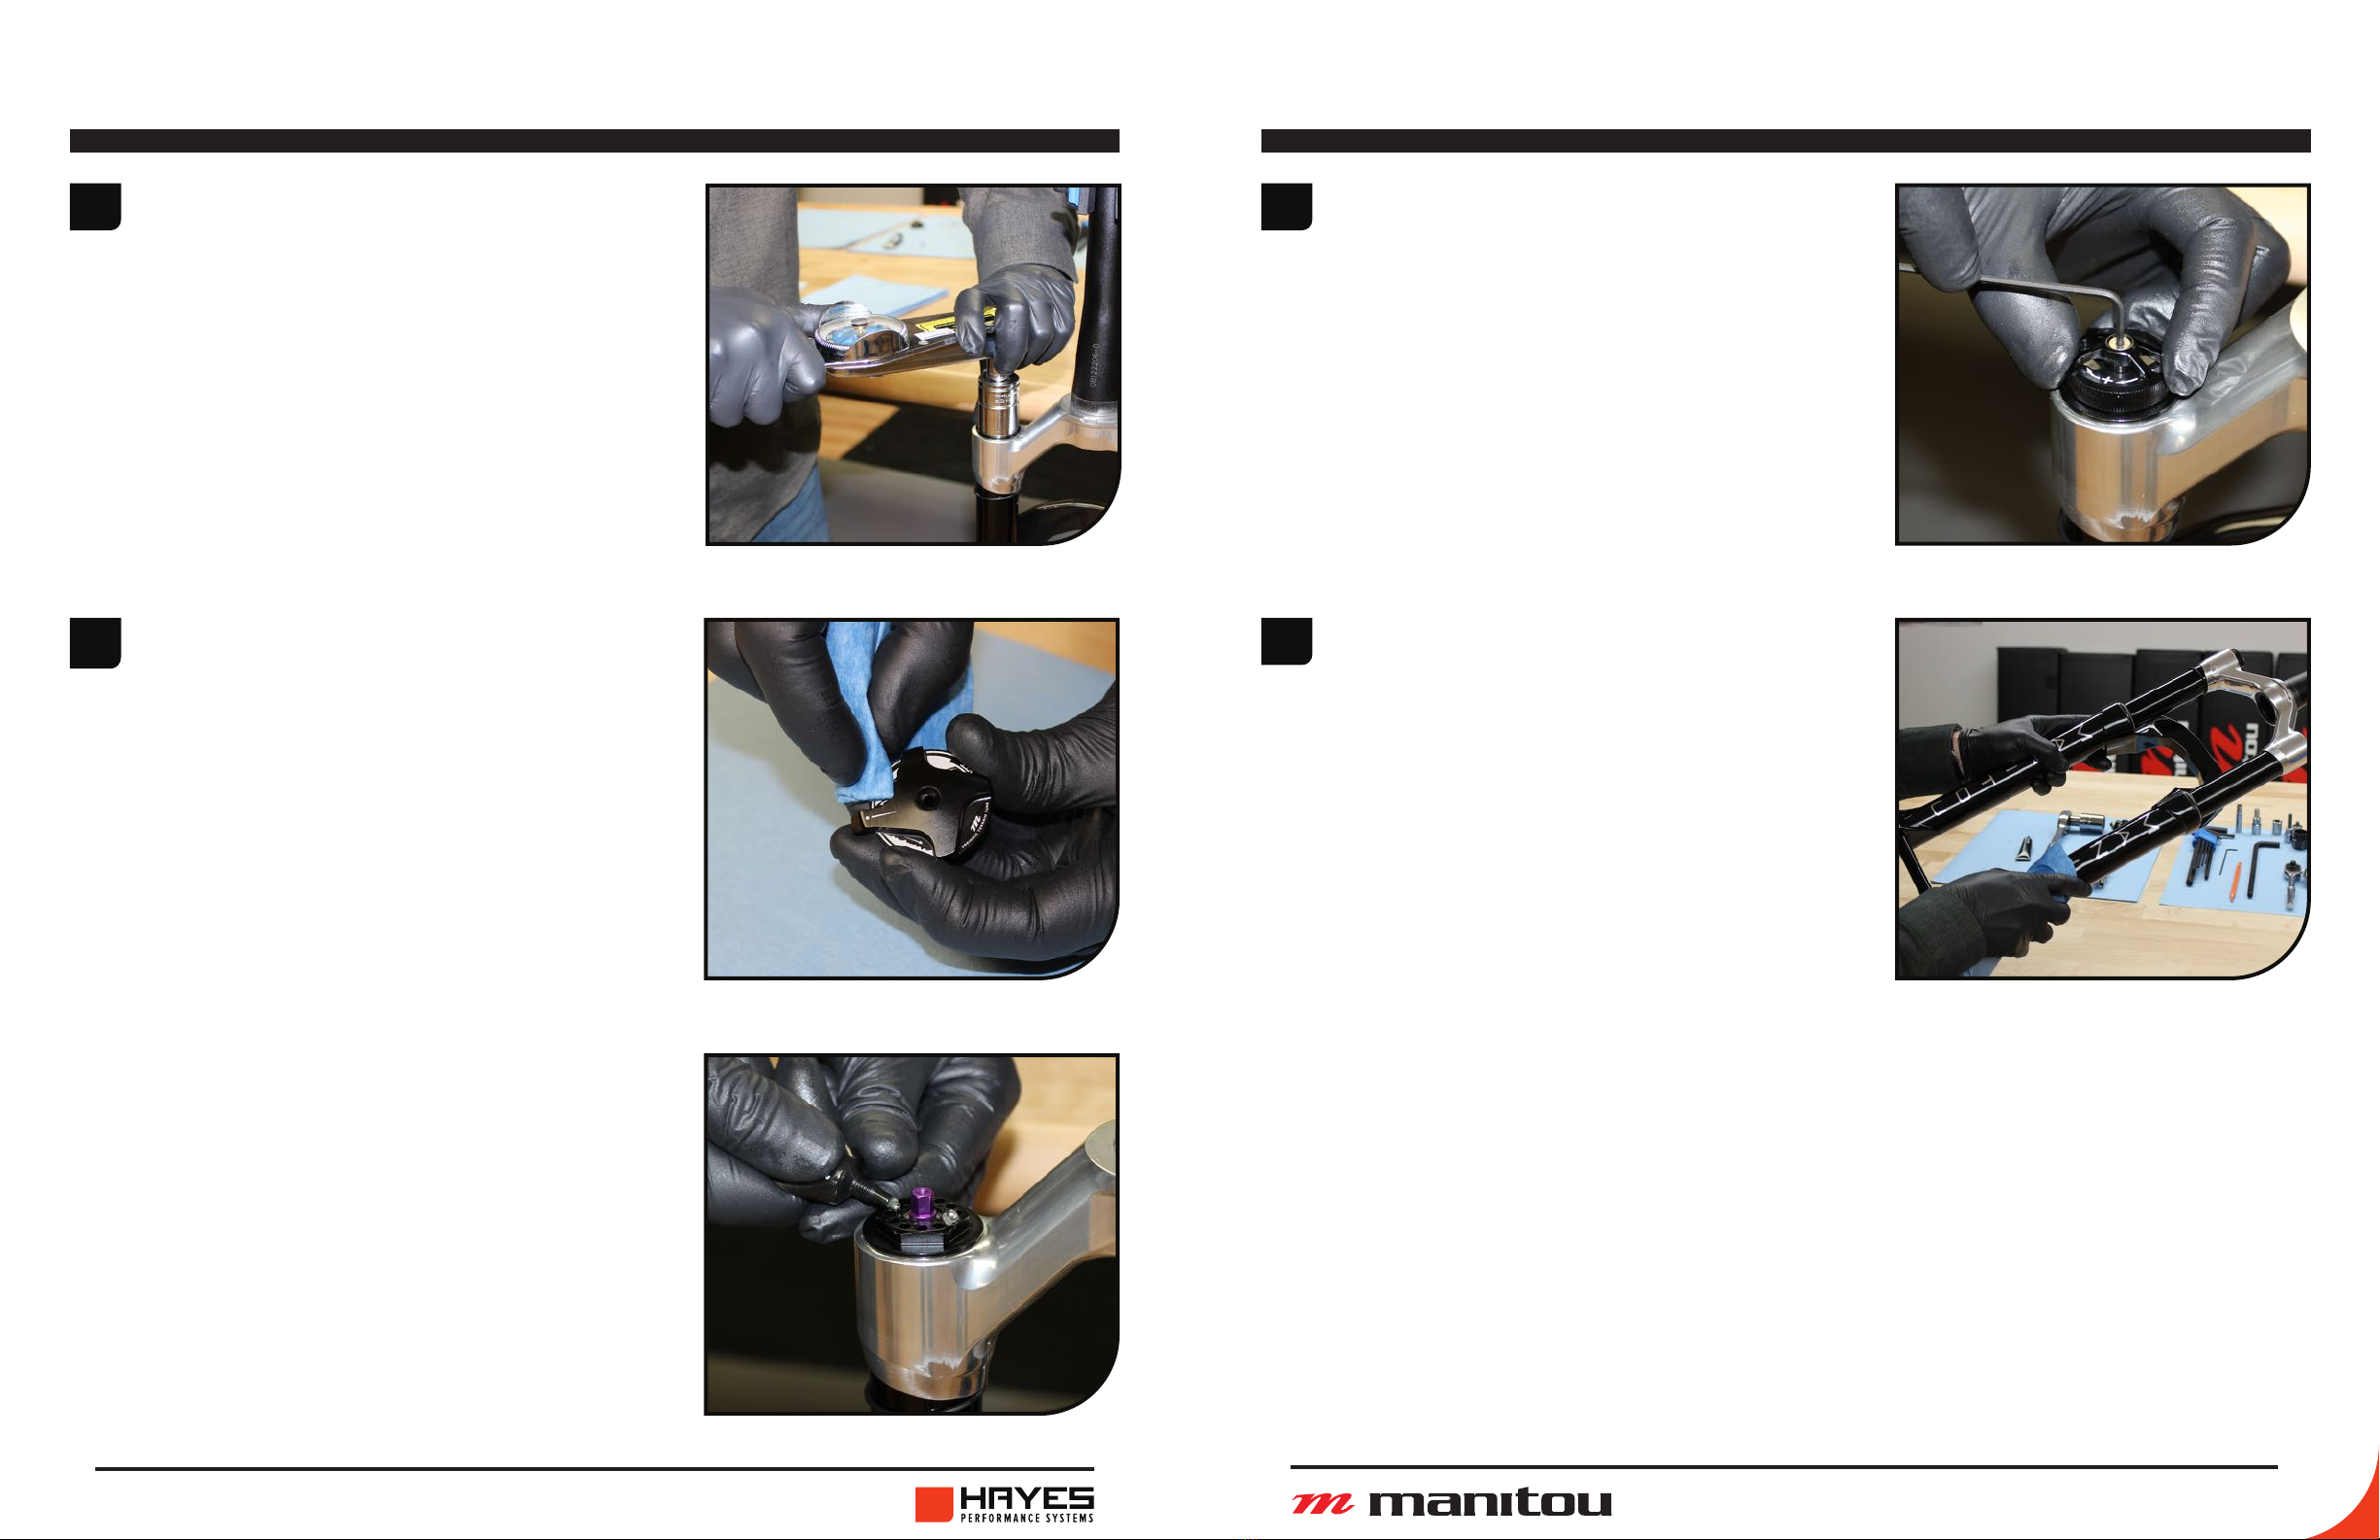
1
2
Using a 2mm Hex wrench remove
the screw of the red “LO-SPEED”
MC2 knob.
Note: Be sure to hold the knob
still while removing the screw. The
damper adjuster may be damaged
if the knob is over torqued.
Use a non-marring pick or pliers
with non-marring barrier to remove
the red “LO-SPEED” compression
knob by lifting straight up.
3With a 11mm socket, unthread the
exposed nut and remove the black
“HI-SPEED” adjustment knob.
Note: Be sure to hold the knob
still while removing the nut. The
damper adjuster may be damaged
if the knob is over torqued.
MC2 Sealed DAMPER SERVICE
4Remove the v-seal that was under
the black “HI-SPEED” adjustment
knob.
5
6
Use a standard cassette tool and
1” socket to unthread the damper
top-cap from the stanchion.
Remove damper assembly from the
stanchion. Inspect damper shaft
and bladder for any damage.
MC2 Sealed DAMPER SERVICE
Pull damper shaft to full extension.
Remove bleed-screw on side of
top-cap. Place damper top-cap
over catch pan. Cycle damper shaft
several times to cycle out old oil
from damper.

18 19
MATTOC / JUNIT 34 / CIRCUS 34 SERVICE GUIDE MATTOC / JUNIT 34 / CIRCUS 34 SERVICE GUIDE
7
9
8
both syringes (141-30695-K020).
Fill one syringe with 3wt Damper oil
(141-34078-K016).
Attach the empty syringe M5x.8
adapter to top-cap bleed port.
Remove bleed-screw from damper
syringe M5x.8 adapter to end-cap
bleed port.
MC2 Sealed DAMPER SERVICE
10
Holding the damper end-cap
up-right in vise simultaneously
retract the empty syringe to
the syring as needed until oil is
drawn into the upper syringe.
11
12
Closing the bleed hose clamp on
both syringes cycle the damper
SLOWLY to draw air to the top
of the damper. Open bleed hose
clamps and repeat step 10 until no
air bubbles are present in oil drawn
into upper syringe.
Fully extend damper shaft and
add oil from bottom syringe until
bladder is slightly expanded.
Closing the bleed hose clamp on
both syringes remove cartridge
bench. Remove lower syringe and
replace bleed screw. Some oil may
discharge from bleed port when
removing syring. Remove upper
syringe and replace bleed screw.
MC2 Sealed DAMPER SERVICE
Install Damper cartridge into
stanchion. Using standard cassette
lock-ring tool Torque to 200-220
LB-in [22.6-25 Nm].

20 21
MATTOC / JUNIT 34 / CIRCUS 34 SERVICE GUIDE MATTOC / JUNIT 34 / CIRCUS 34 SERVICE GUIDE
1
2
3
Apply a light coating of semi-bath
(85-0022) to the inner diameter of
the oil seal/dust wiper.
Make sure the spring shaft is fully
with air (30 PSI).
Fully extend the damper shaft.
mattoc pro CASTING INSTALLation
4
5
6
Slide casting onto the stanchion
assembly. Only slide the casting
down about halfway at this point.
Take care that the seal lips do not
fold over upon installation.
Insert 14cc of semi-bath (85-0022)
into each casting leg. Once the
semi-bath is in the legs slide the
casting the rest of the way onto
the stanchion assembly until the
damper and spring shaft adapters
pass thru the end of the casting.
Some manual alignment may be
needed.
Thread the lock-nut onto the
damper shaft adapter. Holding the
lock-nut with a 14mm box wrench,
use an 8mm Hex wrench to tighten
the rebound damper adapter to
35–40 in-lb [3.95–4.5 Nm] by
turning them counter-clockwise.
Do not overtighten, doing so can
damage the threads.
mattoc pro CASTING INSTALLation

22 23
MATTOC / JUNIT 34 / CIRCUS 34 SERVICE GUIDE MATTOC / JUNIT 34 / CIRCUS 34 SERVICE GUIDE
8
7
Thread the other lock-nut onto the
spring shaft adapter. Holding the
lock-nut with a 14mm box wrench,
use an 8mm socket tighten the
compression rod adapter to 35–40
in-lb [3.95–4.5 Nm] by turning
them counter-clockwise. Do not
overtighten, doing so can damage
the threads.
Install the rebound knob using a
2mm Hex wrench. Add a small drop
of blue Loctite to the screw before
installation to prevent the screw
from backing out during riding.
Note: Be sure to hold the knob
still while removing the screw. The
damper adjuster may be damaged
if the knob is over torqued.
mattoc pro CASTING INSTALLation
1
2
4
Install the black “HI-SPEED”
adjustment knob onto adjuster
hex. With a 11mm socket, thread
on the lock nut and torque to 4-6
in-lb [0.5-0.7 Nm] Note: Be sure to
hold the knob still while installing
the nut. The damper adjuster may
be damaged if the knob is over
torqued.
Clean fork and use a shock pump
to set to desired pressure. Lightly
pull the casing away from the CSA
as you add air.
Clean the adjuster knobs with
isopropyl and replace v-seal into
top-cap counter-bore.
3Lubricate o-ring seal on red “LO-
SPEED” adjustment knob with
Slickoleum™ Grease an install onto
adjuster hex. With a 2mm hex,
thread on the screw and torque to
4-6 in-lb [0.5-0.7 Nm] Note: Be
sure to hold the knob still while
installing the screw. The damper
adjuster may be damaged if the
knob is over torqued.
mattoc pro Compression Knob Installation

24 25
MATTOC / JUNIT 34 / CIRCUS 34 SERVICE GUIDE MATTOC / JUNIT 34 / CIRCUS 34 SERVICE GUIDE
1
2
Using a 2mm Hex wrench remove
the screw of the VTT6knob.
Note: Be sure to hold the knob
still while removing the screw. The
damper adjuster may be damaged
if the knob is over torqued.
Use a non-marring pick or pliers
with non-marring barrier to remove
the black VTT knob by lifting
straight up.
3Remove the v-seal that was under
the black VTT adjustment knob.
VTT6 DAMPER SERVICE
4Use a standard cassette tool and 1”
socket to unthread the damper top-
cap from the stanchion.
5
6
Remove damper assembly from the
stanchion. Inspect damper piston
seal for any damage.
Tip out used damper oil from top
of stanchion into drain pan. Cycle
damper shaft serval times to cycle
out old oil from damper.
VTT6 DAMPER SERVICE
26 27
MATTOC / JUNIT 34 / CIRCUS 34 SERVICE GUIDE MATTOC / JUNIT 34 / CIRCUS 34 SERVICE GUIDE
1
2
Using a 2mm Hex wrench remove
the screw of the ABS+ knob.
Note: Be sure to hold the knob
still while removing the screw. The
damper adjuster may be damaged
if the knob is over torqued.
Note: Small detent balls and
springs are located below ABS+
knob.
Knob can be removed by hand.
3Remove detent balls and springs
from the ABS+ top cap.
ABS+ DAMPER SERVICE
4Use 24mm socket to unthread the
damper top cap from the stanchion.
5
6
Remove damper assembly from the
stanchion. Inspect damper piston
seal for any damage.
Tip out used damper oil from top
of stanchion into drain pan. Cycle
damper shaft serval times to cycle
out old oil from damper.
ABS+ DAMPER SERVICE

28 29
MATTOC / JUNIT 34 / CIRCUS 34 SERVICE GUIDE MATTOC / JUNIT 34 / CIRCUS 34 SERVICE GUIDE
1
2
3
Apply a light coating of semi-bath
(85-0022) to the inner diameter of
the oil seal/dust wiper.
Make sure the spring shaft is fully
with air (30 PSI).
Fully extend the damper shaft.
Mattoc exp/comp, JUnit, & Circus casting INSTALL
4
5
6
Slide casting onto the stanchion
assembly. Only slide the casting
down about halfway at this point.
Take care that the seal lips do not
fold over upon installation.
Insert 14cc Mattoc / Circus Pro, 7cc
JUnit 34 of semi-bath (85-0022)
into each casting leg. Once the
semi-bath is in the legs slide the
casting the rest of the way onto
the stanchion assembly until the
damper and spring shaft adapters
pass thru the end of the casting.
Some manual alignment may be
needed.
Thread the lock-nut onto the
damper shaft adapter. Holding the
lock-nut with a 14mm Pro/Expert,
19mm Comp box wrench, use an
8mm Hex wrench to tighten the
rebound damper adapter to 35–40
in-lb [3.95–4.5 Nm] by turning
them counter-clockwise. Do not
overtighten, doing so can damage
the threads.
Mattoc exp/comp, JUnit, & Circus casting INSTALL

30 31
MATTOC / JUNIT 34 / CIRCUS 34 SERVICE GUIDE MATTOC / JUNIT 34 / CIRCUS 34 SERVICE GUIDE
8
7
Thread the other lock-nut onto
the spring shaft adapter. Holding
the lock-nut with a 14mm Pro /
Expert, 19mm Comp box wrench,
use an 8mm socket tighten the
compression rod adapter to 35–40
in-lb [3.95–4.5 Nm] by turning
them counter-clockwise. Do not
overtighten, doing so can damage
the threads.
Install the rebound knob using a
2mm Hex wrench. Add a small drop
of blue Loctite to the screw before
installation to prevent the screw
from backing out during riding.
Note: Be sure to hold the knob
still while removing the screw. The
damper adjuster may be damaged
if the knob is over torqued.
Mattoc exp/comp, JUnit, & Circus casting INSTALL
1Fill damper leg about 3/4 full with
Maxima fork oil (85-0023).
3
2Install the axle into the fork without
a hub or wheel. Cover the damper
leg opening with a lint-free towel.
Using a wood block or similar
raised support underneath the axle,
compress the fork 10-15 times.
The raised support should be
wide enough and long enough to
safely support the axle as well as
tall enough to eliminate contact
rebound knob. Do not overtighten
the axle bolt.
With the fork fully extended add oil
to the height of 75mm measured
from the top of the stanchion.
NOTE: OIL HEIGHT IS SET WITH
FORK FULL EXTENDED AND
CASTING INSTALLED
VTT6 and ABS+ DAMPER Installation
32 33
MATTOC / JUNIT 34 / CIRCUS 34 SERVICE GUIDE MATTOC / JUNIT 34 / CIRCUS 34 SERVICE GUIDE
4With a 2mm hex, thread on the
screw and torque to 4-6 in-lb [0.5-
0.7 Nm] Note: Be sure to hold
the knob still while installing the
screw. The damper adjuster may
be damaged if the knob is over
torqued.
With the VTT6 / ABS+ adjuster in
the OPEN/ full counter clockwise
position, install damper assembly
into stanchion. Using a standard
cassette lock-ring tool for VTT6, or
a 24mm socket for ABS+ to 200-
220 LB-in [22.6-25 Nm].
6
Clean the adjuster knobs with
isopropyl and replace v-seal
into damper top cap. Install the
black VTT6 adjustment knob onto
adjuster hex, being sure the knob
can fully rotate without contacting
the crown.
5
VTT6 and ABS+ DAMPER Installation
Clean fork and use a shock pump
to set to desired pressure. Lightly
pull the casting away from the CSA
as you add air. See set-up sheet for
recommended air pressures.
7
VTT6 and ABS+ DAMPER Installation
Option: ABS+ Install springs and
ball bearings into ABS+ top cap.
A small dab of grease on top of
the spring can help hold the ball
bearings in place.
34 35
MATTOC / JUNIT 34 / CIRCUS 34 SERVICE GUIDE MATTOC / JUNIT 34 / CIRCUS 34 SERVICE GUIDE
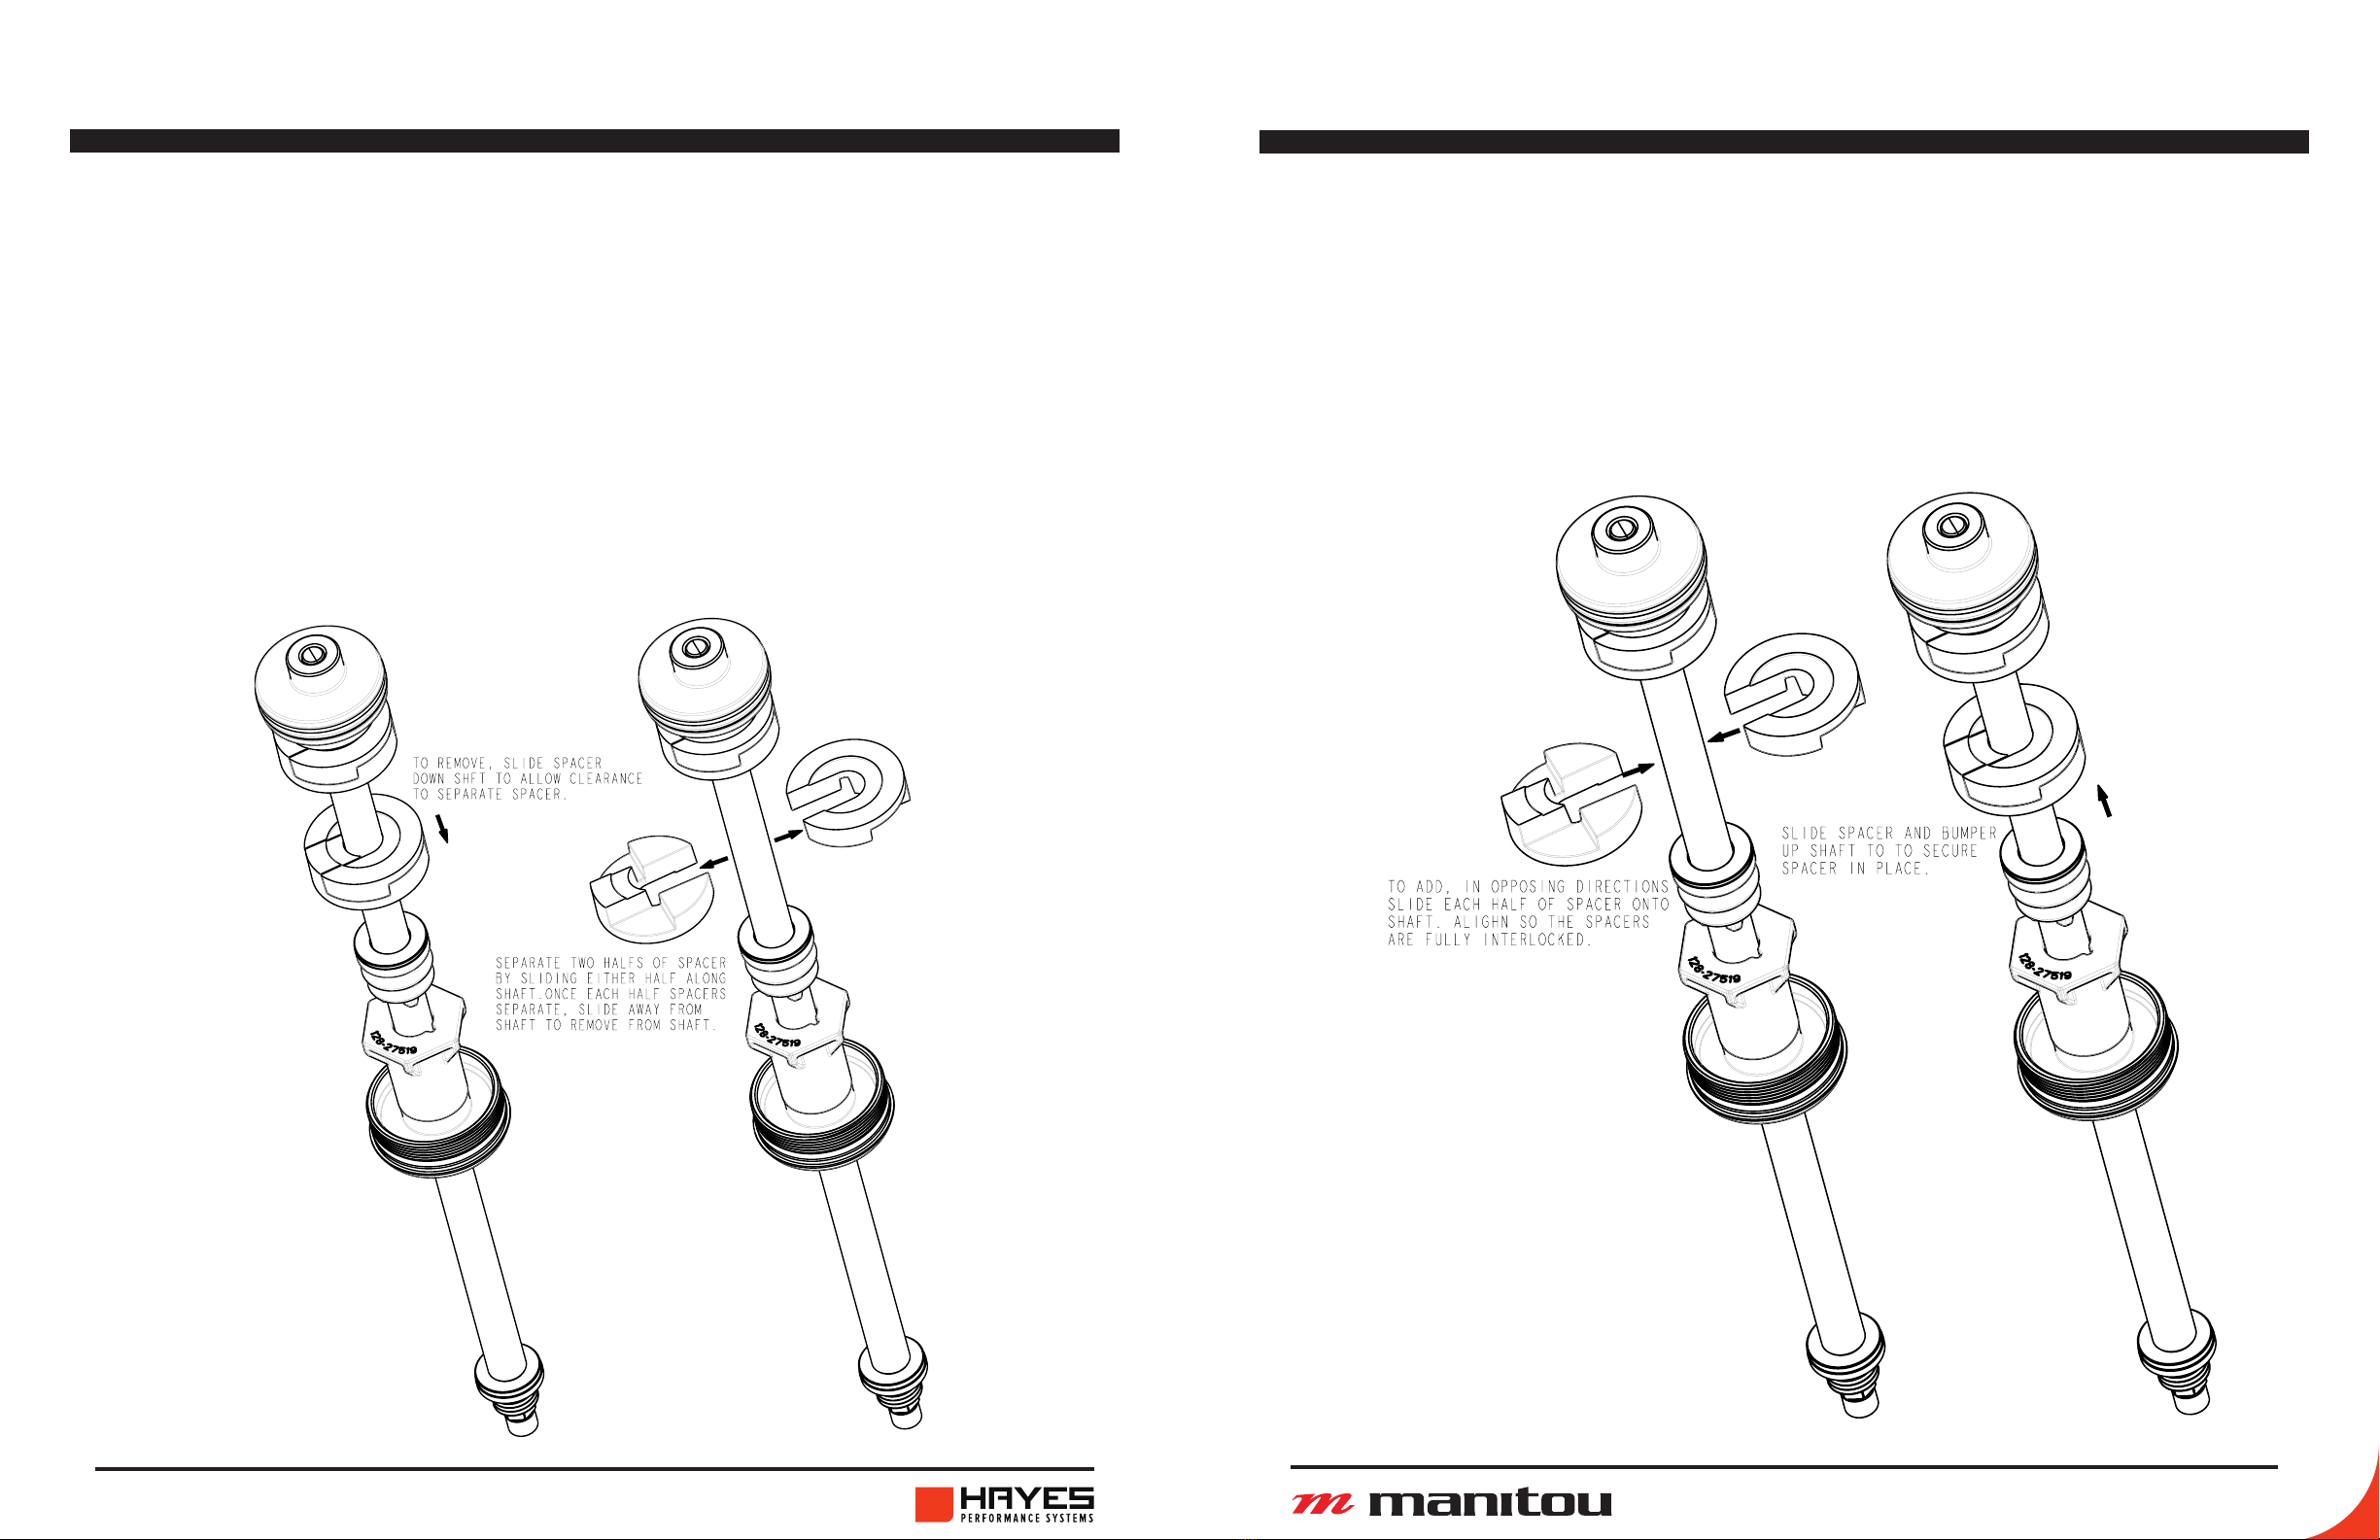
remove the compression rod assembly. For travel change on new forks,
bath oil may be preserved by removing stanchion assembly while fork is
into the desired amount of travel using the charts on the following pages.
Increasing Travel: Each spacer removed increase travel & axel-to-crown by 10mm.
Note: Mattoc Pro / Expert and Circus Pro use a two piece spacer. (use note below about
seperating them). Mattoc Comp, JUnit Pro / Expert use a once piece spacer that clips
onto the comp rod.
travel change
increasing travel
decreasing travel
Decrease Travel: Each spacer added decreases travel & Axel-To-Crown by 10mm.
Note: Mattoc Pro / Expert and Circus Pro use a two piece spacer. (use note below about
seperating them). Mattoc Comp, JUnit Pro / Expert use a once piece spacer that clips
onto the comp rod.
travel change

36 37
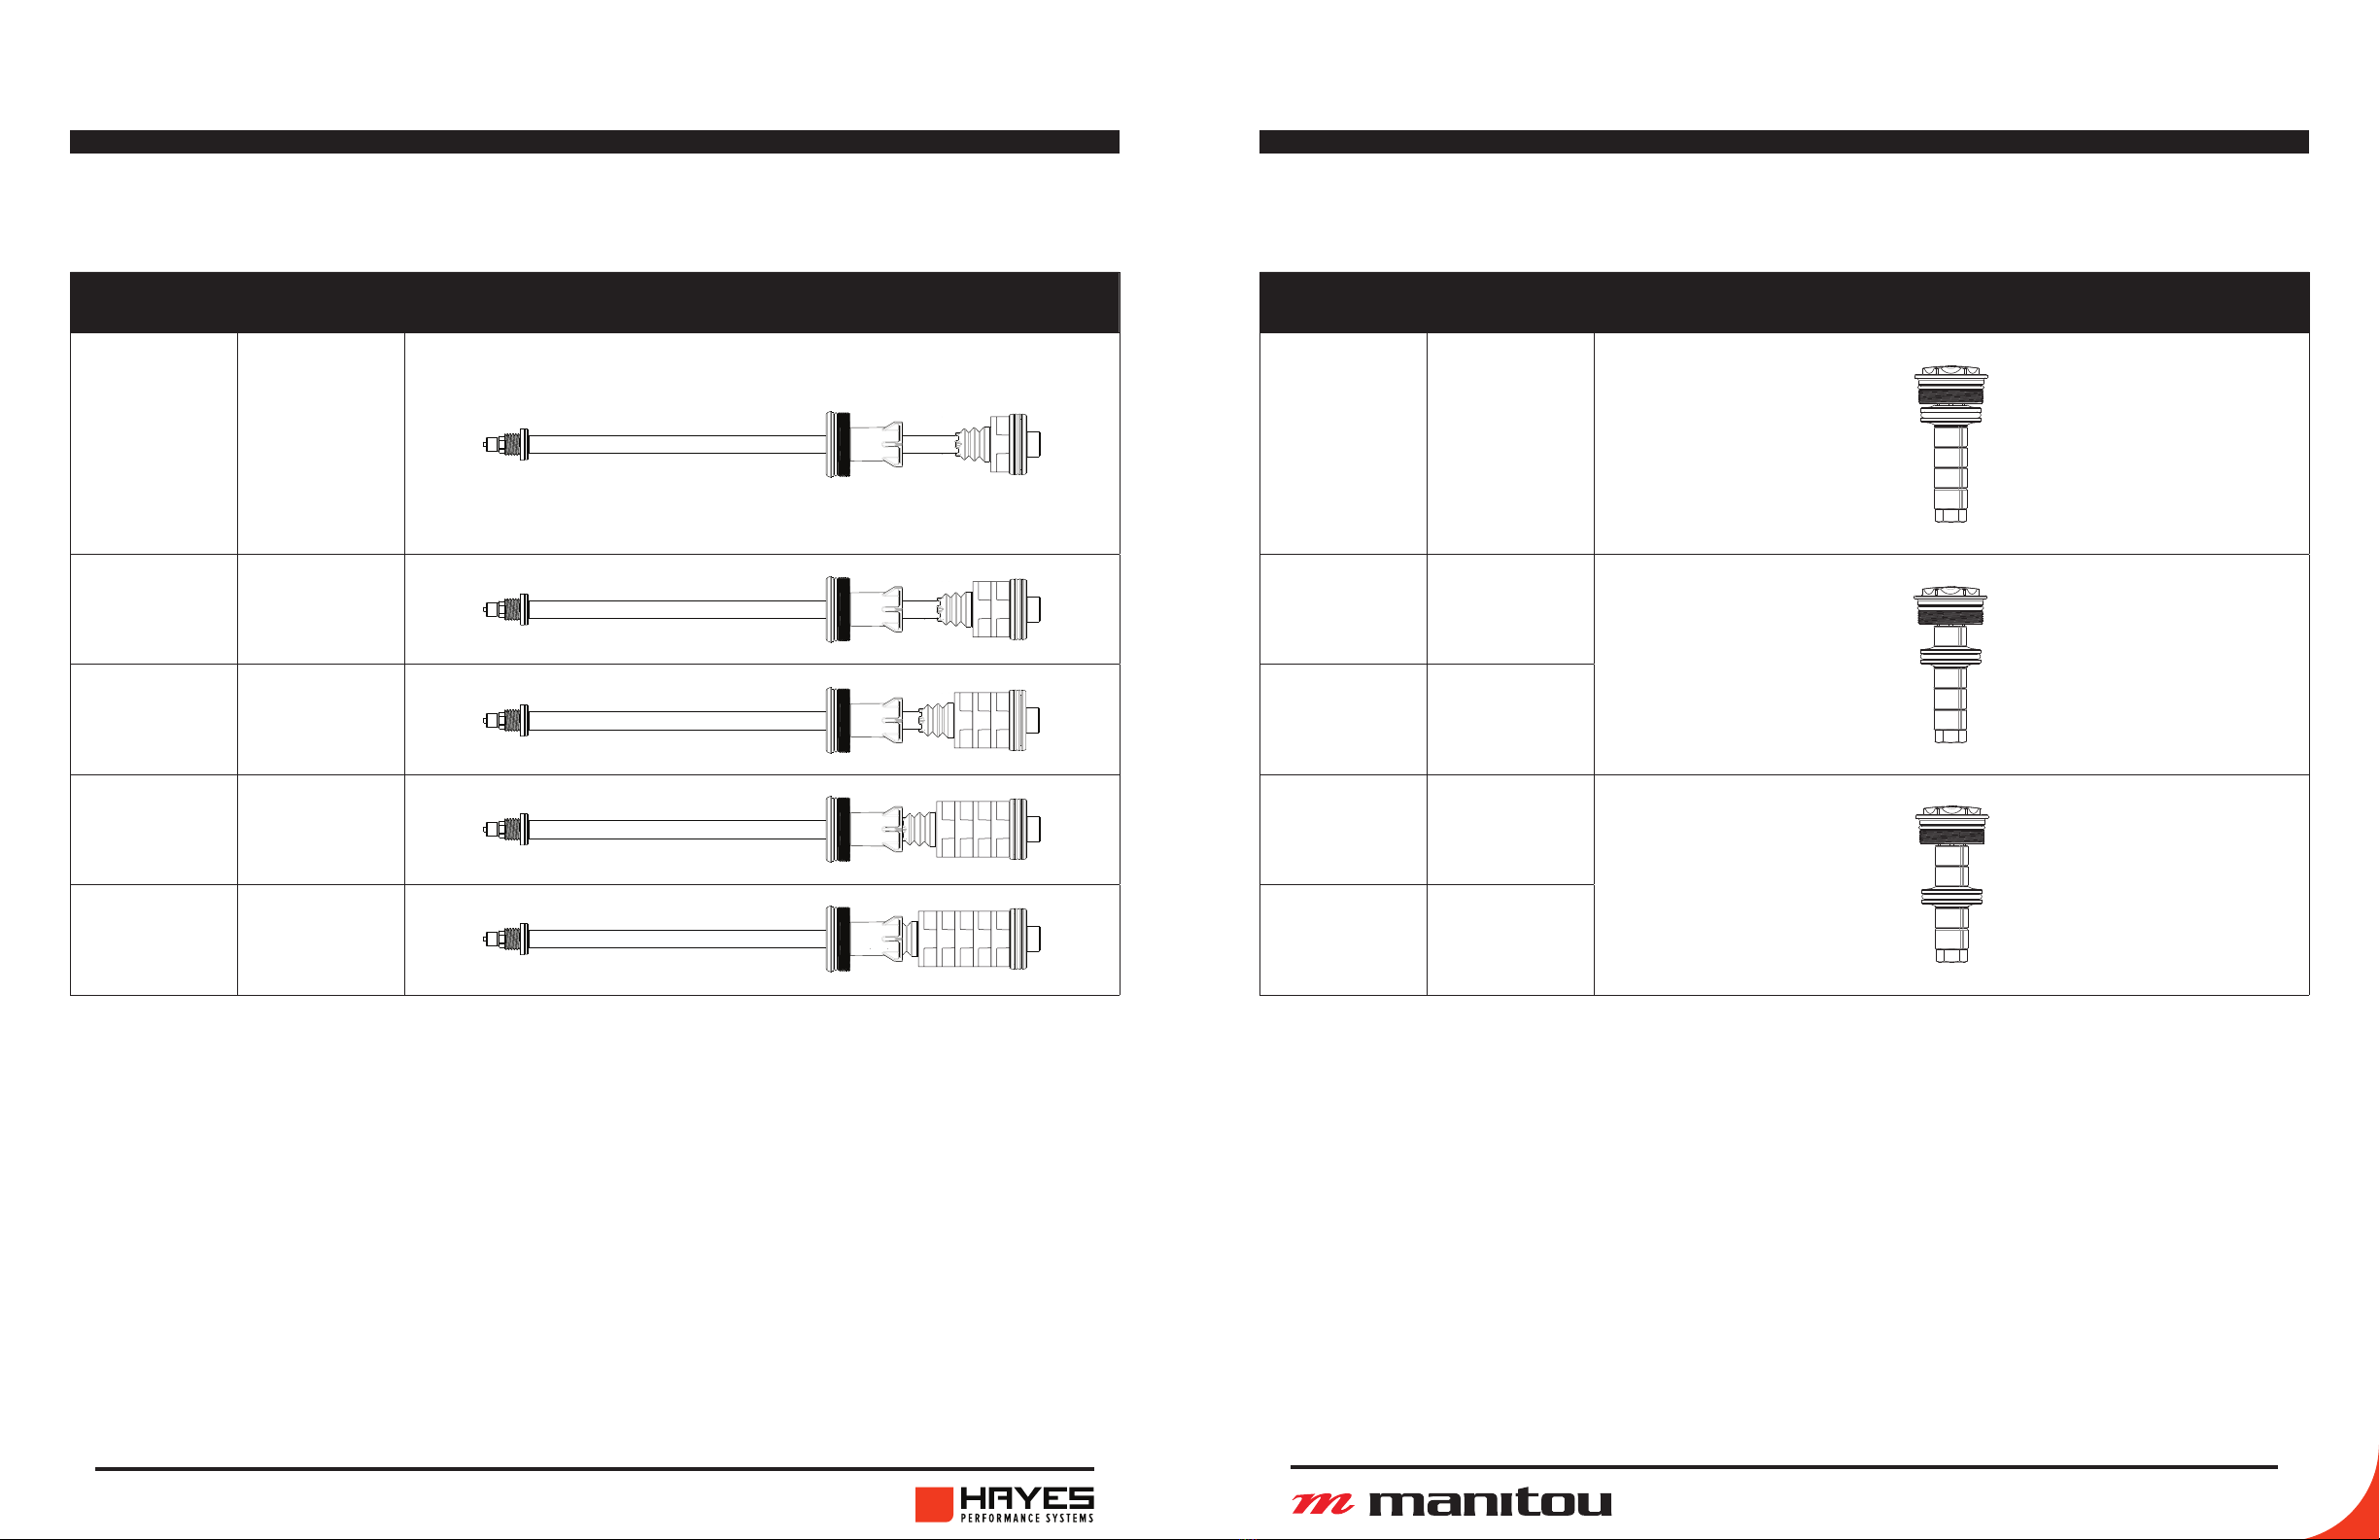
MATTOC / JUNIT 34 / CIRCUS 34 SERVICE GUIDE MATTOC / JUNIT 34 / CIRCUS 34 SERVICE GUIDE
Mattoc Pro / Expert TRAVEL SPACERs Mattoc Expert IVA SETTING
# OF SPACERS TRAVEL DEPICTION
0 150
1 140
2 130
3 120
4 110
TRAVEL IVA POSITION DEPICTION
150 1
140 2
130 2
120 3
110 3
38 39
MATTOC / JUNIT 34 / CIRCUS 34 SERVICE GUIDE MATTOC / JUNIT 34 / CIRCUS 34 SERVICE GUIDE
Mattoc comp TRAVEL SPACERs Mattoc comp IVA SETTING
# OF SPACERS TRAVEL DEPICTION
1 150
2 140
3 130
4 120
5 110
TRAVEL IVA POSITION DEPICTION
150 1
140 2
130 2
120 3
110 3
This manual suits for next models
5
Table of contents
Other Manitou Bicycle Accessories manuals

Manitou
Manitou Mara Pro User manual

Manitou
Manitou Mattoc User manual

Manitou
Manitou 2001 MARS User manual

Manitou
Manitou DORADO User manual

Manitou
Manitou BLACK COMP 80/100 User manual

Manitou
Manitou Jack SL Dropper Seat Post User manual

Manitou
Manitou Circus Expert User manual

Manitou
Manitou MARA PIGGYBACK User manual

Manitou
Manitou DORADO EXPERT 37MM User manual

Manitou
Manitou XVERT R User manual


