manuals.online logo
Brands
  1. Home
  2. •
  3. Brands
  4. •
  5. Manrose
  6. •
  7. Fan
  8. •
  9. Manrose VIVO FAN7291 User manual

Manrose VIVO FAN7291 User manual

FOR YOUR SAFETY
• Use this heat-fan-light unit only as described in this manual. Any other use not recommended by the manufacturer may cause fire, electric shock,
or injury to persons. If you have questions, contact the manufacturer or local agent.
• To prevent electrical shock, please ensure that power is DISCONNECTED before installing.
• All wiring must be carried out by a licensed electrician in accordance with all national wiring codes.
• When cutting into the ceiling, do not damage electrical wiring and other hidden utilities.
• The heat-fan-light unit must be properly earthed.
• This appliance is not intended for use by persons (including children) with reduced physical, sensory or mental capabilities, or lack of experience and knowledge,
unless they have been given supervision or instruction concerning use of the appliance by a person responsible for their safety.
• Children should be supervised to ensure that they do not play with the unit.
• The surface is extremely hot when in use. Allow surface to cool sufficiently before touching or replacement.
• Exhaust fans may adversely affect the safe operation of burning gas or other fuels (including those in other rooms) due to back flow of combustion gases.
These gases can potentially result in carbon monoxide poisoning. After installation of an exhaust fan such as a partition fan or a duct fan the operation of
flued gas appliances should be tested by a competent person to ensure that back flow of combustion gases does not occur.
• Any alterations or additions to building wiring must be completed by a licensed electrician or person authorised by legislation to work on the fixed wiring of
any electrical installation.
INTRODUCTION AND CONSIDERATIONS
• Read these instructions carefully before installing & using the product.
• Always operate this product from a power source of the same voltage, frequency and rating as indicated on rating label.
• This product is designed for installation in flat ceilings only. Don’t mount on a sloping ceiling or a vertical wall.
• Locate and install the product in accordance with the requirements of AS/NZS 3000 and local building codes.
Do not install in a location where there is a possibility of water splashing into the heater.
INSTALLATION INSTRUCTIONS AND HOLE-CUTTING TEMPLATE
READ AND SAVE THESE INSTRUCTIONS! Please use this card as a cutting template 590mm x 320mm
VENTILATION REQUIREMENTS
For the exhaust fan to work efficiently, replacement air of a volume equivalent to what is being extracted must be able to enter the room.
Generally, air would be drawn under the door (20mm undercut), or through a slightly open window. If the room is airtight, the fan will
operate poorly. Air flow path should ideally pass over the steam source.
Before commencing any cutting, check in the ceiling space that there are no obstructions such as ceiling joists and that there is sufficient
height clearance for the housing. Check that the electrical wiring can be routed from the wall switches to the mounting location.
The appliance shall, under no circumstances, be covered with insulating, or similar, material.
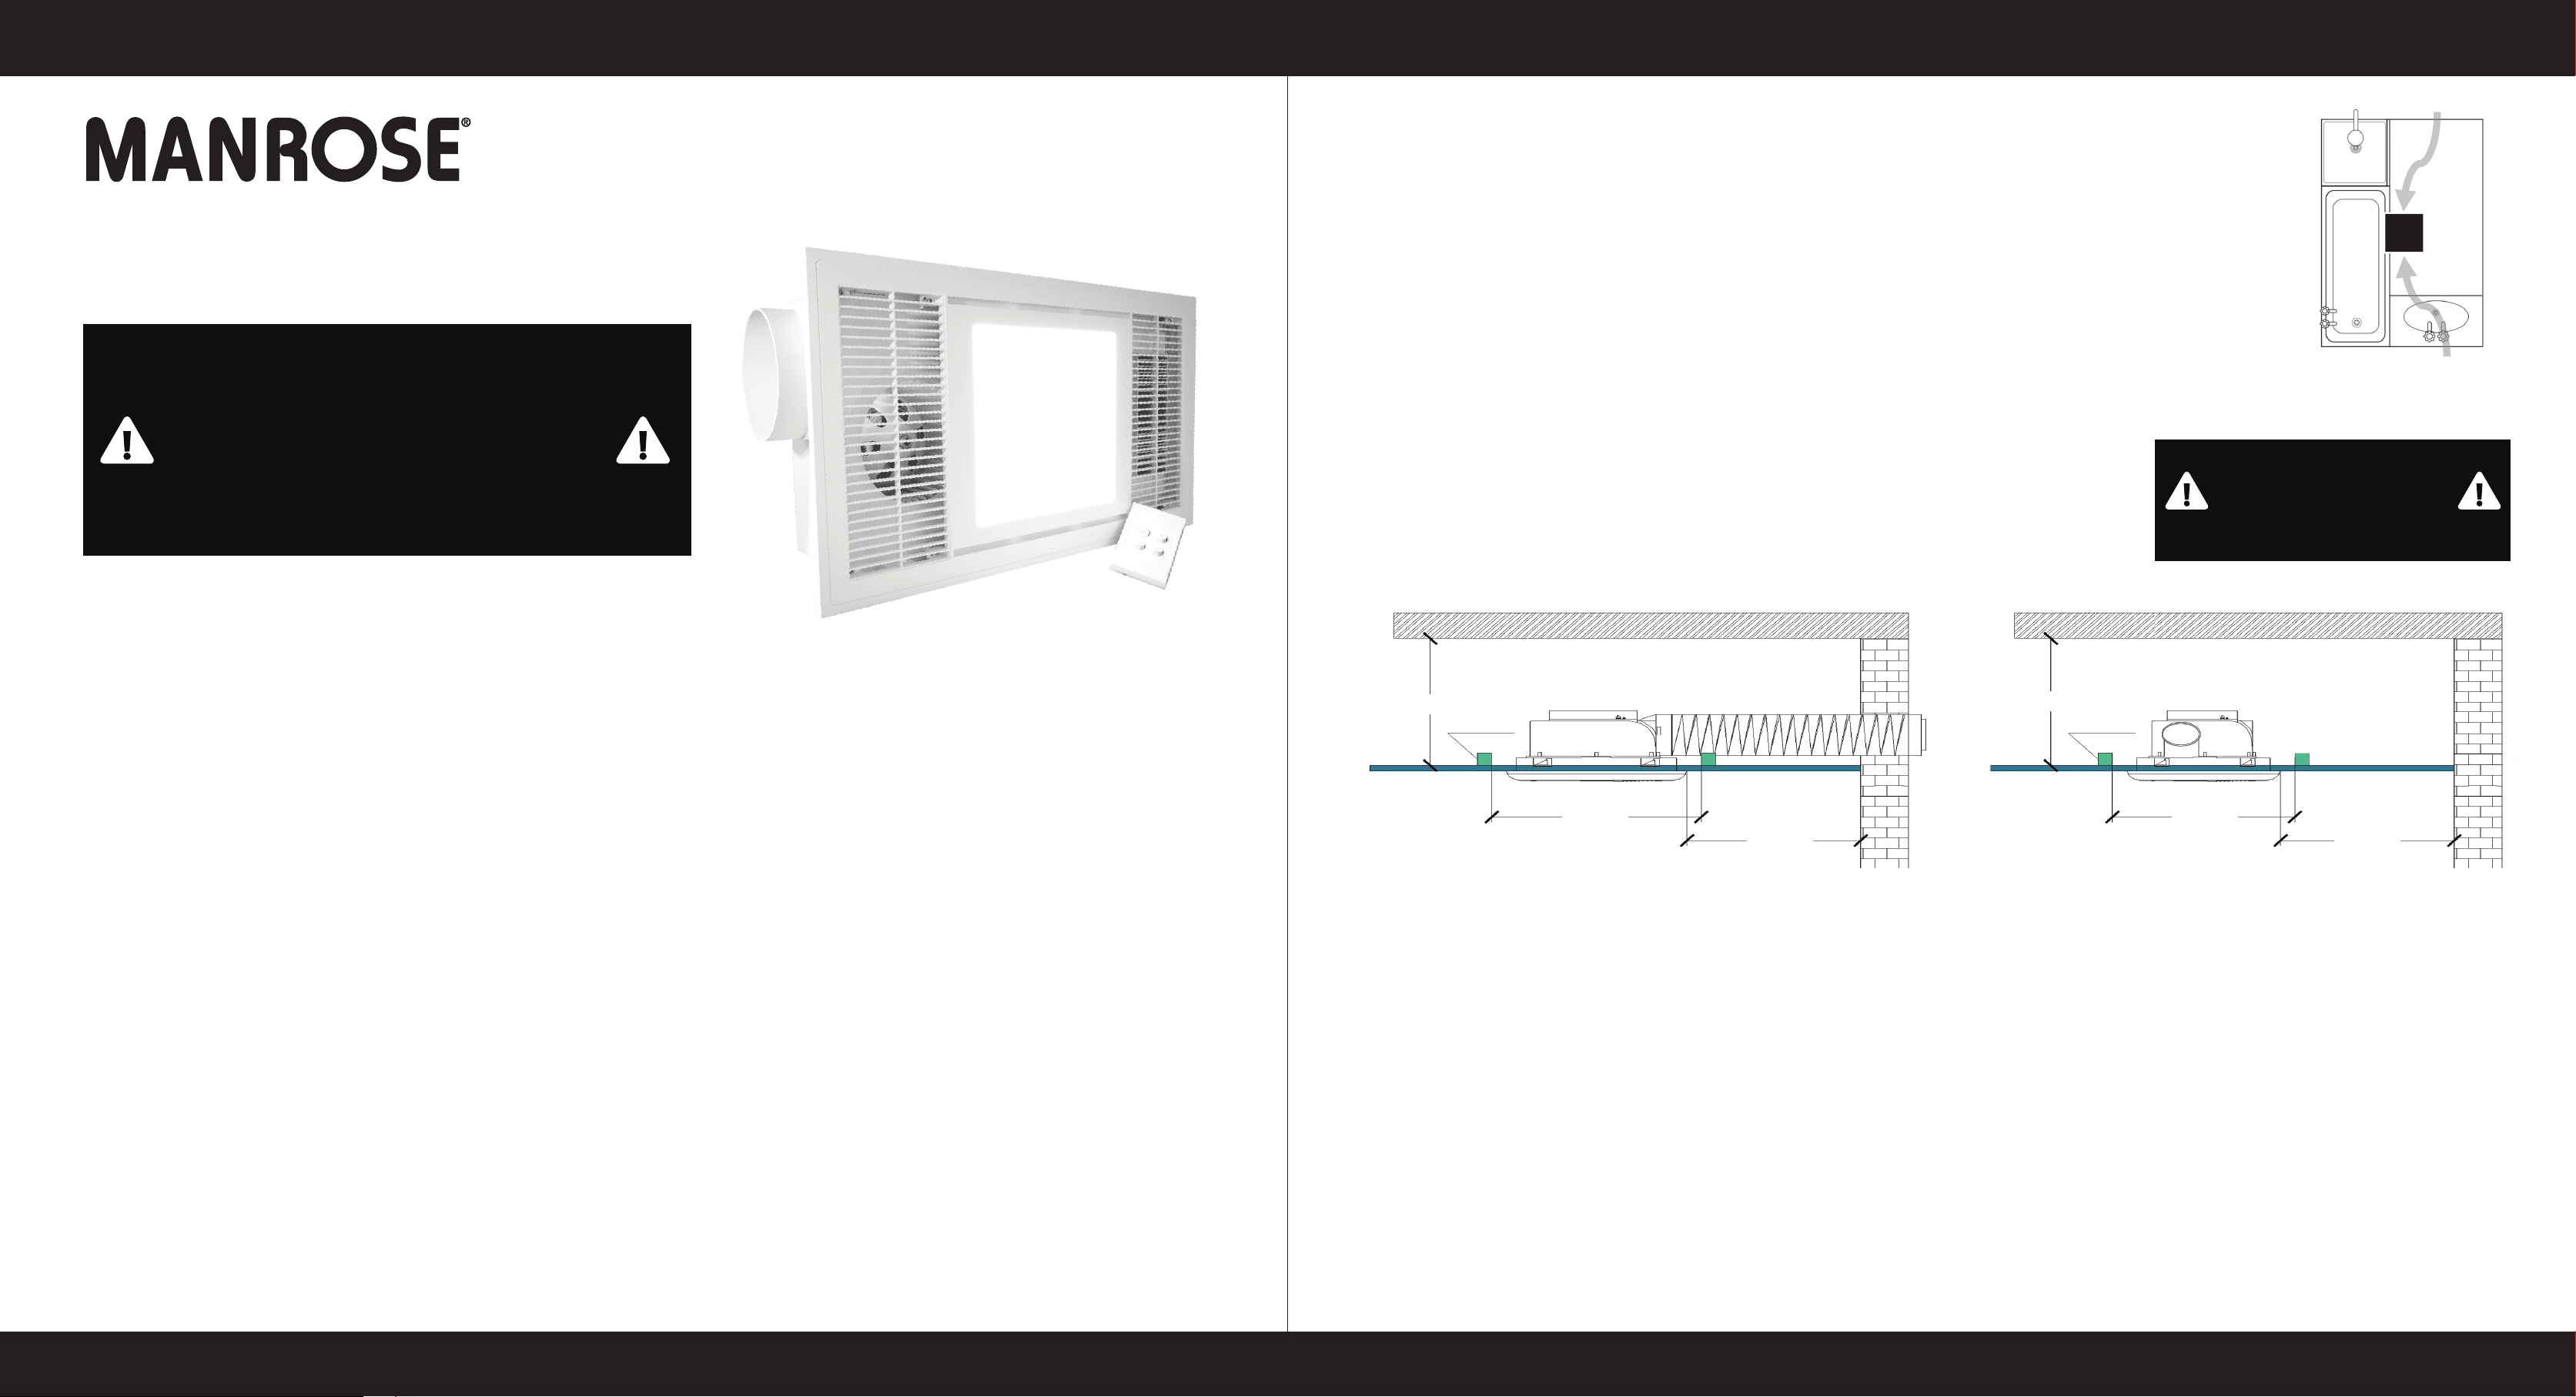
CLEARANCE REQUIREMENTS
• This unit must be mounted at least 250mm away from vertical walls.
• A minimum clearance of 100mm is required above the top of the unit.
• Additionally a minimum of 50mm clearance is required between the sides of unit and joists, walls or insulation.
• The minimum clearance distance of 100 mm from the top of the luminaire to any normally flammable building element.
• The minimum clearance distance of 100 mm from the top of the luminaire to any building insulation.
• The minimum clearance distance of 50 mm from the side of the luminaire to any normally flammable building element.
• The minimum clearance distance of 50 mm from the side of the luminaire to any building insulation.
INSTALLATION
1 This unit must be mounted at least 2.1 meters above the floor and at least 250mm away from vertical walls.
2 Ensure area behind the installation location is clear of all cables, pipes, joists or hidden utilities.
3 Use the template provided to mark and cut a hole in the ceiling (Refer specifications for hole size) ensure sufficient space for the clamping arms to operate.
Ensure the gap between the clamping arm and lip of the body is slightly larger than the thickness of the ceiling. Adjust accordingly.
4 Remove rear terminal cover and connect wires as per wiring diagram below. Refit terminal cover.
Note: Connect ducting (if required) after the unit is installed in the ceiling.
5 Gently insert the unit into the cut out hole ensuring to move the side clamping arms inwards so that the body can pass through the hole without damaging the plasterboard.
Rotate all 6 clamping arms out using the levers then tighten the 6 screws to clamp and secure the unit.
6 Connect the LED panel power connector.
7 Attach the fascia to the body aligning the “HEATER” marking in the inside of the fascia with the “HEATER” marking on the HFL body and tighten screws avoid overtightening
DO NOT use an electric drill or impact driver.
8 Attach ducting to extract the air to the soffit or outer wall using 3m long flexible ducting, duct clamp and vent outlet grille provided.
Fix and tighten duct clamp firmly to hold the flexible duct to the unit and the outer wall vent.
VIVO INTEGRATED BATHROOM HEAT-FAN-LIGHT
MODEL: FAN7291
IMPORTANT
This integrated VIVO bathroom heat-fan-light unit must be
installed by a registered electrician and its installation and
connection to the power supply must comply with all current
Australian and New Zealand electrical and building regulations
including AS/NZS3000, or latest edition thereof.
The power supply cable must be suitably rated by a registered
electrician to satisfy the total load on that circuit.
Door
Airflow
Window
WARNING
RISK OF OVERHEATING OR FIRE
IF THE CLEARANCE DISTANCES
ARE COMPROMISED.
Please read all instructions before commencing installation.
Ceiling
Ceiling Joist
Heater Ventiduct
≥250mm
LED Luminaire
≥220mm
≥685mm
Ceiling
Ceiling Joist
Heater
≥250mm
LED Luminaire
≥220mm
≥415mm
Front View Right Side View
ELECTRICAL WIRING DIAGRAM
1) Ensure the power is switched “OFF” at the mains before commencing installation.
2) Remove the cover on the back of the enclosure to access the terminals.
3) Connect wires as per electrical wiring diagram and markings adjacent to terminal block.
4) Replace the cover removed earlier.
This unit uses PTC heating as a heat source. It also has an extract fan, a heater fan and an LED panel.
The remote switch operation is described below:
1. Lighting - “LIGHT” switch turns on and off the LED light panel
2. Extract - “EXTRACT” switch On/Off. This unit can exhaust odours and steam in a quick and efficient way by turning on the “EXTRACT” switch.
3. Heating - Left “HEAT 1” switch turns on PTC heater and blower fan (1400W)
Right “HEAT 2” switch boosts the heating power of the PTC heater (2000W).
The PTC heater and fan will not run if the left “HEAT 1” switch is off.
Fill out the following details and file along with your purchase receipt and certificate of safety.
Instructions are subject to change without notice.
Model No.:
Purchased from:
Purchased date:
WARRANTY
This unit is warranted against defects in manufacturing and workmanship for a period of 5 years. The warranty does not extend to installation of the unit
or any associated wiring or any damage caused by installation or wiring.
The installation must be conducted by a registered electrician and a suitable certificate of safety is to be issued by the electrician who installed the unit.
Warranty claims will be voided unless a certificate of safety can be produced when required, prior to service or repair.
This warranty does not cover damages or loss caused by:
1. Any consequential losses arising from incorrect installation or operation or maintenance of this product.
2. Any consequential losses arising from incorrect wiring of this product.
3. Any modifications or changes made to the unit, other than those recommended by the manufacturer.
CLEANING
• Switch off the power before commencing cleaning and wait until the heater cools down.
• Regularly wipe front fascia with a soft cloth soaked with water or neutral detergent if required.
• Clean the exhaust fan from dust and dirt with dry or wet cloth if required.
• Clean the exhaust ducting kit and ensure airways are clean and there are no obstructions at the exit from the wall.
LIST OF COMPONENTS SUPPLIED
VIVO Bathroom Heat Fan Light Unit 1 piece
Ø125mm Duct 3m Length 1 piece
Exterior Grille 1 piece
4 Gang Wall Switch 1 piece
Installation instruction and cutting template 1 piece
INSTALLATION INSTRUCTIONS AND HOLE-CUTTING TEMPLATE
READ AND SAVE THESE INSTRUCTIONS! Please use this card as a cutting template 590mm x 320mm
C
C
N
L
Back Side of 4 Gang Wall Switch
VIVO Heat Fan Light Unit
230V AC 50Hz
N
EXTRACT
LIGHT
HEAT 2
HEAT 1
L
PTC
LED
Thermostat
Heat Blower
Fan Motor
Extract Fan
Motor
LED Drive
HEAT 1 HEAT 2
EXTRACT LIGHT
LAMPS
LED panel – FAN7291: DC25-40V, 0.6A, 20W, 1900 lm, Cool White (4000K).
The light source of this luminaire is not replaceable when the light source reaches its end of life the whole luminaire should be replaced.
MAIN TECHNICAL PARAMETERS
Input Power Free Air
Fan Performance
Static
Pressure
Sound Level
@ 3m Hole-cutting Size IP Rating Dimensions
(W x H x D) Weight
220-240V AC
50Hz 2100W 115Pa 92 l/s, 330m3/hr 49.5dB(A) 590mm x 320mm IPX2 5.6kg350mm x 630mm x 145mm
Distributed by Simx Limited
PO Box 14347, Panmure, Auckland 1741, New Zealand
e [email protected] I w www.manrose.co.nz PUB1738 2208
AIRFLOW BY DUCT LENGTH

Other Manrose Fan manuals

Manrose 100T Assembly instructions

Manrose

Manrose 100T Assembly instructions

Manrose FAN0090 User manual

Manrose

Manrose FAN0090 User manual

Manrose FAN5369 User manual

Manrose

Manrose FAN5369 User manual

Manrose Aria 250 Motor User manual

Manrose

Manrose Aria 250 Motor User manual

Manrose MET Series Assembly instructions

Manrose

Manrose MET Series Assembly instructions

Manrose FAN7189 User manual

Manrose

Manrose FAN7189 User manual

Manrose LED Series User manual

Manrose

Manrose LED Series User manual

Manrose LED Series Installation guide

Manrose

Manrose LED Series Installation guide

Manrose FAN0618 User manual

Manrose

Manrose FAN0618 User manual

Manrose EXTRACT-A-LITE Service manual

Manrose

Manrose EXTRACT-A-LITE Service manual

Manrose CQF100 User manual

Manrose

Manrose CQF100 User manual

Manrose Quiet Fan Series Assembly instructions

Manrose

Manrose Quiet Fan Series Assembly instructions

Manrose intellivent 2.0 User manual

Manrose

Manrose intellivent 2.0 User manual

Manrose FAN0085 User manual

Manrose

Manrose FAN0085 User manual

Manrose Classic Series User manual

Manrose

Manrose Classic Series User manual

Manrose MRUF150WH Assembly instructions

Manrose

Manrose MRUF150WH Assembly instructions

Manrose CRA100T User manual

Manrose

Manrose CRA100T User manual

Manrose FAN7191 User manual

Manrose

Manrose FAN7191 User manual

Manrose Classic Series User manual

Manrose

Manrose Classic Series User manual

Manrose Quiet Fan Conceal X5 S Assembly instructions

Manrose

Manrose Quiet Fan Conceal X5 S Assembly instructions

Manrose LEDSLKTC Assembly instructions

Manrose

Manrose LEDSLKTC Assembly instructions

Manrose FAN7500 User manual

Manrose

Manrose FAN7500 User manual

Manrose FAN0616 User manual

Manrose

Manrose FAN0616 User manual

Manrose HYPER150 EC User manual

Manrose

Manrose HYPER150 EC User manual

Popular Fan manuals by other brands

Valueline VL-SFN16 manual

Valueline

Valueline VL-SFN16 manual

emerio TFN-214470.1 instruction manual

emerio

emerio TFN-214470.1 instruction manual

ALDI STIRLING Black Edition TF4601TR-S instruction manual

ALDI

ALDI STIRLING Black Edition TF4601TR-S instruction manual

Minka Group minkaAire SKYHAWK Instruction manual warranty certificate

Minka Group

Minka Group minkaAire SKYHAWK Instruction manual warranty certificate

Craftmade Quest CQ52 Specifications

Craftmade

Craftmade Quest CQ52 Specifications

Viessmann Vitovent 300-W Installation and service instructions

Viessmann

Viessmann Vitovent 300-W Installation and service instructions

Truma TEB-3 installation instructions

Truma

Truma TEB-3 installation instructions

BCP SKY5330 instruction manual

BCP

BCP SKY5330 instruction manual

Broan ERV140TE installation guide

Broan

Broan ERV140TE installation guide

TemperZone OPA 465RKTB Installation & maintenance

TemperZone

TemperZone OPA 465RKTB Installation & maintenance

Rosenberg SupraBox COMFORT 800H operating instructions

Rosenberg

Rosenberg SupraBox COMFORT 800H operating instructions

Tecnosystemi ACC500002 user manual

Tecnosystemi

Tecnosystemi ACC500002 user manual

Somogyi Elektronic home SFI 45 instruction manual

Somogyi Elektronic

Somogyi Elektronic home SFI 45 instruction manual

ELECTROTEK ET-F18SF instruction manual

ELECTROTEK

ELECTROTEK ET-F18SF instruction manual

AIRBORNE Activ Installation & user manual

AIRBORNE

AIRBORNE Activ Installation & user manual

Broan SPK110 SPEAKER FAN instructions

Broan

Broan SPK110 SPEAKER FAN instructions

Vents Quiet 100 DC user manual

Vents

Vents Quiet 100 DC user manual

Prem-I-Air EH0127 quick start guide

Prem-I-Air

Prem-I-Air EH0127 quick start guide

manuals.online logo
manuals.online logoBrands
  • About & Mission
  • Contact us
  • Privacy Policy
  • Terms and Conditions

Copyright 2025 Manuals.Online. All Rights Reserved.