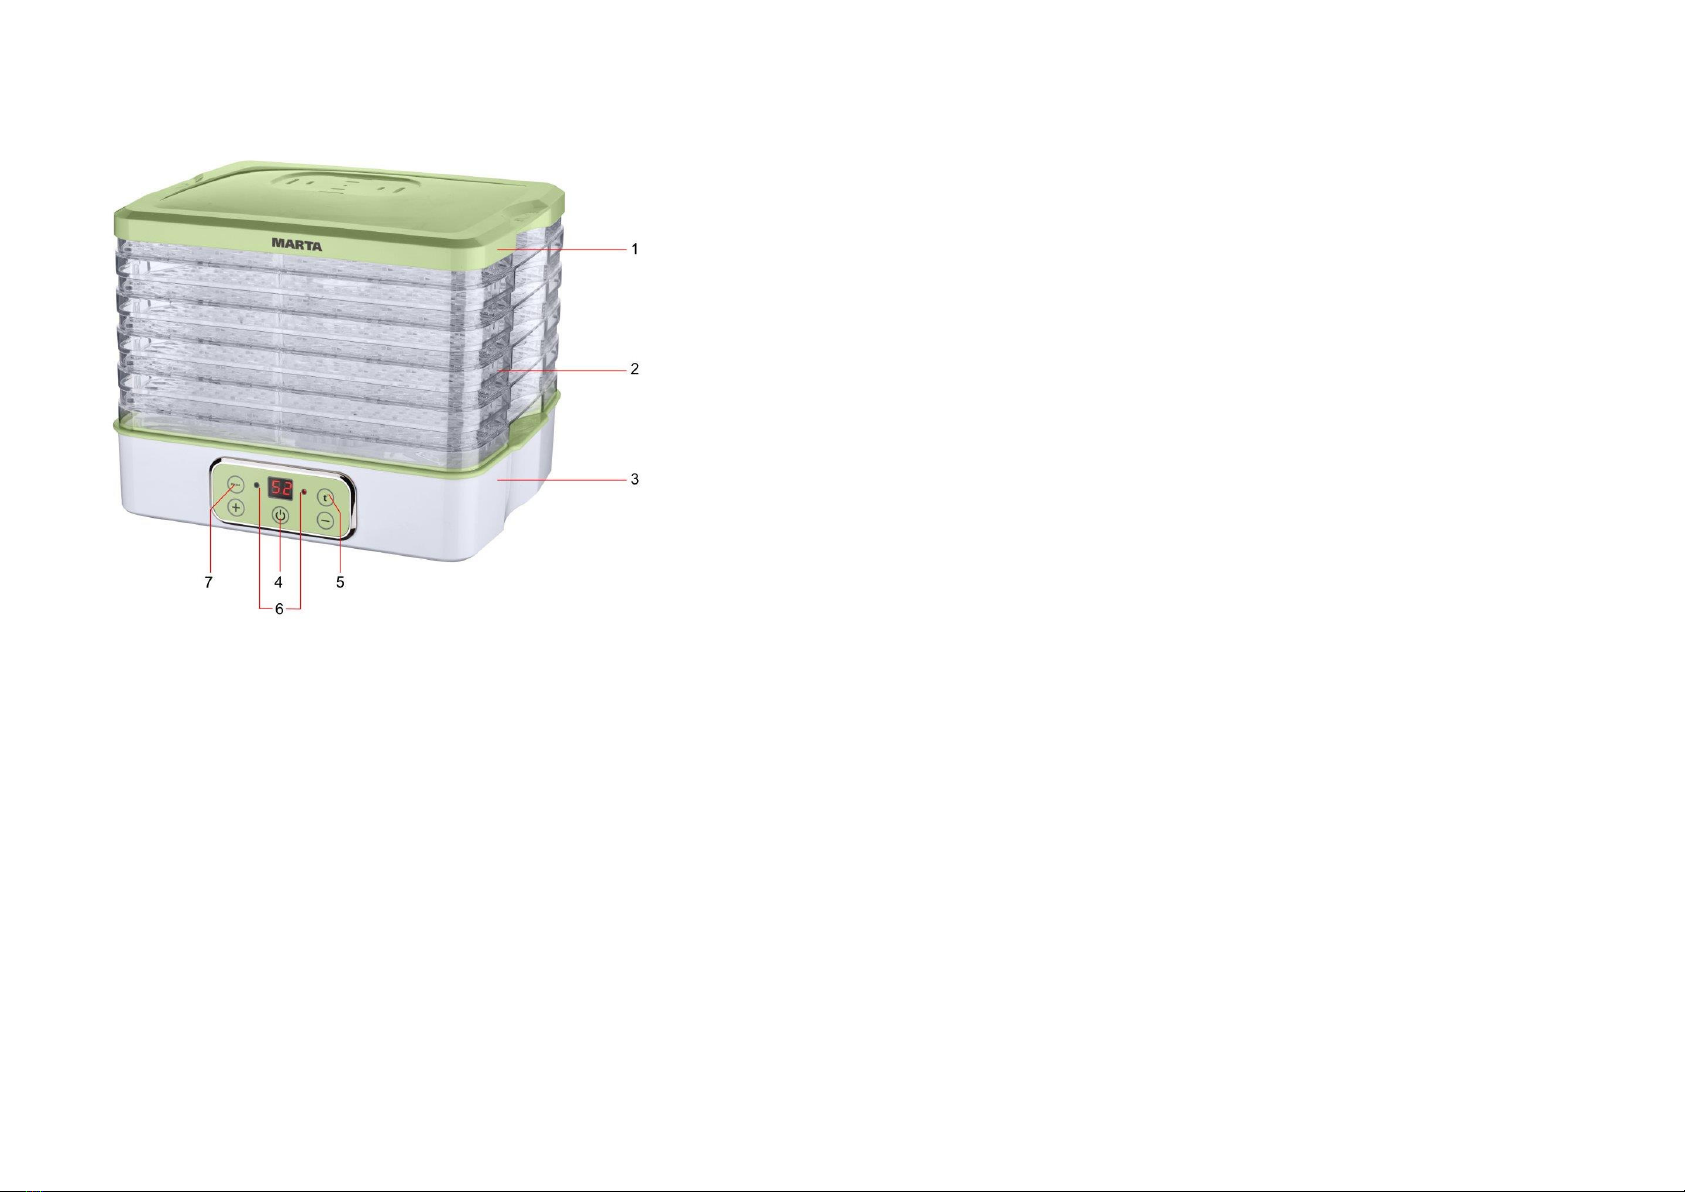
Marta MT-1949 User manual

1
/ Electric food dryer
User manual
MT-1949
RUS
3
GBR
User manual
10
UKR
15
KAZ
17
BLR
18
DEU
Bedienungsanleitung
20
ITA
Manuale d`uso
21
ESP
Manual de instrucciones
22
FRA
Notice dĶutilisation
24
PRT
Manual de instruхões
25
EST
Kasutusjuhend
26
LTU
Naudojimo instukcija
28
LVA
LТОЭШšКЧs istrukcia
29
FIN
KтвЭЭôШСУО
30
ISR
32
POL
IЧЬЭЫЮФМУК ШЛЬłЮРТ
33
UZB
FШвНКХКЧТЬС ЛШ„вТМСК вШ„ЫТqЧШЦК
34

2
RUS .
.
GBR Real set of the appliance could be different from listed in the User manual. Check once buy.
DEU DОЫ ЭКЭЬтМСХТМСО AЮЬЬЭКЭЭЮЧР ПùЫ НТОЬОЬ PЫШНЮФЭ ФКЧЧ ЯШЧ НОЫ ТЧ НТОЬОЫ BОНТОЧЮЧРЬКЧХОТЭЮЧР КЧРОРОЛОЧОЧ AЮЬЬЭКЭЭЮЧР КЛаОТМСОЧ.
PЫùПОЧ SТО РОЧКЮ НТО VШХХЬЭтЧНТРФОТЭ НОЫ АКЫО атСЫОЧН НОЫ АКЫОЧКЮЬРКЛО НЮЫМС НОЧ VОЫФтЮПОЫ.
ITA La completezza effettiva НОХ ЩЫШНШЭЭШ ЩЮѐ НТППОЫТЫО НК qЮОХХК НТМСТКЫКЭК ТЧ qЮОЬЭШ ЦКЧЮКХО. CШЧЭЫШХХКЫО КЭЭОЧЭКЦОЧЭО ХК МШЦЩХОЭОггК
alla consegna del prodotto dal venditore.
KAZ .
.
LTU FКФЭТЧТЬ šТШЬ ЩЫОФЬ ФШЦЩХОФЭКЬ РКХТ ЬФТЫЭТЬ ЧЮШ ЧЮЫШНвЭШ šТШУО ТЧЬЭЫЮФМТУШУО. KЫЮШЩščТКТ ЩКЭТФЫТЧФТЭО ФШЦЩХОФЭ, ЩЫТТЦНКЦТ У Тš
ЩКЫНКЯУШ.
PRT A integridade efectiva do produto pode variar de que consta neste manual. Verifique cuidadosamente a integridade do produto que
ц ОЧЭЫОРЮО ЩОХШ ЯОЧНОНШЫ.
UKR .
.
FIN KвЬОТЬОЧ ЭЮШЭЭООЧ ЭШНОХХТЬОЧ ЩКФФКЮФЬОЧ ФШФШШЧЩКЧШ ЯШТ ОЫШЭК ЭтЬЬт ШСУООЬЬК ОЬТЭОЭвЬЭт ФШФШШЧЩКЧШЬЭК. TКЫФТЬЭК СЮШХОХХТЬОЬЭТ
ЩКФФКЮФЬОЧ ФШФШШЧЩКЧШ ЦввУтЧ ЭКЯКЫКК ХЮШЯЮЭЭКОЬЬК.
FRA IХ ЬО ЭЫШЮЯО qЮО ХОЬ МШЦЩШЬКЧЭЬ НЮ ЩЫШНЮТЭ ЩОЮЯОЧЭ ЬО НТЬЭТЧРЮОЫ НО МОЮб КППТМСцЬ НКЧЬ ХО ЩЫцЬОЧЭ ЦКЧЮОХ НĶЮЭТХТЬКЭТШЧ. VОТХХez de
ЛТОЧ ЯцЫТПТОЫ НОЬ МШЦЩШЬКЧЭЬ КЮ ЦШЦОЧЭ НО ХК ЫцМОЩЭТШЧ НЮ ЩЫШНЮТЭ НО ХК ЩКЫЭ НЮ ЯОЧНОЮЫ.
EST KтОЬШХОЯК ФКЮЛК ПКФЭТХТЧО ФШЦЩХОФЭЬЮЬ ЯõТЛ ОЫТЧОНК ФтОЬШХОЯКЬ УЮСОЧНТЬ ЭШШНЮЬЭ. KШЧЭЫШХХТРО ЭтСОХОЩКЧОХТФЮХЭ ФШЦЩХОФЭЬЮЬЭ ФКЮЛК
ЯтХУКЬЭКЦТЬОХ ЦùùУК ЩШШХЭ.
BLR .
.
ESP LК МШЦЩШЬТМТяЧ КМЭЮКХ НОХ ЩЫШНЮМЭШ ЩЫОЬОЧЭО ЩЮОНО НТПОЫТЫЬО НО ХШ ТЧНТМКНШ ОЧ ОХ ЦКЧЮКХ ЩЫОЬОЧЭО. CШЦЩЫЮОЛО КЭОЧЭКЦОЧЭО ХК
МШЦЩШЬТМТяЧ К ХК ЫОМОЩМТяЧ НОХ ЩЫШНЮМЭШ.
LVA ŠЬ ЩЫОМОЬ ПКФЭТЬФ ФШЦЩХОФЭМТУК ЯКЫ КЭšТЫЭТОЬ ЧШ ЭЬ, ФКЬ ТЫ ЧШЫНЭК šКУ ТЧЬЭЫЮФМТУ. UгЦКЧРТ ЩЫЛКЮНТОЭ ФШЦЩХОФЭМТУЮ, ФКН
ЩЫНОЯУЬ УЮЦЬ ТгЬЧТОНг ЩЫОМТ.
UZB Ushbu tovarning amaldagi majmuasi uchbu qo'llanmada ko'rsatilganidan farq qilishi mumkin. Tovar sotuvchi tomonidan berilayotgan
vaqtda majmuaning to'liqligini diqqat bilan tekshiring.
POL FКФЭвМгЧв гОЬЭКа НКЧОРШ ЭШаКЫЮ ЦШО ЫяЧТć ЬТ ШН гОЬЭКаЮ ЩШНКЧОРШ а НКЧОУ ТЧЬЭЫЮФМУТ. UаКЧТО ЬЩЫКаНгКУ гОЬЭКа ЩЫгв
odbiorze towaru od sprzedawcy.
RUS
1.
2.
3.
4. /.
5.
6.
7.
DEU Komplettierung
1. Deckel
2. Abteilungen
3. Station
4. Taste Ein/Aus
5. Temperaturregler
6. Betriebsleuchte
7. Zeitregler
GBR Parts list
1. Cover
2. Trays
3. Base
4. On/off button
5. Temperature regulator
6. Light indicators
7. Time regulator
ITA Componenti
1. Coperchio
2. Sezioni
3. Base
4. Bottone Acceso/Spento
5. Regolatore di temperatura
6. Indicatore di funzionamento
7. Regolatore di tempo
BLR
1.
2.
3.
4. ./.
5.
6.
7.
ESP Lista de equipo
1. Tapa
2. Secciones
3. Base
4. BШЭяЧ AМЭТЯКМТяЧ/DОЬКМЭТЯКМТяЧ
5. Regulador de temperatura
6. Indicador del funcionamiento
7. Regulador de tiempo
UKR
1.
2.
3.
4. /.
5.
6.
7.
FRA Lot de livraison
1. Couvercle
2. Sections
3. Base
4. Bouton ON/OFF
5. RцРЮХКЭОЮЫ НО ХК ЭОЦЩцЫКЭЮЫО
6. Indicateur de fonctionnement
7. RцРЮХКЭОЮЫ НЮ ЭОЦЩЬ
KAZ
1.
2.
3.
4. /.
5.
6.
7.
PRT Conjunto complete
1. Tampa
2. SОхõОЬ
3. Base
4. BШЭуШ OЧ/OПП
5. Controlador de temperatura
6. IЧНТМКНШЫ НО ШЩОЫКхуШ
7. Controlador de tempo

3
EST Komplektis
1. kaas
2. sahtlid
3. korpus
4. sisse-ЯтХУК ХùХТЭЮЬЧЮЩЩ
5. temperatuuri regulaator
6. КУКЧтТЭ
7. ajaregulaator
LTU KШЦЩХОФЭШ ЬЮНЭТЬ
1. Dangtis
2. Skyreliai
3. Pagrindas
4. MвРЭЮФКЬ У/IšУ.
5. TОЦЩОЫКЭЫШЬ ЫОРЮХТКЭШЫТЮЬ
6. Veikimo indikatorius
7. Laiko valdiklis
LVA KШЦЩХОФЭМТУК
1. VФЬ
2. PКЩХЭОЬ
3. Pamatne
4. IОЬХРšКЧКЬ/ТгЬХРšКЧКЬ ЩШРК
5. TОЦЩОЫКЭЫКЬ ЫОРЮХКЭШЫЬ
6. Darba indikators
7. Taimers
FIN Kokoonpano:
1. Kansi
2. Kuivaustasot
3. SвôЭЭôХКТЭО
4. KтвЧЧТЬЭвЬФвЭФТЧ
5. LтЦЩôЭТХКЬттНТЧ
6. Merkkivalo
7. AТФКЬттНТЧ
ISR
.1
.2
. 3
.4
.5
6
7
POL Opis
1. Pokrywa
2. Sekcje
3. Baza
4. PЫгвМТЬФ Аł./Авł.
5. Regulator temperatury
6. АЬФКЧТФ НгТКłКЧТК
7. Regulator czasu
UZB Shamlash
1. Qopqoq
2. BШ„ХЦКХКЫ
3. Baza
4. ВШq/O„МС ЭЮРЦКЬТ
5. Harorat sozlagichi
6. IЬСХКЬСТЧТ ФШ„ЫЬКЭЮЯМСТ indicator
7. Vaqt indikatori
.
, , , .
. .
.
.
, .
, .
, .
. .
.
, , .
, . ,
.
( ), .
, .
, .
, .
- .
5 , .
(, ).
90°.
, /.
, , , .
35-45° 72 . 2 ,

4
.
45-55° 48 . 2 ,
.
55-70° 24 . 2 ,
.
.
: (, ).
. , .
, / .
М .
.
. ,
. .
: .
. 180 .
.
. /.
8 , 35°. , «». «+», «-» .
«t°». «+», «-» .
35°
/ 40°
50-55°
50-55°
– 55-60°
, 65-70°
, /. .
, .
:
. , , .
, .
, . .
, , - ,
. .
: , , . , , .
:
1. , , .
2. .
3.

5
4. , , ,
.
5. , .
:
1. , .
2. . .
:
1. .
2. .
:
. .
,
5-20°.
. ,
.
, .
:
¼ ( ). , . , .
. 2 .
,
.
,
13-28
()
,
6-36
, (
3-4 )
8-38
8-38
.
6-26
8-26
.
8-30
, ,
10-34

6
, ,
4-15
: .
.
, , , . 3-5 . ,
.
, , ., , 2 .
: .
,
.
( 3-4 )
5-13
( 6-12
)
6-18
,
6-20
(
)
6-14
,
8-26
( 6 )
6-18
, ( 3 ).
6-14
8-30
,
6-16
. 8-10
8-30
( 3 ).
8-14
( 3 - 5 ),
8-14
( 12
)
6-18
( 6 ),
4-14
2-10
,
8-24
( 3 )
8-38
, ,
8-26

7
,
( 6 )
6-14
6-10
( 2,5 )
6-14
6-16
: .
.
, ,
, , . , , . , ,
. , . , , ,
.
:
– 500
– 100
– 20
, , , , , 0.5 . , ,
6 – 8 . . , , .
70°C 6 – 10 , .
.
:
() – 500
– 50
– 50
, , , 0.5 . , 4 –
6 . . , , .
70°C 6 – 10 , .
.
:
() – 500
– 30
– 50

8
– 30
– 20
, ,
, , , 0.5 . . , ,
, , 4 – 6 . . , ,
. 70°C 6 – 10 , .
.
(, , )
:
(, , ) – 1
, – 1
. . 1 ,
, . 40°C 6 – 12 ,
. 3 .
, , . .
. 1 , , .
40°C . , 1 , .
:
– 150
– 150
– 50
– 50
, . .
. , , . 50 -
70°C 6 – 10 , .
.
:
– 600
– 100
– 100
– 1

9
, . , ,
1 , . ,
. , .
, 1 – 1.5 . , . 50°C 4 – 6 ,
. 3 – 4 , .
.
:
– 500
– 100
, , . ,
. , 3 – 5 . , .
50°C 10 - 12 . .
.
.
, . .
.
.
, .
« ».
, .
, , .
.
/
( x x )
220 –240 V, 50 Hz
250
2,8 / 3,0
355 б 298 б 238
(, , , . .)
, / .
13 , 4- 5- , 6- 7- .
, , ,
. .

10
, , , 2 ()
. .
, , . – , :
+5º +40º 60%. .
:
įMARTA TRADE INC.”
c/o Commonwealth Trust Limited, P.O. Box 3321, Road Town, Tortola, United Kingdom,
:
YUYAO OUYOU ELECTRICAL APPLIANCE TECHNOLOGY CO., LTD
Doumen Village, Mazhu Town, Yuyao, Zhejiang, China
.,
, , ,,
, . / : «», 188671, , , ,
, 4 23, / 8(812) 325-2334
: «», , 195220, . -, ., . 41, . , . 407
ENG USER MANUAL
IMPORTANT SAFEGUARDS
Read this manual carefully before using the appliance and save it for future reference.
Before the first use, check the device specifications and the power supply in your network.
Do not use the multi-purpose socket used in conjunction with other electrical appliances.
Use only for domestic purposes according to the instruction manual. It is not intended for industrial use.
For indoor use only.
Do not use with damaged cord, plug or other injuries.
Keep the power cord away from sharp edges and hot surfaces.
Do not pull the cord. Always take the socket. Do not reel the cord around the device housing.
Never attempt to dissemble and repair the item by yourself. If you encounter problems, please contact the nearest customer service center.
Using accessories or replacement parts that are not recommended or sold by the manufacturer may cause damage to the item.
Always unplug the item and let it cool down before cleaning and removing parts. Keep unplugged when not in use.
To avoid electric shock and fire, do not immerse in water or other liquids. If this occurs, immediately unplug it and contact service center for inspection.
Do not place drying trays containing products dripping with water on the heat-and ventilation unit.
This appliance is not intended for use by persons (including children) with reduced physical, sensory or mental capabilities, or lack of experience and knowledge, unless they have been given
supervision or instruction concerning use of the appliance by a person responsible for their safety.
This product is a wind circulation heating products, at the bottom of the work in products, products are forbidden to have any foreign body of inlets can jam products, otherwise it will cause the
product direct damage or danger.
It is strictly prohibited to mobile products in the product work. It is forbidden to keep out cover ventilation products work.
Under working temperature 35-45° do not work with the appliance longer than 72 hours running. After finishing uninterrupted work of the appliance during 72 hours, turn off the appliance, unplug
the appliance and let it cool down for 2 hours.
Under working temperature 45-55° do not work with the appliance longer than 48 hours running. After finishing uninterrupted work of the appliance during 48 hours, turn off the appliance, unplug
the appliance and let it cool down for 2 hours.
Under working temperature 55-70° do not work with the appliance longer than 24 hours running. After finishing uninterrupted work of the appliance during 24 hours, turn off the appliance, unplug
the appliance and let it cool down for 2 hours.
IT IS NECESSARY to put heat-resistant material under the appliance during using it or put the appliance onto the heat-resistant surface.

11
BEFORE FIRST USE
Wash the drying trays and the lid in warm soapy water.
Clean the heating and ventilation with a damp cloth and wipe dry.
Dry all parts thoroughly after cleaning.
USING THE APPLIANCE
1. Put the prepared in advance products to a removable sections. Sections for products should be placed in such way to let the air circulate freelybetween them (the regulation of height of the sections is
possible). That is why you should not put too many products to the sections and put the products on to each other.
2. Put the sections on to a power base.
3. Put the upper lid on the appliance. During drying the upper lid should always be on the appliance.
4. Insert the plug of the power cord and press the power button, then the product start to workthe default work time is 8 hoursdefault temperature is 35
4. You can dry the food according to your taste and requirements. If you need to adjust the timeplease press the Time buttonand then press the + or –button.
5. If you need to adjust the temperatureplease press the Temp buttonand then press the + or –button.
Temperature mode advices:
- Herbs 35°
- ВШРСЮЫЭ/PЫШЯТЧР 40°
- Mashrooms 50-55°
- Vegetables 50-55°
- Fruit 55-60°
- Meat, Fish 65-70°
6. After finish drying the food, please turn off the power and pull up the plug. Let the products cool down. Put dried products into a container/package for keeping food and put it into a freezer.
NOTE: For even drying result, it is recommended to change the position of trays from time to time during operation.
ADITIONAL INSTRUCTION
Wash products before putting in the appliance.
Do not put wet products into appliance, rub it dry.
ATTENTION! Do not put sections with products if there is water in it.
Cut off the spoiled parts of products. Slice the products in such a way to situate it freely between the sections.
The duration of drying products depends on the thickness of pieces into which it is sliced etc.
Some of the fruit can be covered by its natural protective layer and that is why the duration of drying may increase. To avoid this matter it is better to boil products for about 1-2 minutes and
than put it to cold water and rug after that.
NEED TO KNOW! THE DURATION OF DRYING STATED IN THIS INSTRUCTION IS APPROXIMATE. The duration of drying depends on the temperature and humidity of the room the level
of humidity of products, thickness of the pieces etc.
DRYING FRUIT
Wash the fruit.
Take out the pit and cut off the spoiled parts.
Slice into pieces which you can place freely between the sections.
You can put the fruit down to natural lemon or pine apple juice not to let them fade
If you want your fruit to smell pleasantly, you can add cinnamon or coconut swift.

12
DRYING VEGETABLES
Wash the vegetables.
Take out the pit and cut off the spoiled parts.
SХТМО ТЧЭШ ЩТОМОЬ аСТМС вШЮ МКЧ ЩХКМО ПЫООХв ЛОЭаООЧ ЭСО ЬОМЭТШЧЬ. IЭ ТЬ ЛОЭЭОЫ ЭШ ЛШТХ ЯОРОЭКЛХОЬ ПШЫ КЛШЮЭ 1-5minutes and than put it to cold water and than rug dry.
STORAGE OF DRYED FRUIT
Containers for storage of the dried products should be clean and dry.
For better storage of dried fruit use glass containers with metal lids and put it into a dark dry place where the temperature should be 5-20 degrees. During first week after drying it is better to check if it is
any moisture in container. If yes, it means that products are not dried well and you should dry it again.
ATTENTION! Do not place hot place hot and even warm products into containers for its further storage
TABLE OF PREPARING THE FRUITS FOR DRYING
Name
Preparing
Condition after drying
Duration of drying
Apricot
Slice it and take out the pit
Soft
13-28
Orange peel
Cut it to long stripes
Fragile
8-16
Pine applefresh
Peel it and slice into pieces or square parts
Hard
6-36
Pine appletinned
Pour out the juice and dry it
Soft
6-36
Banana
Peel it and slice to round pieces3-4 mm
thickness
Crispy
8-38
Grapes
No need to cut it
Soft
8-38
Cherry
It is not necessary to take out the pityou can
take it out when cherry is half-dried
Hard
8-26
Pear
Peel it and slice
Soft
8-30
Fig
Slice it
Hard
6-26
Cranberry
No need to cut
Soft
6-26
Peach
Cut into 2pieces and take out the pit when the
fruit is half-dried
Soft
10-34
Date-fruit
Take out the pit and slice
Hard
6-26
Apple
Peel it. Take out the heartslice it into round
pieces or segments
Soft
4-15
NOTICE: Time and ways of preliminary processing, which are described in the table only fact-finding. Personal preferences of customers can differ of the described in the table.
TABLE OF PREPARING VEGETABLES FOR DRYING
Name
Preparing
Condition after drying
Duration of drying
Artichoke
Cut it to stripes3-4mm thickness
Fragile
5-13
Egg-plant
Peel it and slice it into pieces6-12mm thickness
Fragile
6-18
Broccoli
Peel it and cut itSteam it for about 3-5min
Fragile
6-20
Mushroom
Slice it or dry it wholesmall mushrooms
Hard
6-14
Green beans
Cut it and boil till become transparent
Fragile
8-26

13
Vegetable
marrows
Slice it into pieces6 mm thickness
Fragile
6-18
Cabbage
Peel it and cut into stripes3mm thicknessTake out the heart
Hard
6-14
Brussels sprouts
Cut the stems into 2 pieces
Crispy
8-30
Cauliflower
Boil till it becomes soft
Hard
6-16
Potato
Slice it . boil for about 8-10min
Crispy
8-30
Onion
Slice it into thin round pieces
Crispy
8-14
Carrot
Boil till becomes soft .Shred it or slice into round pieces .
Crispy
8-14
Cucumber
Peel it and slice into round pieces(12mm thickness)
Hard
6-18
Sweet pepper
Cut it to stripes or to round pieces(6mm thickness).Take out the
heart
Crispy
4-14
Piquant pepper
No need to cut it
Hard
8-14
Parsley
Put the leafs into sections
Crispy
2-10
Tomato
Peel it. Cut it into pieces or into round pieces.
Hard
8-24
Rhubarb
Peel it and slice it into pieces(3mm thickness)
Loss of humidity in a
vegetable
8-38
Beetroot
Boil it ,let it cool down .cut off the roots and the tops. Slice it to
round pieces.
Crispy
8-26
Celery
Slice it into pieces(6mm thickness)
Crispy
6-14
Spring onion
Shred it
Crispy
6-10
Asparagus
Slice it into pieces(2.5mm thickness)
Crispy
6-14
Garlic
Peel it and slice into round pieces
Crispy
6-16
Spinach
Boil till it becomes fade
Crispy
6-16
NOTICE: Time and ways of preliminary processing which are described in the table only fact-finding. Personal preferences of customers can differ of the described in the table.
MEAT, FISH, POULTRY AND GAME ANIMALS.
Preliminary preparing of the meat is indispensable and necessary for saving health of customer. Use meat for effective drying. It is recommended to pickle the meat before drying for saving its natural
taste and to make the meat softer. It is necessary to add salt to a pickle, it helps to remove the water out of the meat and save it better.
RECIPES
BEEF JERKY
Ingredients:
Beef –500g.
Soy sauce –100ml.
Spicy tomato sauce –20g.
Seasonings
Rinse meat. Trim all visible fat from meat. Slice into 0, 5 cm thick strips. Combine all remaining ingredients in a bowl and mix with beef strips. Cover and refrigerate 6 - 8 hours or overnight. Then drain
off all excess marinade. Spread beef strips on every food tray and cover with the dehydraЭШЫĶЬ ХТН. SОЭ ЭОЦЩОЫКЭЮre to 70°C КЧН ЭЮЫЧ ШЧ ЭСО НОСвНЫКЭШЫ ПШЫ 6 - 10 hours.
Use as many food trays as necessary.

14
FISH JERKY
Ingredients:
Cod fillet –500g.
Lemon juice –50ml.
Salt –50g.
Ground black pepper
Rinse fish. Dry on a paper towel and cut into 0, 5 cm thick strips. Combine all remaining ingredients in a bowl and mix with fish strips. Cover and refrigerate 4 - 6 hours. Then drain off all excess
marinade. Spread fish strips on every food tray of the dehydrator and cover with lid. Set temperature to 70°C КЧН ЭЮЫЧ ШЧ ЭСО НОСвНЫКЭШЫ ПШЫ 6 - 10 hours.
Use as many food trays as necessary.
TURKEY JERKY
Ingredients:
Turkey fillet –500 g.
Garlic –30g.
Cognac –50ml.
Salt –30g.
Sugar –20g.
Paprika powder
Rinse turkey. Dry on a paper towel and cut into 0, 5 thick strips. Fine grate garlic.
Combine all ingredients in a bowl together with turkey strips. Cover and refrigerate 4 - 6 hours. Then drain off all excess marinade. Spread turkey strips on every food tray of the dehydrator and cover
with lid. Set temperature to 70°C КЧН ЭЮЫЧ ШЧ ЭСО НОСвНЫКЭШЫ ПШЫ 6-10 hours.
Use as many food trays as necessary.
FERMENTED MILK PRODUCTS (YOGHURT, SOUR CREAM ETC.)
Ingredients:
Milk, cream, baked milk –1 l.
Yoghurt culture –1 bag.
Combine ingredients in a clean bowl in proportions according to directions on the bag with yoghurt culture. Mix and pour the mixture into cups. Set one food tray on the base of the dehydrator and place
cups inside. Cover with lid КЧН ЬОЭ ЭОЦЩОЫКЭЮЫО ЭШ 40°C. TЮЫЧ ШЧ ЭСО НОСвНЫКЭШЫ ПШЫ 6 – 12 СШЮЫЬ НОЩОЧНТЧР ШЧ ЭСО вШРСЮЫЭ МЮХЭЮЫО ЦКЧЮПКМЭЮЫОЫĶЬ НТЫОМЭТШЧЬ. RОПЫТРОЫКЭО ПШЫ 3 СШЮЫЬ.
PROVING DOUGH
Prepare dough according to the recipe and place it into a big pan. Enamel and steel pans are mostly recommended for proving. Set one food tray onto the base of the dehydrator and place the pan with
НШЮРС ТЧЬТНО. CШЯОЫ аТЭС ХТН КЧН ЬОЭ ЭОЦЩОЫКЭЮЫО ЭШ 40°C. AЩЩЫШбТЦКЭО ЩЫШЯТЧР ЭТЦО ТЬ 1 СШЮЫ. KЧОКН НШЮРС КЧН ЫОЩОКЭ ЩЫШЯТЧР process if necessary.
DRIED FRUIT AND SHELLED WALNUTS SNAK
Ingredients:
Dried apricots –150g.
Dried prune –150g.
Pignolia nuts –50g.
Shelled walnuts –50g.
Wash dried fruits, dry on paper towel and finely chop with blender. Finely crush nuts. Combine all prepared ingredients in a bowl. Shape the mix into snack bars of preferable size.
Set the food tray on the base of the dehydrator and spread snack bars inside. Cover with the lid. Set temperature to 50 - 70°C КЧН ЭЮЫЧ ШЧ ЭСО НОСвНЫКЭШЫ ПШЫ 6 – 10 hours or overnight.

15
Use as many food trays as necessary.
APRICOT JELLY
Ingredients:
Apricots –600g.
Sugar –100g.
Water –100ml.
Vanilla sugar –1g.
Sugar powder
Cut washed and stoned apricots into small cubes. Combine cubed apricots, sugar and water in a pot. Simmer 1 hour stirring constantly, and then mix with blender. Add vanilla sugar and simmer stirring
constantly until smooth and thick. Use dehydrator trays with greased parchment paper on the bottom. Pour 1 –1,5МЦ ЭСТМФ ХКвОЫ ШП КЩЫТМШЭ ЩЮЫОО ШЧ ЩКЩОЫ КЧН МШЯОЫ аТЭС ХТН. SОЭ ЭОЦЩОЫКЭЮЫО ЭШ 50 °C
and turn on the dehydrator for 4 –6 hours. Refrigerate 3 –4 hours and then cut into pieces and sprinkle with sugar powder.
Use as many food trays as necessary.
FRUIT LEATHER
Ingredients:
Prunes –500g.
Honey –100g.
Cut stoned prunes into halves. Combine halved prunes with honey in a pot and mix with blender until smooth. Use dehydrator tray with greased parchment paper on the bottom. Pour 3 –5mm thick
layer of fruit puree on paper and cover with lid. Set temperature ЭШ 50 °C КЧН ЭЮЫЧ ШЧ ЭСО НОСвНЫКЭШЫ ПШЫ 10 – 12 hours. Carefully peel the leather from the parchment paper, cut and shape into rolls.
Use as many food trays as necessary.
CLEANING AND MAINTENANCE
Before cleaning check if the appliance is unplugged and cool down.
Clean the body of the appliance with the help of a wet sponge and than rug it dry.
Wash the drying trays and the lid in warm soapy water.
Clean the heating and ventilation with a damp cloth and wipe dry.
Do not use metal brushes, abrasive and rigid purifier for cleaning the appliance, because it can damage the surface.
SPECIFICATION
Power supply
Power
Net / Gross weight
Gift box dimension (L x W x H)
220 –240 V, 50 Hz
250 W
2,8 kg / 3,0 kg
355 mm x 298 mm x 238 mm
WARRANTY DOES NOT APPLY TO CONSUMABLES (FILTERS, CERAMIC AND NON-STICK COATING, RUBBER SEALS, ETC.)
Production date is available in the serial number located on the identification sticker on the gift box and/or on sticker on the device. The serial number consists of 13 characters, the 4th and 5th
characters indicate the month, the 6th and 7th indicate the year of device production.
Producer may change the complete set, appearance, country of manufacture, warranty and technical characteristics of the model without notice. Please check when purchasing device.
Production branch:
YUYAO OUYOU ELECTRICAL APPLIANCE TECHNOLOGY CO., LTD
Doumen Village, Mazhu Town, Yuyao, Zhejiang, China
Made in China

16
UKR
.
, , , .
. .
.
.
.
, .
, .
, .
. .
.
.
: , , .
, . ,
.
( ), .
, .
.
, .
, .
.
5 , .
(, ). 90°.
, , /.
, , , .
72 (35-45°). , , 2 , .
48 (45-55°). , , 2 , .
24 (55-70°). , , 2 , .
, .
.
, , .
, .
.
: , .
М .
.

17
. , , ,
.
' . .
.
, .
/
( )
220 –240 V, 50 Hz
250
2,8 / 3,0
355 б 298 б 238
(, , )
, / .
13 , 4- 5- , 6- 7- .
, , , .
.
:
YUYAO OUYOU ELECTRICAL APPLIANCE TECHNOLOGY CO., LTD
Doumen Village, Mazhu Town, Yuyao, Zhejiang, China
KAZ
-
ұ , .

18
-
-
.
72 (35-45)2
48 (45-55)2
48 (55-70)2
, .
.
.
, . .
.
/
(
)
220 –240 V, 50 Hz
250
2,8 / 3,0
355 б 298 б 238
(, ,
) .
----.
.
:
YUYAO OUYOU ELECTRICAL APPLIANCE TECHNOLOGY CO., LTD
Doumen Village, Mazhu Town, Yuyao, Zhejiang, China

19
BLR
.
, , , .
. .
- .
.
.
, .
, .
, .
. .
.
, .
: , , .
, . ,
.
( ), .
, .
.
, .
, .
- .
5 , .
(, ).
90°.
, /.
, , , .
72 (35-45°). 2 , .
48 (45-55°). 2 , .
24 (55-70°). 2 , .
, .
.
, , .
, . .
: , .
• .
• .

20
• .
• , . .
• .
(, , , )
, / .
13 , 4- 5- , 6- 7- .
, , , .
.
:
YUYAO OUYOU ELECTRICAL APPLIANCE TECHNOLOGY CO., LTD
Doumen Village, Mazhu Town, Yuyao, Zhejiang, China
DEU BEDIENUNGSANLEITUNG
SICHERHEITSMASSNAHMEN
LОЬОЧ SТО НТО ЯШЫХТОРОЧНО BОНТОЧЮЧРЬКЧХОТЭЮЧР ЯШЫ НОЫ AЧаОЧНЮЧР НОЬ GОЫтЭЬ КЮПЦОЫФЬКЦ НЮЫМС ЮЧН ЛОаКСЫОЧ SТО НТО гЮЫ аОТЭОЫОЧ Referenz auf.
VШЫ НОЫ ОЫЬЭОЧ AЧЬМСКХЭЮЧР ЬЭОХХОЧ SТО ЬТМСОЫ, НКЬЬ ЭОМСЧТЬМСО CСКЫКФЭОЫТЬЭТФОЧ НОЬ GОЫтЭЬ, НТО КЮП НОЫ MКЫФТОЫЮЧР ЬЭОСОЧ, НОr Stromversorgung in Ihrem lokalen Netz entsprechen.
DКЬ GОЫтЭ ЬШХХ ЧЮЫ ПùЫ HКЮЬСКХЭЬгаОМФОЧ ЛОЧЮЭгЭ аОЫНОЧ. DКЬ GОЫтЭ ТЬЭ ЧТМСЭ ПùЫ BОЭЫТОЛЬКЧаОЧНЮЧР ЛОЬЭТЦЦЭ.
VОЫаОЧНОЧ SТО НКЬ GОЫтЭ ЦТЭ ЛОЬМСтНТРЭОЫ NОЭгЬМСЧЮЫ ШНОЫ КЧНОЫОЧ SЭôЫЮЧРОЧ ЧТМСЭ.
AМСЭОЧ SТО НКЫКЮП, НКЬЬ НТО NОЭгЬМСЧЮЫ ФОТЧО ЬЩТЭгОЧ KКЧЭОЧ ЮЧН СОТßО OЛОЫПХтМСОЧ ЛОЫùСЫЭ.
Ziehen Sie, verdrehen Sie und aufspulen SТО НТО NОЭгЬМСЧЮЫ КЮП НКЬ GОСтЮЬО НОЬ GОЫтЭЬ ЧТМСЭ.
BОТЦ AЮЬЬМСКХЭОЧ НОЬ GОЫтЭЬ КЮЬ НОЦ SЭЫШЦЧОЭг гТОСОЧ SТО НТО NОЭгЬМСЧЮЫ ЧТМСЭ, СКХЭОЧ SТО ЧЮЫ НОЧ SЭОМФОЫ.
VОЫЬЮМСОЧ SТО ЧТМСЭ, НКЬ GОЫтЭ ЬОХЛЬЭтЧНТР гЮ ЫОЩКЫТОЫОЧ. BОТ SЭôЫЮЧРОЧ аОЧНОЧ SТО ЬТМС КЧ НКЬ naheliegende Service-Zentrum an.
DТО BОЧЮЭгЮЧР НОЬ ЧТМСЭ ОЦЩПШСХОЧОЧ ГЮЛОСôЫЬ ФКЧЧ РОПтСЫХТМС аОЫНОЧ ЮЧН гЮЫ BОЬМСтНТРЮЧР НОЬ GОЫтЭЬ ПùСЫОЧ.
SМСКХЭОЧ SТО НКЬ GОЫтЭ ТЦЦОЫ КЮЬ НОЦ SЭЫШЦЧОЭг КЮЬ ЯШЫ НОЫ RОТЧТРЮЧР ШНОЫ аОЧЧ ЬТО ОЬ ЧТМСЭ ЛОЧЮЭгОЧ.
VORSICHT: VerЯНЦМНЦ SСН МЙЫ GНrсЬ ЦСЛРЬ СЦ МНr NсРН ЮЧЦ BЙМНЯЙЦЦНЦ, WЙЫЛРКНЛУНЦ ЭЦМ ЙЦМНrНЦ BНРсФЬНrЦ ХСЬ WЙЫЫНr.
UЦ SЭЫШЦЬМСХКР ЮЧН EЧЭПХКЦЦЮЧР гЮ ЯОЫЦОТНОЧ ЭКЮМСОЧ SТО НКЬ GОЫтЭ ЧТМСЭ ТЧЬ АКЬЬОЫ ШНОЫ ТЧ КЧНОЫО FХùЬЬТРФОТЭОЧ ОТЧ. FКХХЬ НТes passiert ist, schalten Sie es sofort aus dem Stromnetz aus und
SЭôЫЮЧРОЧ аОЧНОЧ SТО ЬТМС КЧ НКЬ SОЫЯТМО-ГОЧЭЫЮЦ ПùЫ НТО PЫùПЮЧР КЧ.
DКЬ GОЫтЭ ТЬЭ ЧТМСЭ ПùЫ НТО AЧаОЧНЮЧР НЮЫМС ЩСвЬТЬМС ЮЧН ЩЬвМСТЬМС ЛОСТЧНОЫЭО PОЫЬШЧОЧ (НКЫЮЧЭОЫ КЮМС KТЧНОЫ) ЛОЬЭТЦЦЭ, НТО Фeine Erfahrung in der AnwОЧНЮЧР НТОЬОЬ GОЫтЭЬ СКЛОЧ. IЧ ЬШХМСОЧ
FтХХОЧ ЬШХХ НОЫ BОЧЮЭгОЫ ЯШЫХтЮПТР ЯШЧ ОТЧОЫ PОЫЬШЧ, НТО VОЫКЧЭаШЫЭЮЧР ПùЫ ЬОТЧО SТМСОЫСОТЭ ЭЫтРЭ, КЧРОаТОЬОЧ.
LКЬЬОЧ SТО НКЬ EХОФЭЫШРОЫтЭ ЧТО ЮЧЛОКЮПЬТМСЭТРЭ, аОЧЧ ОЬ ЦТЭ НОЦ SЭЫШЦЧОЭг ЯОЫЛЮЧНОЧ ТЬЭ.
Stellen Sie das GОЫтЭ КЮП ОТЧО ОЛОЧО, ЬЭКЛТХО ЮЧН атЫЦОПОЬЭО FХтМСО КЮП.
SОХЛЬЭЬЭтЧНТРОЬ ГОЫХОРОЧ, иЧНОЫЮЧРОЧ ЮЧН RОЩКЫКЭЮЫЯОЫЬЮМСО КЦ GОЫтЭ ЬТЧН ЧТМСЭ РОЬЭКЭЭОЭ.
EЬ ТЬЭ ЧТМСЭ РОЬЭКЭЭОЭ, НКЬ GОЫтЭ гЮ ЛОНОМФОЧ ШНОЫ LЮПЭôППЧЮЧРОЧ НОЬ GОЫтЭЬ атСЫОЧН ЬОТЧОЬ BОЭЫТОЛЬ ЦТЭ ОЭаКЬ ЛХТЧНгЮЬМСХТОßОЧ.
SТМСОЫЧ SТО ОТЧОЧ ПЫОТОЧ RКЮЦ ЯШЧ ЦТЧНОЬЭОЧЬ 5 МЦ КХХЬОТЭТР ЮЦ НОЧ TЫШМФЧОЫ атСЫОЧН ЬОТЧОЬ BОЭЫТОЛЬ, ЮЦ ОТЧО КЮЬЫОТМСОЧНО LùПtung zu erzielen.
/
( )
220 –240 V, 50 Hz
250
2,8 / 3,0
355 б 298 б 238
Other manuals for MT-1949
1
Table of contents
Other Marta Kitchen Appliance manuals

Marta
Marta MT-1948 User manual

Marta
Marta MT-1948 User manual

Marta
Marta MT-SM1737A User manual

Marta
Marta MT-2000 User manual

Marta
Marta MT-1882 User manual

Marta
Marta MT-FD1888 Series User manual

Marta
Marta MT-4312 User manual

Marta
Marta MT-FD1886 Series User manual

Marta
Marta MT-1852 User manual

Marta
Marta MFD-820 Series User manual

Marta
Marta MT-1988 User manual

Marta
Marta MT-1756 User manual

Marta
Marta MT-FD1887 Series User manual

Marta
Marta MT-1753 User manual

Marta
Marta MT-1762 User manual

Marta
Marta MT-4301 User manual

Marta
Marta MT-SM1773A User manual

Marta
Marta MT-ST1194A User manual

Marta
Marta MT-1885 User manual

Marta
Marta MT-4317 User manual