Maxon 49-HX User manual

49-HX
HANDS-FREE
COMMUNICATOR
Owner’s Manual
English Spanish French

TABLE OF CONTENTS
Specifications 1
Product Description 2
Package Contents 3
Performance Features 4
Controls and Functions 5
Operating Instructions 8
sing the Intercom Mode 10
Helmet Installation Instructions 11
Installing the Remote P-T-T 13
Warranty Service Instructions 14
Warranty Statement 15
Optional/Replacement Accessories 17
Other Maxon Products 17

TABLA DE CONTENIDO
Especificaciones 18
Descripción del Producto 19
Contenido del Paquete 20
Características de Funcionamiento 21
Controles y Funciones 5
Instrucciones de Operación 22
tilización del Modo Intercom 25
Instrucciones de Instalación
en un Casco 26
Instalación del P-T-T
(Presione para Hablar) Remoto 28
Instrucciones para el Servicio
de Garantía 29
Garantía 30
Accesorios Opcionales
y de Repuesto 32
Otros Productos de Maxon 32

TABLE DES MATIÈRES
Fiche Technique 33
Description du Produit 34
Contenu 35
Caractéristiques 36
Commandes et Fonctions 5
Mode d’Emploi 37
tilisation du mode Intercom 39
Installation sur un Casque
Protecteur 40
Installation de la Touche
d'Émission à Distance 42
Instructions pour Réparations 43
Déclaration de Garantie 44
Accessoires Optionnels/de
Remplacement 46
Autres Produits Maxon 46

49-HX SPECIFICATIONS
GENERAL
Channels: 5
Frequency range: A: 49.830 MHz,
B: 49.845 MHz,
C: 49.860 MHz,
D: 49.875 MHz
E: 49.890 MHz
Power source: 3 AA alkaline or ni-cad
batteries
Dimensions: W x H x D 5-1/2" x 3" x 1"
Weight: 6.5 oz.
RECEIVER
Receiving system: FM Dual conversion
superheterodyne
Intermediate frequency: 1st IF: 10.7 MHz,
2nd IF: 455 kHz
TRANSMITTER
Transmitting system: Manual push-to-talk or
VOX
RF Output power: 10,000 µV/M @ 3
meters (FCC maximum)
Modulation: FM (Frequency
Modulation)
Specifications subject to change without notice.
1

PRODUCT DESCRIPTION
Maxon’s 49-HX hands-free communicator is a
compact, 5-channel portable two-way transceiver
with a built-in intercom function. The radio has
a uniquely designed headset that can be quickly
and easily mounted onto a variety of open and
closed-faced helmets, or worn as a standard
headset. Communications between the 49-HX
and other 49 MHz models is possible - provided
each is equipped with the same channel/
frequency.
Maxon’s 49-HX provides you the choice of hands-
free automatic transmitting or manual push-to-talk
operation. With the use of an optional 49-HXH
passenger headset, two-way intercom communica-
tions can occur between driver and passenger.
The 49-HX provides hundreds of uses - in
recreational (motorcycling, biking, boating,
camping, hunting), and business situations (ware-
housing, building maintenance, inventory control,
security, etc.).
Please take a few minutes to become familiar
with the features and operating instructions of your
Maxon 49-HX hands-free communicator.
2

PACKAGE CONTENTS
The Maxon 49-HX comes complete with belt clip,
helmet adaptable headset with adjustable boom
mic and whip antenna, hook and loop fastening
material and Owner’s Manual. NOTE: Three
AA alkaline or ni-cad batteries are required for
operation - batteries are not included.
3

PERFORMANCE FEATURES
• Five channel operation
• Approx. 1/4 mile range
• Helmet adaptable headset with boom
microphone and whip antenna
• Powered by 3 AA alkaline or ni-cad
batteries (not included)
• Choice of voice operated (VOX) or
push-to-talk (P-T-T) operation
• Thumbwheel on/off-volume control
• VOX Sensitivity control
• Battery low LED
• Jack for in-unit charging of ni-cad
batteries, remote P-T-T and optional
passenger headset
4

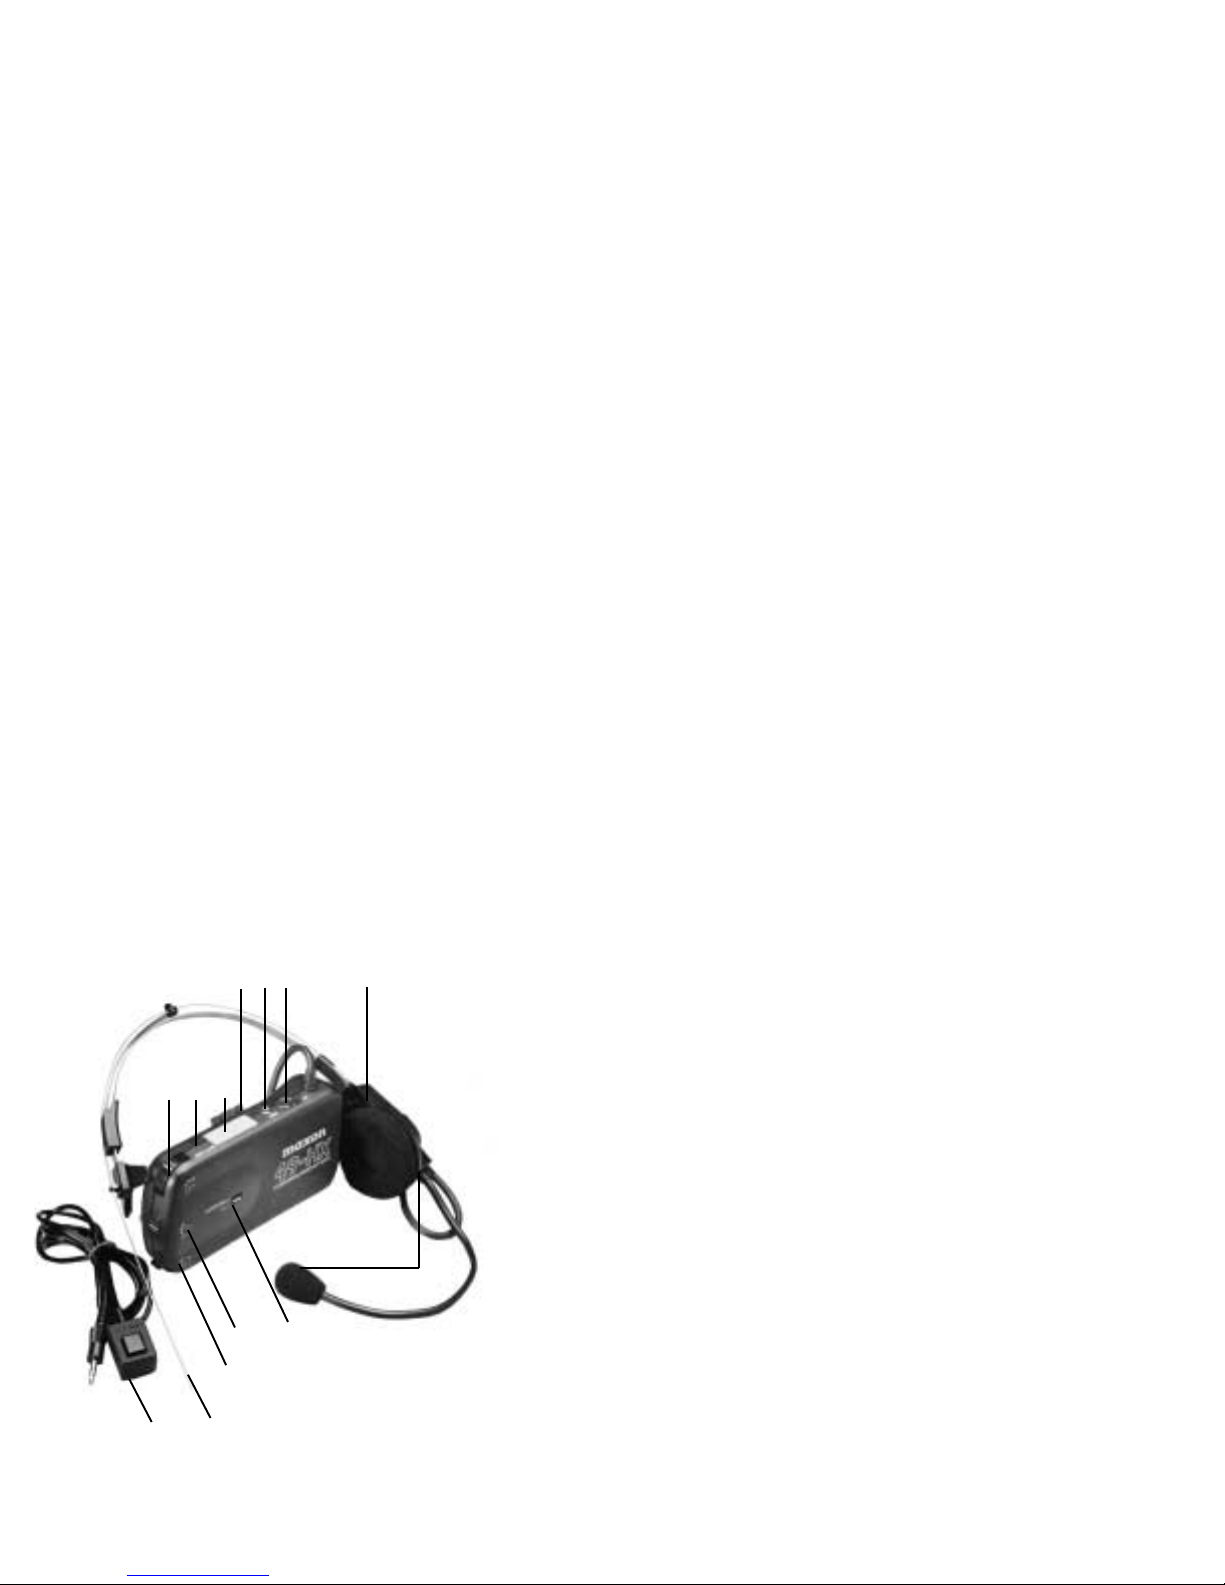
CONTROLS AND FUNCTIONS
CONTROLES Y FUNCIONES
COMMANDES ET FONCTIONS
A. Power on off-volume control - Turns power on/off and
adjusts volume level • Control de encendido apagado y
volumen - Enciende/apaga y ajusta el nivel de volumen
• Interrupteur et commande du volume - Allume/éteint
l’appareil et permet de régler le volume
B. Battery low LED - Lights to indicate when battery power
is low • Indicador LED de baterías con carga baja - Se
enciende para indicar cuando la carga de las baterías está en
un nivel bajo • Voyant de niveau faible de la pile - S’allume
lorsque le niveau de la pile est faible
C. Push-to-talk button - Push and hold to transmit (talk);
release to receive (listen) • Botón "presione para hablar" -
Manténgalo oprimido para transmitir (hablar); suéltelo para
recibir (escuchar) • Touche d’émission - Gardez enfoncée pour
émettre (parler); relâchez pour recevoir (écouter)
D. Belt clip • Sujetador para el cinturón • Pince pour
ceinture
E. Jack for remote P-T-T switch • Enchufe para el
interruptor remoto (P-T-T) (Presione para Hablar) • Prise
pour touche d’émission à distance
F. Jack for intercom passenger headset • Enchufe para el
conjunto de audífonos micrófono de intercomunicación del
pasajero • Prise pour casque du passager
G. Fully adjustable and helmet adaptable headset
• Conjunto de audífonos micrófono completamente ajustable
y adaptable a un casco • Casque de communication
entièrement réglable compatible avec un casque protecteur
5

6
M L
A B C
D E F G
H
J I
K

H. Adjustable microphone with windscreen • Micrófono
ajustable con pantalla contra el viento • Microphone
réglable avec boule antivent
I. Intercom TX mode selector - Selects either unit to unit
communications or intercom communciations between main
headset and passenger headset • Selector de modo Intercom
TX - Selecciona la unidad a la función de comunicaciones de
la unidad o a la de comunicaciones intercom entre el conjunto
de audífonos/micrófono principal y el del pasajero
• Sélecteur mode Intercom TX - Réglez ce sélecteur à TX
pour communiquer avec d’autres appareils ou à Intercom pour
communiquer avec le passager seulement
J. VOX P-T-T Control dial - Thumbwheel selects mode
of operation (voice or manual push-to-talk) and controls
microphone sensitivity during voice activated transmissions
• Disco de control VOX P-T-T - Con una ruedecilla para
mover con el pulgar se selecciona el modo de operación
(activado por voz o manual - presione para hablar) y se
controla la sensibilidad del micrófono durante transmisiones
activadas por la voz • Sélecteur activation par la voix
activation manuelle - tilisez la molette pour choisir le mode
d’activation et la sensibilité du microphone (activation par la
voix)
K. Channel selector switch • Interruptor selector de canales
• Sélecteur de canaux
L. Whip antenna - Receives and transmits radio signals
• Antena flexible - Recibe y transmite señales de radio
• Antenne fouet - reçoit et émet les signaux radio
M. Remote P-T-T - sed to activate the P-T-T button without
reaching for the main unit switch • Interruptor remoto P-T-T
(Presione Para Hablar) - tilizado para activar el botón P-T-T
sin tener que alcanzer el botón de la unidad principal
• Cadran d'émission à distance - Est utilisé pour activer la
touche d’émission sans avoir l’appareil à portée de la main
7

Charging jack - sed to charge ni-cad batteries inside the
unit - requires Maxon DV-7510 AC/DC wall charger (not
shown) • Enchfe para cargar - tilizado para cargar las
baterías de níquel-cadmio dentro de la unidad - requiere un
cargador de Maxon DV-7510 AC/DC de pared (no se
muestra) • Prise de chargement - est utilisée pour charger
les piles dans l
'
appareil - requiert le chargeur au mur c.a./c.c.
Maxon DV-7510 (non montré)
OPERATING INSTRUCTIONS
1) Remove the battery compartment door
by pulling the door tab towards you. Install three
fresh AA batteries, noting the polarity diagram
embossed in the battery compartment. For
continuous, heavy-duty use, alkaline batteries
are recommended.
NOTE: Rechargeable ni-cad batteries can
be used in the 49-HX. To recharge them while
installed in the unit, Maxon’s DV-7510 optional
AC/DC wall charger must be used. Average
charging time is 12-16 hours.
CAUTION: Do not attempt to recharge alkaline
or carbon zinc batteries - this could result in an
explosion, or other damage to the unit.
8

2) sing the belt clip, affix the unit to your
belt or another convenient location. Put the
headset on, extend the antenna and adjust
to a comfortable fit. Keep the microphone ele-
ment within 1" of your mouth.
NOTE: If you choose to adapt the 49-HX headset
for helmet use, refer to the helmet installation
instructions in this manual.
3) Turn the power on and adjust the volume to a
desired listening level.
4) Select the desired channel using the channel
selector switch.
5) If you want to communicate radio to radio, set
the intercom/TX switch to TX. If you choose to
utilize the Maxon 49-HXH passenger headset
(sold separately), plug in the passenger headset
and set the intercom/TX switch to the intercom
position.
6) Position the VOX/P-T-T thumbwheel control
to either the VOX position (for hands-free, voice
activated transmissions) or the P-T-T position (for
manual push-to-talk transmissions). When using
the VOX mode, adjust the sensitivity setting to
suit your surroundings and needs. While looking
at the
9

front of the unit, move the thumbwheel clockwise
for a high setting, or counter-clockwise to a low
setting. A low setting requires you to speak more
loudly to activate the transmitter and should be
used when background noise levels are high. A
higher setting allows you to speak in a softer
voice and should be used when lower background
noise is present.
NOTE: Very high noise levels may cause the unit
to transmit continuously in the VOX mode. When
very high background noise levels are present, the
P-T-T mode may be the only method to avoid this
problem.
The Maxon 49-HX will not receive a transmission
while you are transmitting. Wait until an incoming
message is completed before transmitting.
If the unit appears to malfunction, or has constant
static present, try replacing the batteries, even if
the “BATT LOW” LED has not illuminated.
USING THE INTERCOM MODE
1) When using the unit’s intercom, follow steps
1 ~ 3 in the operating instructions.
10

2) Set the intercom/TX switch to the intercom
position.
3) Plug in the optional Maxon 49-HXH passen-
ger headset (sold separately) into the headset jack
on the top of the unit.
4) Position the VOX/P-T-T thumbwheel control
as directed in operating instructions.
NOTE: The 49-HXH passenger headset will
only communicate with the main unit headset.
However it can monitor all other unit to unit
conversations, but will not transmit. (FCC Regula-
tions).
HELMET INSTALLATION
INSTRUCTIONS
Both the headband and earpiece of the 49-HX
headset can be detached from the antenna/boom
microphone assembly. Hook-and-loop fastening
material is included with your 49-HX to enable
attaching the antenna/boom microphone assembly
to the exterior of the helmet and for attaching the
earpiece to the interior.
11

To remove the headband: Release the whip
antenna from the retaining hook. Hold down
the headband release tab (A) and gently slide the
headband out of the antenna/earpiece housing
assembly. (Figure 1)
To remove the earpiece: Gently pull the earpiece
away from the antenna housing assembly.
(Figure 2).
Peel the adhesive backing from the 2"x 4" piece
of hook-and-loop fastening material. Apply the
material to the outside surface of the helmet,
positioning it to allow the antenna to be in a
vertical position and the boom microphone to
be about 1" from your mouth when wearing
the helmet. 12
(A)

Mount the earpiece inside the helmet, positioning
it so that it will be next to your ear when wearing
the helmet. A 2" x 2" piece of hook-and-loop
fastening material is supplied for this mounting.
NOTE: Some helmets have recesses for inserting
an earpiece, or have pads which can be removed
to provide space to mount the earpiece.
INSTALLING THE REMOTE P-T-T
The radio’s remote push-to-talk button has been
designed to fit the handlebar of a motorcycle,
bicycle, snowmobile, etc. A mounting strap with
hook-and-loop fastening material has been
provided with your 49-HX.
To use the remote P-T-T: Plug into the REM
jack on your transceiver and set the VOX/P-T-T
control dial to the P-T-T position (counter-
clockwise, as far as it will go).
13

WARRANTY SERVICE INSTRUCTIONS
1) Refer to the Operating Instructions section of
this Owner’s Manual for adjustments that
may be applicable to correct your problem.
2) If the above mentioned procedure does not
correct the problem you are experiencing with
your unit, return the unit (with proof of purchase)
to the place of purchase, or call Maxon’s
Customer Service Department for assistance.
Maxon America, Inc.
Customer Service Department
10828 NW Air World Drive
Kansas City, Missouri 64153
816/891-1093, ext. 499
14

LIMITED WARRANTY STATEMENT
The Consumer Products Division of Maxon America,
Inc. (hereinafter referred to as “Maxon”), warrants
that its Products and their included accessories will be
free from defects in workmanship or materials under
normal use for a period of ninety (90) days from date
of purchase by the original end user, provided that the
buyer has complied with the requirements stated
herein.
If the Product fails to function under normal use
because of manufacturing defect(s) or workmanship
during the ninety (90) day period following the date
of purchase, it will be replaced or repaired at Maxon’s
option at no charge when returned to the place of
purchase. The defective unit must be accompanied
by proof of the date of purchase in the form of a sales
receipt.
Maxon’s sole obligation hereunder shall be to repair or
replace the Product covered in this Warranty. Replace-
ment, at Maxon’s option, may include a similar or
higher-featured product. Repair may include the
replacement of parts or boards with functionally
equivalent reconditioned or new parts or boards.
Replaced parts, accessories, batteries or boards are
warranted for the balance of the original time period. All
replaced parts, accessories, batteries or boards become
the property of Maxon America, Inc.
15

Maxon shall have no obligation to make repairs or to
cause replacement required through normal wear and
tear or necessitated in whole or in part by catastrophe,
fault or negligence of the user, improper or unautho-
rized alterations or repairs to the Product, use of the
Product in a manner for which it was not designed, or
by causes external to the Product. This warranty is void
if the serial number is altered, defaced or removed.
The purchaser shall provide for removal of the defective
Product and installation of its replacement.
THE EXPRESS WARRANTIES CONTAINED HEREIN ARE
IN LIE OF ALL OTHER WARRANTIES, EITHER
EXPRESSED OR IMPLIED, OR STAT TORY, INCL D-
ING, WITHO T LIMITATION, ANY WARRANTY OF
MERCHANTABILITY OR FITNESS FOR A PARTIC LAR
P RPOSE.
FOR ANY PROD CT THAT DOES NOT COMPLY
WITH THE WARRANTY SPECIFIED, THE SOLE
REMEDY WILL BE REPAIR OR REPLACEMENT. IN NO
EVENT WILL MAXON AMERICA, INC. BE LIABLE TO
THE B YER FOR ANY DAMAGES, INCL DING ANY
SPECIAL, INCIDENTAL, INDIRECT OR CONSEQ EN-
TIAL DAMAGES, OR THE LOSS OF SE OF, OR THE
INABILITY TO SE THE PROD CT.
This warranty is void for sales and deliveries outside of
the .S.A.
16
Table of contents
Languages:
Other Maxon Automobile Accessories manuals

Maxon
Maxon 297890-01G User manual

Maxon
Maxon DMD-22 User manual

Maxon
Maxon GPC X1-LDF User manual

Maxon
Maxon GPTLR-25 User manual

Maxon
Maxon 49-SX User manual

Maxon
Maxon GPTWR-25 Operating and maintenance instructions

Maxon
Maxon DMD series User manual

Maxon
Maxon Railift Series User manual

Maxon
Maxon T-181 User manual

Maxon
Maxon DMD-22 Operating instructions
Popular Automobile Accessories manuals by other brands

Whispbar
Whispbar K358W Fitting instructions

Spiker
Spiker Tacoma T2SG installation instructions

Safe Fleet
Safe Fleet PRIME DESIGN PBR-255 ARE2 quick start guide

ARB
ARB DELUXE BULL BAR Fitting instructions

Whispbar
Whispbar K681W Fitting instructions

Thule
Thule Railing Foot Half Pack 4152 installation instructions