Medin Miniflow REF 4000 User manual

medin Medical Innovations GmbH
Adam-Geisler-Str. 1
D-82140 Olching
Made in Germany
For USA: Rx only
Miniflow® and
accessories

Classification:
- Prongs, Masks, Miniflow: class IIa
- Bonnets: class I
0483
medin Medical Innovations GmbH
Adam-Geisler-Str. 1
D-82140 Olching
OP Miniflow
REV 07
Stand 30.08.2017

1
Contents
2
DE
7
EN
12
ES
17
FR
22
IT
27
NL
32
CS
37
NO
42
SL
47
ZH
52
FI
57
EL
63
SV
67
PT
73
TR
78
RU
84
PL
89
RO
94
JA
99
History of Changes
100
Notes

Handbuch Miniflow® DE 2
Warnung: Handbuch und Gebrauch
Lesen Sie vor Verwendung der Produkte diese Gebrauchsanweisung genau durch und befolgen Sie die Anweisungen genauestens.
Der Miniflow®darf nur mit detaillierter Kenntnis über und unter Beachtung dieser Gebrauchsanleitung und nur für den unter
Zweckbestimmung beschriebenen Zweck verwendet werden.
Miniflow®darf nur in Kombination mit einem passenden Beatmungsgerät oder einem geeignetem Wasserschloss mit
Druckregeleinheit und einer geeigneten Patientenüberwachung verwendet werden.
Die Masken, Prongs und Mützen dürfen nur in Kombination mit einem Miniflow®verwendet werden und nur mit Kenntnis dieser
Gebrauchsanweisung.
Die Warnungen und Hinweise sind zu beachten.
Der Gebrauch der in Kombination mit Miniflow®verwendeten Geräte (z. B: Beatmungsgerät und Befeuchter) ist in den jeweiligen
Gebrauchsanweisungen der Geräte beschrieben. Diese Gebrauchsanweisungen sind ebenfalls zu befolgen.
1. Zweckbestimmung
1.1 Miniflow®
Der Miniflow®ist ein Einmalprodukt für die nCPAP Therapie oder nichtinvasive Beatmung an Früh- und Normalzeitgeborenen auf
Intensivstationen. Dabei ist der Miniflow®die Schnittstelle zum Patienten. Er wird in Kombination mit einem Beatmungsgerät
verwendet, welches den CPAP Druck kontrolliert und den Miniflow®mit dem nötigen Gas versorgt.
1.2 Mützen, Masken, Prongs
Die Mützen, Masken und Prongs sind Produkte zur Verwendung für die nCPAP Therapie oder nichtinvasive Beatmung von Frühchen
und Neugeborenen. Sie sind in Kombination mit den nCPAP Generatoren Miniflow®zu verwenden. Die Mützen sind in verschiedenen
Größen verfügbar und werden zur Fixierung der nCPAP Generatoren und zur Fixierung der Masken und Prongs verwendet. Sie können
je nach Version nur einmal oder mehrfach verwendet werden. Die Masken und Prongs sind einmal verwendbare Silikonadapter,
welche den Kontakt zwischen dem nCPAP System und dem Patienten herstellen. Ihre verschiedenen Größen ermöglichen, dass eine
möglichst sanfte und dichte Verbindung zur Nase des Patienten hergestellt wird.
Warnung: Verwendung des Miniflow®
2. Funktionsprinzip und technische Spezifikation
2.1 Miniflow®
Der Miniflow®ist ein Patienteninterface, welches im CPAP Modus oder bei nichtinvasiver Beatmung in Kombination mit einem
Ventilator oder einem Bubble-CPAP System verwendet werden kann. Deshalb kann Miniflow®mit dem Inspirations- und dem
Exspirationsschlauch verbunden werden und darüber mit dem Beatmungsgerät. Am Beatmungsgerät werden die CPAP Parameter
eingestellt und geregelt. Das Beatmungsgerät stellt auch den nötigen Gasfluss zur Verfügung.
Im Miniflow®sind der Exspirations- und der Inspirationsgasfluss durch eine Trennwand bis zum Erreichen des Prongadapters
voneinander getrennt. Der Prongadapter ist kippbar, dadurch kann die Richtung des Prongadapters an die Nasenanatomie und Größe
des Babys angepasst werden und so die Fixierung erleichtert wird.
Auf den Prongadapter wird ein Silikonprong oder eine Silikonmaske, welche entsprechend der Größe des Babys ausgewählt werden,
aufgesteckt. Der Prong oder die Maske stellen einen sanften Kontakt zwischen dem CPAP System und der Nase des Babys sicher.
Der Miniflow®selbst wird auf der Mütze befestigt, welche das Baby auf hat.
Technische Daten:
Exspirationsanschluss:
10mm
Inspirationsanschluss:
10mm
Gewicht:
10g
nCPAP Druck:
0-20 cmH2O
2.2 Mützen, Masken, Prongs
An den Mützen aus Polyamid ist an der Oberseite ein geteilter Flausch aufgenäht. Ein Schaumstoffkeil (Minifoam für Miniflow®) wird
zwischen die Flauschteile gesetzt, darin wird Miniflow®platziert und mit einem separaten Kletthalteband fixiert. Die zusätzlich
enthaltenen Bändchen werden zur Stabilisierung der Masken oder Prongposition verwendet und können mit ihren Klettenden
beliebig auf dem Mützenstoff platziert werden.
Die wiederverwendbaren Mützen sind mit einem Klettverschluss ausgestattet, der mittig auf der Stirn des Patienten platziert w
Nur für den klinischen Gebrauch
Die Sauerstoffsättigung im Blut des Patienten muss während des Gebrauchs dauerhaft kontrolliert werden.
Das Produkt darf nur von geschultem Personal verwendet werden.
Miniflow®und Masken, Einmalmützen, Prongs sind Einmalprodukte, sie dürfen nur an einem einzigen Patienten
verwendet werden –und dürfen nicht wiederaufbereitet werden.
Die Mützen, Masken und Prongs dürfen nur in Kombination mit einem Miniflow®verwendet werden.
Miniflow®darf nur in Kombination mit einem Beatmungsgerät oder einem Wasserschloss mit Druckregeleinheit
verwendet werden.
Bei Verwendung eines geeigneten Wasserschlosses mit Druckregeleinheit muss der in der entsprechenden
Gebrauchsanweisung genannte Mindestflow des Systems beachtet werden.

Handbuch Miniflow® DE 3
ird. In diesem Klettverschluss wird das Interface fixiert. Die Mützen haben spezielle Flauschflächen zur Befestigung der Bändchen.
Die Masken und Prongs bestehen zu 100% aus Silikon. Sie enthalten jeweils Ösen für die Bändchen zur Befestigung an der Mütze.
Zudem enthalten sie für den Anschluss am Medijet®oder am Miniflow®ein Lochpaar, in welches der Kippadapter des Miniflow®s
eingesteckt wird.
Einmalmützen
Wiederverwendbare
Mützen
Masken
Prongs
Material
Polyamid
Polyamid
Silikon
Silikon
Verwendung
Einmalprodukt
Wieder verwendbar
Einmalprodukt
Einmalprodukt
60°C(140°F)
Verfügbare Größen
XXS bis XXXL
XS bis XXXXL
XS bis XL
XS bis XL
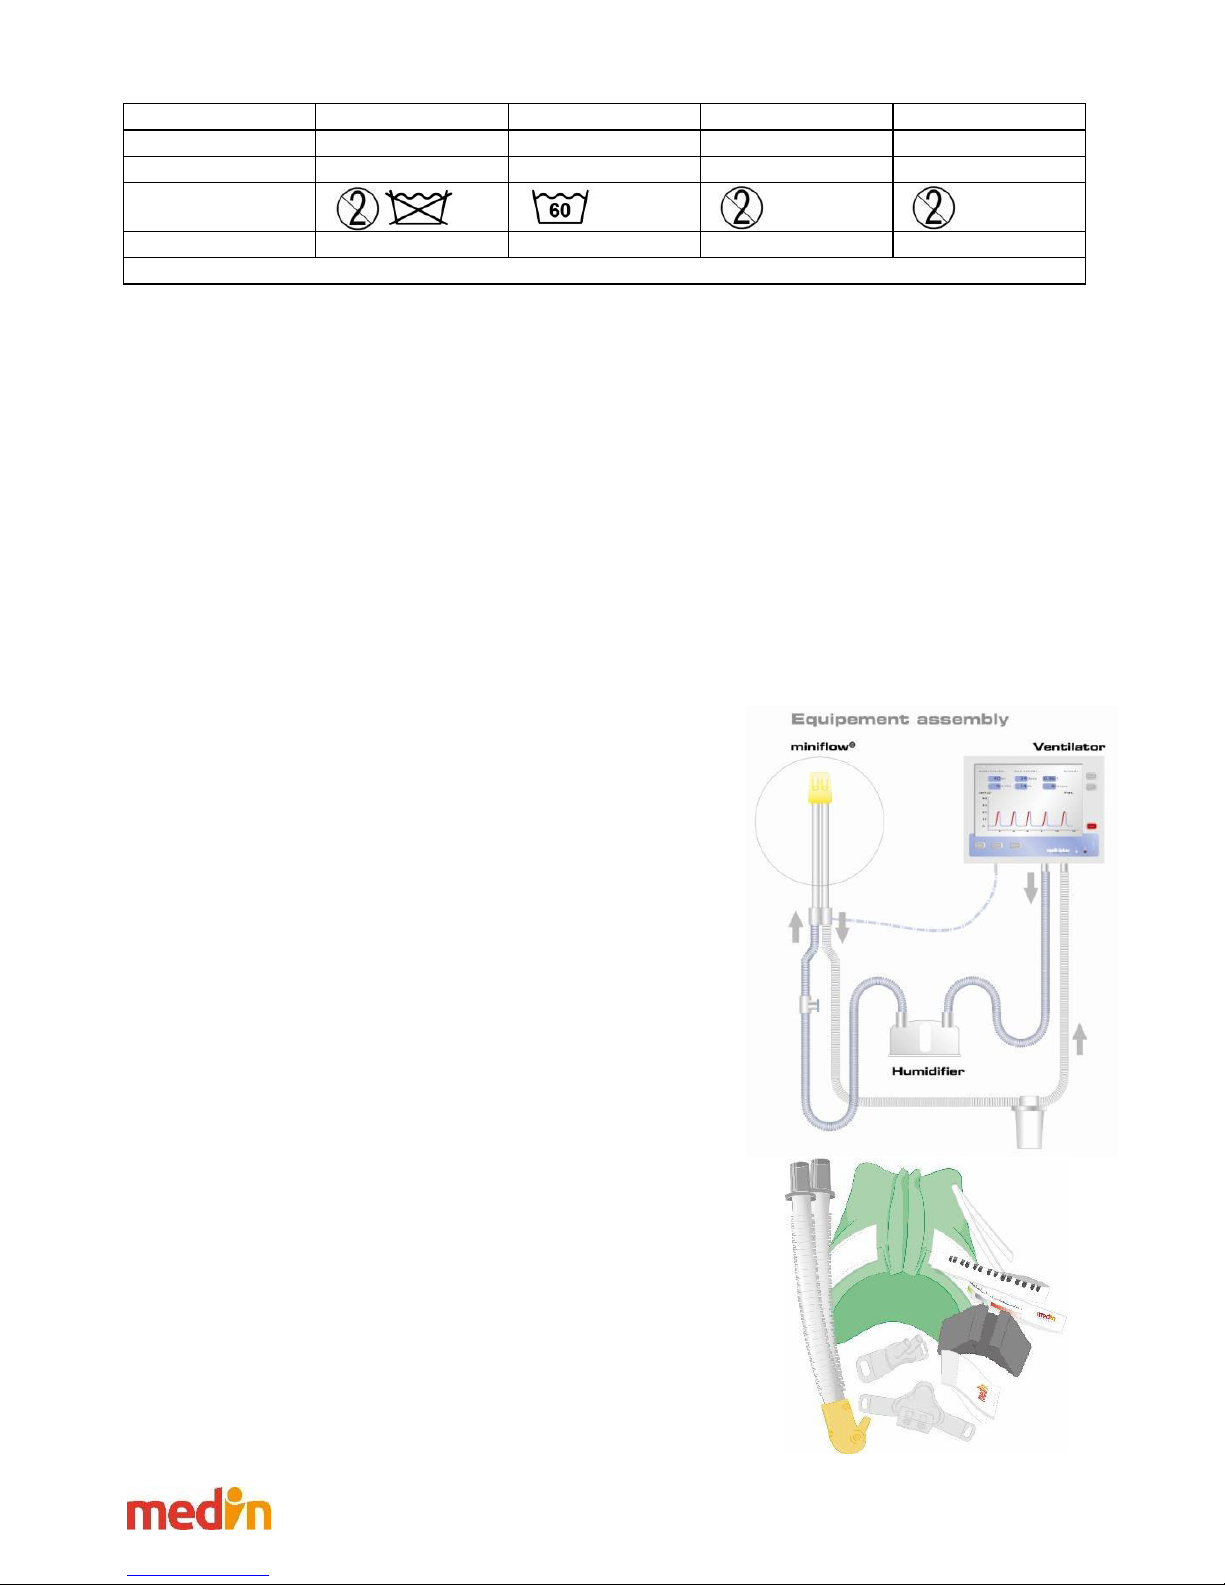
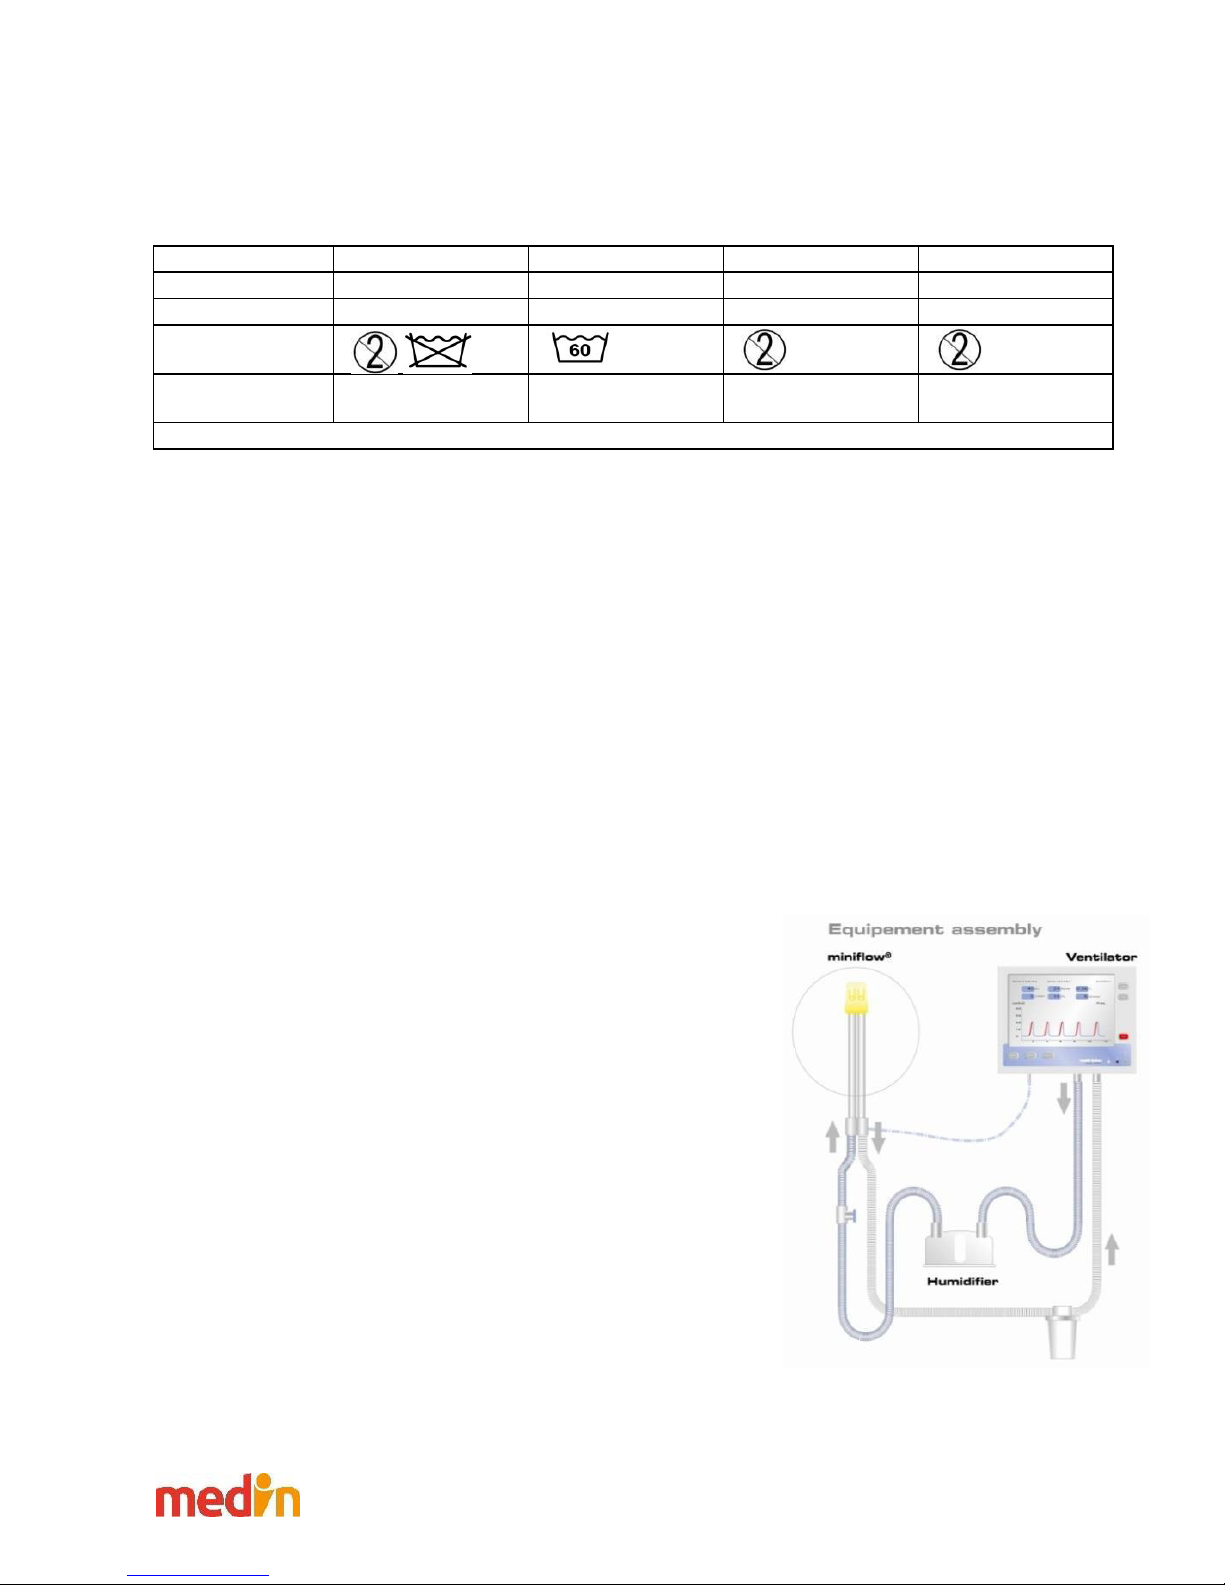
Kombinierbare nCPAP Generatoren: Medijet®1000, Medijet®1010, Medijet®1020 und Miniflow®4000
3. Aufbau und Anwendung
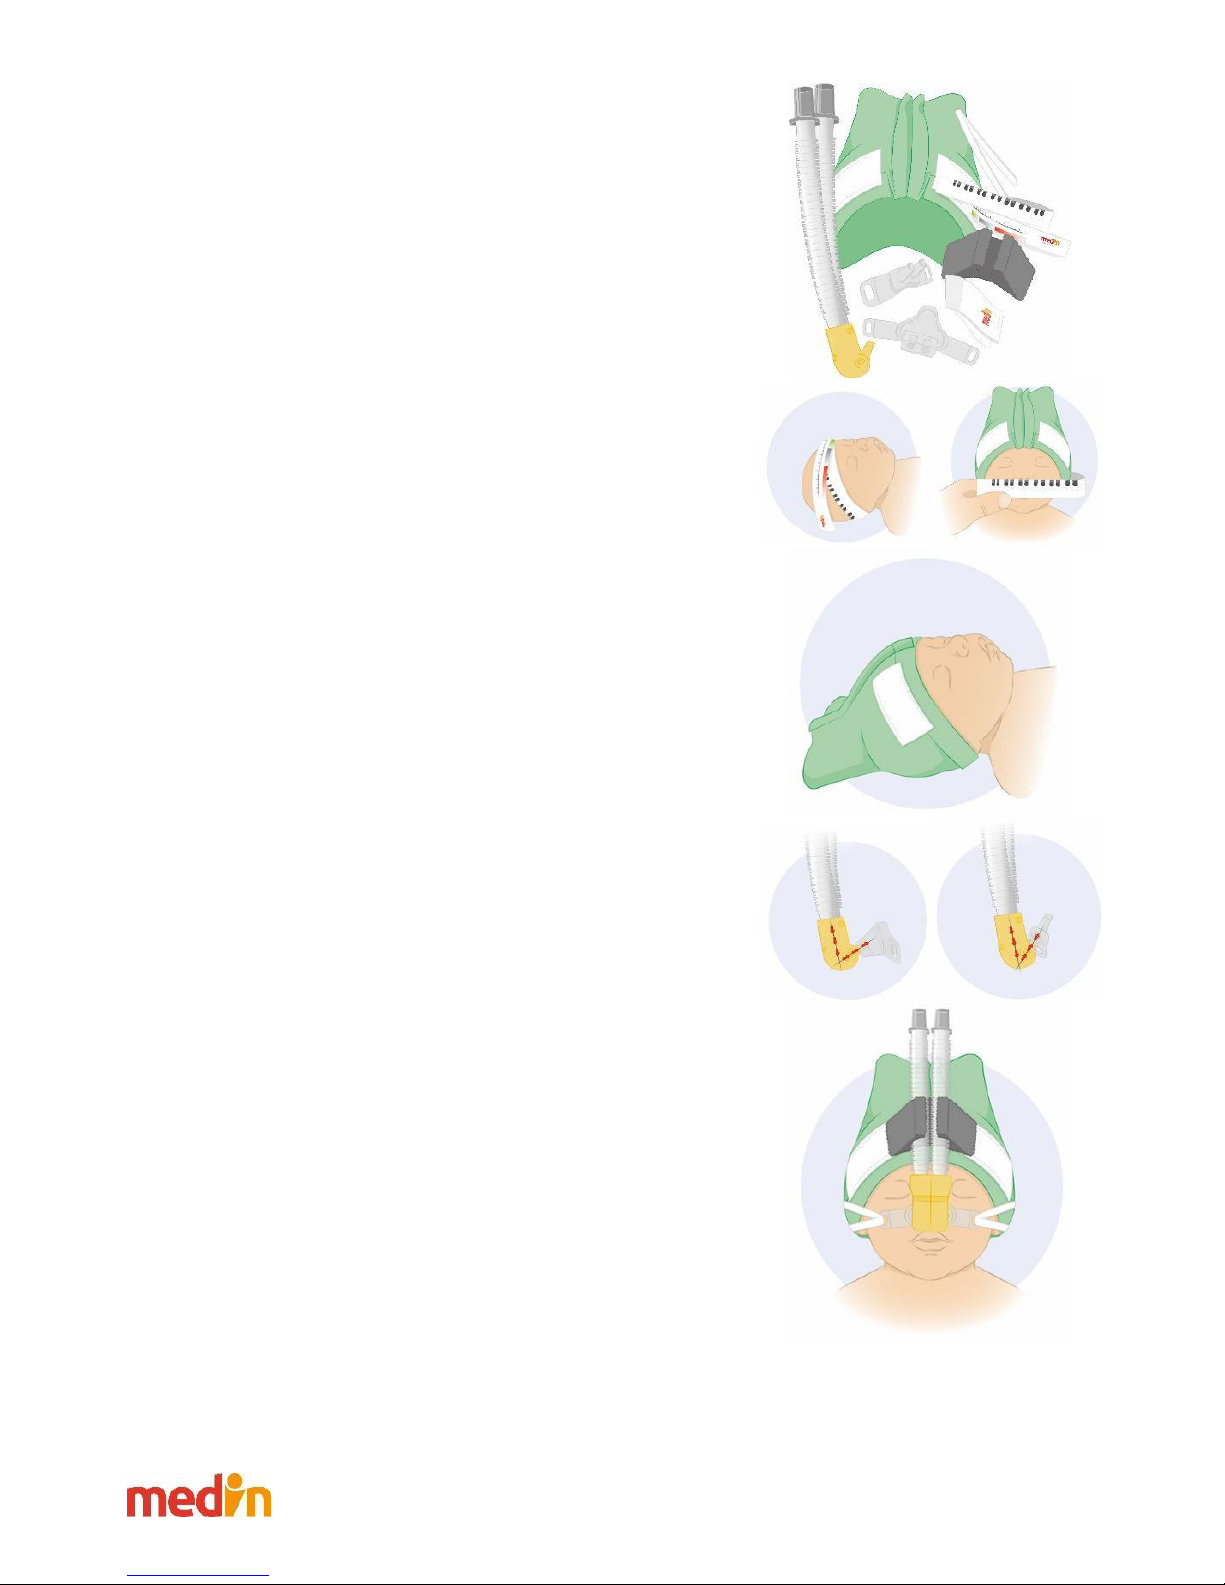
Nötige Ausrüstung:
Um eine effektive CPAP Therapie mit dem Miniflow®durchzuführen wird diese Ausrüstung benötigt:
Ein Beatmungsgerät oder ein Bubble CPAP System
Ein aktiver Atmegasbefeuchter
Ein Miniflow®
Ein passendes Schlauchset, welches eine Inspirations- und eine Exspirationsleitung enthalten muss. Zusätzlich wird eine
Kammer für den Befeuchter benötigt. Die Anschlüsse an den Schlauchenden müssen F10 sein, um auf den Miniflow®zu passen.
Ein Maßband, um die Größen von Mützen und Prongs zu bestimmen
Eine Mütze –ihre Größe muss passend zum Baby ausgewählt werden.
Eine Maske oder ein Prong der richtigen Größe
Optional für Beatmungsgeräte, welche eine externe Druckmessung benötigen:
Ein T-Stück zur Messung des Drucks (in den medin Schläuchen bereits enthalten oder separat bestellbar REF 4010)
Warnung: Verpackung
Ist die Verpackung eines Teiles beschädigt oder sind die Produkte selbst beschädigt, dürfen diese Teile nicht verwendet werden und
müssen entsorgt werden.
Prüfen Sie außerdem die Löcher des Generators sowie der Prongs/ Masken auf Durchgängigkeit. Bei einer Blockade der Löcher dürfen
betroffene Produkte nicht verwendet werden.
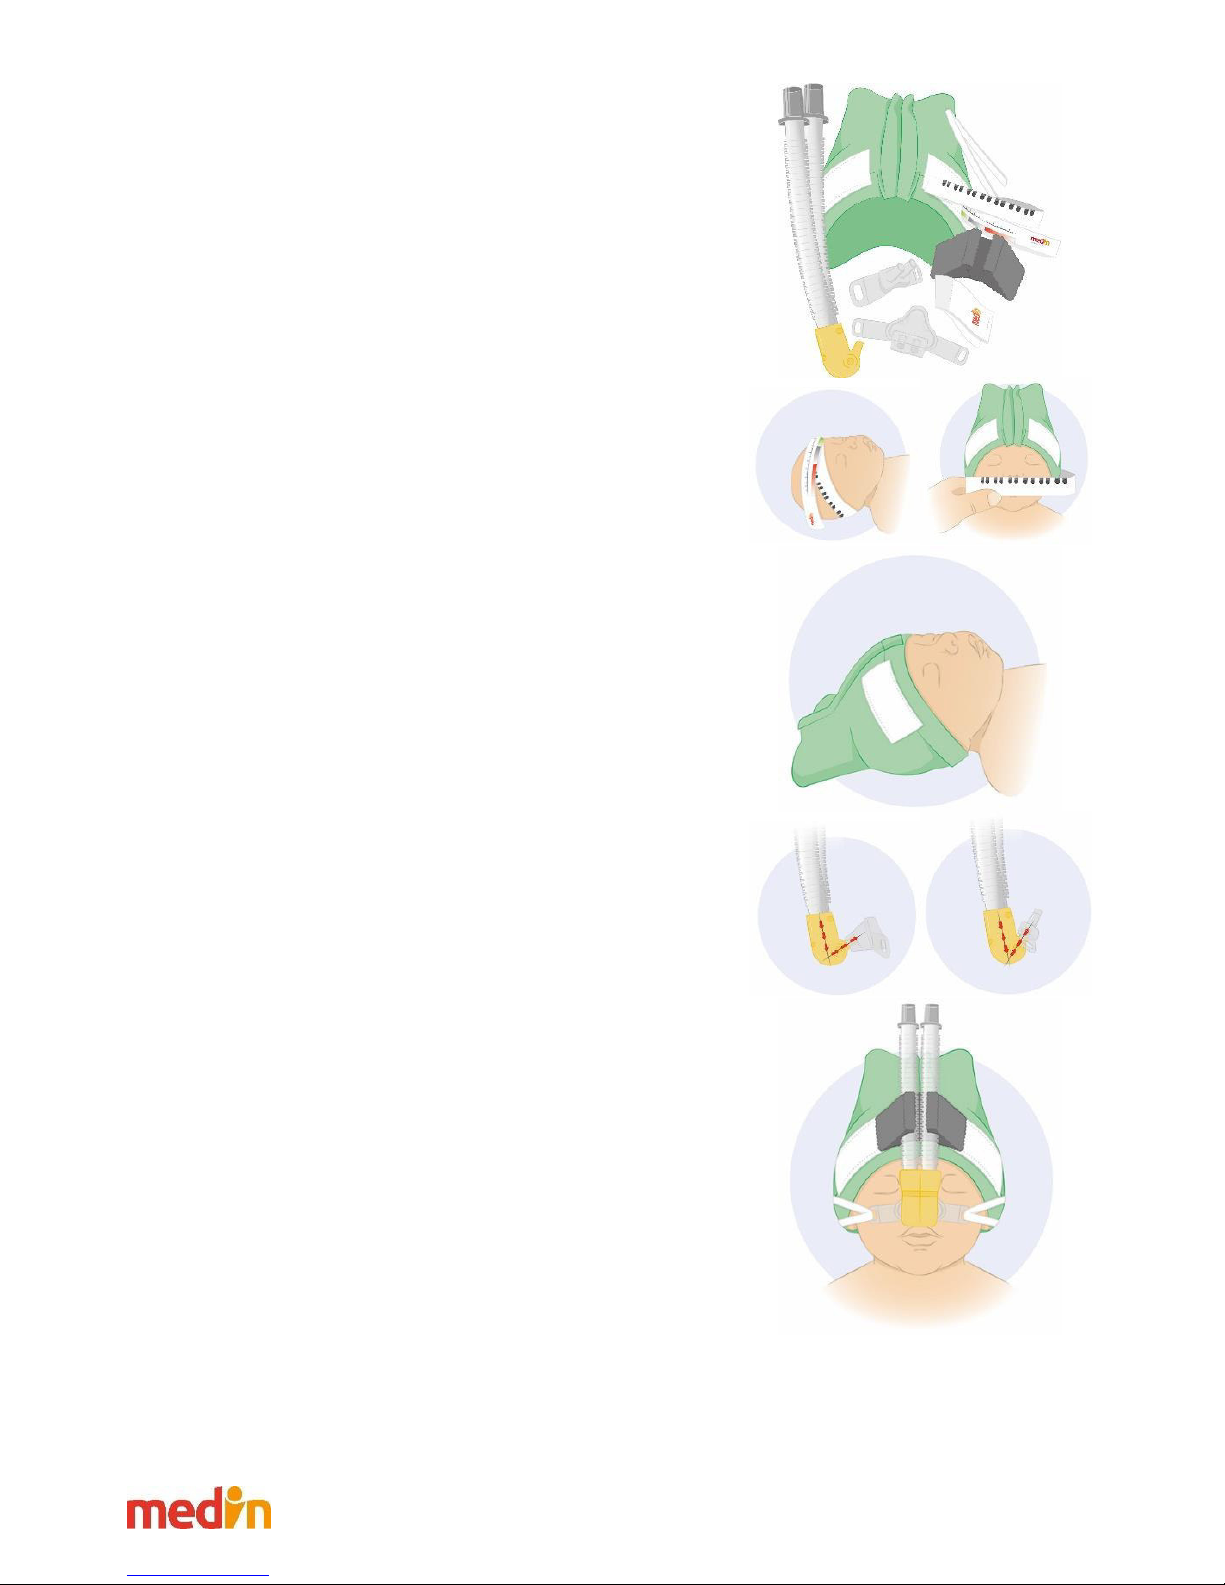
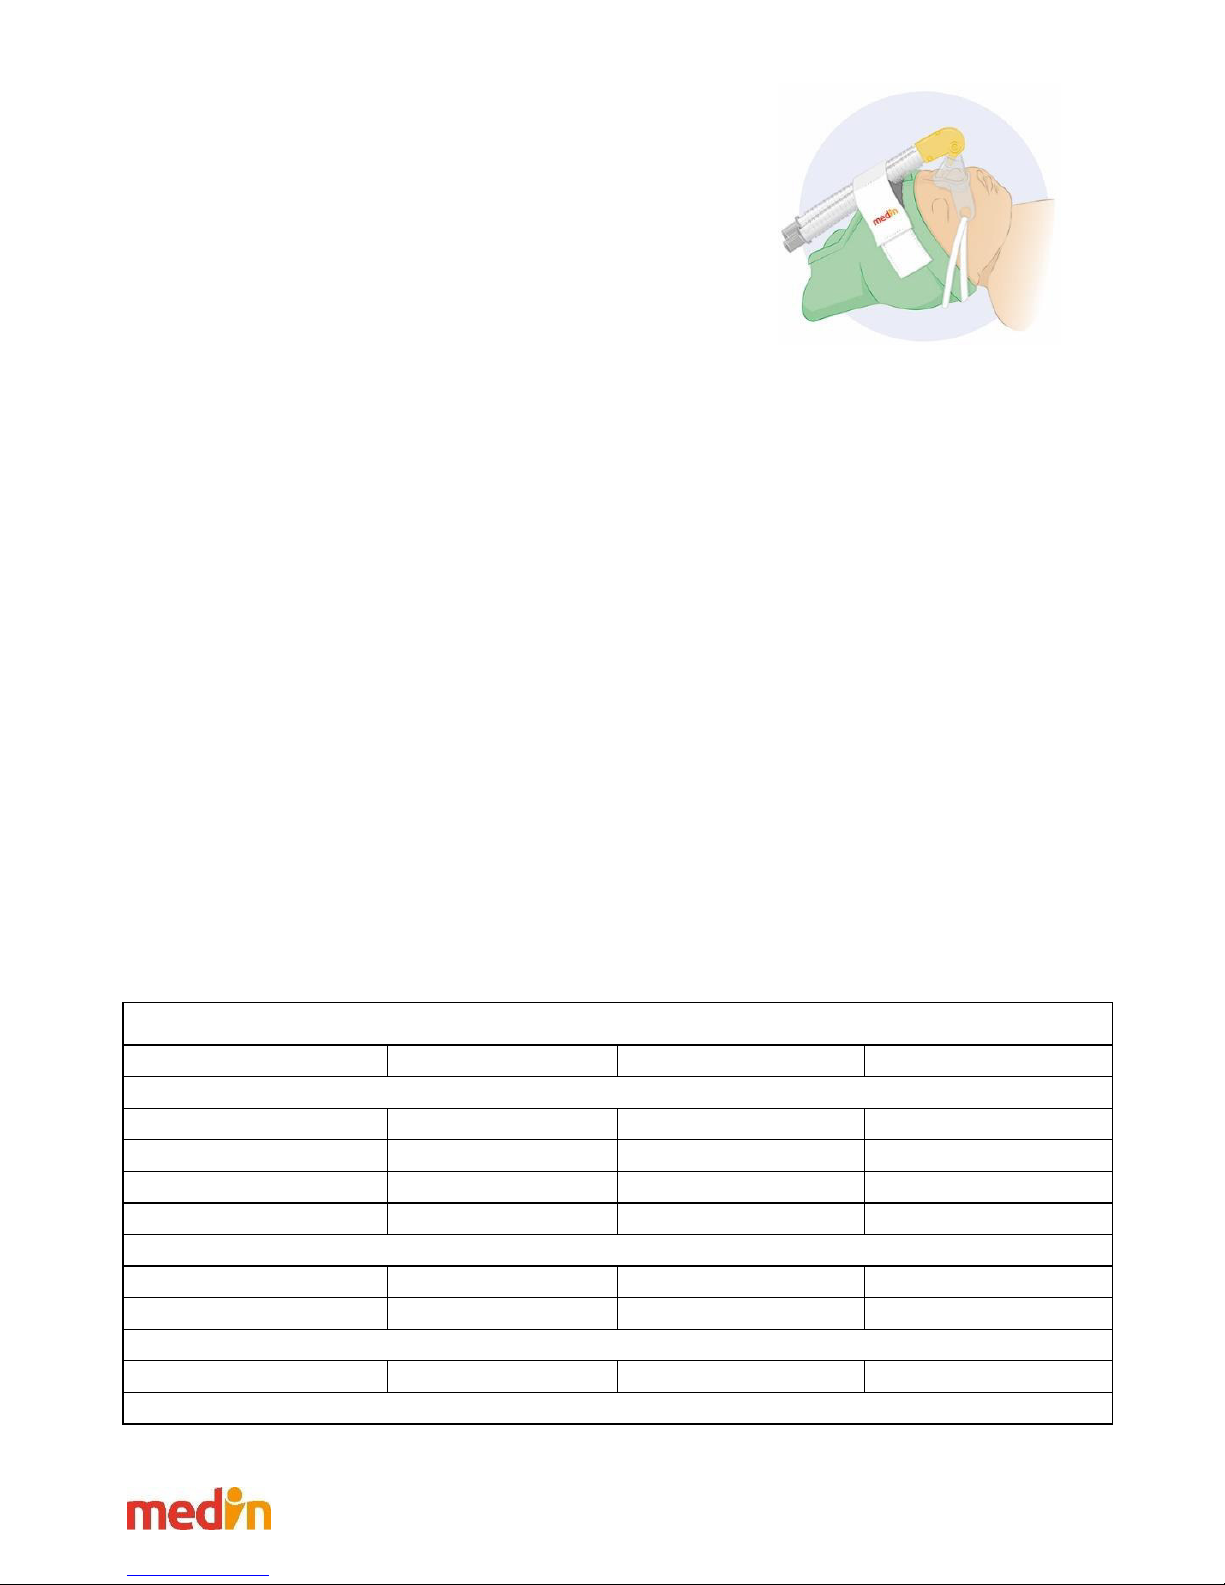
Aufbau und Set-up des Systems (Einmalmützen)
(1) Das Schlauchset am Beatmungsgerät und dem Befeuchter
anschließen. Falls nötig verwenden Sie die beigelegten Adapter.
Stecken Sie die Temperatursensoren bis zum Anschlag ein, ihre Spitze
muss im Gasfluß sein.
(2) Schließen Sie den Miniflow®an den Inspirations- und
Exspirationsschlauch an. Falls Ihr Beatmungsgerät eine externe
Druckmessung benötigt, fügen Sie in das Exspirationsteil das T-Stück
zur Druckmessung ein. In dieses wiederum kann die Druckmessleitung
eingesteckt werden und mit dem Beatmungsgerät verbunden werden.
(3) Verschließen Sie den Prongadapter des Miniflow®s per Hand und
stellen Sie die CPAP Parameter, z. B. den Druck, am Beatmungsgerät
an. Falls dies nicht möglich ist, überprüfen Sie die Verbindungen der
Schläuche auf Leckagen. Wenn alle Verbindungen korrekt sind und der
Miniflow®die Probleme verursacht, muss der Miniflow®entsorgt
werden und darf nicht verwendet werden.
Wichtiger Hinweis: Defekter Miniflow®
Falls der Miniflow®nicht korrekt arbeitet, darf er nicht verwendet werden.
Handbuch Miniflow® DE 4
(4) Wählen Sie einen Prong oder eine Maske mit Hilfe des Maßbandes aus.
Der Prong sollte so groß ausgewählt werden, dass er das gesamte
Nasenloch verschließt. Die Maske sollte so gewählt werden, dass sie
genau neben die Nasenflügel passt. Ein Prong wird so auf den
Miniflow®Generator gesteckt, dass die bogenförmige Seite des Prongs
zur Oberlippe des Patienten zeigt. Die Maske wird so aufgesteckt, dass
sie zur Form der Nase passt.
Hinweis: Prongs
Immer den größtmöglichen Prong verwenden, um Leckagen zu vermeiden
und um einen bestmöglichen Sitz zu gewährleisten –je geringer die Leckagen
sind, desto höher und stabiler ist der nCPAP-Druck.
Warnung: Prongs und Masken
Immer den Miniflow®vollständig in die Prongs oder Masken einstecken und
keine Creme in der Nähe der Prongs, Masken oder Miniflow®s verwenden, da
sonst der Prong oder die Maske vom Miniflow®rutschen kann.
Die Prongs und Masken dürfen nicht wiederaufbereitet und
wiederverwendet werden. Sie sind nur für den Einmalgebrauch.
Wiederaufbereitete Prongs und Masken können verhärten und den
Patienten verletzen.
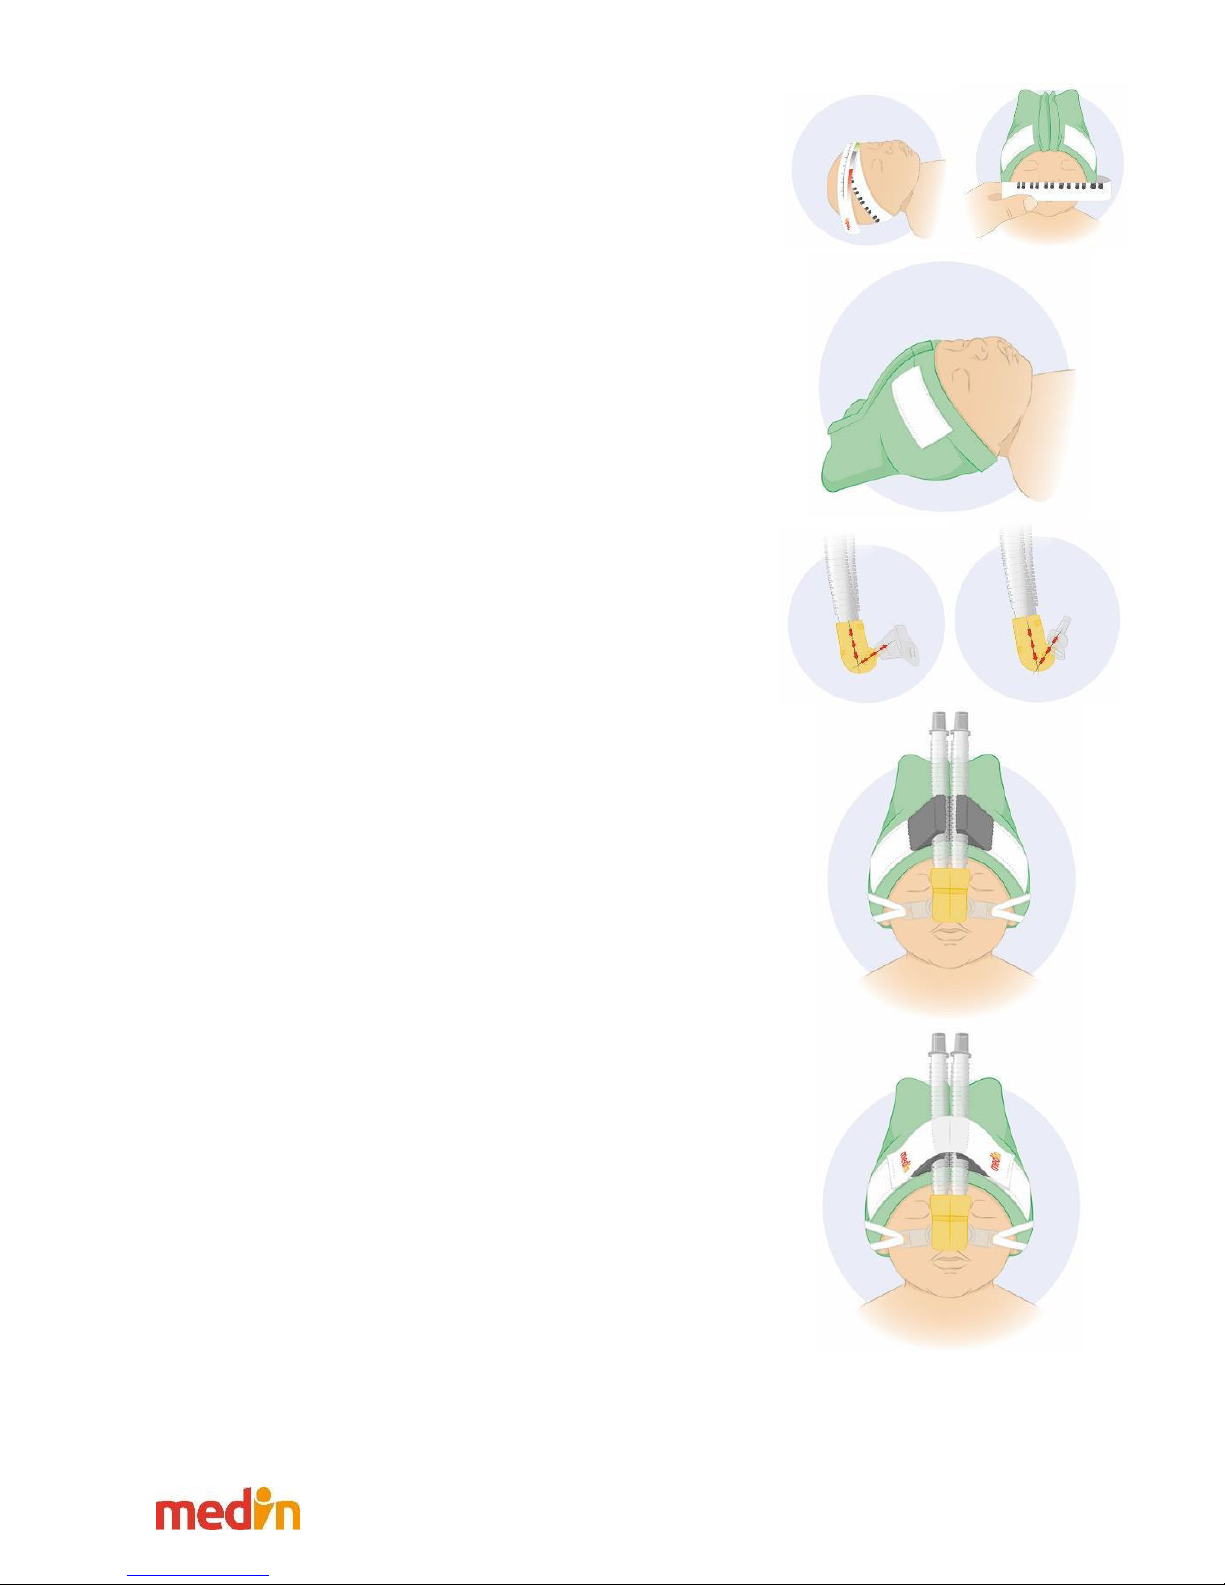
(5) Wählen Sie mit dem Maßband und der entsprechenden Farbkodierung
eine Mütze der richtigen Größe. Die Mütze soll fest genug sitzen, ohne
zu einer Deformation des Kopfes zu führen. Entfernen Sie das
Kletthalteband von der Mütze und legen es griffbereit zur Seite. Die
Mütze wird so auf den Kopf gesetzt, dass die Lücke zwischen den
beiden Flauschteilen mittig über der Stirn sitzt. Die Mütze soll die
Ohren bedecken und bis in den Nacken gezogen werden. Fädeln Sie
die Fixationsbändchen durch die Ösen am Prong oder an der Maske
(siehe Bild).
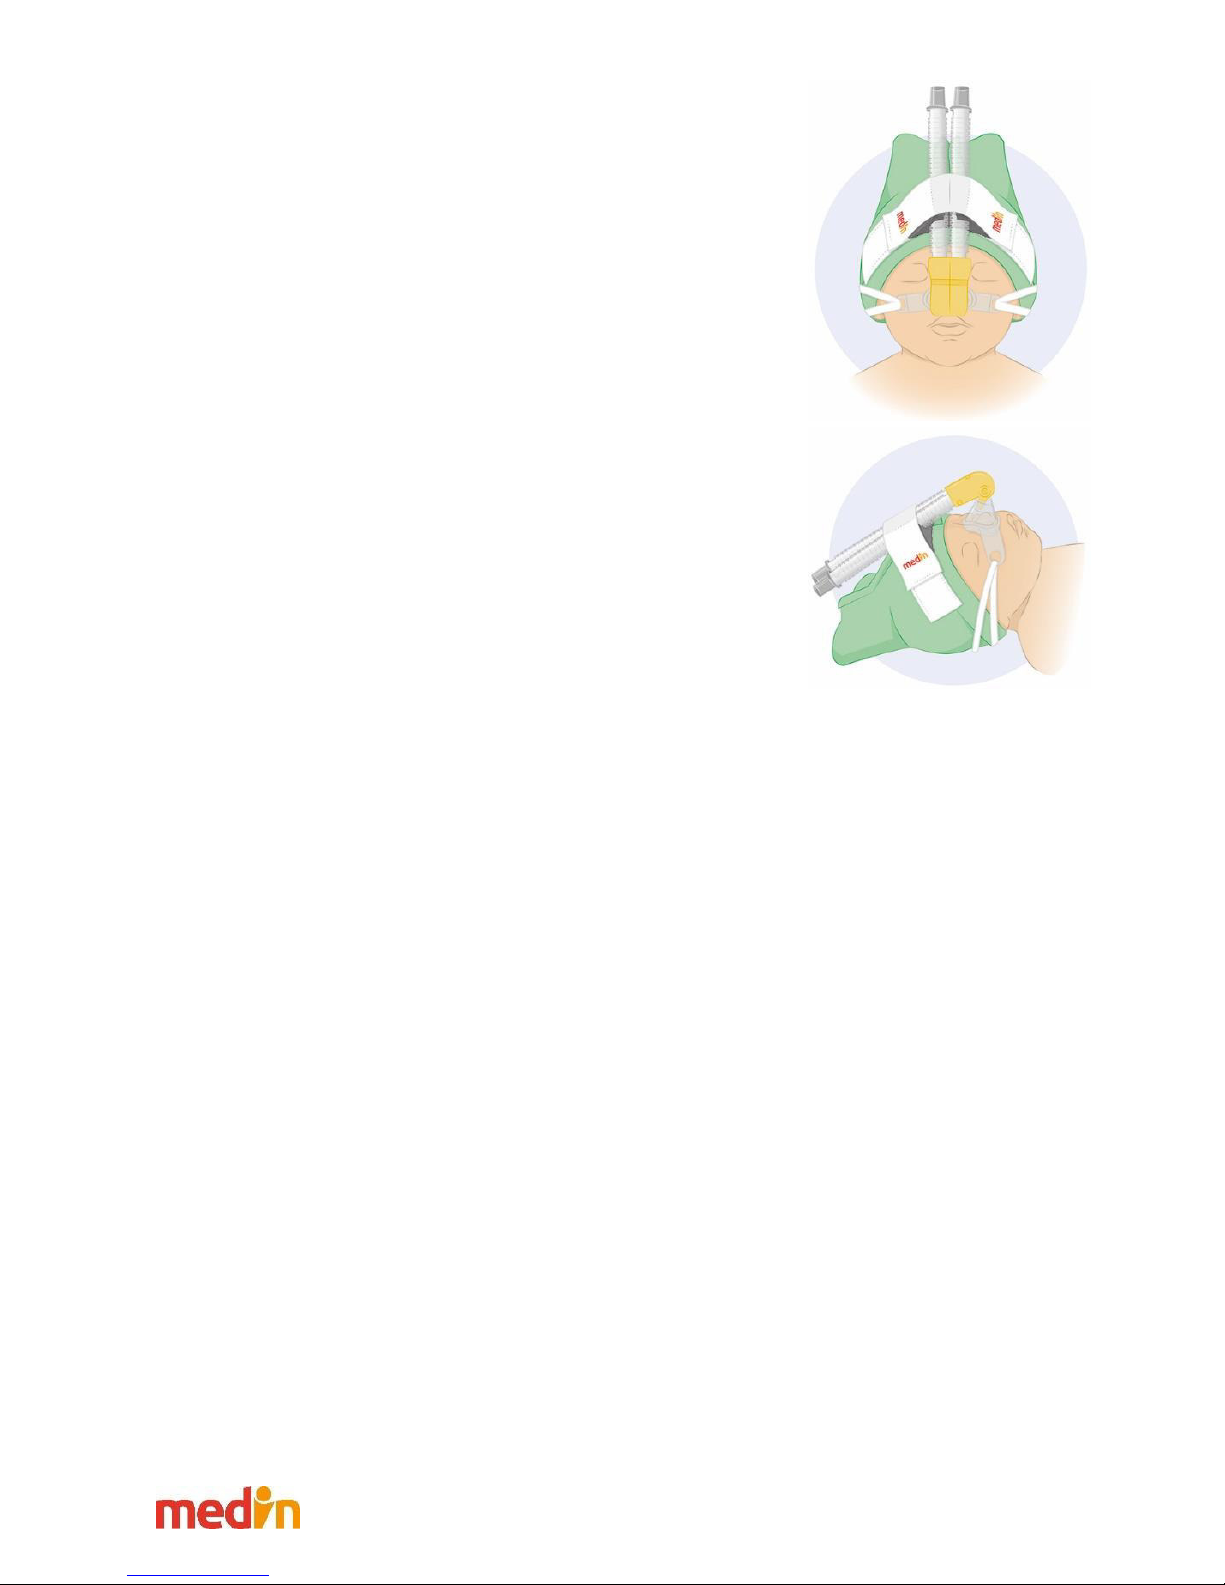
Die Mehrwegmütze ist, im Gegensatz zur Einmalmütze, mit einem
Klettverschluss ausgestattet, in dem das Interface fixiert wird. Die
Schläuche werden hinter dem Kopf des Patienten weitergeführt.
Hinweis Mützen:
Ziehen Sie die Mütze knapp über die Augenbrauen des Patienten so nah wie
möglich zu den Augen –die Fixierung des Medijet®s wird dadurch vereinfacht.
Zu kleine Mützen führen zur Deformierung des Patientenkopfes. Zu große
Mützen können keine ausreichende Fixierung des CPAP Generators
sicherstellen.
(6) Wählen Sie den günstigsten Winkel für den Prongadapter des
Miniflow®s (45° oder 60°). Wird ein Prong benutzt, bietet sich meist der
engere Winkel an, beim Einsatz der Maske der weitere. Setzen Sie den
Minifoam Schaumstoffkeil zwischen die beiden Flauschstücke in die
Mitte der Mütze. Passen Sie den Miniflow®in die dafür vorgesehene
ovale Öffnung des Schaumstoffs ein. Führen Sie den Prong in die
Nasenlöcher ein. Halten Sie dabei einen kleinen Abstand zwischen
Nasenseptum und Basis des Prongs. Beim Einsatz der Maske ist auf
gleichmäßige Auflage auf der Haut zu achten. Die Nasenlöcher sind frei
zu halten und sollen von keinem Teil der Maske verlegt werden.
Fixieren Sie den Miniflow®mit dem Klettband von oben auf den
Flauschstücken der Mütze. Fixieren Sie den Klettbereich der Bändchen
im Bereich der Ohren in Verlängerung der Fixationslaschen des Prongs.
Ziehen Sie die Bändchen nicht zu fest an, sie sollen lediglich für den
nötigen Seitenhalt sorgen.
Wichtiger Hinweis: Befestigen der Prongs und Masken
Führen Sie Prongs nicht komplett in die Nasenlöcher ein. Der
Anschlussblock sollte die Nase nicht berühren.
Handbuch Miniflow® DE 5
Ein regelmäßiger Wechsel zwischen Prong und Maske ist eine
effektive Methode um Hautschäden am Patienten zu
vermeiden oder zu reduzieren
Ziehen Sie die Bändchen nicht zu fest an. Der Miniflow®wird
hauptsächlich über die Mütze und den Schaumstoff gehalten.
Falls die Leckage zu groß ist, überprüfen Sie die gewählte Prong
oder Maskengröße - die Bändchen fester anzuziehen löst das
Problem nicht zwingend.
Eine zu feste Befestigung der Bändchen oder ein zu weites
Einführen der Prongs kann zu Druckstellen an der Nase oder
der Haut des Babys führen.
Wichtiger Hinweis: Fixierung der In- und Exspirationsschläuche
Stellen Sie sicher, dass das Gewicht der Schläuche nicht direkt
am Kopf des Patienten und dem Interface zieht. Unterstützen
Sie die Schläuche mit Lagerungsmitteln.
Die In- und Exspirationsschläuche sollten ein Gefälle weg vom
Patienten und Miniflow®aufweisen, damit das
Kondensatwasser nicht zum Baby läuft.
(7) Überprüfen Sie regelmäßig die CPAP Einstellungen und die Fixierung.
Wichtiger Hinweis: Regelmäßige Überprüfung der Fixierung
Überprüfen Sie den Sitz und die Fixierung des Miniflow®s und der Zubehörs regelmäßig, da sonst Druckstellen entstehen können.
Überprüfen Sie die Prongs und Masken regelmäßig auf Sekretansammlungen, da es sonst zu einer Obstruktion kommen könnte.
4. An den Miniflow®anschließbare Beatmungsgeräte
Der Miniflow®kann mit jedem Beatmungsgerät verbunden werden, welches diese Voraussetzungen erfüllt:
Das Beatmungsgerät muss einen CPAP Modus oder einen nicht-invasiven Modus anbieten. Dieser muss:
oDen Flow und Druck so steuern, dass im Schlauchsystem ein konstanter Druck erreicht wird.
oOhne externen Flowsensor arbeiten können.
oDen Druck geräteintern oder an einem zusätzlichen T-Stück im Schlauchsystem messen.
oLeichte Leckagen im Schlauchsystem tolerieren.
Das Beatmungsgerät muss für die Inspiration und Exspiration Anschlüsse der Größe M22 oder F15 haben, dann kann es mit
den medin Schlauchsätzen verbunden werden, oder es müssen für das Beatmungsgerät Schlauchsätze (In- und Exspiration)
existieren, welche auf der Seite des Miniflow®s einen F10-Anschluss enthalten.
Miniflow®ist unter anderem kombinierbar mit:
Maquet SERVO Serie (i, u und n)
SLE 4000, 5000 und 6000
Hamilton T1, C1, MR1, C2, C3, C6, G5, S1
Newport Medical e360 Ventilator:
Für Newport Medical e360 bei Benutzung mit dem Miniflow®nur von Newport empfohlene Beatmungsschläuche verwenden.
Entfernen Sie den Miniflow®aus den Schläuchen, während die e360 Schlauchprüfung durchgeführt wird.
4.1 Mützen, Masken, Prongs
Alle Mützen, Masken und Prongs können nur mit den nCPAP Generatoren Miniflow®kombiniert werden.

Handbuch Miniflow® DE 6
5. Zubehör
Miniflow®20 Stück
REF 4000
Prongs –10 Stück Einmalgebrauch
X Small
REF 1200-01
Large
REF 1200-22
Small
REF 1200-21
Large wide
REF 1200-33
Medium
REF 1200-02
X large
REF 1200-03
Medium wide
REF 1200-32
Masken –10 Stück Einmalgebrauch
X Small
REF 1200-08
Medium
REF 1200-05
Small
REF 1200-04
Large
REF 1200-06
Masken –5 Stück Einmalgebrauch
X Large
REF 1200-07
Mützen –10 Stück Einmalgebrauch-
XX Small
REF 1213-10
Large
REF 1217-10
X Small
REF 1214-10
X large
REF 1218-10
Small
REF 1215-10
XX large
REF 1219-10
Medium
REF 1216-10
XXX large
REF 1220-10
Mützen –1 Stück wieder verwendbar
Micro
REF 1214
X large
REF 1218
Small
REF 1215
XX large
REF 1219
Medium
REF 1216
XXX large
REF 1220
Large
REF 1217
XXXX large
REF 1221
Minifoam - 10 Stück
REF 4030
Schläuche –10 Sets –Einmalgebrauch
Einmal Schlauchsätze für
Miniflow®mit beheizter
Inspiration und
Befeuchterkammer
REF 206746
Einmal Schlauchsätze für
Miniflow®mit beheizter
Inspiration
REF 206748
Einmal Schlauchsätze für
Miniflow®mit beheizter In-
und Exspiration
REF 206749
Warnung: Zubehör
Der Miniflow®funktioniert nur in Kombination mit diesen Masken, Prongs und Mützen, andernfalls kann die korrekte Funktion nicht
garantiert werden.
Mützen, Masken und Prongs können nur mit den nCPAP Generatoren Miniflow®kombiniert werden.
6. Lagerung und Entsorgung
Der Miniflow®und sein Zubehör müssen in einem sauberen und trockenen
Raum gelagert werden. Temperaturen zwischen -30°C und 70°C haben keinen
negativen Einfluss auf den Miniflow®oder das Zubehör.
Der Miniflow®und sein Zubehör können im normalen Hausmüll entsorgt
werden.

User Manual EN 7
Warning: instructions for use and usage
Read these instructions for use carefully before using these products and follow the instructions precisely. Miniflow®may only be
used by those with detailed knowledge of these instructions for use, which must be strictly observed. Miniflow®may only be used
for the purpose described in the chapter intended use.
Miniflow® may only be used in combination with an appropriate ventilator or a suitable surge tank with a pressure-regulating unit
and appropriate patient monitoring.
The masks, prongs and bonnets may only be used in combination with a Miniflow® and only with knowledge of these instructions
for use.
All warnings and instructions must be followed.
The use of devices (e.g. ventilator and humidifier) which are used in combination with Miniflow®is described in the instructions for
use of these devices. Such instructions for use must also be followed.
1. Intended use
1.1 Miniflow®
Miniflow®is a single use product for nCPAP therapy / non invasive ventilation therapy in treating neonates and premature infants
in intensive care units. In such cases, Miniflow®serves as the patient interface. It is used in combination with a ventilator, which
controls the nCPAP pressure and supports Miniflow®with the necessary gas flow.
1.2 Masks, Prongs and Bonnets
The bonnets, masks and prongs are products for use during nCPAP therapy / non invasive therapy when treating neonates and
premature infants. They are to be used in combination with the Miniflow®nCPAP generators. The bonnets, which are available in
different sizes, are used for fixation of the nCPAP generator, mask and prongs. Depending on the version, the bonnets are either
single-use or reusable. The masks and prongs are single-use products made of silicone, which connect the nCPAP system to the
patient. Their different sizes enable a patient-friendly connection which is as leakage-proofed as possible.
Warning:
2. Functional principle and technical specification
2.1 Miniflow®
The Miniflow®is a patient interface which can be used in CPAP mode or during non-invasive ventilation in combination with a
ventilator or a bubble CPAP system. Miniflow®can be connected to the inspiratory and expiratory tubes and thus to the ventilator.
The CPAP parameters are adjusted and controlled on the ventilator.
Inside Miniflow®, the expiratory and inspiratory gas flows are separated until they reach the prong adapter. The prong adapter is
fleileàadàitsàagleàaàeàadjustedàtoàtheàa’sàsizeàadàaatoàtoàsiplifàfiatio.à
áàsilioàpogàoàask,àhoseàtoàsuitàtoàtheàa’sàsize,àisàoetedàtoàthe prong adapter. The prong or the mask ensure gentle
otatàeteeàtheàCPáPàssteàadàtheàa’sàose.
Miniflow®itselfàisàfasteedàtoàaàoetàoàtheàa’sàhead.
Technical data:
Expiration connector:
10 mm
Inspiration connector:
10 mm
Weight:
10 g
nCPAP pressure:
0-20 cm H2O
2.2 Masks, Prongs and Bonnets
A divided fleece is sewn onto the upper side of the polyamide bonnet. A foam wedge (Minifoam for Miniflow) is placed between
the fleece parts and the Miniflow is placed in this and secured with a separate Velcro strap. The straps additionally included are
used to stabilise the masks or prong position and, with their Velcro ends, they can be placed anywhere on the bonnet fabric.
TheàeusaleàoetsàaeàeuippedàithàaàVeloàlosueàhihàisàplaedàiàtheàeteàofàtheàpatiet’sàfoehead.àTheàitefae is
secured in this Velcro closure. The bonnets have special fleece surfaces for securing the strap. The masks and prongs are made of
100% silicone. They all have holes for inserting the strips for fixation to the bonnet. In addition, they include a pair of holes for
inserting the Medijet or Miniflow®prong connectors.
Only for clinical use.
The patiet’sàogeàsatuatioàustàeàotiuouslàoitoedàduigàuse.
The products may only be used by trained personnel.
Miniflow®, masks, single use bonnets and prongs are single use products for a single patient only. Do not reuse or
reprocess these products.
The bonnets, masks and prongs should only be used in combination with a Miniflow®.
Miniflow®may only be used in combination with a ventilator or a surge tank with a pressure-regulating unit.
When using a suitable surge tank with a pressure-regulating unit, the minimum flow of the system indicated in the
corresponding instructions for use must be observed.
User Manual EN 8
Single-use bonnets
Reusable bonnets
Masks
Prongs
Material
Polyamide
Polyamide
Silicone
Silicone
Use
Single use
Reusable
Single use
Single use
60°C(140°F)
Available sizes:
XXS to XXXL
XS to XXXXL
S to XL
Micro to XL
Combinable nCPAP generators: Medijet 1000, Medijet 1010, Medijet 1020 and Miniflow®4000
3. Set-up and application
Necessary parts:
To administer effective nCPAP therapy with Miniflow®, the following equipment is necessary:
A ventilator or a bubble CPAP system
An active respiratory gas humidifier
a suitable circuit set including inspiratory and expiratory tubes and a chamber for the humidifier. The connectors at the end
of the inspiratory and the expiratory tubes have to be 10 female to fit Miniflow®.
A measuring tape to measure the necessary bonnet and prong size
a bonnet that fits the baby
a mask or prong of the correct size
optional for ventilators which require external pressure measurement:
a pressure measuring T-pieeàaleadàiludedàisideàedi’sàiuitsàoàodered separately (REF 4010)
Warning: packaging
If the packaging of any part or the part itself is damaged, this part cannot be used and must be discarded and disposed of.
Also check that the holes of the generator and of the prongs /masks are not blocked. In the event of blockage, the products in
question must not be used.
Structure and set-up of the system (disposable bonnets):
(1) Connect the circuit set to the ventilator and humidifier. If necessary,
use the extra connectors. Insert the temperature sensors completely,
until the tip reaches the gas flow.
(2) Connect Miniflow®to the inspiratory and expiratory tubes If your
ventilator requires external pressure measurement, insert the T piece
for pressure measurement in the expiration part, where you can insert
the pressure line and connect it to the ventilator.
(3) Close the prong adapter of the Miniflow®with your finger and adjust
the nCPAP parameters on the ventilator, e.g. the pressure. If this is not
possible, check the connections to see if one is leaking. If all
connections are correct and Miniflow®is the reason for the failure,
discard this Miniflow®and dispose of it.
Important instruction: defective Miniflow®
If Miniflow®is not working correctly, it may not be used.
(4) Select a prong or mask with the aid of the measuring tape. The prong
should be selected such that it is large enough to seal the entire
nostril. The mask should be selected such that it fits precisely along
the sides of the nostrils. A prong is placed on the Miniflow®generator
suhàthatàtheàahedàsideàofàtheàpogàpoitsàtoadàtheàpatiet’sà
upper lip. The mask is attached such that it conforms to the shape of
the nose.
Instruction: prongs and masks
Always use the largest possible prong to avoid leaks and ensure the best
possible positioning –the smaller the leak is, the higher and more stable the
CPAP pressure is
User Manual EN 9
Warning: prongs and masks:
Always insert the Miniflow®completely into the progsàoàasksàadàdo’tàuseà
creme near the prong, mask or Miniflow®, otherwise the prong or mask can
slip of the Miniflow®.
Do not re-use the prongs or masks. They are for single patient use only.
Sterilized and disinfected prongs and masks may harden and cause injury to
the patient.
(5) Select a bonnet of the correct size using the measuring tape and the
corresponding colour coding. The bonnet should be secured firmly
enough but without leading to deformation of the head. Remove the
separate Velcro strap from the bonnet and put it aside, within easy
reach. The bonnet is placed on the head such that the gap between
the two fleece parts is centred over the forehead. The bonnet should
cover the ears and be pulled down to the nape of the neck. Thread the
fixation straps through the loops on the prong or on the mask (see
picture).
In contrast to the disposable bonnet, the reusable bonnet is equipped
with a Velcro closure in which the interface is secured. The tubes are
dietedàehidàtheàpatiet’sàhead.
Instruction: bonnets
Pullàtheàoetàdoàtoàjustàaoeàtheàpatiet’sàeeos,àasàloseàasà
possible to the eyes –this makes it easier to secure the Medijet®.
Bonnets which are too sallàleadàtoàdefoatioàofàtheàpatiet’sàhead.à
Bonnets which are too large cannot ensure sufficient fixation of the CPAP
generator.
(6) Select the most appropriate angle for the prong adapter of the
Miniflow®(45° or 60°). If a prong is used, it generally yields the
narrower angle; if a mask is used, it generally yields the wider angle.
Place the Minifoam foam wedge between the two fleece pieces in the
middle of the bonnet. Fit the Miniflow®into the oval opening of the
foam provided. Insert the prong into the nostrils. In doing so, maintain
a small distance between the nasal septum and the base of the prong.
When using the mask, ensure that it rests evenly on the skin. The
nostrils must be kept clear and should not be displaced by any part of
the mask. Using the Velcro strap, secure the Miniflow®from above to
the fleece pieces of the bonnet. Secure the Velcro area of the strap in
the area of the ears as an extension of the fixation loop of the prong.
Do not pull the straps too tightly; they should only provide the lateral
support needed.
Important instruction: prong and mask application
Do not insert the prongs fully into the nostrils. The connector
block should not touch the nose.
Regularly switching between prong and mask is an effective
ethodàfoàaoidigàoàeduigàdaageàtoàtheàpatiet’sàski.à
Do not pull the straps too tight. The Miniflow®is held primarily
by means of the bonnet and the foam. If the leak is too large,
check the selected prong or mask size –pulling the straps more
tightly does not by itself solve the problem.
Excessively tightening the straps or inserting the prongs too far
can lead to pressure points on the baby's nose or skin.
User Manual EN 10
Important instruction: fixation of the inspiratory and expiratory tubes
Ensure that the weight of the tubes does not pull directly on the
patiet’sàheadàoàoàtheàiteface. Use cushioning to support
the tubes.
The inspiration and expiration tubing should slope away from
the patient and the Miniflow®so that the water condensation
does not come into contact with the baby.
(7) Regularly check the CPAP parameters and the fixation.
Important instruction: regular check of the fixation:
Check the fit and fixation of Miniflow®and the accessories regularly to avoid pressure sores.
Check the prongs and masks regularly for accumulation of secretions to avoid obstruction.
4. Ventilators which can be connected to Miniflow®
Miniflow®can be connected to all ventilators that meet the following requirements:
The ventilator has to offer a CPAP or non invasive mode which:
oControls the flow and pressure in such a manner that a constant CPAP pressure is maintained in the tubing
system.
oIs able to work without an external flow sensor.
oMeasures the pressure inside the ventilator or at an external T-connector in the tubing system.
oTolerates small leakages in the tubing system.
If used in combination with Medin circuits, the ventilator has to have 22mm male or 15mm female connectors for the
inspiratory and expiratory tubes. If used with other circuits, the size of the connectors to Miniflow®must be 10 mm
female.
Miniflow®can among others be combined with:
Maquet SERVO Serie (i, u und n)
SLE 4000, 5000 und 6000
Hamilton T1, C1, MR1, C2, C3, C6, G5, S1
Newport Medical e360 Ventilator:
For Newport Medical e360, use only Newport approved breathing circuits when you use with the Miniflow®. Remove the
Miniflow®device from the circuit when e360 Circuit Check is performed.
4.1 Bonnets, masks, prongs
All bonnets, masks and prongs can only be combined with the Miniflow®nCPAP generators.
5. Accessories
Miniflow®20 pieces
REF 4000
Prongs –10 pieces single use
X Small
REF 1200-01
Large
REF 1200-22
Small
REF 1200-21
Large wide
REF 1200-33
Medium
REF 1200-02
X large
REF 1200-03
Medium wide
REF 1200-32
Masks –10 pieces single use
X Small
REF 1200-08
Medium
REF 1200-05
Small
REF 1200-04
Large
REF 1200-06
Masks –5 pieces single use
X Large
REF 1200-07
Bonnets –10 pieces single use

User Manual EN 11
XX Small
REF 1213-10
Large
REF 1217-10
X Small
REF 1214-10
X large
REF 1218-10
Small
REF 1215-10
XX large
REF 1219-10
Medium
REF 1216-10
XXX large
REF 1220-10
Bonnets –1 piece reusable
Micro
REF 1214
X large
REF 1218
Small
REF 1215
XX large
REF 1219
Medium
REF 1216
XXX large
REF 1220
Large
REF 1217
XXXX large
REF 1221
Minifoam - 10 pieces single use
REF 4030
Circuits –10 sets - single use
Disposable circuit set for
Miniflow®with heated
inspiration, expiration with
water trap and humidifier
chamber
REF 206746
Disposable circuit set for
Miniflow®with heated
inspiration and expiration
with water trap
REF 206748
Disposable circuit set for
Miniflow®with heated
inspiration and expiration
REF 206749
Warning: accessories
Miniflow®may only be used in combination with these masks, prongs and bonnets, otherwise the correct function of the device
cannot be guaranteed.
Bonnets, masks and prongs can only be combined with the Miniflow®nCPAP generators.
6. Storage and disposal
Miniflow®and its accessories should be stored in a dry clean place.
Temperatures between -30°C and 70°C have no negative effect on Miniflow®.
Miniflow®and its accessories can be disposed of in the domestic waste.

Manual de usuario de Miniflow®y accesorios ES 12
Advertencia: Instrucciones de uso
Lea detenidamente estas instrucciones de uso antes de la utilización de los productos y siga exactamente las instrucciones.
Miniflow®solo puede utilizarse con un conocimiento detallado y un seguimiento estricto de estas instrucciones de uso, y
exclusivamente para el fin descripto en la sección "Uso previsto".
Miniflow® solo debe utilizarse en combinación con un respirador o una trampa de agua con unidad de regulación de presión
apropiados y una supervisión adecuada del paciente.
Las máscaras, horquillas y gorros solo se deben utilizar en combinación con Miniflow®y habiendo leído estas instrucciones de uso.
Es obligatorio seguir todas las advertencias e instrucciones.
La utilización de los dispositivos (por ejemplo, un respirador y un humidificador) que se usan en combinación con Miniflow®se
describe en las instrucciones de uso correspondientes a cada dispositivo. También es obligatorio seguir estas instrucciones.
1. Uso previsto
1.1 Miniflow®
Miniflow®es un producto de un solo uso para terapia nCPAP (presión positiva nasal continua en las vías respiratorias) o terapias
respiratorias no invasivas en recién nacidos y bebés prematuros tratados en unidades de cuidados intensivos. Miniflow®es la interfaz
del paciente. Se utiliza en combinación con un respirador, el cual controla la presión CPAP y proporciona al Miniflow®el flujo de gas
necesario.
1.2 Gorros, máscaras y cánulas
Los gorros, las máscaras y las cánulas son productos para utilizar en terapia nCPAP o respiración no invasiva de bebés prematuros y
recién nacidos. Deben utilizarse en combinación con los generadores nCPAP Miniflow®. Los gorros están disponibles en distintos
tamaños y se utilizan para la fijación de los generadores nCPAP y la fijación de las máscaras y las cánulas. Según la versión , pueden
utilizarse una única vez o varias veces. Las máscaras y las cánulas son adaptadores de silicona de un solo uso que establecen el
contacto entre el sistema nCPAP y el paciente. Sus distintos tamaños permiten el establecimiento de una unión lo más suave y
ajustada posible con la nariz del paciente.
Advertencia: uso de Miniflow®
2. Principios de funcionamiento y especificaciones técnicas
2.1 Miniflow®
Miniflow®es una interfaz de paciente que puede utilizarse en el modo CPAP o, para la ventilación no invasiva, en combinación con
un ventilador o un sistema CPAP de burbujas. En consecuencia, Miniflow®puede conectarse a los tubos de inspiración y espiración
y, por lo tanto, al respirador. Los parámetros CPAP se ajustan y regulan en el respirador.
En el Miniflow®, los flujos de gas de espiración e inspiración están separados por una pared hasta llegar al adaptador de cánulas. El
adaptador de cánulas puede inclinarse, de modo que su dirección se ajuste a la anatomía nasal y al tamaño del bebé, lo que facilita
su fijación.
Al adaptador de cánulas se le conecta una cánula o una máscara de silicona, que puede elegirse según el tamaño del bebé. La horquilla
o la máscara garantiza un contacto suave entre el sistema de CPAP y la nariz del bebé.
Miniflow®se fija a un gorro que se coloca en el bebé.
Datos técnicos:
Conector de espiración:
10 mm
Conector de inspiración:
10 mm
Peso:
10 g
Presión nCPAP:
0-20 cm H2O
2.2 Gorros, máscaras y cánulas
En la parte superior de los gorros de poliamida hay cosida una pieza de vellón en dos mitades. Entre las piezas de vellón, se coloca
una cuña de espuma (Minifoam para Miniflow). Miniflow®se sitúa en esta cuña, fijado con una cinta de velcro separada. Las cintas
adicionales incluidas se emplean para estabilizar las máscaras o la posición de las horquillas. Sus extremos de velcro permiten
colocarlas en cualquier punto del tejido del gorro.
Indicado únicamente para uso clínico.
La saturación de oxígeno en sangre del paciente debe controlarse permanentemente durante el uso del producto.
El producto solo puede ser utilizado por personal calificado.
El Miniflow®, las máscaras, los gorros desechables y las cánulas son productos de un solo uso que deben emplearse en
un único paciente; no pueden reutilizarse.
Los gorros, máscaras y horquillas solo se deben utilizar en combinación con Miniflow®.
Miniflow®solo debe utilizarse en combinación con un respirador o una trampa de agua con unidad de regulación de
presión.
Si se utiliza una trampa de agua adecuada con unidad reguladora de la presión, se deberá tener en cuenta el flujo
mínimo del sistema, indicado en las instrucciones de uso correspondientes.
Manual de usuario de Miniflow®y accesorios ES 13
Los gorros reutilizables llevan un cierre de velcro que se coloca en el centro de la frente del paciente. En este cierre de velcro se fija
la interfaz. Los gorros tienen superficies de vellón especiales para fijar las cintas.
Las máscaras y las cánulas están compuestas al 100% por silicona. Contienen ojales para las cintas destinados a fijar el gorro. Además,
para la conexión en el Medijet o Miniflow®tienen un par de agujeros en los que se introduce el adaptador basculante del Medijet o
Miniflow®.
Gorros desechables
Gorros reutilizables
Máscaras
Cánulas
Material
Poliamida
Poliamida
Silicona
Silicona
Utilización
Producto desechable
Reutilizable
Producto desechable
Producto desechable
60°C (140°F)
Tamaños
disponibles
XXS a XXXL
XS a XXXXL
S a XL
Micro a XL
Generadores nCPAP combinables: Medijet 1000, Medijet 1010, Medijet 1020 y Miniflow®4000
3. Instalación y aplicación
Piezas necesarias:
Para llevar a cabo una terapia CPAP efectiva con Miniflow®, es necesario disponer del siguiente equipo:
Un respirador o un sistema CPAP de burbujas
Un humidificador activo del gas respiratorio
Un conjunto adecuado de tubos que incluyan los tubos de inspiración y de espiración. Adicionalmente, se requiere una cámara
para el humidificador. Los conectores situados en los extremos de los tubos deben ser de tipo F10 para que puedan ajustarse
al Miniflow®.
Una cinta métrica para medir el tamaño de los gorros y las cánulas
Un gorro con un tamaño adecuado para el bebé
Una máscara o una cánula del tamaño adecuado
De forma opcional, para respiradores que necesitan una medición de presión externa:
una pieza en T para medir la presión (ya está incluida en los tubos medin o se puede solicitar por separado con la referencia
REF 4010)
Advertencia: empaquetado
Si el empaquetado de una pieza o los propios productos están dañados, la pieza no podrá utilizarse y deberá desecharse.
Compruebe además la permeabilidad de los orificios del generador y de las cánulas/máscaras. Si están obstruidos, no se deben
utilizar los productos afectados.
Instalación y configuración del sistema (gorros desechables):
(1) Conecte los tubos al respirador y al humidificador. Si es necesario, utilice
los adaptadores auxiliares. Inserte del todo los sensores de temperatura,
hasta que la punta llegue al flujo de gas.
(2) Conecte Miniflow®a los tubos de inspiración y espiración. Si su respirador
requiere una medición externa de la presión, inserte la pieza en T para
medir la presión en la pieza de espiración. A continuación, podrá insertar
el conducto de medición de la presión y conectarlo al respirador.
(3) Cierre el adaptador de cánulas del Miniflow®con la mano y ajuste los
parámetros de CPAP del respirador, por ejemplo, la presión. Si no puede
ajustarlos, examine las conexiones para comprobar que no haya fugas en
los tubos. Si todas las conexiones son correctas y Miniflow®es la causa
del fallo, deséchelo.
Instrucción importante: Miniflow®defectuoso
Si Miniflow®no funciona correctamente, no lo utilice.
Manual de usuario de Miniflow®y accesorios ES 14
(4) Seleccione una horquilla o una máscara con ayuda de la cinta métrica.
Elija una horquilla de un tamaño que obture por completo el orificio
nasal. Elija una máscara que se acople justo al lado de las aletas nasales.
Inserte una horquilla en el generador Miniflow®, de forma que el lado
arqueado de la horquilla esté dirigido hacia el labio superior del paciente.
La máscara se inserta ajustándola a la forma de la nariz.
Instrucción: cánulas
Utilice siempre las horquillas mayores posibles, para evitar fugas y garantizar
la mejor colocación posible: cuanto menores sean las fugas, mayor y más
estable será la presión CPAP.
Advertencia: cánulas y máscaras
Introduzca siempre todo el Miniflow®en las cánulas o las máscaras y no aplique
ninguna crema cerca de las cánulas, las máscaras o el Miniflow®, ya que la
cánula o la máscara podrían deslizarse del Miniflow®.
Las cánulas y las máscaras no se deben volver a preparar y reutilizar; están
diseñadas para un solo uso. Una nueva preparación de las cánulas y las
máscaras puede endurecerlas y lesionar al paciente.
(5) Seleccione, mediante la cinta métrica y la codificación por colores
correspondiente, un gorro del tamaño correcto. El gorro debe quedar
firmemente ajustado, pero sin deformar la cabeza. Retire la cinta de
velcro del gorro y téngala al alcance de la mano. El gorro se coloca en la
cabeza, con el hueco entre las dos piezas de vellón centrado sobre la
frente. El gorro debe cubrir las orejas y se debe estirar hasta la nuca.
Introduzca las cintas de fijación en los ojales de la horquilla o de la
máscara (ver imagen).
A diferencia del gorro desechable, el gorro reutilizable lleva un cierre
velcro en el que se fija la interfaz. Los tubos se dirigen a la parte posterior
de la cabeza del paciente.
Instrucción: gorros
Estire el gorro hasta justo por encima de las cejas del paciente, lo más cerca
posible de los ojos. Así será más fácil fijar Medijet®.
Los gorros demasiado pequeños deforman la cabeza del paciente. Los gorros
demasiado grandes no garantizan la fijación adecuada del generador CPAP.
(6) Seleccione el mejor ángulo para el adaptador de horquillas de Miniflow®
(45° o 60°). Si se utiliza una horquilla, suele ser el ángulo menor; si se
utiliza la máscara, el mayor. Introduzca la cuña de espuma Minifoam
entre las dos piezas de vellón, en el centro del gorro. Ajuste Miniflow®en
el orificio oval de la espuma previsto al efecto. Introduzca la horquilla en
los orificios nasales, manteniendo una pequeña distancia entre el septo
nasal y la base de la horquilla. Si utiliza la máscara, asegúrese de que
quede uniformemente apoyada sobre la piel. Los orificios nasales deben
quedar despejados, sin que los obstruya parte de la máscara. Desde
arriba, fije Miniflow®con la cinta de velcro en las piezas de vellón del
gorro. Fije la zona de velcro de las cintas en la región de las orejas, como
prolongación de las lengüetas de fijación de la horquilla. No apriete las
cintas demasiado; basta con que proporcionen el apoyo lateral
necesario.
Instrucción importante: fijación de la cánula y la máscara
No introduzca la horquilla entera en los orificios nasales. El
bloque de conexión no debe tocar la nariz.

Manual de usuario de Miniflow®y accesorios ES 15
Un método eficaz para evitar o reducir lesiones cutáneas en el
paciente es alternar periódicamente entre horquilla y máscara.
No apriete las cintas demasiado. Miniflow® se sujeta
principalmente por el gorro y la espuma. Si la fuga es demasiado
grande, compruebe el tamaño seleccionado de la horquilla o de
la máscara; ajustar las cintas no bastará para resolver el
problema.
Si las cintas se aprietan demasiado o la horquilla se introduce
excesivamente, pueden producirse puntos de presión en la nariz
o la piel del bebé
Instrucción importante: Fijación del tubo de inspiración y de espiración
Asegúrese de que el peso de los tubos no tira directamente de la
cabeza del paciente y de la interfaz. Aguante los tubos con
medios adecuados.
Los tubos de inspiración y espiración deben presentar un declive
alejado del paciente y de Miniflow®para evitar que el agua de
condensación fluya en dirección del bebé.
(7) Compruebe periódicamente los ajustes de CPAP y la fijación.
Instrucción importante: supervisión periódica de la fijación
Compruebe periódicamente la posición y la fijación de Miniflow®y los
accesorios, ya que pueden aparecer marcas de presión.
Compruebe periódicamente si se han acumulado secreciones en las cánulas y
las máscaras, ya que pueden provocar una obstrucción
4. Respiradores a los que puede conectarse Miniflow®
Miniflow®puede conectarse a todos los respiradores que cumplan con los siguientes requisitos:
El respirador debe ofrecer un modo de CPAP o un modo no invasivo, que:
oControle el flujo y la presión de tal manera que en el sistema de tubos se consiga una presión constante
oPueda funcionar sin un sensor de caudal externo
oMida la presión en el interior del respirador o en una pieza en T adicional del sistema de tubos
oTolere pequeñas fugas en el sistema de tubos
El respirador debe disponer de conectores de tamaño M22 o F15 para los tubos de inspiración y de espiración, a fin de que
pueda conectarse con el sistema de tubos medin, o debe haber tubos (de inspiración y espiración) para el respirador que
contengan conectores F10 por el lado del Miniflow®.
Miniflow®puede combinarse, entre otros, con:
Maquet SERVO Serie (i, u und n)
SLE 4000, 5000 und 6000
Hamilton T1, C1, MR1, C2, C3, C6, G5, S1
Newport Medical e360 Ventilator:
Para el modelo e360 de la marca Newport Medical, use solo tubos para respirador recomendados por Newport. Retire el
Miniflow®de los tubos cuando quiera verificar el funcionamiento de los tubos del e360.
4.1 Gorros, máscaras y cánulas
Todos los gorros, las máscaras y horquillas solo se pueden combinar con los generadores de nCPAP Miniflow®.

Manual de usuario de Miniflow®y accesorios ES 16
5. Accesorios
Miniflow®20 piezas
REF 4000
Cánulas: 10 piezas de un solo uso
X Small
REF 1200-01
Large
REF 1200-22
Small
REF 1200-21
Large wide
REF 1200-33
Medium
REF 1200-02
X large
REF 1200-03
Medium wide
REF 1200-32
Máscaras: 10 piezas de un solo uso
X Small
REF 1200-08
Medium
REF 1200-05
Small
REF 1200-04
Large
REF 1200-06
Máscaras: 5 piezas de un solo uso
X large
REF 1200-07
Gorros: 10 piezas de un solo uso
XX Small
REF 1213-10
Large
REF 1217-10
X Small
REF 1214-10
X large
REF 1218-10
Small
REF 1215-10
XX large
REF 1219-10
Medium
REF 1216-10
XXX large
REF 1220-10
Gorros: 1 pieza reutilizable
Micro
REF 1214
X large
REF 1218
Small
REF 1215
XX large
REF 1219
Medium
REF 1216
XXX large
REF 1220
Large
REF 1217
XXXX large
REF 1221
Minifoam: 10 piezas de un
solo uso
REF 4030
Tubos: 10 conjuntos de tubos de un solo uso
Conjunto desechable para
Miniflow®con inspiración
calentada y cámara de
humidificación
REF 206746
Conjunto desechable para
Miniflow®con inspiración
calentada
REF 206748
Conjunto desechable para
Miniflow®con inspiración y
espiración calentadas
REF 206749
Advertencia: accesorios
Miniflow®solo funciona en combinación con estas máscaras, cánulas y gorros; en caso contrario, no podrá garantizarse el
funcionamiento correcto del producto.
Los gorros, las máscaras y horquillas solo se pueden combinar con los generadores de nCPAP Miniflow®.
6. Almacenamiento y eliminación
El Miniflow®y sus accesorios deben guardarse en una habitación seca y limpia.
Las temperaturas de entre -30 °C y 70 °C no dañan a Miniflow®ni a los
accesorios.
El Miniflow®y los accesorios pueden desecharse con los residuos domésticos.

Mauelàd’utilisateuàMiiflo®et accessoires FR 17
Attention : instructions et utilisation
эieàattetieetàesàistutiosàd’utilisatioàaatàd’utiliseàleàpoduitàetàlesàsuieàsupuleuseet.à
“eulsàueàoaissaeàdtailleàdeàesàistutiosàetàleàespetàigoueuàdeàesàosigesàautoisetàl’utilisation de Miniflow®.
Miniflow®peut uniquement teàutilisàofoetààl’usageàpuàditàdasàleàhapiteàIdiatio.
Miniflow®eàpeutàteàutilisàu’eàassoiatioàaeàuàespiateuàadaptàouàuàtop-plein adapté avec régulateur de pression et
un monitoring approprié au patient.
эesàasues,àeoutsàasauàetàoetsàeàdoietàteàutilissàu’eàassoiatioàaeàuàMiiflo®et uniquement par une
pesoeàoaissatàleàodeàd’eploi.
Toutes les mises en garde et toutes les consignes doivent être respectées.
э’utilisatioàd’appaeils (par ex. respirateur ou humidificateur) associés à Miniflow®estàditeàdasàlesàistutiosàd’utilisatioàdeà
l’appaeil.àCesàistutiosàdoietàgaleetàteàespetes.
1. Indication
1.1 Miniflow®
Miniflow®est un produit à usage unique destiné au traitement par pression positive continue (nCPAP) / par ventilation non invasive
chez les nouveaux-nés ou les prématurés en unités de soins intensifs. Pour ce traitement, Miniflow®epseteàl’itefaeàpatiet.à
Ce dispositif est utilisé en association avec un respirateur qui contrôle la pression positive continue et alimente Miniflow®avec le flux
gazeux nécessaire.
1.2 Bonnets, masques et embouts nasaux
Les bonnets, masques et embouts nasaux sont des produits à utiliser dans le cadre de la thérapie par pression positive continue
nasale (PPC nasale ou nCPAP) ou la ventilation non-invasive des prématurés et nouveau-nés. Ils doivent être utilisés en association
avec les générateurs nCPAP Miniflow®. Les bonnets sont disponibles en différentes tailles et servent à la fixation des générateurs
nCPAP ainsi que des masques et embouts nasaux. Selon le modèle, ils sont à usage unique ou réutilisables. Les masques et embouts
nasaux sont desàadaptateusàsilioeààusageàuiue,àseatàd’itefaeàeteàleàssteàCPáPàetàleàpatiet.àэesàdiffetesàtaillesà
permettent de réaliser une liaison la plus indolore et étanche possible avec le nez du patient.
Attention : utilisation de Miniflow®
2. Principe de fonctionnement et caractéristiques techniques
2.1 Miniflow®
Miniflow®est une interface patient qui peut être utilisée en mode CPAP ou pour la ventilation non invasive avec un respirateur ou
un système Bubble-CPAP. Miniflow®peutàteàeliàauàtuesàd’ispiatioàetàd’epiatioàet,àpaàosuet,àauàespirateur. Les
paramètres CPAP sont réglés et contrôlés sur le respirateur. э’appaeilàguleàlaàpessioàpositieàotiueàpouàfouiàleàfluàgazeuà
nécessaire.
âàl’itieuàdeàMiniflow®, les fluàispiatoieàetàepiatoieàsotàspasàpaàueàpaoiàaatàd’atteideàl’adaptateuàdeàl’eoutà
asal.àэ’adaptateuàdeàl’eoutàasalàestàilialeàafiàueàsoàoietatioàpuisseàteàajusteààlaàtailleàetàl’aatoieàdeàl’efatà
pour en simplifier la fixation.
Uàeoutàasalàouàasueàeàsilioe,ààhoisiàeàfotioàdeàlaàtailleàdeàl’efat,àestàitoduitàsuàl’adaptateuàdeàl’ebout nasal.
э’eoutàasalàouàleàasueàassueàuàotatàeàdoueuàeteàleàssteàdeàCPáPàetàleàezàduà.
Miniflow®est fixé sur un bonnet sur la tête du bébé.
Caractéristiques techniques :
Coeteuàd’epiatio :
10mm
Coeteuàd’ispiatio
10mm
Poids :
10 g
pression nCPAP:
0-20 cm H2O
2.2 Bonnets, masques et embouts nasaux
Deux morceaux de molleton sont cousus sur les bonnets en polyamide. Une cale en mousse (Minifoam pour Miniflow) est placée
entre les morceaux de molleton, Miniflow®estàisààl’itieuàetàfiàauàoeàd’ueàadeàauto-agrippante séparée. Les
bandelettes supplémentaires fournies sont utilisées pour stabiliser la position des masques et embouts nasaux et peuvent être
fiesà’ipoteàoàsuàleàoetààl’aideàdesàetitsàauto-agrippantes.
À usage médical uniquement
эaàsatuatioàeàogeàduàpatietàdoitàteàotleàeàpeaeeàpedatàl’utilisatio.à
э’utilisatioàdeàeàpoduitàestàelusieetàseeààuàpesoelàfo.à
Miniflow®, les masques, les bonnets jetables et les embouts nasaux sont des produits à usage unique qui doivent être
utilisés pour un seul patient exclusivement –ne pas réutiliser ou reconditionner.
Si un trop-plein adapté avec régulateur de pression est utilisé, le débit minimum du système indiqué dans le mode
d’eploiàdoitàasoluetàteàespet.
Miniflow®eàpeutàteàutilisàu’eàassoiatioàaeàuàespiateuàouàuàtop-plein avec régulateur de pression.
Si un trop-plein adapté avec régulateur de pression est utilisé, le débit minimum du système indiqué dans le mode
d’eploiàdoitàasoluetàteàespet.

Mauelàd’utilisateuàMiiflo®et accessoires FR 18
эesàoetsàutilisalesàsotàuisàd’ueàfeetueàauto-agippateàpositioeàauàilieuàsuàleàfotàduàpatiet.àэ’itefaeàestà
fixée dans cette fermeture auto-agrippante. Des morceaux de molleton servent à fixer les bandelettes.
Les masques et les embouts nasaux se composent à 100 %àdeàsilioe.àIlsàsotàdotsàd’œilletsàpeettatàdeàfieàlesàadelettesàsuà
le bonnet. Par ailleurs, ils sont également pourvus de deux orifices pour le raccordement au générateur Medijet ou Miniflow®dans
lesuelsàs’efiheàl’adaptateuàilialeàdeàMedijetàouàMiniflow®.
Bonnets jetables
Bonnets réutilisables
Masques
Embouts nasaux
Matériau
Polyamide
Polyamide
Silicone
Silicone
Utilisation
Produit jetable
Réutilisables
Produit jetable
Produit jetable
60°C(140°F)
Tailles disponibles
XXS à XXXL
XS à XXXXL
S à XL
Micro à XL
Générateurs nCPAP combinables : Medijet 1000, Medijet 1010, Medijet 1020 et Miniflow®4000
3. Mise en place et application
Équipement nécessaire :
э’uipeetàsuiatàestàessaieàpouàuàtaiteetàpaàCPáPàeffiaeàaeàMiniflow®:
un respirateur ou un système Bubble-CPAP
un humidificateur de gaz respiratoire actif
uàkitàiuitàdeàaheetàopeatàdesàtuesàd’ispiatioàetàd’epiatioàetàueàhaeàpouàl’huidifiateu.à
эesàoeteusààl’etitàdeàhaueàtueàdoietàteàdeàdiesioàнàpouàpouoir être raccordés à Miniflow®.
un ruban gradué pour déterminer la taille du bonnet et des embouts nasaux
un bonnet de taille adaptée au bébé
un masque ou un embout nasal à la bonne taille
sur les respirateurs nécessitant une mesure de pression externe :
une pièce en T de mesure de la pression est déjà incluse dans les circuits medin ou peut être commandée séparément
(REF 4010).
Attention : emballage
“iàl’eallageàd’ueàpie,àouàsiàlaàpieàelle-même, est endommagé(e), la pièce ne doit pas être utilisée et doit être jetée.
Vérifiez également que les trous du générateur ainsi que ceux des embouts nasaux/masques ne sont pas bouchés. En cas
d’ostutio,àeàpasàutiliseàlesàpoduitsàoes
Mise en place et configuration du système (bonnets à usage unique):
(1) Relieà leà kità iuità auà espiateuà età à l’huidifiateu.à Utiliseà lesà
adaptateurs fournis si nécessaire. Insérer totalement les sondes de
tepatueàjusu’àeàueàlaàpoiteàatteigeàleàfluàgazeu.
(2) Relier Miniflow®auà tuesà d’ispiatioà età d’epiatio.à Si le
respirateur requiert une mesure de pression externe, insérer la pièce
eà Tà dasà l’letà d’epiatio. La conduite de pression peut être
insérée et reliée au respirateur.
(3) нeeàl’adaptateuàdeàl’eoutàasalàsuàMiniflow®avec le doigt et
ajuster les paramètres CPAP sur le respirateur, par exemple la
pessio.à“iàeà’estàpasàpossile,àifieàl’aseeàdeàfuitesàauàieauà
des raccords. Si tous les raccords sont corrects et que la panne est
imputable au dispositif Miniflow®, éliminer ce dispositif Miniflow®.
Consigne importante : Miniflow®défectueux
Si Miniflow®ne fonctionne pas correctement, il ne doit pas être utilisé.
Table of contents
Languages:
Other Medin Medical Equipment manuals


Popular Medical Equipment manuals by other brands


getemed
getemed VitaGuard VG310 operating instructions

Active Medical
Active Medical 77644 Device instructions

Seers Medical
Seers Medical ST7640 operating instructions

Atom Medical Corporation
Atom Medical Corporation Neo Cot Operation manual

Wolf
Wolf 44301 user manual

Medicatech
Medicatech MasterRad30 installation manual