Meditech AlphaTrainer Professional User manual
Manual for
• AlphaTrainer Professional
• AlphaTrainer Home

Introduction – Chapter 1
2
Table of Content
1. Introduction........................................................................................................................................ 3
1.1. Lateral Training – what‘s that?.................................................................................................. 3
1.2. Product content ........................................................................................................................ 3
1.3. Necessary accessories ............................................................................................................ 4
1.4. Differences between the AlphaTrainer PROFESSIONAL and AlphaTrainer HOME ................ 5
2. Safety instructions ............................................................................................................................ 6
3. Top view of the AlphaTrainer ............................................................................................................... 7
3.1. Top view .................................................................................................................................. 7
3.2. Back view and connection facilities .......................................................................................... 8
3.3. How to set up the AlphaTrainer to connect to a CD-player /
to run the special FLIC language training................................................................................. 8
4. How to operate the AlphaTrainer ..................................................................................................... 9
4.1. Getting started.......................................................................................................................... 9
4.2. Display...................................................................................................................................... 9
4.3. Functions in the main menu .................................................................................................. 10
4.4. General information on submenus ..........................................................................................11
4.5. Special function keys...............................................................................................................11
4.6. Menu Volume ......................................................................................................................... 12
4.7. Menu Lateralization / lateral movement from side to side ..................................................... 15
4.8. Menu Audio Settings .............................................................................................................. 18
4.9. Menu MP3 Control ................................................................................................................. 21
4.10. Menu Personal data management ......................................................................................... 25
4.11. Menu Perception Discrimination Trainer................................................................................. 28
4.12. Menu Extras ........................................................................................................................... 33
4.13. Menu Help .............................................................................................................................. 35
4.14. Trouble Shooting .................................................................................................................... 36
5. Technology and maintenance ........................................................................................................ 38
5.1. Cleaning ................................................................................................................................. 38
5.2. Maintenance and storage....................................................................................................... 38
5.3. Disposal.................................................................................................................................. 38
5.4. Identification lable................................................................................................................... 39
5.5. Technical data ........................................................................................................................ 40
5.6. Technical requirements at accessories .................................................................................. 41
6. Service.............................................................................................................................................. 42
6.1. Service Guarantee ................................................................................................................. 42
6.2. EEC declaration of conformity ............................................................................................... 42
6.3. For your memos ..................................................................................................................... 43

Chapter 1 – Introduction
3
1. Introduction
This manual for the AlphaTrainer addresses users with and without educational/therapeutic back-
ground. It describes the functionality of both AlphaTrainer Professional and Home.
Those functions, which are available only in the Professional version, are marked as such. In this ma-
nual you will find both installation and operating instructions. It explains how you can utilize the device
and which technical options are available in the respective unit. Most of all you will find explanations
how you can use lateral training effectively.
1.1 Lateral training – what’s that?
The AlphaTrainer is used to improve and train the interaction of the
two brain hemispheres. It is particularly directed towards improving
reading, writing, math and learning skills, attention, concentration
as well as foreign language capabilities. You will hear either langu-
age and/or music wandering from ear to ear. In a similar fashion
text or other visual impressions will be perceived alternating from
side to side thanks to applying the special LCD shuttering glasses.
The key is to enhance the brain’s processing capabilities in both
the auditory and visual modality. This is basic lateral training.
As a training device the AlphaTrainer has been designed to im-
prove the neuronal processing capabilities for processing auditory
and visual stimuli in the trainee. By alternating between left and right, the brain and its respective he-
mispheres are forced to acquire a higher level of performance and brain coordination. To do this, the
auditory and visual senses are addressed. The brain is taught to process information in the included
modalities faster and more efficiently. An emphasis is given to the ability of language perception and
its respective improvement. A multistage training based on the client’s original abilities is available.
The ability to discriminate all critical phoneme’s in a given language is one of the primary training
aims. The AlphaTrainer includes a highend technology that allows for phonemes to be perceived
much more clearly and brilliant both in quiet and noisy environmens.
This active medical device for temporary use may be distributed and used with clients as it does not
endanger the trainer, the clients or respective third parties as long as a proper installation, usage and
maintenance are ensured.
1Dummyhead stereophony recordings provide a very realistic 3D audio impression.
1.2 Product content
• AlphaTrainer (Professional or Home)
• Power adapter (FW 7556/12 – 12 V, 1,5 A)
• Manual (for either version – home or professional)
• MediTOOLs software light version (only with Alpha Trainer Professional)
Please find more information about necessary accessories on the next page.
Please read the manual carefully prior to installing and using the AlphaTrainer device.
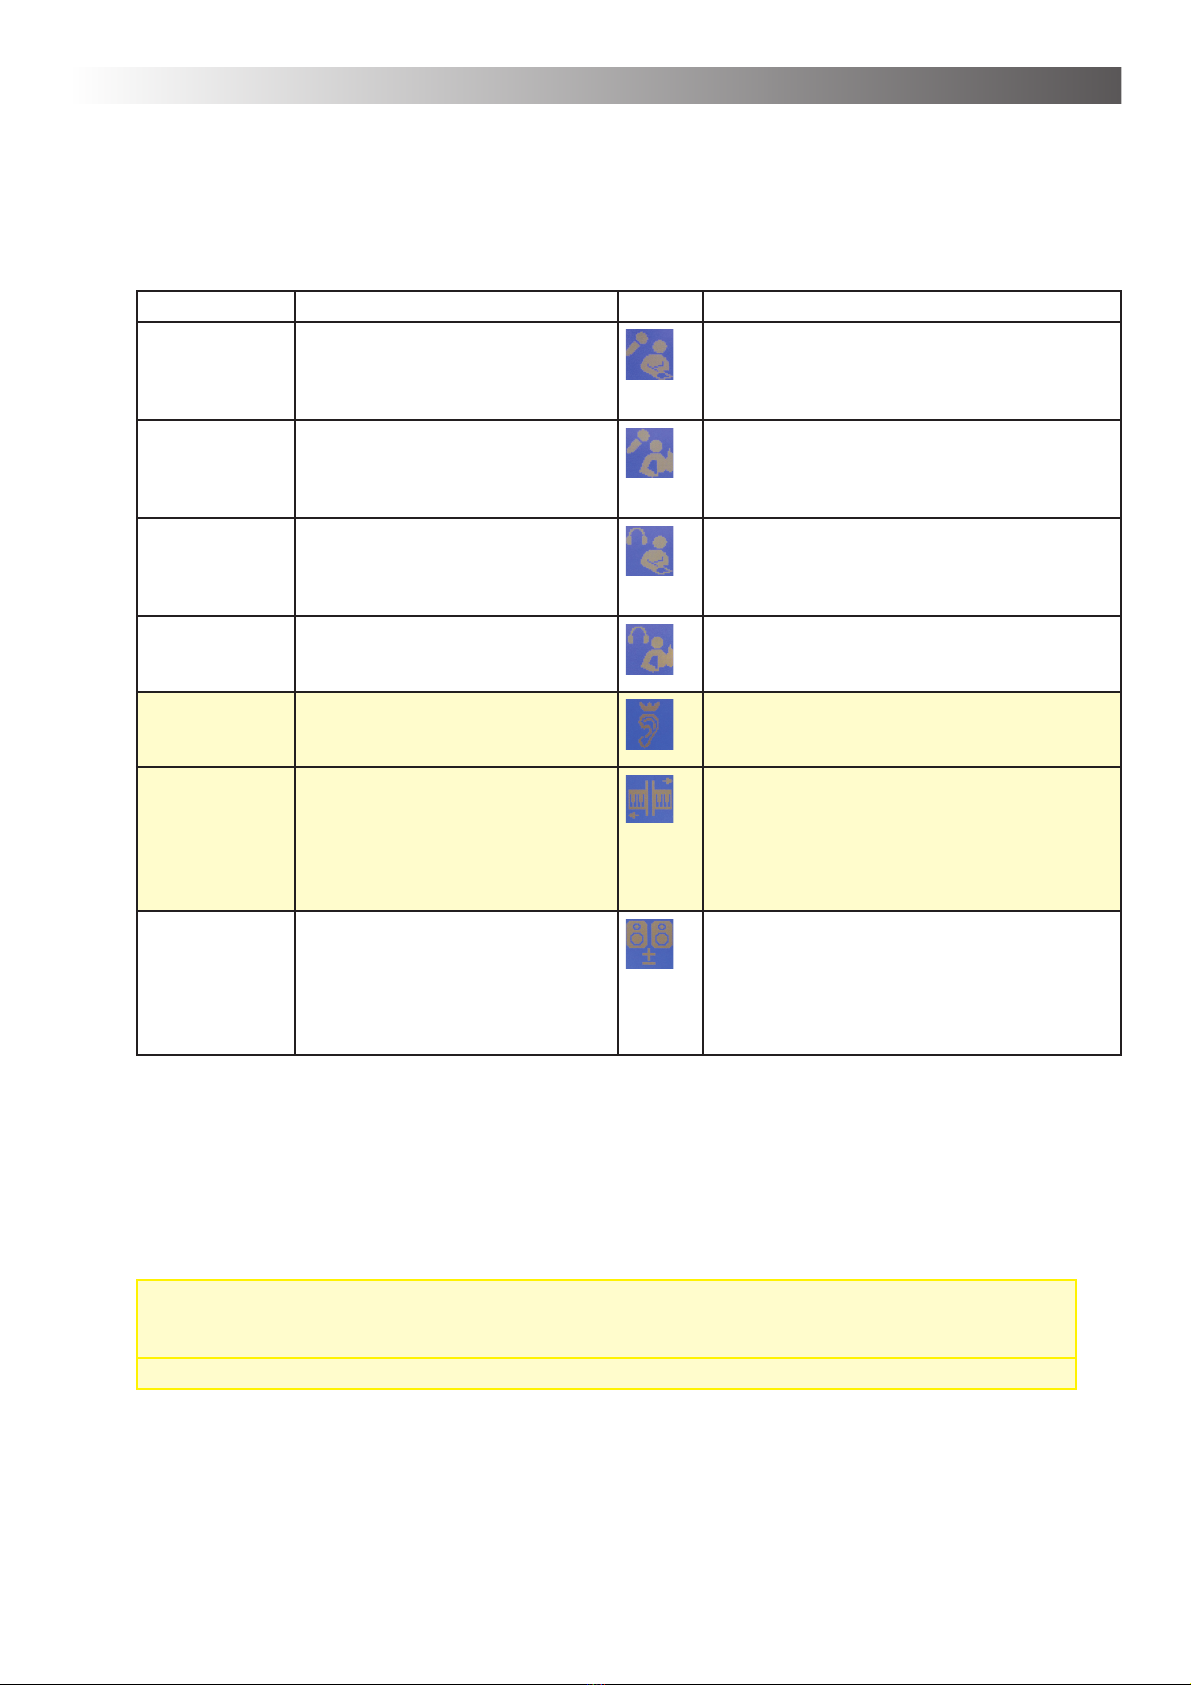
Client
Client
Coach
Coach
Coach
Coach
Client
Client

Introduction – Chapter 1
4
1.3 Necessary accessories
Note that – for safety reasons – you may only use headphones, microphones and shutter glasses -
as well as corresponding splitter devices – from MediTECH’s accessories supply. Only these were
developed for use with the AlphaTrainer and correspond to the technical and legal safety require-
ments of such training systems.
Important:
Note that – for safety reasons – you may only use headphones, microphones and shutter glasses
- as well as corresponding splitter devices – from MediTECH’s accessories supply. Only these
were developed for use with the AlphaTrainer and correspond to the technical and legal safety
requirements of such training systems.
Accessories Home training Individual
training by
professionals
Group training (with up to 6
students*) / and one trainer
Headphones 2 2 2 to 6 + 1 for the trainer
Headphones splitter (6 slots) - - 1
Microphones 2 2 2 to 6 + 1 for the trainer
Microphone splitter (6 socket) - - 1
Microphone table stand up to 2 up to 2 one per handheld microphone
Headset up to 2 up to 2 one per handheld microphone
(instead of one headphone and
one microphone)
up to 2 up to 2 up to 7
LCD Shutter glasses 1 1 up to 6
LCD Shutter glasses splitter
(6 slots)
-- 1
USB-Stick / MP3-Player 1 1 1
CD player 1 1 1
AlphaTrainer cable-set ** 1 1 1
* For larger groups, additional splitters and headphones / microphones are needed. Please contact us for quotes on the corre-
sponding set solutions.
** Consists of two essential cable sets
1. Connects CD-player and/or computer line-out as input device (line-in) for the AlphaTrainer
2. Connects the student microphone into MIC in of both the computer and the AlphaTrainer (i.e. needed for FLIC language
training (Foreign Language Acquisition with the Instinct of a Child). Different programs and modules on the PC allow for
audio recordings when using the AlphaTrainer.
Please note:
If you wish to record auditory information, use the LINE IN cable (the same or an additional one).
Plug the cable into the LineOut socket of the AlphaTrainer and the plug with a green mark into
the recording device.
The following accessories are available – please contact us if you have any questions regarding these
items:
• splitter set for group training with 7 to 12 clients
• Extension cord for microphones
• Extension cord for headphones
• Extension cord for shutter glasses
• non-lateralization plug (to suppress the lateralization for the coach)
Additionally you need training materials matching your clients age and abilities.
Important:
1. Even with older clients, it is important to adapt training to the possibilities and abilities of the individual
client. More often than not it is mandatory to improve the client’s fundamental reading and perception
skills on a very basic level.
2. Audio material which is too fast for the client to follow, will cause frustration and be impair motivation.
3. A primary training goal is the improvement of fundamental neuronal capabilities. While the require-
ments for the individual training tasks often are high, the content level of the material intentionally is
kept low..

Chapter 1 – Introduction
5
1.4 Differences between the AlphaTrainer PROFESSIONAL and AlphaTrainer HOME
Function AlphaTrainer Professional AlphaTrainer Home
Voice enhancement on/off+ scalable on/off
Perception discrimination trainer (for distinct phoneme distinction) Different settings, > 400
phonemes(-combinations)
No
Input of client data (Personal data management) infinite number One client
Input of coach data (Personal data management) infinite number One coaches
Adjustment of lateral width Yes No
Stop function (break lateral movement) Yes No
Darkening (shutter glasses) yes, darkening scalable yes, but not scalable
Multi-Channel-Voice-Fusion MCVF Yes No
Additional noices Zahlreiche Störgeräusche rush
Interface for MediTOOLs software (settings for trainees and trainers
changeable)
(on / off + skalable) (on / off + skalable)
Limited functionality of the AlphaTrainer home version:
This manual describes both versions of the AlphaTrainer – home and professional. In part, the Al-
phaTrainer home functionality is limited in comparison to the professional version. Such differences
are clearly pointed out in this manual.
If you use an AlphaTrainer Home and you also want to have access to the additional functions of the Alpha-
Trainer Professional, please get in contact with the MediTECH or your domestic MediTECH representative.
Your device can be upgraded to become an AlphaTrainer Professional. We will gladly assist you in the
process.
Recommended: Service contracts for the AlphaTrainer and MediTOOLs
When using the AlphaTrainer professionally, we strongly recommend a service contract for both hardware
and software. This contract includes:
• Annual examination of the AlphaTrainer and its accessories.
• Extensive endurance test.
• Cleaning of the both the AlphaTrainer and its accessories.
• Necessary repairs free of charge within a two-year period after purchase.
• After two years: Replacement parts costs only, all labor costs are included..
• Guaranteed short service periods with pre-scheduled service appointments
• Written estimate of costs prior to repairs if value exceeds 50 Euro.
Within given periods of time, the functionality of the AlphaTrainer is enhanced and extended, based on
user requirements and research results. Customers with full service contracts for hard- and software can
receive such updates.
Important:
It is strongly recommended to ensure an annual service examination of your AlphaTrainer by the
manufacturer.

Safety instructions – Chapter 2
6
2. Safety instructions
The AlphaTrainer is intended to improve specific brain capabilities related to language performance, au-
ditory processing and sensory perception. For this purpose you have to follow the instruction steps of this
manual. The use of this device for other purposes is against its provision and therefore not permitted.
When operating the AlphaTrainer, you particularly have to observe the following security information:
Caution! Explosion Hazard: Do not use the AlphaTrainer in rooms where the following
inflammable mixtures are present – they could spark off!
• Anesthetic mixture with air
• Anesthetic mixture with Oxygen or Nitrous Oxide.
Danger! Protect the device and the batteries against ultrasonic baths, significant humidity and
chemical detergents The device could be destroyed.
Caution! Note that cables of the accessory device do not become pulled out from the sockets of
the device.
Caution! Use the device only in dry areas and protect you it - both with the work and in the
switched off condition - against wetness and humidity. They or third could be injured. In
addition the device could be damaged effectively and strongly.
Caution! Just use the plug power pack provided. It was developed particularly for the AlphaTrai-
ner and corresponds to the defaults for medicine products.
Caution! Do not open the case of the AlphaTrainer in any case. You or third could be injured. In
addition the device could be damaged effectively and strongly. With the opening of the
device automatically any adhesion and guarantee protection expire.
Caution! Separate the switched off device only from electricity mains, by pulling the plug power
pack out of the plug socket. Then you remove the power cable from the device.
Caution! Use with training excluding the accessory device, which is recommended to you of the
MediTECH. These correspond to the necessary conditions and safety regulations for
medicine products and are particularly co-ordinated for lateral training.
Caution! Make sure that the client at least 1.5 m far away from the CD player is.
Note: For actions, which offend against these safety references and the instructions of this
document, on the part of the MediTECH no warranty or adhesion is taken over.
Thoroughly review this manual prior to using the device!

Chapter 3 – View on device
7
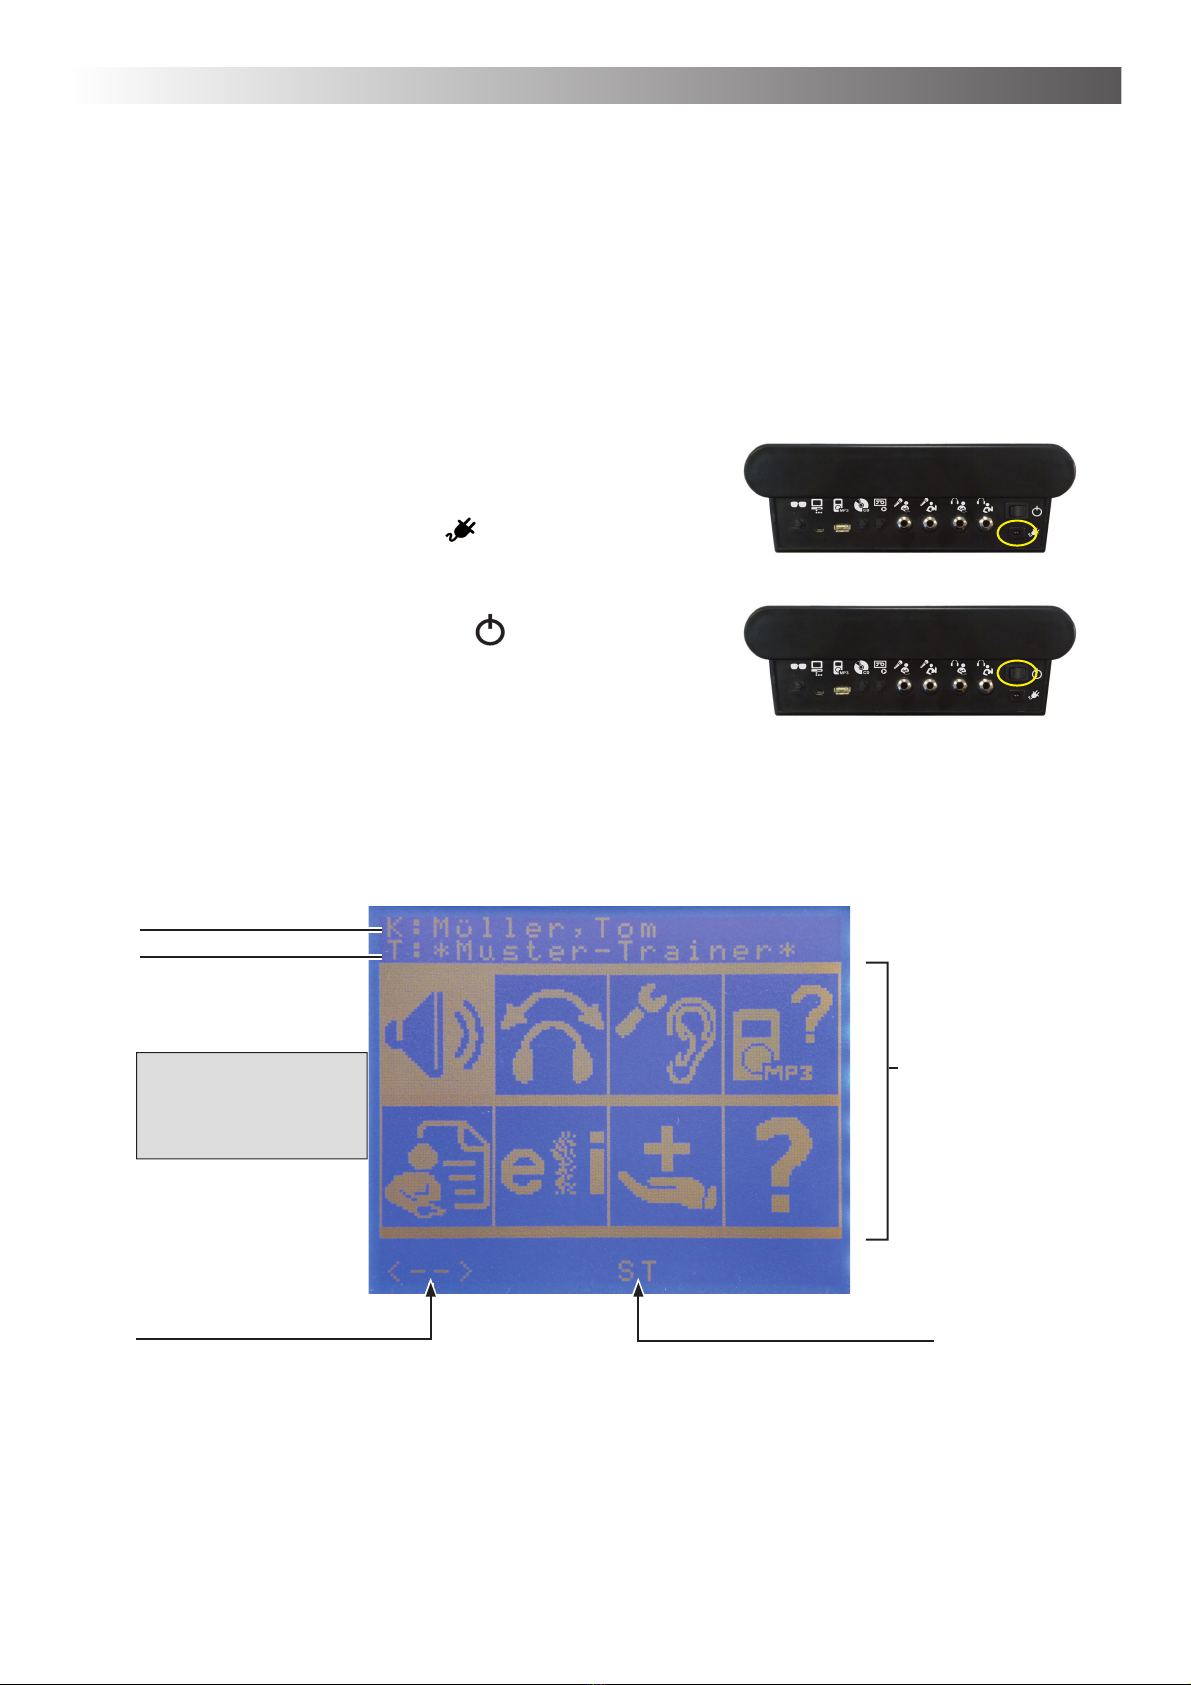
3.1 Top view
Position the AlphaTrainer in front of you in order to easily be able to compare the graphic with the actual
device.
The AlphaTrainer is controlled through its well structured menu which you can view and use when the
device is turned on.
3. Top view of the AlphaTrainer
The following diagram shows all elements of the AlphaTrainer which you can apply when using this lateral
training device.
Navigation keys
and enter key
Menu selection keys
Menu selection keys
Display
(Displaying the
ontrol menu )
… back to
main menu
Stop lateralization
Store function
T9
T12
T1
T5
T2
T6
T3
T7
T4
T8
T10
T11
T16
-
T12
T13
T14
T15
T16
You will be introduced to the functionality on the back of the device as well as to the corresponding acces-
sories on the next page.

View on device – Chapter 3
8
3.3 How to set up the AlphaTrainer to connect to a CD-player / to run the special FLIC
language training.
Connect this plug into
the headphones jack
headset-phone of the CD
player put
Here put the client microphone in (to it
the screwed on adapter remove)
Audio connection field of the computer
(usually back)
This plug into the
microphone socket of
the computer put.
This plug into the jack
headset-phone of the
computer put.
in
to
ac
k
e
C
D
3.2 Back view of the AlphaTrainer
Attach the components necessary for training (headphone, microphones, CD player, shutter glasses) to the
AlphaTrainer. Make sure that headphones and microphones in particular are allocated correctly to client(s)
and trainer.
Attention! In order to avoid dangers, technical problems and disfunctions during the employment
of the AlphaTrainer, it is very important that you ensure that all accessories are con-
nected to the correct sockets.
LCD shutter glasses Power supply
Headphones for the coach
Headphones for the client
Microphone for the client
(as needed: Connection of the AlphaTrainer special microphone cable
Microphone for the coach
Computer (USB-cable)
Line IN MP3-Player / USB-Stick
(training material)
Line IN-cableel, e.g. CD-Player (training
material) or computer (=sound source)
Line OUT (for recording device)
On / off switch
Please note:
If you wish to record auditory information, use the LINE IN cable (the same or an additional one). Plug the
cable into the LineOut socket of the AlphaTrainer and the plug with a green mark into the recording device.
Chapter 4 – Operation
9
4. Operation of the AlphaTrainer
This guidance is to facilitate the employment of the AlphaTrainer for you. It enables you to get to know the
functions time efficient.
4.1 Start-up
The AlphaTrainer is power pack-claimant device. Thus 230 V must be attached a plug socket to, before
thereby can be trained.
Switch on the AlphaTrainer
1. Connect the AlphaTrainer with electricity mains:
1. Small plug into the socket
2. Large plug into a normal house plug socket.
2. They scolded the device.
Press in addition the black rocker switch to the left on the
back of the device. After short time a welcome screen in the
display appears on the front of the device.
4.2 Display
If this announcement is to be seen in the display, the AlphaTrainer is ready for use and indicates the main
menu:
The meaning of the individual symbols in the main menu you infer from the overview on the continuation
page.
available menu options
selected client
selected coach
* The asterisk means:
Up-to-date no coach is
selected
Announcement for Lateralization
Indication means: Lateralization runs
Mono /Stereo function
Indication means: Stereo function is
active
All settings will be saved
for these persons: Volume,
lateralization speed, results
with the PDT,…
Allgemein

Operation – Chapter 4
10
4.3 Functions in the main menu
The main menu is the AlphaTrainer’s main control panel. From here, you can launch all submenues, start
individual functions and adjust the available settings.
This manual is structured in such a way that each submenu is described in consecutive order.
The main menu contains the following submenus:
Settings for lateralization (auditory/visual)
• Hold and transfer times
• Lateral width (audio information only)
• Darkening intensity level (LCD glasses only)
• Synchronization of auditory and visual signals
Audio settings
• Presettings for microphones and head-
phones
• Dummy head stereophony
• MCVF (Multi Channel Voice fusion)
• Mono /Stereo
Volume settings
• Microphones
• Headphones
• CD-/MP3
player
• Recording
• Noise
Perception discrimination test and training
• Settings
• Options/Parameters
Extras
• Time and date
• Display settings
• Keystroke speed settings
• Available memory report
• Back to factory settings
MP3 control
• Play MP3 titles
• Internal storage or from
USB stick/MP3-Player)
Personal data management
… Client/Coach
• Select, Insert, Edit, Delete
• Individual volume settings
• Save/Load templates
Help
• Manufacturer contact
details
• Product
version
In General

Chapter 4 – Operation
11
4.4 General information on submenus
In order to change settings, select MP3 files or apply the Perception Discrimination Trainer, use of the cor-
responding submenus. All submenus are operated in the same way, so that you will find a general descrip-
tion about them below.
The respective buttons carry the same name throughout this manual. Each button has been given a corre-
sponding number which you find here and at the beginning of each new menu description. It is recommen-
ded to memories the corresponding names. It will help you to operate the AlphaTrainer even more easily.
Number Function
T1 - T8 Menu selection
T9 Back to the upper
menu level
T10 Stop Lateralization
T11 Save settings (main
menu only)
T12 - T16 Keys for navigation
T12 Increase values
T14 Confirm settings
T15 Descrease values
1. Press the key T1 to T8 next to the respective symbol for the submenu, in order to apply / switch to the
desired function. The submenu opens and the corresponding options show on the display.
2. If you are in a submenu, press T9 to return to the upper menu.
4.5 Special function keys
Return to the main menu
Press T9 (if necessary repeatedly), in order to return to the main menu from any given submenu or func-
tion. Unsaved new settings may be lost.
Stop lateralization
Press T10. The lateral movement in headphones and LCD glasses will stop immediately. The audio
transmission will continue without shifting from ear to ear. You may find this function helpful i.e. with the
Perception Discrimination Training when you wish to emphasize training for one particular ear. Also stop
the lateral movement if your client shows any sort of discomfort.
Save settings
Changed settings or parameters will be active until you switch clients or turn off the AlphaTrainer. If you
wish to save settings permanently press the T11 key in the main menu.
T1 T2 T3 T4
T5 T6 T7 T8
T9
T10
T11
T12
T13
T14
T15
T16
Limitation for AlphaTrainer HOME:
This function is only available with the
AlphaTrainer PROFESSIONAL
In General
Operation – Chapter 4
12
Volumes
You are in the volumes menu.
In this chapter you learn how you adjust volumes with the AlphaTrainer.
The volumes, which are important during the use of the AlphaTrainer, can be adjusted in the volumes
submenu.
Exception: The volume of the syllables in the Perception Discrimination Trainer. You find corresponding
references in the chapter explaining the use of the PDT training module.
Advice:
1. When adjusting volumes, plug in and use the headphones and microphones. This way you can
monitor adjustments in real time and verify if they truly suit your needs and expectations.
2. Connect and use the respective components (CD player, MP3-Player, microphones,…), which you
wish to adjust in volume.
3. Speak into the microphone when adjusting its volume and listen to the effect in parallel applying
your headphones.
Example ... The following example describes how to adjust the trainer’s microphone volume:
1. Press T2 over the corresponding symbol . The symbol is now highlighted. In the center of the
display you now see the text relevant for adjusting the trainer’s microphone.
2. Change the volume depending on your requirements:
• Press T12 in order to increase the volume. The values showing on the display will increase, the audio
information / language will turn louder.
• Press T15 in order to decrease the volume. The values showing on the display will decrease, the
audio information / language will turn quieter.
3. Press T14 once the volume meets your requirements.
4. Press one of the other keys (T1 and/or T2) if you wish to adjust other volume setting.
5. Press T11 once all volumes meet your requirements. Now the settings are saved for the defined trai-
ner (or client if you adjust client volume settings).
You can find the exact approach for each option in the following chart.
T1 T2 T3 T4
T5 T6 T7 T8
T9
T10
T11
T12
T13
T14
T15
T16
Submenu:
headphones: client / coach
Submenu:
Noise
xx
x
xx
xx
Menu: Volumes

Chapter 4 – Operation
13
How to proceed per volume option
1. Select the option, for which you wish to adjust the (chart - column Menu).
2. Make the desired changes by pressing the suggested key sequences from the chart.
Menu Explanation Symbol Procedure (key sequence)
--> press the following keys:
Client Micro-
phone
Volume for the microphone of
client(s)
1. T1 (switch to desired submenu)
2. T15: decrease; T12: increase **
3. T14 (save settings)
Trainer Micro-
phone
Volume for the microphone of the
trainer(s)
1. T2 (switch to desired submenu)
2. T15: decrease; T12: increase **
3. T14 (save settings)
CD input signal CD player volume (external device) 1. T3 (switch to desired submenu)
2. T15: decrease; T12: increase **
3. T14 (save settings)
MP3-Audio Volume of MP3 files (internal and
external)
1. T4 (switch to desired submenu)
2. T15: decrease; T12: increase **
3. T14 (save settings)
Client Head-
phones Volume
L Volume R
Volume for the headphones of the
client(s) (settings per ear left/right)
1. T5 (switch to desired submenu)
2. T1 (switch to left ear settings)
3. T15: decrease; T12: increase **
4. T14 (save settings)
5. T2 (switch to right ear settings)
6. T15: decrease; T12: increase **
7. T14 (save settings)
8. T9 (back to the upper menu level)
Trainer Head-
phones Volume
L Volume R
Volume for the headphones of the
trainer(s) (settings per ear left/right)
1. T6 (switch to desired submenu)
2. T1 (switch to left ear settings)
3. T15: decrease; T12: increase **
4. T14 (save settings)
5. T2 (switch to right ear settings)
6. T15: decrease; T12: increase **
7. T14 (save settings)
8. T9 (back to the upper menu level)
Recording Recording volume for external re-
cording devices (i.e. DAT recorder,
cassette player, computer, …)
1. T7 (switch to desired submenu)
2. T15: decrease; T12: increase **
3. T14 (save settings)
Additional Noise
level
• Noise level (scalable back-
ground noise signals):
• Fast on/off function
1. T8 (switch to desired submenu)
2. T1 (for noise levels - switch to settings
submenu)
3. T15: decrease; T12: increase ** T14 (save
settings)
4. T2 (for fast on/off - switch to settings sub-
menu)
5. T15: off; T12: on
6. T14 (save settings)
7. T9 (back to the upper menu level)
* With additional distributors you can increase the number of clients per connection, allowing you to train with
up to six clients per distributor in parallel. This is ideal for group training; it requires additional headphones and
microphones (one per client).
** Press once, several times or for an extend period of time to modify settings..
3. Press the T9 key in order to return to main menu.
4. Press T11 in order to save the adjusted settings.
Menu: Volumes

Operation – Chapter 4
14
Further background information and hints for volume settings
Volume headphones:
• Usually the volumes should be identical for both ears. If different values should appear to be neces-
sary and a peripheral hearing impairment has not yet been determined, it is highly recommended to
clarify any findings visiting ENT specialist or an equivalent health care professional.
• Increase the headphones volume of the client only gradually and carefully. The client shall listen in
and describe if the settings are suitable. Reduce the values immediately, if the client feels the volume
is too loud.
How do volumes interact / correspond?
• When adjusting the volumes of the microphones and external sources (i.e. CD or MP3 files), ensure
to listen in on them in the process. For example, when adjusting the microphone volume, continuously
speak into the microphone with a steady flow of words at approximately the identical loudness. This
way you notice the effect of your adjustments immediately
• You can adjust the volume for all other sources (such as CD-player, MP3 player etc.) in the same
fashion.
• Do not rely on the numbers showing on the display (+xx/- xx) as they serve only for orientation purpo-
ses. Your decision should be based on your actual hearing impression only.
Background noise
• The standard background noise is socalled “white noise”. This signal contains (almost) the entire
spectrum of audible frequencies. Thus it can also be perceived by persons with specific peripheral
hearing losses.
• The noise is not lateralized = not wandering from ear to ear
• Noise is used to improve language processing in noisy environments. Being able to blend out back-
ground noise and focusing on one specific auditory information (voice) is a fundamental capability for
language processing in real life.
Recording…
• • You need to have an additional LINE IN cable if you wish to record lateralized information or training
sesseions.
• • If you wish to record a training session with a DAT or a regular tape recorder, use such an additional
LINE IN cable. Insert the binder plug (black plug with indention) into the Line OUT socket of the Alpha-
Trainer. Insert the green marked plug of the cable into the microphone socket of the recording device.
Menu: Volumes
Chapter 4 – Operation
15
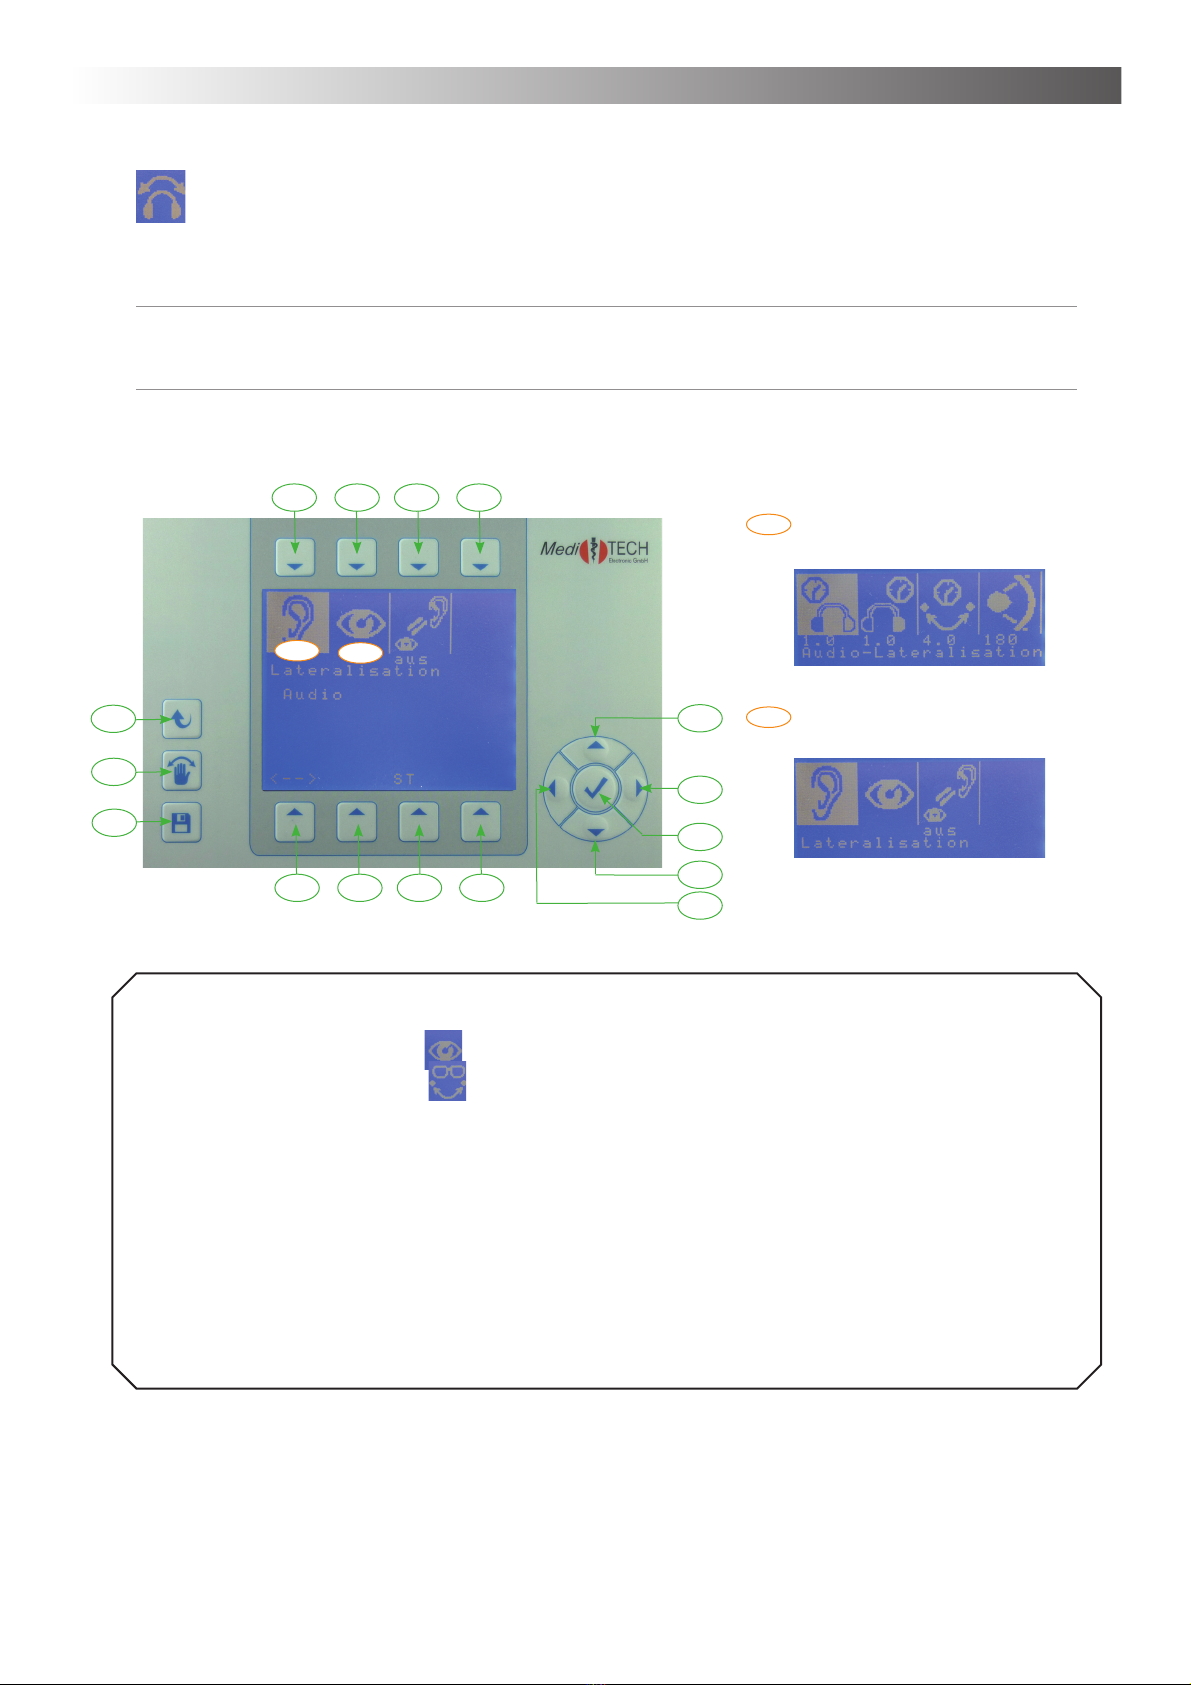
Lateralization / lateral movement from side to side
You are in the lateralization menu. In this chapter you learn how to adjust the auditory and visual laterali-
zation of the AlphaTrainer.
Advice:
You can stop lateralization at any time by pressing the T10 key. If a client shows uneasiness or
dizziness of any sort, stop lateralization immediately. The uneasiness/dizziness will pass swiftly.
Example ... This is how you adjust the transfer time of the visual lateralization:
1. Press T2 over the symbol . The submenu video lateralization opens up.
2. Press T3 over the symbol . In the center of the display the current settings for the transfer time
are indicated. Change these according to your requirements:
• Press T12 in order to increase the transfer time. The values in the display will grow bigger and
both eyeglass lenses will be open longer in parallel.
• Press T15 in order to decrease the transfer time. The values in the display are reduced and both
eyeglass lenses will be open in parallel for a shorter time span.
3. Press T14 if the transfer time corresponds to your requirements.
4. Press one of the other keys T1 to T4 to adjust other settings related to the visual lateralization.
5. Press T11 if all settings meet your requirements. By doing, so you save those settings for each client.
You can adjust all other settings in this submenu in the same way. The following chart describes how to
proceed for each function.
T1 T2 T3 T4
T5 T6 T7 T8
T9
T10
T11
T12
T13
T14
T15
T16
Submenu: Lateralization Audio
Submenu:
Lateralization Video
x
x
xx
xx
Menu: Lateralization / lateral movement from side to side

Operation – Chapter 4
16
How to adjust lateralization settings
1. Select the option for which you wish to adjust the settings (Chart - column menu).
2. Make the desired changes by pressing the suggested key sequences from the chart (chart - column
procedure)
Menu Explanation Symbol Procedure (key sequence) > Press:
Audio –
hold time L
Duration settings for how long the
audio signal remains on the left ear
without moving
1. T1 (switch to Audio submenu)
2. T1 (switch to settings submenu)
3. T15: decrease, T12: increase **
4. T14 (save settings)
Audio –
hold time R
Duration settings for how long the
audio signal remains on the right ear
without moving
1. T1 (switch to Audio submenu)
2. T2 (switch to settings submenu)
3. T15: decrease, T12: increase **
4. T14 (save settings)
Audio
transfer time
Duration of how much time a trans-
fer from one side to the other takes
(ear to ear)
1. T1 (switch to Audio submenu)
2. T3 (switch to transfer time submenu)
3. T15: decrease, T12: increase **
4. T14 (save settings)
Audio Lateral
Width
Limitation:
HOME
Standard setting: 180° = full shift
from ear to ear, 90°: Only partial shift
within a 90°-angle, adjustable in 15°
steps
1. T1 (switch to Audio submenu)
2. T4 (switch to lateral width submenu)
3. T15: decrease, T12: increase **
4. T14 (save settings)
Video – hold
time L
Defines for how long the left lense of
the LCD glasses stays open.
1. T2 (switch to Video submenu)
2. T1 (switch to video hold time L submenu)
3. T15: decrease, T12: increase **
4. T14 (save settings)
Video – hold
time R
Defines for how long the right lense
of the LCD glasses stays open.
1. T2 (switch to Video submenu)
2. T2 (switchto video hold time R submenu)
3. T15: decrease, T12: increase **
4. T14 (save settings)
Video transfer
time
Defines for how long both lenses
of the LCD glasses stay open in
parallel.
1. T2 (switch to Video submenu)
2. T3 (switch to transfer time submenu)
3. T15: decrease, T12: increase **
4. T14 (save settings)
Video Intensity
Limitation:
HOME
Defines the intensity of darkening for
the LCD glasses. (identical for both
lenses) high values = itense, low
values = less intense
1. T2 (switch to Video submenu)
2. T4 (switch to LCD intensity submenu)
3. T15: less intense, T12: more intense **
4. T14 (save settings)
Audio/Video
Sync
The visual settings adapt to the
auditory settings (to allow for easier
adaption to the use of the LCD
glasses).
1. T3 (switch to AV synchronicity submenu)
2. T15: off, T12: on
3. T14 (save settings)
* The voice of the client and the trainer/the external source (MP3, CD,…) are perceived as moving in opposite
directions. I.e.: If the voice of the client is to be heard on the left ear, the voice of the model voice (trainer / CD)
will be perceived on the right = opposing ear. The voices will wander from ear to ear constantly shifting and will
briefly meet in the center when intercrossing. This description is made with reference to the client voice.
** Press T15/T12 once, several times or for an extended period of time to modify settings.
3. Press the T9 key in order to return to main menu.
4. Press T11 in order to save the adjusted settings.
Menu: Lateralization / lateral movement from side to side

Chapter 4 – Operation
17
Further background information and hints for lateralization settings
Lateral width ...
Limitation - AlphaTrainer HOME:
You can only adjust the lateral width with the AlphaTrainer Professional.
• Some clients may feel slightly uneasy when the lateral width is set to 180° (when experiencing latera-
lization for the first time). Adjust this setting only with clients that express such a discomfort. With each
training session you then increase the lateral width until reaching 180°.
• This function allows you to analyze how well your clients can direct their attention towards the lateral
movement and how well they can concentrate on their respective reading task: Slightly adjust the set-
tings for the lateral width. If the client responds to this adjustment and gets distracted from the reading
task, the level of concentration is not at its best.
• In return, applying very small values for the lateral width allows you to analyze how well the spatial
hearing of your client works.
Auditory-visual synchronization ...
• As soon as you change one of the settings for lateralization (hold times, transfer times) the synchro-
nicity is no longer in place.
• This function should only be applied with clients that show difficulties using the LCD shutter glasses
in parallel to the auditory stimulation. After some training sessions you should reach a level of compe-
tence in your client that allows for continuous non-synchronized training
Employment and settings for the LCD shutter glasses ...
Limitation - AlphaTrainer HOME:
With the AlphaTrainer HOME the shutter glasses can be used. With the AlphaTrainer Professional,
the level of darkness intensity is scalable.
• Note: The client should continue to wear his regular glasses underneath the LCD shutter glasses.
• Use the LCD shutter glasses only in a later stage of the training. The client should already be accusto-
med to the auditory training modes.
Exception: For clients with visual perception problems, the LCD shutter glasses should be used
at starting at an early stage of training.
• The level of intensity for the LCD glasses should usually be set to 100%. If the client struggles with the
reading process when applying the LCD glasses, temporarily reduce the level of darkening intensity.
Rebuild it to 100% within a few weeks of training.
• Important: As with the auditory settings, ensure that you choose values comfortable for your client in
order to keep him motivated for the training.
Lateralization for the coach ...
• If you drove through lateral training daily in several training units with clients, have possibly the need
to hear the language normally. For this purpose you can use the non-lateralization adapter. This sup-
presses the movement at the jack headset-phone, at which he is attached. The lateralization to client
headphones remains unimpaired of it.
• In order to use the adapter, you proceed as follows:
1. Pull the plug at the headphone cable out of the AlphaTrainer.
2. Put the non-lateralization plug into the device socket.
3. Put the plug at the headphone cable into the socket of the non-lateralization plug.
Menu: Lateralization / lateral movement from side to side

Operation – Chapter 4
18
Audio Settings
You are in the audio settings menu. In this chapter you learn how you can assign predefined microphones
and headphones to clients and trainers. Furthermore, in this submenu you can define settings for con-
sonant enhancement, MCVF (Multi Channel Voice fusion) and mono/stereo modes. You will find specific
instructions of how to proceed under “Further background information and advice”.
Example… of how to change the type of headphones for the client:
1. Press T3 on top of the symbol . The submenu “device se-
lection” opens. The currently selected headphones are indicated
by an arrow in front of it. In the lower part of the display you find
further information on this currently active component.
2. Press T15 to scroll through the list.
3. Continue to press T15 until the arrow is in front of the headphones you are currently using
4. Press T14 once the arrow is in front of the headphones currently used by you and confirm your se-
lection by clicking on the button with the YES symbol.
5. Press one of the other keys T1 to T7 if you wish to further adjust microphone and headphone types
or settings.
6. Press T11 if the settings are correct in order to store the settings
In order to define / change all other settings in this menu, you simply proceed in the same way. You can
find the exact approach for each option in the following chart.
T1 T2 T3 T4
T5 T6 T7 T8
T9
T10
T11
T12
T13
T14
T15
T16
Submenu:
Device selection – microphones
Submenu:
Device selection – headphones
x
x x
xx
xx xx
Menu: Audio-Settings
Chapter 4 – Operation
19
How to define the audio settings
1. Select the option for which you wish to adjust the settings (Chart - column menu).
2. Make the desired changes by pressing the suggested key sequences from the chart (chart - column
procedure)
Menu Explanation Symbol Procedure (key sequence) > Press:
Client
microphone type
Selection of microphone type you
are using for your client*
1. T1 (switch to device selection submenu
2. T15 ** to mark the microphone type
3. T14 (save settings)
Coach
microphone type
Selection of microphone type you
are using for the coach
1. T2 (switch to device selection submenu)
2. T15 ** to mark the microphone type
3. T14 (save settings)
Client
headphones
type
Selection of headphones type you
are using for your client*
1. T3 (switch to device selection submenu
2. T15 ** to mark the headphone type
3. T14 (save settings)
Coach
headphones
type
Selection of headphones type you
are using for the coach
1. T4 (switch to device selection submenu
2. T15 ** to mark the headphone type
3. T14 (save settings)
Enhencement
Limitation:
HOME
A special audio filter that strongly
improves signal quality particularly
of spoken language
1. T5 (switch to enhancement submenu)
2. T12: increase; T15: decrease **
3. T14 (save settings)
MCVF
(Multi-Channel-
Voice-Fusion)
Limitation:
HOME
Special extended hearing training:
Frequency band training in which
model voice and client voice are
split up and blend into one another
(explanation under further back-
ground information and advice)
1. T6 (switch to MCVF audio settings subme-
nu)
2. T12: more bands; T15: less bands **
3. T14 (save settings)
Mono / Stereo Switch between the mono and stereo
settings - depending upon the type
of audio material you are using:
Stereo: for audio material recorded in
dummyhead stereophony Mono: for
commercial audio material
1. T7 (switch to mono/stereo settings subme-
nu)
2. T15 (toggle between mono and stereo)
3. T14 (save settings)
* When you are using more than one type of headphones or microphones, we recommend to opt for NORM_0dB
as the device of choice.
** T12/T15 press once, several times or for an extended period of time until the desired settings are in place
3. Press the T9 key in order to return to main menu.
4. Press T11 in order to store the changes made.
Limitations - AlphaTrainer HOME:
• With the AlphaTrainer HOME the enhancement can be switched on or off. In the Professional
version the enhancement is additionally scalable.
• The function of the MCVF is available only in the Professional version.
Menu: Audio Settings

Operation – Chapter 4
20
Further background information and advice for audio settings
Type of microphone/type of headphone ...
• Microphone and headphone types to some extend differ in their respective volume levels. With diffe-
rent microphones, the same speaker will still seem louder or more quiet if the settings of the AlphaTrai-
ner are not adjusted correspondingly. The same holds true when using different headphones. Hence
it is important to define the microphone and headphone types used in the training.
• In order to easily adjust to and neutralize these differences, the types of device certified for this equip-
ment by the manufacturer are preset in the AlphaTrainer. You can simply select them from the menu.
Voice Enhancement ...
Limitation – AlphaTrainer HOME:
With the AlphaTrainer HOME, the voice enhancement can be switched on / switched off. With the
Professional version the voice enhancement is scalable (0, 25, 50, 75, 100% intensity).
• Voice enhancement is a special signal modulation, with which the volume of certain frequency ranges
of language and music are increased to improve perceivability. You can increase the level of intensity
in steps of 25%, 50% 75% and 100%. The fourth step (full) is then the maximally possible signal en-
hancement.
MCVF (Multi-Channel-Voice-Fusion) ...
Limitation - AlphaTrainer HOME:
The MCVF function of the MCVF is available only in the Professional version.
• Imagine for a moment that the language or music which you perceive via headphones during lateral
training actually are two broad coloured bands. The band produced by the client microphone is green
and the model voice (trainer, CD, MP3) is blue. These bands continuously shift from ear to ear. This is
the key effect that allows for the distinct training provided by lateral training.
• With the MCVF function the corresponding bands are cut full length into two and/or four thin strips.
High frequencies are on one strip, low frequencies on the other. Now half of the bands switch sides
while the other half stays in place, creating a whole new hearing impression.
• With two frequency bands per signal (speaker) The low frequency bands switch sides so that half
the model voice is perceived on the left, the other half on the right ear. The same holds true for the
client, only the other way around.
• With four frequency bands per signal (speaker) you have a broad band on the left consisting of
green-blue-green-blue while on the right you have the blue-green-blue-green strips.
• These newly formed bands now are being lateralized and wander from ear to ear just like the usual
signals would.
• When applying MCVF, both the client’s and the trainer’s voice blend into one another even the more
than with regular lateralization alone.
Mono / Stereo ...
• CD and MP3 material produced by MediTECH usually is recorded in dummyhead stereophony. This
recording methods creates a very realistic, 3D-like hearing impression in which differences in distance
and direction are made audible. Recordings for lateral training usually are done in such a way that
the model voice primarily is perceived from one direction while still being audible on the other ear,
too, creating a hearing impression much closer to standard hearing situations in real life than regular
stereo recordings. Any material recording with dummyhead stereophony requires the stereo setting
on the AlphaTrainer.
• The settings mono is meant for commercial CD and MP3 material. In this mode you can apply your
own selection of audio material or allow your client to bring his own favorite story or recording for mo-
tivation purposes. If you set the AlphaTrainer to stereo when playing a regular commercial CD, there
usually is no lateralization, hence no training effect.
Menu: Audio Settings
This manual suits for next models
1
Table of contents
Other Meditech Medical Equipment manuals


Popular Medical Equipment manuals by other brands


Getinge
Getinge Arjohuntleigh Nimbus 3 Professional Instructions for use

Mettler Electronics
Mettler Electronics Sonicator 730 Maintenance manual

Pressalit Care
Pressalit Care R1100 Mounting instruction

Denas MS
Denas MS DENAS-T operating manual

bort medical
bort medical ActiveColor quick guide

AccuVein
AccuVein AV400 user manual


