MedViron 39" Overbed Table User manual
Service Manual
39” Medviron Overbed Table

Table of Contents
Section 1 Caster Replacement
Section 2 Plug Replacement
Section 3 Top Replacement
Section 4 Gas Spring Replacement
Section 5 Pedestal Service
Section 6 Vanity Service

Section 1: Service Instructions for
MedViron Overbed Table Caster Replacement
This manual is intended for trained professionals for adjustment of the MedViron Overbed Table. Any
action not outlined in this manual may result in voiding of the warranty.
Tools required
½” Open end wrench
1.0 Turn the over bed table upside down
To replace casters that are worn or malfunctioning, first raise the unit to its fullest extension. Turn the
over bed table upside down and place on a protected surface such as a blanket (may require assistance).
1.1 Removing and replacing the caster and post
Using a ½” open end wrench, loosen each caster post by turning nut counter clockwise with a wrench
and remove the caster and washer. Replace the washer and caster with new parts. see Figure 1
Figure 1

Section 2: Service Instructions
MedViron Overbed Table Base Plug Replacement
This manual is intended for trained professionals for adjustment of the MedViron
Overbed Table. Any action not outlined in this manual may result in voiding of the
warranty.
Tools required
Soft Mallet or Hammer
Punch
2.0 Turn the over bed table upside down or on its side
To replace damaged or worn end plugs, first raise the unit to its fullest extension. Turn the
over bed table upside down or on its side and place on a protected surface such as a blanket
(may require assistance).
2.1 Removing and replacing the plug
Insert a punch through the caster hole (as shown) and tap on the back side of the plug.
Remove the plug. Insert a new plug carefully, inserting all sides evenly and equally. If
necessary, tap the plug with a soft mallet or hammer. See Figure 2
Figure 2

Section 3: Service Instructions OBT 39” Top Replacement
This manual is intended for trained professionals for adjustment of the Medviron Overbed Table.
Any action not outlined in this manual may result in voiding of the warranty.
Tools required
5/32” Allen wrench
#2 Square driver bit (Provided)
3.0 Remove the top
Raise the unit to its fullest extension. Remove shelves (pedestal, cover plate, and handle sleeve do not
need to be removed for top replacement). Remove (8) screws from the underside of the plate. Lift top
up and off of the plate. See Figure 3
3.1 Replace the top
Place the new top on the plate and align the holes. Replace the screws with care. Do not cross thread
or over-tighten. Replace drawer tubs or shelves.
Figure 3
Section 4: Service Instructions –Gas Spring Replacement
MedViron 39” Overbed Table
This manual is intended for trained professionals for adjustment of the MedViron Overbed Table. Any
action not outlined in this manual may result in voiding of the warranty.
The overbed table contains a single locking gas spring for height adjustment. This gas spring keeps the
table from being lowered until the handle is activated, but allows free rise. Gas springs can lose force
over time, which will cause the table to descend faster when activated.
Tools required
#2 & #3 Phillips Screwdriver (Powered driver not recommended except where noted)
7/16” socket or wrench
Block (provided)
Replacing the gas spring
4.0 Lift table to the highest adjustment position. Remove shelf pedestal following instructions in
Section 5.
4.1 Remove the top as shown in Section 3.
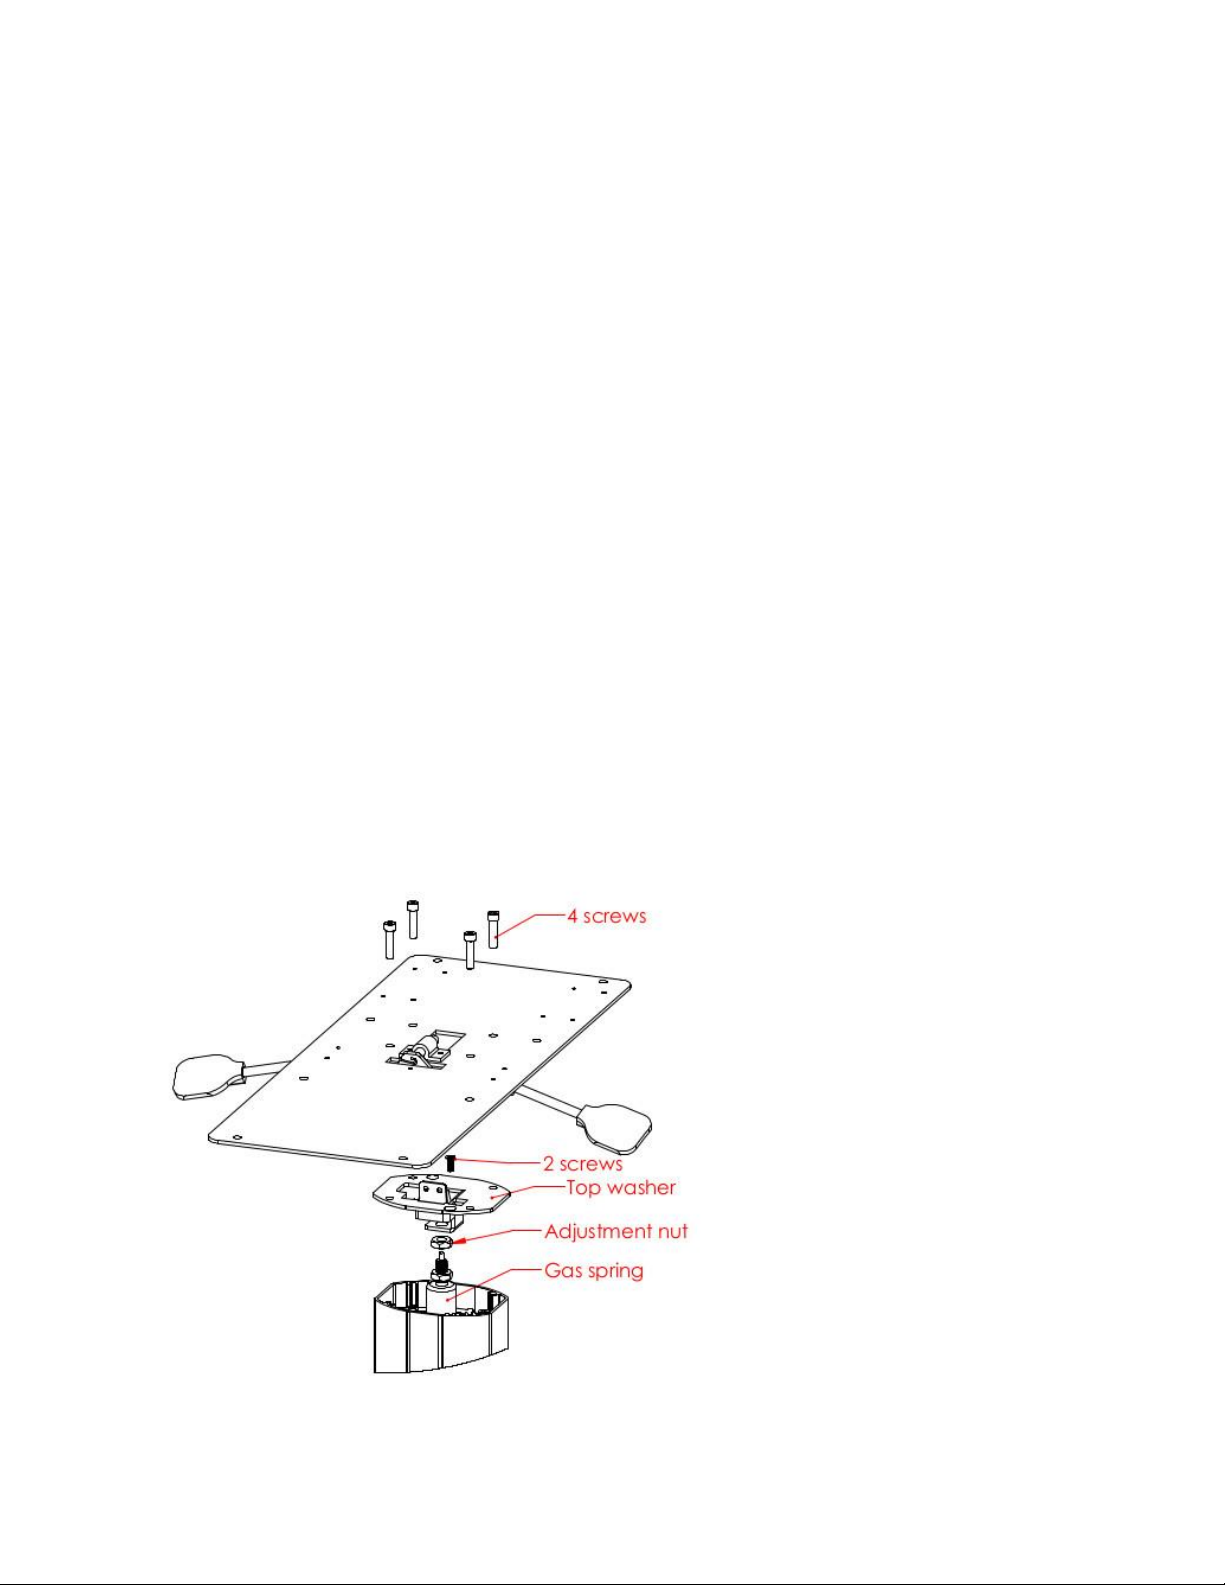
4.2 Remove the top plate by first loosening (4) screws (Figure 4). A power driver may be required
for this operation.
Figure 4
4.3 Remove the top washer by removing the 2 screws that are attached to the upper column, NOTE:
keep hold of the upper column while removing the screws to prevent the column from dropping. Next
loosen the 2 nuts holding the gas spring to the top washer. Remove the top nut & the top washer & set
aside.
Figure 5
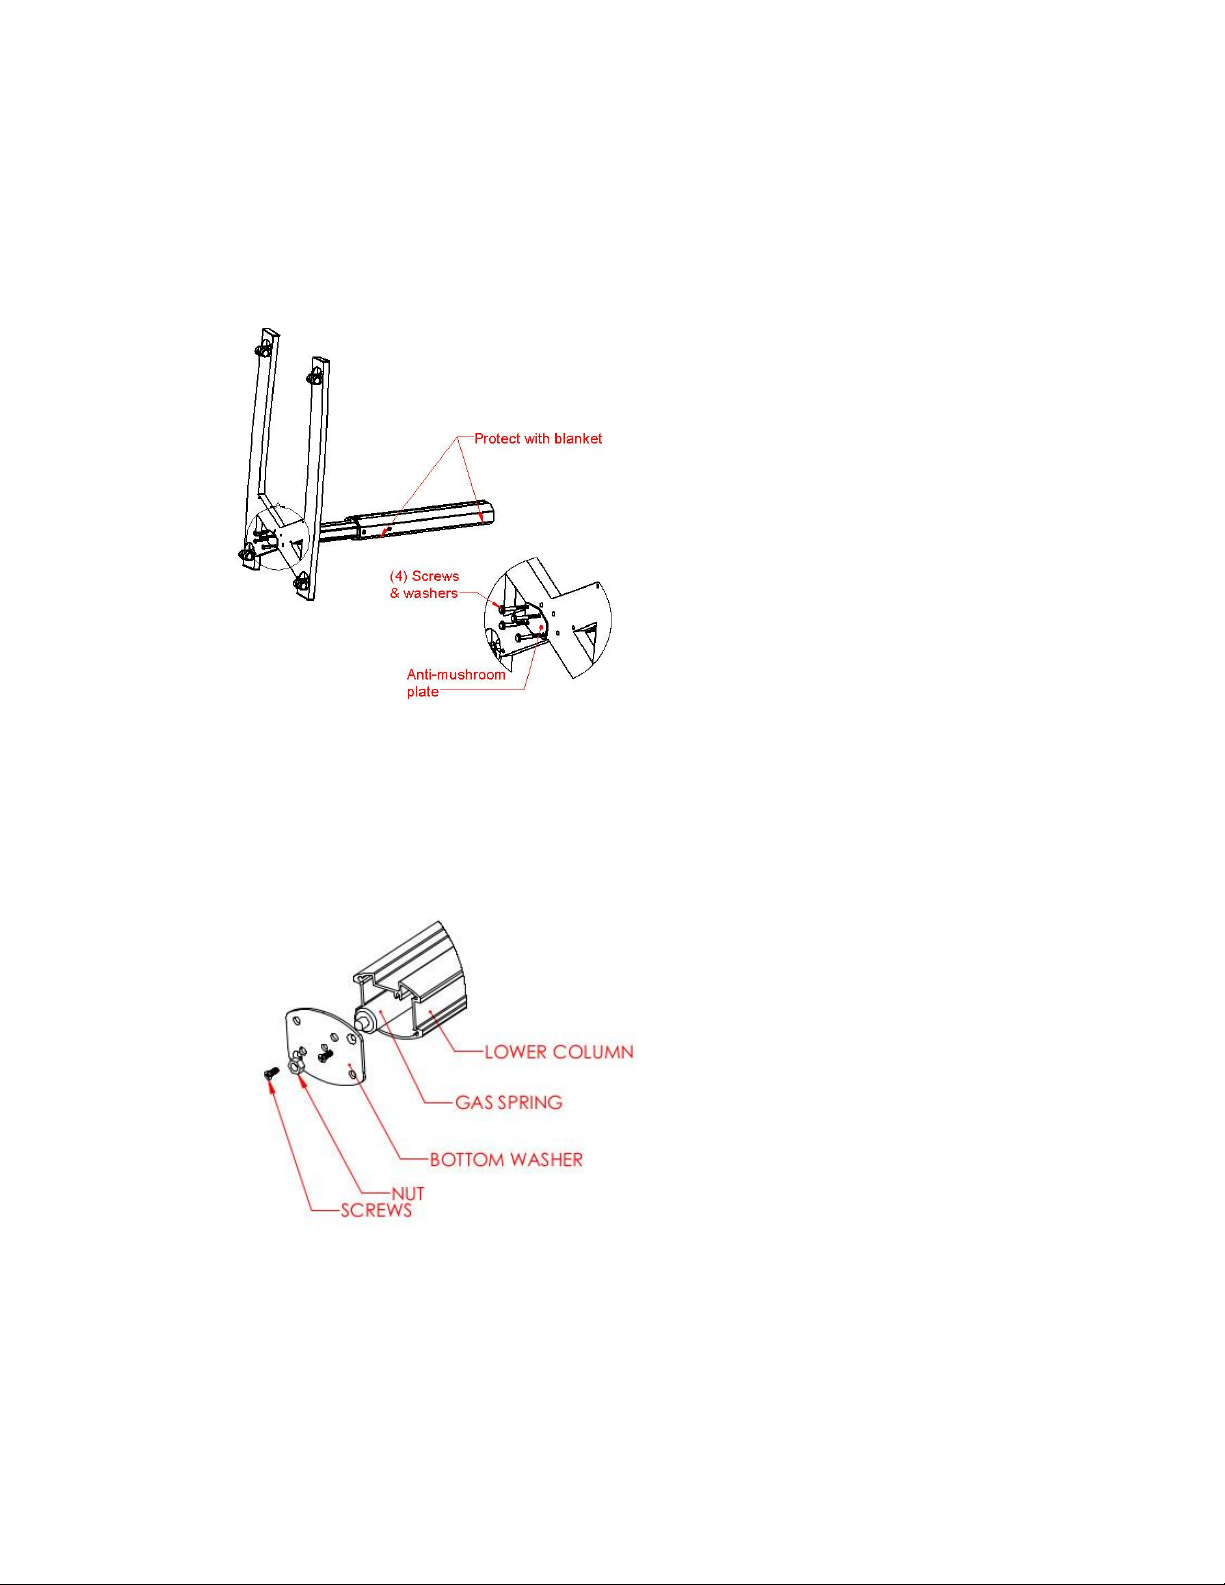
4.4 Remove the base. Place unit on a soft surface such as a blanket or carpet. Remove four bolts,
washers & Anti-mushroom plate (Figure 5).
4.5 Remove the bottom washer. Remove nut & two screws in the bottom of the column’s bottom
washer. Unscrew the bottom washer from the gas spring. Pull the gas spring out of the column.
(Figure 6).
Figure 6
4.6 Assemble bottom washer to the new gas spring by screwing the bottom washer onto the gas
spring. Re-attach the nut onto the bottom washer/gas spring. (Figure 6).
4.7 Insert the gas spring into the column and attach the bottom washer to the column with the two
screws removed in step 4.5 making sure all bolt holes line up with screw boses in the column.

4.8 Attach the X-Base to the column using the screws, washers & anti-mushroom plate removed in
step 4.4 (Figure 5).
4.9 Attach the top washer removed in step 4.3 to top of gas spring. Thread on the top nut. Adjust
the nut setting so that the “L” lever is perpindicular (Figure 7).
Figure 7
4.10 Attach the upper column to the top washer. Use the provided block to boost the upper column
(Figure 8). Activate the gas spring lever and push the top plate down, aligning the plate and column
holes. Attach with the 2 screws removed in step 4.3 (Figure 4).
Figure 8
4.11 Attach the Top plate to the column with the 4 screws removed in step 4.2 (Figure 4).
4.12 Attach the top as shown in Section 3.

Section 5: Service Instructions
MedViron Overbed Table 39” Pedestal
This manual is intended for trained professionals for adjustment of the MedViron Overbed Table. Any
action not outlined in this manual may result in voiding of the warranty.
Tools that may be required
#2 & #3 Phillips screwdriver
5mm Hex drive
5.0 Servicing the pedestal unit
5.1 Removing the pedestal from the unit
Raise the unit to its fullest extension. If only replacing shelves, remove as illustrated in the User
Manual and replace with new part(s). If replacing sides or rods, move to the next step.
Remove shelves. Place unit upside down on a blanket or carpet. Remove (8) screws attached to
the top plate with a #2 screw driver (Figures 9). The pedestal should be loose. Remove the
pedestal and set on one side on a protected surface.
Figure 9
5.2 Replacing sides
Remove (6) connector bolts with a 1/8” hex drive or wrench. Remove the side (Figure 10).

Place the (6) connector bolts thru the new side and begin to thread them into the corresponding
rods, make sure to place the (4) washers between the side & the lower (4) rods. Once all (6)
connector bolts have been partially threaded, finish tightening them. If replacing two sides,
repeat the process for the other side.
Figure 10
5.3 Reattaching the pedestal
Reattach the pedestal by aligning the holes in the (2) sleeves with the corresponding holes in the
top plate. Attach with the (8) screws from section 5.1
Section 6: Service Instructions Vanity Tray Replacement
This manual is intended for trained professionals for adjustment of the Medviron Overbed Table.
Any action not outlined in this manual may result in voiding of the warranty.
Tools that may be required
Straight or Slotted screwdriver
#2 Phillips screwdriver
6.0 Removing or replacing a vanity tray
6.1 Removing the vanity tray
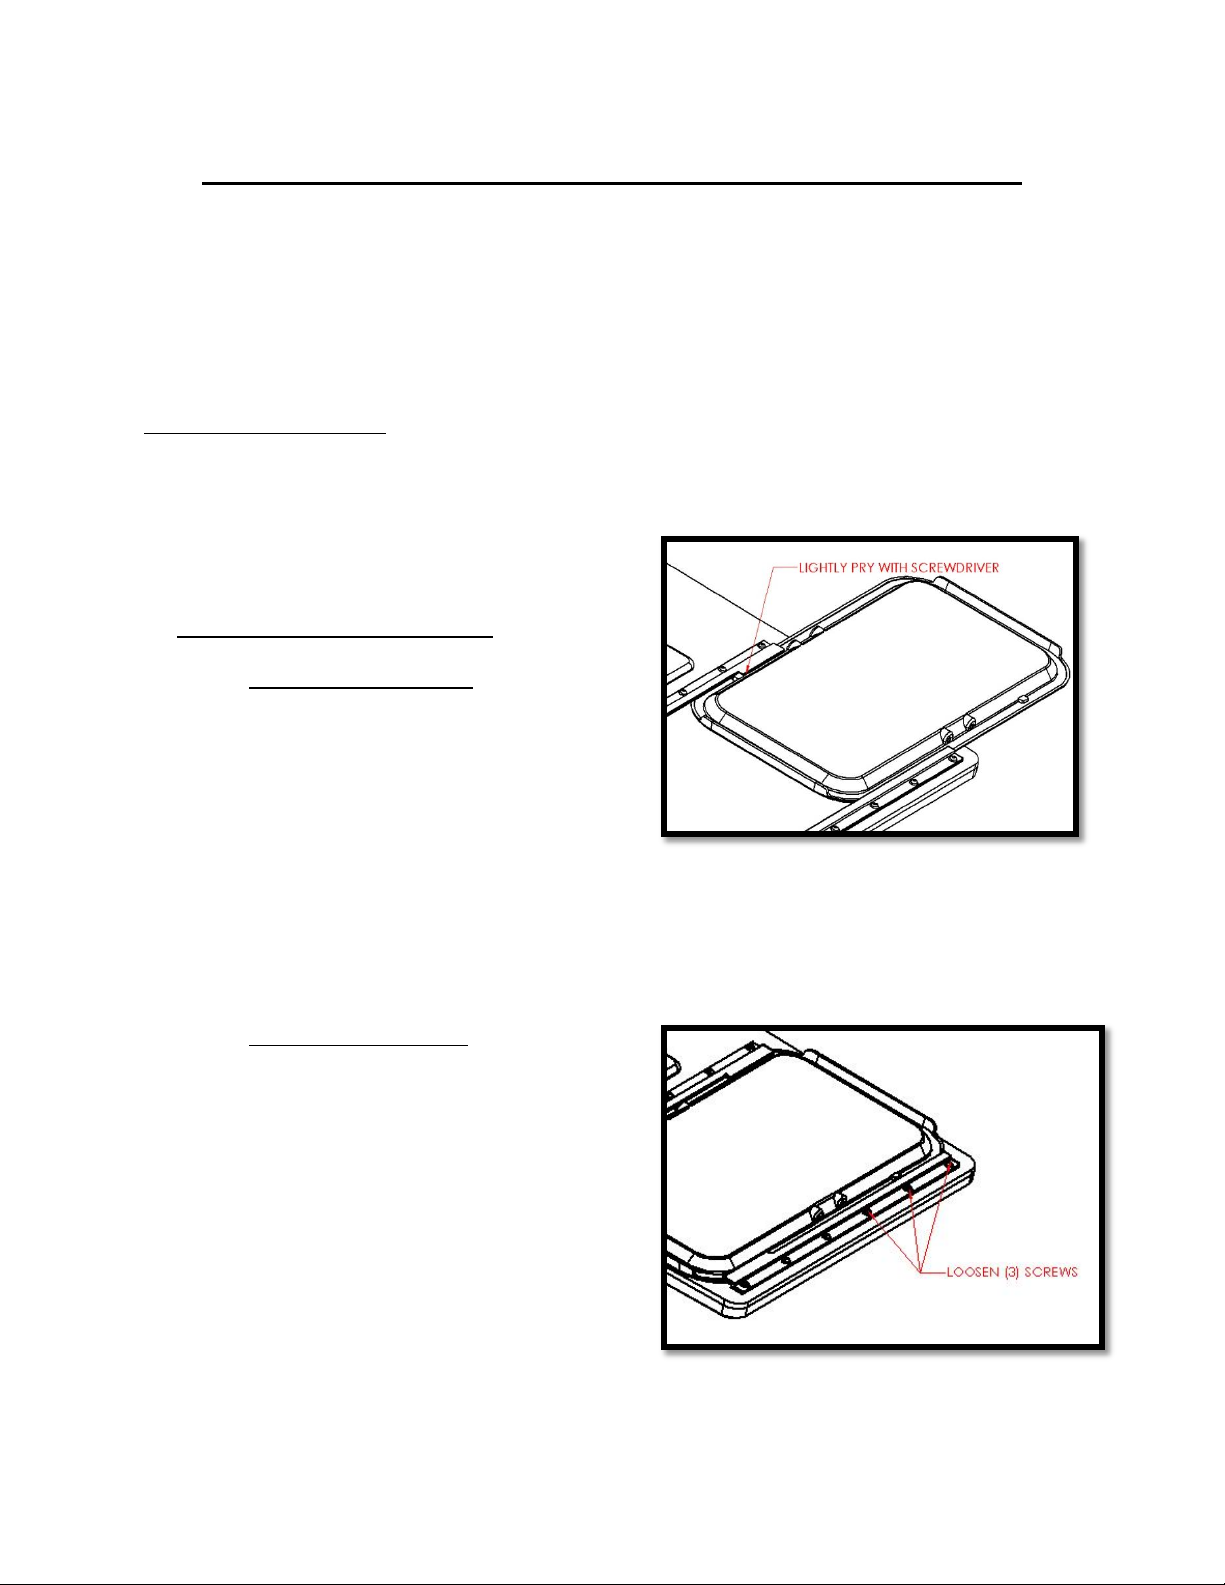
Raise the unit to its fullest extension. In most
cases, the vanity tray can be removed by
pulling the tab past the stop. If the stop is too
tight, a slotted screw driver may be used to
lightly pry the stop . The vanity can be
replaced the same way it was removed.
Figure 1
6.2 Replacing the vanity tray
If replacing the vanity, the rails may need
adjustment. Remove the old vanity as
described in 6.1. Insert the new vanity.
If the vanity works well and does not slide too
hard or easy, no adjustment is necessary. If
the vanity slides too hard or too easily
adjustment may be required. If the vanity
needs adjustment, start by loosening (3)
screws on the outer rail with the vanity
centered . If the vanity moved too easy, hold

the rail slightly closer to the vanity and retighten the screws. Repeat the process with the other
(3) screws on the same rail. If the vanity is too tight, use the same process but move the rail
slightly farther away from the vanity.
Other manuals for 39" Overbed Table
2
Table of contents
Other MedViron Medical Equipment manuals


Popular Medical Equipment manuals by other brands

SchureMed
SchureMed Stirrup Dolly Instructions for use

Dentsply Sirona
Dentsply Sirona Intego installation manual

Ultrasound Technologies
Ultrasound Technologies Fetatrack 310 Service manual

human care
human care Roomer S user manual

O-Two
O-Two 01MN1000 Operator's manual

Polar Electro
Polar Electro Active Ice instructions


