MEI Conlux MCM5 User manual

DIS LED
C/C LED
DIAGNOSTIC LED’s
Error status will be reported to the main controller, and
LEDs will flash as below:
“DIS”: Error of discriminator (Upper part of body)
“C/C”: Error of coin changer (Lower part of body)
User
Interface
Buttons
TOKEN TEACH
The Conlux MCM5 will accept tokens when the Token
DIP Switch is placed in the ON position. The Token teach
mode is entered by pressing the Mode and B button
simultaneously for longer than 2 seconds. When this mode
is entered, the C/C LED will flash rapidly. The user should
then drop 10 tokens with at least 1 second intervals
between tokens.
The mode will automatically end after the 10th token
is dropped. If successful, the C/C LED will illuminate
continuously.
To obtain tokens contact Vendnet at 800-833-4411.
www.vendnet.com
Check Light LED
Discriminator
MCM5
Installation Guide
Coin Dispenser
Coin Cassette
ELECTRONICS &
REFRIGERATION
Distributed By : Area Wide Inc.
4753 E. Lower Springboro Rd.
Waynesville, OH 45068
Phone: 1-800-233-5413
Fax : 1-513-897-7696
e-mail: [email protected]
www.vendohio.com

DIP SWITCHES
GENERAL INFORMATION
CONLUX MCM5
This document contains information for installing the
MEI Conlux MCM5 coin mechanism.
This product fits into the standard coin changer channel
provided by vending machine manufacturers. It mounts on
the existing three mounting studs/screws located in the
vending machine.
INTERFACE
MEI Conlux MCM5 coin changer operates in machines that
support the MDB interface*.
The operating voltage of a MEI Conlux coin mechanism is
stated on the label of each product. The label is located on
the left side of the coin mechanism.
Weight
3.5 lbs.
Rated Operating Voltage Voltage: 34v d.c. 12W
0.92A at DC34V peak
Compliance UL standard, FCC standard
*Note: MDB (Multi drop bus) interface information can be
found on NAMA’s website located at www.vending.org
Reading the Conlux Serial #
117400052
First two digits are the year - 2011
Second digit is the month - July
X = October
Y = November Ignore the rest of the numbers
Z = December
INSTALLATION INSTRUCTIONS
Before you begin...
•Remove the coin mechanism from the packaging
material. Inspect unit for physical damage.
You need these tools:
Phillips screw driver
Wire Tie wraps
Wire cutters
Wire Tie wrap adhesive anchors
•Turn OFF
the power supply to the vending machine.
•Lift up on the White lever on the top left side of the coin
mechanism and tilt the Discriminator assembly forward.
Push Up Tilt Out
Hang
Securely
•Once open, the mounting holes are accessible. Hang the
coin mechanism on the mounting studs/screws, ensuring
that the coin mechanism is mounted vertically with no tilt,
on all three studs/screws.
•Tighten the screws (if required),
Check / Set the DIP Switches.
Close and latch the Discriminator assembly.
3 Mounting
Holes

A B C D E
CURRENCY SWITCH
(Located on the back of the Discriminator Unit.)
Switch Number Function
#1 USA On/Off On - Accept United States Coins
#2 Canada On/Off On - Accept Canadian Coins
#3 Token On/Off On - Accept Tokens
#4 Float High/Low Set Float either High ($52.00) or
Low ($34.00)
ALIGNMENT
Once the coin mechanism is installed, check that there
is a small gap (2 mm) between the return lever on the
vending machine and the Acceptor Gate lever on the coin
mechanism.
Confirm that when you press the coin return lever on the
machine door, it fully depresses the acceptor gate lever on
the coin mechanism, then lets it return smoothly without
holding the gate open.
Check the alignment of the coin input chute and cashbox
chute. Insert some coins to check that they enter the coin
mechanism properly and exit into the return cup. Ensure
that the coin chute does not rest on or open the acceptor
gate.
Most machines allow you to adjust the return lever, coin
chute, and the return cup to align with the coin mechanism.
Align, adjust, and test as necessary to ensure coins are
properly routed before continuing with these instructions.
CONNECTION
If the vending machine has a bill validator, connect the
MDB harness coming from the coin mechanism to the bill
validator’s “Y” connector. If there is no bill validator, connect
the coin mechanism harness to the harness coming from
the vending machine control board.
Tuck any excess length of harnessing inside the machine.
Make sure no harness is pinched or trapped when the coin
return lever is pressed or when the vending machine door
in closed.
Now you may switch ON the power to the vending
machine.
COIN CASSETTE
The coin mechanism can be ordered with one of two
cassette configurations for both the USA and Canada.
The USA and CANADA use the same cassettes.
• Remove cassette by using your thumb to depress the
white latch and tilt the cassette forwards and lift upwards
as shown.
Front
The cassette type will be recognized automatically by the
coin mechanism.
LOADING THE COIN CASSETTE
You can load the coin cassette using either of these two
techniques:
Loading by Removing Cassette
1. Remove the cassette. Place it front down on a firm
surface. Open the back by pinching the two tabs together
and levering it open on the hinge. Fig 1.
2. It is recommended that you fill each tube (nickel, dime,
quarter, and dollar) if available with at least 15 coins. Each
tube will hold 2 rolls of coins.
Note: Insure that coins are inserted into the proper tubes.
Do not fill above the MAX FILL line. Fig. 2
LOADING THE COIN CASSETTE
Loading from the Front
1. Press down on the white Cassette Latch in front and tilt
the top of the cassette out until you can lift the cassette
from the coin changer. Stand the cassette on a firm
surface.
2. From the front, manually load the coins into tubes A, B,
C, D, and E.
Fig. 2
Fig. 1

Types of cassettes and the coin configuration
How to Manually set User Float/Par
Programming
The user must empty the current cassette.
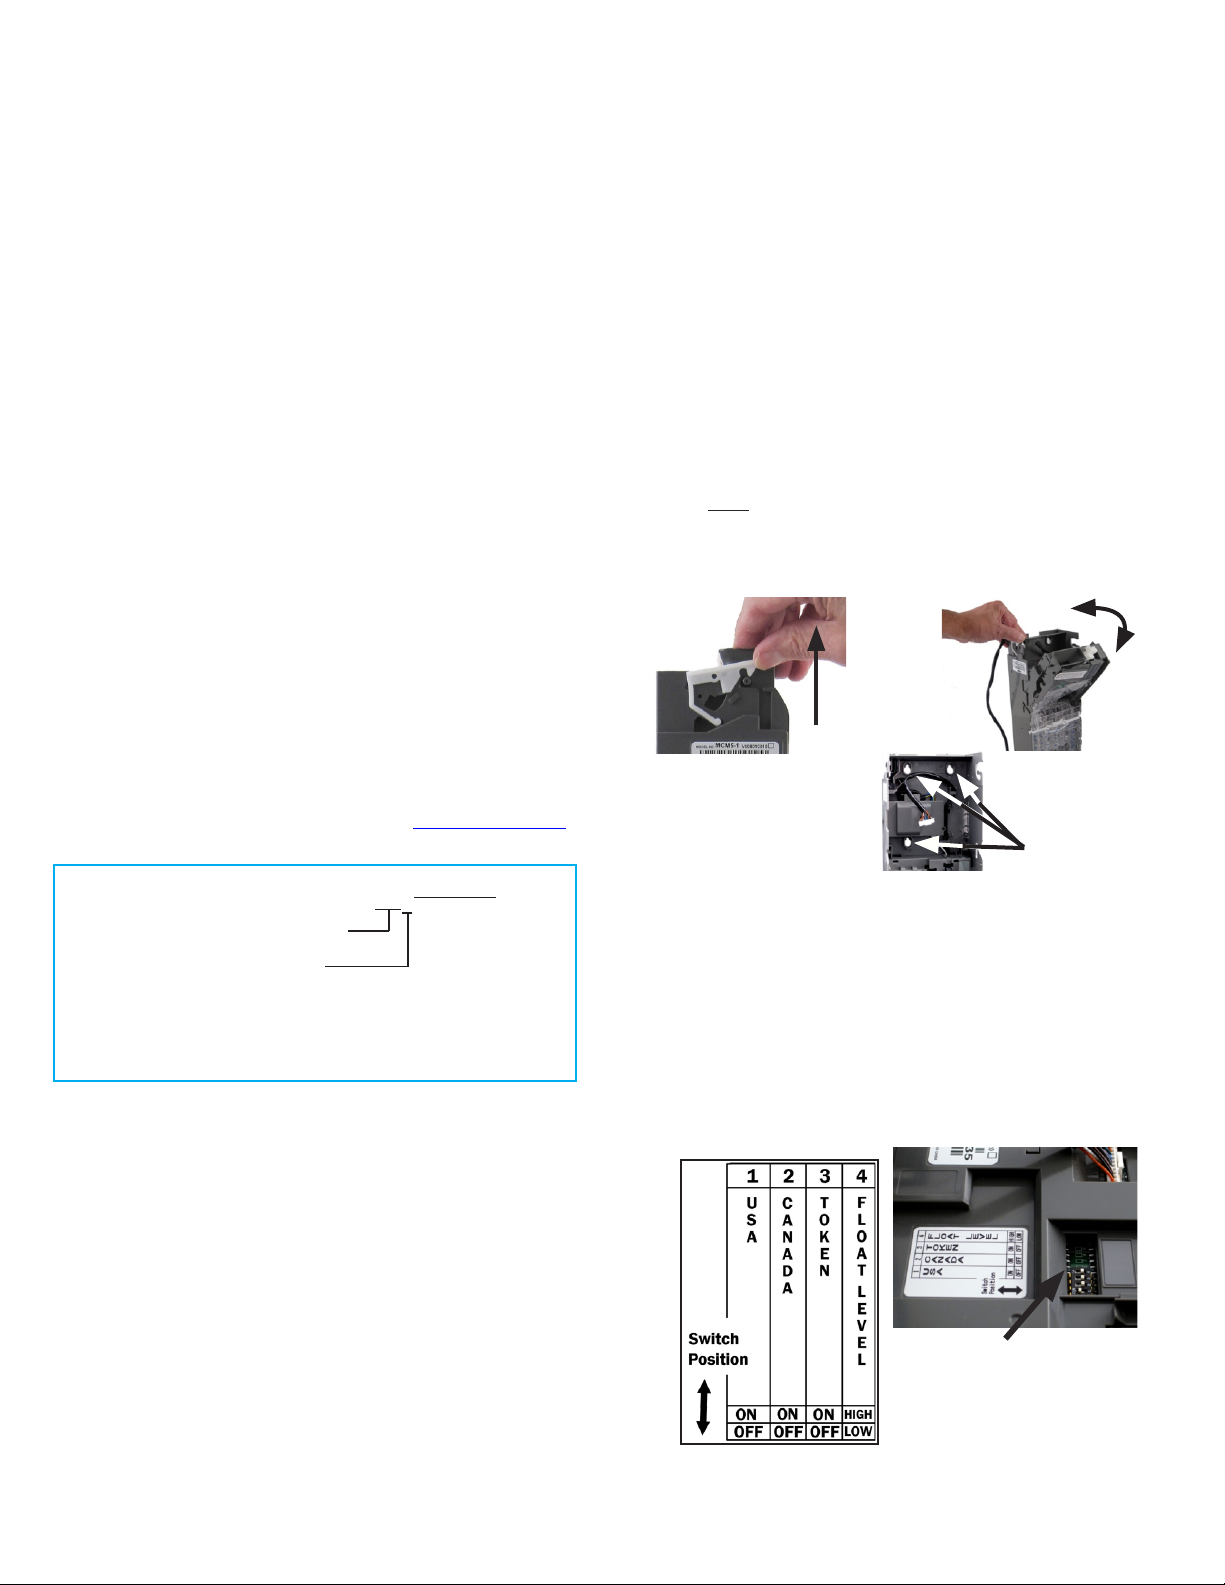
1. The DIP switch should be set to either Float High (ON)
or Float Low (OFF) depending on which value will be
re-programmed.
2. Press the Mode and C buttons simultaneously. If one of
the low level sensors is covered, the C/C LED will flash
slowly for 5 seconds and the changer reverts to its
normal operating mode. If all the low level sensors are
uncovered, the C/C LED will blink rapidly and the next
step can be performed.
3. The user will insert coins through the coin funnel
until the required float level is reached. The following
conditions will apply:
Unrecognized coins will be rejected.
If the cassette contains coin tubes of equal value,
the coins will alternately be routed to each
tube in turn.
The mode will automatically exit if no coins are
dropped for a period of 2 minutes.
Coins will be reported on the MDB protocol as
Manual Fill.
The mode can be exited at any time
without
saving any data by pressing the Mode button for 2
seconds or longer.
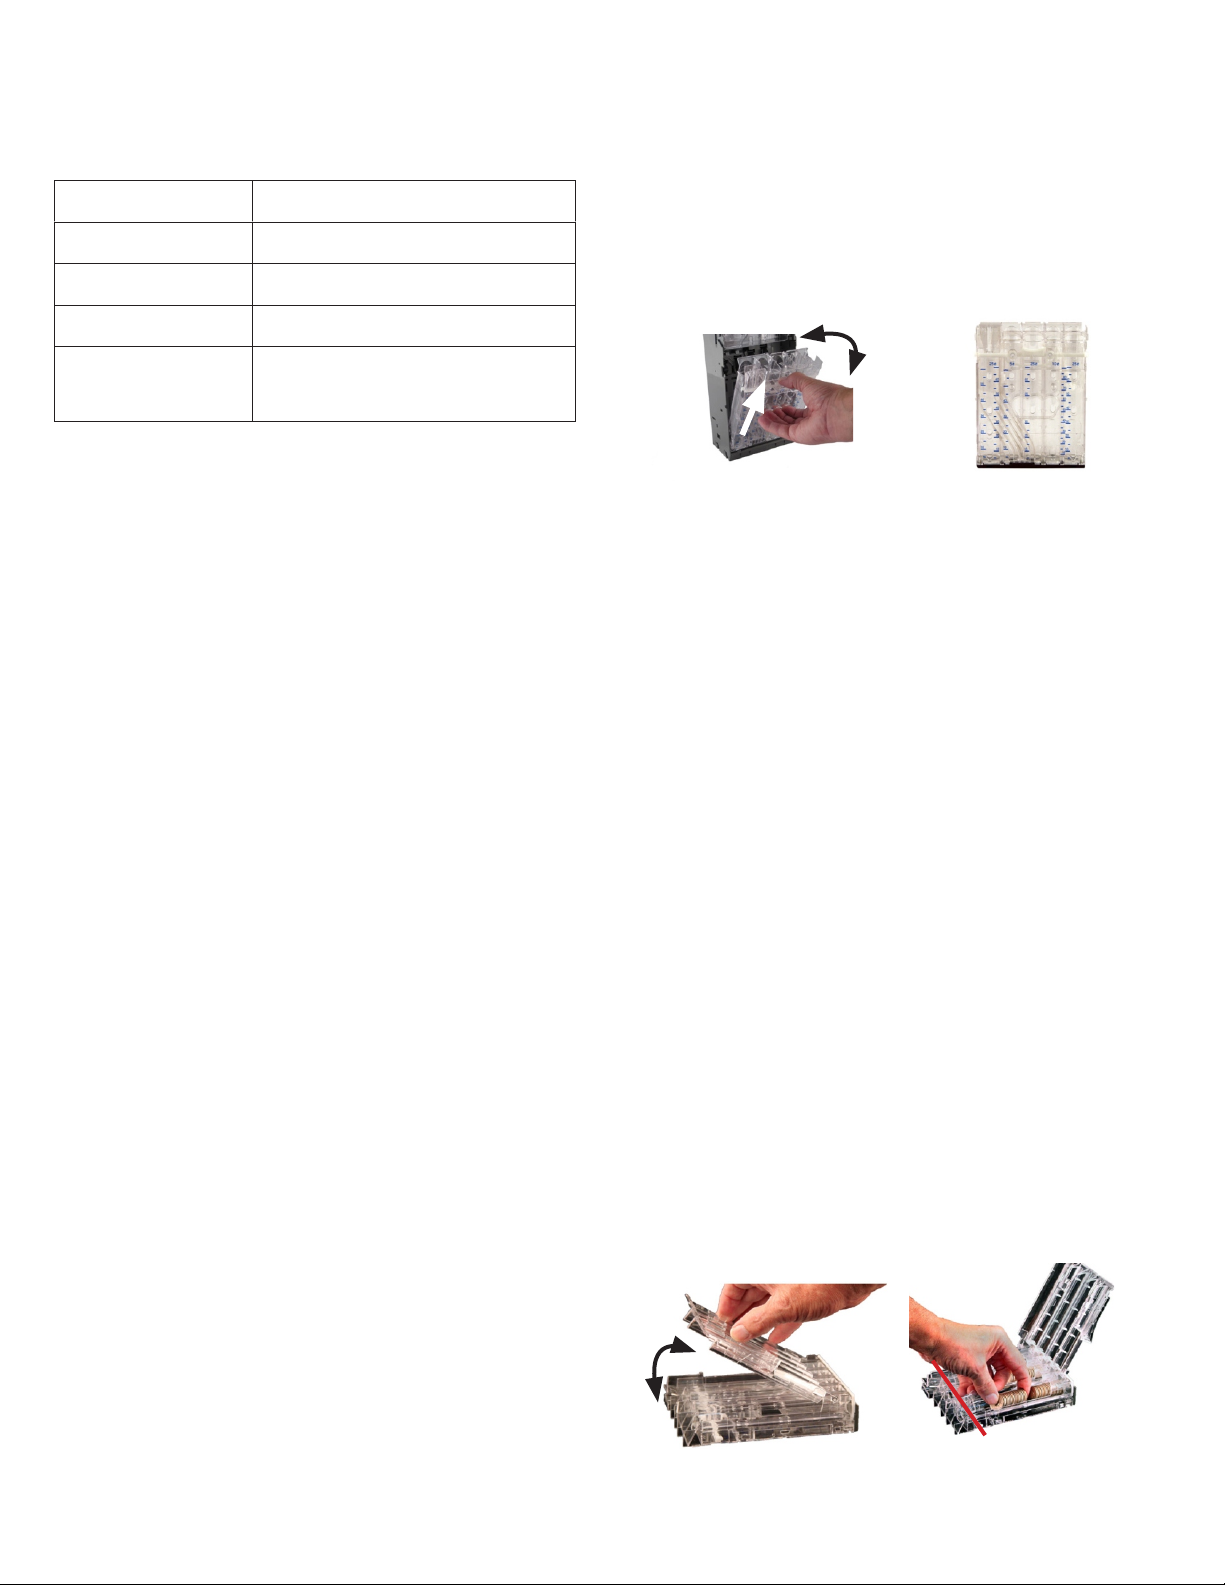
The cassette can be removed and replaced at
anytime without affecting the current tube counts.
When the cassette has been filled to the
appropriate level, the user should press the
Mode and C buttons simultaneously to save the
tube levels.
4. To return the float levels to the default factory
programmed values, the Float / Par Programming
mode should be entered as described above by
pressing the Mode and C buttons simultaneously. When
the C/C LED is blinking rapidly, the user should press
the F↓ button and the F↑ button simultaneously.
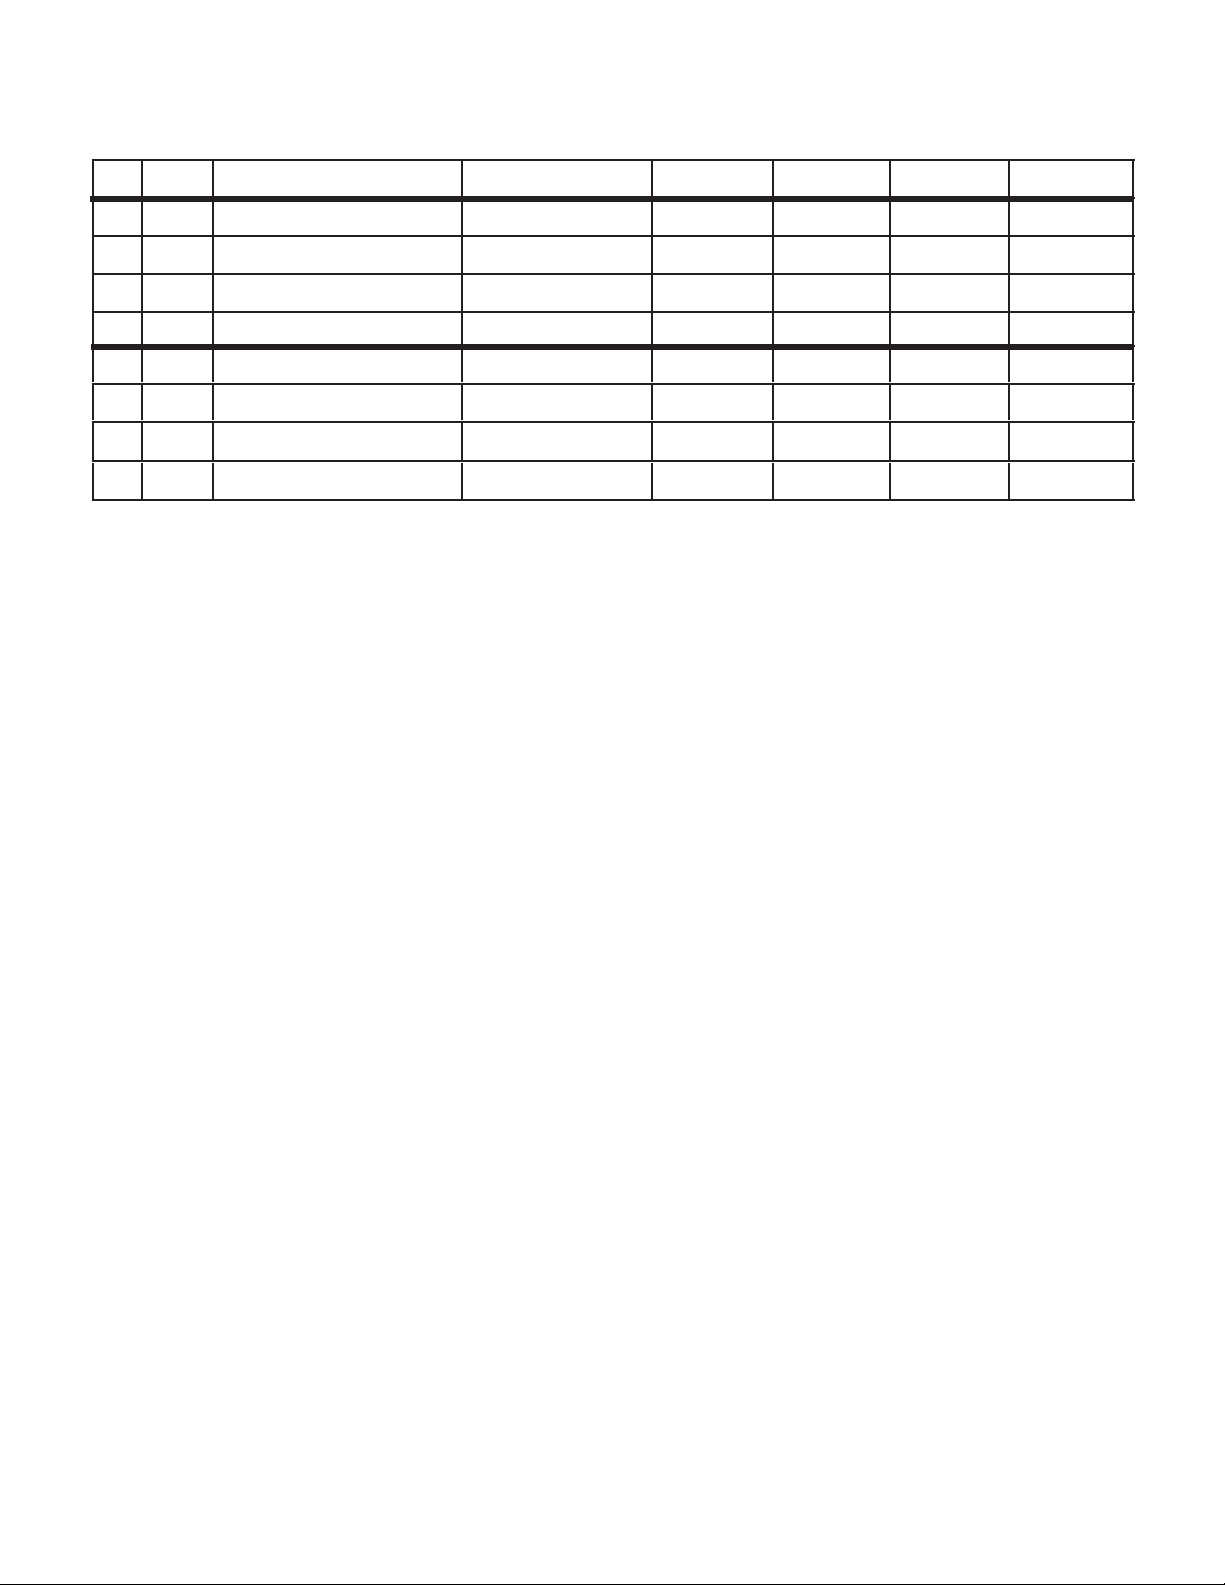
Type Feature Tube A Tube B Tube C Tube D Tube E
1 US-1 Denomination 25 ¢ 5 ¢ 25 ¢ 10 ¢ 25 ¢
Auto Storing No Yes Yes Yes No
Empty Quantity (Note 1) 6 8 8 10 5
Full Quantity (Note 2) 71 64 71 97 N/A
2 US-4 Denomination 1 $ 5 ¢ 25 ¢ 10 ¢ 25 ¢
Auto Storing Yes Yes Yes Yes No
Empty Quantity (Note 1) 5 8 8 10 5
Full Quantity (Note 2) 63 64 71 97 N/A
Note 1: If lower sensor detects coins, then there
are coins to at least the empty quantity.
Note 2: If the coins reach the upper sensor, the
tube is considered to be full.
Factory FLOAT/PAR Settings
Float 1 $34 – Switch Position Low (OFF)
Cassette US-1
Tube A – 25¢ 40 coins = $10
Tube B - 5¢ 40 coins = $ 2
Tube C – 25¢ 40 coins = $10
Tube D – 10¢ 40 coins = $ 4
Tube E – 25¢ 32 coins = $ 8
Cassette US-4
Tube A - $1 10 coins = $10
Tube B – 5¢ 40 coins = $ 2
Tube C – 25¢ 40 coins = $10
Tube D – 10¢ 40 coins = $ 4
Tube E – 25¢ 32 coins = $ 8
Float 2 $52 – Switch Position High (ON)
Cassette US-1
Tube A – 25¢ 60 coins = $15
Tube B - 5¢ 60 coins = $ 3
Tube C – 25¢ 60 coins = $15
Tube D – 10¢ 60 coins = $ 6
Tube E – 25¢ 52 coins = $13
Cassette US-4
Tube A - $ 1 30 coins = $30
Tube B – 5¢ 40 coins = $ 2
Tube C – 25¢ 40 coins = $10
Tube D – 10¢ 40 coins = $ 4
Tube E – 25¢ 24 coins = $ 6
Other MEI Vending Machine manuals
Popular Vending Machine manuals by other brands

BIANCHI VENDING
BIANCHI VENDING LEI600 Use and maintenance manual

Dixie Narco
Dixie Narco 2145 Operation & service manual

Seaga
Seaga HF2000 Operator's manual

Westomatic
Westomatic Sigma Touch Operator's & installation manual

Westomatic
Westomatic ELEVATE QUARTZ operating instructions

Crane
Crane Voce Media Technical manual