MeiTrack P99G User manual

MEITRACK P99G User Guide
MEITRACK P99G User Guide

MEITRACK P99G User Guide
Copyright © 2017 Meitrack Group All rights reserved. - 2 -
Change History
File Name
MEITRACK P99G User Guide
Created By
Kyle Lv
Project
P99G
Creation Date
Update Date
2016-11-03
2017-04-27
Subproject
User Guide
Total Pages
18
Version
V1.1
Confidential
External Documentation

MEITRACK P99G User Guide
Copyright © 2017 Meitrack Group All rights reserved. - 3 -
Contents
1 Copyright and Disclaimer........................................................................................................................................... - 4 -
2 Product Overview ...................................................................................................................................................... - 4 -
2.1 Product Features........................................................................................................................................... - 4 -
2.1.1 Four Positioning Modes ....................................................................................................................... - 4 -
2.1.2 Power-Saving Mode............................................................................................................................. - 5 -
2.1.3 Setting the Data Interval to 1 Second .................................................................................................. - 5 -
2.1.4 Powering Off the Device by C76 Command ......................................................................................... - 5 -
2.1.5 Automatic APN Settings....................................................................................................................... - 6 -
2.1.6 Two Charging Methods ........................................................................................................................ - 6 -
3 Product Functions and Specifications........................................................................................................................ - 6 -
3.1 Product Functions......................................................................................................................................... - 6 -
3.1.1 Position Tracking .................................................................................................................................. - 6 -
3.1.2 Emergency Alarm................................................................................................................................. - 6 -
3.1.3 Other Functions ................................................................................................................................... - 6 -
3.2 Specifications................................................................................................................................................ - 7 -
4 P99G and Accessories................................................................................................................................................ - 7 -
5 About the P99G ......................................................................................................................................................... - 8 -
5.1 Appearance................................................................................................................................................... - 8 -
5.2 LED Indicator................................................................................................................................................. - 8 -
6 First Use..................................................................................................................................................................... - 9 -
6.1 Charging the Device...................................................................................................................................... - 9 -
6.1.1 Magnetic Charging............................................................................................................................... - 9 -
6.1.2 Wireless Charging .............................................................................................................................. - 10 -
6.2 Installing the SIM Card and Turning on the Device ..................................................................................... - 10 -
7 Quick Operation Command ..................................................................................................................................... - 11 -
7.1 Tracking by Mobile Phone........................................................................................................................... - 11 -
7.2 Setting SOS Phone Numbers –A71............................................................................................................. - 12 -
7.3 Setting Listen-in Phone Numbers –A72 ..................................................................................................... - 13 -
7.4 Setting a Smart Sleep Mode –A73 ............................................................................................................. - 13 -
7.5 Setting the Maximum Working Time of the Woken GPS Module –A83 ..................................................... - 14 -
7.6 Setting the Unit of the GPRS Data Interval –A84 ....................................................................................... - 15 -
7.7 Setting a Positioning Mode –A85............................................................................................................... - 15 -
7.8 Setting the SMS Time Zone –B35 ............................................................................................................... - 15 -
7.9 Powering Off the Device by Command –C76 ............................................................................................. - 15 -
7.10 Disabling the Power-off Function of the Power Button –C77 .................................................................. - 16 -
7.11 Backing up Device Parameters –F10 ........................................................................................................ - 16 -
8 Configuring Device Parameters by Meitrack Manager ............................................................................................ - 16 -
9 Logging In to MS03 Tracking System........................................................................................................................ - 17 -
10 Tracking by App ..................................................................................................................................................... - 17 -
11 Safety and Usage Instructions ............................................................................................................................... - 18 -
12 Battery Disposal..................................................................................................................................................... - 18 -

MEITRACKP99GUserGuide
Copyright © 2017 Meitrack Group All rights reserved. - 4 -
1Copyright and Disclaimer
Copyright © 2017 MEITRACK. All rights reserved.
and are are trademarks that belong to Meitrack Group.
The user manual may be changed without notice.
Without prior written consent of Meitrack Group, this user manual, or any part thereof, may not be reproduced for
any purpose whatsoever, or transmitted in any form, either electronically or mechanically, including photocopying
and recording.
Meitrack Group shall not be liable for direct, indirect, special, incidental, or consequential damages (including but
not limited to economic losses, personal injuries, and loss of assets and property) caused by the use, inability, or
illegality to use the product or documentation.
2Product Overview
The P99G is a 3G personal tracking device and is specially designed for sports lovers and lone workers both indoors
and outdoors. It has the following features:
IP67 water resistance rating
Two-way calling
Press the SOS button to call the designated contact in case of emergency.
Low power consumption and long standby time
Polygonal geo-fence alarm
Man down alarm
Wireless charging (optional) and magnetic charging
2.1 Product Features
2.1.1 Four Positioning Modes
There are four positioning modes available: GPS + WiFi + LBS positioning, WiFi + LBS positioning, GPS + LBS
positioning, and LBS positioning.
You can set a positioning mode as required by Meitrack Manager or A85 command.
Working hours in normal working mode:
GPS + WiFi + LBS Positioning
WiFi + LBS Positioning
Time Interval
Working Hour
Time Interval
Working Hour
10s
16h
10s
16h
60s
28h
60s
37h
60 mins
48h
60 mins
115h
GPS + LBS Positioning
LBS Positioning
Time Interval
Working Hour
Time Interval
Working Hour
10s
16h
10s
20h
60s
28h
60s
81h
60 mins
48h
60 mins
118h

MEITRACK P99G User Guide
Copyright © 2017 Meitrack Group All rights reserved. - 5 -
The preceding working hours are for reference only and vary depending on your usage.
Note:
1. The WiFi positioning function will be enabled automatically only after the function is set in advance and the
GPS is invalid.
2. You can enable the WiFi positioning function by Meitrack Manager or MS03 tracking system.
3. The WiFi positioning function is optional.
2.1.2 Power-Saving Mode
This working mode is not recommended for frequent positioning and continuous platform connection for a long
time. A piece of positioning data can be uploaded at 5-minute intervals or 10-minute intervals.
This mode can help prolong the device's working hours, but the device cannot receive GPRS commands from the
platform. In addition, the device can receive SMS commands.
You can use the following ways to set the device:
1. Set the deep sleep mode by Meitrack Manager or A73 command.
2. Set the heartbeat packet reporting interval by Meitrack Manager or A11 command.
3. Use Meitrack Manager or A83 command to set the maximum working time of the GPS module woken up by
heartbeat packet.
Working hours in deep sleep mode (The maximum working time of the GPS module is 2 minutes after it is woken
up by a heartbeat packet.):
GPS + WiFi + LBS Positioning
WiFi + LBS Positioning
Time Interval
Working Hour
Time Interval
Working Hour
10 mins
180h
10 mins
230h
60 mins
416h
60 mins
390h
GPS + LBS Positioning
LBS Positioning
Time Interval
Working Hour
Time Interval
Working Hour
10 mins
200h
10 mins
250h
60 mins
425h
60 mins
400h
The preceding working hours are for reference only and vary depending on your usage.
2.1.3 Setting the Data Interval to 1 Second
The device can generate a piece of positioning data every 1 second. This function is available for sports lovers and
users requiring smooth routes.
You can set the function by Meitrack Manager or A84 command. The default time interval is 10 seconds.
Note: The device can generate a piece of data every 1 second, but it cannot upload the data every 1 second.
2.1.4 Powering Off the Device by C76 Command
This function is available for sports lovers and lone workers. They can turn off the device by C76 command instead
of the power button.
This function is disabled by default.

MEITRACK P99G User Guide
Copyright © 2017 Meitrack Group All rights reserved. - 6 -
2.1.5 Automatic APN Settings
This function is enabled by default. After you install a SIM card, you can use the MS03 platform directly and do not
need to set APN parameters.
Note: If you install a SIM card and the device cannot connect the network for a long time, maybe your SIM card is
provided by a new operator or the device does not store the APN settings. You can use Meitrack Manager or A81
command to set APN parameters again. You can also provide the APN settings for us, so that you do not need to set
the APN parameters again.
2.1.6 Two Charging Methods
You can use any of the following methods to charge the device:
Wireless charging (optional): To charge your device, place it on the charging base. This avoids complicated
cabling.
Magnetic charging: The current is 1800 mA during the charging. The larger the current is, the faster the
charging is. It will take about 2.5 hours to charge the device.
For details, see section 6.1 "Charging the Device."
3Product Functions and Specifications
3.1 Product Functions
3.1.1 Position Tracking
GPS + LBS + WiFi positioning (WiFi positioning optional)
Real-time location query
Track by time interval
Track by distance
Track by mobile phone
Speeding alarm
Cornering report
A-GPS
3.1.2 Emergency Alarm
SOS alarm
3.1.3 Other Functions
SMS/GPRS/UMTS (TCP/UDP) communication (Meitrack protocol)
GPS blind spot alarm
Over-the-Air (OTA) update
Low power alarm for internal battery
3D shake wakeup
Listen-in/Two-way calling
Polygonal geo-fence
Stillness/Movement alarm
MEITRACK P99G User Guide
Copyright © 2017 Meitrack Group All rights reserved. - 7 -
Online Parameter Editor
IP67 water resistance rating
Towing alarm
Mileage report
Wireless charging (optional)
Device parameter backup
3.2 Specifications
Item
Specifications
Dimension
18 mm x 108 mm x 52 mm
Weight
106g
Frequency band
GSM: 850/900/1800/1900 MHz
UTMS: 800/850/900/1900/2100 MHz
WiFi positioning
WiFi 2.4 GHz
802.11 b/g/n
GPS positioning accuracy
2.5m
Water resistance rating
IP67 (Withstand being submerged in water for up to 30 mins in a 1-meter
depth.)
Operating temperature
-20°C to 55°C
Operating humidity
5%–95%
Memory
8 MB
Sensor
3-axis accelerometer
Microphone/Speaker
Internal microphone and speaker
LED indicator
3 indicators showing power, WiFi, GSM, and GPS status
Backup battery
2000 mAh/3.7 V
Power consumption (normal)
40 mA (average current; 3.8 V; GPS ON; WiFi ON; upload data every 60
minutes)
50 hours of battery life: upload data every 60 minutes
Power consumption (standby)
5 mA (average current; 3.8 V; GPS OFF; WiFi OFF; don't upload data)
400 hours of battery life
Charging
2 charging methods:
a) Wireless charging (optional): 500 mA (charging time: about 6.5 hours)
b) Magnetic charging: 1800 mA (charging time: about 2.5 hours)
Button/Switch
1 SOS button (used for sending SMS/GPRS alarms and calling)
1 power button
2 volume buttons
1 answer button
1 hang-up button
4P99G and Accessories
P99G tracker

MEITRACK P99G User Guide
Copyright © 2017 Meitrack Group All rights reserved. - 8 -
Magnetic charging cable
Travel adapter
MEITRACK P99G Quick Start Guide
Wireless charging base (optional)
Hanging buckle (optional)
CD download card
5About the P99G
5.1 Appearance
GSM indicator (green)
Power indicator (red)
Answer button
Speaker
GPS/WiFi indicator (blue)
Microphone
Hang-up button
SOS button
Power button SIM card slot
Volume buttons
(up/down)
5.2 LED Indicator
Power On: Press and hold down the power button for 3–5 seconds. Then the LED indicators will blink.
Power Off: Press and hold down the power button for 3 seconds. Then the LED indicators will blink for at most 25
seconds.
Indicator
Indicator Status
Description
GPS indicator
(blue)
Blink (every 0.1 seconds)
The device is being initialized.
Blink (0.1 seconds on and 2.9 seconds
off)
A GPS signal is received.

MEITRACK P99G User Guide
Copyright © 2017 Meitrack Group All rights reserved. - 9 -
Blink (1 second on and 2 seconds off)
No GPS signal is received.
Steady off
The device is turned off or is in sleep mode, or
the GPS module stops.
WiFi indicator
(blue)
Blink (0.1 seconds on and 2.9 seconds
off); 2 times
A WiFi hotspot is available.
Blink (1 second on and 1 second off);
3 times
The WiFi positioning function is disabled or no
WiFi hotspot is available.
GSM indicator
(green)
Steady on
A call is coming in or a call is being made.
Blink (every 0.1 seconds)
The device is being initialized.
Blink (0.1 seconds on and 2.9 seconds
off)
A GSM signal is received.
Blink (1 second on and 2 seconds off)
No GSM signal is received.
Steady off
The device is turned off or is in sleep mode.
Power
indicator (red)
Steady on
The device is charging.
Steady off
The device is fully charged or works properly.
Blink (0.3 seconds on and 0.3 seconds
off)
The battery power is low.
In standby mode, press and hold down the hang-up button to detect the WiFi signal. Then all indicators will be off.
After 5 seconds, the blue WiFi indicator will blink according to the previous table and show the WiFi status. The
device will recover to the standby mode 1 second later.
6First Use
6.1 Charging the Device
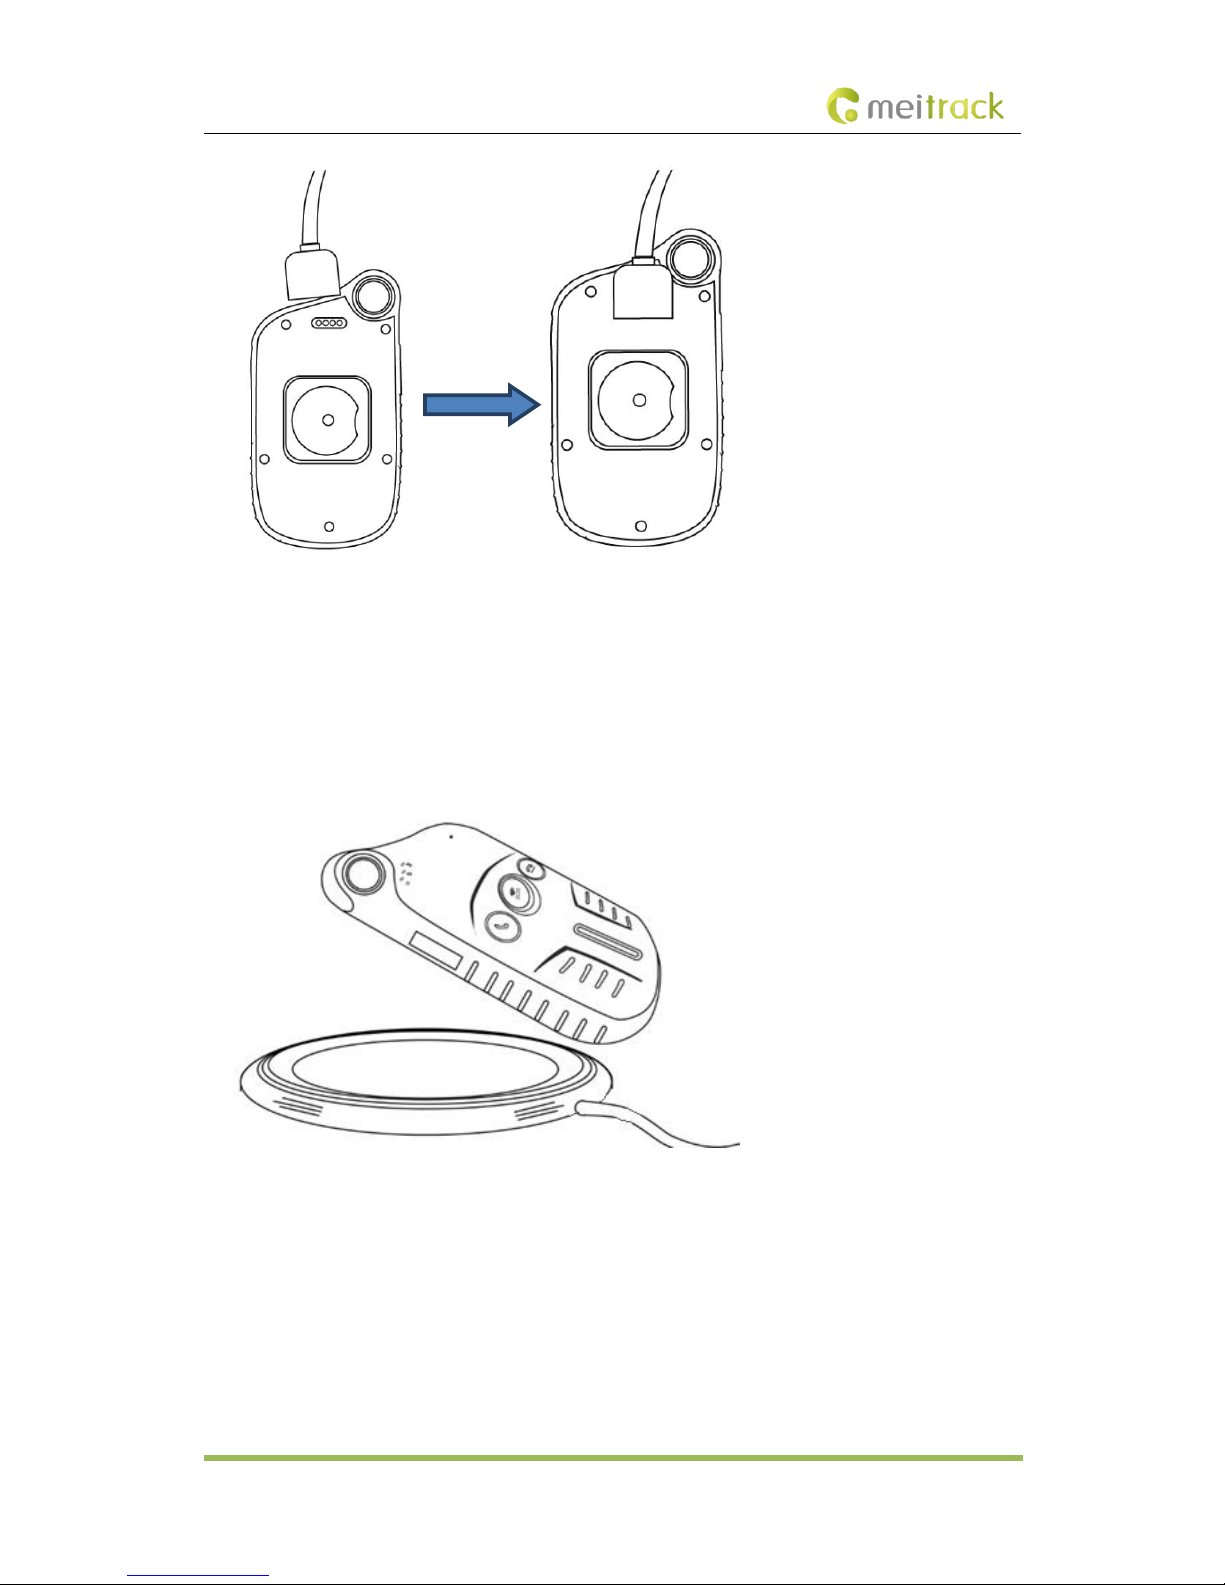
6.1.1 Magnetic Charging
Attach one side of the magnetic charging cable to the body of the device, and plug the other side of the magnetic
charging cable into the adapter (5 V, 2 A), as shown in the following figures.
When the red indicator is steady on, the device is charging.
MEITRACK P99G User Guide
Copyright © 2017 Meitrack Group All rights reserved. - 10 -
It will take about 2.5 hours to charge the device.
Note: If you plug the magnetic charging cable into a computer, it will take about 6.5 hours to charge the device.
6.1.2 Wireless Charging
Place your device on the charging base, as shown in the following figure.
Note: You had better place the device at the center of the charging base.
When the red indicator is steady on, the device is charging; when the red indicator is off, the device is fully charged.
It will take about 6.5 hours to charge the device.
Note: This function needs to be set before shipment.
6.2 Installing the SIM Card and Turning on the Device
To install the SIM card, open the rubber cover on the right side of the device, insert the SIM card, and close the
rubber cover, as shown in the following figure.
After charging, press and hold down the power button for 3–5 seconds to turn on your device and start using it

MEITRACK P99G User Guide
Copyright © 2017 Meitrack Group All rights reserved. - 11 -
Note: Ensure that the rubber cover is properly closed, so as to prevent water from entering the device.
Please read the following instructions to know more about its functions.
7Quick Operation Command
Before use, common parameters must be set by SMS command or Meitrack Manager.
7.1 Tracking by Mobile Phone
This section describes how to query device's current location, ensuring that the GPS is working normally.
Call the device's SIM card number, and hang up after the dial tone rings 2–3 times. The device will reply to an SMS
with a map link.
Click the SMS link. The device's location will be displayed on Google Maps on your mobile phone.
Note: If an authorized phone number was set by SMS command A71, only this phone number can receive SMS
reports.
SMS example:
Now,110727 02:48,V,16,23Km/h,61%,http://maps.google.com/maps?f=q&hl=en&q=22.540103,114.082329
The following table describes the SMS format:
Parameter
Description
Remarks
Now
Indicates the current location.
SMS header: indicates the current

MEITRACK P99G User Guide
Copyright © 2017 Meitrack Group All rights reserved. - 12 -
location or the alarm type.
For details about the SMS header, see the
MEITRACK SMS Protocol and MEITRACK
GPRS/UMTS Protocol.
110727 02:48
Indicates the date and time in
YYMMDD hh:mm format.
None
V
The GPS is invalid.
A = Valid
V = Invalid
16
Indicates the WCDMA/GSM signal
strength.
Value: 1–32
The larger the value is, the stronger the
signal is. If the value is greater than 12,
GPRS/UMTS reaches the normal level.
23Km/h
Indicates the speed.
Unit: km/h
61%
Indicates the remaining battery power.
None
http://maps.google.com/m
aps?f=q&hl=en&q=22.5401
03,114.082329
This is a map link.
Latitude: 22.540103
Longitude: 114.082329
None
If there is no valid GPS available, the tracker will reply to the most recent valid position.
If your mobile phone does not support HTTP, enter the latitude and longitude on Google Maps to query a location.
7.2 Setting SOS Phone Numbers –A71
This command is used to set SOS phone numbers. When you dial a phone number, an SMS report about the
location will be received.
SMS text:
0000,A71,Phone number 1,Phone number 2,Phone number 3
Send the text to the embedded SIM card phone number.
Tip: "," should be an English comma and no space exists before and after the comma.
The P99G will automatically reply to the SMS: IMEI,A71,OK. It indiates that the SOS phone number is set
successfully.
Note:

MEITRACK P99G User Guide
Copyright © 2017 Meitrack Group All rights reserved. - 13 -
Phone number: Contains a maximum of 16 bytes. If no phone numbers are set, leave them blank. Phone
numbers are empty by default.
Phone number 1/2/3: SOS phone numbers. When you call the tracker by using these phone numbers, you will
receive SMS notification about the location, geo-fence alarm and low power alarm.
When you press the SOS button, the P99G will dial three authorized phone numbers in sequence. It will stop
dialing when one phone number answers, and then will send alarm information to the phone numbers.
Note: The phone numbers are blank by default. The phone numbers that are set must be separated by
comma (“,”) to avoid setting failures. No comma is required next to the last phone number. For example:
0000,A71,13500000000,,
0000,A71,13500000000,13600000000,
0000,A71,13500000000,13600000000,13700000000
Reply: 353358017784062,A71,OK
To clear all phone numbers, send 0000,A71.
If this function is unavailable, please add your Country and Area Code before your phone number when you set the
preset phone numbers, or consult your local mobile operator.
7.3 Setting Listen-in Phone Numbers –A72
The command is used to listen in to the surrounding environment. After the setting, the device is allowed to
confidentially and automatically answer a phone and enters listen-in state for one-way communication.
Note: If Auto Answer Incoming Call and Listen-in are set for a same phone number, only Auto Answer Incoming
Call takes effect.
To implement the listen-in function, do not set Auto Answer Incoming Call for the phone number, or clear all
phone numbers by sending 0000,A71.
SMS text:
0000,A72,Listen-in phone number 1,Listen-in phone number 2
Send the text to the embedded SIM card phone number.
The P99G automatically replies to the SMS: IMEI,A72,OK. It indiates that the listen-in number is set
successfully.
When you call the tracker by using the preset listen-in phone number, the tracker will answer the call
automatically and enter the listen-in state. Meanwhile, the device will not make any noise.
Note:
Phone number: A maximum of two listen-in phone numbers can be set. Each phone number contains at most 16
digits. If only one monitor number is set, the number must be separated by a comma (“,”) to avoid setting failures.
If no phone numbers are set and commas are remained, phone numbers set before will be deleted. The phone
numbers are blank by default.
Example: 0000,A72,13844444444,13855555555
Reply: 353358017784062,A72,OK
To clear all monitor numbers, send 0000,A72.
7.4 Setting a Smart Sleep Mode –A73
This command is used to enable a smart sleep mode, prolonging standby time. The device's maximum working
hours are more than 400 hours.
SMS text:

MEITRACK P99G User Guide
Copyright © 2017 Meitrack Group All rights reserved. - 14 -
0000,A73,Sleep level
Send the text to the embedded SIM card phone number.
The P99G automatically replies to the SMS: IMEI,A73,OK. It indicates that the sleep mode is set successfully.
To enable the GPS Log or scheduled tracking function, disable the sleep mode.
Description:
When the sleep level is 0, the sleep mode is disabled (default).
When the sleep level is 1, the tracker enters the normal sleep mode. The WCDMA/GSM module always works, and
the GPS module occasionally enters the sleep mode. The tracker works 25% longer in the normal sleep mode than
that in the normal working mode. This mode is not recommended for short interval tracking; this will affect the
route precision.
When the sleep level is 2, the tracker enters deep sleep mode. If no event (SOS, button changes, incoming calls, or
SMSs) is triggered after five minutes, the GPS module will stop and the WCDMA/GSM and MCU modules will enter
sleep mode. Once an event is triggered, the GPS, WCDMA, GSM, and MCU modules will be woken up.
Note:
1. The tracker can enter normal sleep mode under vibration, while 3D shake cannot wake the tracker up from
normal sleep mode.
2. In deep sleep mode, you can enable or disable the 3D shake wakeup function by Meitrack Manager.
In any condition, you can use an SMS, GPRS, or UMTS command to disable the sleep mode, and then the tracker
exits the sleep mode and switches back to the normal working mode.
In deep sleep mode, if you want to obtain the location by SMS/call and the GPS is invalid within five minutes
(default), the device will reply to the most recent valid position.
After the device enters deep sleep mode, functions of Track By Time Interval, Track By Distance, and GPSLog are
not available until you exit the sleep mode.
The device can be woken up from the sleep mode by pressing a key, call, or SMS. After an event is handled, the
device will enter sleep mode again.
Example:
Sending: 0000,A73,2
Reply: 353358017784062,A73,OK
7.5 Setting the Maximum Working Time of the Woken GPS Module –A83
When the device is in deep sleep mode, you can send a heartbeat packet to wake the GPS module up and set the
maximum working time of the GPS module by A83 command.
Send the following SMS text to the embedded SIM card phone number: 0000,A83,X.
X: indicates the maximum working time of the GPS module woken up by heartbeat packet. Decimal; value range:
0–255; unit: minute.
X = 0 (default): After the GPS module is woken up by heartbeat packet, it does not work and the GPS is invalid.
Example:
Sending: 0000,A83,1
Reply: 353358017784062,A83,OK
After the command is sent successfully and the GPS module is woken up by a heartbeat packet:
If the GPS is valid within 1 minute, a heartbeat packet about valid GPS will be uploaded.
If the GPS is invalid within 1 minute, a heartbeat packet about invalid GPS will be uploaded.

MEITRACK P99G User Guide
Copyright © 2017 Meitrack Group All rights reserved. - 15 -
7.6 Setting the Unit of the GPRS Data Interval –A84
Send the following SMS text to the embedded SIM card phone number: 0000,A84,X.
X: indicates the unit of the GPRS data interval. Decimal; value range: 0–255; unit: second.
The default unit is 10 seconds.
Example:
Sending: 0000,A84,1
Reply: 353358017784062,A84,OK
According to the previous example, the device will generate a piece of data every 1 second.
7.7 Setting a Positioning Mode –A85
Send the following SMS text to the embedded SIM card phone number: 0000,A85,X.
X: indicates the device's positioning mode. Decimal; value range: 0–3.
X = 0: GPS + LBS positioning
X = 1: WiFi + LBS positioning
X = 2: GPS + WiFi + LBS positioning
X = 3: LBS positioning
Example:
Sending: 0000,A85,1
Reply: 353358017784062,A85,OK
7.8 Setting the SMS Time Zone –B35
This command is used to set the time zone of an SMS report. The default time zone of the tracker is GMT 0.
To change the time zone, follow the following instructions:
SMS text:
0000,B35,SMS minute
Send the text to the embedded SIM card phone number.
The P99G automatically replies to the SMS: IMEI,B35,OK. It indicates that the time zone is set successfully.
Note: The time zone is in unit of minutes. The default time zone of the tracker is GMT 0, and the time zone of SMS
reports is different from that of GPRS/UMTS data packets. The GPS Log time zone is GMT 0.
When SMS minute is 0, the time zone is GMT 0 (default time zone).
When SMS minute is a value ranging from -720 to 720, set time zones. Set the China time zone value to 480.
Example:
Sending: 0000,B35,480
Reply: 353358017784062,B35,OK (The time zone is set to Beijing time successfully.)
7.9 Powering Off the Device by Command –C76
This command is used to power off the device.
Send the following SMS text to the embedded SIM card phone number: 0000,C76.
Example:
Sending: 0000,C76
Reply: 353358017784062,C76,OK

MEITRACK P99G User Guide
Copyright © 2017 Meitrack Group All rights reserved. - 16 -
7.10 Disabling the Power-off Function of the Power Button –C77
Send the following SMS text to the embedded SIM card phone number: 0000,C77,X.
X: Whether to disable the power-off function of the power button.
X = 1: You can turn off the device by power button.
X = 0: You cannot turn off the device by power button.
Example:
Sending: 0000,C77,1
Reply: 353358017784062,C77,OK
7.11 Backing up Device Parameters –F10
This command is used to back up and restore the device parameters.
Send the following SMS text to the embedded SIM card phone number: 0000,F10,X,User-defined parameters.
Description:
X = 0: Obtain a user-defined device parameter name.
X = 1: Restore user-defined device parameters.
X = 2: Set the user-defined device parameters to the system parameters. Please save device parameter names
that you set.
X = 3: Delete user-defined device parameters and corresponding parameter names (non-numeric ASCII
characters like 00 or FF).
User-defined parameters: At most 32 ASCII characters. If the value is less than 32 characters, add
non-numeric ASCII characters like 00 or FF.
For details about SMS commands, see the MEITRACK SMS Protocol.
Note:
1. The default SMS command password is 0000. You can change the password by using Meitrack Manager and
SMS command.
2. The device can be configured by SMS command with a correct password. After an authorized phone number
is set, only the authorized phone number can receive the preset SMS event report.
8Configuring Device Parameters by Meitrack Manager
This section describes how to use Meitrack Manager to configure the P99G on a computer.
Procedure:
1. Install the USB-to-serial cable driver and Meitrack Manager.
2. Connect the P99G to a computer by using the magnetic charging cable.
3. Run Meitrack Manager, then the following dialog box will appear:

MEITRACK P99G User Guide
Copyright © 2017 Meitrack Group All rights reserved. - 17 -
Meitrack Manager will detect the device model automatically and the parameter page will appear accordingly.
For details about Meitrack Manager, see the MEITRACK Manager User Guide.
Note: The software language will be automatically switched according to the operating system language. Press Ctrl +
Lto manually switch the language.
9Logging In to MS03 Tracking System
Visit http://ms03.trackingmate.com, enter the user name and password, and log in to the MS03. (Purchase the
login account from your provider.)
For more information about how to add a tracker, see the MEITRACK GPS Tracking System MS03 User Guide
(chapter 4 "Getting Started").
The MS03 supports the following functions:
Track by time interval or distance.
Query historical trips.
Set polygonal geo-fences.
Bind driver and vehicle information.
View various reports.
Send commands in batches.
Support OTA updates.
For details, see the MEITRACK GPS Tracking System MS03 User Guide.
10 Tracking by App
Scan the following QR code to download the MS03 app.
MS03 app for Android
MS03 app for iOS

MEITRACKP99GUserGuide
Copyright © 2017 Meitrack Group All rights reserved. - 18 -
Note: Please use your MS03 account to log in to the app. Contact Locat Administrator
11 Safety and Usage Instructions
Use only Meitrack-approved accessories.
Incompatible accessories may cause serious injuries or damages to your device.
Handle the battery and charger carefully.
Use batteries specified by Meitrack and chargers exclusively designed for your device. Incompatible batteries
and chargers may cause serious injuries or damages to your device.
Do NOT place batteries or devices on fire or in heating devices, such as microwave ovens, ovens, or radiators.
Batteries may explode when overheated.
12 Battery Disposal
(Waste Electrical and Electronic Equipment Directive –Applicable in European Union and other European countries
with separate battery return system.)
This symbol in the manual indicates that this product and its accessories (such as chargers, batteries and the USB
cable) cannot be disposed of with other household wastes when they reach the end of their life. If batteries are not
properly disposed of, these wastes may cause harm to human health and the environment. To prevent the harm,
please dispose of or recycle them separately from other waste so as to boost resource recycling and reuse.
If you have any questions, do not hesitate to email us at info@Gps-trackers.gr.
Table of contents
Other MeiTrack GPS manuals

MeiTrack
MeiTrack T366 User manual

MeiTrack
MeiTrack P88L User manual

MeiTrack
MeiTrack MS02 Setup guide

MeiTrack
MeiTrack MT90 User manual

MeiTrack
MeiTrack TC68L User manual

MeiTrack
MeiTrack TS299L User manual

MeiTrack
MeiTrack MT90G User manual

MeiTrack
MeiTrack iButton MVT600 User manual

MeiTrack
MeiTrack MVT380 User manual

MeiTrack
MeiTrack iButton T1 User manual

MeiTrack
MeiTrack T333L User manual

MeiTrack
MeiTrack VT310 User manual

MeiTrack
MeiTrack T366G User manual

MeiTrack
MeiTrack MVT800 User manual

MeiTrack
MeiTrack VT300 User manual

MeiTrack
MeiTrack MVT100 User manual

MeiTrack
MeiTrack TC68L User manual

MeiTrack
MeiTrack T633G User manual

MeiTrack
MeiTrack TC68 Operating manual

MeiTrack
MeiTrack MS02 User manual


